- RAID
- 04 May 2022 at 11:52 UTC
-

- 1/4

Previously, we created a RAID 5 volume with 3 hard disks (2 used for data storage and the 3rd for parity of the RAID volume).
However, in the event of a hard drive failure, you would necessarily have to buy a new hard drive and open up your computer / server to physically replace it at the time the failure occurs.
It takes time and it's not possible in production.
To reduce the downtime of your services, you can add an additional hard disk that you define as "Hot Spare".
This can then be used as a spare hard drive in the event of a failure of a physical drive in your array or in any array of your Microsemi Adaptec SmartRAID controller.
This behavior will depend on the choice made when adding this physical disk as a "Hot Spare".
- Hot Spares system informations
- Adding a new hard drive to your computer / server
- Configure the Hot Spares activation mode (from ACU)
- Configure the Hot Spares activation mode (from the web interface : maxView Storage Manager)
- New unassigned physical disk (visible in ACU and in maxView)
- Define a physical disk as Spare (via ACU)
- Define a physical disk as Spare (via maxView Storage Manager)
- Display the Spares configured on an array (via ACU)
- Display the Spares configured on an array (via maxView Storage Manager)
- Physical disk associated with an array
- Information visible in the web interface : maxView Storage Manager
- Hard drive failure
- Logical drive rebuilding (visible in ACU)
- Rebuilding the physical disk using the Spare (in case of failure or predicted failure)
- Parity initialization
- Waiting for a replacement of the failed physical disk
- Replacing the failed physical disk
- Automatic rebuilding of the replaced physical disk (Copyback process)
- Initialization of parity (following the replaced physical disk rebuilding)
1. Hot Spares system informations
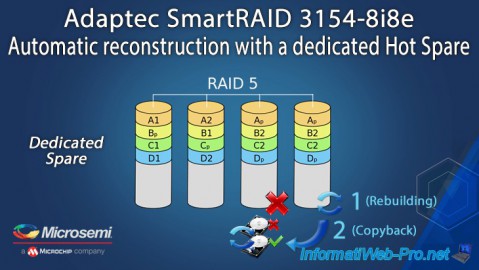
Hot Spares can be of the "Dedicated" or "Auto-Replace" type.
In the case of this tutorial, we will configure it as "Dedicated Spare", which means that :
- this Hot Spare will protect any redundant logical drive
- this physical disk will be used to rebuild a failed physical disk
- Once the controller detects that the defective hard drive in the protected array has been physically replaced, the data on the Hot Spare will be copied back to its original location (the new physical drive that physically replaces the failed one). This is called "Copyback".
This also means that it doubles the time (rebuild in case of failure + Copyback later) that your controller will move data in the event of a hard drive failure.
Which would not be the case with an "Auto-Replace Spare". - once you have physically replaced the defective hard drive in your cluster with a new physical drive and the Copyback process (explained above) is complete, the "Dedicated Spare" will again be available as a "Hot Spare".
Hot Spares limitations :
- Hot Spares can only protect redundant logical disks (therefore all RAID levels except RAID 0 which is corrupted upon loss of a hard disk).
- If you want to protect a RAID 0 with a Hot Spare, your controller must be configured to use the Hot Spare in the event of a predicted failure (Predictive activation).
However, this doesn't mean that your RAID 0 will be 100% protected. This is because it's possible that the hard drive fails too soon (before its failure prediction or during the rebuilding of the failed drive) and permanent data loss will still occur. - you can't get a Spare by using a physical disk which is already assigned to an Array
- you must use a physical disk that has a capacity at least as large as that of the smallest physical disk in the array you want to protect
- the interface (connections) of the Hot Spare must be identical to that of the array.
You must therefore use a SAS disk to protect a SAS array or a SATA disk to protect a SATA array. - and more
Sources :
- PDF : Microsemi Smart Storage Controllers - User Guide - maxView Storage Manager
- for the Spares : "6.1. Dedicated Spare or Auto-Replace Spare ?" at page 40
- for redundant or not redundant RAID : "F.2 Non-redundant Logical Drives (RAID 0)" at page 165
2. Adding a new hard drive to your computer / server
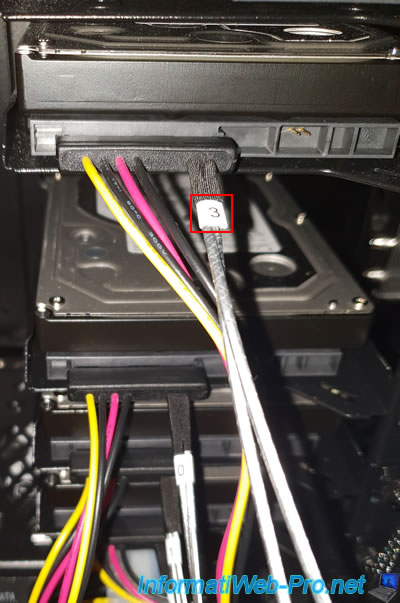
For this tutorial, we plugged in a new SAS hard drive with cable 3 which is already connected to our Microsemi Adaptec SmartRAID controller on the CN4 port.
The 3 SAS hard drives plugged in below are those of our RAID 5 volume and are plugged in with cables : 0, 1 and 2.
Note that in our case, this new SAS hard drive is identical to the others. It therefore has the same interface (SAS) and the same capacity (size).
This can therefore be used to protect our RAID 5 array without any problem.
3. Configure the Hot Spares activation mode (from ACU)
When starting your computer / server, press the "CTRL + A" (QWERTY keyboard) or "CTRL + Q" (AZERTY keyboard) keys.
Info : if you can't restart your server, access the "maxView" web interface and go to the next step of the tutorial.
In the Microsemi Adaptec configuration tool, go to : Configure Controller Settings.
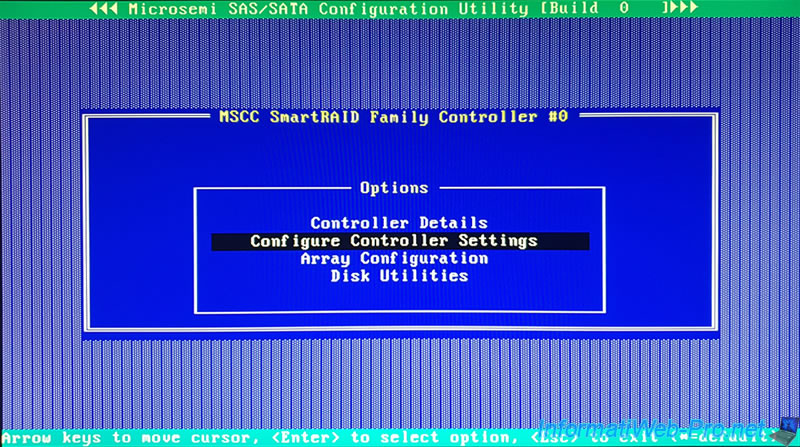
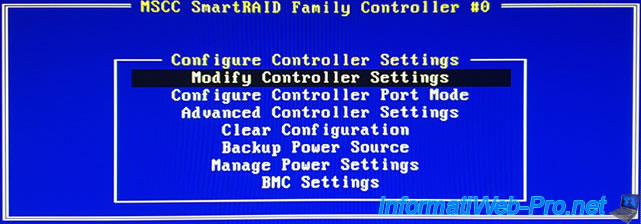
Then, in : Modify Controller Settings.
As you can see, by default the "Spare Activation Mode" option is set to : Failure SA.
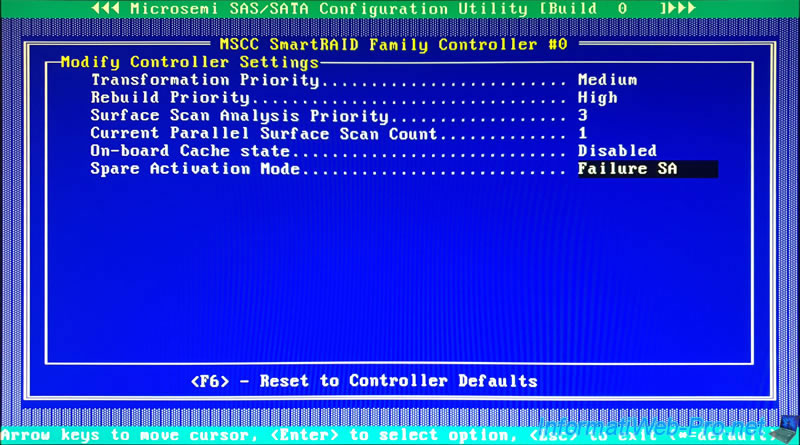
If you try to change the value, you can choose between :
- Failure SA : Hot Spares configured on your Microsemi Adaptec SmartRAID controller will be used to rebuild failed hard drives when a physical drive (HDD / SSD) in a protected array fails.
- Predictive SA : in this case, the Hot Spares will be used when the failure of a physical disk member of a protected array is predicted. In other words, the Hot Spare will be used to rebuild the defective hard drive a little before it actually fails. This decreases the time during which the failure of a second physical drive could cause permanent data loss.
Important : as indicated by Microsemi, if you want to protect a RAID 0 with Hot Spare, you are obliged to configure this activation mode on "Predictive SA".
Indeed, when a physical disk in a RAID 0 fails, this immediately causes a permanent and total loss of data of everything that was on the array in RAID 0.
RAID 0 is therefore strongly discouraged under normal circumstances, unless you really know what you are doing.
In our case, we will choose "Failure SA" since we are using RAID 5.

4. Configure the Hot Spares activation mode (from the web interface : maxView Storage Manager)
If you already have a free hard drive and can't restart your computer / server, install maxView on it (if you haven't already) and access this web interface.
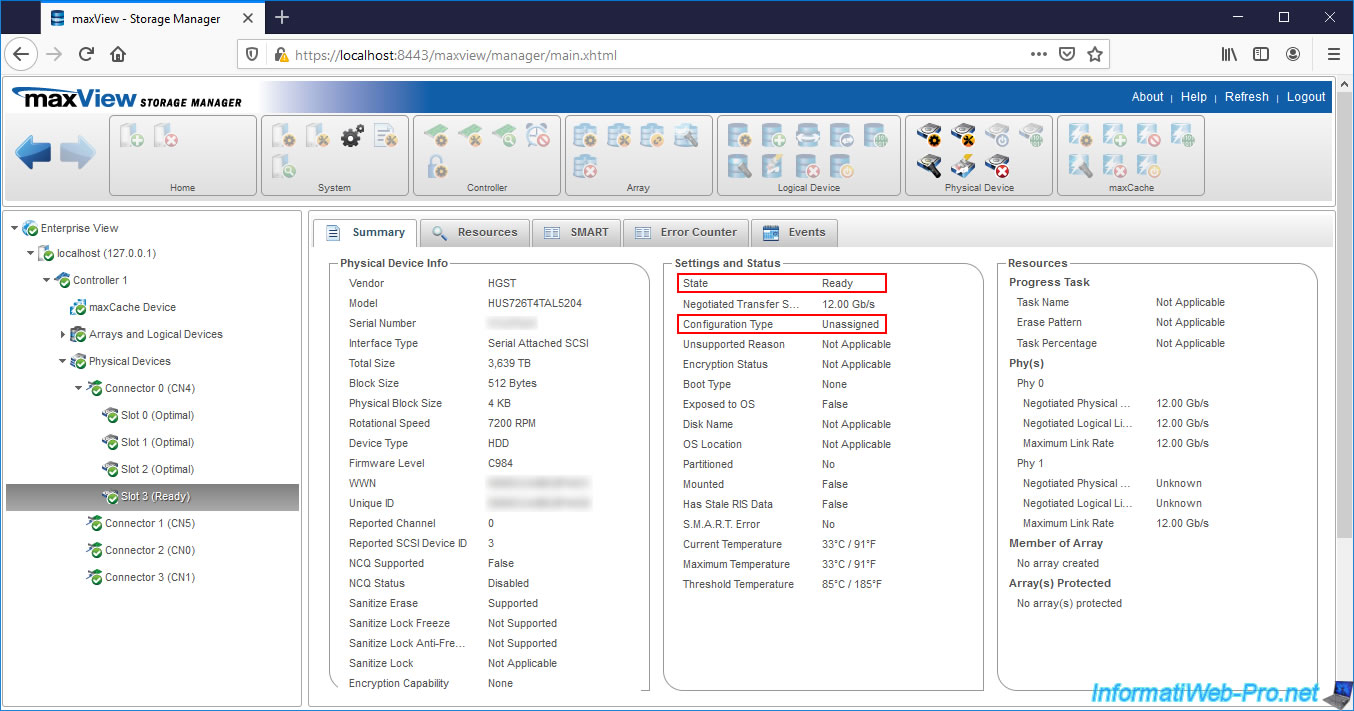
Then, select your Microsemi Adaptec SmartRAID controller on the left and you will see that an additional Physical Device has appeared and it is not assigned (Unassigned Drive) at the moment.

If you go to the "Resources" tab of your controller, you will see that the status of your new physical drive is "Ready".
Which means you can use it later as a Spare if you want. Click on the little blue arrow to its right.
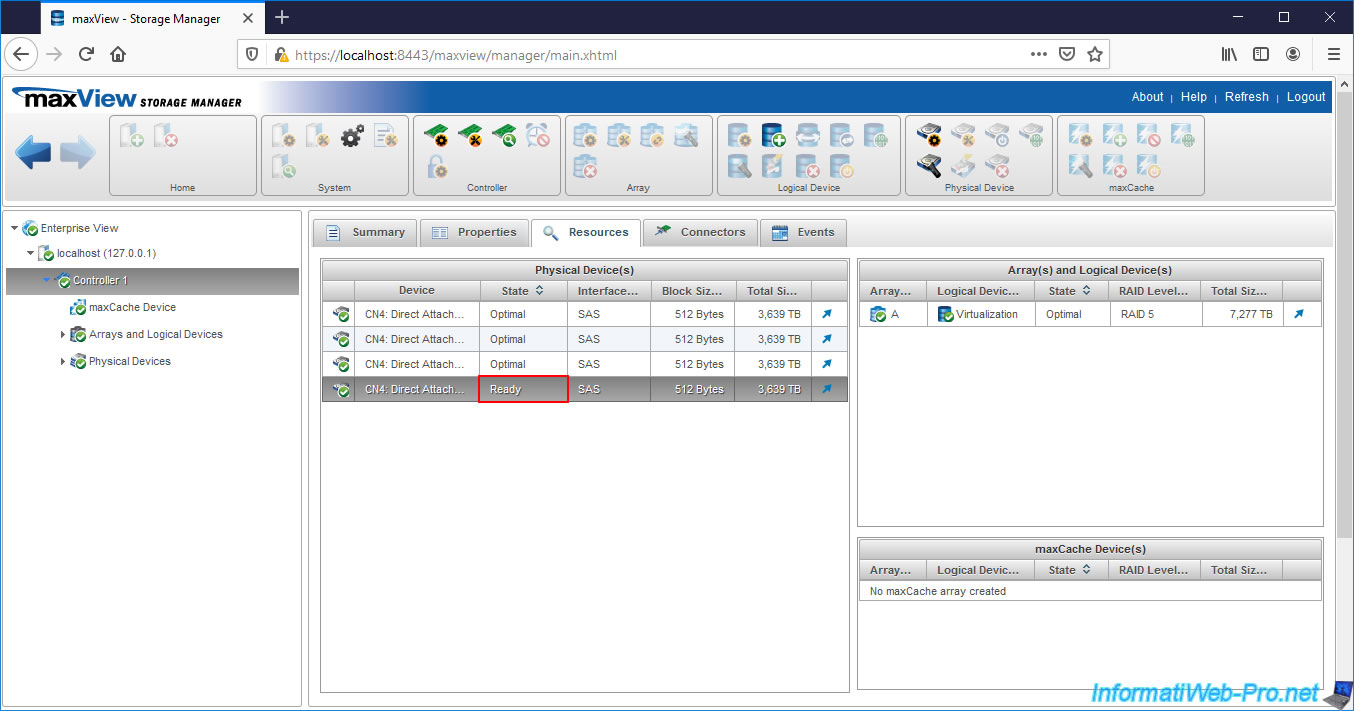
As you can see, this physical disk is in "Ready" state and its Configuration Type is "Unassigned".
Which means your controller is not using it at the moment. This physical disk is therefore free.
To configure the activation mode of your future Spares, select your controller on the left and click on the 1st icon of the "Controller" block located at the top of the page.

In the "Data Protection" tab, you will find the same "Spare Activation Mode" parameter with the values :
- Failure : Hot Spares will be used when a physical disk of a protected array fails
- Predictive : Hot Spares will be used when the failure of a physical disk in a protected array is predicted. So, it will be used before the physical disk actually fails.
As a reminder : if you want to protect a RAID 0 with a Spare, you must choose "Predictive" to try to protect your RAID 0 array.
Warning : it's quite possible that a physical disk in your RAID 0 fails too quickly and that the reconstruction does't have time to be fully carried out.

5. New unassigned physical disk (visible in ACU and in maxView)
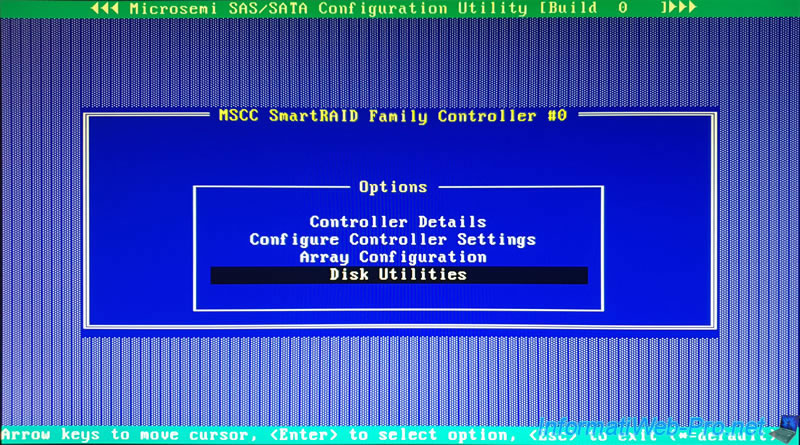
This is not necessary, but if you can restart your computer / server, be aware that you will be able to check whether your physical disk is free or not by accessing the Microsemi Adaptec Configuration Tool (ACU).
In this configuration tool, go to : Disk Utilities.
In the list that appears, we find our new hard drive connected to the "CN4:01:003" location.
Select it and press Enter.
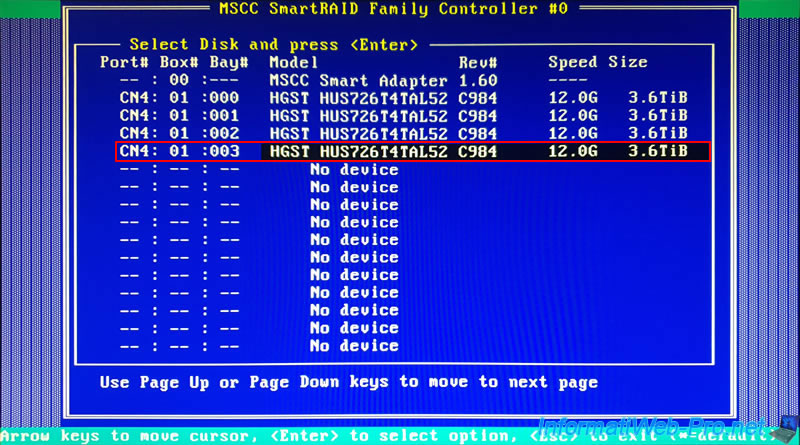
Select "Device Information" and press Enter.

At the bottom, you will see that this physical disk is not associated with an array (Associated to Array : No).
Which means that this physical disk is free and that you can define it as Spare if you wish.

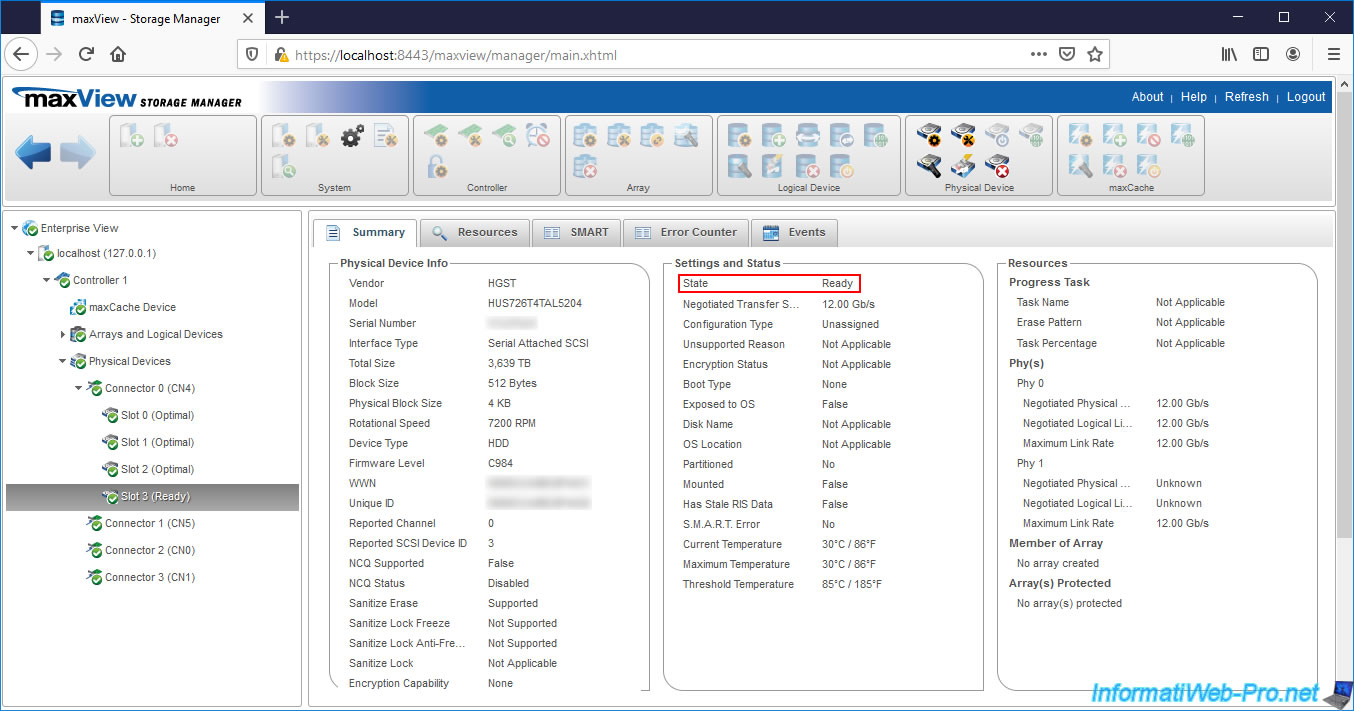
If you can't restart your computer / server, you can also check it very easily via maxView Storage Manager.
Select the physical disk you just plugged in and you will see that its status is "Ready". Which means this one is free.
6. Define a physical disk as Spare (via ACU)
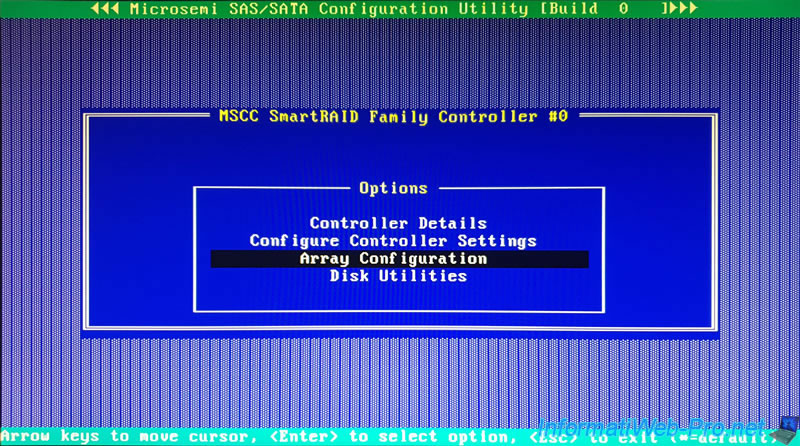
Still in the configuration tool accessible when starting your computer / server, go to : Array Configuration.
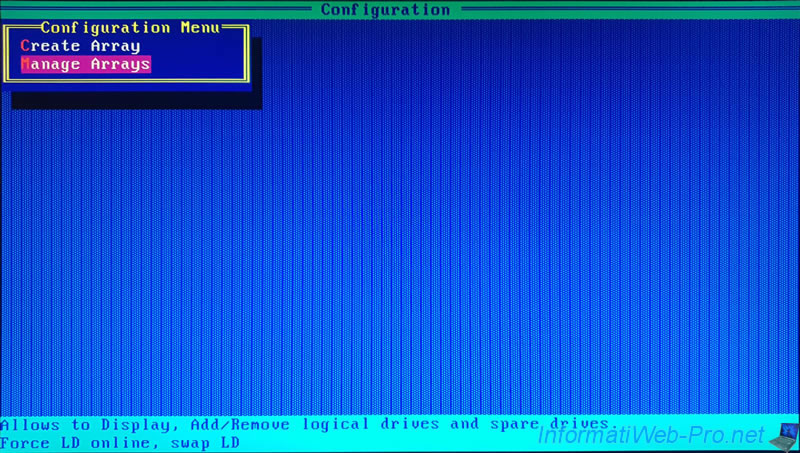
Then, in : Manage Arrays.
Select the array you want to protect with a Spare and press the "CTRL + S" keys (as shown at the bottom of the screen).
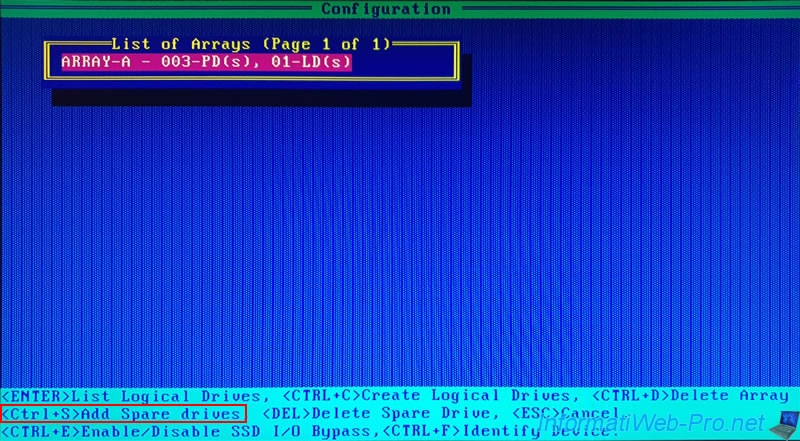
If no physical disk eligible for this array was found by your Microsemi Adaptec SmartRAID controller, the "No eligible disk found to create a hot spare" error message will appear.
If this is the case, refer to the limitations listed in step "1. Information about the Hot Spares system" of the tutorial.
In particular, make sure that the physical disk you want to use :
- is free
- that its capacity (size) is sufficient = greater than that of the smallest physical disk of this array
- its interface (SAS / SATA) corresponds to that of the cluster
- and more
![]()
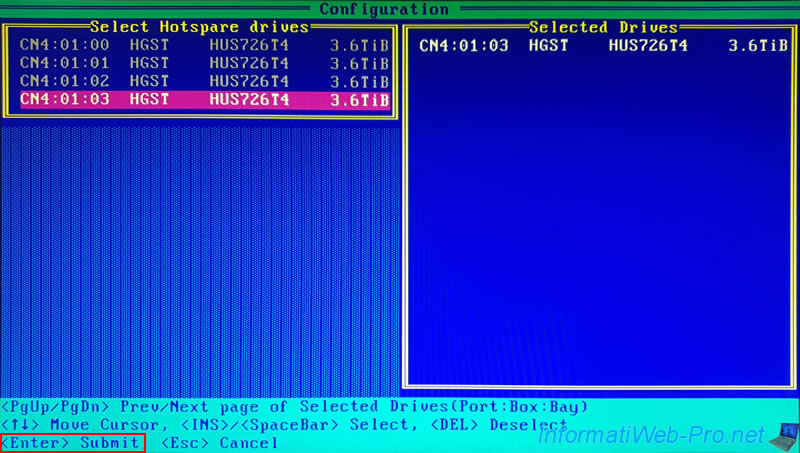
If your physical disk is eligible, this screen will be displayed with 2 columns :
- a "Select Hotspare drives" column listing the hard drives connected to your Microsemi Adaptec controller.
Those already in use by your controller (for this array or other arrays) are displayed in gray.
Those that are currently free and available to be used as Spare for this array are displayed in white and can be selected. - a "Selected Drives" column listing the hard drives you just selected to add as Spare to this array.
To add a physical disk as a Spare, use the arrow keys to select a physical disk, then press the space bar or the "Insert or Ins" key to add it to the "Selected Drives" list.
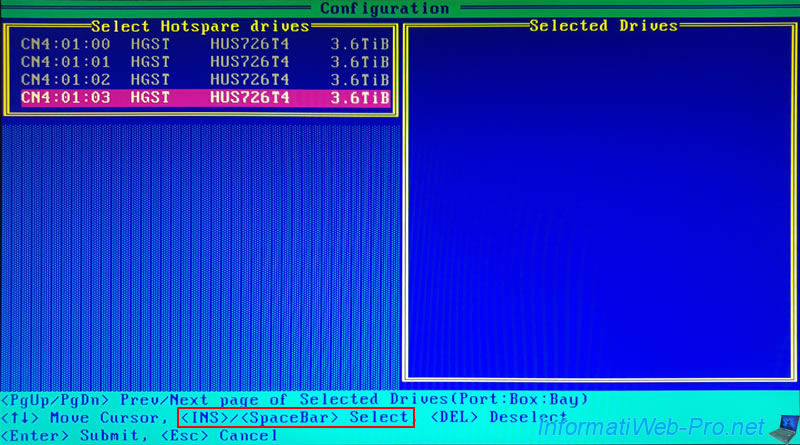
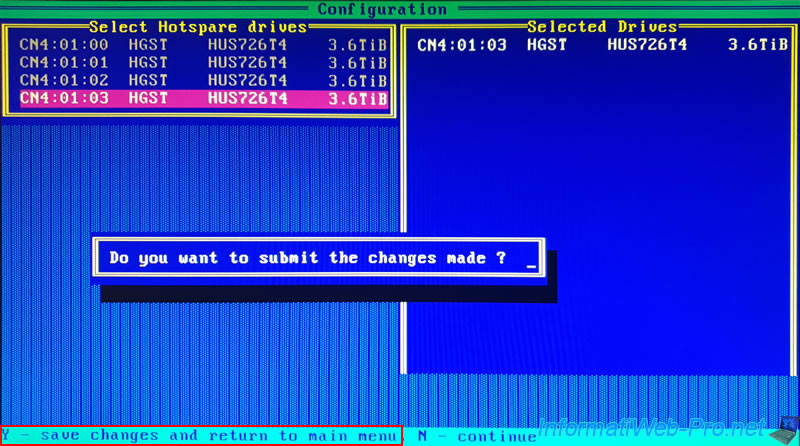
Once you have selected the disk(s) you want to use as a Spare for this array, press Enter to confirm the selection.
Confirm the changes by pressing the "Y" letter.
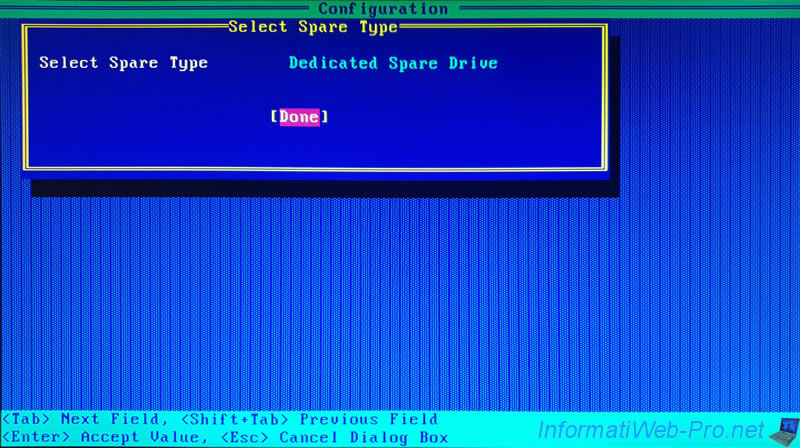
Select the type of Spare you want to use :
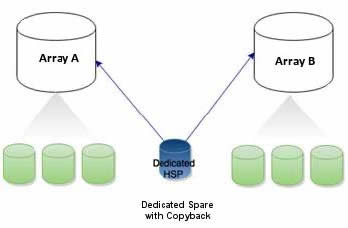
- Dedicated Spare Drive : this Spare can be assigned to one or more arrays and will protect any logical drive present on them.
In the event of a failure (or predicted failure, depending on the activation mode configured on your controller), this Spare will be used to rebuild the defective hard drive.
Then, when you physically replace the hard drive that was failed, the data in the Spare will be copied back to the original location (process called : Copyback). - Auto replace drives : this Spare is assigned to this array and will protect any logical drive present on it.
In the event of a failure (or predicted failure, see explanation above), this Spare will be used to rebuild the defective hard drive and will then permanently become a member of this array.
In this case, don't forget to set up a new Spare later for this array if you want to keep this Spare system on your cluster.
In the case of this tutorial, we have selected "Dedicated Spare Drive".
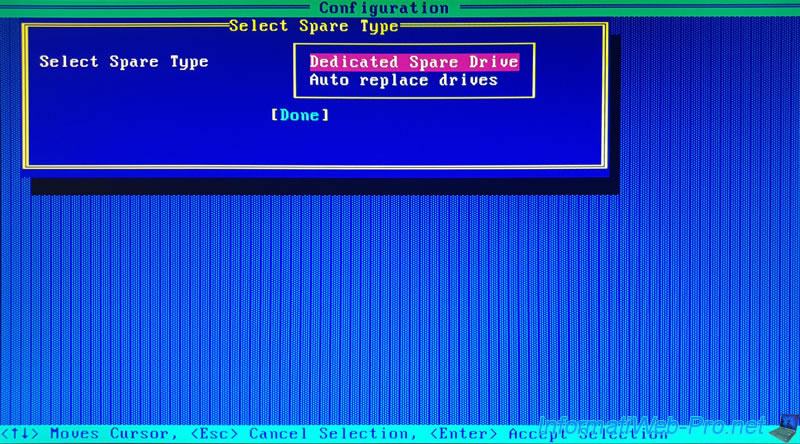
Then, press Enter to finish configuring the Spares.
Share this tutorial
To see also
-

RAID 4/20/2022
Adaptec maxView Storage Manager v3 - Create a RAID volume
-

RAID 4/8/2022
Adaptec maxView Storage Manager v3 - Download and boot on USB version
-

RAID 4/13/2022
Adaptec maxView Storage Manager v3 - Installation on Linux
-

RAID 4/15/2022
Adaptec maxView Storage Manager v3 - Manage an Adaptec SmartRAID controller on VMware ESXi 6.7
You must be logged in to post a comment