- RAID
- 28 January 2022 at 11:48 UTC
-

- 1/2

Previously, we showed you how to create a RAID 5 volume with an Adaptec RAID controller.
In this new tutorial, we will show you this with our new Microsemi Adaptec SmartRAID controller (which offers the option to run in RAID, HBA or both mode at the same time on the same Microsemi Adaptec SmartRAID controller).
- Enter the Microsemi Adaptec SmartRAID Controller Configuration Tool
- View Information About Your Microsemi Adaptec SmartRAID Controller
- Change the operating mode (RAID / HBA / MIXED) per port of the Microsemi Adaptec SmartRAID controller
- List the hard drives connected to your Microsemi Adaptec SmartRAID controller
- Create a RAID volume
- Manage RAID volumes
- Exit the Microsemi configuration tool
- Configured RAID volume
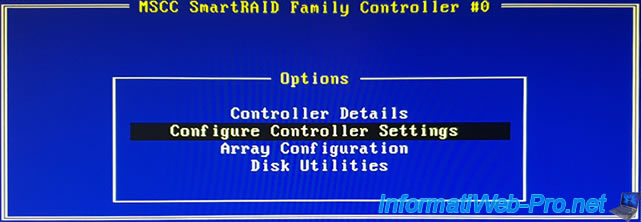
1. Enter the Microsemi Adaptec SmartRAID Controller Configuration Tool
Once the Microsemi Adaptec SmartRAID controller is plugged into your computer or server, this will appear on the screen each time you start your computer / server.
Plain Text
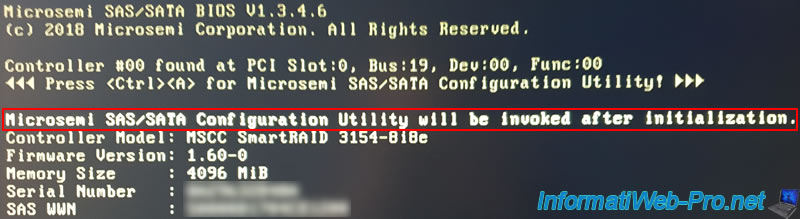
Microsemi SAS/SATA BIOS V1.3.4.6.
(c) 2018 Microsemi Corporation. All Rights Reserved.

Controller #00 found at PCI Slot:0, Bus:19, Dev:00, Func:00.
Controller Firmware starting & Scanning for devices...

Once the hard drives detection is complete, this message will be displayed :
Plain Text
Press <Ctrl><A> for Microsemi SAS/SATA Configuration Utility!
This means that to enter the configuration utility of your Microsemi Adaptec SmartRAID controller, you will have to press the "CTRL + A" keys (on a QWERTY keyboard, since it's in English) or "CTRL + Q "(on an AZERTY keyboard).
Note that information will then be displayed regarding your Adaptec SmartRAID controller :
- your controller model : Controller Mode - MSSC SmartRAID 3154-8i8e
- the version of its firmware : Firmware Version - 1.60-0
- the size of the built-in RAM on it : Memory Size - 4096 MiB (= 4 GiB)
- the serial number of the controller : Serial Number
- the unique SAS identifier defined by the controller : SAS WWN
Since no RAID volume has been created yet, there is no logical drive created on your Microsemi SmartRAID controller and the "No Logical Drives Found" message is displayed.
This only affects logical drives created on your Microsemi Adaptec SmartRAID controller and NOT your physical hard drives.

If you have pressed the "CTRL + A" keys, the "Microsemi SAS/SATA Configuration Utility will be invoked after initialization" message will be displayed.
Note that this message doesn't always appear instantly, however pressing these keys will still be taken into account.
2. View Information About Your Microsemi Adaptec SmartRAID Controller
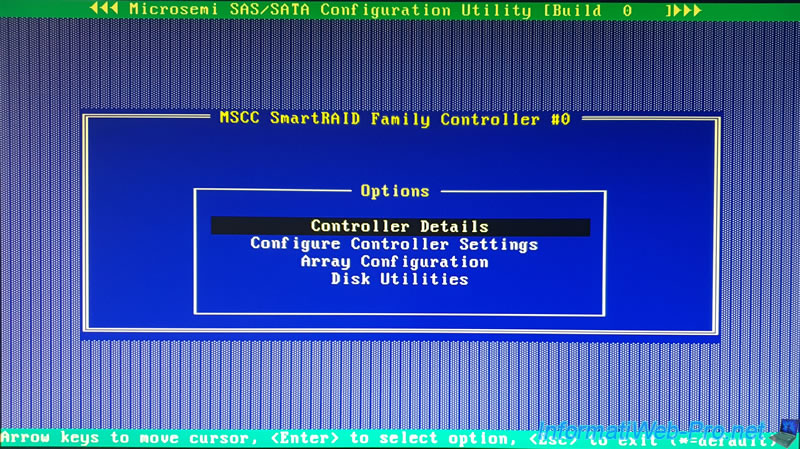
To view information about your Microsemi Adaptec SmartRAID controller from this "Microsemi SAS/SATA Configuration Utility", select "Controller Details" and press Enter.
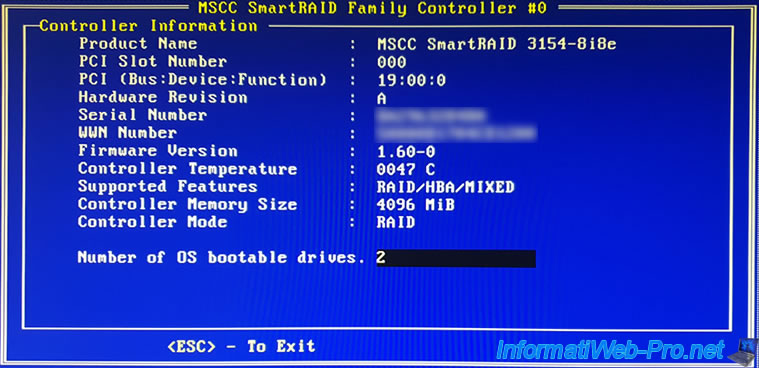
A lot of information about your Microsemi Adaptec SmartRAID controller will be displayed :
- the product name : Product Name - MSSC SmartRAID 3154-8i8e
- the PCI slot on which it is connected : PCI Slot Number - 000
- the PCI slot it is plugged into : 19:00:0 (Bus:Device:Function)
- its hardware revision : Hardware Revision - A
- the serial number of the SmartRAID controller : Serial Number
- the unique SAS identifier defined by the SmartRAID controller : WWN Number
- the version of its firmware : Firmware Version - 1.60-0
- the current temperature of the SmartRAID Controller : Controller Temperature - 0047 C.
Info : the correct operating temperature is indicated on the page of your SmartRAID controller. - the features (modes) it supports : Supported Features - RAID/HBA/MIXED.
This allows you in particular to create a RAID volume on a port of the controller and use another port in HBA mode if you wish (MIXED). - the size of RAM available on this SmartRAID controller : Controller Memory Size - 4096 MiB
- the overall operating mode of the SmartRAID controller : Controller Mode - RAID.
Note that you can change the mode to use per port if you wish. - the number of logical disks (RAID volumes) that can be bootable : Number of OS bootable drives - 2.
This allows you to install Windows or any other supported operating system on a logical drive created on a RAID volume.
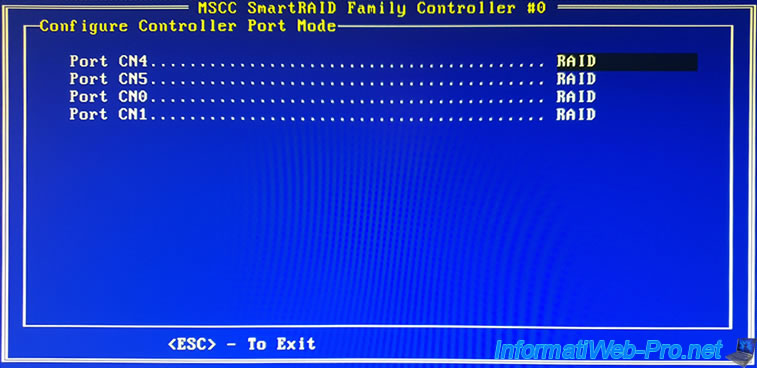
3. Change the operating mode (RAID / HBA / MIXED) per port of the Microsemi Adaptec SmartRAID controller
By default, your MSCC SmartRAID controller is configured to operate in RAID mode on all ports (internal and external, if applicable) that it has.
However, if you want to use HBA mode on one or more of its ports, go to "Configure Controller Settings".
Then, go to : Configure Controller Port Mode.

As you can see, our MSCC SmartRAID controller has 4 ports :
- CN4 and CN5 : the 2 internal mini SAS HD ports (SFF-8643)
- CN0 and CN1 : the 2 external mini SAS HD ports (SFF-8644)
To know which are the internal and external ports (if any), just look in the web interface of maxView Storage Manager.
Select your SmartRAID controller from the list on the left, then go to the "Connectors" tab. You will see the list of ports available on your SmartRAID controller, along with their locations : Internal or External.
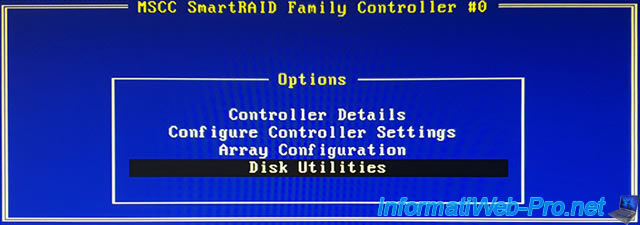
4. List the hard drives connected to your Microsemi Adaptec SmartRAID controller
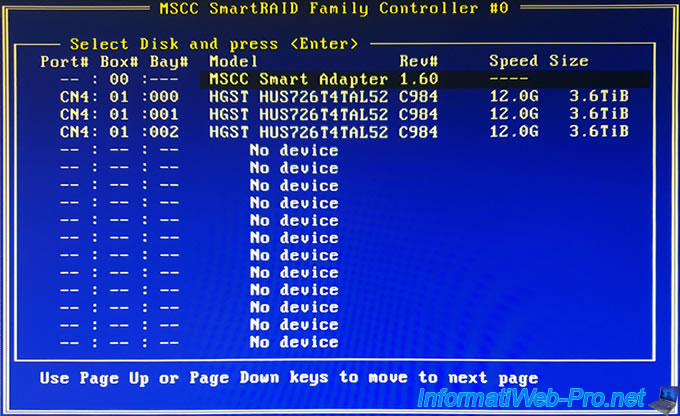
For informations about the hard drives connected to your Microsemi Adaptec SmartRAID controller, go to : Disk Utilities.
As you can see, in our case, we have a "MSCC Smart Adapter" controller whose firmware version is 1.60.
You can also see that 3 hard drives are connected to this SmartRAID controller :
- Port# - CN4 : the physical port (whether internal or external) to which they are connected
- Box# - 01 : his location
- Bay# - 000/001/002 : the number of the cable with which it's connected to the SmartRAID controller
- Model - HGST HUS726T4TAL52 : the model of the connected hard drive
- Rev# - C984 : the revision number of the affected hard drive
- Speed - 12.0G : its operating speed. In our case, 12.0G given that these are 12 Gb/s SAS hard drives.
- Size - 3.6 TiB : its capacity (size)
5. Create a RAID volume
To create a RAID volume using this SmartRAID controller, go to : Array Configuration.
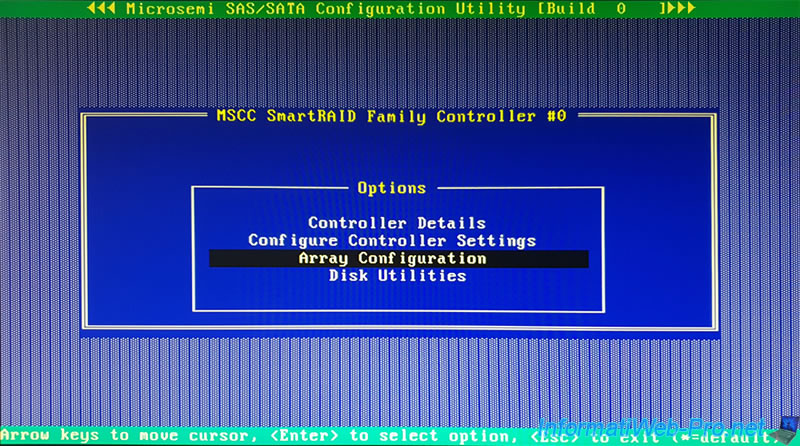
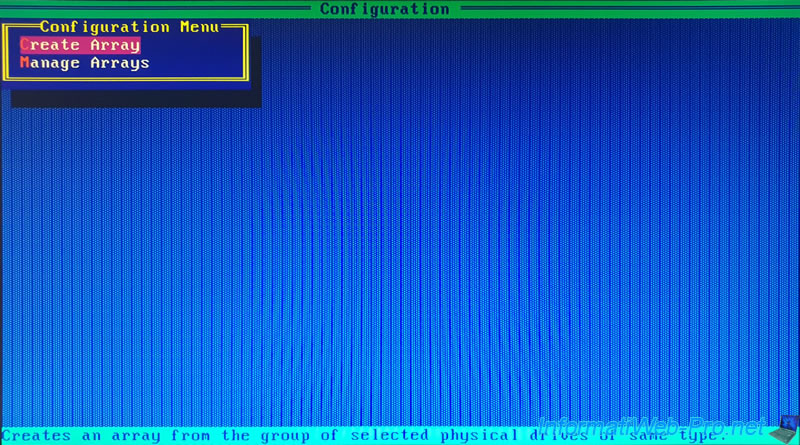
Then, select "Create Array" and press Enter.
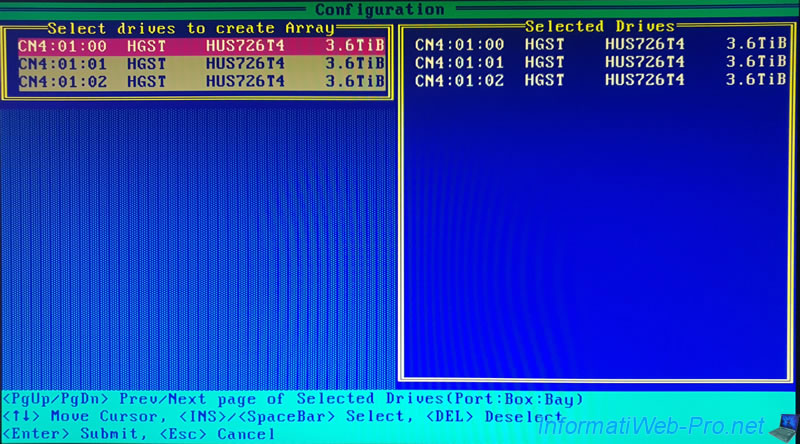
Since we are going to create a RAID 5, we have connected 3 identical hard drives (which is preferable) and we will select them here.
To do this, select the desired hard drive with the arrows on the keyboard, then press the space bar to add it to the list of selected hard drives.
In our case, we just have to press the space bar 3 times to select our 3 hard drives.
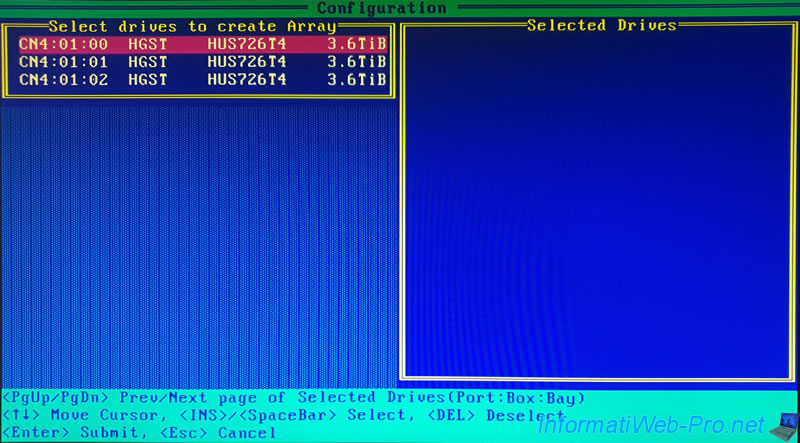
Once selected, they will appear in the "Selected Drives" list on the right and grayed out in the left one.
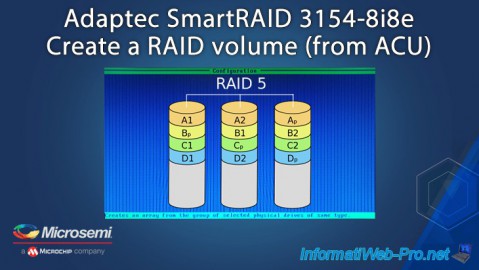
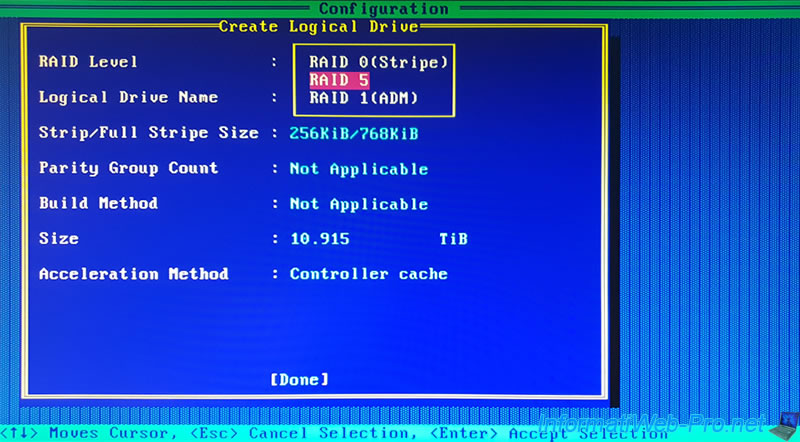
As explained previously, we are going to create a RAID 5.
In our case, with 3 hard disks, the proposed RAID Levels are :
- RAID 0 (Stripe) : requires 2 hard drives and increases performance by copying half of each data to the 1st hard drive and the other half to the 2nd hard drive.
Warning : if a hard drive fails, you will lose all data on your RAID volume. - RAID 5 : requires at least 3 hard disks and allows you to combine performance and data security.
This RAID level consists of :
- copy half of each data to the 1st hard drive
- the other half on the 2nd hard drive
- parity on the 3rd hard drive. This makes it possible to reconstruct the missing part in the event that one of the hard drives fails. - RAID 1 (ADM) : ensures data security by copying each piece of data to each hard drive chosen for your RAID volume.
If one hard drive fails, you will still have your data intact on the other hard drives in your RAID volume.
ADM (Advanced Data Mirroring) means that the data will be mirrored on 3 hard drives instead of 2 with traditional RAID 1.
However, our Microsemi Adaptec SmartRAID 3154-8i8e controller supports RAID levels : 0, 1, 5, 6, 10, 50, 60, 1 ADM and 10 ADM.
As indicated on the Adaptec SmartRAID 3154-8i8e page of the Microchip website.
Enter a name for your RAID volume (Logical Drive Name).
This name is purely indicative and simply allows you to find your RAID volume more easily in the web interface of maxView Storage Manager and in this configuration tool (ACU).
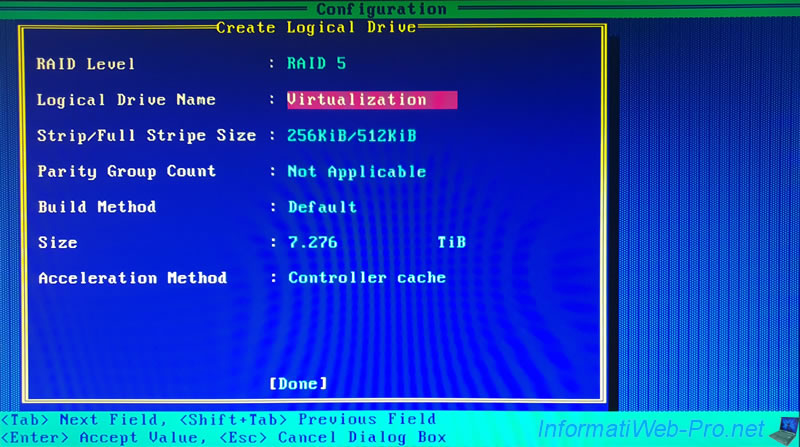
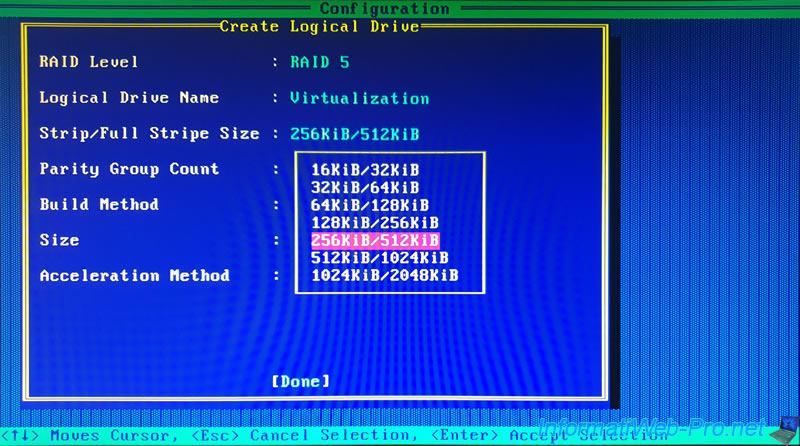
Select the desired stripes size (Strip/Full Stripe Size).
However, the appropriate value changes depending on the selected RAID level and the number of hard drives selected in the previous step.
It's therefore recommended to leave the value selected by default.
Source : What is the optimum stripe size setting for RAID 5? - Microchip Adaptec Support Knowledgebase
For information :
- Strip Size : size of each stripe on each previously selected physical disk. Or in other words, the amount of data written to a tape before moving to the next hard drive of the array.
- Full Stripe Size : combined stripe size of each hard drive (not including the one used to store parity data).
In the case of our array in RAID 5, we therefore have 2 hard disks where we can store data and the 3rd hard disk only stores parity data.
The combined size of the stripes (Full Stripe Size) is therefore equal to 2 (number of hard disks for data) x 256 (strip size selected in the image) = 512 (combined size of the stripes).
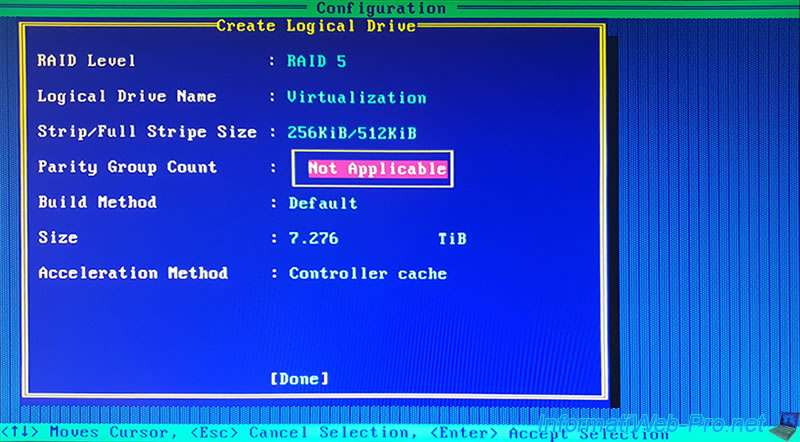
Only when you create a RAID 50 or 60, you will be able to choose the number of parity groups.
In the case of a RAID 50, if you choose 2, your RAID controller will create a RAID 50 based on a array of 2 RAID 5.
In our case, with a RAID 5, this is not applicable, so we leave the "Not Applicable" option.
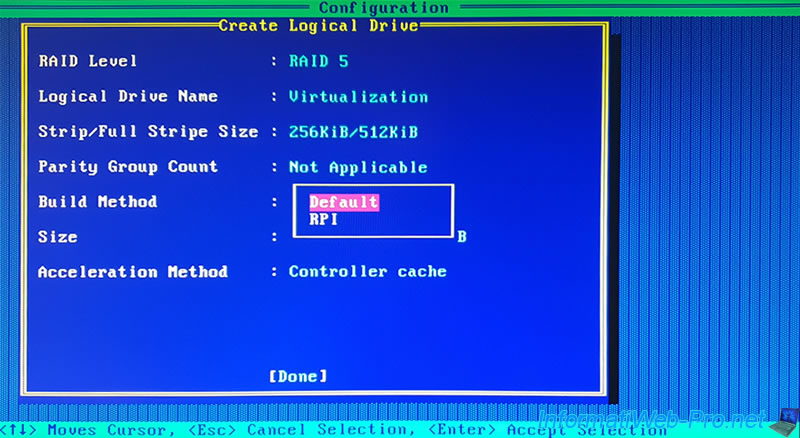
For the Build Method of the RAID volume, you have the choice between :
- Default : the RAID volume (Logical Drive) will be initialized in the background and the logical drive will therefore be available directly.
However, initialization will affect its performance and your data will not be protected until it's completed. - RPI : a fast initialization will be performed "offline" and the RAID volume (Logical Drive) will be available only when this initialization is complete.
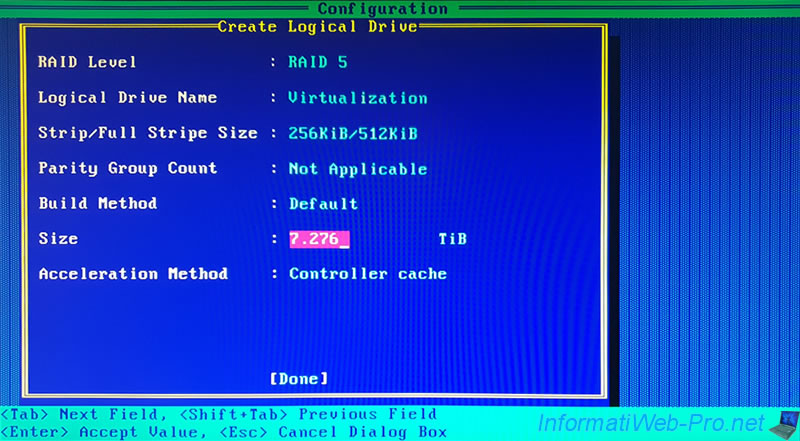
By default, the logical drive size is set to the maximum size available on your physical hard drives with the selected RAID level.
In our case, given that we are using 3 hard disks of 3.6 TiB and the last one is used for parity of RAID 5, we can therefore store maximum : 3.6 TiB x 2 hard disks = 7.2 TiB.
By default, the RAID volume will take all available space on the previously selected hard drives and the logical drive will take all available space on that RAID volume.
Note that you can also reduce this size to create multiple logical drives if you wish on the same RAID volume.
Also note that each logical drive created here will be seen as a full-fledged hard drive and can therefore also be partitioned from the desired operating system (Windows, Linux, ...).
In our case, we leave the default value to simplify the tutorial.
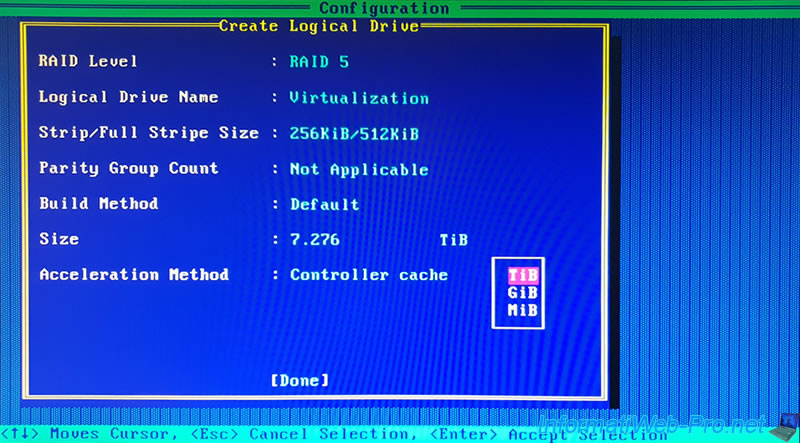
The next step is simply to select the unit for the size (capacity) of your logical drive : TiB, GiB or MiB.
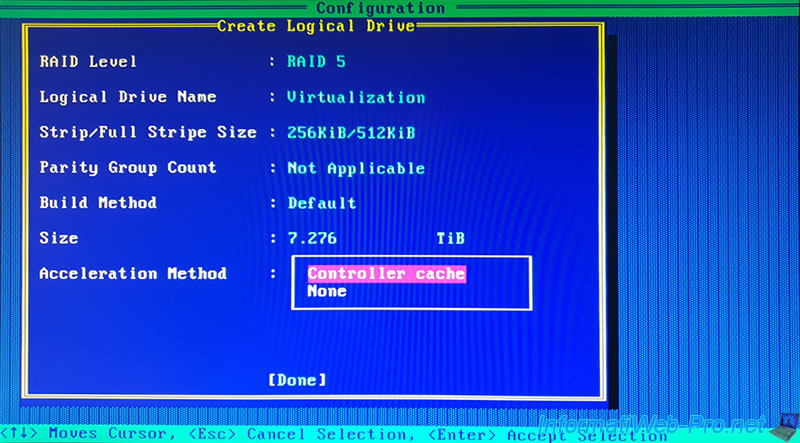
Finally, you will need to select the desired acceleration method :
- Controller cache : allows you to use the read and write cache of the SmartRAID controller.
Since the "Microsemi Adaptec Flash Backup Module ASCM-35F" battery is plugged into our Microsemi Adaptec SmartRAID 3154-8i8e controller, we can use the write cache without the risk of losing data in the event of a power failure between when the data is written to the cache and the moment when it's actually transferred to the hard drives affected by our logical drive. - None : no cache will be used.
Once setup is complete, just press Enter.
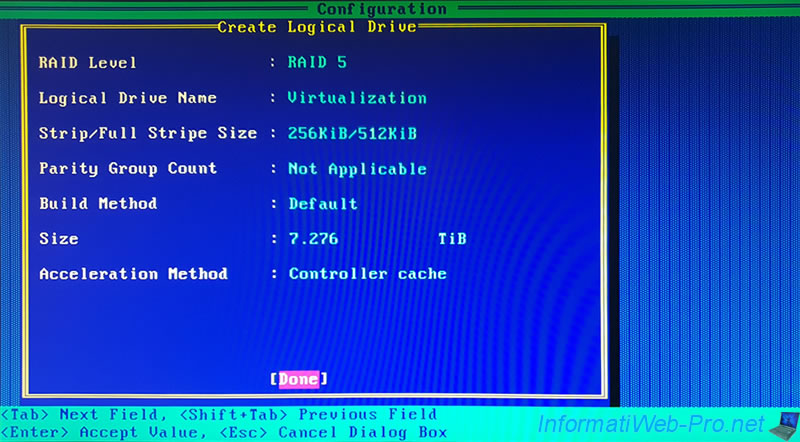
The logical drive will be created, then the "Array/Logical Drive creation successful" message will appear.
![]()
Share this tutorial
To see also
-

RAID 4/20/2022
Adaptec maxView Storage Manager v3 - Create a RAID volume
-

RAID 4/8/2022
Adaptec maxView Storage Manager v3 - Download and boot on USB version
-

RAID 4/13/2022
Adaptec maxView Storage Manager v3 - Installation on Linux
-

RAID 4/15/2022
Adaptec maxView Storage Manager v3 - Manage an Adaptec SmartRAID controller on VMware ESXi 6.7
You must be logged in to post a comment