Automatically rebuild a failed physical disk using a dedicated Hot Spare with an Adaptec SmartRAID 3154-8i8e controller
- RAID
- 04 May 2022 at 11:52 UTC
-

- 2/4

7. Define a physical disk as Spare (via maxView Storage Manager)
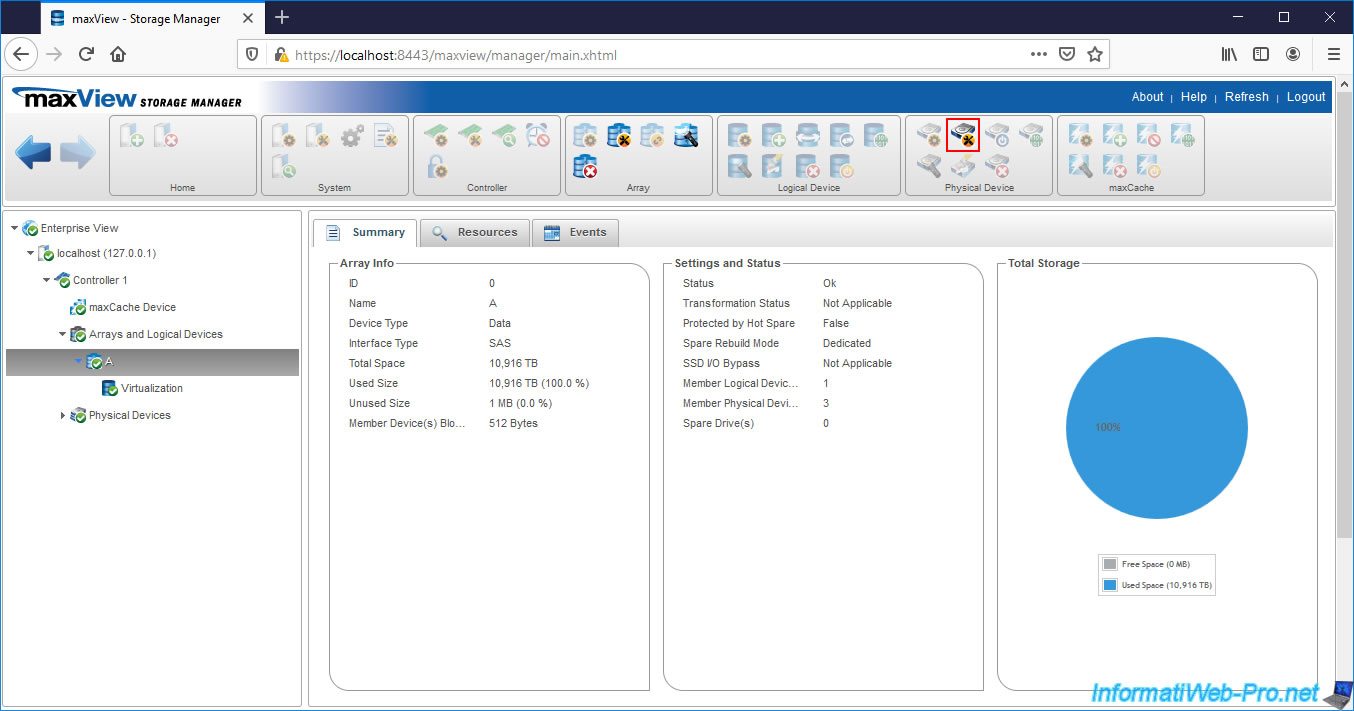
If you don't wish to restart your computer / server, here is how to assign a physical disk as Spare to an array from the "maxView Storage Manager" web interface.
To start, select the array you want to protect in the left column, then click on the 2nd icon in the "Physical Device" block located at the top of the page.
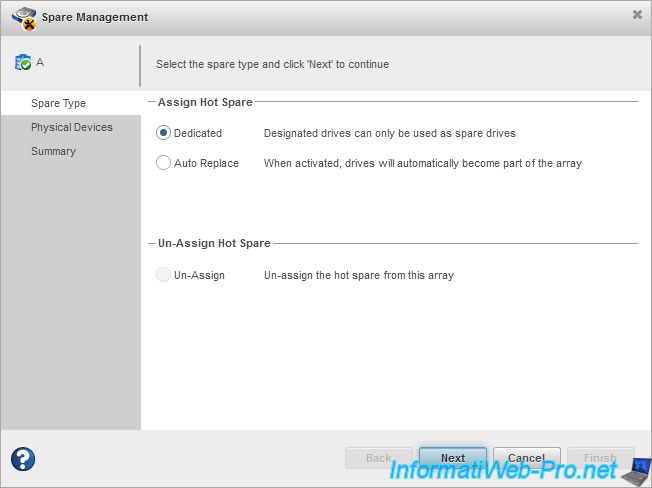
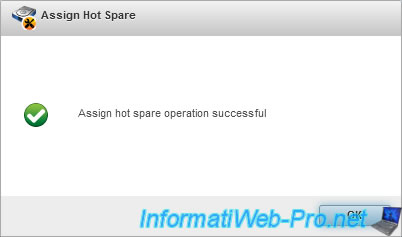
In the "Spare Management" window that appears, select "Dedicated" in the "Assign Hot Spare" section and click Next.
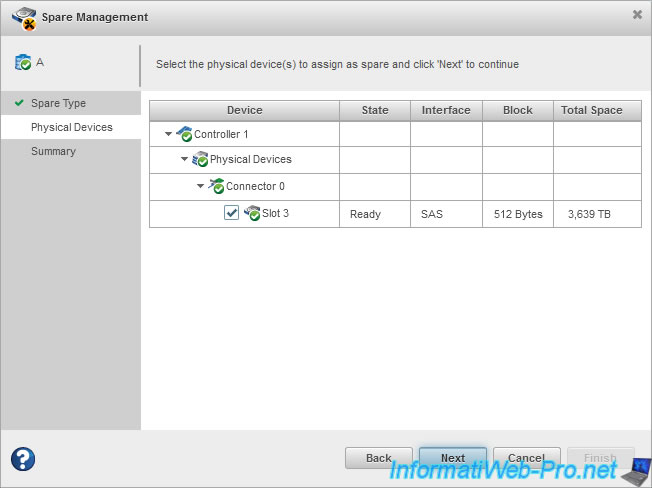
Check the physical disk(s) you want to set as Spare for this array, then click Next.
Then, click on Finish.
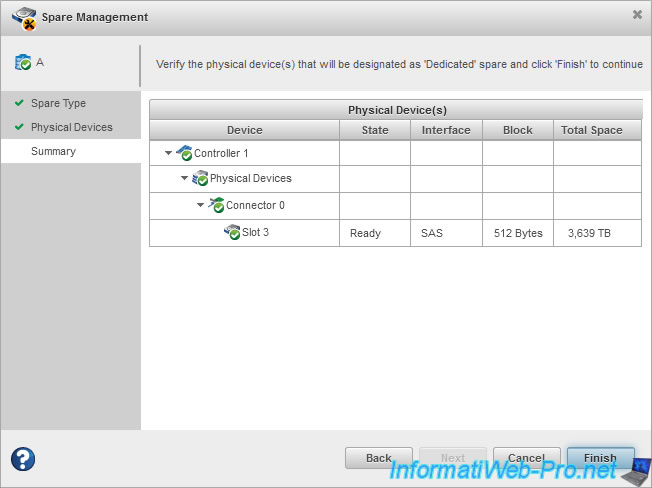
The "Assign hot spare operation successful" message appears.
8. Display the Spares configured on an array (via ACU)
To view the Spares configured on your Array, select it in the Microsemi Adaptec (ACU) Configuration Tool and press Enter.
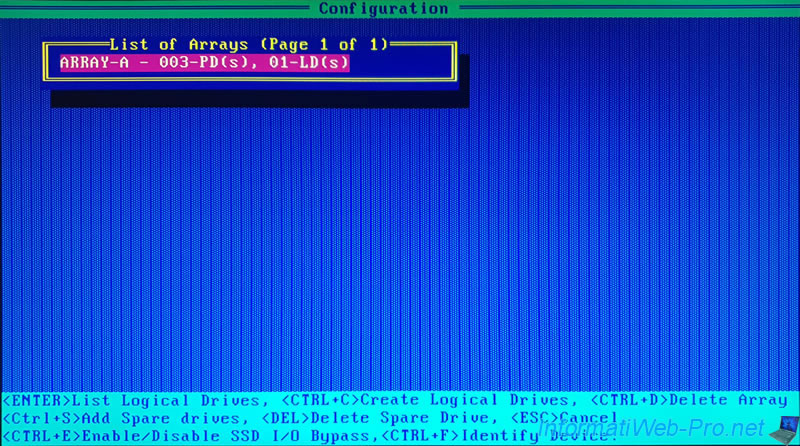
Select one of your logical drives and press Enter.
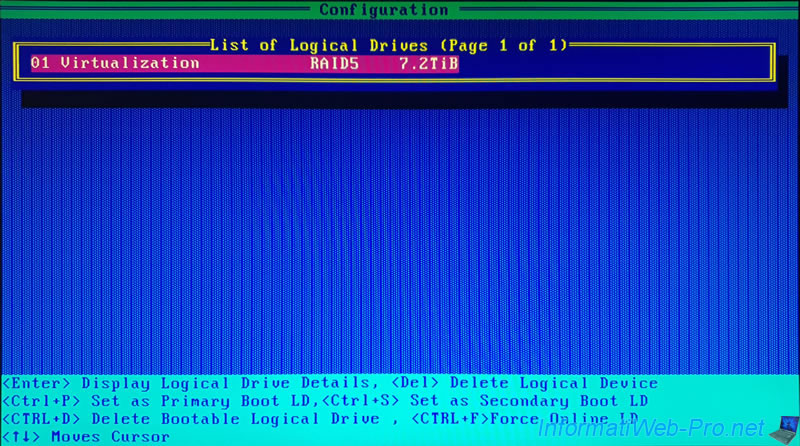
Then, press the "CTRL + S" keys to display the Spares protecting this logical drive.
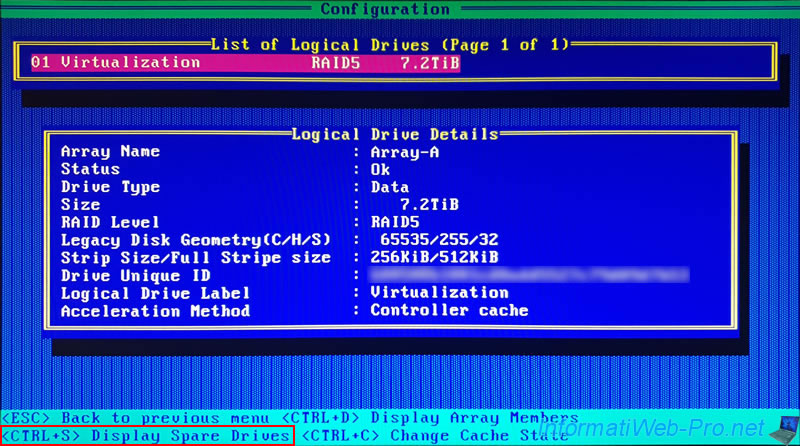
As expected, the Microsemi Adaptec configuration tool tells you that a Spare is configured as "Dedicated Spare" to protect this logical drive and that it's located at location : CN4:01:03.
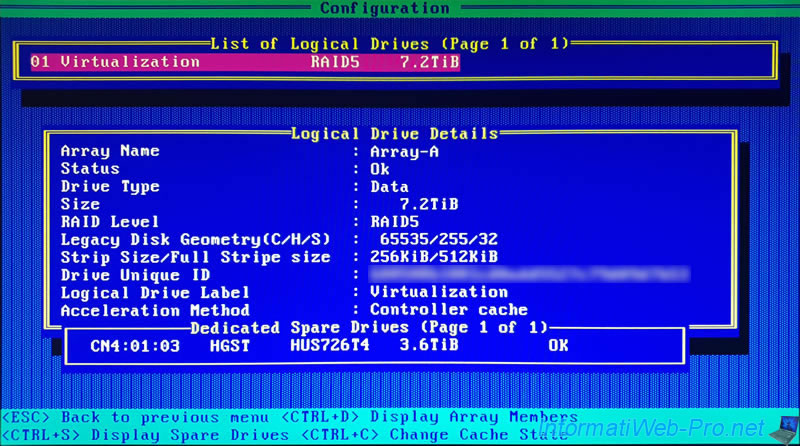
For the members (displayable with the keys "CTRL + D"), this doesn't change anything for the moment.

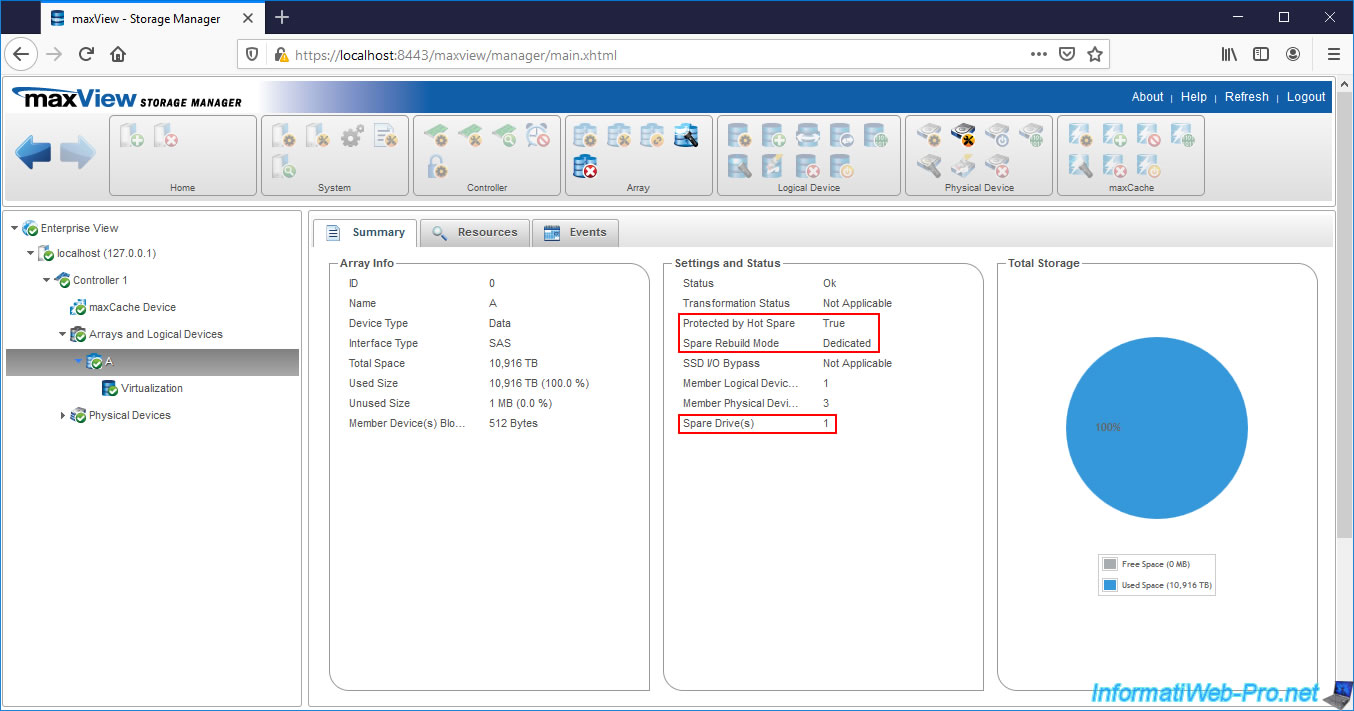
9. Display the Spares configured on an array (via maxView Storage Manager)
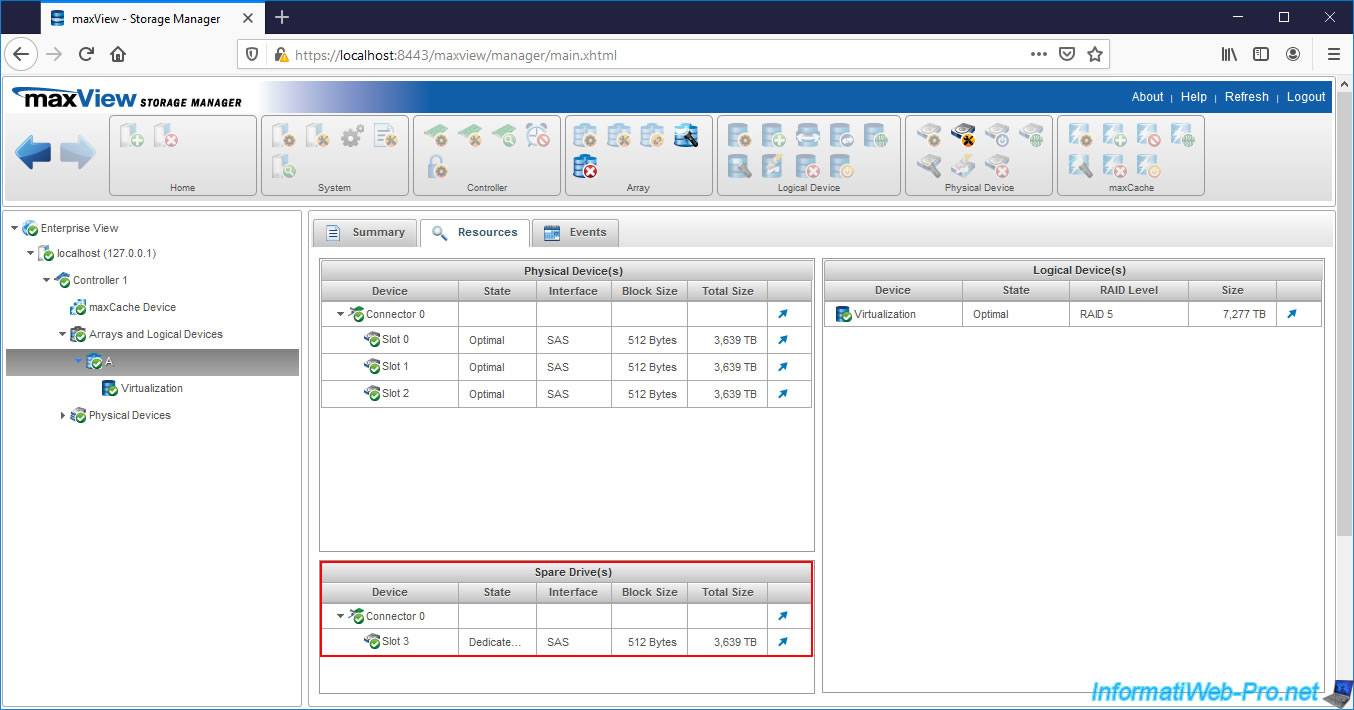
If you want to check the addition of the Hot Spare directly via the "maxView Storage Manager" web interface, select your array and you will see that :
- Protected by Hot Spare - True : this array is protected by a Spare
- Spare Rebuild Mode - Dedicated : the Spare mode you chose when assigning the Spare is "Dedicated"
- Spare Drives - 1 : indicates that a Spare protects this cluster
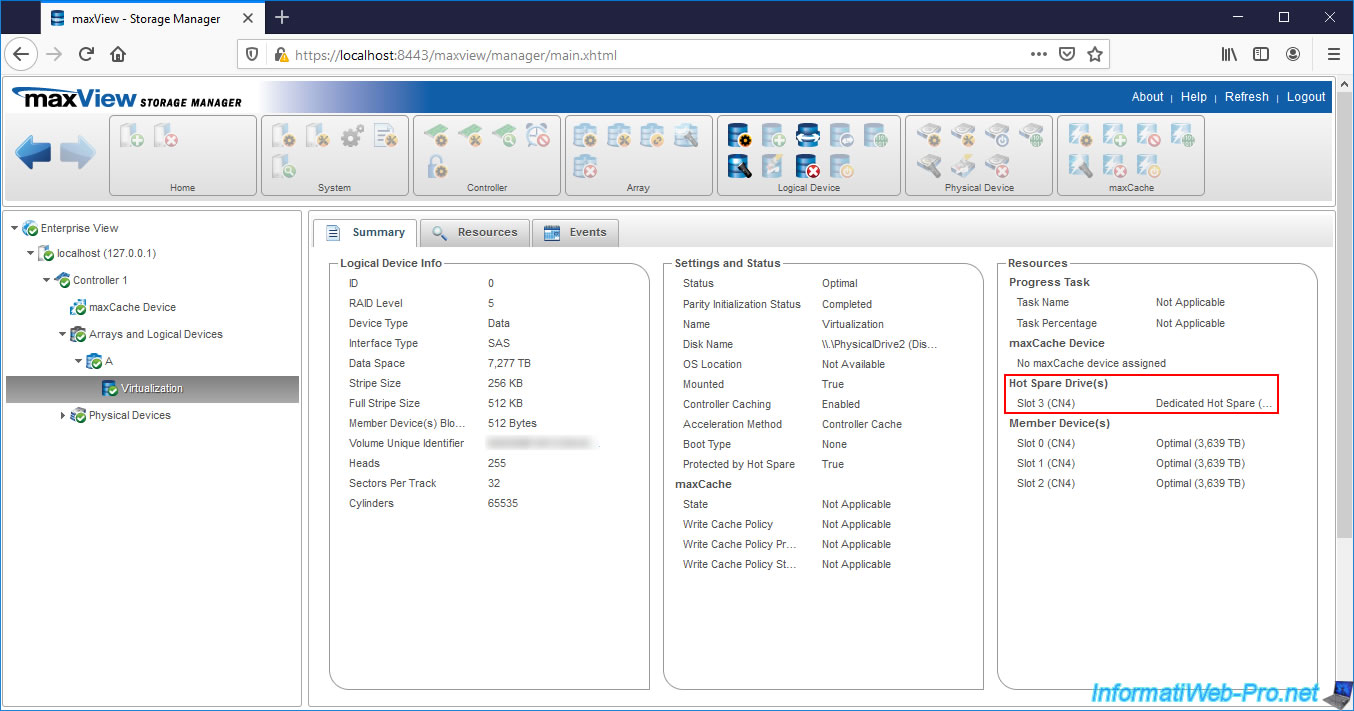
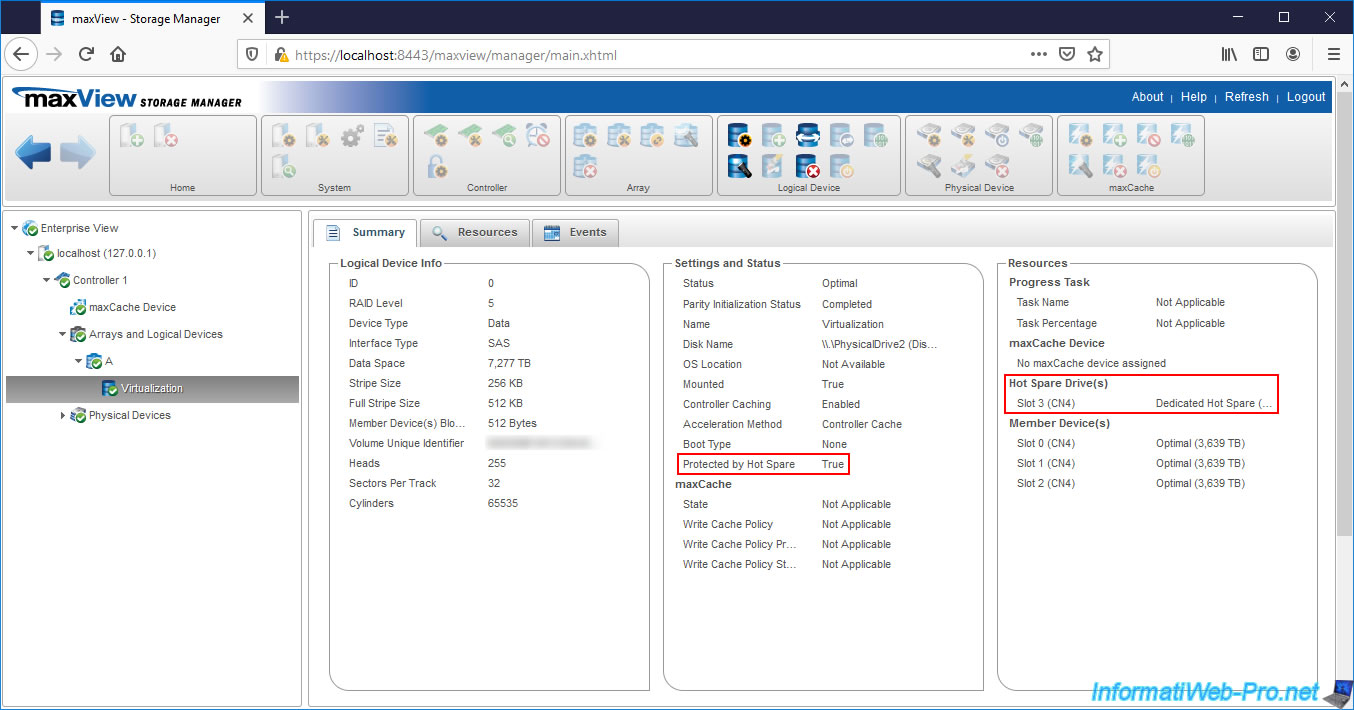
If you select a logical drive of this array, you will see your Spare appear in the "Hot Spare Drives" section.
maxView also tells you that in this case it's a : Dedicated Hot Spare.
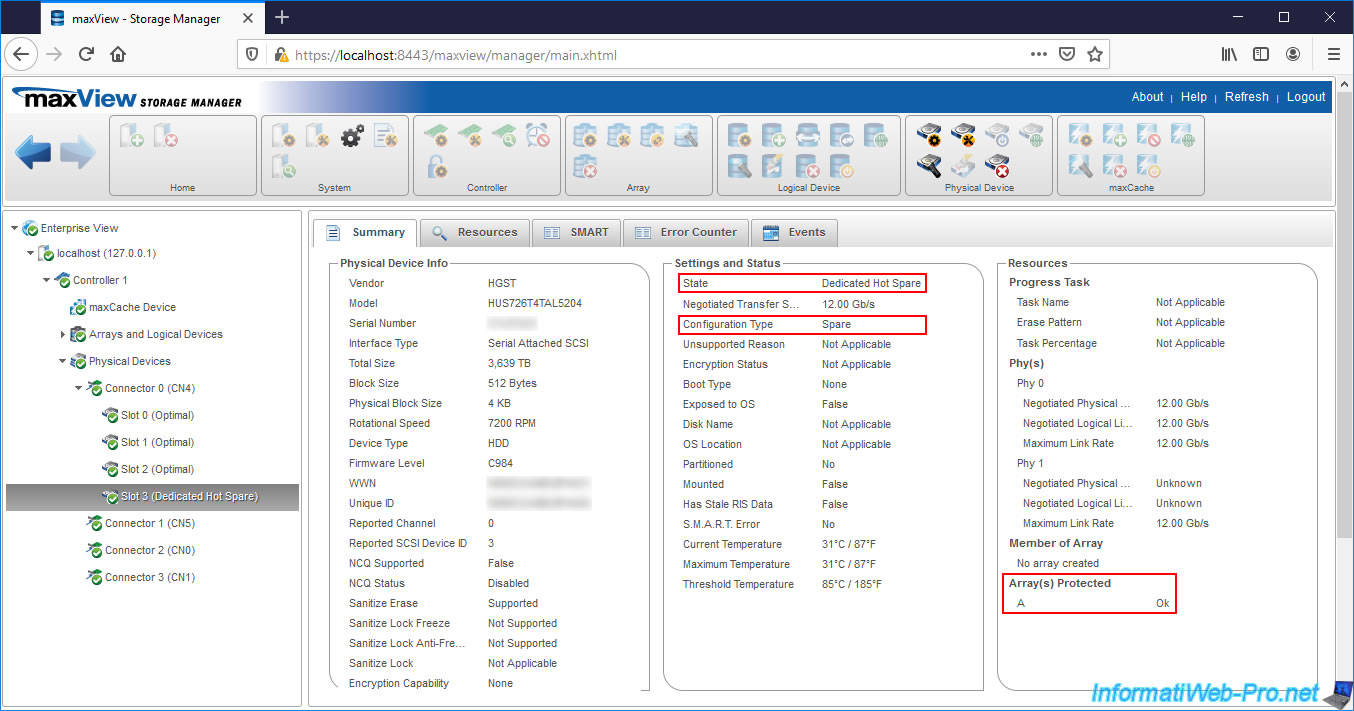
If you select the Physical Device assigned as Hot Spare, you will see that :
- its state is : Dedicated Hot Spare
- its configuration type is : Spare
- it protects the "A" array : Arrays Protected - A
10. Physical disk associated with an array
Optional : in the Microsemi Adaptec configuration tool, go to : Disk Utilities.
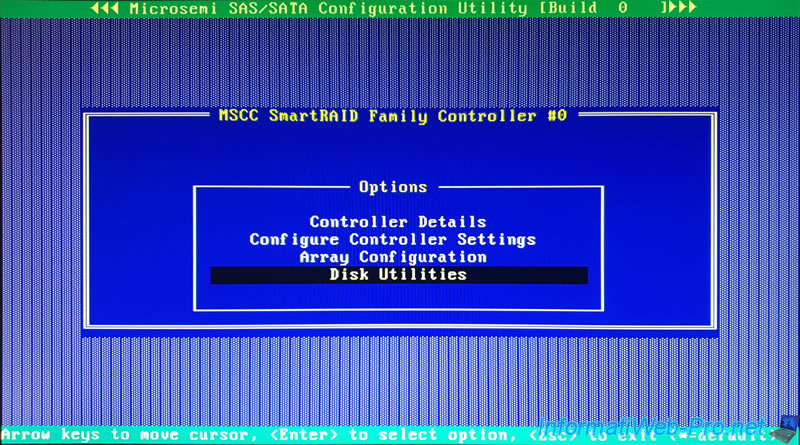
Select your physical disk and press Enter.
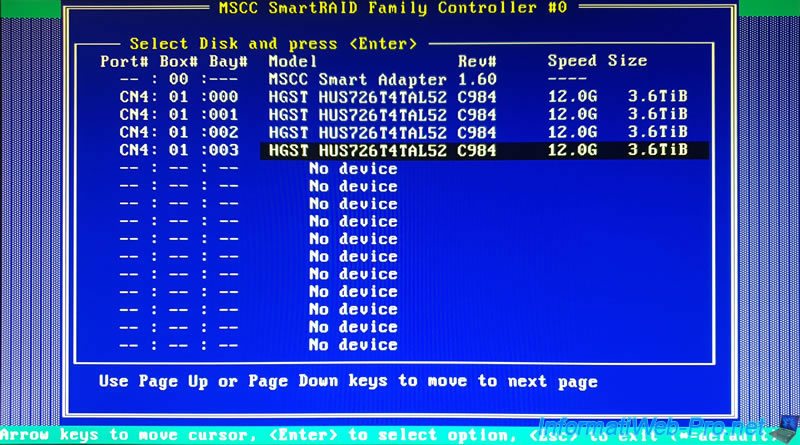
Select "Device Information".

As you can see, your physical disk is :
- associated with an array (Associated to Array : Yes)
- associated with the array : Array-A
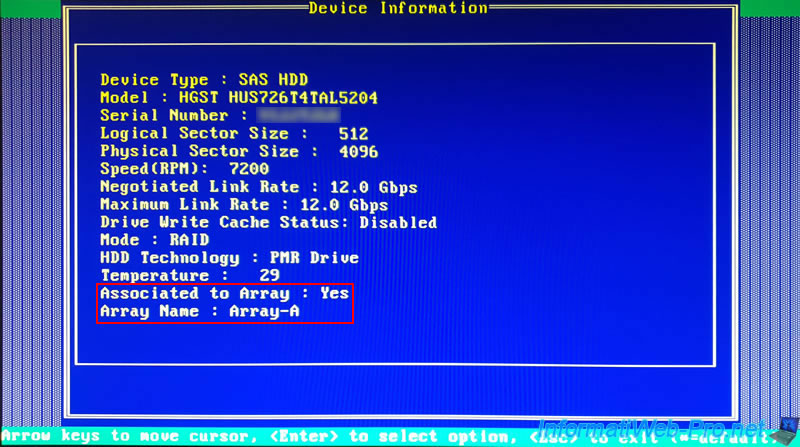
When your computer / server starts up, you will not see any changes as long as your physical disks are in good condition.
11. Information visible in the web interface : maxView Storage Manager
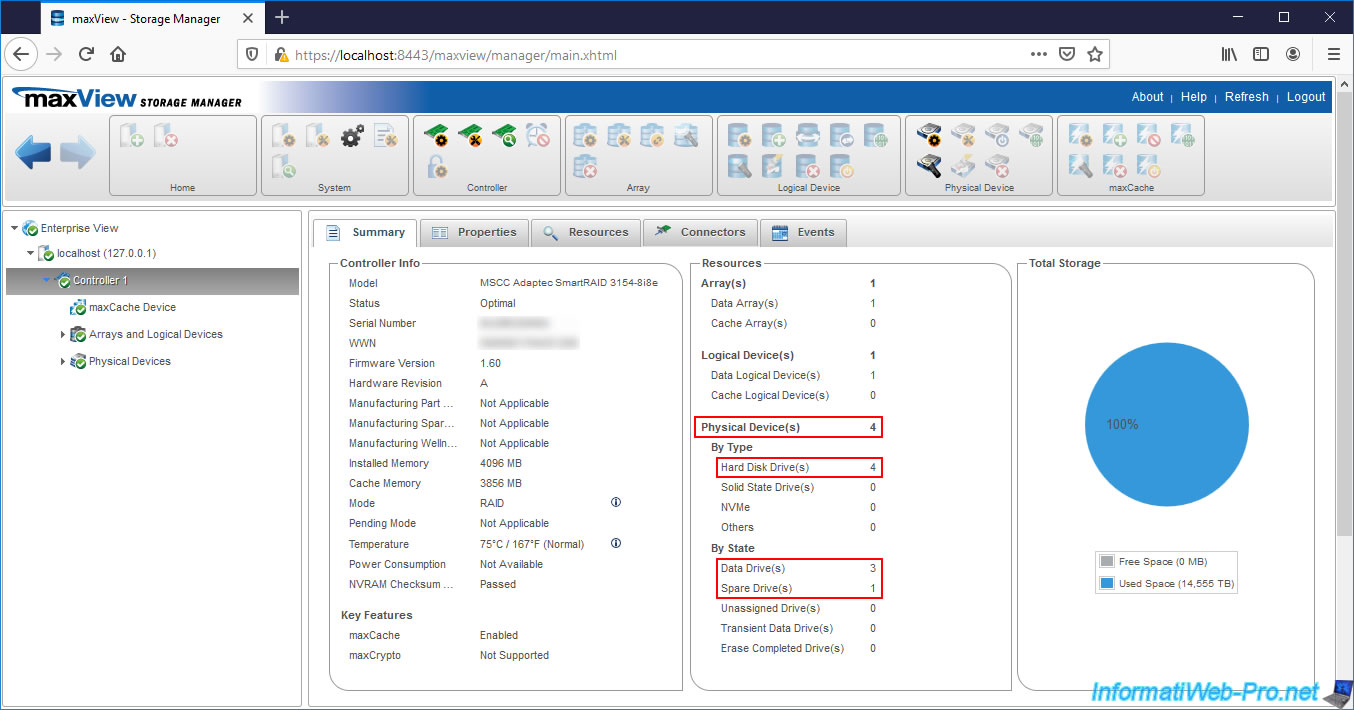
In the web interface: maxView Storage Manager, if you select your Microsemi Adaptec controller from the list on the left, you will see that your controller counts :
- 4 physical disks (Physical Device(s) : 4)
- 4 hard disk drives (Hard Disk Drive(s) : 4)
- 3 physical disks are storage disks (Data Drive(s) : 3) = those who are members of your array
- 1 physical disk is a Spare (Spare Drive(s) : 1) = the one defined as Spare for your array
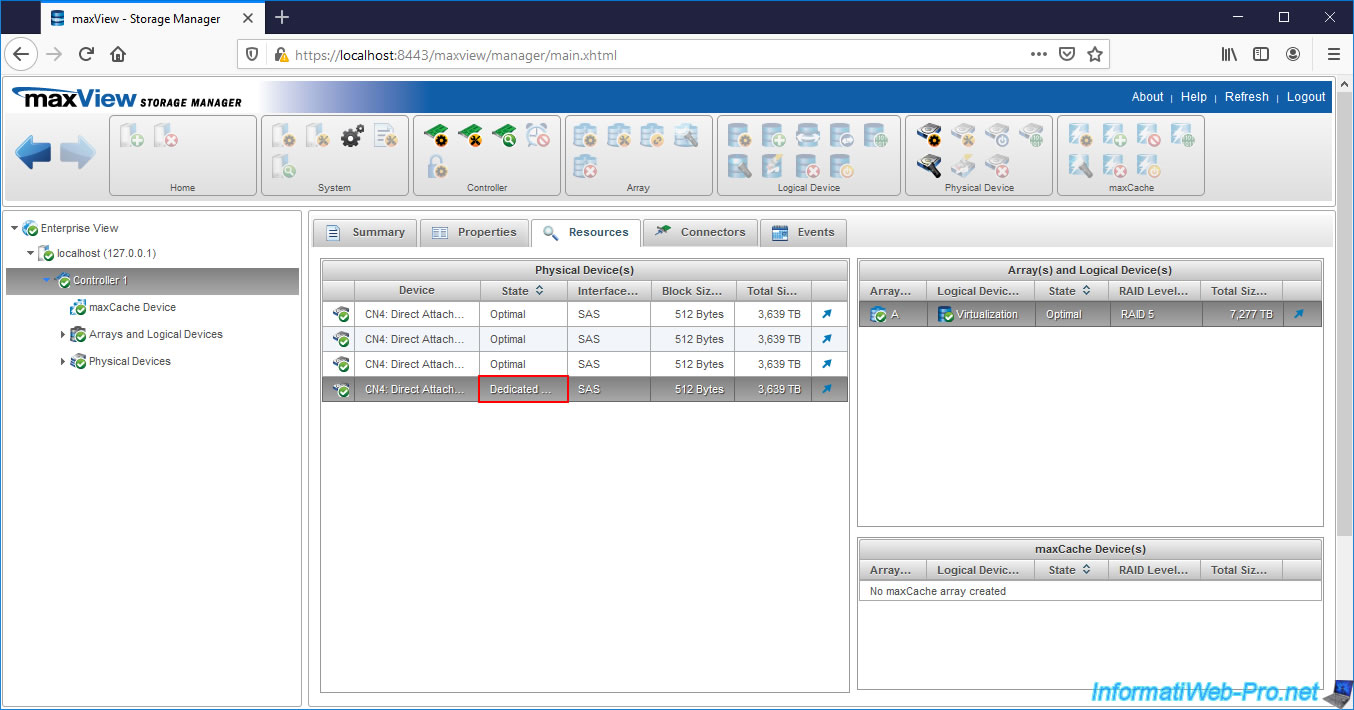
If you look in the "Resources" tab of your controller, you will see that the status of your physical disk is "Dedicated Spare".
If you click once on it, you will see that it protects array "A" and therefore also the "Virtualization" logical drive that is there.
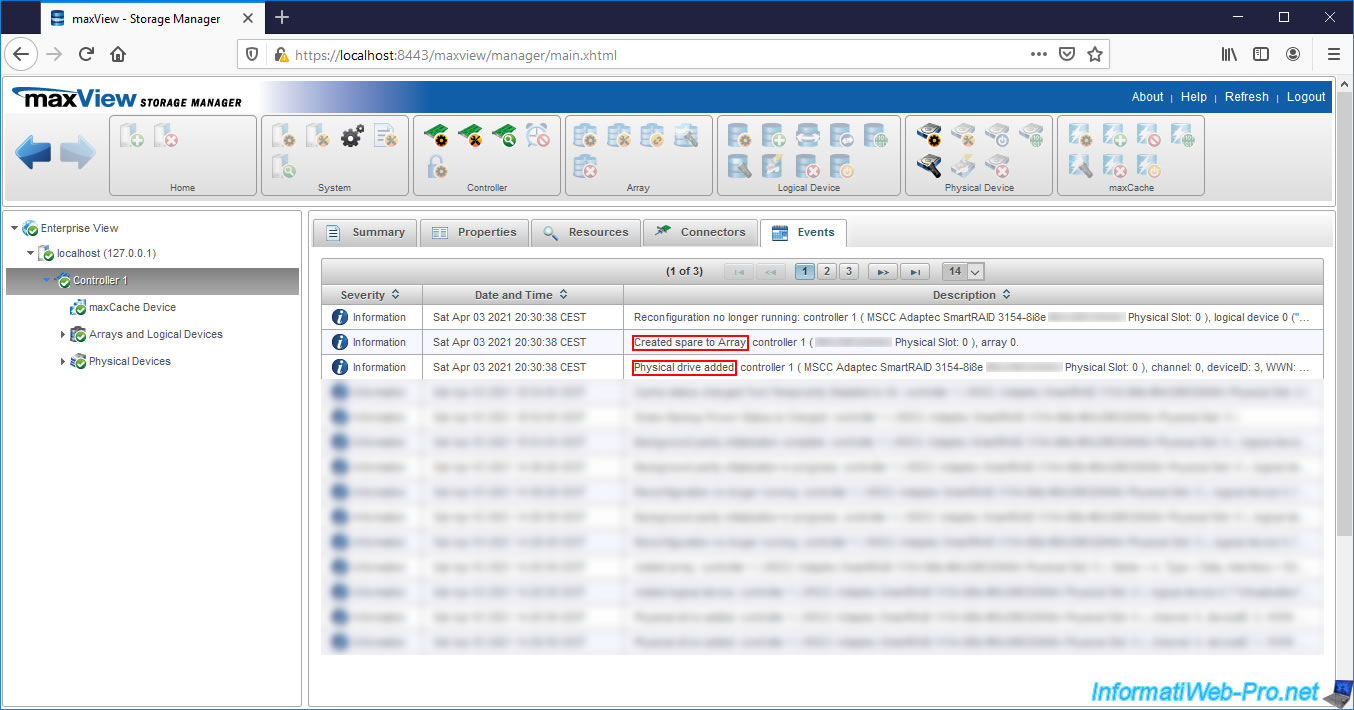
In the "Events" tab of your controller, you will see that :
- a new physical disk has been added : Physical drive added ...
- a new Spare to the array whose ID is 0 (so "Array-A" in our case) : Created spare to Array ...
If you select the physical disk you just configured as Spare, you will see the following lines :
- State : Dedicated Hot Spare
- Configuration Type : Spare
- Array(s) Protected : A (name of the array protected by it) - Ok (current status of this array)

In the "Resources" tab of this physical disk, you will be able to see which array(s) / logical disks it's protecting (Array(s) Protected).
If you select the protected array (in our case : array "A"), you will see that :
- Protected by Hot Spare - True : this array is protected by a Hot Spare
- Spare Rebuild Mode - Dedicated : the rebuild mode on this Spare is "Dedicated". This means that the Spare is configured as "Dedicated Spare"
- Spare Drive(s) - 1 : a Spare protects this array

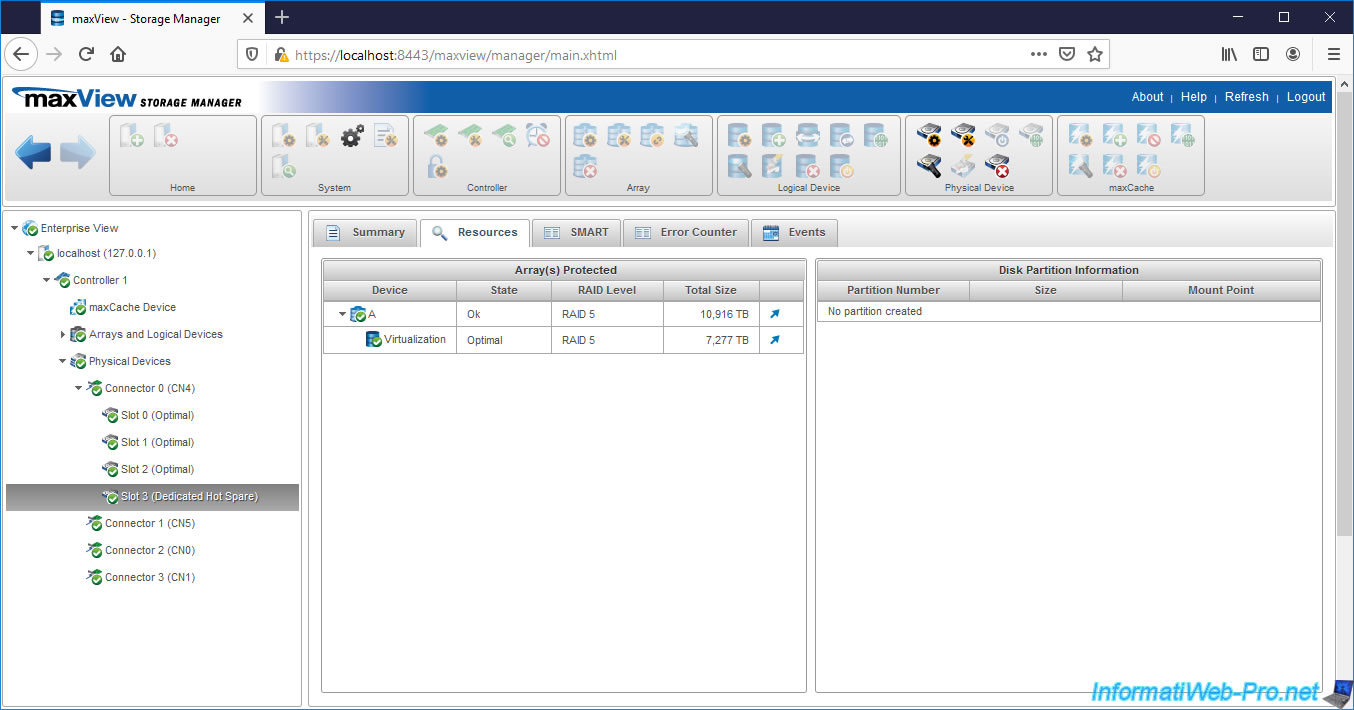
If you display the resources of your array, you will see that it contains a "Spare" type disk whose status is : Dedicated Spare.
If you select your logical drive, you will see that it's protected by a Spare (Protected by Hot Spare : True) located in location : Slot 3 (CN4).
You will also see again that it's a Spare of type : Dedicated Hot Spare.
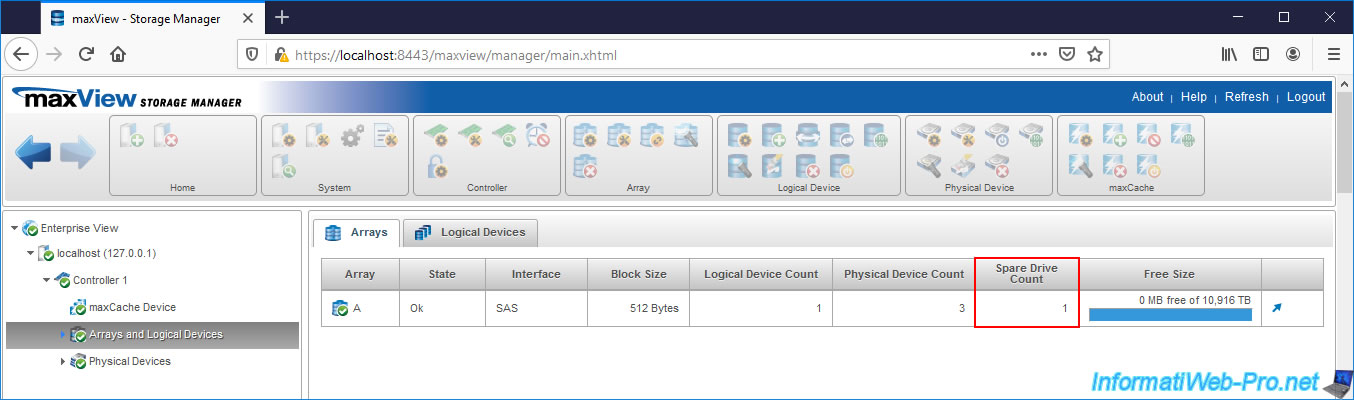
If you select "Arrays and Logical Devices" in the left column, you will see that the "Spare Drive Count" column is at 1.
Share this tutorial
To see also
-

RAID 4/20/2022
Adaptec maxView Storage Manager v3 - Create a RAID volume
-

RAID 4/8/2022
Adaptec maxView Storage Manager v3 - Download and boot on USB version
-

RAID 4/13/2022
Adaptec maxView Storage Manager v3 - Installation on Linux
-

RAID 4/15/2022
Adaptec maxView Storage Manager v3 - Manage an Adaptec SmartRAID controller on VMware ESXi 6.7
No comment