Presentation of the Adaptec Configuration Utility (ACU) of the Adaptec SmartRAID 3154-8i8e controller
- RAID
- 04 April 2025 at 06:53 UTC
-

- 4/4

To force a RAID logical drive online, press the "CTRL+F" keys (<CTRL+F> Force Online LD).
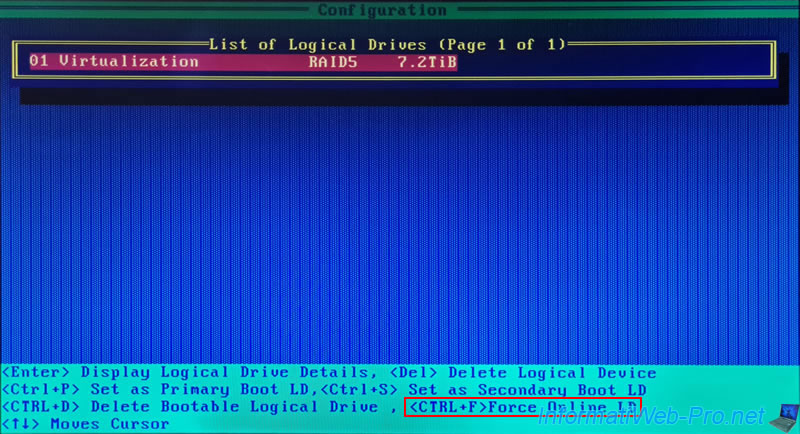
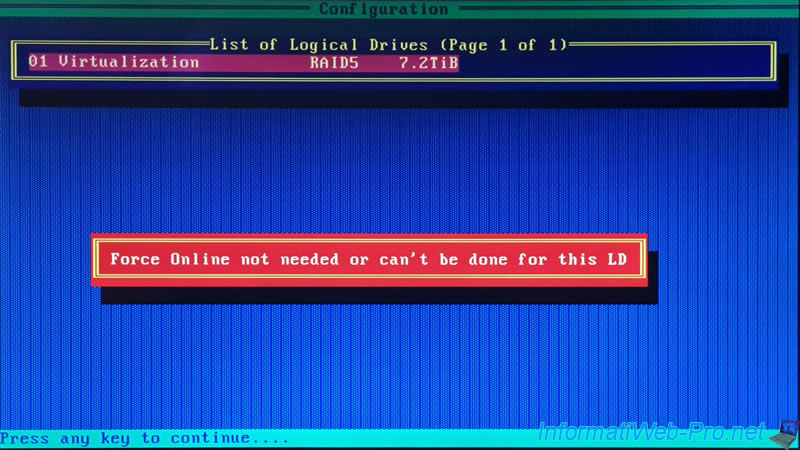
If this cannot be done on a RAID logical drive (because it is already online, for example), the error below will appear.
Plain Text
Force Online not needed or can't be done for this LD.
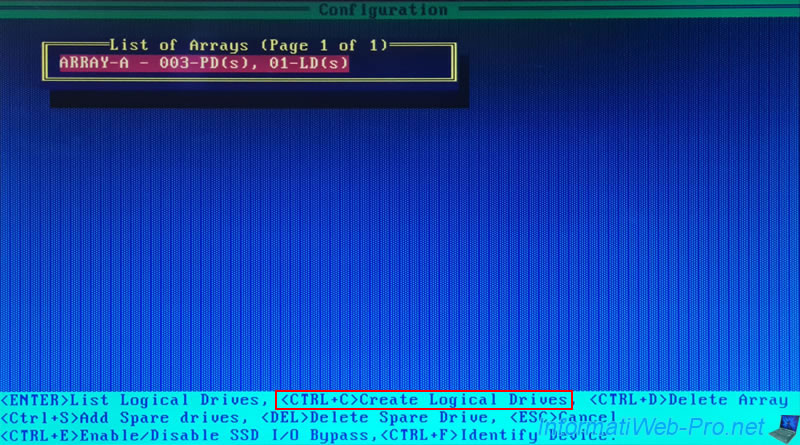
From the List of Arrays, you can create new RAID logical drives on an existing RAID array if there is unused space left on it.
To do this, select the desired RAID array (for example: ARRAY-A) and press the "CTRL+C" keys (<CTRL+C> Create Logical Drives).
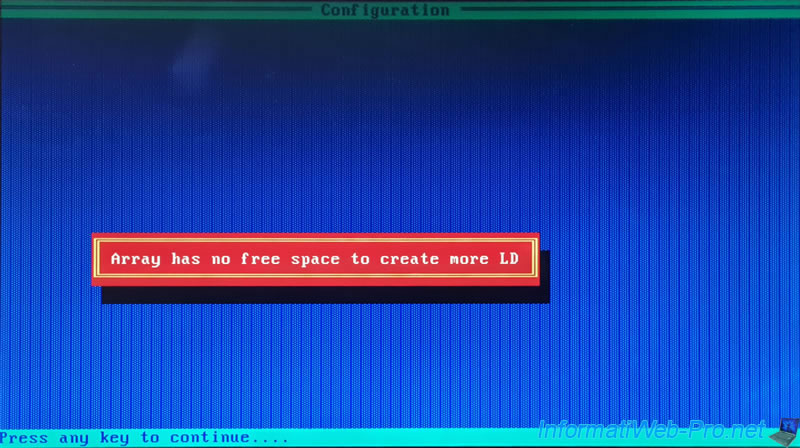
In our case, there is no more space available on our "ARRAY-A" RAID array, so the error below appears.
Plain Text
Array has no free space to create more LD.
However, if you want to know how to create several RAID logical disks on the same RAID array via this "ACU" configuration tool, refer to our tutorial : Adaptec SmartRAID 3154-8i8e - Create multiple logical drives in a RAID array.
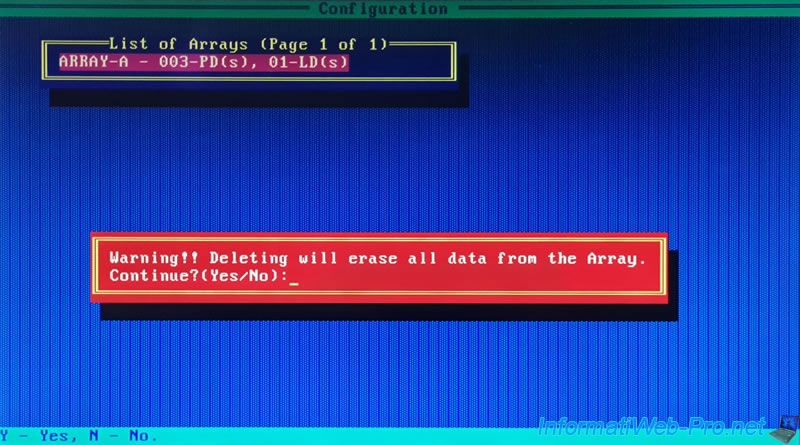
To delete a RAID array, select the desired RAID array and press the "CTRL+D" keys (<CTRL+D> Delete Array).
Then answer "Y" to the question that appears.
Plain Text
Warning!! Deleting will erase all data from the Array.
Continue?(Yes/No):
Warning : the desired RAID array, as well as all logical disks created on it and the data located on these RAID logical disks will be permanently deleted.
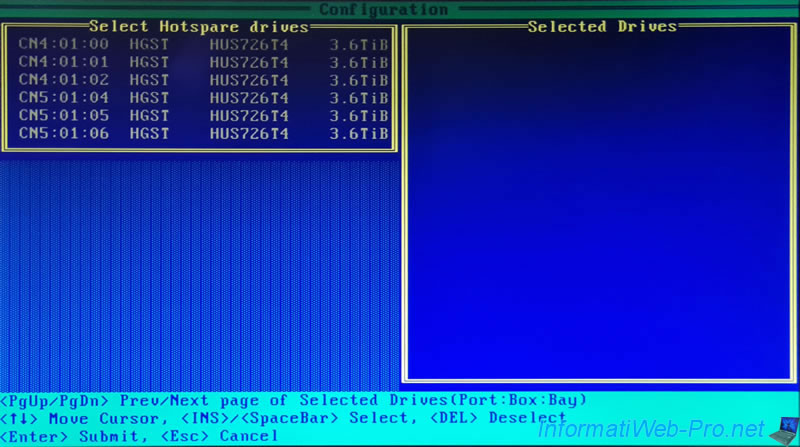
To add a Spare to an array to automatically rebuild a physical disk of the array that fails, press the "CTRL+S" keys (<Ctrl+S> Add Spare drives).
Currently all of our disks are in use, so we can no longer set any as Spare.
However, if you want to use a Spare with your Microsemi Adaptec SmartRAID controller, refer to one of our tutorials:
- Adaptec SmartRAID 3154-8i8e - Automatic reconstruction with an Auto-Replace Spare
- Adaptec SmartRAID 3154-8i8e - Automatic reconstruction with a dedicated Hot Spare (Dedicated Spare)
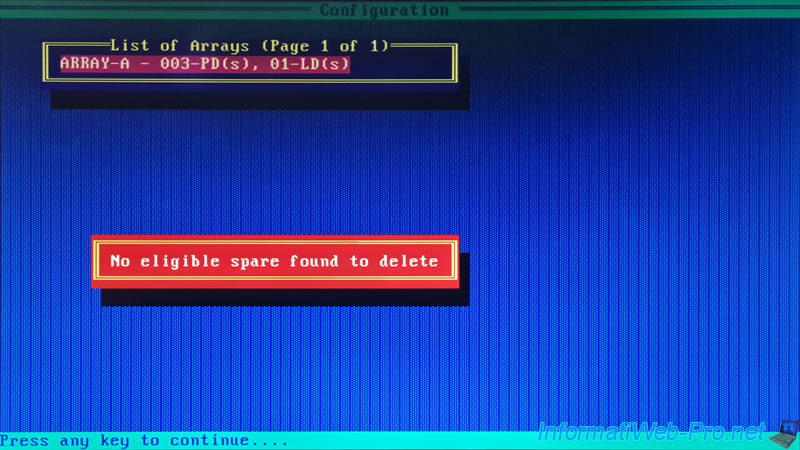
To delete the "Spare" state set on a physical disk, select the affected array and press the "Delete" key (<DEL> Delete Spare Drive).
Note: if no Spare is defined for this cluster, the error "No eligible spare found to delete" will appear.
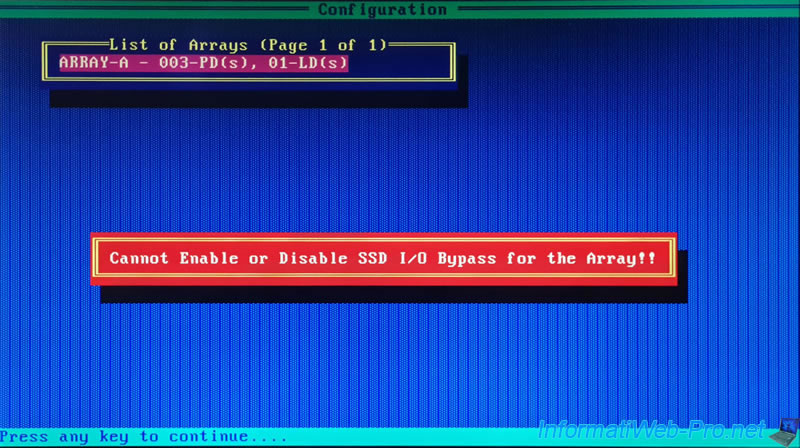
To enable or disable the "SSD I/O Bypass" feature on a RAID array, select the desired RAID array, then press the "CTRL+E" keys (<CTRL+E> Enable/Disable SSD I/O Bypass).
This "SSD I/O Bypass" feature allows direct access to the SSDs in the cluster (if applicable) by overriding the firmware of the Microsemi Adaptec SmartRAID controller.
Since this feature is only useful for SSDs and our RAID array is only composed of hard drives, the error "Cannot Enable or Disable SSD I/O Bypass for the Array!!" appears.
To find out more about using this "SSD I/O Bypass" feature with a RAID array composed only of SSDs, refer to our tutorial : Adaptec SmartRAID 3154-8i8e - Create a RAID array of SSDs.
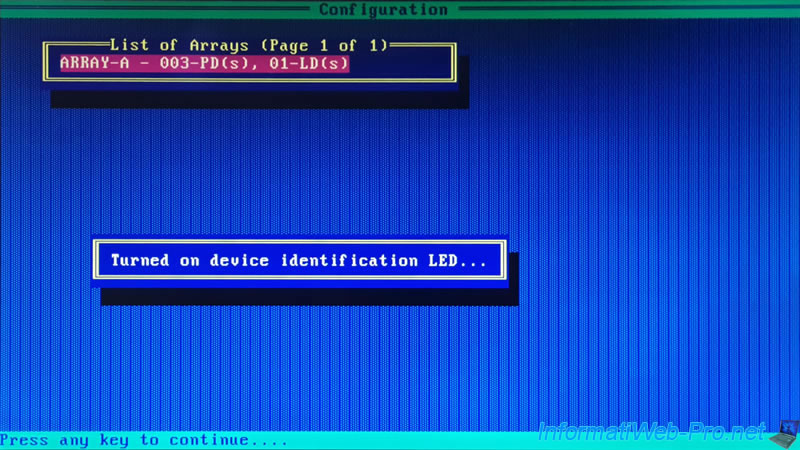
To identify the physical disks in a RAID array, press the "CTRL+F" keys (<CTRL+F> Identify Device).
The message "Turned on device identification LED" will appear.
However, this feature is only useful in physical servers.
Source : Adaptec SmartRAID 3100 and SmartHBA 2100 Installation and User Guide - Adaptec (page 76).
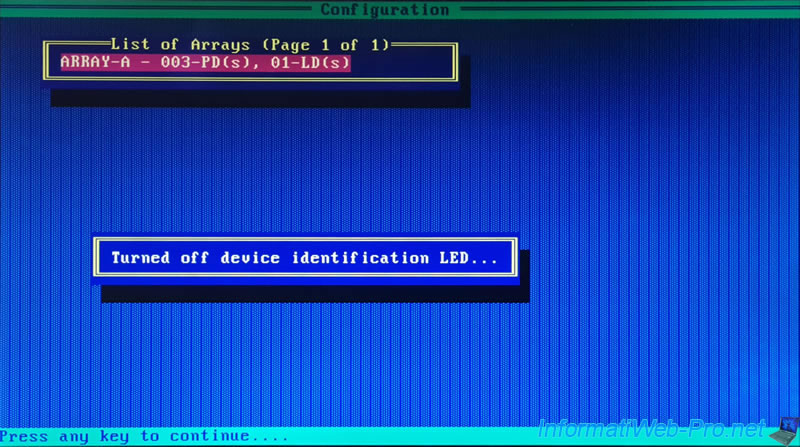
Then, the message "Turned off device identification LED" will be displayed.
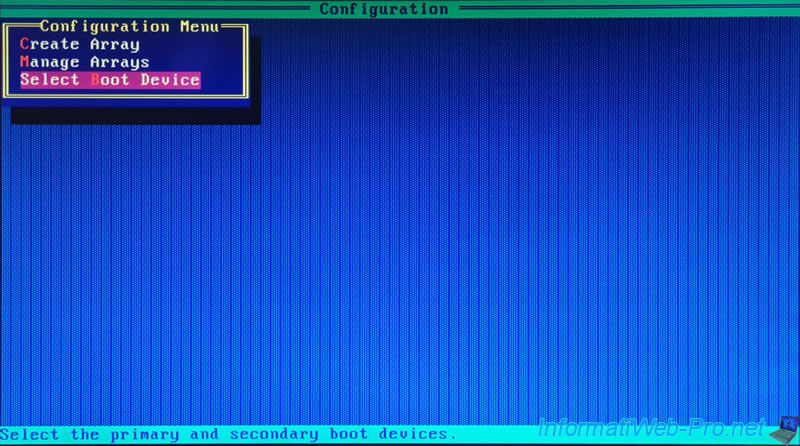
4.3. Select Boot Device
To select the primary boot device and secondary boot device, choose: Select Boot Device.
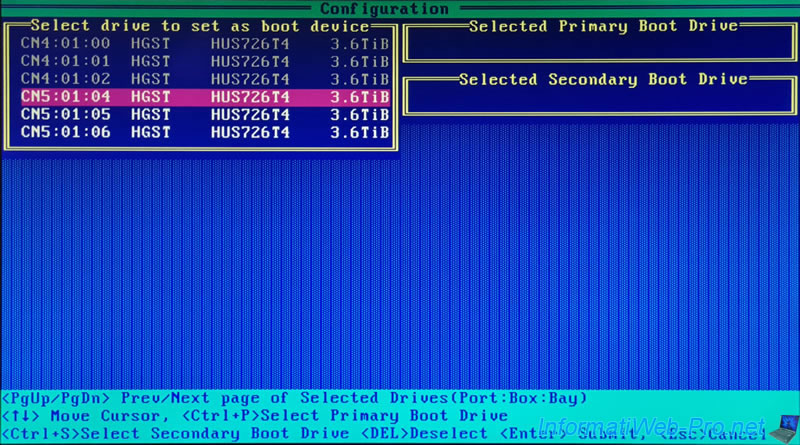
When you use HBA mode on a slot on your Microsemi Adaptec SmartRAID controller, you can set the physical disks in that slot as the boot disk on your Microsemi Adaptec SmartRAID controller.
As you will have understood, our 3 "HGST HUS726T4" hard drives connected to the CN5 connector of our Microsemi Adaptec SmartRAID controller are accessible via HBA mode.
These are therefore displayed in white.
Those shown in gray are those that are part of a RAID array.
To set a physical disk as the Selected Primary Boot Drive, select it and then press "Ctrl+P" (<Ctrl+P> Select Primary Boot Drive).
To set it as a Selected Secondary Boot Drive, press "Ctrl+S" (<Ctrl+P> Select Secondary Boot Drive).
5. Disk Utilities (physical disk tools)
In the "Disk Utilities" section, you can obtain information about the physical disks connected to your Microsemi Adaptec SmartRAID controller.
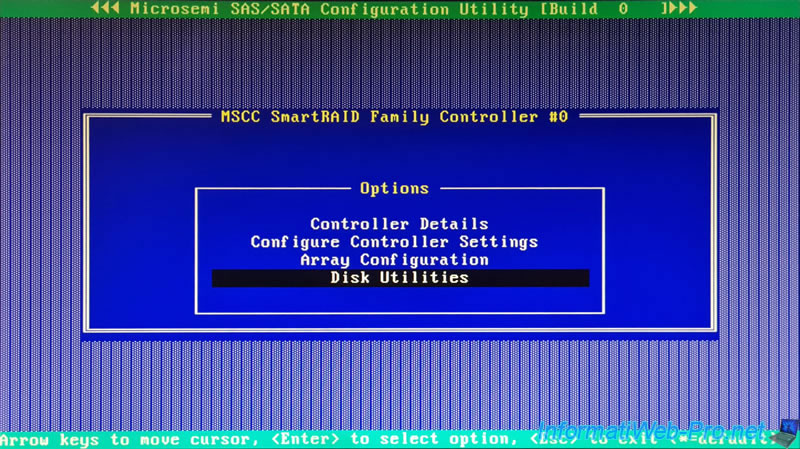
In the list that appears, you will find:
- your controller: --: 00: --- MSCC Smart Adapter 1.60 ----
The only interesting information is the revision number of your RAID controller. - your physical disks with:
- Port#: the number of the physical connector on your controller where this physical disk is connected.
Examples CN4, CN5, ... - Box#: the position of the box or backplane. (Only applies to servers.)
- Bay#: the location number of the physical disk.
- Model: the make and model of the physical disk.
In our case: HGST HUS726T4TAL52 (which corresponds to our WD Ultrastar DC HC310 (4 TB) hard drives). - Rev#: the revision number of the physical disk.
- Speed: the speed of the physical disk.
Typically: 12.0G for SAS hard drives, 6.0G for SATA 3 drives, and 3.0G for SATA 2 drives. - Size: the capacity of the physical disk.
- Port#: the number of the physical connector on your controller where this physical disk is connected.
To get more information about a physical disk, select it and press Enter.
Sources :
- Huawei Server RAID Controller Card User Guide (Arm) 04 - Disk Utilities - Huawei
- Data Sheet: Ultrastar DC HC310 - Western Digital

Note that if you select your RAID controller, the "Not a Disk Drive" error will appear.

To get more information about one of your physical disks, select the physical disk you want and press Enter.
Next, select "Device Information" and press Enter again.

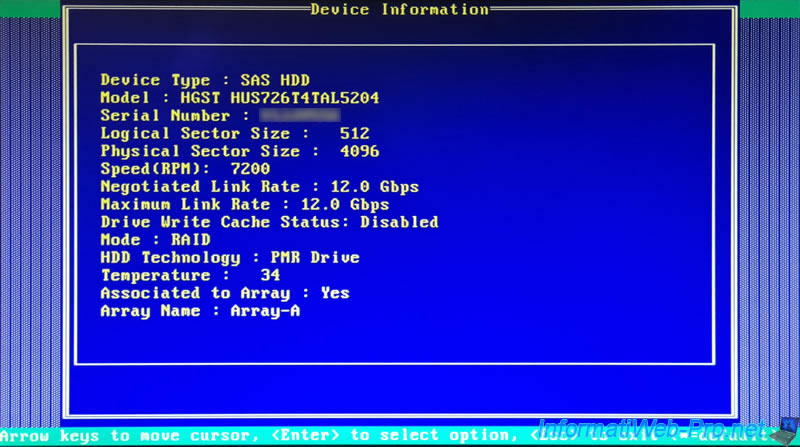
In the "Device Information" window that appears, you will find:
- Device Type: the type of physical disk this is.
In our case "SAS HDD" since we use SAS hard drives. - Model: brand and model of this physical disk.
In our case: HGST HUS726T4TAL5204. - Serial Number: the serial number of this physical disk.
Useful if you need to contact the manufacturer of a physical disk connected to your RAID controller. - Logical Sector Size: logical sector size.
- Physical Sector Size: physical size of sectors.
- Speed (RPM): the rotation speed of the disks on your hard drive.
In our case: 7200.
Common values are: 5400 RPM and 7200 RPM. - Negotiate Link Rate: the transfer speed negotiated between your controller and your physical disk.
In our case: 12.0 Gpbs. Since this speed is supported by our SAS hard drive and our Microsemi Adaptec SmartRAID controller. - Maximum Link Rate: maximum transfer speed for this physical disk.
SAS hard drives have a transfer rate of 12 Gbps, SATA 3 drives have a transfer rate of 6 Gbps, and SATA 2 drives have a transfer rate of 3 Gbps. - Drive Write Cache Status: write cache status of the physical disk.
In our case, this is disabled. - Mode: indicates the mode used for this physical disk.
Note that the value displayed depends on the mode selected for the physical connector (eg: CN4, CN5, ...) of your Microsemi Adaptec SmartRAID controller.
The mode used for a connector can be changed in the "Configure Controller Settings -> Configure Controller Port Mode" menu.
The value will therefore be "RAID" or "HBA". - HDD Technology: allows you to know if it is a PMR (or CMR) or SMR disk. In our case: PMR Drive.
Preferably, use PMR (or CMR) disks in the case of a RAID array.
Important: do not mix SMR disks with PMR (or CMR) disks in the same RAID array. - Temperature: current temperature of this physical disk.
- Associated to Array: indicates whether this physical disk is part of a RAID array (Yes) or not (No).
- Array Name: the name of the RAID array of which this physical disk is a part (if applicable).
For example: Array-A.
Sources :
- Huawei Server RAID Controller Card User Guide (Arm) 04 - Creating RAID 50 - Huawei
- SMR, CMR, PMR: which hard drive to choose? - PC Astuces (via Google Translate)
- How to expand a RAID array on Smart Adapters using CLI? - Adaptec Support Knowledgebase
To locate a physical disk in a server, select a physical disk and press Enter.
Next, select "Identify Device" and press Enter again.

The message below will appear.
Plain Text
Turned on device identification LED.
Pressing any key will turn off the identification LED.

6. Quit ACU (Adaptec RAID Configuration Utility)
To exit this "ACU" configuration tool, press "Esc" several times to return to the main menu, then press "Esc" (<Esc> to exit) again to exit ACU.
Answer "Yes" to the "Exit Utility" question.

The "Rebooting the system, Please Wait" message will appear.

Share this tutorial
To see also
-

RAID 4/20/2022
Adaptec maxView Storage Manager v3 - Create a RAID volume
-

RAID 4/8/2022
Adaptec maxView Storage Manager v3 - Download and boot on USB version
-

RAID 4/13/2022
Adaptec maxView Storage Manager v3 - Installation on Linux
-

RAID 4/15/2022
Adaptec maxView Storage Manager v3 - Manage an Adaptec SmartRAID controller on VMware ESXi 6.7
No comment