- RAID
- 18 February 2022 at 13:14 UTC
-

- 1/2

In a previous tutorial, we showed you how to create a array with SAS hard drives.
But here, we are going to do it with 3 SSDs. This changes a few things and in particular the acceleration method that can be used with this array of SSDs.
- Create a SSD array (via ACU)
- Create a SSD array (via maxView)
- Information about your array in ACU
- Information about your array in maxView
- Start parity initialization on your logical drive
1. Create a SSD array (via ACU)
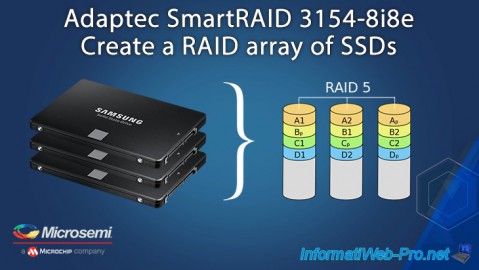
For this tutorial, we used 3 "Samsung SSD 870 EVO" SSDs of 250 GB which are therefore connected via SATA.

When your computer starts up, press the "CTRL + A" keys (on a QWERTY keyboard, since it's in English) or "CTRL + Q" (on an AZERTY keyboard).
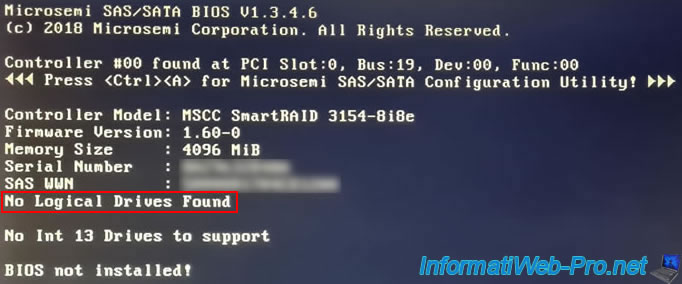
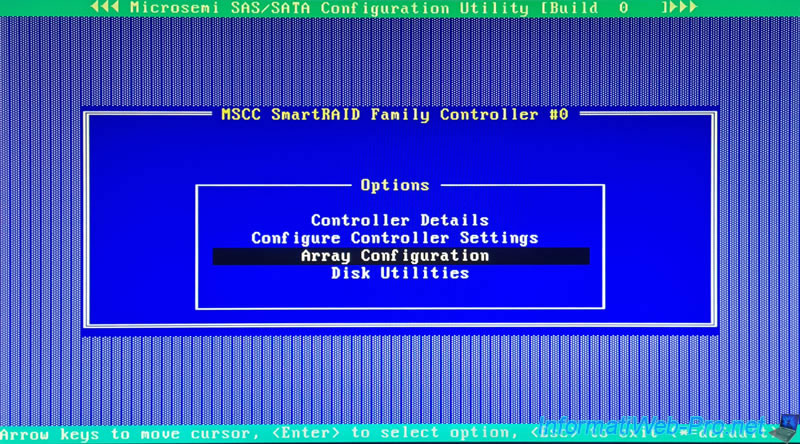
Once you have entered the Configuration Tool (ACU) of your Microsemi Adaptec SmartRAID controller, go to : Array Configuration.
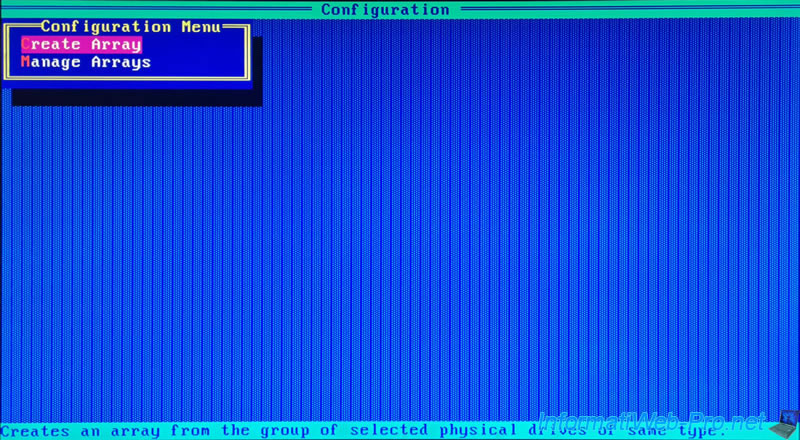
Select : Create Array.
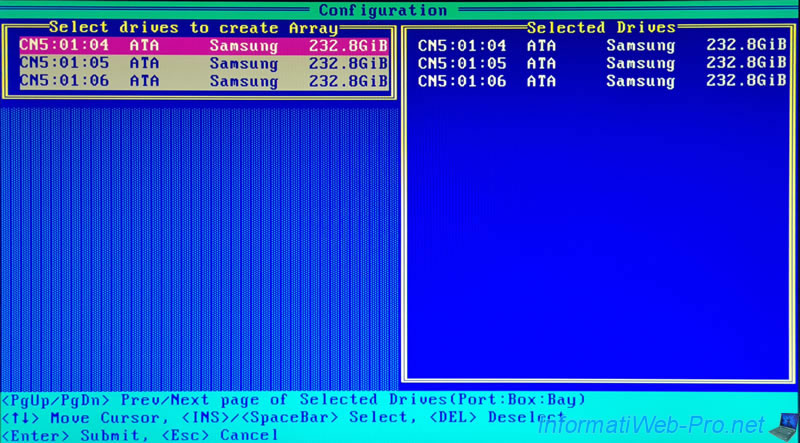
Select the SSDs to be used for this array using the arrows of the keyboard, then add them to the list of selected drives by pressing the space bar on your keyboard each time.
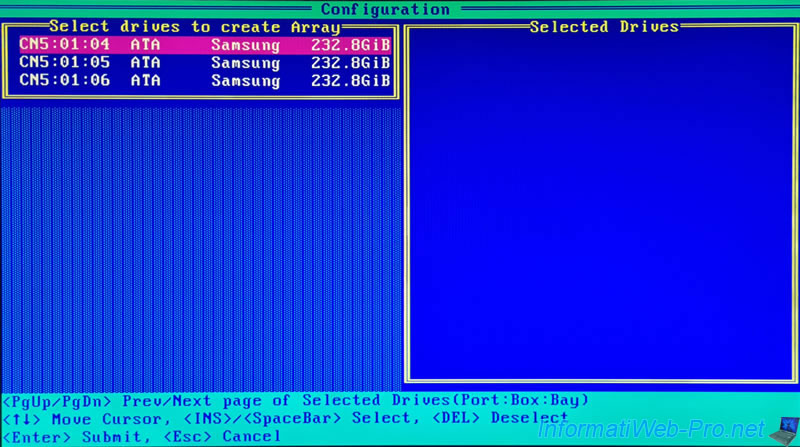
Once the desired physical disks have been selected, validate your choice by pressing Enter.
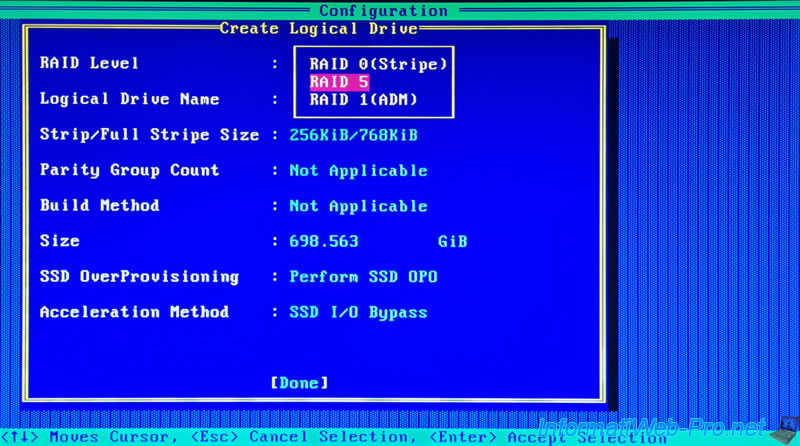
Choose the desired RAID level. In our case, we have selected "RAID 5" which combines performance and data security.
Note that this option is limited depending on the number of physical disks selected in the previous step.
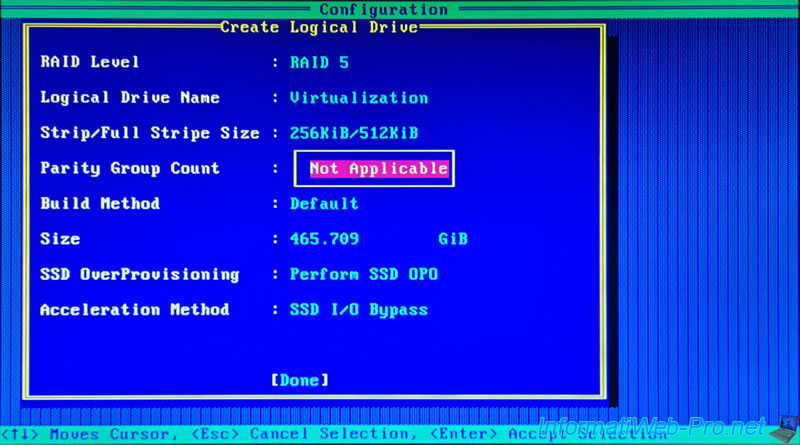
Provide a name for your logical drive. In our case : Virtualization.
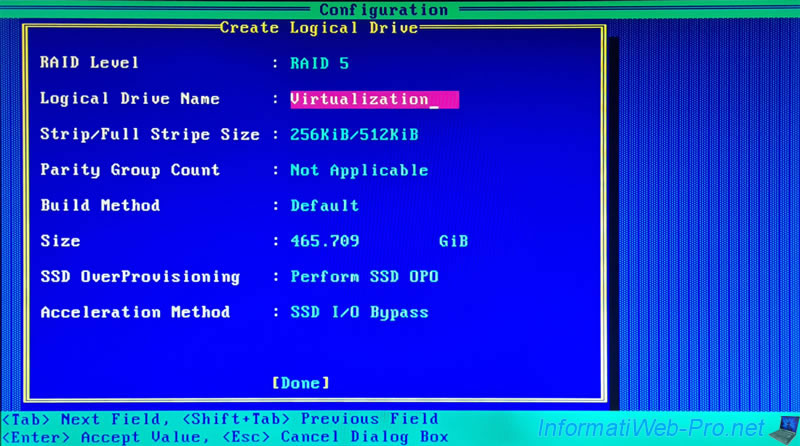
For the size of the strips (Strip / Full Stripe Size), it's preferable to leave the default size since it depends on the number of physical disks selected previously and the chosen RAID level.
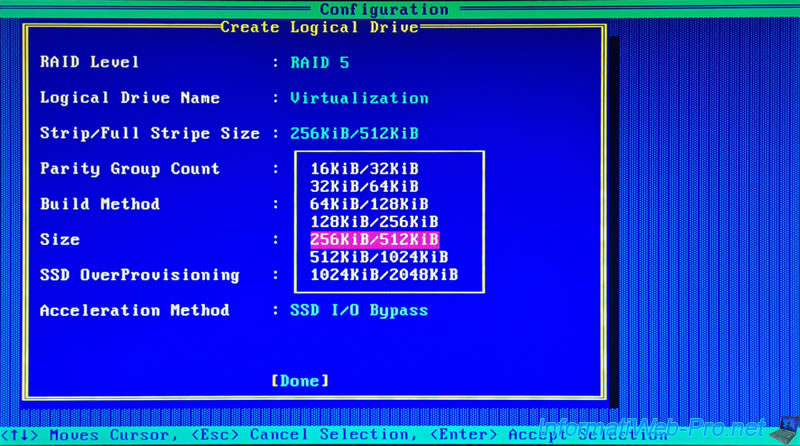
The "Parity Group Count" option only concerns RAID levels 50 and 60.
In the case of a RAID 50 (for example), if you select "Parity Group Count : 2", your Microsemi Adaptec SmartRAID controller will create a RAID 50 array based on an array of 2 RAID 5 arrays.
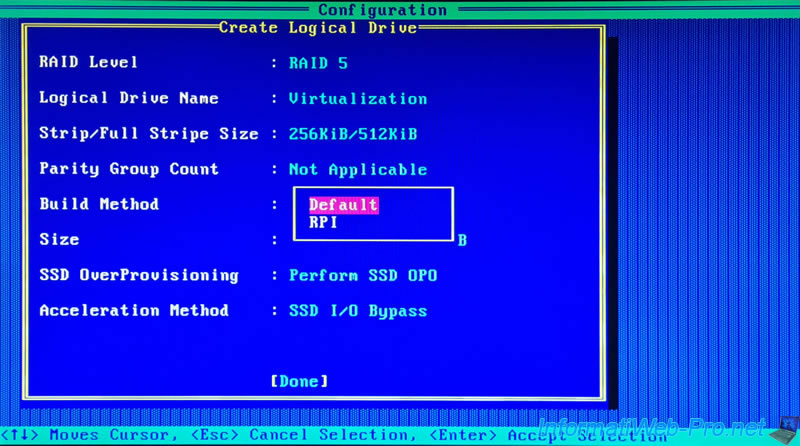
For the building method of this logical drive, you will have the choice between :
- Default : the initialization of the parity of this logical drive will be carried out in the background and it will therefore be immediately available.
However, its performance will be reduced as long as the initialization of this parity is not completed. - RPI : the parity will be initialized quickly in an "offline" way and this logical disk will only be available when it has been completely initialized
For the size specified by default, this is the maximum storage size that will be available on this array.
If you leave the default size, this RAID logical drive will take all the space available on your RAID array.
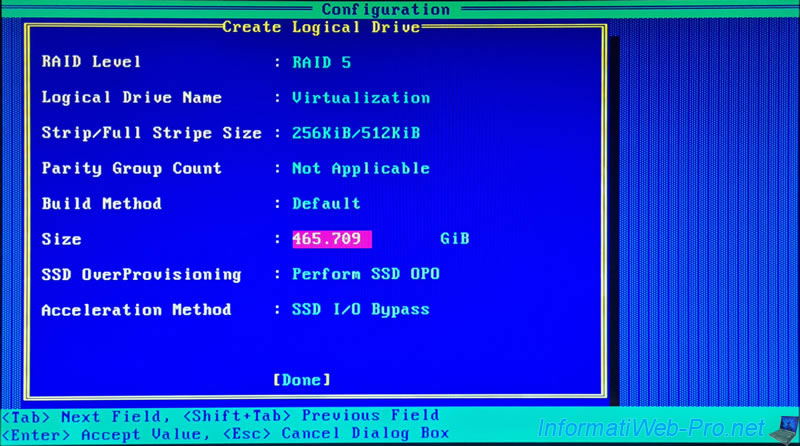
If you want, you can use another unit for the size of the logical drive.
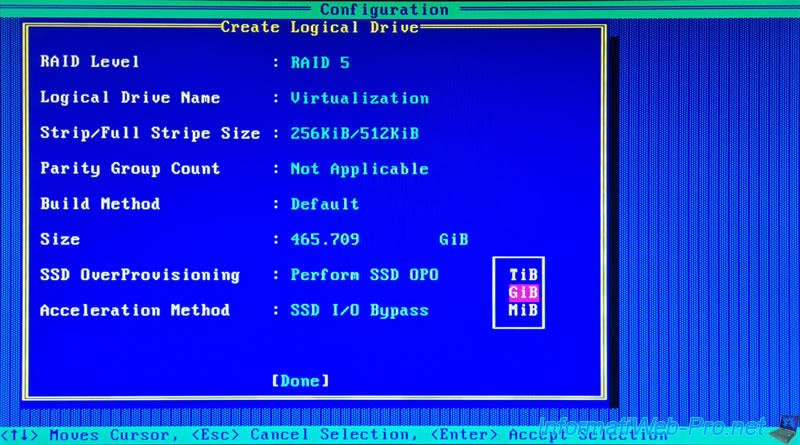
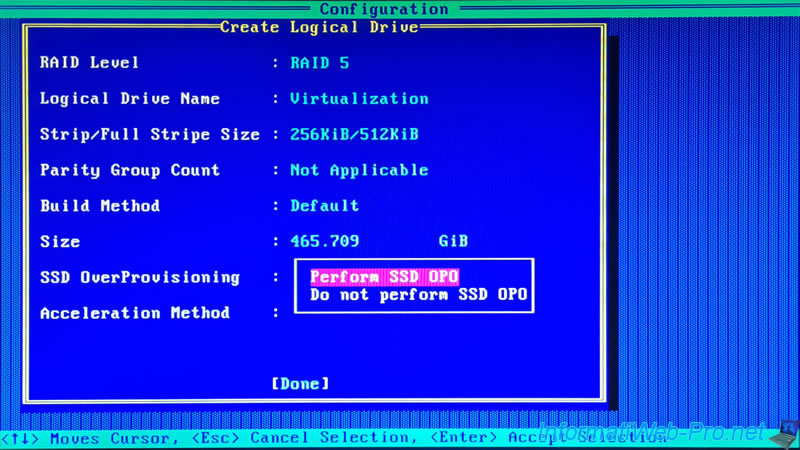
Since this is a array of SSDs and not a array of hard disks, the Configuration Tool (ACU) will display a "SSD OverProvisioning" option.
If you select "Perform SSD OPO" (Perform SSD OverProvisioning Optimization), all used blocks will be reallocated to optimize your SSDs before data is written to the SSD. This will speed up the initialization process.
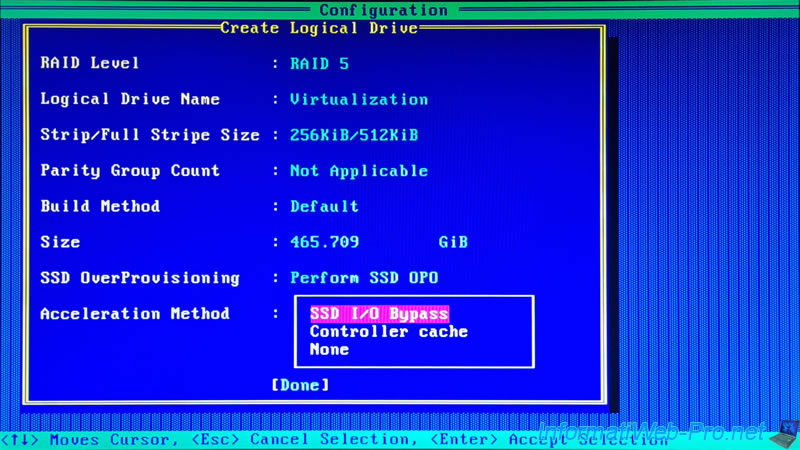
For the Acceleration Method, since this is a array of SSDs, you will have an additional option called "SSD I/O Bypass".
You can therefore choose between :
- SSD I/O Bypass : allows the inputs/outputs (I/O) to bypass the firmware of the controller and thus directly access the SSDs.
This option therefore accelerates the read speed for all RAID levels and the write speed for RAID 0. - Controller cache : allows to use the read and write cache of the controller (as you could also do with a hard disk array)
- None : no acceleration method will be used
Source : Microsemi Smart Storage Controllers - User's Guide - maxView Storage Manager (page 65).
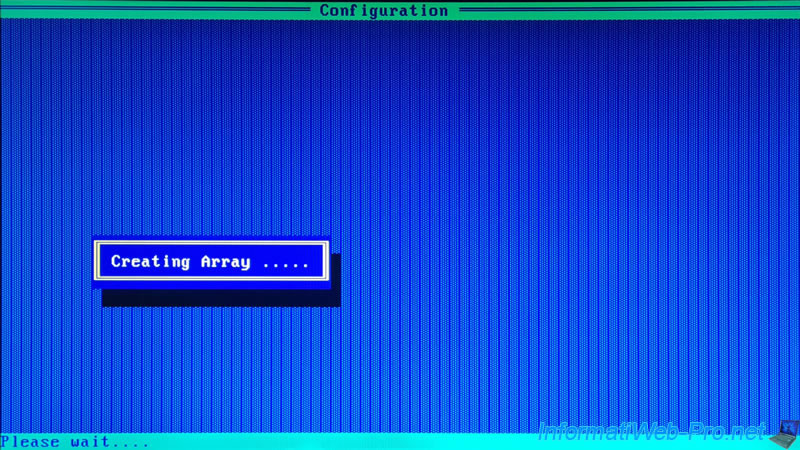
Validate the configuration of your logical drive by pressing Enter.
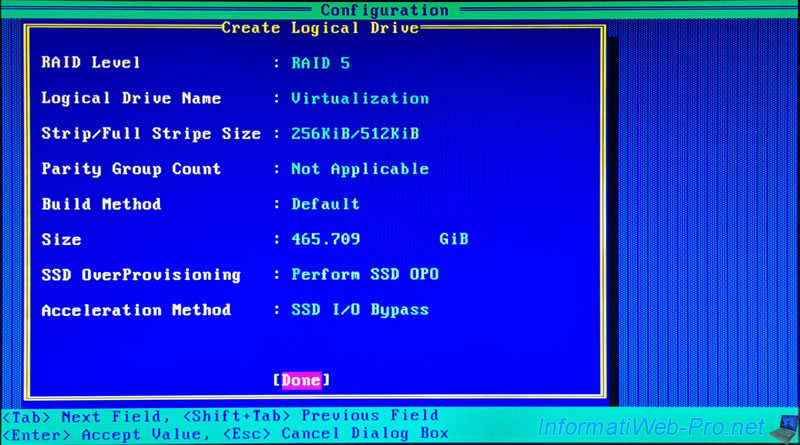
The "Creating Array" message appears for a few seconds.
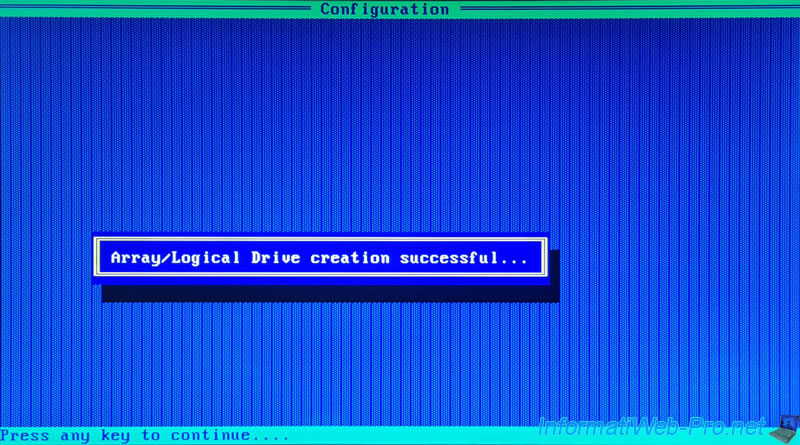
Then, the "Array/Logical Drive creation successful ..." message will appear.
Press any key.
2. Create a SSD array (via maxView)
If you can't restart your computer to access your Microsemi Adaptec SmartRAID controller configuration tool, here's how to create your SSD array and logical drive from the maxView web interface.
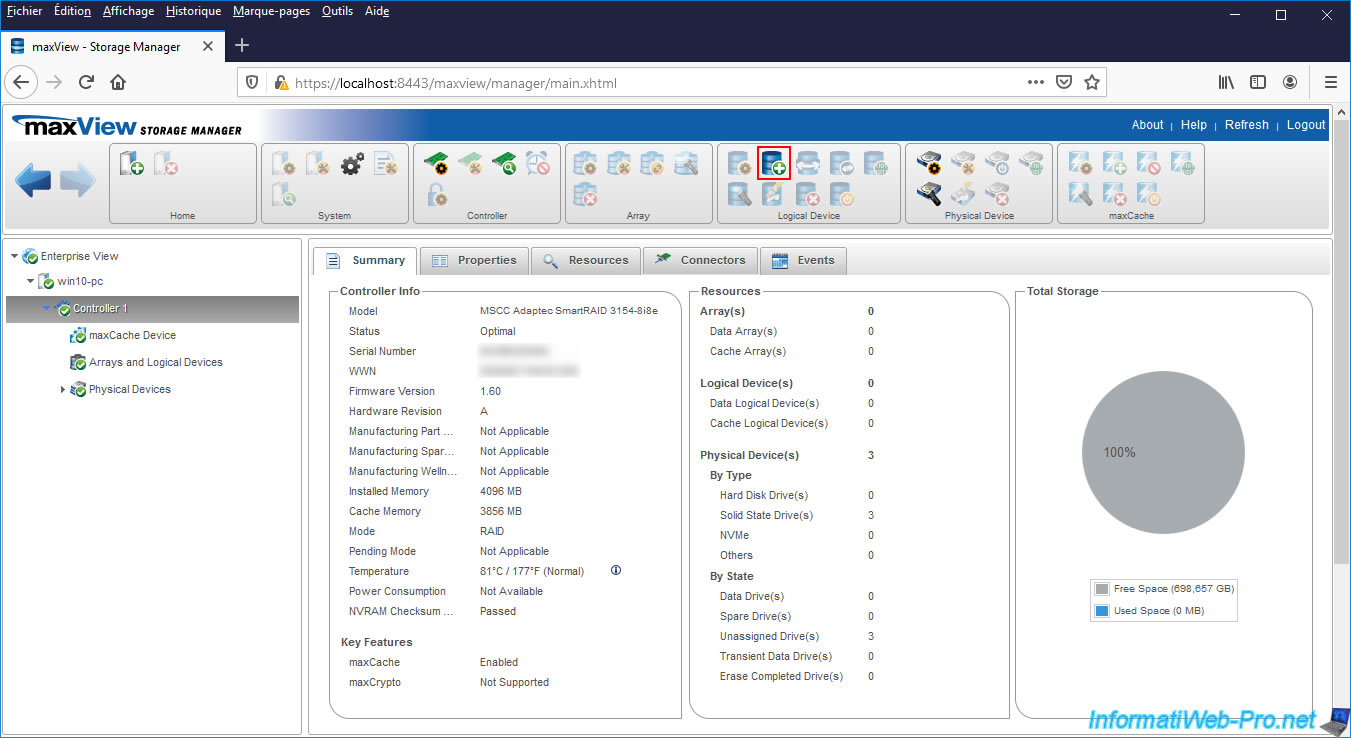
To start, select your controller on the left, then click on the "+" icon located in the "Logical Device" block.
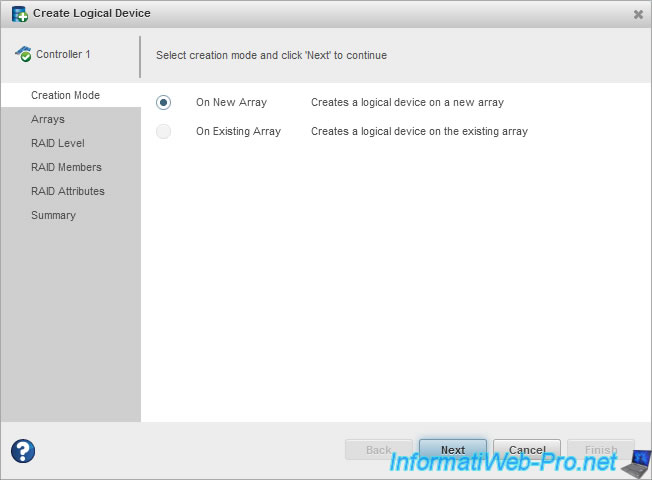
In the "Create Logical Device" window that appears, select "On New Array" and click Next.
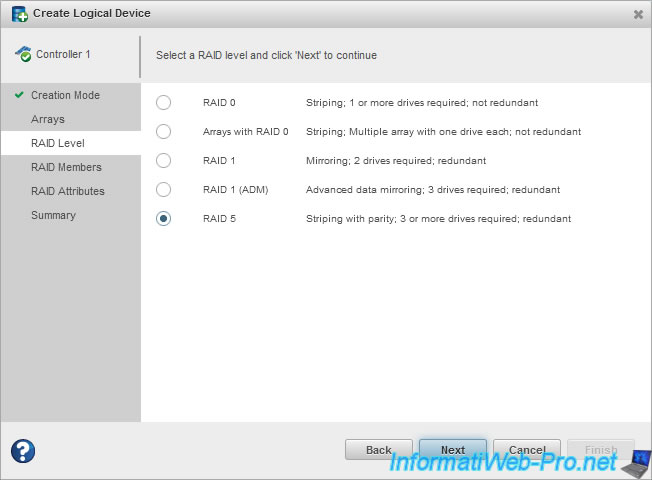
Choose the desired RAID level.
In our case, we chose to create a RAID 5 to combine performance and data security (thanks to the fault tolerance of 1 SSD).
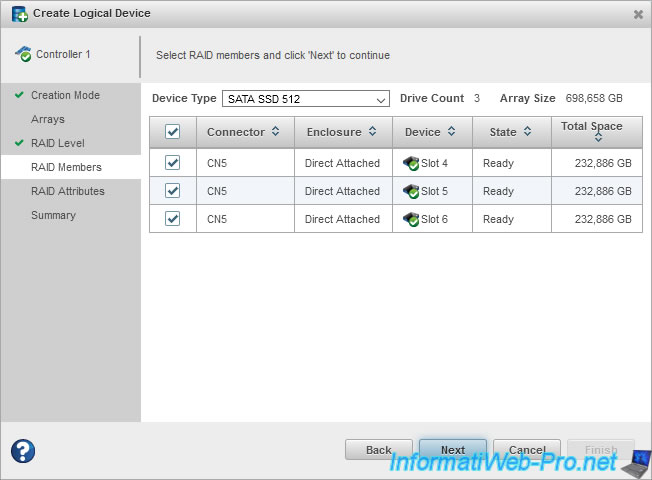
Select the SSDs you want to use for this array.
In our case, we will use 3 identical SATA SSDs.
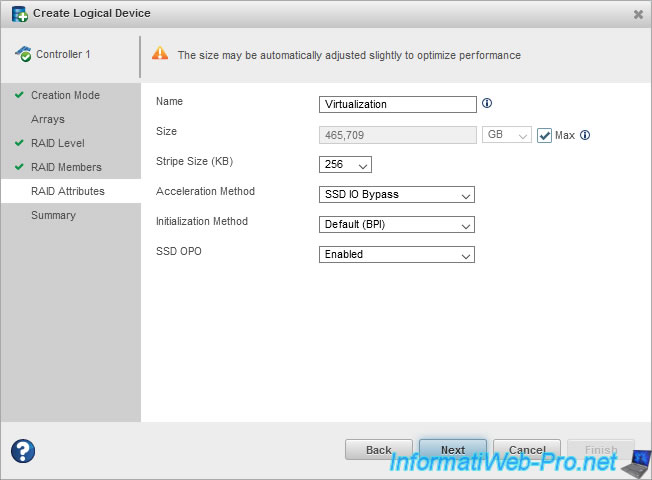
In the "RAID Attributes" step, you can choose :
- Name : the name of the logical drive
- Size : the size of the logical drive, as well as the capacity unit (GB, MB, ...). By default, the "Max" box is checked so that the logical drive takes up all the space available on your RAID array.
- Strip Size (KB) : strip size that will be used for this logical drive. It's recommended to leave the default value, since the value selected by default varies depending on the chosen RAID level.
- Acceleration Method : the acceleration method that will be used for this logical drive.
By default, the "SSD IO Bypass" option will be selected, which allows the inputs/outputs (I/O) to directly access the SSDs of the array by bypass the firmware of your controller.
This improves reading speed (regardless of the chosen RAID level) and writing speed (if you have chosen RAID 0).
Alternatively, you can also choose to use just the controller's read/write cache or none of these options. - Initialization Method : allows you to choose the method of initializing your logical drive.
- Default (BPI) : parity initialization will be performed in the background and the logical drive will be available immediately. However, its performance will be reduced until it's completed.
Note that the lower the RAID level, the faster the parity initialization will be. For example, initializing parity for a RAID 5 will therefore take less time than for a RAID 50.
- Build (RPI) : allows you to initialize the parity in the background and make it invisible until the initialization of the parity is complete. - SSD OPO : stands for "SSD OverProvisioning Optimization" and allows you to reallocate all the blocks used to optimize the SSDs in your array before data is stored there.
It will also speed up the initialization process.
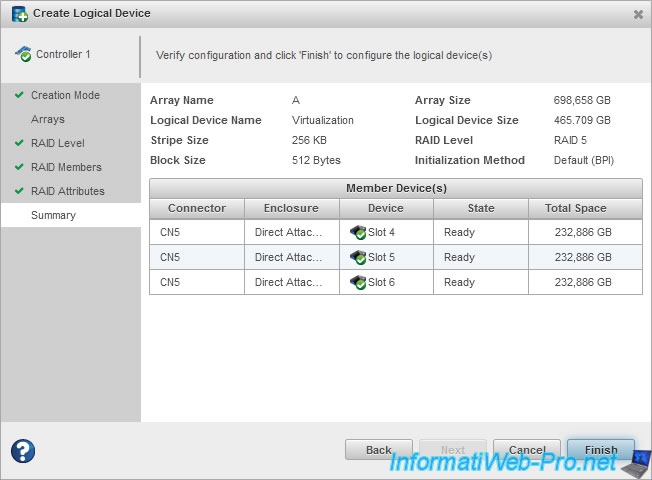
A summary is displayed with :
- Array Name : the name of the array.
- Logical Device Name : the name of the logical drive.
- Stripe Size : the stripe size that will be used for this RAID array.
- Block Size : the block size that will be used for this RAID array.
- Array Size : the size of your array (also including the space used for parity data).
- Logical Device Size : logical drive size (counting only the space available for data storage).
It's therefore normal that this size is always less than the size of the cluster, even if you had checked the "Max" box for the size of the logical drive. - RAID Level : previously chosen RAID level.
- Initialization Method : previously chosen initialization method.
- Member Device(s) : list of physical disks (in this case : SSDs) that will be members of this array
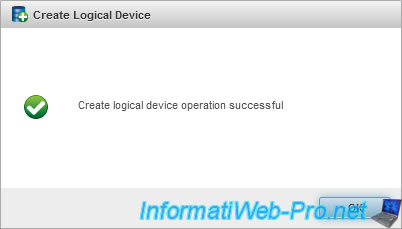
Click on Finish.
The "Create logical device operation successful" message appears.
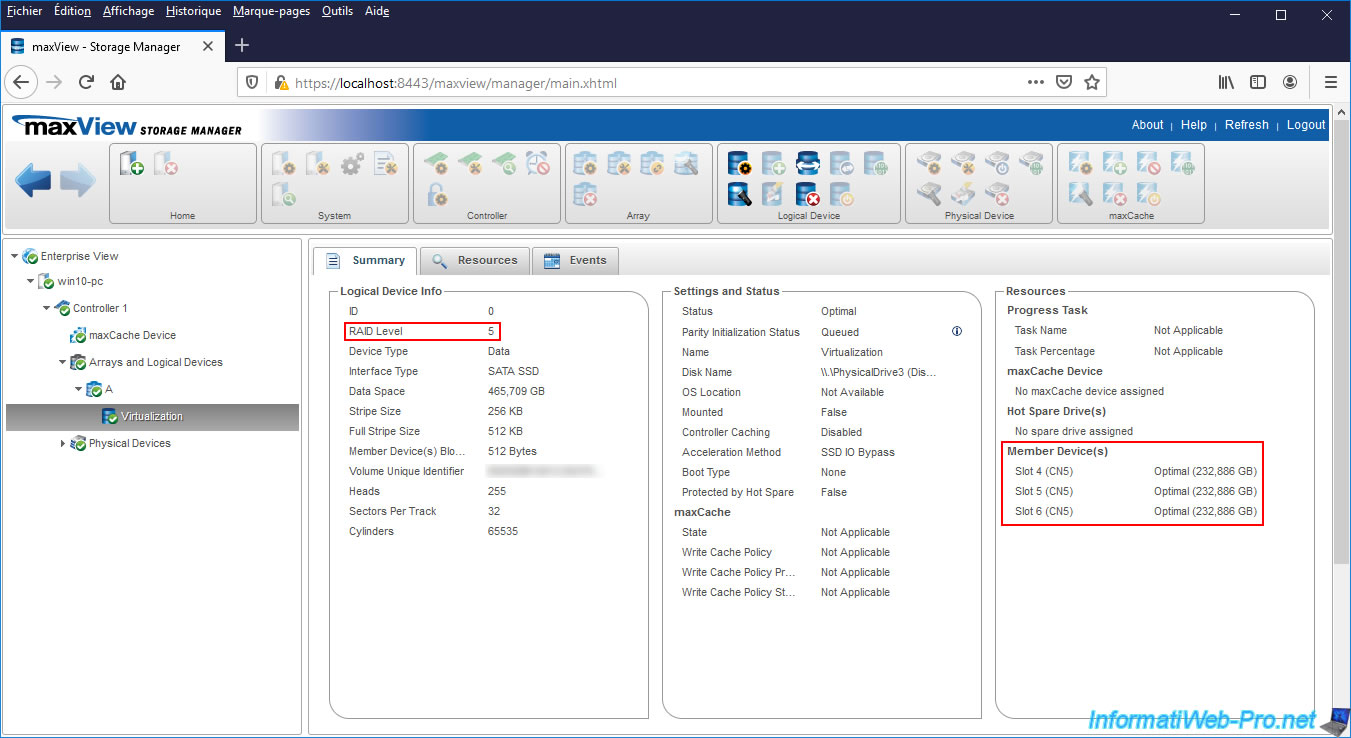
As you can see, maxView tells us that we have a array (Data Array) and a logical drive (Data Logical Device) to store data in.
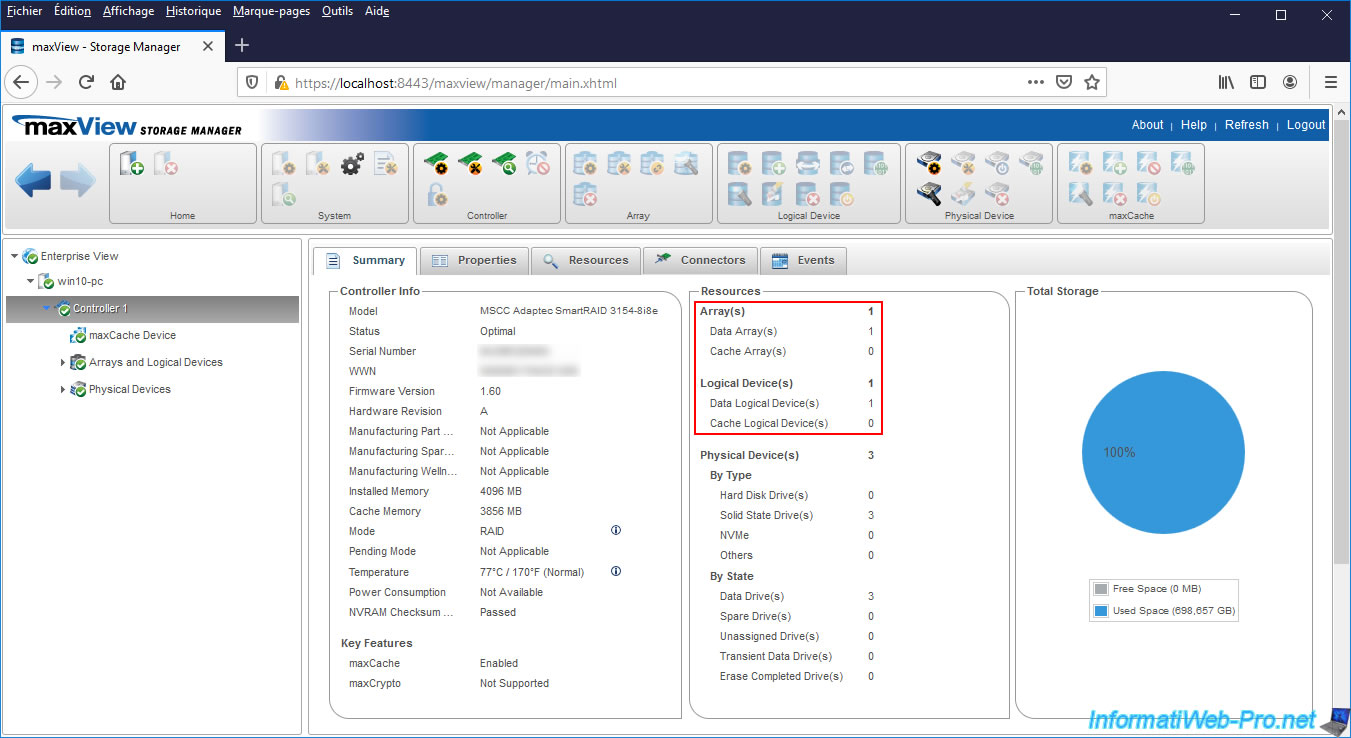
As expected, the RAID level is "5" and there are indeed 3 physical member disks for it.
Share this tutorial
To see also
-

RAID 4/20/2022
Adaptec maxView Storage Manager v3 - Create a RAID volume
-

RAID 4/8/2022
Adaptec maxView Storage Manager v3 - Download and boot on USB version
-

RAID 4/13/2022
Adaptec maxView Storage Manager v3 - Installation on Linux
-

RAID 4/15/2022
Adaptec maxView Storage Manager v3 - Manage an Adaptec SmartRAID controller on VMware ESXi 6.7
You must be logged in to post a comment