- VMware
- VMware vCenter Server (VCSA), VMware vSphere
- 26 December 2025 at 10:34 UTC
-

- 1/4


On VMware vSphere, you can virtualize the "Unraid" NAS solution using only a physical USB key (to which the Unraid license or trial version will be attached).
Before you begin, you'll need to follow steps 1 and 2 of our "Virtualize Unraid 6.9.2 with VMware Workstation 17.5.1" tutorial to create your Unraid USB key, as well as download the "PlopKexec" tool, which you'll need to boot your VMware virtual machine from your Unraid USB key.
Warning : while you can technically virtualize Unraid on VMware vSphere, this is not officially supported by Lime Technology (the company that created Unraid).
- Add the PloplKexec ISO to a VMware vSphere datastore
- Create and configure the Unraid virtual machine on VMware vSphere
- Connect your Unraid USB key to your Unraid virtual machine
- Known issue: USB port version different between host and VM
- Change the USB controller version of your Unraid virtual machine
- Start the Unraid evaluation period
- Configure Unraid array
- Install "Community Applications" plugin
- Install VMware Tools on Unraid
- Enable automatic array startup
- Test VMware Tools
1. Add the PloplKexec ISO to a VMware vSphere datastore
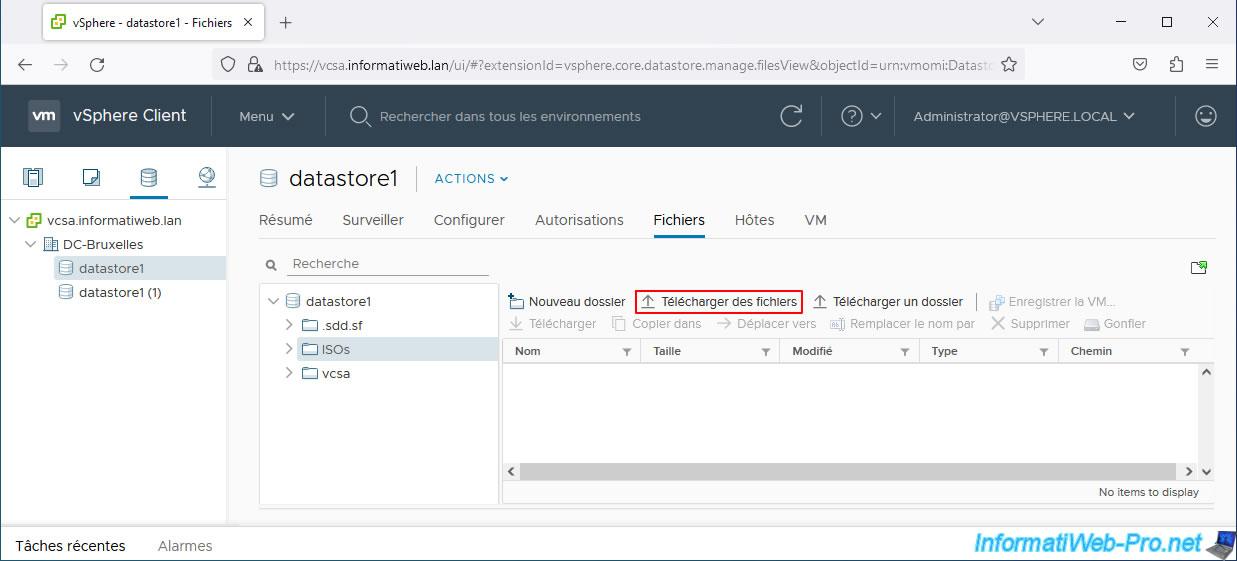
To begin, store the PlopKexec ISO file in the datastore corresponding to the VMware ESXi host you wish to use for your Unraid virtual machine.
The Unraid USB key must be plugged into the desired VMware ESXi host.
Important : since you must use a physical USB key for Unraid, your virtual machine cannot be migrated to another host via vMotion (either manually via vMotion or automatically via DRS).
To do this, navigate to the desired datastore, select the desired folder, and then click Upload files.
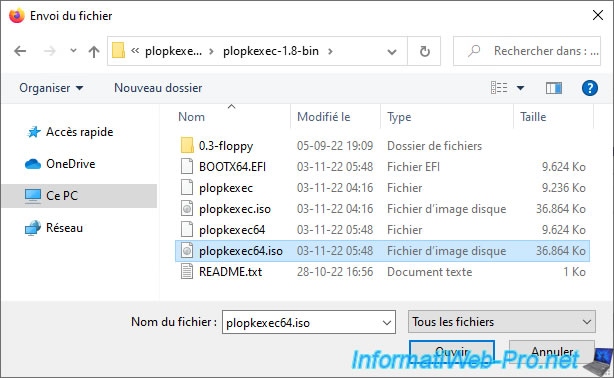
Select the "plopkexec64.iso" file and click Open.
The ISO file appears in your datastore.

2. Create and configure the Unraid virtual machine on VMware vSphere
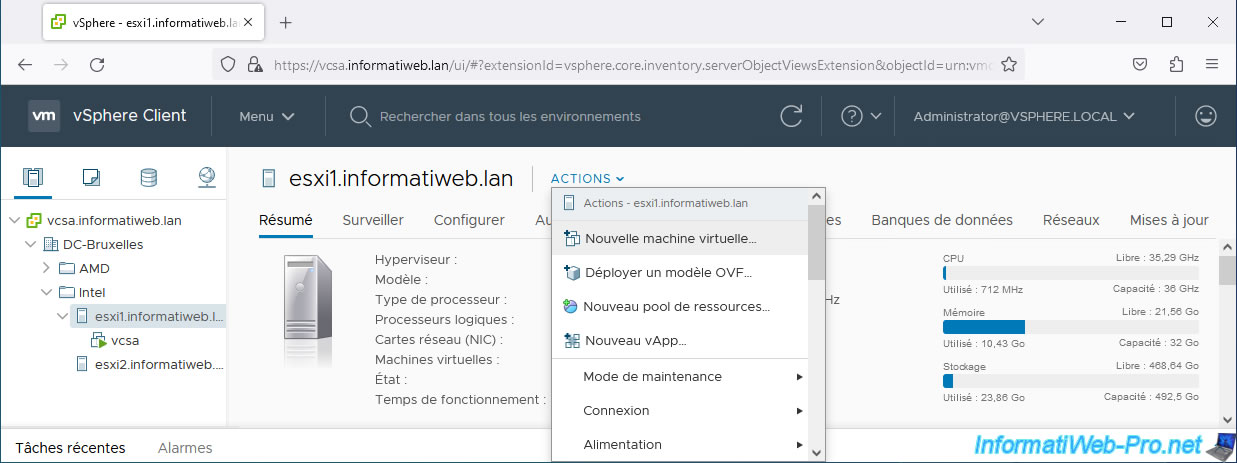
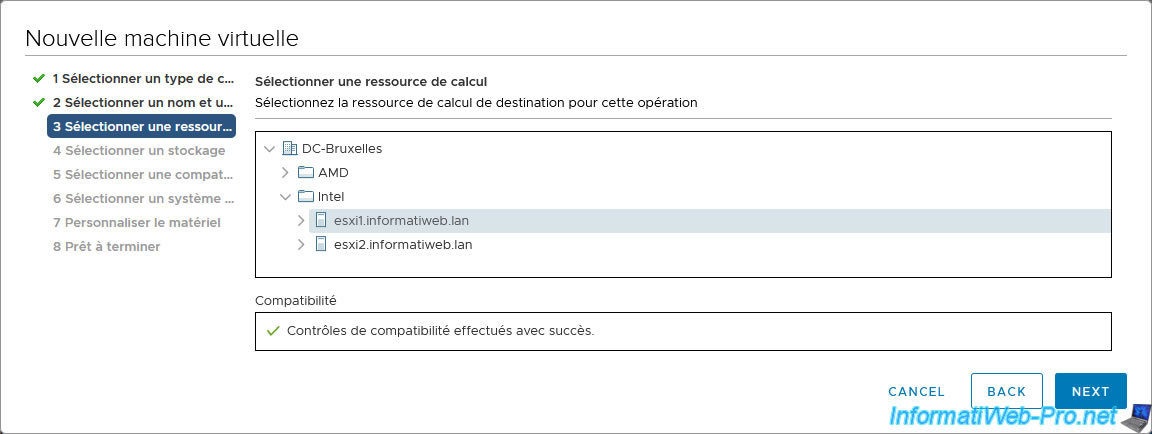
Select the VMware ESXi host where you want to plug in your Unraid USB key and click: Actions -> New Virtual Machine.
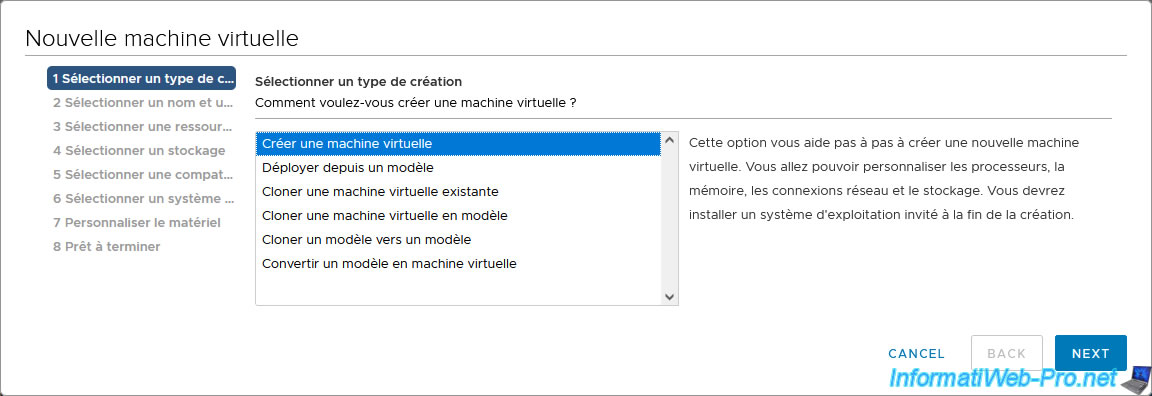
Select: Create a virtual machine.
Enter a name for your virtual machine.
In our case: UNRAID v6.9.2.
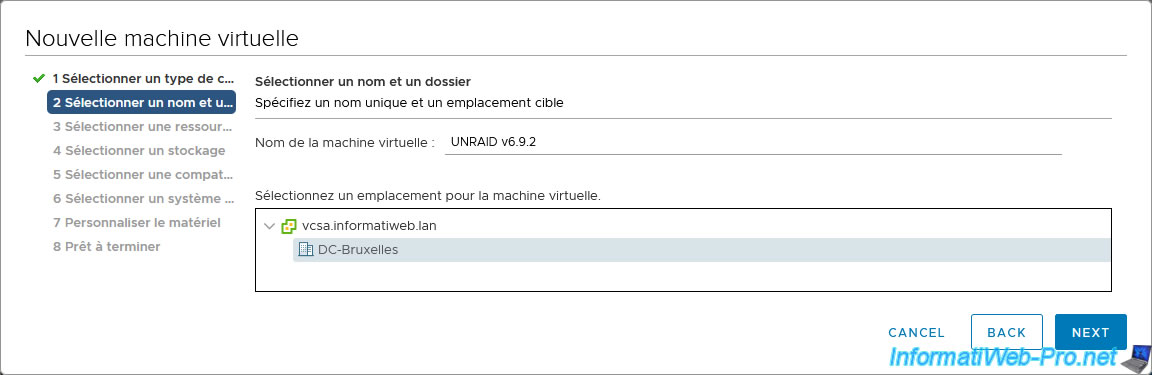
Leave the host selected by default (as it is the one chosen previously).
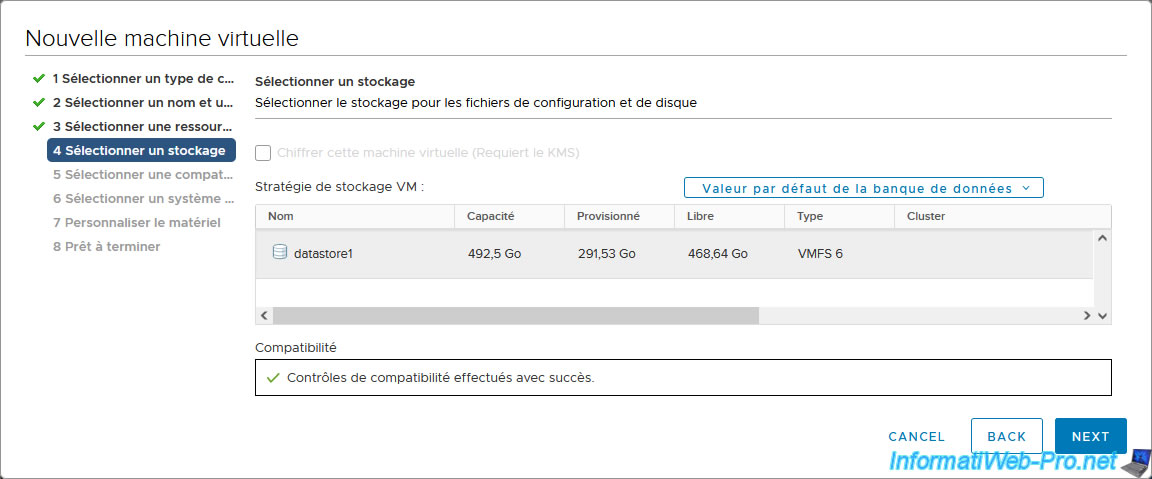
Select the datastore where you want to store your Unraid virtual machine.
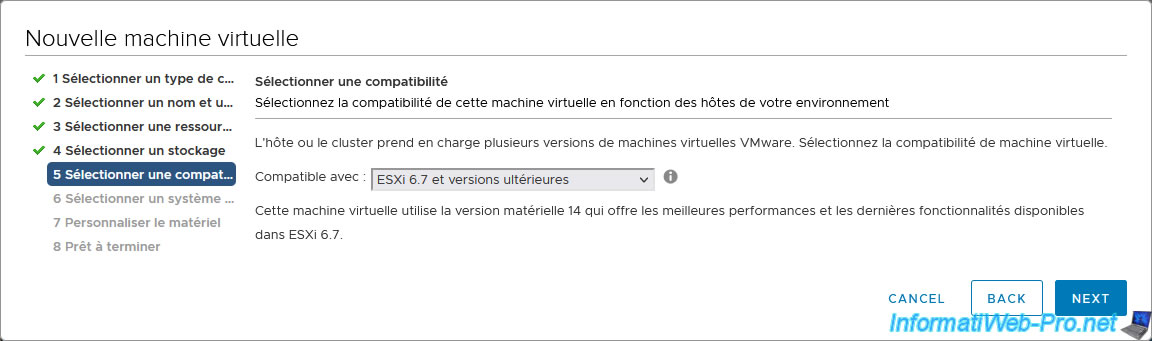
Leave the default compatibility level.
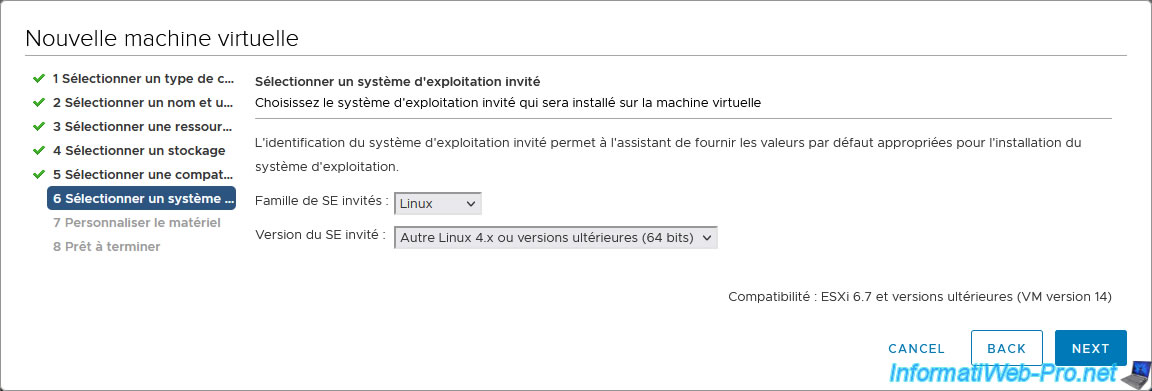
For guest OS, select:
- Guest OS family: Linux.
- Guest OS version: Other Linux 4.x or later (64-bit).
Indeed, Unraid v6.9.2 uses Linux kernel version 5.10.28.
To find out which Linux kernel version is used by the version of Unraid you wish to use, refer to the "Release Notes | Unraid Docs" page.
On the page that appears, select your version of Unraid and look at the Linux kernel version used in the "Changelog" section of the page.
Note: VMware ESXi 6.7 does not offer an option for "Linux 5.x".
However, if you are using a newer version of VMware ESXi and have the option to choose "Linux 5.x", do so.
The "Customize hardware" step appears.
To use Unraid in the best possible conditions, while respecting its requirements, you will need to configure many settings here.
To do this, follow the rest of this tutorial.

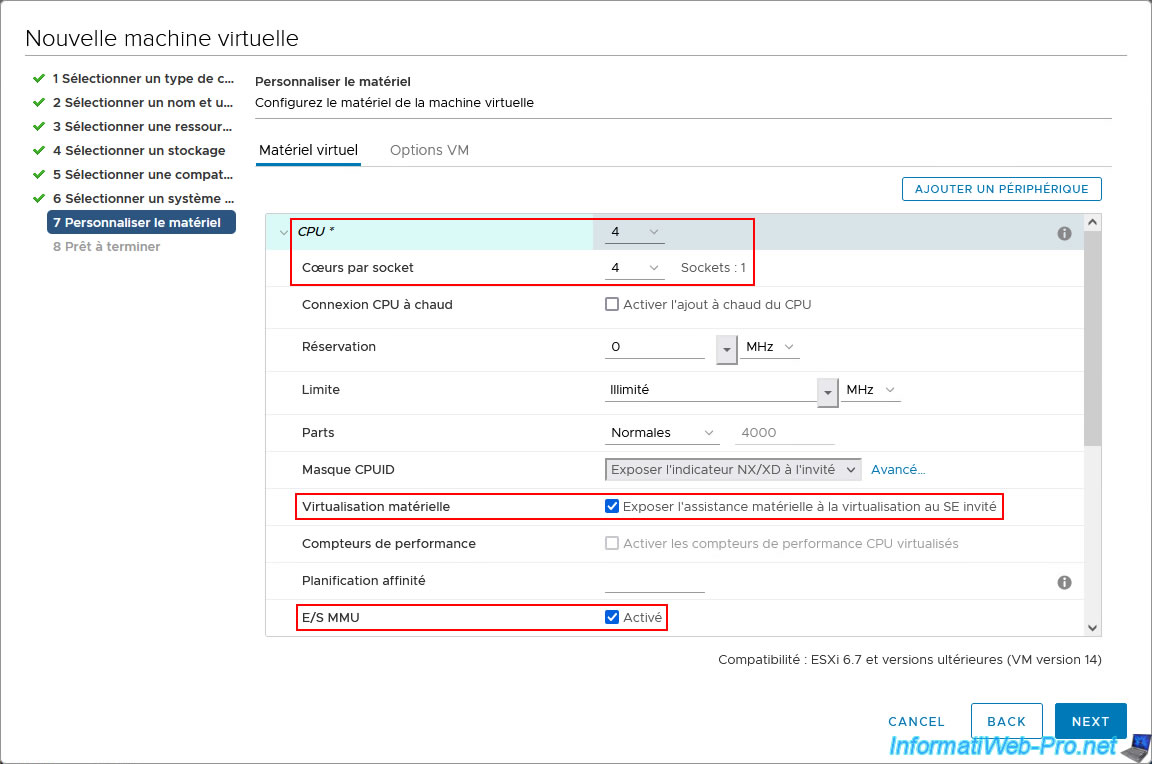
To begin, Unraid requires a processor with at least 4 cores:
- CPU : 4.
- Cores per socket: 4 (same value as above).
This allows, in this case, to create a single virtual processor with 4 cores.
Additionally, to virtualize machines on Unraid, you'll need to enable CPU virtualization (Intel VT-x/AMD-V), as well as I/O virtualization (Intel VT-d/AMD IOMMU).
To do this, enable these two settings:
- Hardware virtualization: Expose hardware assisted virtualization to the guest OS.
- I/O MMU: Enabled.
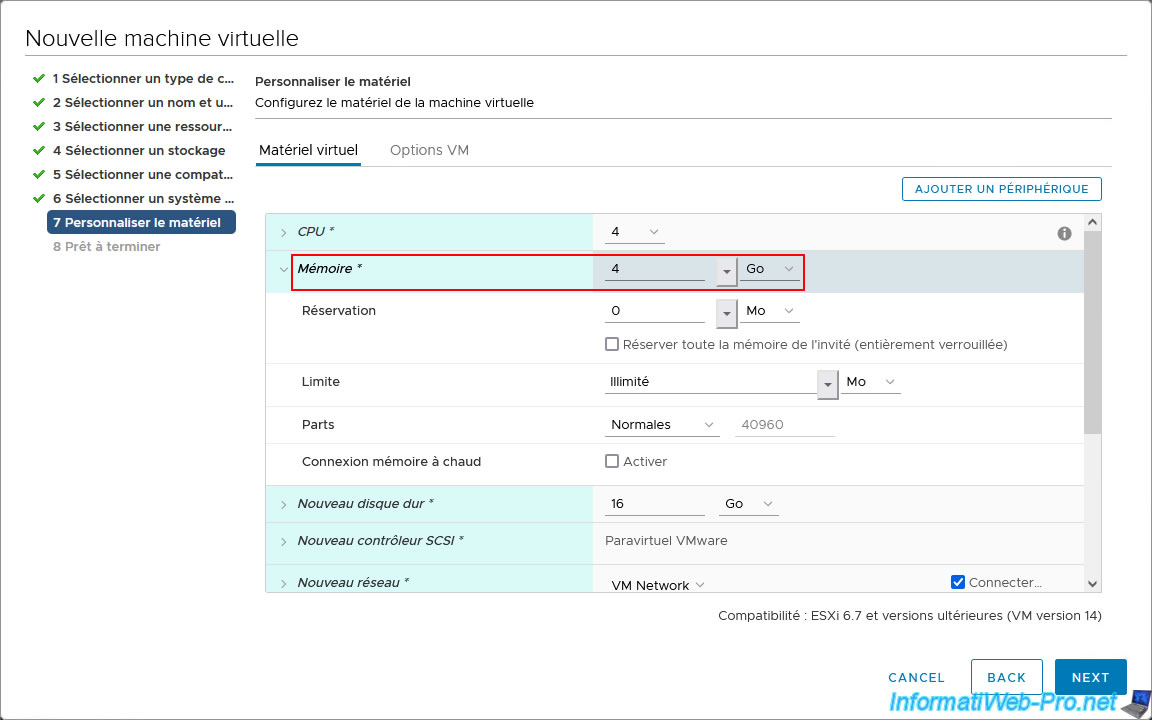
In order to run applications via Docker on Unraid, it is recommended to allocate at least 4 GB of RAM to Unraid.
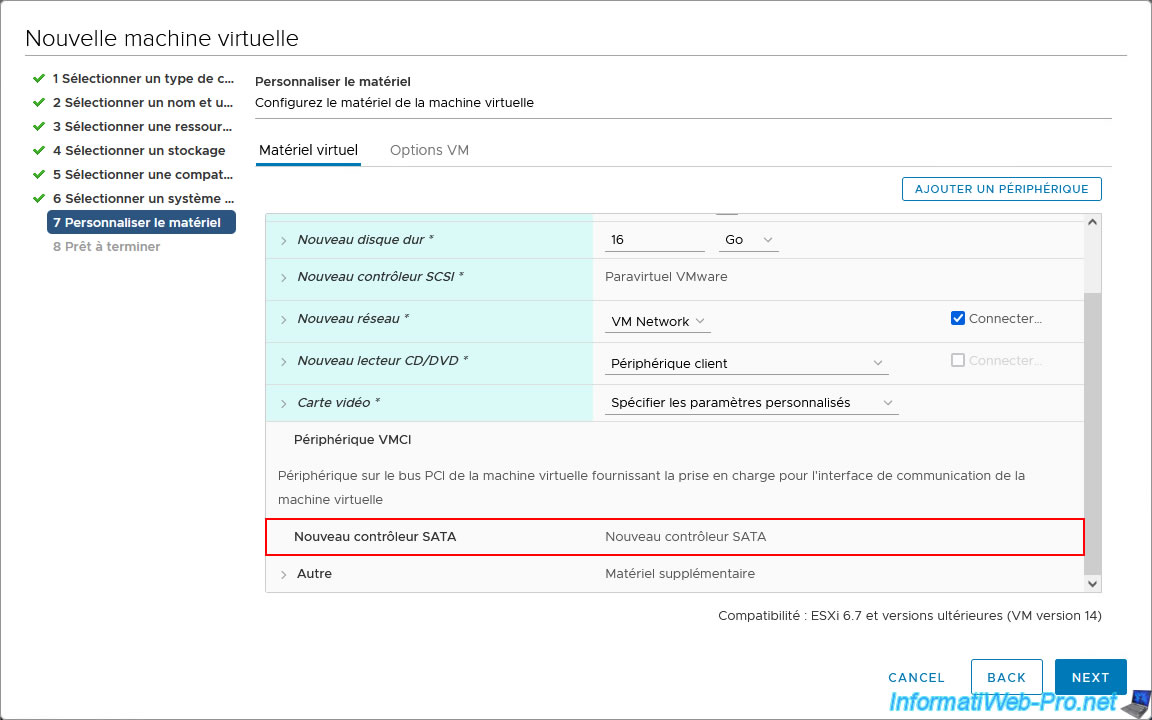
Next, for the Unraid array, you can use virtual hard drives connected to an IDE controller, a SATA controller, or an NVME controller.
Warning : virtual hard drives connected to a SCSI controller (regardless of the type of SCSI controller used in VMware vSphere) will not be recognized.
Furthermore, for the NVMe controller, Unraid will only recognize one virtual drive per NVMe controller.
For the virtual hard drives you will use for your Unraid array, we recommend using a SATA controller.
Indeed, you can easily connect multiple virtual hard drives to the same SATA controller without any problems in Unraid.
Furthermore, the SATA controller allows you to connect many virtual hard drives (unlike IDE, which is physically limited to four virtual hard drives).
In short, click: Add Device -> SATA Controller.

The new SATA controller appears in the virtual hardware of your Unraid virtual machine.
By default, a virtual hard disk is already present in your virtual machine's virtual hardware.
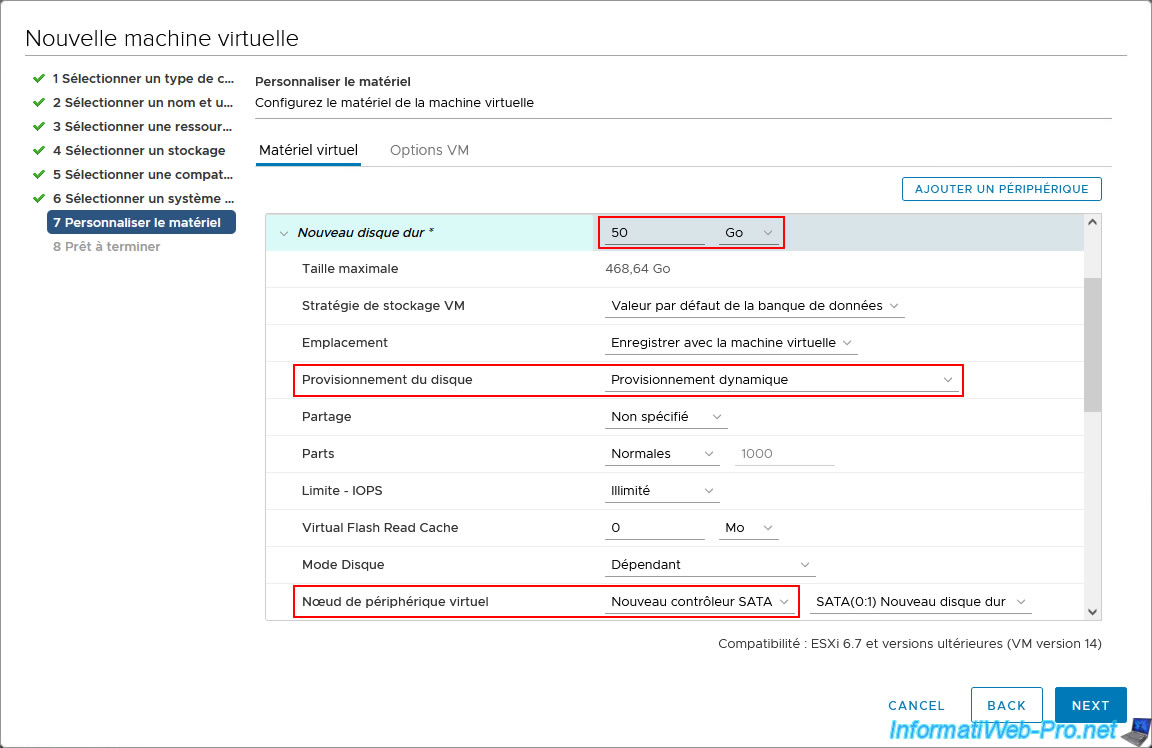
For this virtual hard disk, configure these settings:
- specify a capacity (size) that must be the same for all virtual hard disks in your Unraid array.
In our case, we used a small capacity (size) to avoid wasting too much time calculating the parity disk (since this VM is only used for this tutorial). - Disk Provisioning: Thin provisioning. This allows you to save disk space on your VMware ESXi host.
However, thin provisioning can also bring down your VMware virtual infrastructure (in production), as we already explained in our article "Understanding and avoiding overprovisioning on your VMware ESXi 6.7 hypervisor". - Virtual Device Node: select the "New SATA Controller".
Note: on Unraid, 1 virtual hard disk in the array must be used as a parity disk. The others can be used to store data.

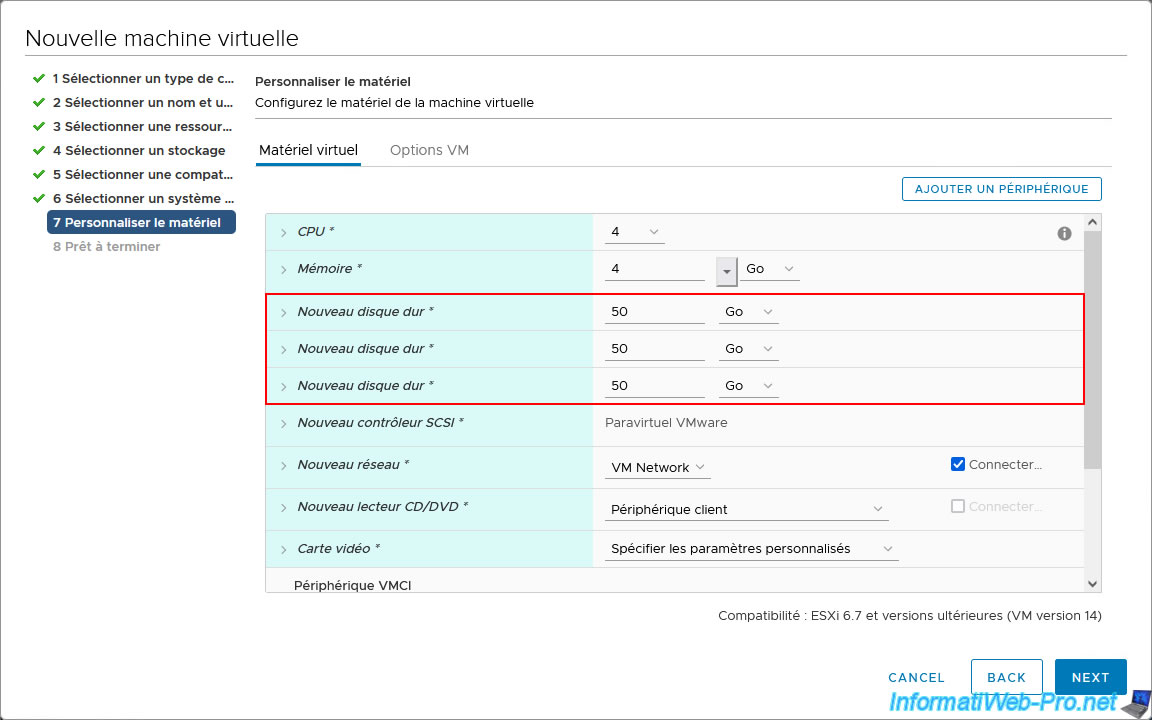
In our case, we'll use three virtual SATA hard drives for our array on Unraid.
This simulates using a RAID 5 with three hard drives, since one hard drive will be used by Unraid for parity.
To do this, double-click: Add Device -> Hard Drive.
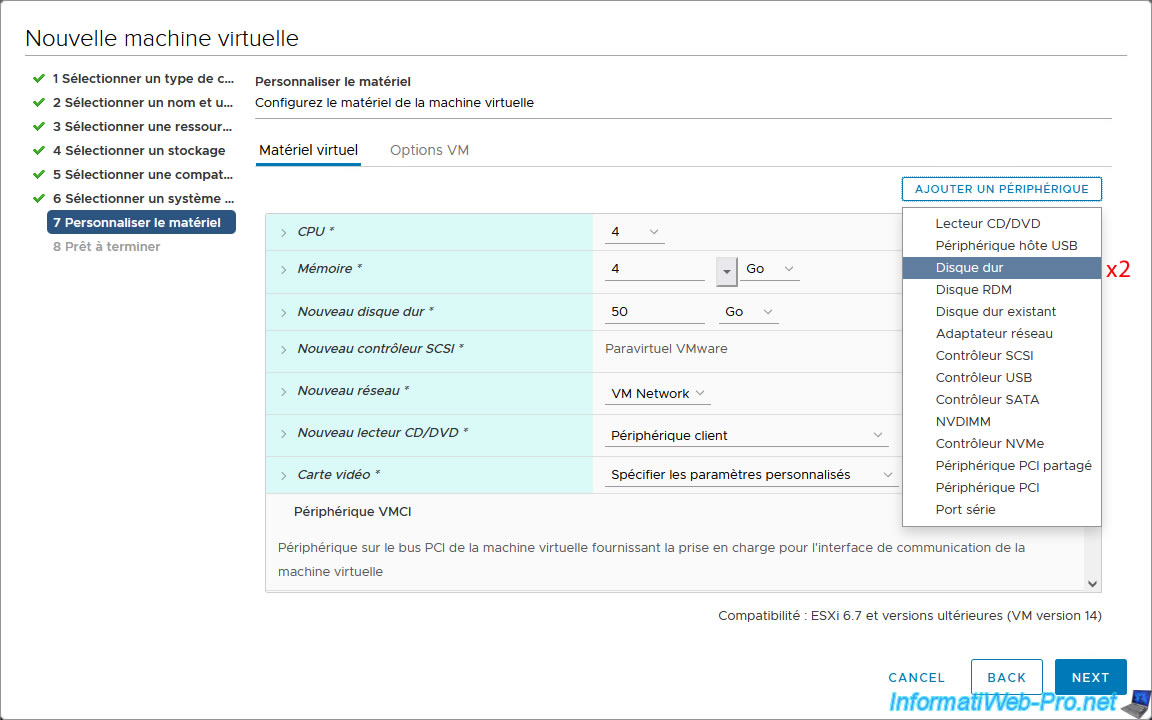
The 2 added virtual hard drives appear.

For these 2 new virtual hard disks, specify the same capacity (size) and the same parameters as for the previously configured virtual hard disk:
- same capacity (size).
In our case: 50 GB. - Disk provisioning: Thin provisioning.
- Virtual device node: New SATA controller.
Currently you have 3 virtual SATA hard drives that you will use for your array on Unraid.
Now, for the Unraid cache, you'll need to use two virtual SSDs.
Indeed, the cache is supposed to be faster, so you'll usually use SSDs for the Unraid cache.
Additionally, you should use at least two disks for the cache, because if you use only one, Unraid will consider the data on it unprotected.
Indeed, if the only disk used for the cache fails, the data would be lost.
Since NVMe connectivity is primarily used for SSDs, we'll use NVMe controllers in VMware vSphere to simulate the use of virtual SSDs.
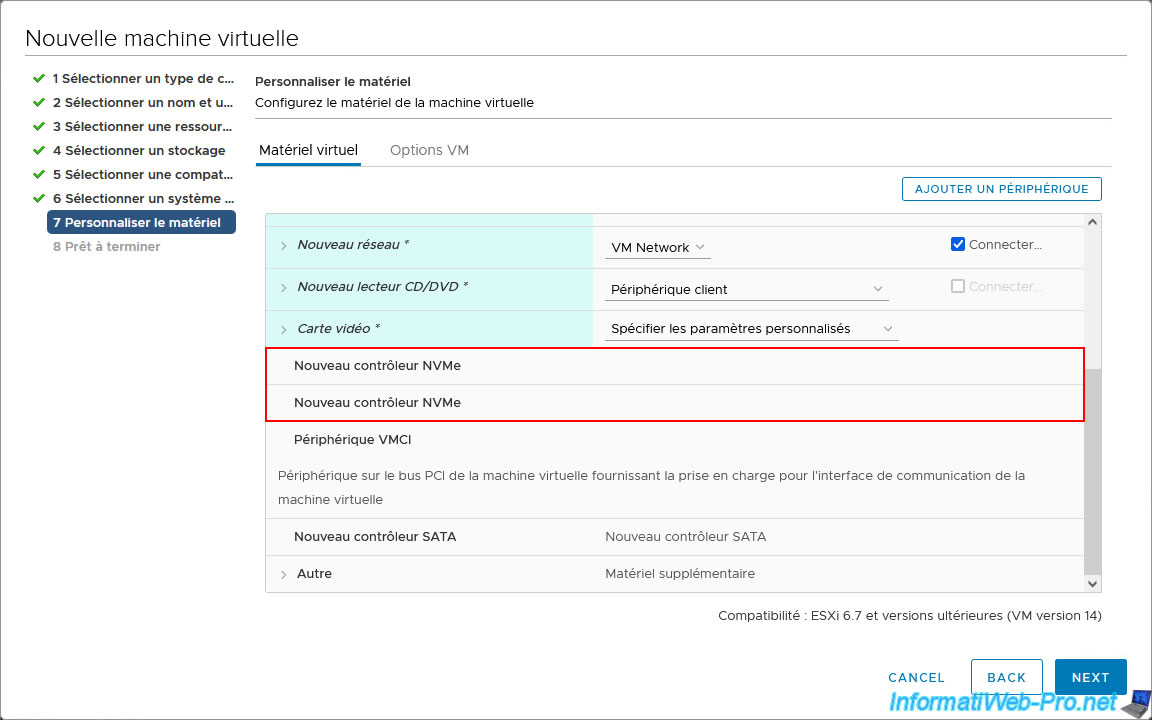
To do this, add as many NVMe controllers as virtual disks you want to add for the Unraid cache.
In our case: two NVMe controllers.
To do this, double-click: Add Device -> NVMe Controller.
Important : as previously explained, based on our tests, Unraid only recognizes one disk per NVMe controller.
To use two virtual disks in NVMe, you therefore need two NVMe controllers.
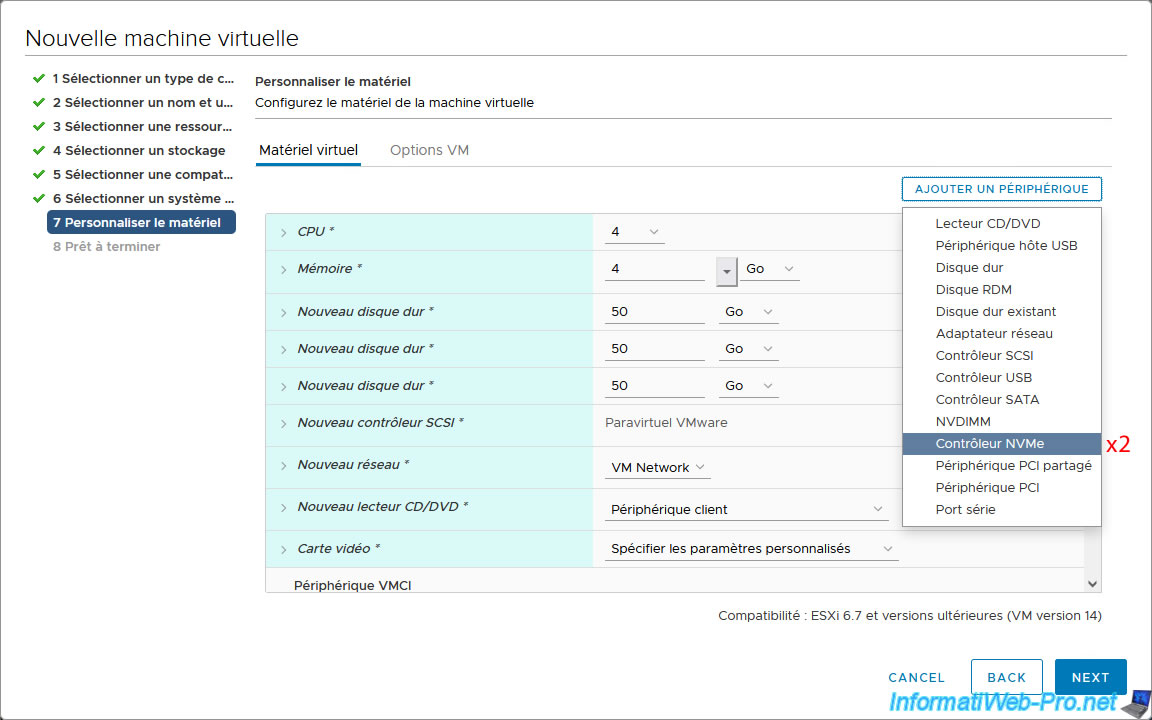
2 lines "New NVMe Controller" appear in the virtual hardware of your virtual machine.
Double-click on: Add a device -> Hard disk.
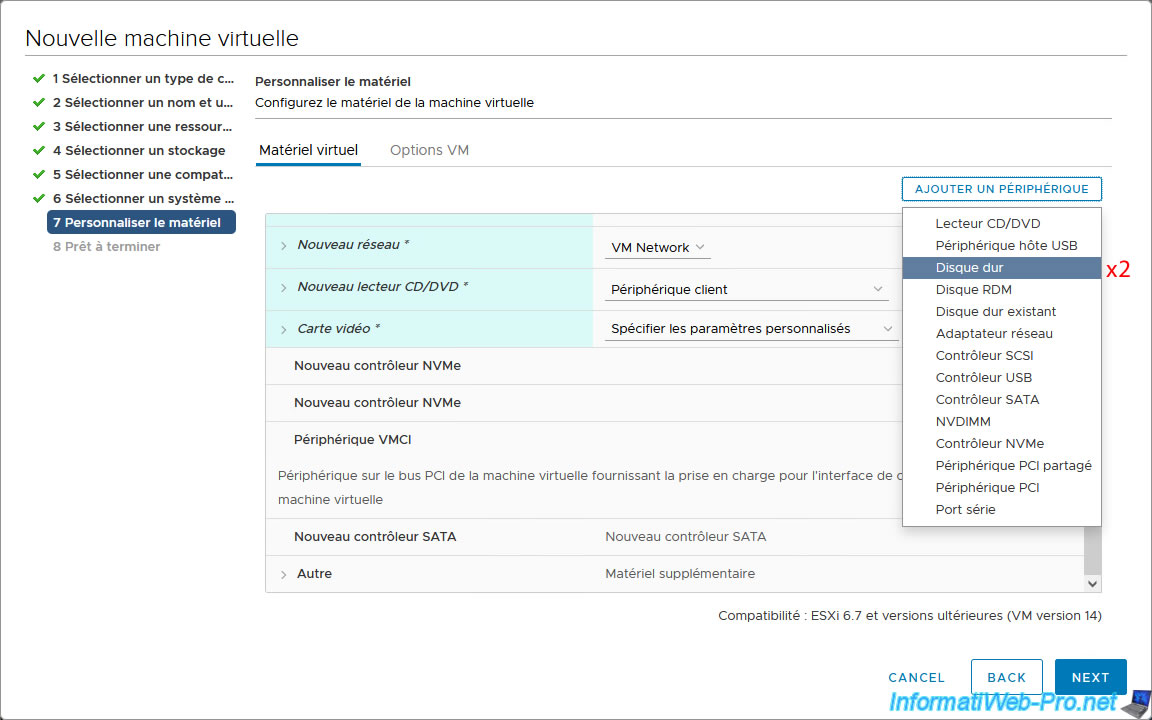
2 new virtual hard disks appear in the virtual hardware of your virtual machine.

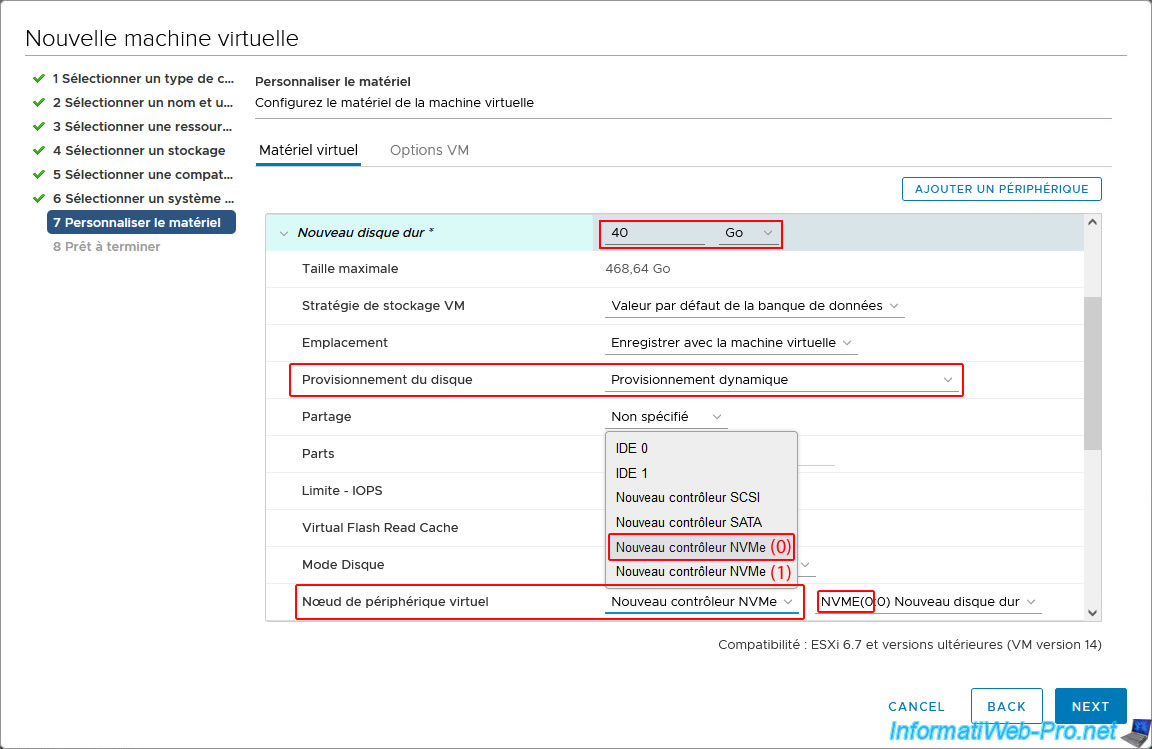
For the 1st NVMe virtual SSD, configure these settings:
- specify the desired capacity (size). This can be different from the capacity (size) specified for the SATA hard drives (which will be used for the array on Unraid), but it must be the same for all your virtual NVMe SSDs.
- Disk Provisioning: Thin provisioning. This saves disk space, but can be risky due to overprovisioning (as explained previously) in an enterprise environment.
- Virtual Device Node: Select the first option "New NVMe Controller" (which corresponds to the first NVMe controller, whose ID is 0).
Once this first option "New NVMe Controller" is selected, you will see that the virtual disk will be connected to the first NVMe controller, whose ID is 0 (NVME (0:X) New Hard Drive).
For the second virtual NVMe SSD, specify the same thing (except for the virtual device node).
This time, select the second option, "New NVMe Controller" (which corresponds to the second NVMe controller, whose ID is "1").
Once you select this second option, "New NVMe Controller," you will see that this virtual disk will be connected to the second NVMe controller, whose ID is 1 (NVME (1:X) New Hard Drive).

Share this tutorial
To see also
-
VMware 5/19/2023
VMware ESXi 6.7 - Create an iSCSI datastore
-

VMware 11/9/2022
VMware ESXi 6.7 - Virtualize Hyper-V (nested virtualization)
-

VMware 12/20/2024
VMware vSphere 6.7 - Clone vApps
-
VMware 2/14/2024
VMware vSphere 6.7 - Install vCenter Server with SQL Server database
You must be logged in to post a comment