- VMware
- 08 November 2024 at 12:24 UTC
-

- 1/4

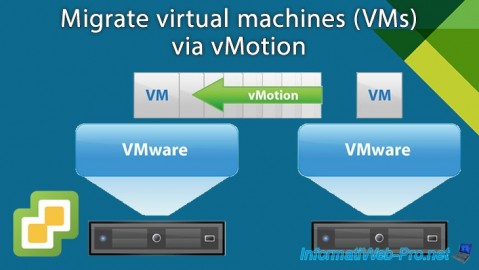
Using the vSphere vMotion feature in the VMware vSphere solution, you can migrate virtual machines hot (live migration) and cold from one VMware ESXi host to another.
When you migrate virtual machines live (i.e. when they are powered on), there will be no service interruption during the migration. The migration will therefore be transparent for the user.
However, this requires some prerequisites and some practices are recommended by VMware so that this is optimized in your infrastructure.
- Prerequisites for migrating virtual machines via VMware vSphere vMotion
- Best practices for migrating virtual machines through VMware vSphere vMotion
- Configure the prerequisites on VMware ESXi
- Dedicated physical network card visible on VMware ESXi
- Management network created by default visible on VMware ESXi
- Create a virtual switch (vSwitch) for vSphere vMotion on VMware ESXi
- Create a VMkernel interface for vSphere vMotion on VMware ESXi
- Dedicated virtual switch topology for vSphere vMotion on VMware ESXi
- Configuring the destination VMware ESXi host for vSphere vMotion on VMware ESXi
- Configure prerequisites on VMware vCenter Server (VCSA)
- Dedicated physical network card visible on VMware vCenter Server (VCSA)
- Management network created by default visible on VMware vCenter Server (VCSA)
- Create a VMkernel interface for vSphere vMotion on VMware vCenter Server (VCSA)
- Dedicated virtual switch topology for vSphere vMotion on VMware vCenter Server (VCSA)
- Configuring the destination VMware ESXi host for vSphere vMotion on VMware vCenter Server (VCSA)
- Add a physical failover network card for vMotion on VMware ESXi
- Add a physical failover network card for vMotion on VMware vCenter Server (VCSA)
- Test network connectivity between 2 VMkernel vMotion interfaces
- Single virtual network per data center (data center)
- Migrate a virtual machine (hot or cold) from one VMware ESXi host to another via VMware vCenter Server (VCSA)
1. Prerequisites for migrating virtual machines via VMware vSphere vMotion
To begin, it is necessary that the network interfaces of the source VMware ESXi host and those of the destination host are correctly configured.
This notably involves activating the vMotion service on at least one VMkernel interface (vmkX) of each of the VMware ESXi hosts affected by the virtual machine that you wish to migrate.
To migrate multiple virtual machines simultaneously, you will need to ensure that your network bandwidth is at least 250 Mbps. Note that the WAN optimization that you would potentially have implemented in your case is not taken into account for this 250 Mbit/s limit.
If you want to do long distance vMotion migration (between 2 physical sites for example), the maximum supported latency is 150 milliseconds. Additionally, this particular case requires a vSphere Enterprise Plus license.
Source : vSphere vMotion Networking Requirements.
2. Best practices for migrating virtual machines through VMware vSphere vMotion
When you want to migrate virtual machines from one VMware ESXi host to another, it is recommended to:
- use a dedicated network adapter for vSphere vMotion traffic.
- use at least a 1 GbE (Gigabit Ethernet) network card and preferably a 10 GbE (10 Gigabit Ethernet) network card.
- also preferably use a failover card for vSphere vMotion traffic.
- connect all vSphere vMotion network adapters on the same network and avoid crossing different networks or subnets so that vMotion performance is not unnecessarily degraded.
- use jumbo frames if this is supported in your case. However, all network equipment on the vSphere vMotion path must support it.
- place vSphere vMotion traffic on the vMotion TCP/IP stack to migrate virtual machines over an IP subnet that has a dedicated default gateway that is different from the VMware ESXi management network.
This is only possible since vSphere 6.0. - use VMware ESXi hosts with identical processors (preferably) so that live migration is possible.
Although it is possible to enable EVC (Enhanced vMotion Compatibility) mode on a VMware cluster so that live migration is possible, but with reduced performance.
For the migration to be done securely, it is recommended to separate the vMotion network from the usual network.
So vMotion traffic goes through a dedicated network that is only accessible by the hosts between which you want to migrate virtual machines.
Additionally, this allows you to avoid saturating your usual network bandwidth when migrating virtual machines whose storage is also migrated from one VMware ESXi host to another. This is necessary when the virtual machine is not on storage shared by the 2 VMware ESXi hosts.
VMware also specifies that each service (management, vmotion, ...) must be separated using different virtual switches (standard or distributed) preferably.
If this is not possible, it is recommended to create port groups with different VLAN IDs to separate these networks.
Note that you can also limit the bandwidth used by vSphere vMotion using vSphere Network I/O Control to prevent excessive vMotion traffic from physically saturating your network card and perhaps also your physical switch.
Sources :
3. Configure the prerequisites on VMware ESXi
Prerequisites for vMotion can be configured from the VMware ESXi web client (VMware Host Client), as well as from the web client (VMware vSphere Client) of the VMware vCenter Server (VCSA) to which your VMware ESXi hosts are linked.
It's up to you to choose the method you prefer, knowing that in business, it is possible that direct access to a VMware ESXi host is blocked thanks to the VMware vSphere locking mode.
In short, on VMware ESXi, use the web client (VMware Host Client) and log in as "root".
Note: if you want to configure the prerequisites from the web client (VMware vSphere Client) of your VMware vCenter Server, go directly to step "4. Configure the prerequisites on VMware vCenter Server (VCSA)" of this tutorial.
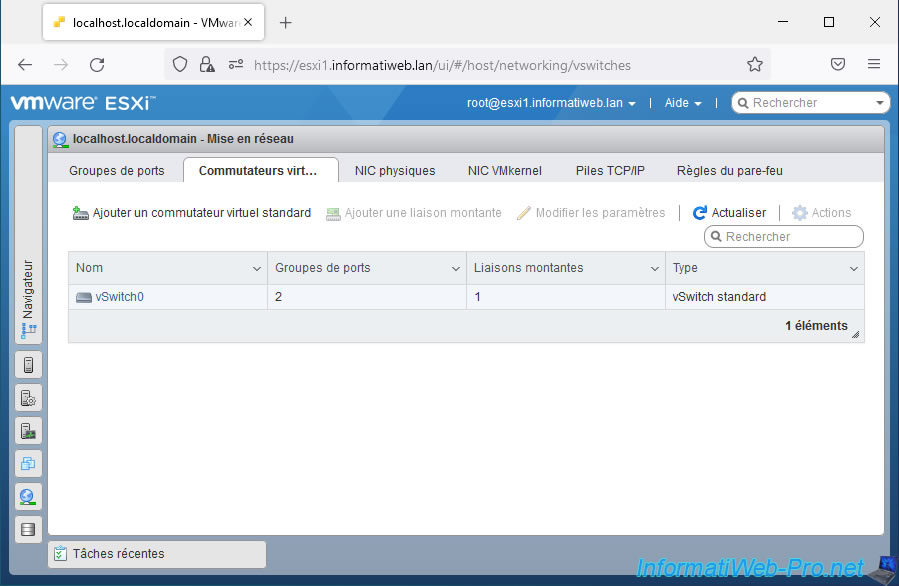
3.1. Dedicated physical network card visible on VMware ESXi
To begin with, in accordance with the prerequisites described previously, it is strongly recommended to use a dedicated physical network card for vMotion.
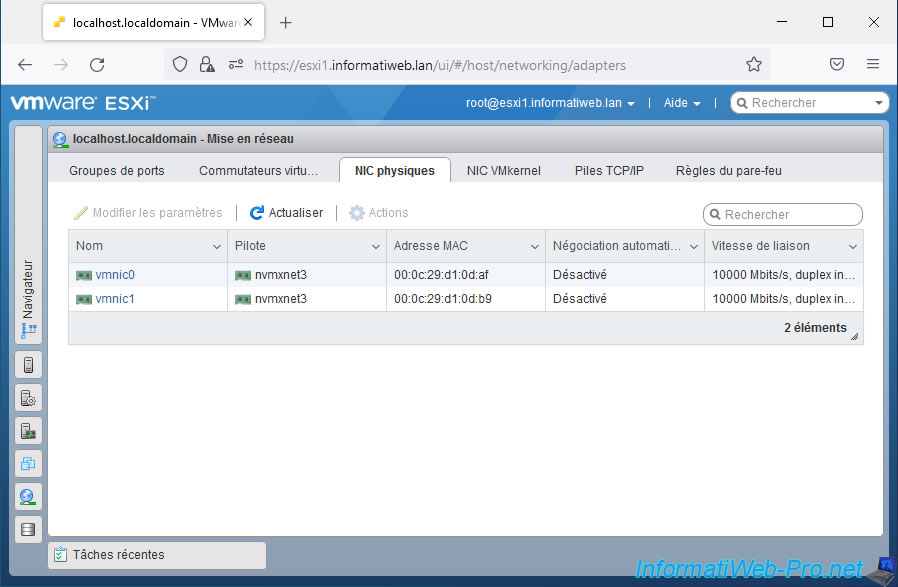
From the web client (VMware Host Client) of your VMware ESXi host, you will find the list of physical network cards in: Networking -> Physical NICs.
In our case, we have 2 network cards on our host "esxi1":
- vmnic0: the network card used for managing this VMware ESXi host.
This network card is also used to provide physical network and Internet access to our virtual machines using the "vSwitch0" virtual switch and associated "VM Network" port group created by default. - vmnic1: the currently unused additional NIC that we will use for vSphere vMotion traffic.
Note that in our case, these are 10 GbE network cards as you can see by the "10000 Mbit/s" value displayed in the "Link speed" column.
3.2. Management network created by default visible on VMware ESXi
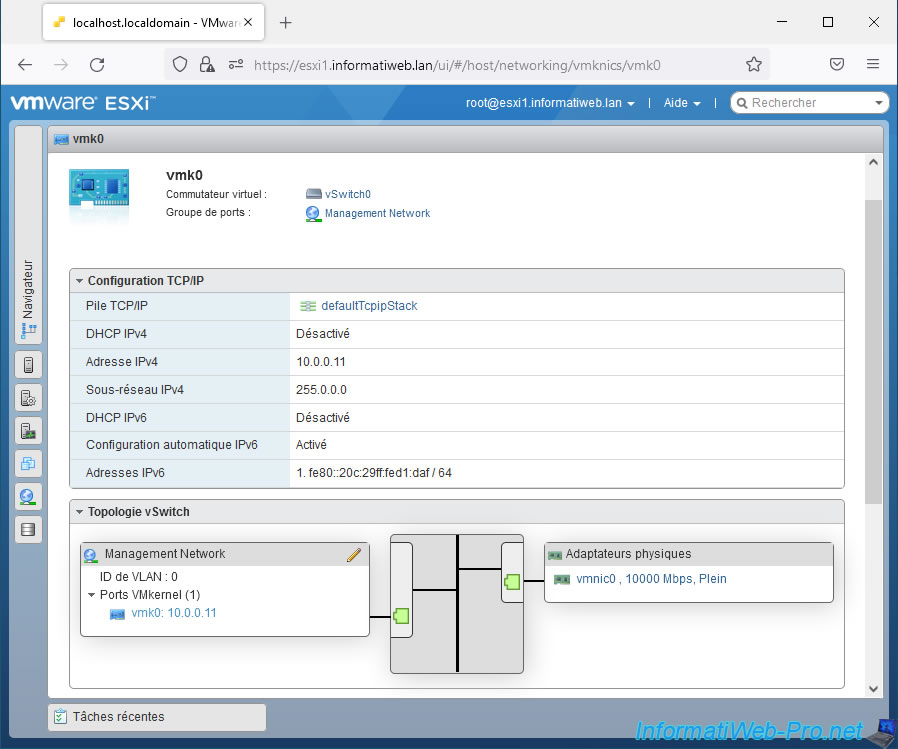
If you go to the "VMkernel NICs" tab, you will see that there is a network interface "vmk0" created by default:
- that uses the portgroup: Management Network
- which uses the TCP/IP stack: Default TCP/IP stack
- who provides the service: Management
- which has the IP address configured from the VMware ESXi DCUI console. In our case: 10.0.0.11.
- which has an IPv6 address (if applicable) configured from the DCUI console or received from your DHCPv6 server.
Click on the name "vmk0" of this VMkernel network interface.

As you can see, this VMkernel network interface "vmk0" uses the physical adapter (physical network card): vmnic0.
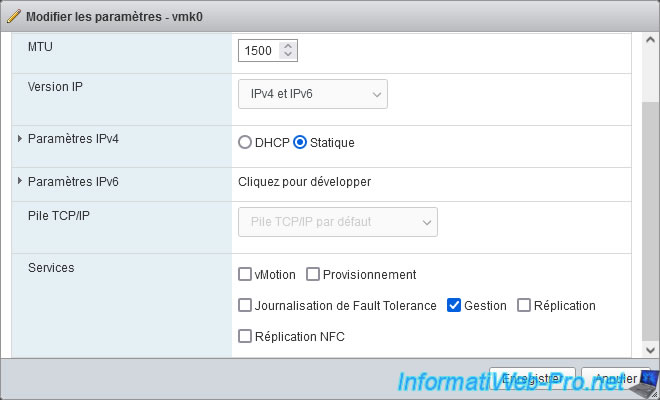
If you click the "Edit" button at the top of the page, you will see that only the "Management" service is enabled.
Which indicates that it is through this network interface that you can manage your VMware ESXi host.
Note: in the case of a lab (test environment), you could check the "vMotion" box for this network interface "vmk0" so that vMotion works in your case.
However, in business, you should not use this trick. Because this does not meet the vMotion prerequisites and it risks saturating the bandwidth of your usual network, as well as that of the virtual machines running on this VMware ESXi host.
3.3. Create a virtual switch (vSwitch) for vSphere vMotion on VMware ESXi
To separate vSphere vMotion network traffic from regular network traffic, you must create a new virtual switch.
Then, when creating this new virtual switch, you will be able to select the additional physical network adapter that you added to separate the vMotion network from your regular network.
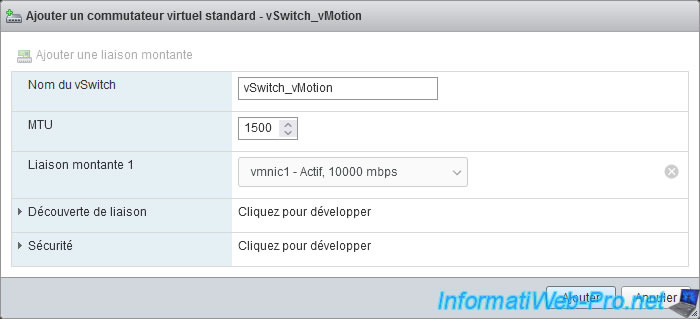
To do this, go to "Networking -> Virtual switches" and click: Add standard virtual switch.
In the "Add standard virtual switch" window that appears, enter "vSwitch_vMotion" as the name for this new vSwitch.
By default, VMware ESXi will automatically add currently unused physical network adapters to this new vSwitch.
Hence our physical NIC "vmnic1" automatically appears as uplink 1.
For other settings, no changes are necessary to use vMotion.
Click: Add.
The new virtual switch ("vSwitch_vMotion" in our case) has been added.
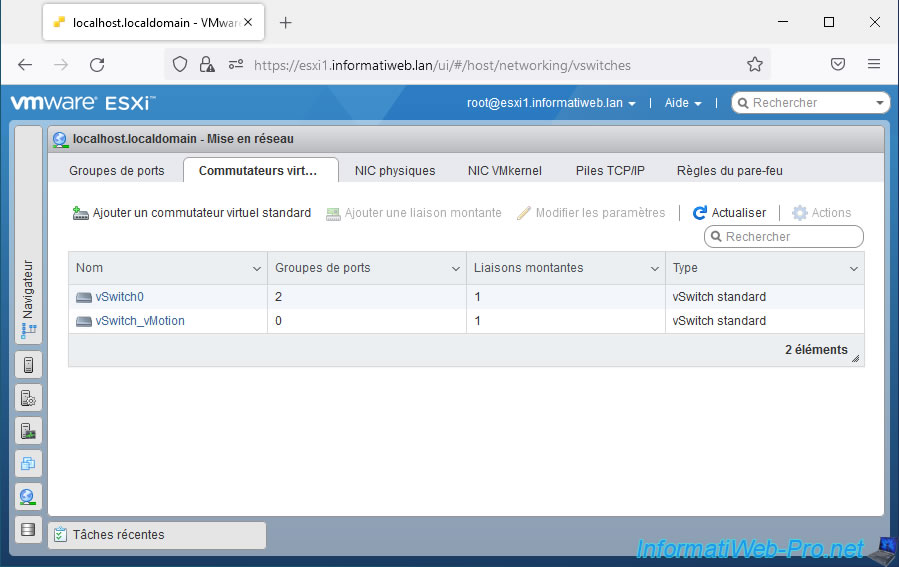
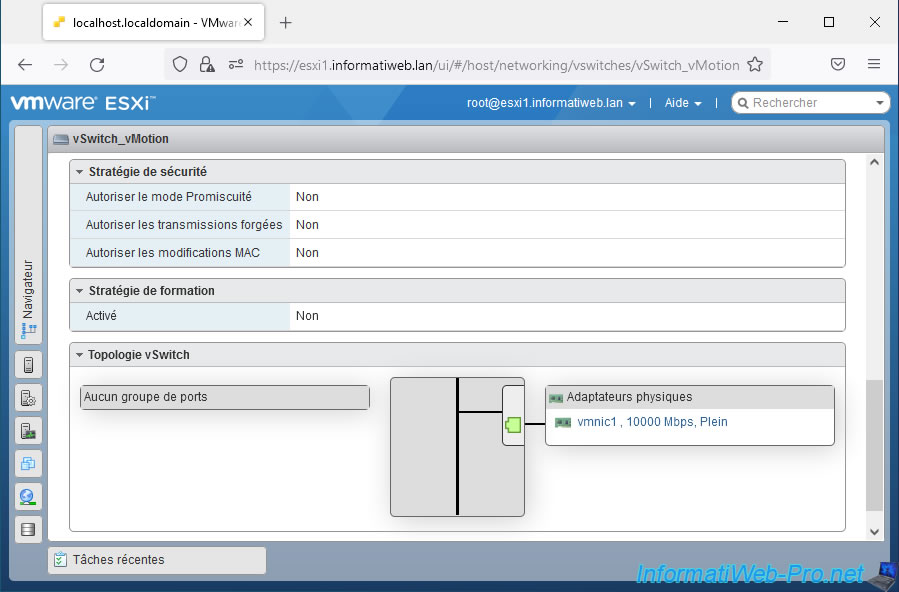
If you click on the name of this new vSwitch and go to the bottom of the page that appears, you will find a "vSwitch topology" box where you can see that only one physical adapter (physical network card) is used by this virtual switch.
But, no port group is used at the moment.
3.4. Create a VMkernel interface for vSphere vMotion on VMware ESXi
Unlike port groups that allow you to manage network traffic between multiple virtual machines, VMkernel interfaces allow you to manage network traffic between multiple VMware ESXi hosts and/or between a VMware ESXi host and the physical network.
In short, to be able to manage vMotion traffic (between 2 VMware ESXi hosts), you will need a VMkernel interface.
Although it is technically possible to route vSphere vMotion network traffic over the same VMkernel interface, it is not recommended in an enterprise setting.
This should therefore only be used in a testing environment (to learn how to use VMware solutions, for example).
In business and in accordance with the prerequisites cited at the beginning of this tutorial, you will need an additional VMkernel interface dedicated to vSphere vMotion traffic.
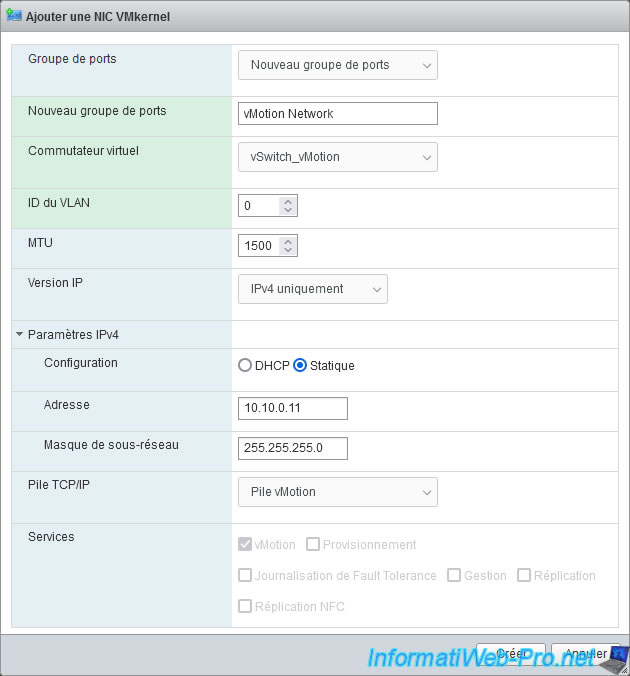
To create this new VMkernel interface, go to "Networking -> VMkernel NICs" and click: Add VMkernel NIC.

In the "Add VMkernel NIC" window that appears, specify:
- Port group: New port group
- New port group: vMotion Network
- Virtual switch: vSwitch_vMotion. Which corresponds to the additional virtual switch created previously.
- IPv4 settings:
- Configuration: choose whether you want to use dynamic or static IP addresses on this vMotion-dedicated network.
In our case, our 2 VMware ESXi hosts are connected by a simple switch. There is therefore no DHCP server available.
So, we selected "Static". - Address: the IPv4 address you want to assign to this new VMkernel interface on your VMware ESXi host.
In our case, on this subnet dedicated to vMotion, our 2 VMware ESXi hosts (esxi1 and esxi2) will respectively use the IP addresses: 10.10.0.11 and 10.10.0.12. - Subnet Mask: The subnet mask used on this dedicated network.
- Configuration: choose whether you want to use dynamic or static IP addresses on this vMotion-dedicated network.
- TCP/IP stack: since VMware vSphere 6.0, you have the option to use the new TCP/IP stack "vMotion Stack". Which allows you to use a different gateway address than the management network if you wish.
If you are still using a version prior to VMware vSphere 6.0, then you will need to use the "Default TCP/IP Stack". - Services: check only the "vMotion" box.
Note that if you have selected the TCP/IP stack "vMotion Stack", the "Services" options will all be grayed out and only the "vMotion" box will be checked automatically.
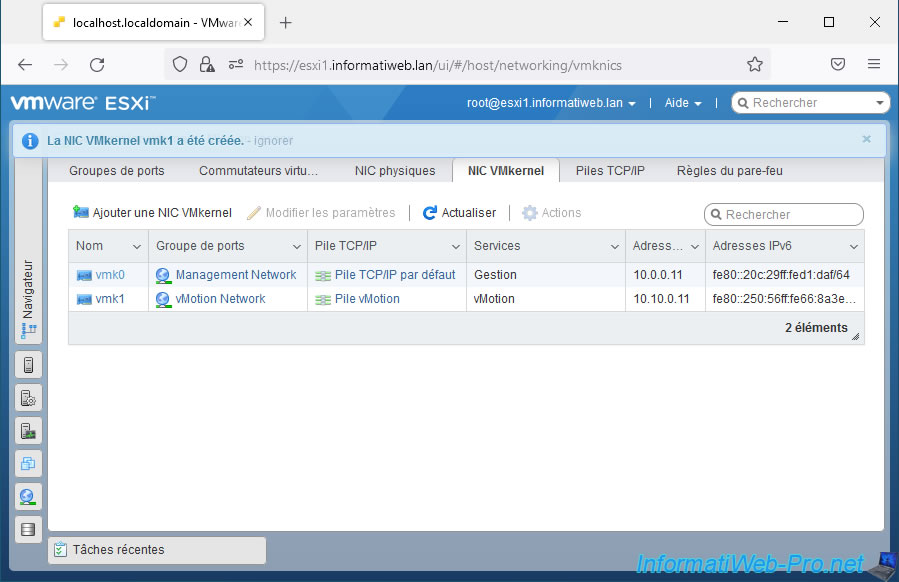
The message "VMkernel NIC vmk1 was successfully created" appears.
As you can see, you now have 2 VMkernel interfaces:
- vmk0: for management traffic
- vmk1: for vMotion traffic
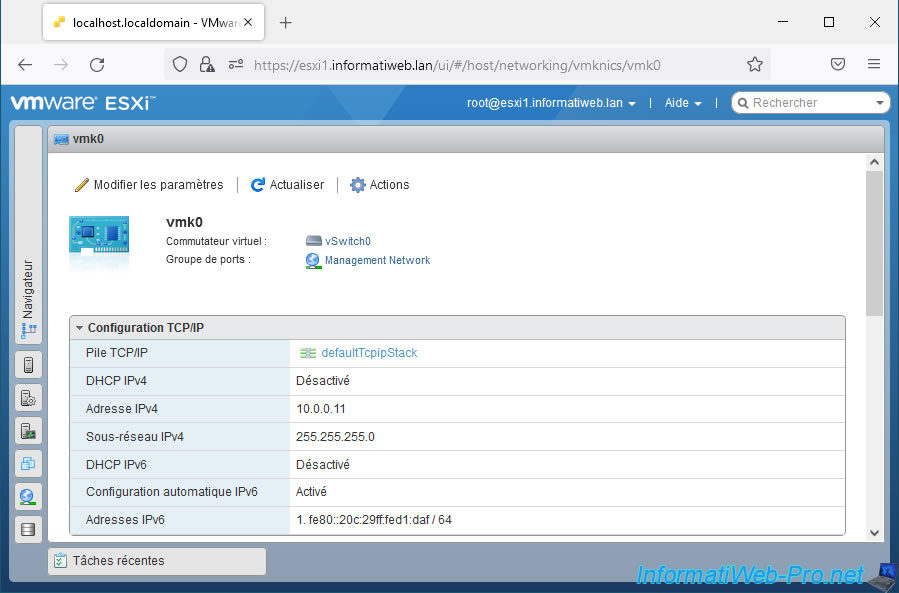
If you click on the VMkernel interface "vmk0", you will see that:
- it is connected to the virtual switch: vSwitch0
- it is connected to the port group: Management Network
- it uses the TCP/IP stack "defaultTcpipStack" (Default TCP/IP stack)
- its IPv4 address is 10.0.0.11
- its subnet mask is: 255.255.255.0 (in our case)
If you click on the VMkernel interface "vmk1", you will see that:
- it is connected to the virtual switch: vSwitch_vMotion
- it is connected to the port group: vMotion Network
- it uses the TCP/IP "vmotion" stack (vMotion Stack)
- its IPv4 address is 10.10.0.11
- its subnet mask is: 255.255.255.0 (in our case)

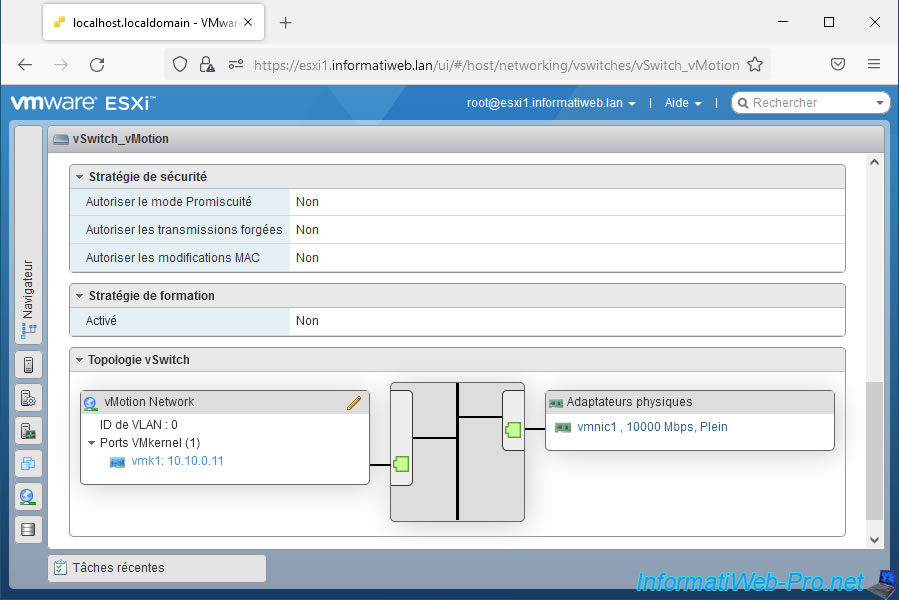
3.5. Dedicated virtual switch topology for vSphere vMotion on VMware ESXi
Now that the various network components are created and configured, go back to the "Networking -> Virtual switches" section and click on your new virtual switch "vSwitch_vMotion".
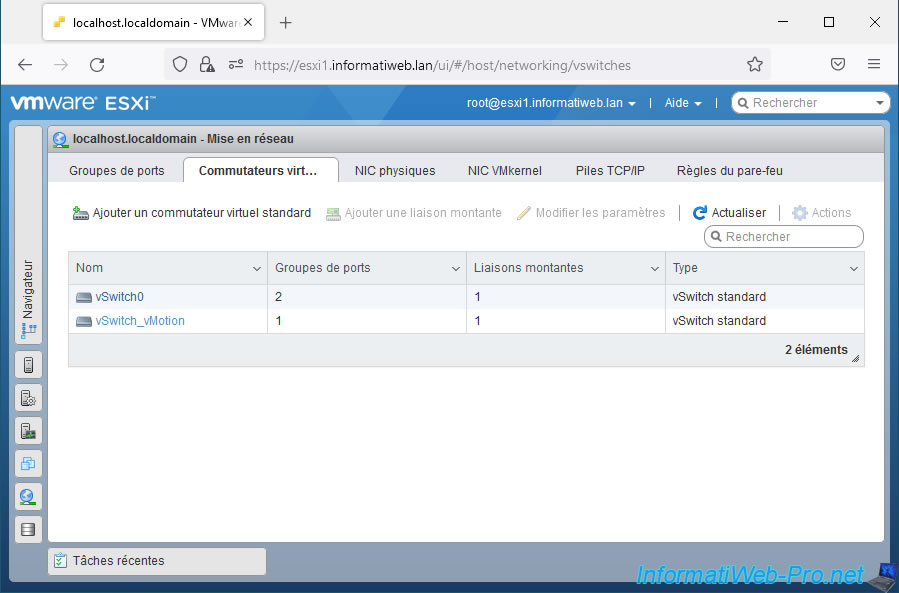
As you can see at the bottom of the "vSwitch_vMotion" page that appears, this virtual switch (vSwitch) makes it possible to make the link between the "vMotion Network" port group (of which the VMkernel interface "vmk1" is part) and the physical network card (vmnic1) added at the very beginning of the tutorial to be able to separate vMotion traffic from regular network traffic.
Share this tutorial
To see also
-
VMware 3/5/2025
VMware vSphere 6.7 - Cluster admission control
-
VMware 2/14/2025
VMware vSphere 6.7 - Create a cluster
-
VMware 2/19/2025
VMware vSphere 6.7 - Create a cluster and enable EVC mode
-
VMware 2/12/2025
VMware vSphere 6.7 - Create a datastores cluster and enable SDRS
You must be logged in to post a comment