- RAID
- 04 April 2025 at 06:53 UTC
-

- 1/4

To configure your Microsemi Adaptec SmartRAID controller, you can use the "ACU" configuration tool accessible when you start your computer or the "maxView Storage Manager" web interface which you can install under Windows, Linux, ...
- Access ACU (Adaptec RAID Configuration Utility)
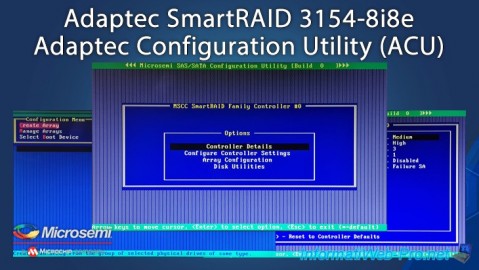
- Controller Details (information about your controller)
- Configure Controller Settings
- Array Configuration (configure RAID arrays on your controller)
- Disk Utilities (physical disk tools)
- Quit ACU (Adaptec RAID Configuration Utility)
1. Access ACU (Adaptec RAID Configuration Utility)
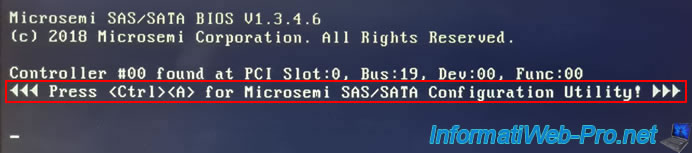
When you start your computer, you will see this displayed:
Plain Text
Microsemi SAS/SATA BIOS V1.3.4.6
(c) 2018 Microsemi Corporation. All Rights Reserved.

Controller #00 found at PCI Slot:0, Bus:19, Dev:00, Func:00
<<< Press <Ctrl><A> for Microsemi SAS/SATA Configuration Utility! >>>
To access ACU (Adaptec RAID Configuration Utility), press the "CTRL + A" keys (on a QWERTY keyboard) or the "CTRL + Q" keys (on an AZERTY keyboard).
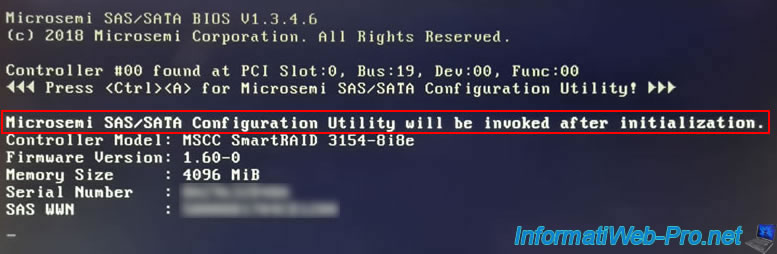
Once you have pressed these keys simultaneously, you will see an additional message appear:
Plain Text
Microsemi SAS/SATA Configuration Utility will be invoked after initialization.
Your Microsemi Adaptec SmartRAID controller will continue to load and the rest of the information will be displayed.
Plain Text
Controller Model: MSCC SmartRAID 3154-8i8e.
Firmware Version: 1.60-0
Memory Size     : 4096 MiB
Serial Number   : ...
SAS WWN         : ...
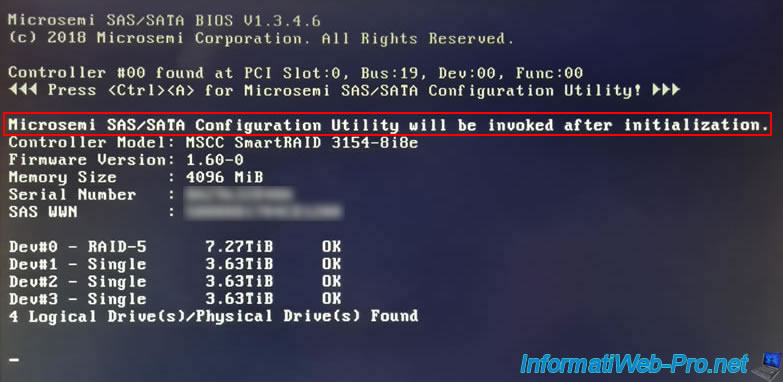
If you have already configured RAID logical drives and/or ports on your Microsemi Adaptec SmartRAID controller in HBA mode, you will see information similar to this appear.
Notes:
- RAID-X: refers to the RAID level used for the displayed RAID logical drive.
- Single: refers to drives connected to a port configured in HBA mode on your RAID controller.
Plain Text
Dev#0 - RAID-5     7.27TiB     OK
Dev#1 - Single     3.63TiB     OK
Dev#2 - Single     3.63TiB     OK
Dev#3 - Single     3.63TiB     OK
4 Logical Drive(s)/Physical Drive(s) Found.
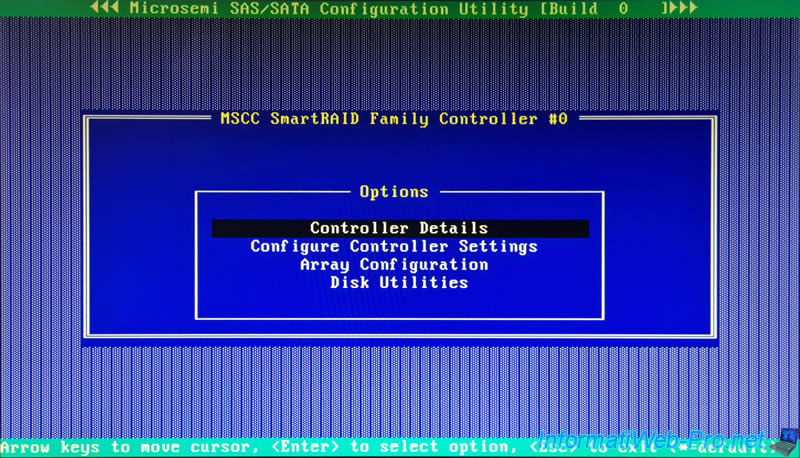
2. Controller Details (information about your controller)
Once your Microsemi Adaptec SmartRAID controller has finished loading, the "ACU" configuration tool will automatically appear.
Plain Text
Microsemi SAS/SATA Configuration Utility [Build  0  ]

MSCC SmartRAID Family Controller #0
For information about your Microsemi Adaptec SmartRAID controller, go to: Controller Details.
In the "Controller Information" box that appears, you will find:
- Product Name: the model of your RAID controller.
In our case: MSCC SmartRAID 3154-8i8e.
Note: MSCC = Microsemi Corporation. - PCI Slot Number: the PCI slot number to which your Microsemi Adaptec SmartRAID controller is connected.
In our case: 000. - PCI (Bus:Device:Function): the PCI address for this RAID controller.
Note that this address depends on the PCIe port where this RAID controller is plugged.
In our case: 19:00:0. - Hardware Revision: hardware revision information for this controller.
In our case: A. - Serial Number: serial number of your Microsemi Adaptec SmartRAID controller.
Useful when you want to contact Microsemi support. - WWN Number: WWN stands for World Wide Name and is the unique identifier of your Microsemi Adaptec SmartRAID controller.
- Firmware Version: the firmware version of your Microsemi Adaptec SmartRAID controller.
In our case: 1.60-0. - Controller Temperature: current temperature of your Microsemi Adaptec SmartRAID controller in degrees Celsius.
In our case: 0065 C. - Support Features: indicates the supported modes.
- RAID: allows you to create a RAID array grouping together several physical disks.
Then you can create one or more RAID logical drives on this RAID array.
Each RAID logical drive will be seen as a different drive by the operating system installed on your computer or server. - HBA: allows you to connect physical disks to your Microsemi Adaptec SmartRAID controller and make them visible as is to the operating system installed on your computer or server.
Each physical disk connected to your Microsemi Adaptec SmartRAID controller can therefore be seen (with its real brand and model) as if you had connected it to a SATA port (for example) on your motherboard.
The advantage being that you can use, for example, SAS hard drives with a consumer motherboard that only has SATA ports. - Mixed: allows you to use RAID and HBA modes simultaneously on the same Microsemi Adaptec SmartRAID controller.
More specifically, this means that you will be able to configure one or more physical ports of your Microsemi Adaptec SmartRAID controller in RAID mode and one or more physical ports of your controller in HBA mode.
This is also what we did in our case: a physical connector with a RAID array in RAID 5 with 3 physical disks and another physical connector in HBA mode so that the other 3 physical SAS hard disks are seen as they are.
Hence the appearance of 4 disks (1 logical RAID disk and 3 physical disks) on the image displayed at the start of this tutorial.
- RAID: allows you to create a RAID array grouping together several physical disks.
- Controller Memory Size: the memory size of your controller. In other words, the size of its cache.
- Controller Mode: the current mode of your RAID controller.
Either "RAID" or "HBA" if the same mode is used on all physical connectors of your RAID controller.
Either "MIXED" if you use RAID mode on some connectors and HBA mode on other connectors of your RAID controller. - Number of OS bootable drives: indicates the number of disks that can be configured as bootable.
Default: 2.
Sources :
- ARCCONF Command Line Utility for Adaptec® Smart Storage Controllers User's Guide - Adaptec
- Set Bootable Device(s) for Legacy Boot Mode - Huawei Server RAID Controller Card User Guide (x86) 02 - Huawei
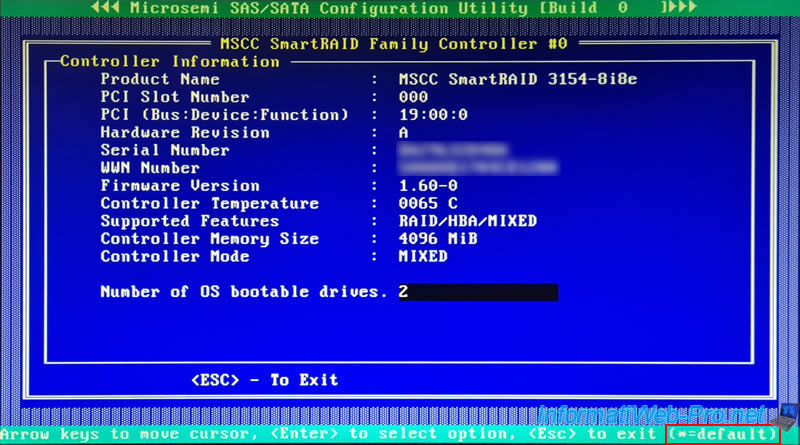
If you select the "Number of OS bootable drives" parameter value and press Enter, you will be able to choose between 0 and 8 for the number of bootable drives.
Note: the value with an asterisk always corresponds to the default value (as shown at the bottom of the screen).

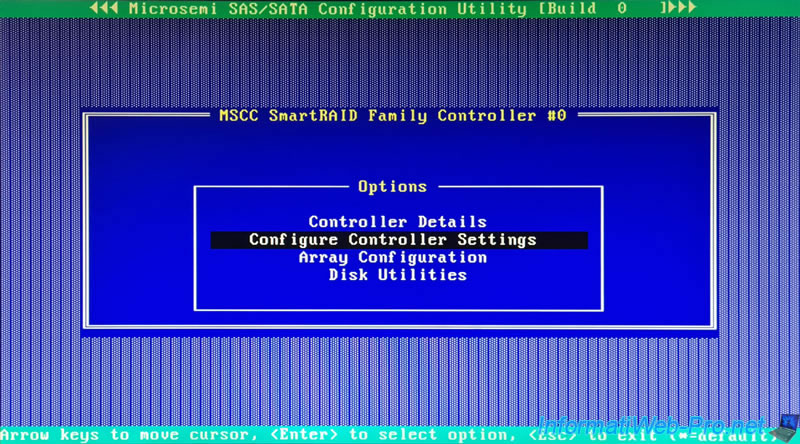
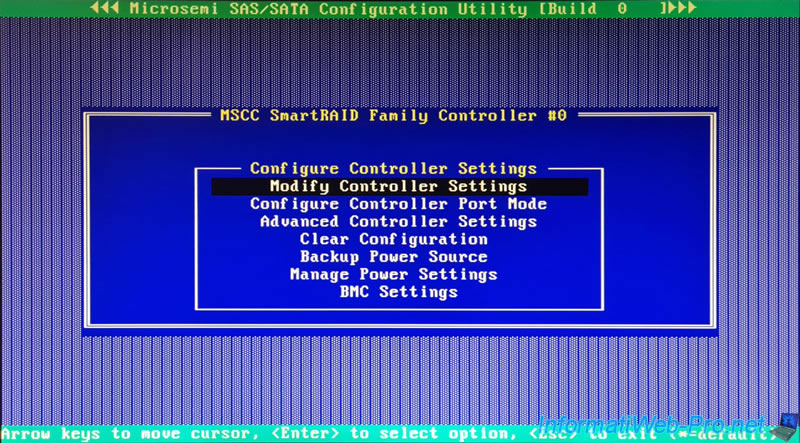
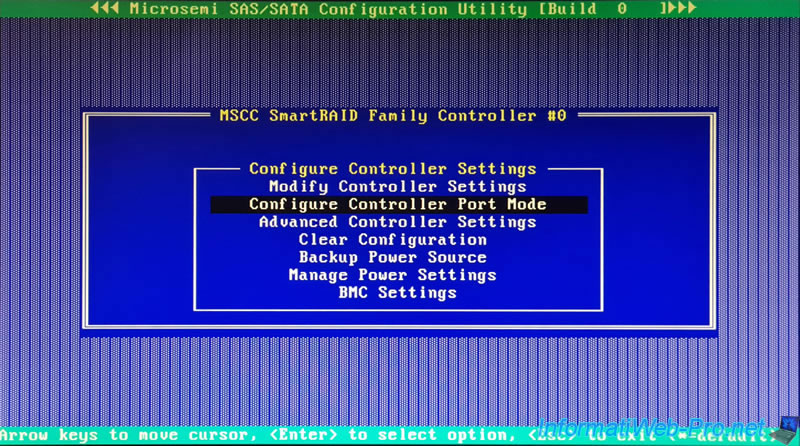
3. Configure Controller Settings
In the "Configure Controller Settings" section, you will be able to configure the settings, advanced settings, connectors, ... of your Microsemi Adaptec SmartRAID controller.
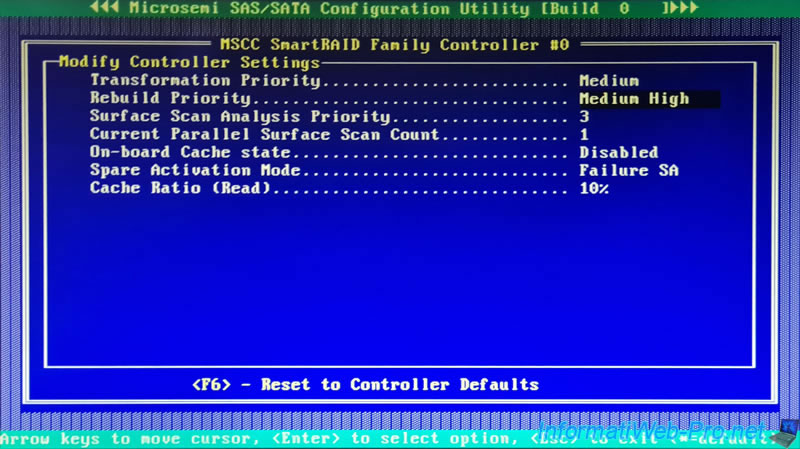
3.1. Modify Controller Settings
In the "Modify Controller Settings" section, you will be able to configure the settings of your Microsemi Adaptec SmartRAID controller.
In this "Modify Controller Settings" section, you will find the settings:
- Transformation Priority: allows you to adjust the priority given to operations on your arrays and RAID logical drives.
For example: the expansion of a RAID array or logical disk, the migration of RAID logical disks, ...- High: allows you to prioritize operations performed by the controller on your RAID arrays and logical drives over input/output (I/O) performance performed by the operating system.
Reads/writes will therefore be slower during a transformation carried out by your RAID controller. But it allows transformations to be completed much faster. - Medium (default): the operations performed by your Microsemi Adaptec SmartRAID controller on your RAID arrays and logical drives will impact the input/output (I/O) performance performed by the operating system.
- Low: operations on your arrays and logical disks will ONLY be performed when there is no input/output (I/O) being performed by your operating system.
Which means that the operations will take a long time.
- High: allows you to prioritize operations performed by the controller on your RAID arrays and logical drives over input/output (I/O) performance performed by the operating system.
- Rebuild Priority: sets the priority used when rebuilding a failed RAID logical drive.
- High: reconstruction will take priority over other operations (including I/O performed by the operating system).
This therefore reduces performance for reads/writes to your RAID logical drive performed by the operating system. - Medium High: reconstruction will take priority over normal system operation.
- Medium: reconstruction takes place half the time. During the other half of the time, the system operates normally.
- Low: normal system operation takes priority over RAID logical drive rebuild operations.
- High: reconstruction will take priority over other operations (including I/O performed by the operating system).
- Surface Scan Analysis Priority: sets the inactivity timeout after which your controller will resume surface scanning.
- 0: disabled.
- 1 to 30 (default: 3): inactivity timeout before resuming surface analysis.
- 31 (High): high priority.
- Current Parallel Surface Scan Count: allows you to specify the number of simultaneous surface scans your controller can perform.
- 1 (default): disabled = no simultaneous surface analyses.
- 2 to 16: number of simultaneous surface scans your controller can perform.
- On-board Cache state: allows you to enable (Enabled) or disable (Disabled) the onboard cache of your Microsemi Adaptec RAID controller.
Default: Enabled. - Spare Activation Mode: allows you to automatically use a disk set as Spare as a replacement disk when a physical disk fails and your controller predicts that one of your physical disks will soon fail.
- Failure SA: when a physical disk in one of your RAID arrays fails, your controller will automatically use a disk set as Spare to rebuild the missing disk.
- Predictive SA: when your Microsemi Adaptec RAID controller predicts that one of your physical disks will soon fail, your controller will use a disk defined as Spare to rebuild the disk that will soon fail.
Sources :
- ARCCONF Command Line Utility for Adaptec® Smart Storage Controllers User's Guide - Adaptec
- HPE D2500sb Gen10 Storage Blade User Guide - Transformation priority - HPE
- Modifying controller settings - HPE
![]()
If you change the value of a setting, simply press "Esc" to save the changes.
ACU will detect that a setting has been changed and ask you "Save Changes Made?".
Answer "Yes" to save the change.

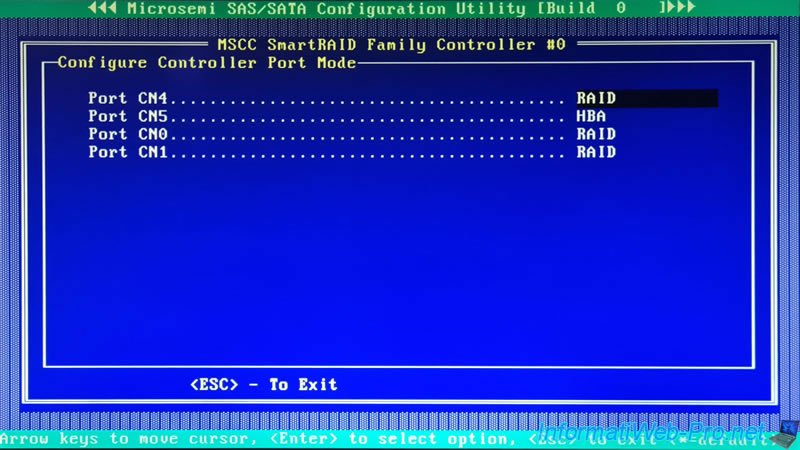
3.2. Configure Controller Port Mode
In the "Configure Controller Port Mode" section, you can configure the mode to use on the different ports of your Microsemi Adaptec SmartRAID controller.
In our case, our Microsemi Adaptec SmartRAID controller has 4 ports (2 internal ports (CN4/CN5) and 2 external ports (CN0/CN1)):
- Port CN4 : RAID.
- Port CN5 : HBA.
- Port CN0 : RAID.
- Port CN1 : RAID.
For each port, you will have the choice between:
- RAID: to create a RAID array from physical disks plugged into this connector, then create RAID logical disks on your RAID arrays.
- HBA: so that the physical disks connected to this connector are recognized as they are by the operating system as if they were connected to your motherboard.
This allows, for example, to use SAS hard drives with a motherboard that does not have SAS connectors. - MIXED: use the 2 modes on the same physical connector on your controller.
Note: to find out which ports your physical disks are connected to, refer to the "Disk Utilities" section available in the main menu of this "ACU" configuration tool.
You can also find the number of the internal connectors (CN4, CN5, ...) on the printed circuit of your RAID controller.
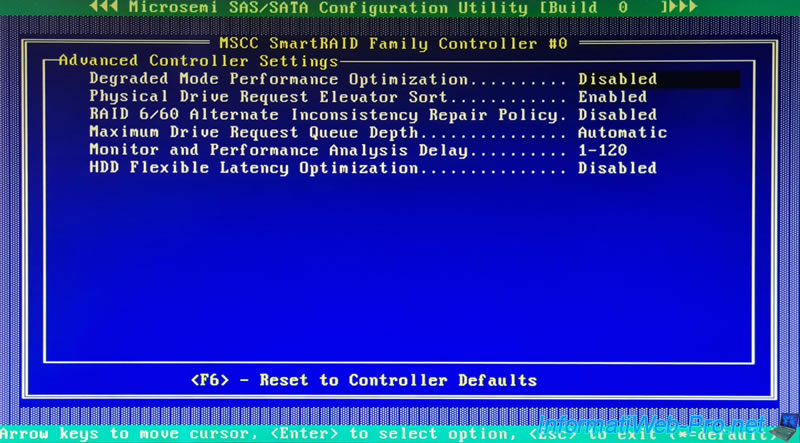
3.3. Advanced Controller Settings
In the "Advanced Controller Settings" section, you will be able to configure advanced settings for your Microsemi Adaptec SmartRAID controller.
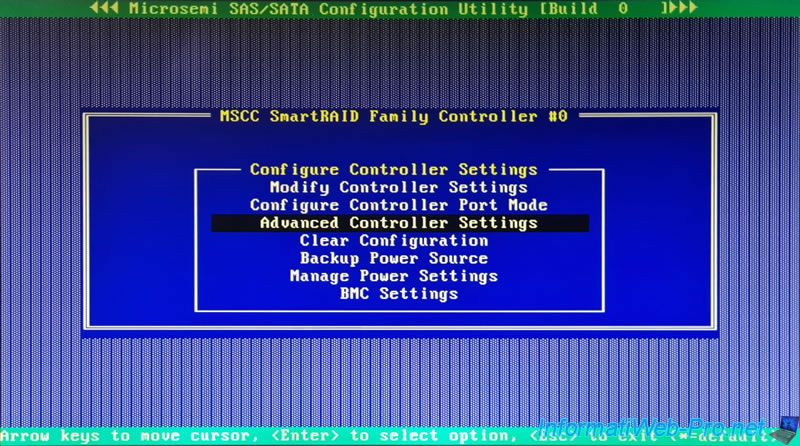
In this "Advanced Controller Settings" section, you will find the settings:
- Degraded Mode Performance Optimization: this setting only affects RAID logical drives created with a RAID level of RAID 5.
- Enabled: improves large data reads by buffering physical disk requests.
- Disabled: the controller will be forced to reread several times from the same disks.
- Physical Drive Request Elevator Sort: allows you to control the behavior of the elevator sort algorithm for writing to the controller cache.
However, this requires the installation of a valid license key. - RAID 6/60 Alternate Inconsistency Repair Policy: allows you to configure the inconsistency repair policy for RAID levels: RAID 6 and RAID 60.
This setting can be enabled (Enabled) or disabled (Disabled). - Maximum Drive Request Queue Depth: allows you to specify the maximum number of physical disk requests that your controller can send to a physical disk at a specific time.
Possible values are: Automatic (default), 32, 16, 8, 4 and 2. - Monitor and Performance Analysis Delay: allows you to configure your controller behavior and performance analysis delay.
Possible values are: Disabled (0) = disabled, 1-120 (default), 121-240, 241-360, ... and 1321-1440. - HDD Flexible Latency Optimization: reduces the maximum latency observed from a host request.
Possible values are: Disabled (default) = disabled, Low, Middle(100ms), High, Very High(30ms) and Very High(10ms).
Note: most of these settings primarily adjust the performance of your Microsemi Adaptec SmartRAID controller with video applications.
Source : Modifying advanced controller settings - HPE.
Share this tutorial
To see also
-

RAID 4/20/2022
Adaptec maxView Storage Manager v3 - Create a RAID volume
-

RAID 4/8/2022
Adaptec maxView Storage Manager v3 - Download and boot on USB version
-

RAID 4/13/2022
Adaptec maxView Storage Manager v3 - Installation on Linux
-

RAID 4/15/2022
Adaptec maxView Storage Manager v3 - Manage an Adaptec SmartRAID controller on VMware ESXi 6.7
You must be logged in to post a comment