- NAS
- Unraid
- 09 September 2026 at 14:08 UTC
-

- 1/4


With Unraid, you can create a gaming virtual machine by adding a physical graphics card (in our case, an Nvidia GeForce RTX 3050).
However, if you have a motherboard designed for home use (which is certainly the case for you), it's quite possible that the "ACS" feature, which is recommended for GPU passthrough, won't be available in your case.
Fortunately, there is a software solution supported by Unraid to solve this problem.
Warning : the solution used in this tutorial will create a security vulnerability, as we will explain later.
However, it is the only available solution when your motherboard does not support the "ACS" feature.
Important : to create a gaming VM, you need two physical graphics cards or one physical graphics card and a processor with a graphics component. In our case: we have a physical graphics card "Nvidia GeForce RTX 3050" and an Intel i9-10900 processor (with a graphics part "Intel UHD Graphics 630").
- Configure your motherboard's BIOS / UEFI firmware
- Prerequisites for creating a virtual machine
- Enable the creation of virtual machines on Unraid
- Create shares for your virtual machines
- List of devices for VFIO without ACS support
- Enable PCIe ACS override patch
- Free up physical devices by assigning them to VFIO (using PCIe ACS overrides)
- Create a gaming virtual machine on Unraid
- Install Windows 10 in your virtual machine
- Install your virtual machine drivers in Windows 10
- Partition the second virtual hard disk of your virtual machine
- Download and install the latest driver available for your Nvidia graphics card
- Install Steam and install your favorite game
- Play Shadow of Tomb Raider in your Windows 10 virtual machine
1. Configure your motherboard's BIOS / UEFI firmware
To upgrade your physical graphics card (in our case, our "Nvidia GeForce RTX 3050" physical graphics card), you need to configure your motherboard's BIOS/UEFI firmware so that your computer uses your processor's graphics card (e.g., Intel UHD Graphics 630) or another graphics card by default.
To do this, when you start your computer, press "Del" or "Delete" to enter your motherboard's BIOS/UEFI firmware.
Warning : if you have a processor without a graphics card and therefore want to use two graphics cards (one for the Unraid console and the other for the gaming VM), then refer to the first 2 steps of our tutorial "Unraid 6.9.2 - VMs - Create a gaming virtual machine" to learn how to connect them and how to configure your motherboard's BIOS.
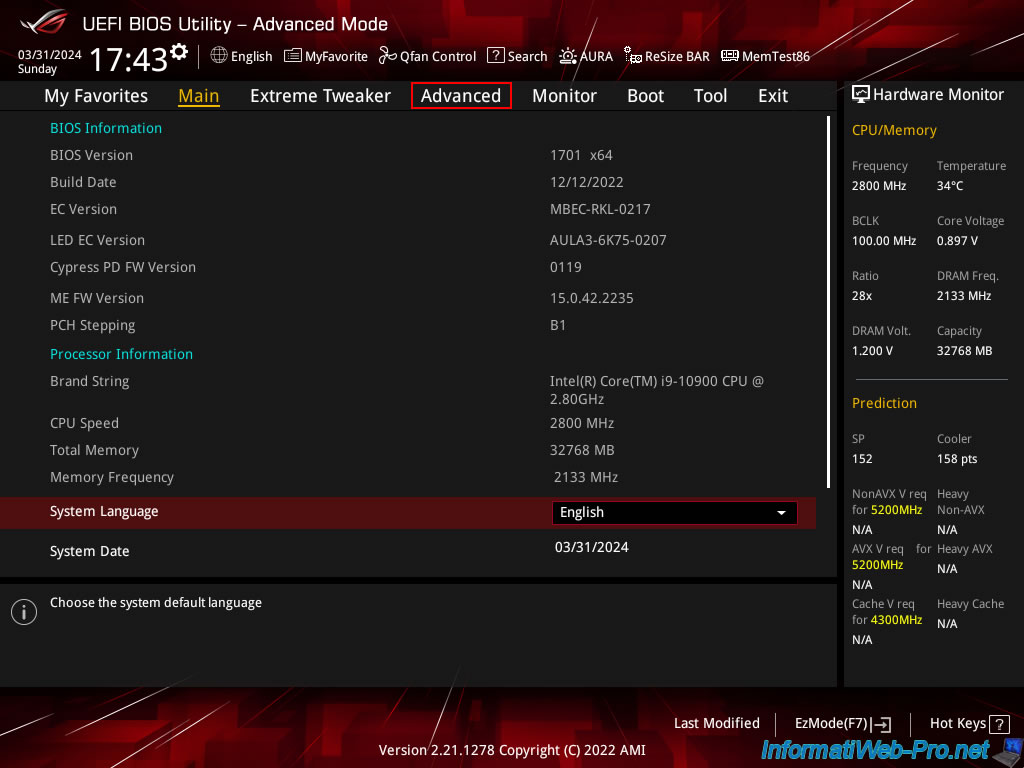
In the "Advanced" tab, go to the "System Agent (SA) Configuration" section.
Then, enable the "VT-d" setting by selecting the "Enabled" value.
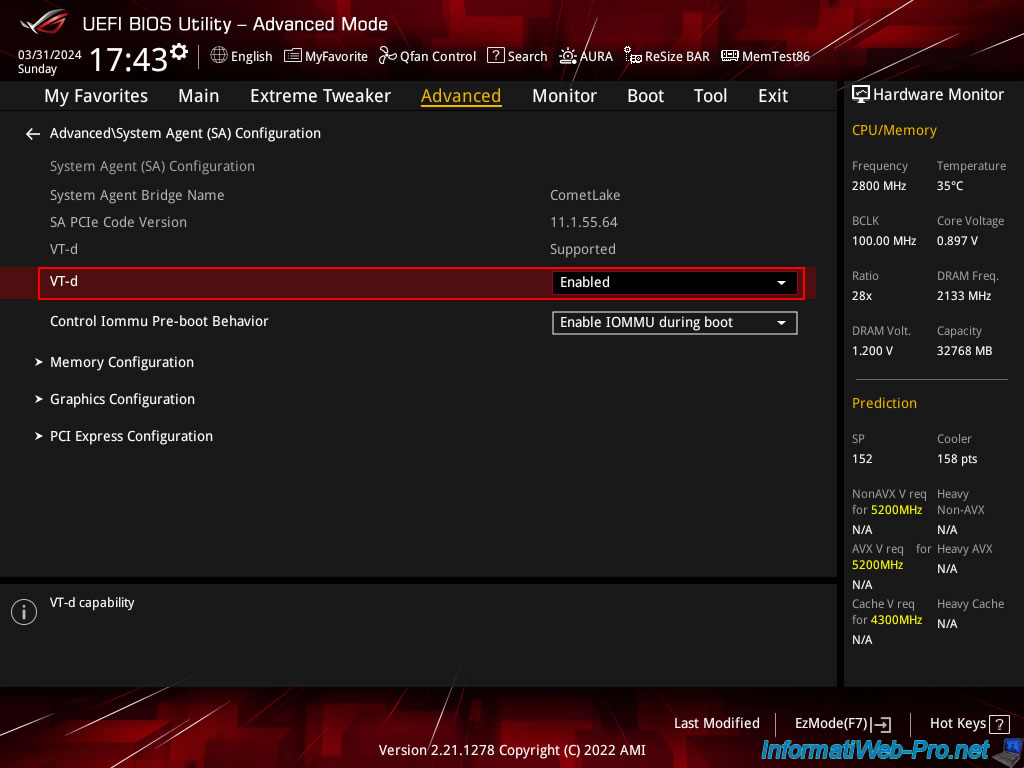
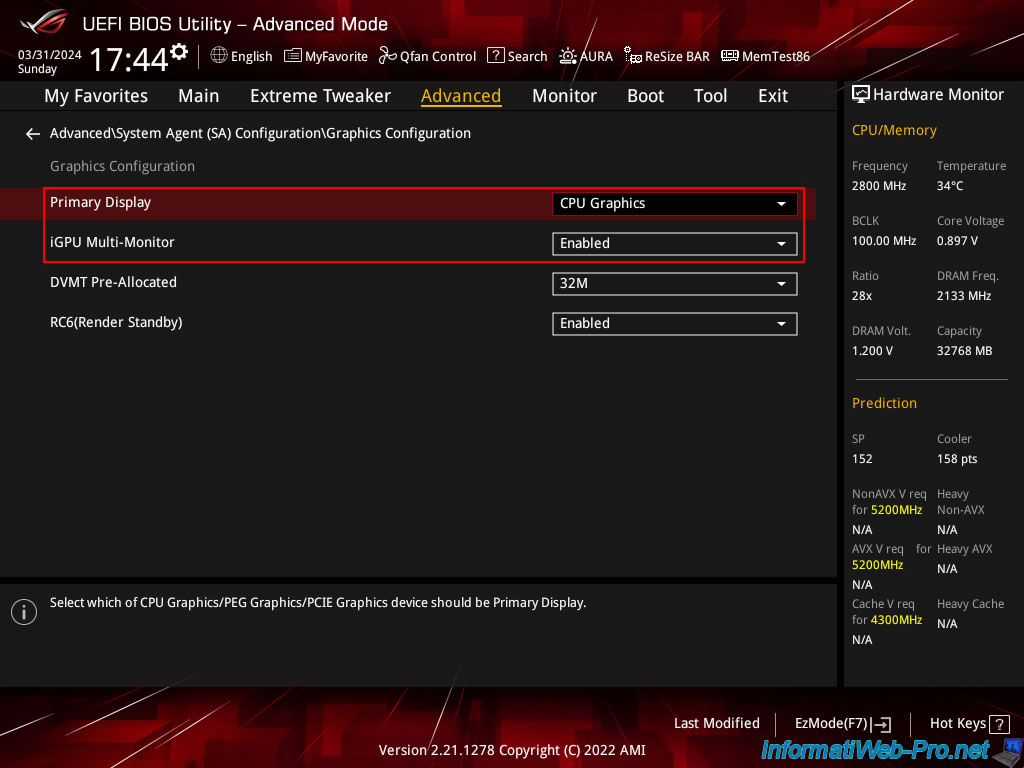
Next, click on "Graphics Configuration" (available in the "System Agent (SA) Configuration" section where you are) and configure these settings like this:
- Primary Display: CPU Graphics.
This allows your computer to use the graphics portion of your processor (e.g., Intel UHD Graphics 630) by default.
This means your physical graphics card (in our case, the Nvidia GeForce RTX 3050) will not be used by Unraid, and you can use it for your gaming VM. - iGPU Multi-Monitor: Enabled.
This provides power to the graphics portion of the processor, as well as the physical graphics card.
However, if this setting were disabled, connecting a physical graphics card (e.g., Nvidia) via PCIe would disable the graphics portion of your processor (e.g., Intel UHD Graphics 630).
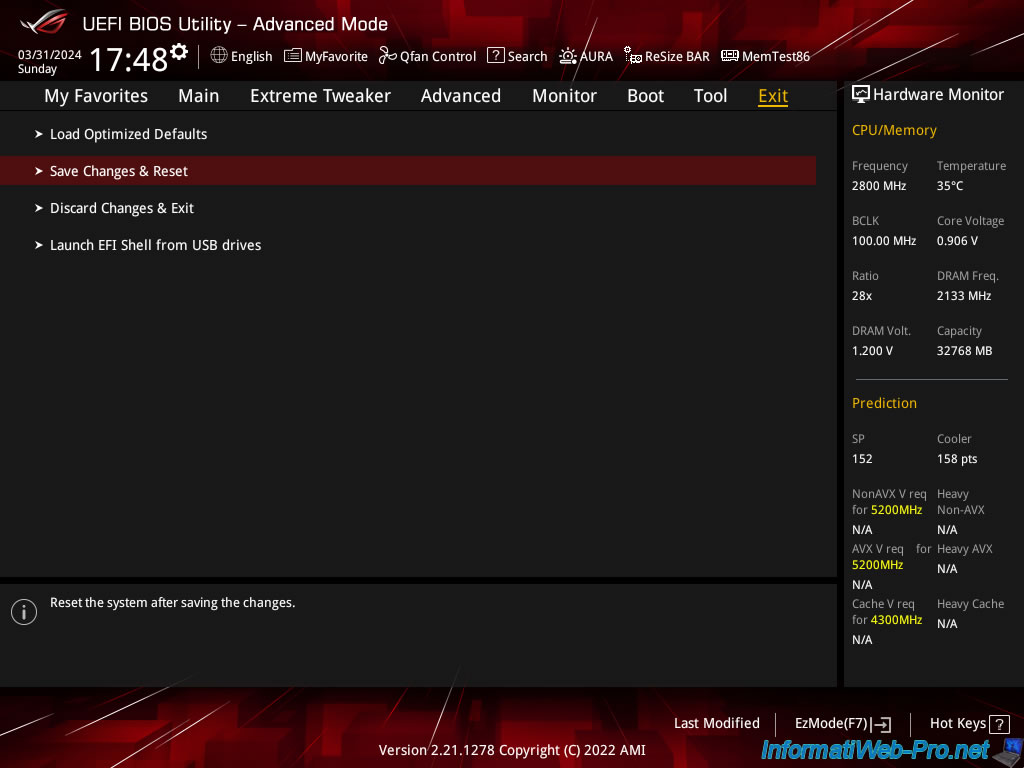
Finally, save the changes by going to the "Exit" tab, then click on "Save Changes & Reset".
2. Prerequisites for creating a virtual machine
To use virtual machines on Unraid and create a gaming virtual machine (by connecting a physical graphics card to it), CPU virtualization and Input/Output (I/O) virtualization must be supported by your hardware and enabled in your motherboard's BIOS/UEFI firmware.
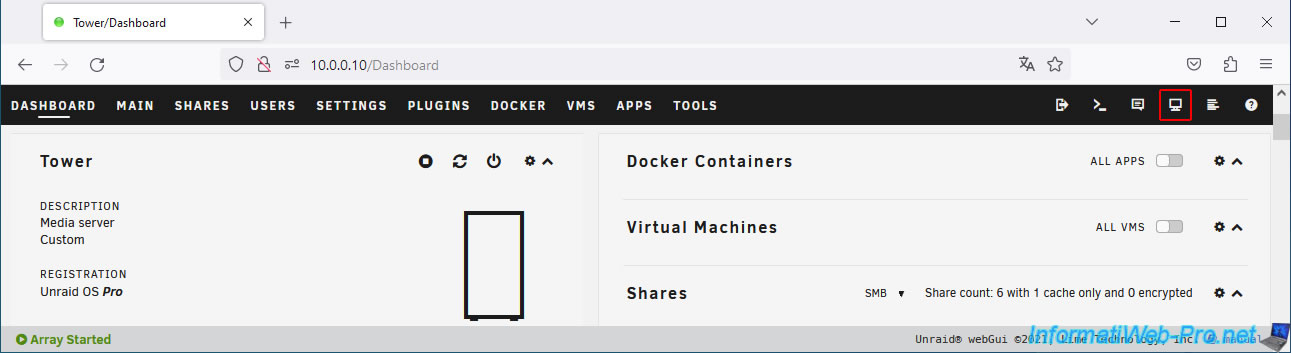
To verify this, click on the fourth icon.
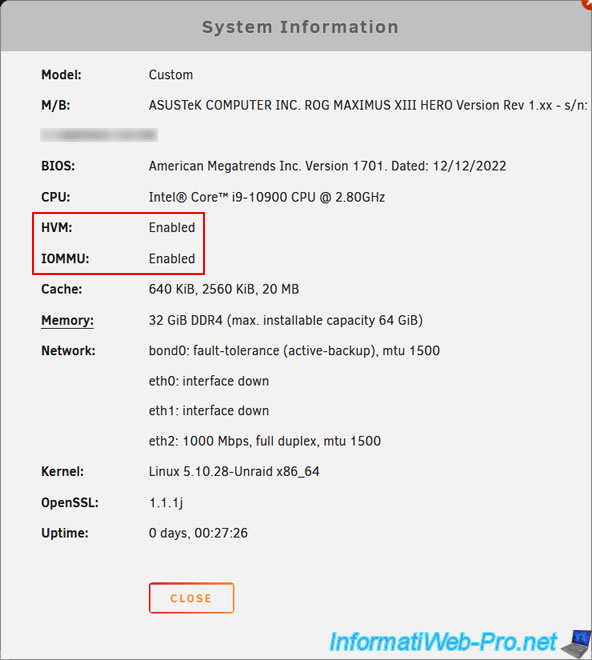
Next, check that these options are enabled:
- HVM: If the value is "Enabled," this means that CPU virtualization is supported by your processor and motherboard, and that CPU virtualization is also enabled in your motherboard's BIOS/UEFI firmware.
If not, check online to see if your processor supports this feature and refer to our tutorial "Enable virtualization (Intel VT-x / AMD-V)" to enable this option in your motherboard's BIOS/UEFI firmware.
This feature is required to create virtual machines on Unraid. - IOMMU: If the value is "Enabled," this means that Input/Output (I/O) virtualization is supported by your processor and motherboard, and that Input/Output (I/O) virtualization is also enabled in your motherboard's BIOS/UEFI firmware.
If not, double-check if this feature is supported by your processor, then refer to our tutorial "Enable IOMMU or VT-d in your BIOS" to enable this option in your motherboard's BIOS/UEFI firmware.
This feature is required to migrate physical devices (including your physical graphics card) to virtual machines on Unraid.
Note: please note that the motherboard used in this case is a gaming motherboard (Asus ROG MAXIMUS XIII HERO) and is therefore intended for home users.
This means that the "ACS" feature is not supported by our motherboard.
3. Enable the creation of virtual machines on Unraid
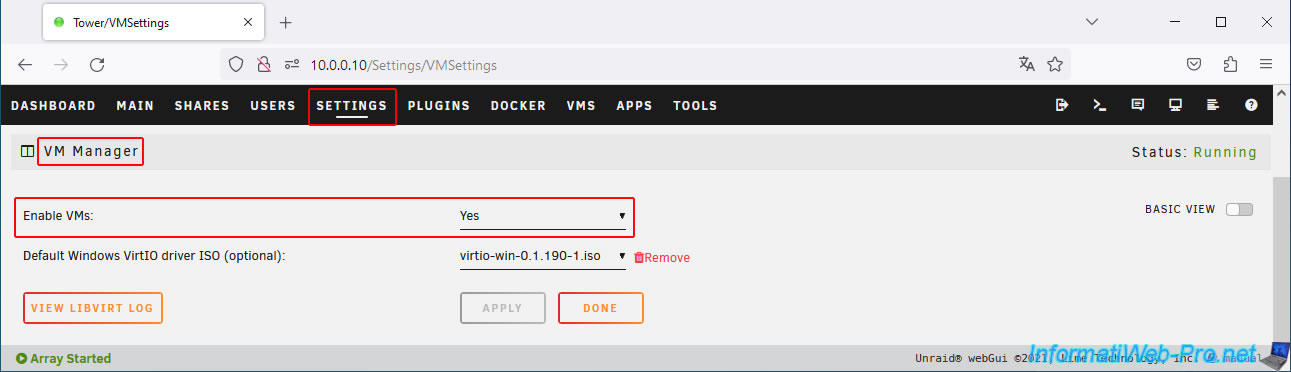
To create virtual machines on Unraid, you must go to "Settings -> VM Manager" and enable the "Enable VMs" setting.
Then, click the "Download" link to the right of the "Default Windows VirtIO driver ISO (optional)" option to download the VirtIO driver ISO, which you will need later for your future gaming VM.
Once this option is enabled, click "Apply".
4. Create shares for your virtual machines
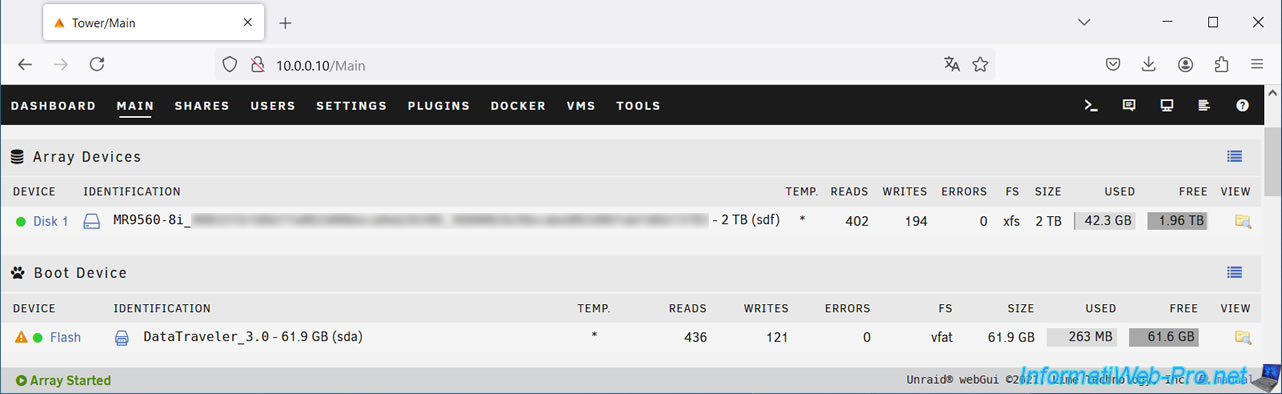
As you can see below, in this case, we only have one physical disk (which is actually a logical RAID disk created on a "Broadcom MegaRAID 9560-8i" controller).
Note: we don't need a parity disk in Unraid, since this logical RAID disk is composed of three physical disks in a RAID 5 configuration (two data disks and one parity disk).
To create shares, go to the "Shares" tab and create an "array_vdisks" share (for the virtual hard drive where you will install your games) and, optionally, an "ssd_vdisks" share (for the virtual hard drive where you will install Windows).
In our case, we don't have an SSD available on this PC, so we only created the "array_vdisks" share.
However, if you have SSDs available, you can also create an "ssd_vdisks" share to make Windows faster for your gaming VM. This is optional, though.
To create these shares, refer to step "4. Create shares for your virtual machines" of our tutorial on creating a gaming VM.
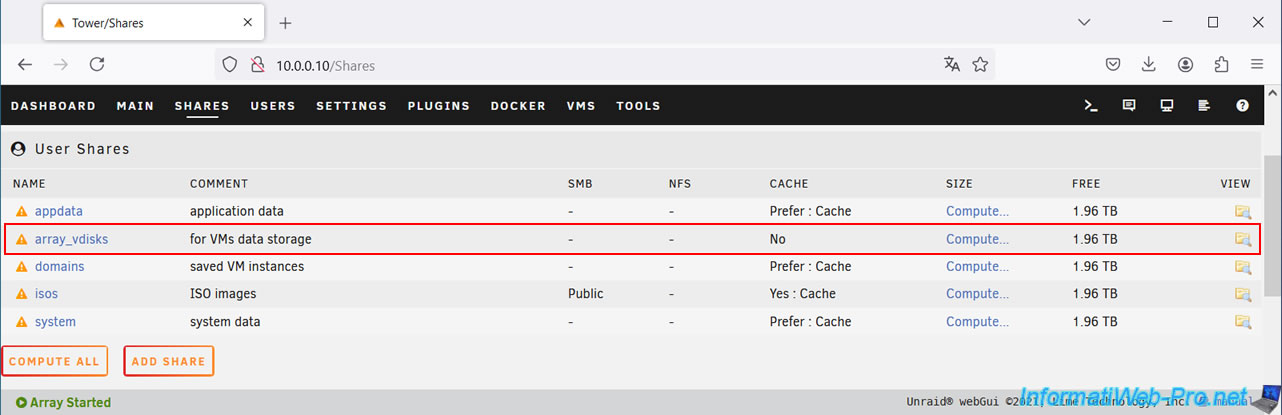
Note: ignore the orange triangles displayed in our case.
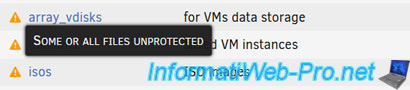
If we hover over these icons with the mouse, Unraid indicates that some files are unprotected.
This is because we haven't configured a parity disk in Unraid.
However, since the RAID logical drive is protected by our RAID controller against the loss of a physical drive, our data is still protected (even though Unraid isn't supposed to know this).
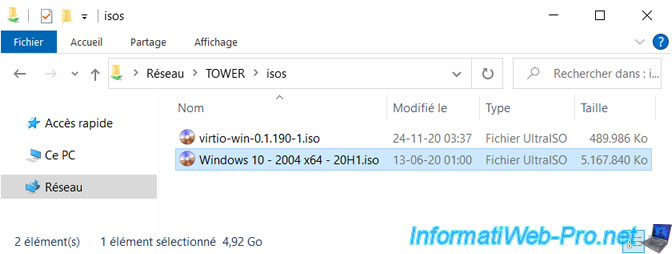
Download a Windows 10 ISO, then transfer it to the "isos" network share on your Unraid server.
Note: if this network share does not appear in your case, make sure you have selected "Yes" for the "Export" setting of the "isos" share on Unraid (as explained at the beginning of our "Unraid 6.9.2 - VMs - Create a virtual machine" tutorial).
5. List of devices for VFIO without ACS support
As we explained previously, our motherboard (which is intended for home users) does not support the "ACS" feature.
In fact, generally, no motherboard intended for home users supports this "ACS" feature (hence the usefulness of this tutorial for home users).
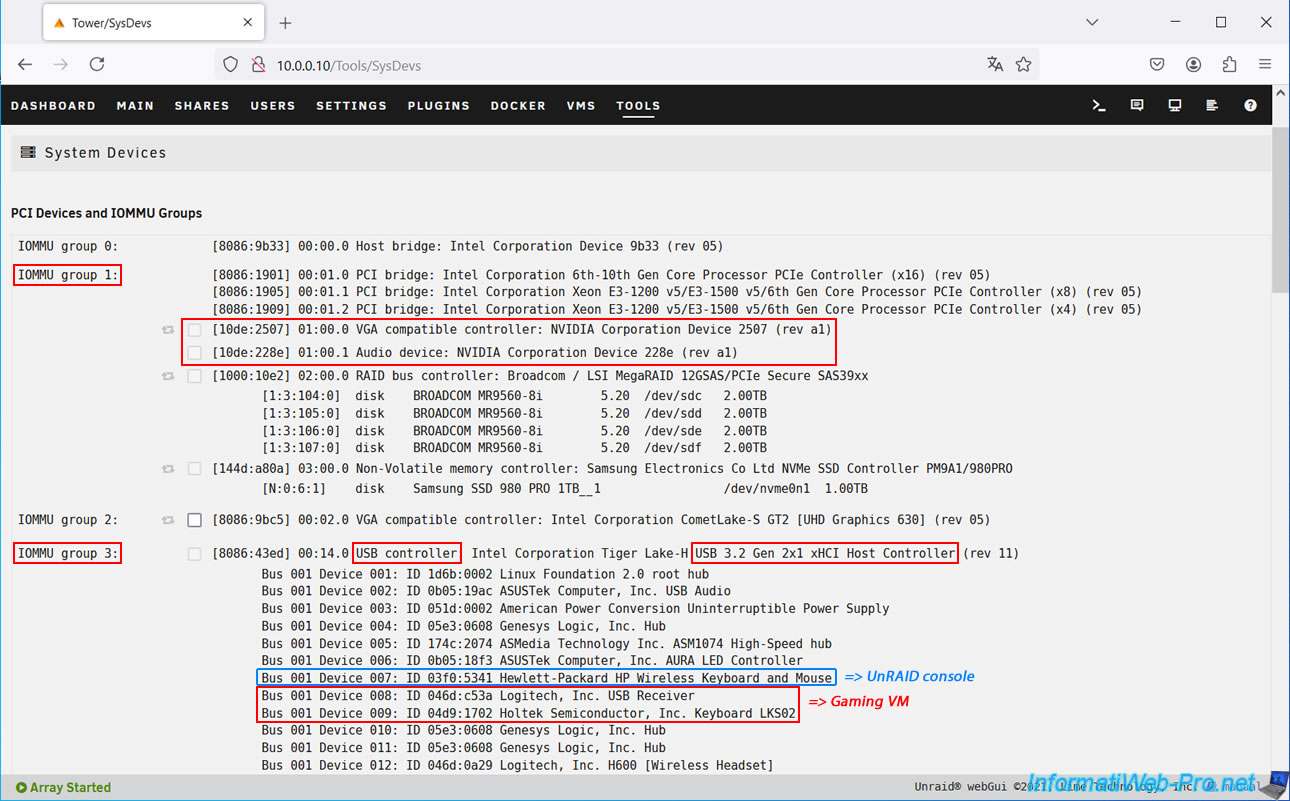
In the Unraid web interface, go to "Tools -> System Devices".
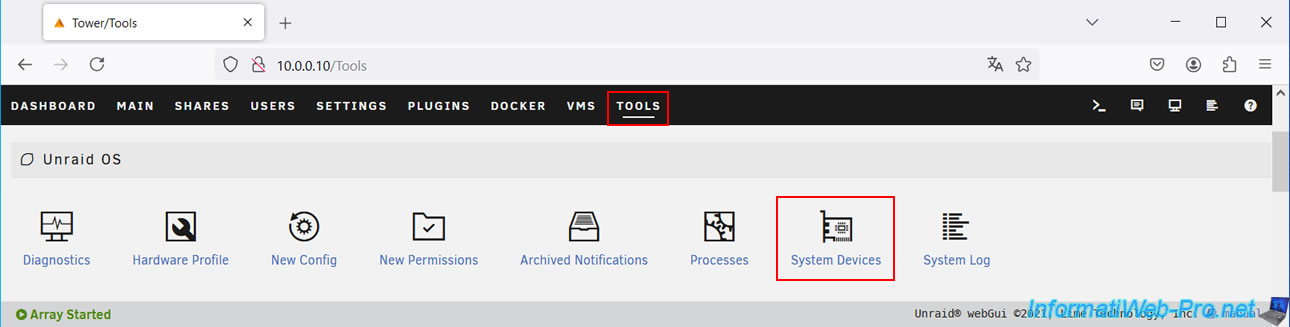
In this list, you can easily find:
- your physical graphics card: by locating a line similar to this: "VGA compatible controller: NVIDIA Corporation...".
- your mouse (connected to a USB controller): in our case, the "Logitech, Inc. USB Receiver" USB dongle of our "Logitech G703" wireless mouse connected via the "Logitech PowerPlay" mouse pad.
- your keyboard (also connected to a USB controller): in our case, "Holtek Semiconductor, Inc. Keyboard LKS02."
The important thing is the keyword "keyboard."
Note: The "Hewlett-Packard HP Wireless Keyboard and Mouse" device corresponds to the USB dongle that allows us to use our second wireless keyboard and mouse.
These allow us to use the Unraid console, while the others will be passed to our gaming VM.
Warning : as you may have guessed, in this case, you don't have the option to assign these devices to the VFIO (which is necessary to pass the devices corresponding to your gaming VM) since they are grayed out.
In addition, you'll easily notice that:
- the NVIDIA physical graphics card located in IOMMU group 1 is located in the same IOMMU group as our "Broadcom / LSI MegaRAID..." RAID controller, our Samsung 980 PRO NVMe SSD, and system peripherals (PCI bridge: Intel Corporation ... Processor PCIe Controller ...).
- all of your computer's USB peripherals are located on the same USB controller (your keyboards (HP Wireless Keyboard and Keyboard LKS02), your mice (HP Wireless Mouse and Logitech USB Receiver), the data cable from our APC UPS (American Power Conversion Uninterruptible Power Supply), and other system peripherals on your motherboard (ASUSTek Computer, Inc. USB Audio, ASUSTek Computer, Inc. AURA LED Controller, ...).
In short, as you may have understood, you won't be able to pass just your graphics card, keyboard, and mouse in this case, because other devices are also in the same IOMMU groups as those you want to pass to your gaming VM.
To do this, you'll need to use the ACS patch to isolate all your devices in software. This way, they will be isolated (one device per IOMMU group).
This will solve the problem for creating your gaming virtual machine.
Warning : although the ACS patch makes it very easy and free to fix this problem encountered with motherboards intended for home users, it will also create a security vulnerability on your computer.
Indeed, once the ACS patch is loaded by Unraid, if you pass your graphics card (for example) to your gaming VM, this will mean that a hacker will be able to attack the other physical devices on your computer that were in the original IOMMU group. In other words, in our case, with the ACS patch, a hacker who installs a virus on our gaming VM would be able to attack our Broadcom / LSI MegaRAID ... RAID controller, our Samsung 980 PRO NVMe SSD, as well as the system devices of our Intel processor (Intel Corporation ... Processor PCIe Controller) in our physical PC from within our gaming VM.
So, with the ACS patch, the virtual machine is no longer truly isolated, as there will be a security vulnerability allowing a hacker to access your physical PC's hardware from within the VM.
If you still want to use the ACS patch, protect your gaming VM with antivirus software and be careful what you do in it. You have been warned!
For USB devices, you can simply pass them as USB devices when creating the gaming VM.
Warning : although USB devices are plug-and-play (dynamically recognized when you unplug and plug them back in), this is not the case when they are physically passed to your gaming VM.
These USB devices must therefore be plugged in for your gaming VM to boot, and you must leave them plugged in while the VM is booting.
Otherwise, you will need to turn it off and on again.
At the beginning of each line in the device list, you'll find their hardware IDs.
In our case, Unraid recognizes our graphics card as "[10de:2507] ... NVIDIA Corporation Device 2507".
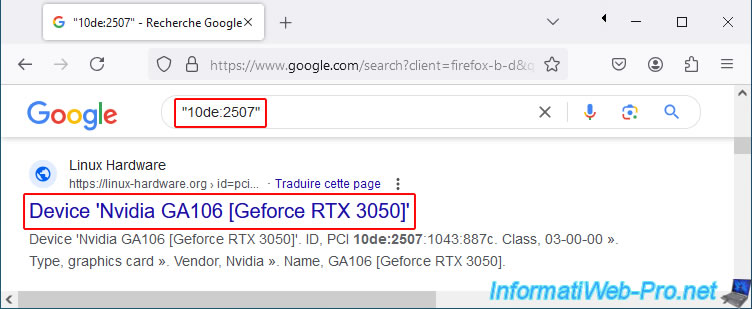
To find out your graphics card model, simply type this hardware ID into Google, putting quotation marks around it.
As you can easily see below, in our case, it's an "NVIDIA GeForce RTX 3050" graphics card.
6. Enable PCIe ACS override patch
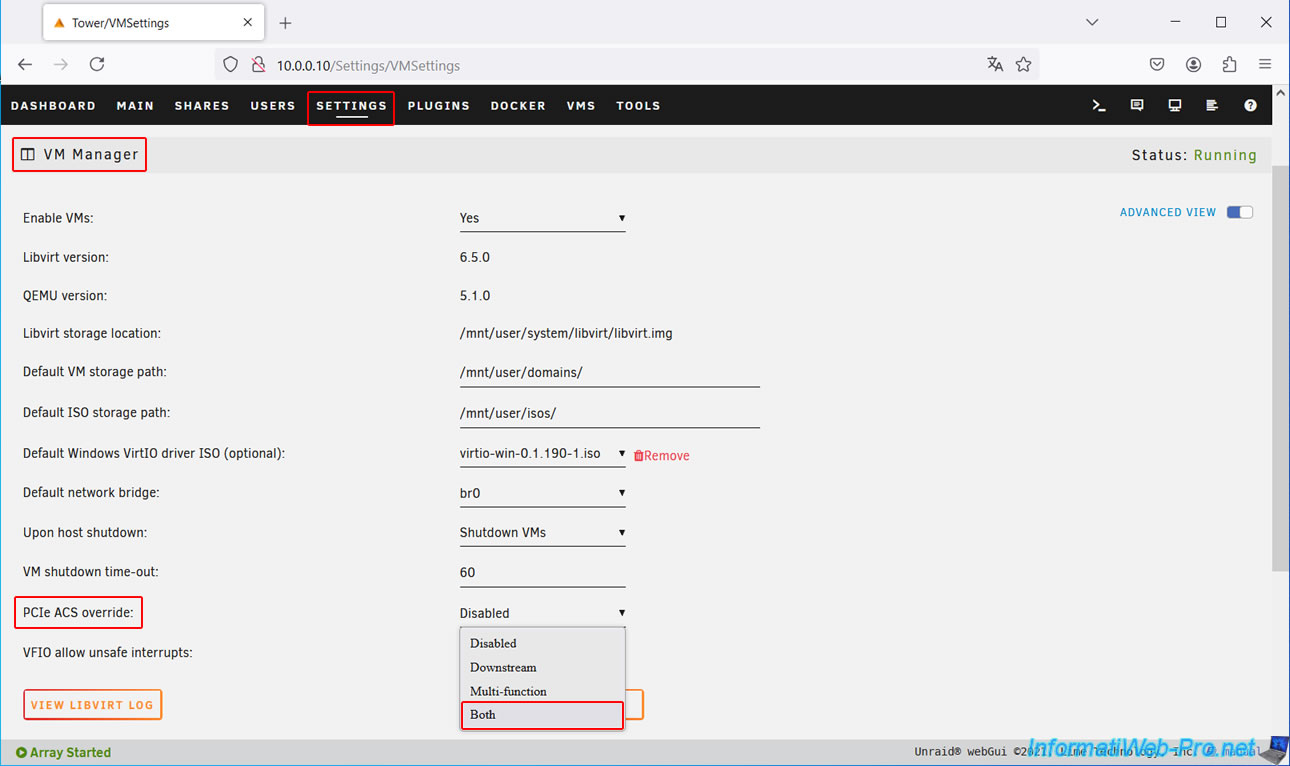
To isolate all your physical devices into separate IOMMU groups and easily switch your graphics card to your future gaming VM, go to "Settings -> VM Manager".
Then, select "Both" for the "PCIe ACS override" setting.
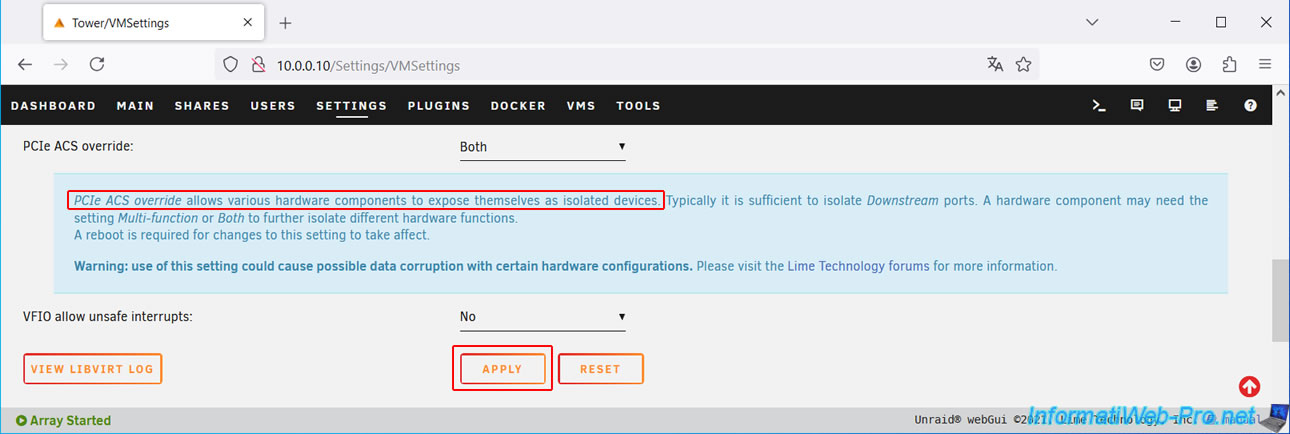
If you click on the name of this setting, Unraid will inform you that this setting exposes all physical devices on your computer as isolated devices.
In other words, isolates all your physical devices into separate IOMMU groups.
Click "Apply".
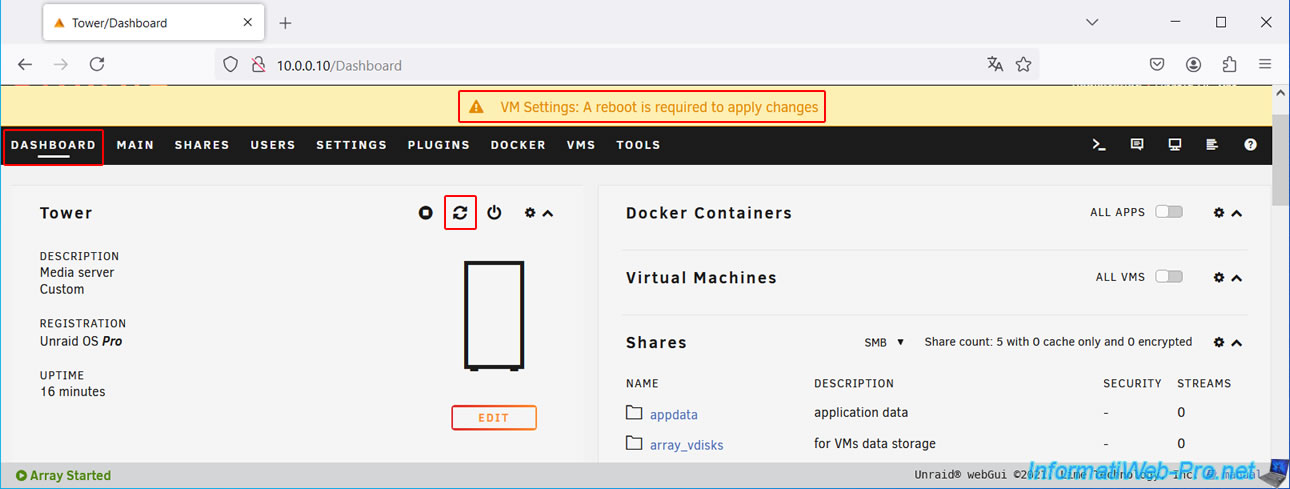
Changing the "PCIe ACS override" setting will require a restart of your Unraid server.
Go to the "Dashboard" tab and click the second icon to restart Unraid.
Plain Text
VM Settings: A reboot is required to apply changes.
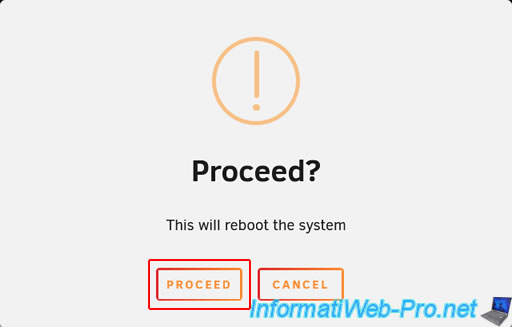
Click on "Proceed".
Share this tutorial
To see also
-

NAS 6/3/2026
Unraid 6.9.2 - SWAG - Access Jellyfin via reverse proxy and Duck DNS (DDNS)
-

NAS 6/10/2026
Unraid 6.9.2 - SWAG - Access Jellyfin via reverse proxy and personal domain
-

NAS 5/6/2026
Unraid 6.9.2 - SWAG - Install a reverse proxy (SWAG)
-

NAS 9/23/2026
Unraid 6.9.2 - VMs - Hotplug USB devices (USB Manager plugin)
You must be logged in to post a comment