- NAS
- Unraid
- 01 July 2026 at 13:16 UTC
-

- 1/3

Previously, we explained how to access the different services hosted on your Unraid server via the reverse proxy "swag" using your own domain.
However, to do this, you had to indicate your WAN IP address as the target for your own domain name (as well as for its subdomains, if you used DNS records of type "A" or "AAA" instead of CNAME records pointing to the root of your domain).
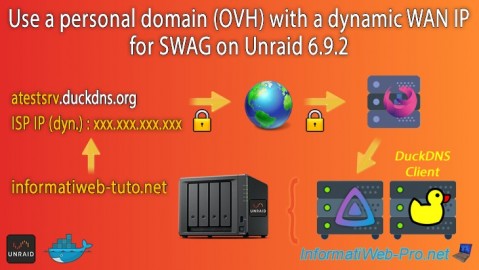
As you may already know, when you take out an Internet subscription as an individual, you have a dynamic WAN (external) IP address.
This means that it changes regularly (every day, every week, ...). The frequency of this change varies from one ISP (Internet Service Provider) to another.
To easily avoid this problem while keeping the advantages of using a real domain, simply create a dynamic domain (DDNS) at Duck DNS (for example), then point your domain to it.
Thus, once the Duck DNS client is installed and configured on your Unraid server, the IP address obtained by your computer or smartphone by resolving your real domain will always be the current one of your Unraid server's Internet connection.
- Swag configuration
- Reverse proxy logs: swag
- Create a dynamic subdomain (DDNS) at Duck DNS
- Install and configure the Duck DNS client on Unraid
- Unable to create a CNAME DNS record on the root of a domain
- Delete the DNS record of your root domain
- Point your www subdomain at OVH to your dynamic domain name created at Duck DNS
- Example of setting up your domain with swag and Jellyfin
- Configuration for swag reverse proxy
1. Swag configuration
For the swag configuration, nothing changes.
To check it, click on the "swag" icon, then on: Edit.
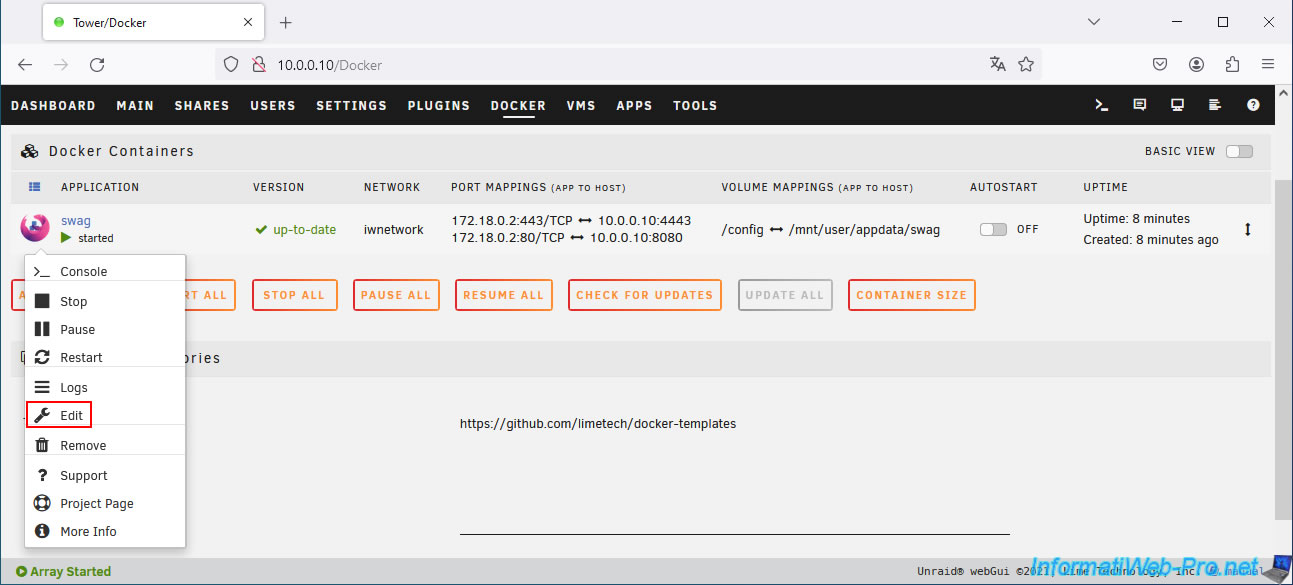
The "Update Container" page appears.
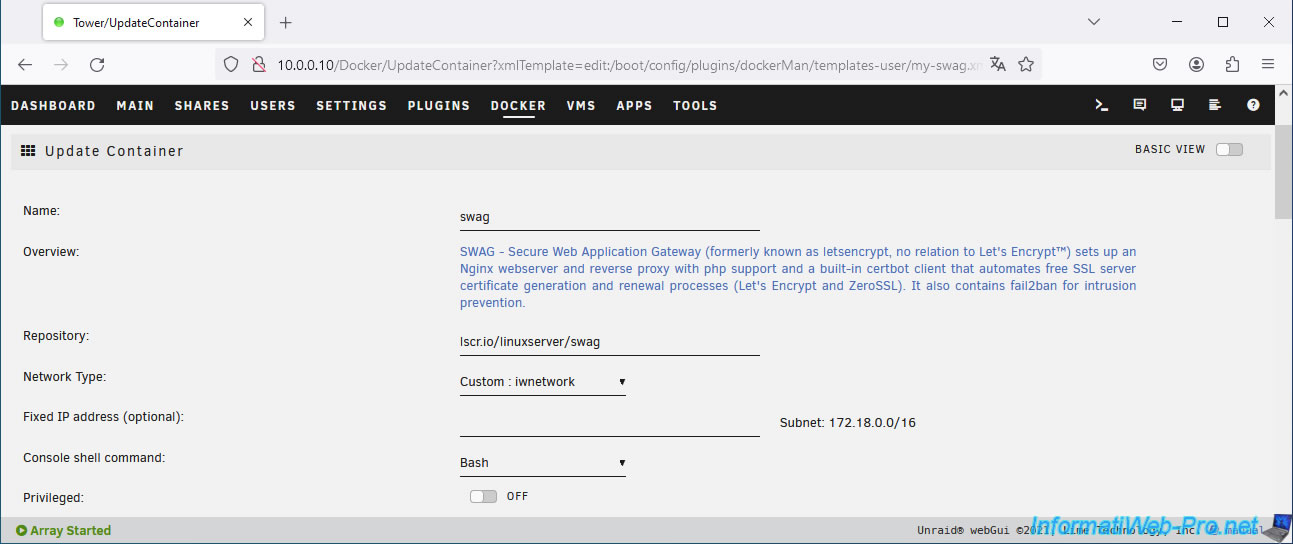
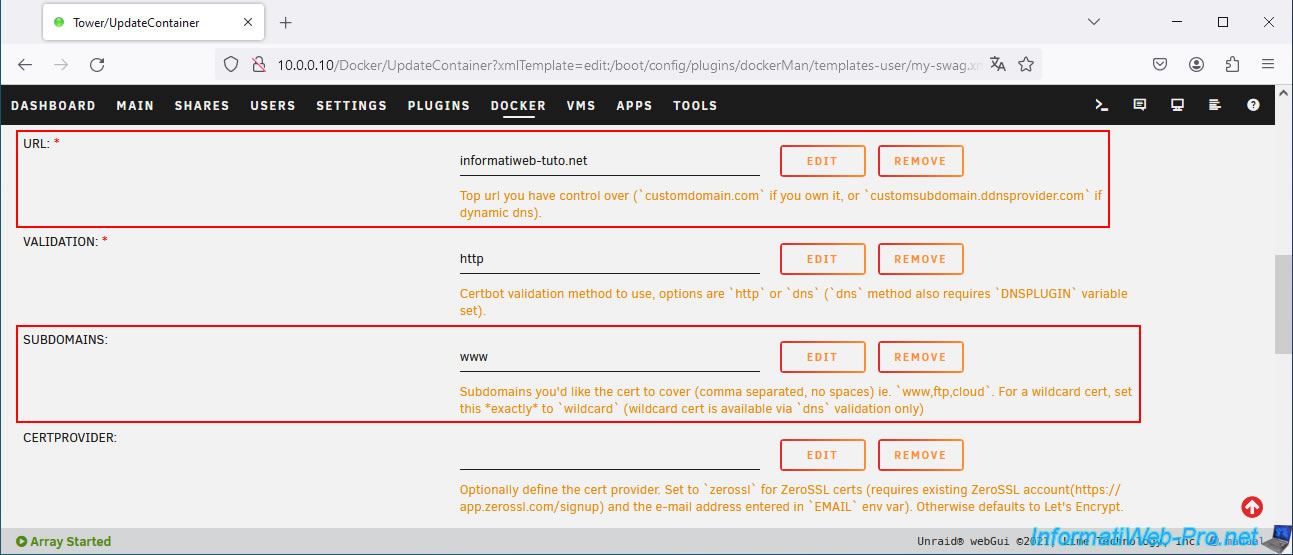
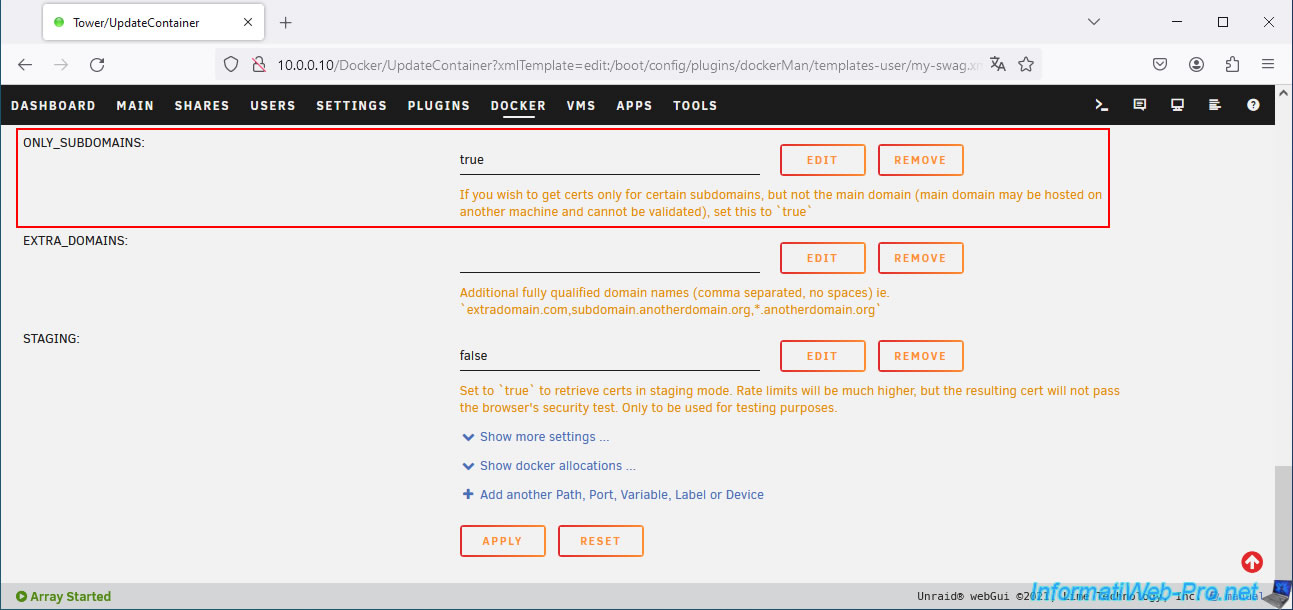
As you can see, in our case, we use our domain "informatiweb-tuto.net" and its subdomain "www" with "swag".
This reverse proxy "swag" therefore generates a certificate that is valid for our root domain "informatiweb-tuto.net", as well as its subdomain "www.informatiweb-tuto.net".
Important : as you will see a little later in this tutorial, it is impossible to create a "CNAME" (alias) field on the root of your domain without losing access to your emails for this same domain.
It is therefore not possible to automatically update the IP address associated with the root of your domain.
For the "http" type validation used by default by "swag" to continue to work, you must therefore indicate "true" as the value for the "ONYL_SUBDOMAINS" parameter.
Thus, only your subdomains can be validated and used with the "swag" reverse proxy. Which is more than enough.
Then, click on "Apply".
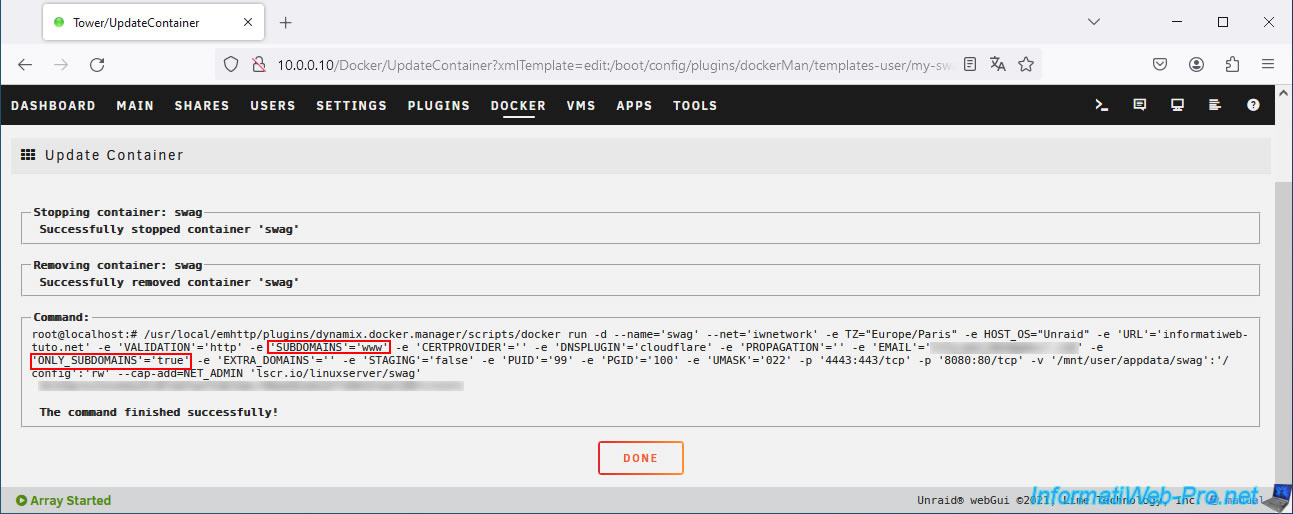
As you can see, currently we are using the subdomain "www" with "swag" and the value of the parameter "ONLY_SUBDOMAINS" is "true".
Click on: Done.
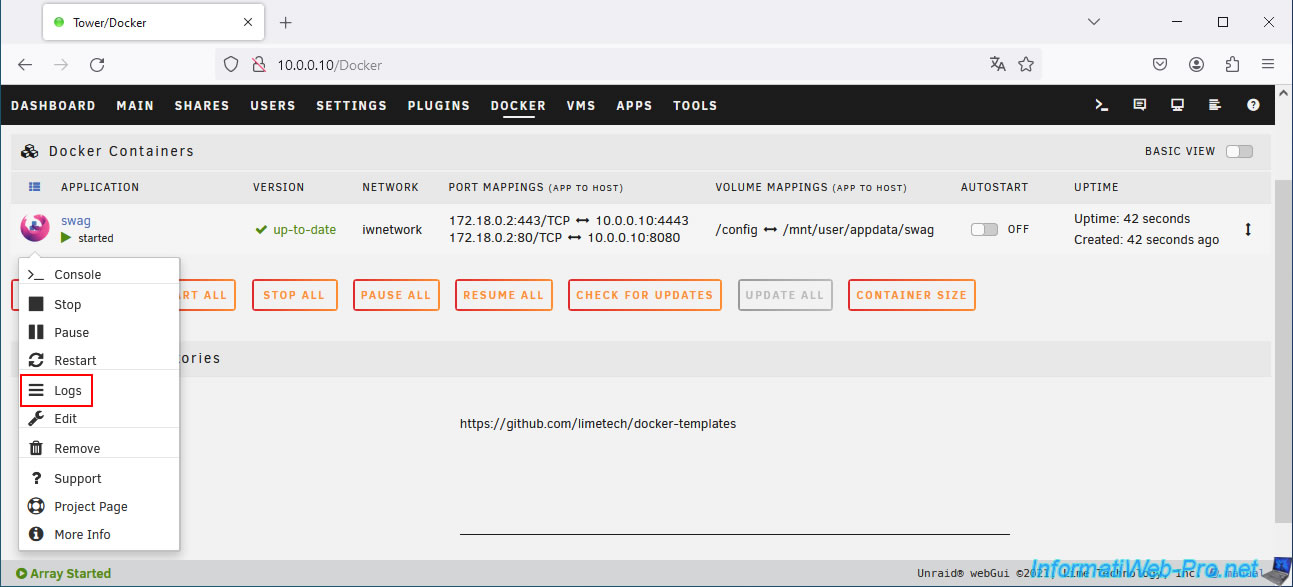
2. Reverse proxy logs: swag
To see the logs of the reverse proxy "swag", click on its icon, then on: Logs.
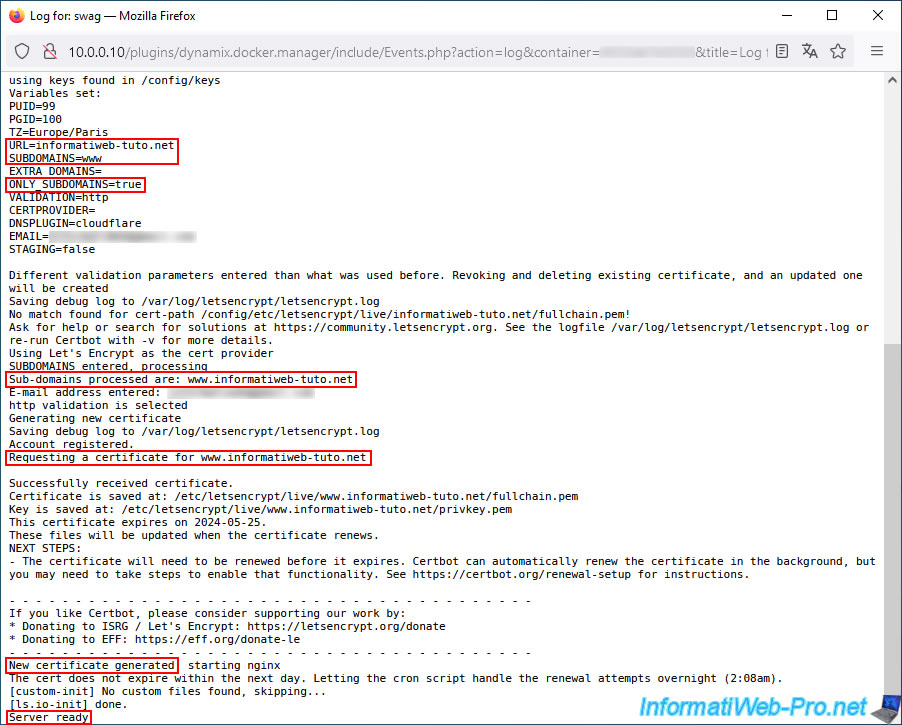
As you can see, the reverse proxy "swag" asks for a certificate that will be valid only for your subdomains.
In its case, our subdomain "www.informatiweb-tuto.net".
3. Create a dynamic subdomain (DDNS) at Duck DNS
As explained above, in order for your subdomains (which you will later reference in the "swag" configuration) to always point to your current WAN (external) IP address, you will need a dynamic domain name (DDNS).
For this, we recommend using the "Duck DNS" service which is supported by the "swag" reverse proxy, as well as by Unraid (thanks to the free "duckdns" application available on the Unraid Store).
On this site, log in with an existing Twitter, GitHub or Google account to register on Duck DNS.
Note: for the detailed procedure on how to create subdomains at Duck DNS and how to configure the "duckdns" client on Unraid, refer to our tutorial: Unraid 6.9.2 - Docker - Install a DDNS client (Duck DNS).
In this tutorial, we only give you the main steps to explain our little trick to use a real domain with a dynamic WAN IP address.

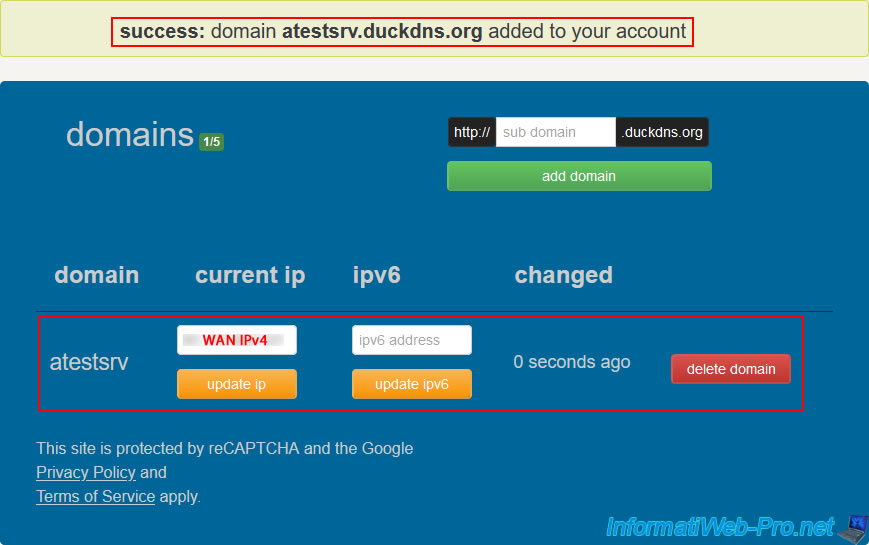
Once you are registered and logged in to the Duck DNS website, go to the "domains" section located a little further down the page and create a Duck DNS subdomain.
This name must be unique and does not really matter since you will only indicate it as a target in the DNS zone of your real domain and in the configuration of your "duckdns" client on Unraid.

Your new subdomain "xxxxx.duckdns.org" appears in your domains list and your current WAN IP address appears in the "current ip" box for this subdomain.
4. Install and configure the Duck DNS client on Unraid
To ensure that your subdomain created at Duck DNS always points to your current WAN IP address, you need to install and configure a Duck DNS client on your Unraid server.
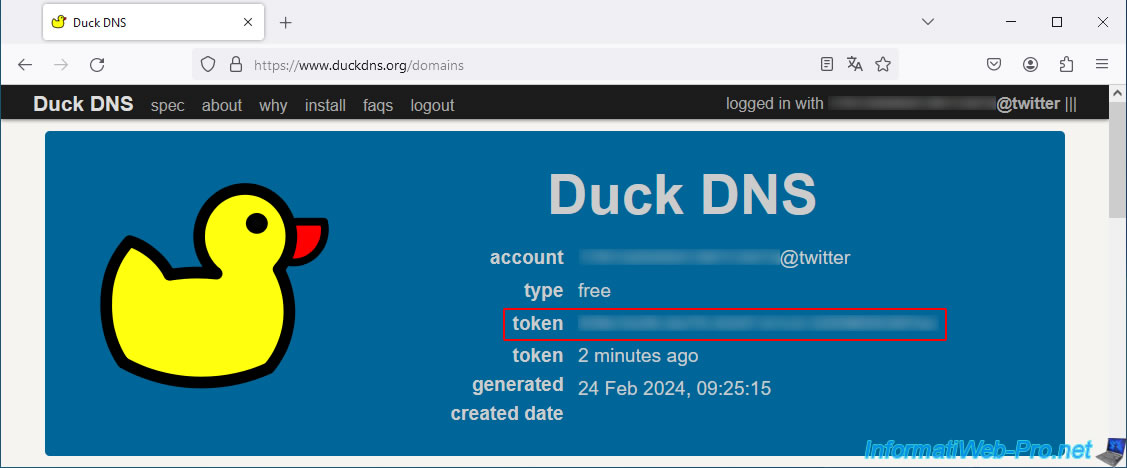
Before you start, get your token from the Duck DNS site where you are currently logged in.
This is what identifies your account at Duck DNS.
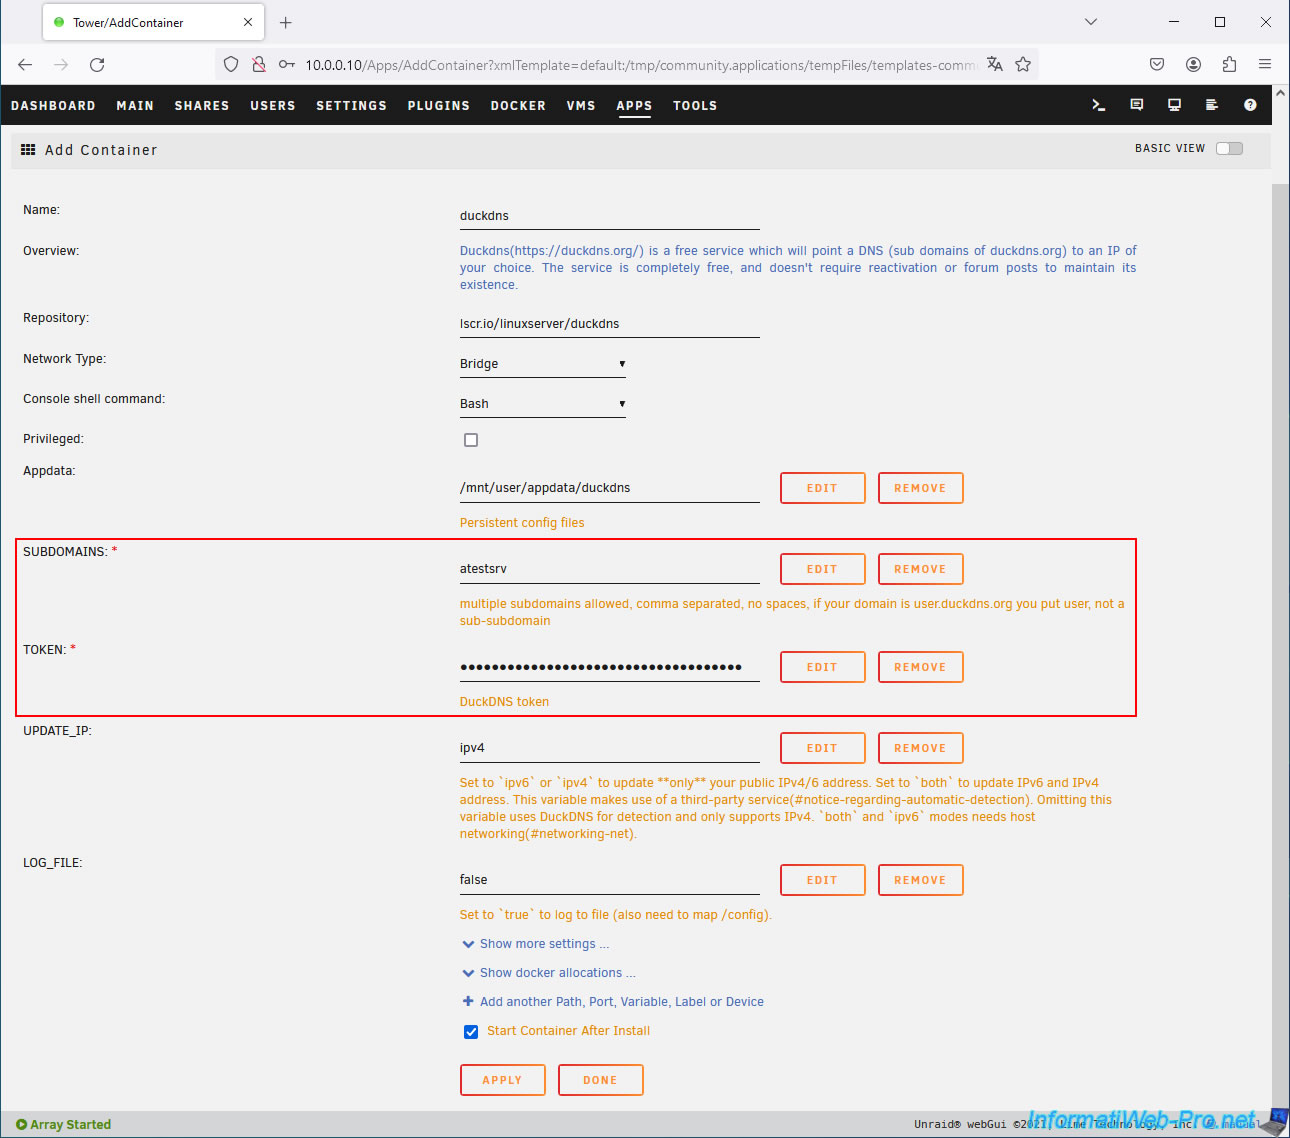
Then, go to the "Apps" tab of your Unraid server and install the "duckdns" application present in the "linuxserver" repository.
In the "Add Container" form that appears, configure these 2 fields:
- SUBDOMAINS: your subdomain (without the "duckdns.org" suffix) previously created at Duck DNS.
- TOKEN: your token retrieved from the Duck DNS site where you are connected.
Click "Apply" at the bottom of the page.
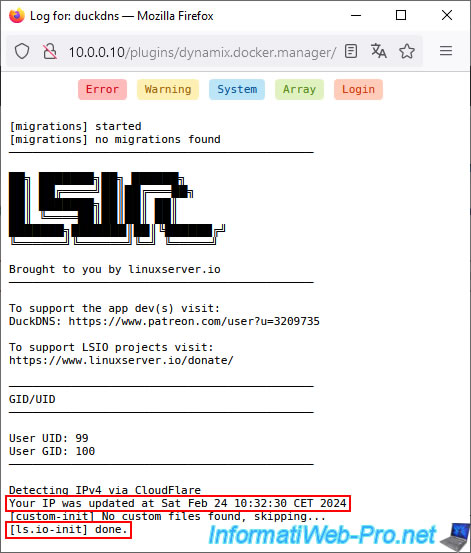
In the logs of this "duckdns" application, you will see that your IP address has been updated for your subdomain created at Duck DNS.
5. Unable to create a CNAME DNS record on the root of a domain
If you try to add a CNAME type DNS record for the root of your domain at OVH, you will see that an error will occur (even if you have previously deleted the "A" and/or "AAAA" type DNS records).
Plain Text
Add an entry to the DNS zone.
...
Field type: CNAME.
Plain Text
The subdomain already uses a DNS record. You cannot register a CNAME field due to an incompatibility. Delete the existing records for this subdomain, so that you can add a new one, of type CNAME.
Plain Text
informatiweb-tuto.net.  TXT  "1|www.informatiweb-tuto.net"
informatiweb-tuto.net.  NS   dnsXX.ovh.net.
informatiweb-tuto.net.  NS   sXX.ovh.net.
informatiweb-tuto.net.  MX   10 mxX.mail.ovh.net.
informatiweb-tuto.net.  MX   1 mxX.mail.ovh.net.
Warning : do not delete these DNS records.
Indeed, DNS records of type:
- MX: used to locate the mail server for receiving emails on your email addresses of the type "you@your-domain.com".
If you delete your "MX" type records, your email addresses will no longer work and you will no longer receive your emails at these addresses. - TXT: used for the configuration of your web hosting (for example) or more often to prove to third-party sites (analytical tools, advertising networks, ...) that you are the owner of your domain.
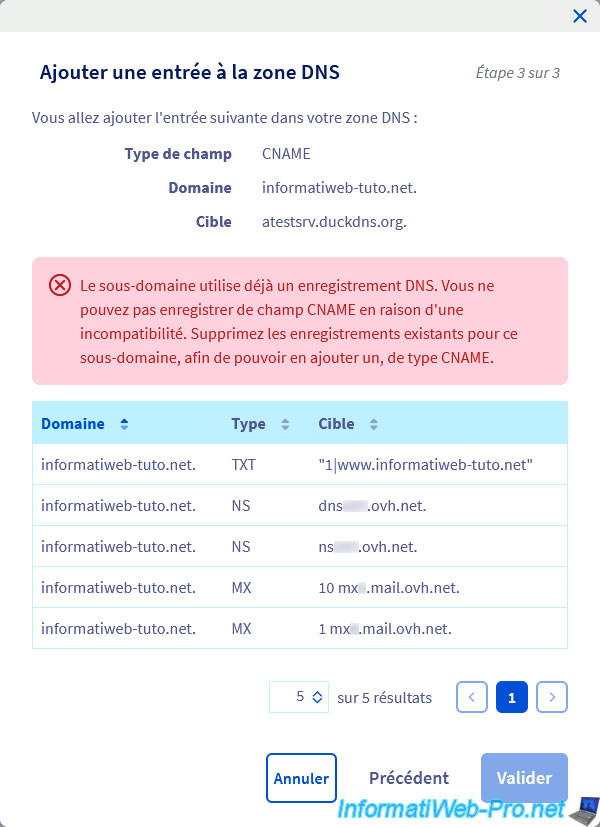
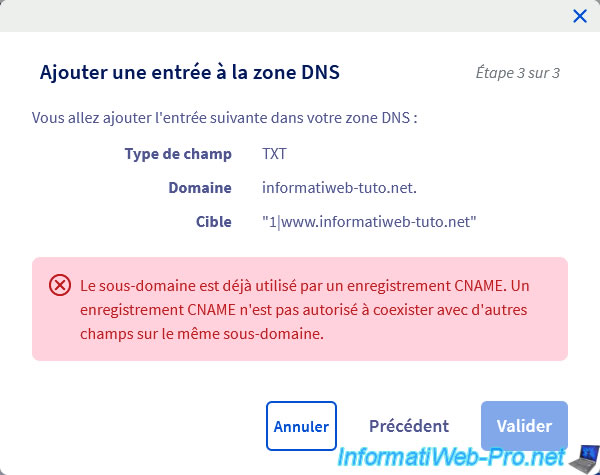
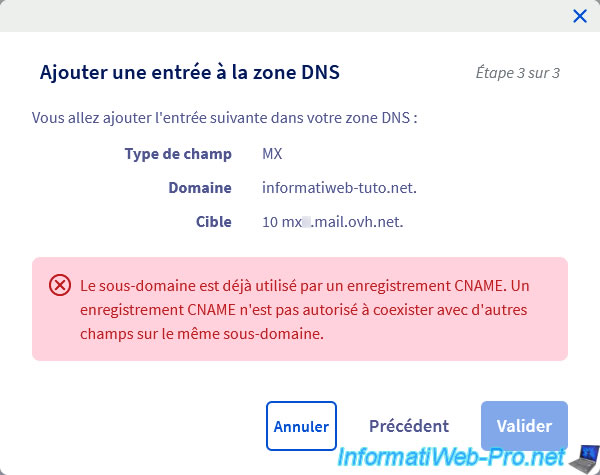
No need to delete these DNS records to try to create the CNAME record and recreate them right after, it will not work.
As you can check with the following 2 images below.
Plain Text
The subdomain is already in use by a CNAME record. A CNAME record is not allowed to coexist with other fields on the same subdomain.
Note that this problem is not specific to OVH, but to the DNS protocol itself.
Indeed, you can check this restriction:
- on Wikipedia : CNAME record - Wikipédia.
- on the official reference : RFC 1034 - Domain names - concepts and facilities - 3.6.2. Aliases and canonical names.
Share this tutorial
To see also
-
NAS 4/15/2026
Unraid 6.9.2 - Docker - Install a file server (Nextcloud)
-
NAS 3/11/2026
Unraid 6.9.2 - Presentation of Dynamix plugins (sys info, ...)
-
NAS 5/13/2026
Unraid 6.9.2 - SWAG - Locally access the reverse proxy (SWAG)
-
NAS 7/22/2026
Unraid 6.9.2 - VMs - Backing up a VM manually
You must be logged in to post a comment