- NAS
- Unraid
- 15 July 2026 at 16:20 UTC
-

- 1/3

On Unraid, you also have the option to create virtual machines via the "VMS" tab.
In this tutorial, you'll see the prerequisites to check, as well as how to enable the use of virtual machines in Unraid and create your first virtual machine in Unraid.
- Manage ISO files to install a guest OS in a virtual machine
- Enable CPU virtualization and input/output (I/O) virtualization
- Enable virtual machine manager on Unraid
- Create a virtual machine on Unraid
- Install guest operating system (Windows 10)
- Install VirtIO drivers on Windows 10
1. Manage ISO files to install a guest OS in a virtual machine
To begin, go to the "Shares" tab in Unraid.
As you can see, four user shares are already created by default.
When you want to create virtual machines in Unraid, you'll use two of them:
- domains: for the configuration and virtual hard drives of your virtual machines.
- isos: for the ISO files you will use to install a guest operating system (OS) in a virtual machine.
However, by default, this "isos" share is not accessible via the network.
To resolve this issue, click on its name.
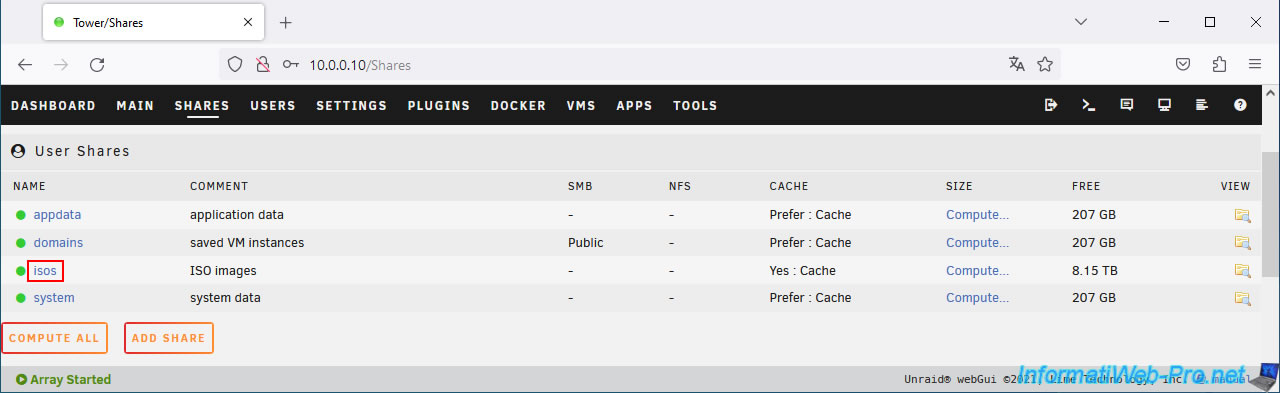
In the "SMB Security Settings" section (located at the bottom of the page), you'll see that it isn't "exported" by default.
This "ISO" share is therefore inaccessible from other computers on your local network.
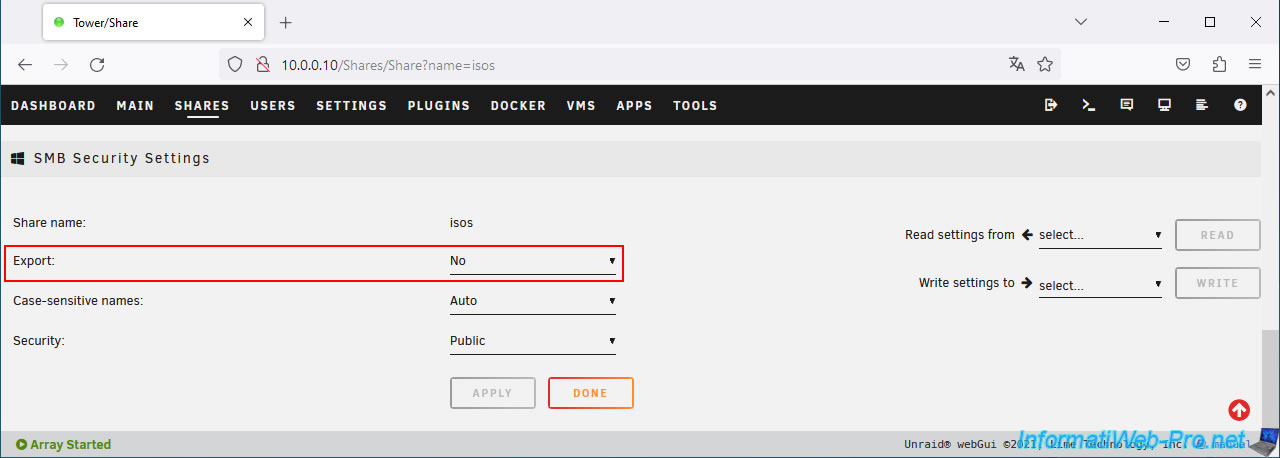
Change the "Export" setting to "Yes" to make it visible on the network.
Then, click Apply.
Note that, by default, this share is not password protected since the "Security" setting below it is set to "Public".
To learn more about configuring shares in Unraid, refer to our tutorial: Unraid 6.9.2 - Create shares (network / user).
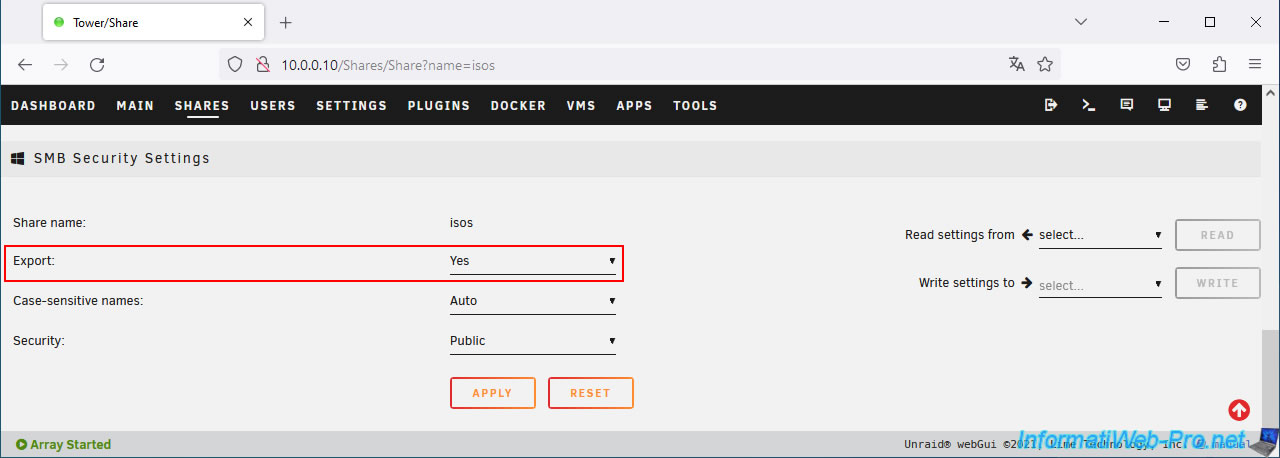
In Windows file explorer, type "\\TOWER" in the address bar.
Note that you can also use the IP address of your Unraid server. In our case, this would be "\\10.0.0.10".
You will see the "isos" shared folder appear.
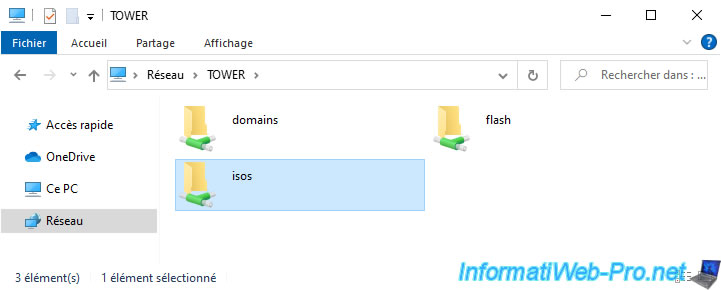
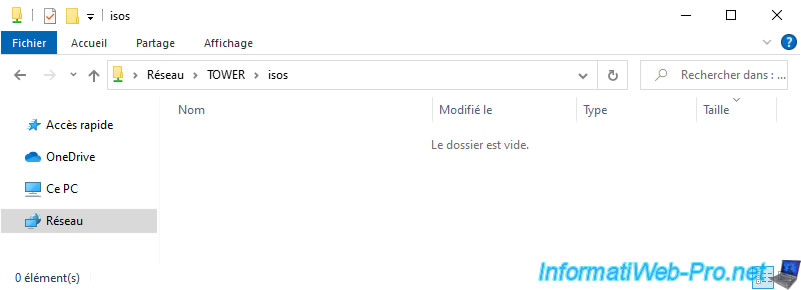
By default, this folder is empty.
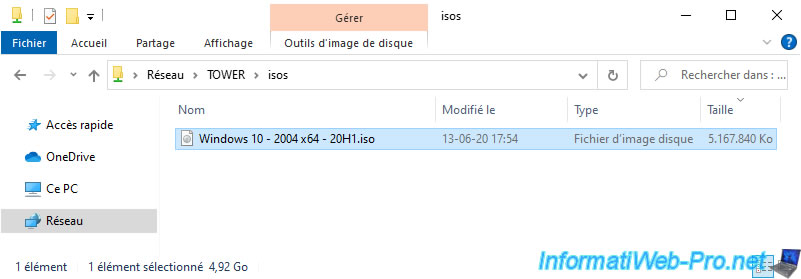
For this tutorial, we have added the Windows 10 ISO file (downloaded in the past from the Microsoft website).
2. Enable CPU virtualization and input/output (I/O) virtualization
To create virtual machines, CPU virtualization must be enabled.
In addition, to use PCI passthrough (to pass a physical device to a VM), input/output (I/O) virtualization must be enabled.
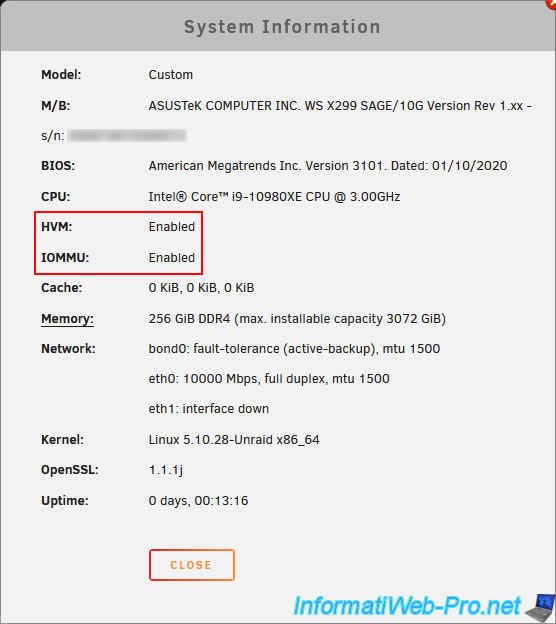
To verify that these options are supported by your hardware and enabled, click the small screen icon (outlined in red in the image below) located at the top right of the page.
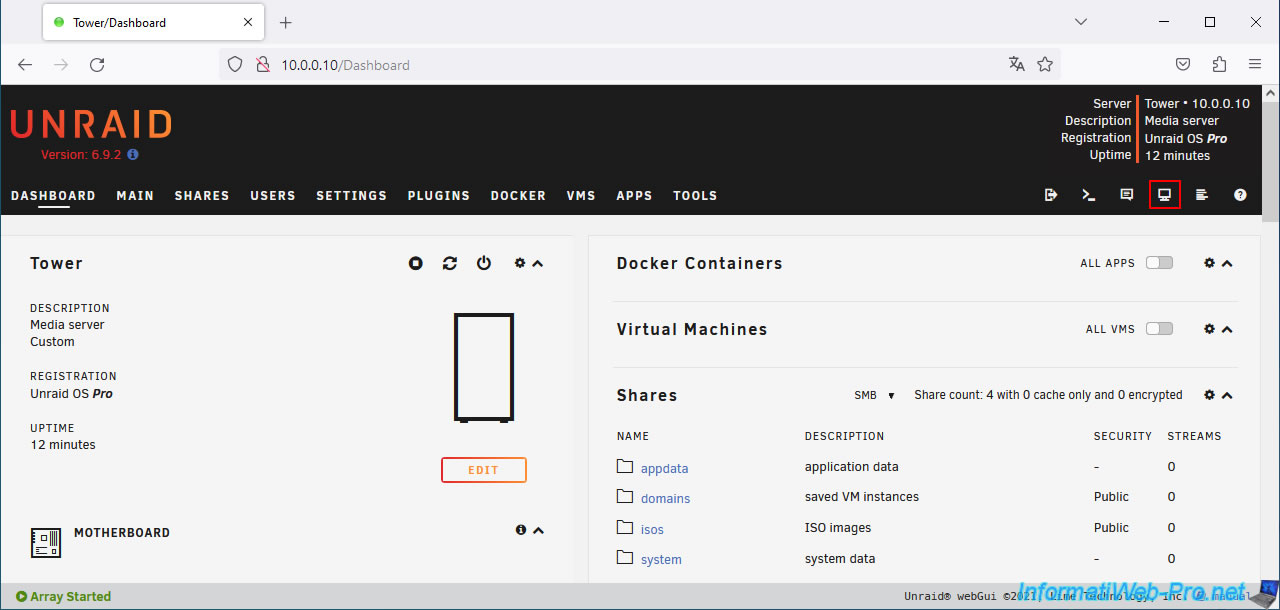
Identify the options:
- HVM: indicates whether CPU virtualization (Intel VT-x / AMD-V) is enabled or disabled.
If CPU virtualization is not enabled in your case, refer to our tutorial: Enable virtualization (Intel VT-x / AMD-V).
This option is required to use virtual machines on Unraid. - IOMMU: indicates whether input/output virtualization (Intel VT-d / IOMMU) is enabled or disabled.
If input/output (I/O) virtualization is not enabled in your case, refer to our tutorial: Enable IOMMU or VT-d in your BIOS.
This option is optional as it is only useful if you want to pass a supported physical device to a virtual machine created on Unraid.
3. Enable virtual machine manager on Unraid
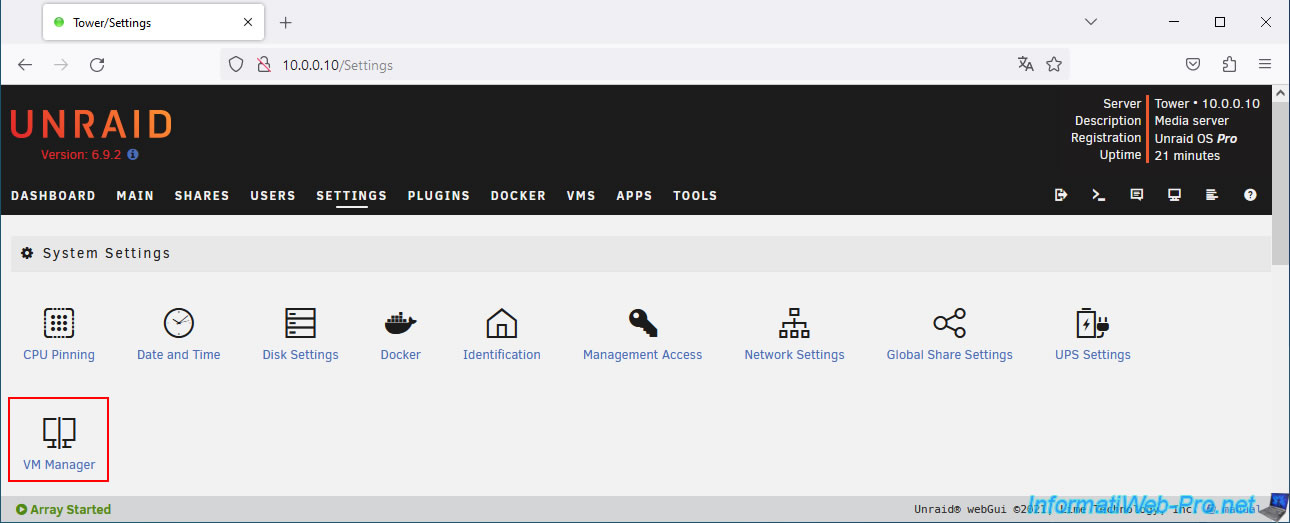
To use virtual machines on Unraid, the Virtual Machine Manager must be enabled.
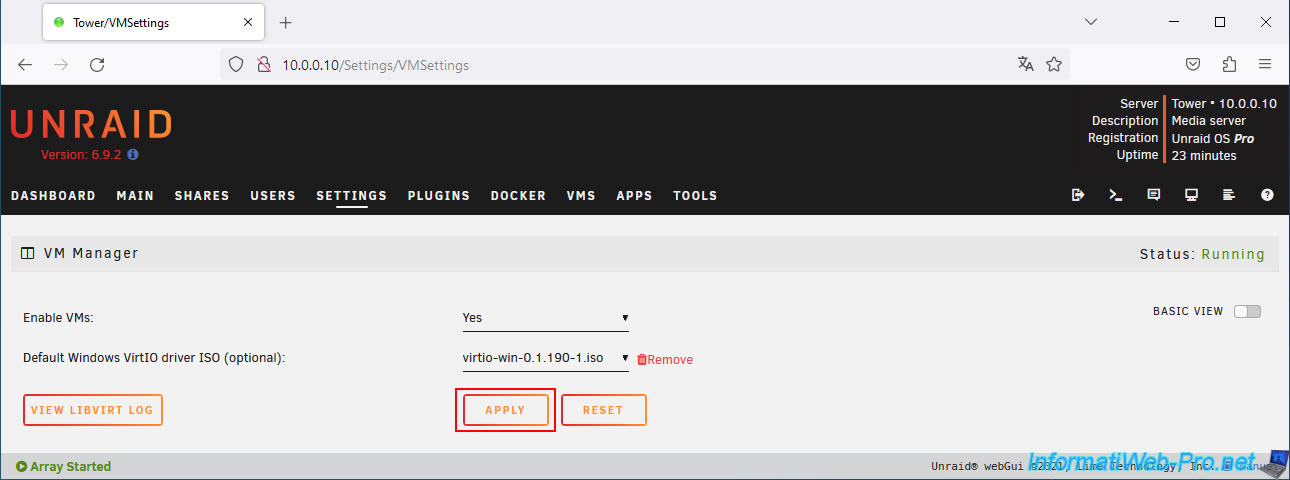
To do this, go to: Settings -> System Settings -> VM Manager.
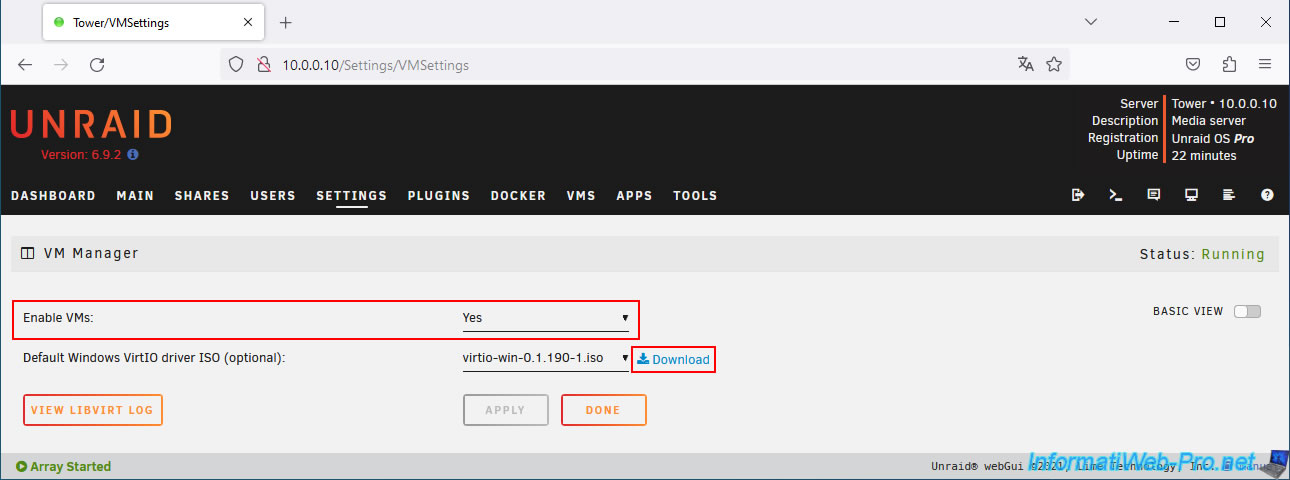
Ensure the "Enable VMs" setting is set to "Yes," then click the "Download" link to the right of the "Default Windows VirtIO driver ISO (optional)" setting.
By default, the latest version of the VirtIO driver ISO file (which you'll need for your Windows virtual machines) is selected.
Please wait while the VirtIO drivers ISO file downloads.
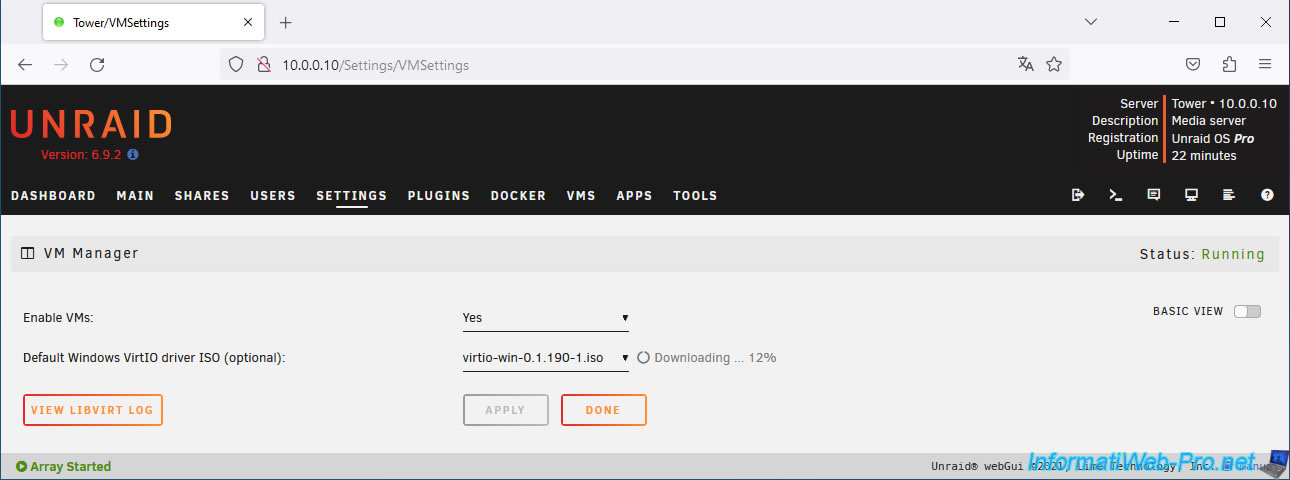
Once the VM Manager is enabled and the VirtIO ISO file is downloaded, click: Apply.
4. Create a virtual machine on Unraid
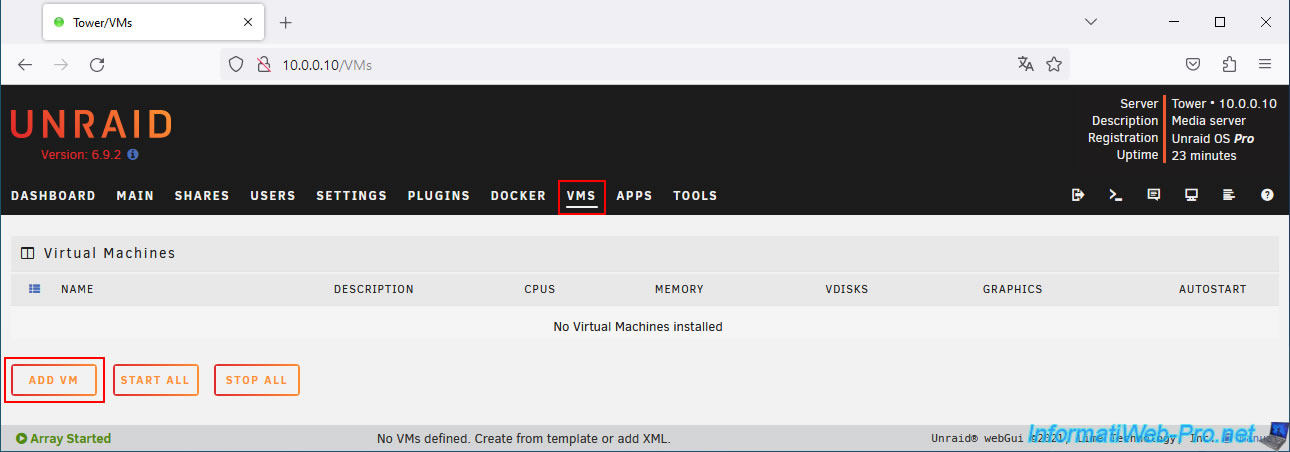
To create a virtual machine on Unraid, go to the "VMS" tab, then click on the "Add VM" button.
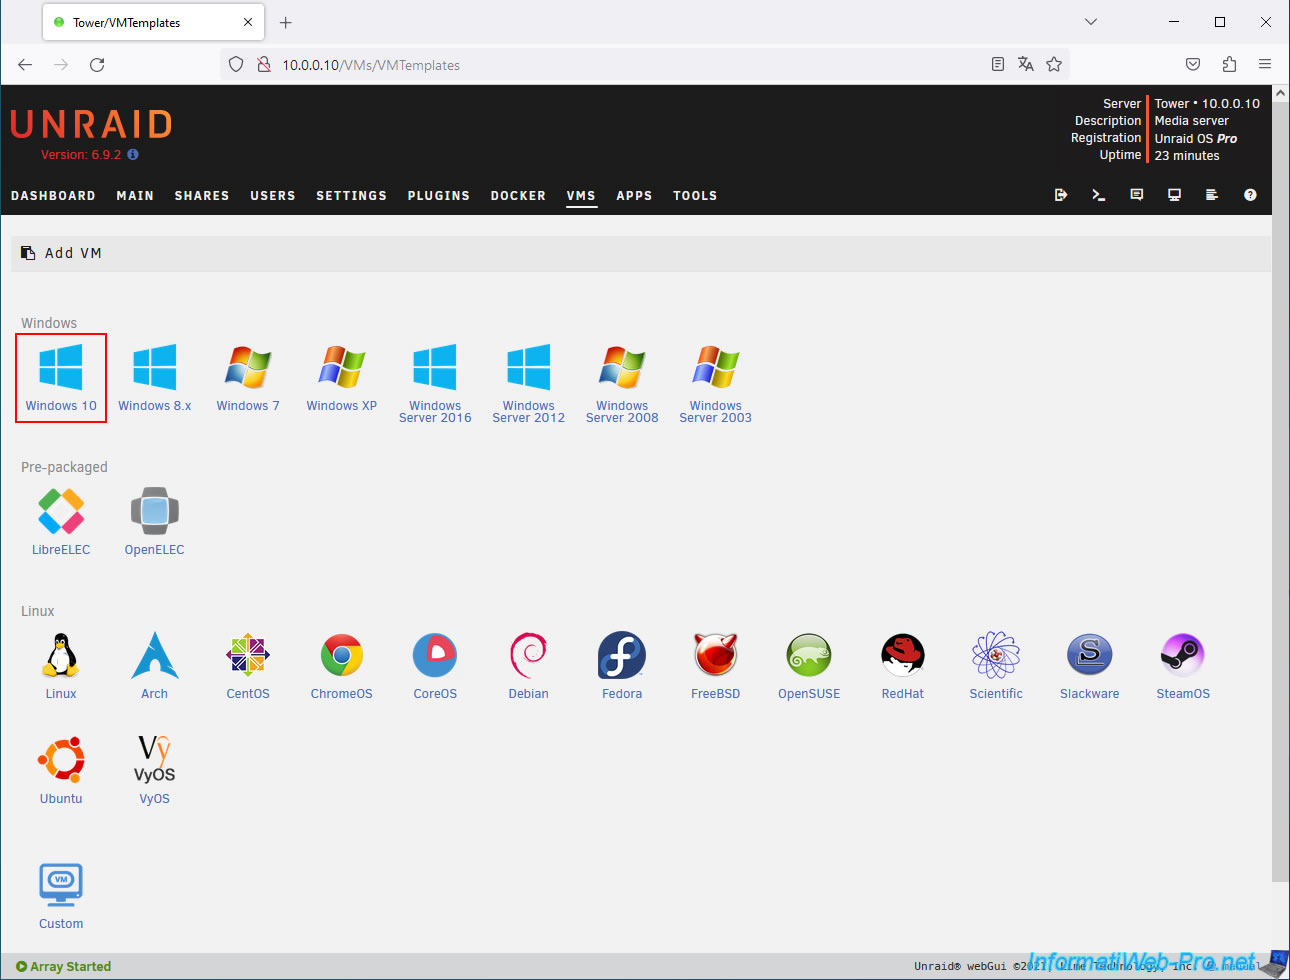
Click the icon corresponding to the operating system you wish to install in your future virtual machine.
In our case: Windows 10.
However, as you can see, you can virtualize:
- Windows client versions: Windows 10, 8.x, 7, and XP.
- Windows server versions: Windows Server 2016, 2012, 2008, and 2003.
- a media server: LibreELEC and OpenELEC (very lightweight Linux-based operating systems that allow you to use only the Kodi application).
- Linux distributions: Linux (generic model), Debian, Fedora, Ubuntu, ...
- other operating systems by manually configuring the settings (by choosing "Custom").
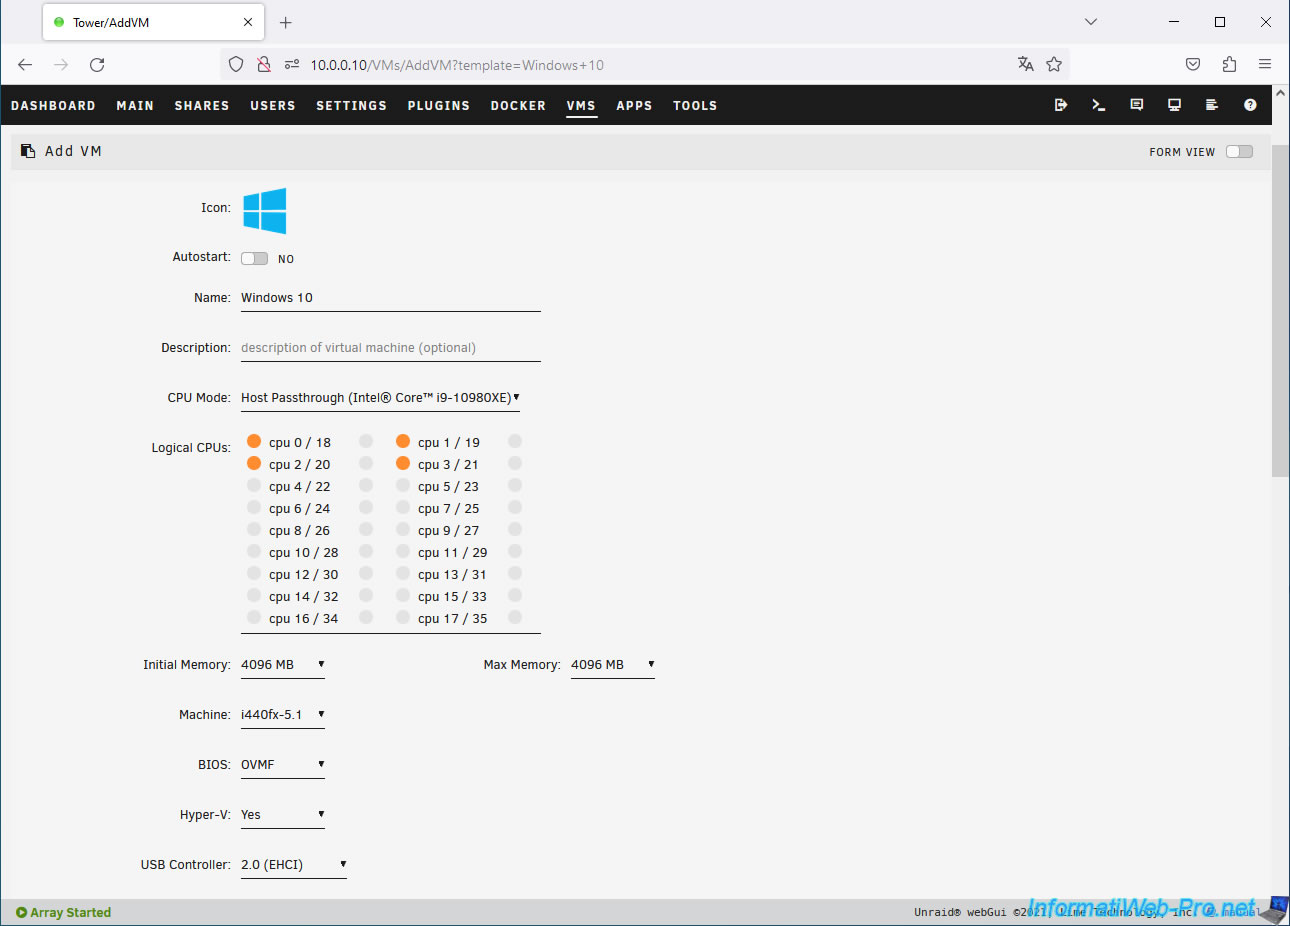
An "Add VM" form appears where you will see / be able to configure the following parameters:
- Icon: Icon corresponding to the previously selected operating system.
- Autostart: automatically starts this virtual machine when the Unraid array starts.
To automatically start the Unraid array when your server starts, go to "Settings -> System Settings -> Disk Settings" and enable the "Enable auto start" setting. This will automatically start the virtual machine when your Unraid server starts. - Name: name of the virtual machine.
For example: Windows 10. - Description: an optional description for this virtual machine (VM).
- CPU Mode:
- Host Passthrough ([CPU brand and model]): by default, Unraid will directly use the desired cores (configured via the following parameter) of your Unraid server's physical processor.
In our case, an Intel® Core™ i9-10980XE processor. - Emulated (QEMU64): allows you to emulate a QEMU processor (the virtualization solution available on Linux on which Unraid's VM system is based).
However, this option may not work with some operating systems due to incompatibility.
- Host Passthrough ([CPU brand and model]): by default, Unraid will directly use the desired cores (configured via the following parameter) of your Unraid server's physical processor.
- Logical CPUs: allows you to manually specify which processor cores your virtual machine can use.
This allows you to dedicate specific cores to one virtual machine and other cores to another virtual machine.
Thus, if one virtual machine attempts to use 100% of the cores you have allocated to it, this will not affect the CPU performance of the other virtual machine.
For the listed cores, two scenarios are possible:- If multithreading is enabled, each physical core of the processor is divided into two logical cores (although this has changed since the 12th generation of Intel processors, where a performance core = two logical cores and an efficiency core = one logical core).
If multithreading is enabled, you will see options such as "cpu 0 / 18", "cpu 1 / 19", ...
This means two logical cores on one physical core. - If multithreading is disabled, you will simply see options such as "cpu 0", "cpu 1", ...
This means that each physical core = one logical core.
- If multithreading is enabled, each physical core of the processor is divided into two logical cores (although this has changed since the 12th generation of Intel processors, where a performance core = two logical cores and an efficiency core = one logical core).
- Initial Memory: amount of RAM allocated to your virtual machine.
- Max Memory: maximum amount of RAM your virtual machine can use.
For better compatibility, specify the same value as for the "Initial Memory" parameter.
However, to dynamically allocate RAM to a virtual machine, you can specify a higher value than the value defined for the "Initial Memory" parameter.
Dynamic RAM allocation to a virtual machine is based on the "memory ballooning" system, which allows KVM (the hypervisor used by QEMU) to expand or contract memory allocations as needed.
Warning: Dynamic RAM allocation is not possible if you assign a physical PCI device to this virtual machine. - Machine: allows you to choose the chipset to use.
However, the default value is the one recommended for the previously selected operating system.- i440fx: default chipset for Windows virtual machines.
You should only change this if you have problems trying to switch a physical graphics card from your Unraid server to your virtual machine.
Note that you may need to reactivate Windows in this case. - Q35: default chipset for Linux virtual machines, and you shouldn't need to change it to switch a physical graphics card to your virtual machine.
- i440fx: default chipset for Windows virtual machines.
- BIOS: allows you to choose the type of BIOS/firmware to use.
- SeaBIOS: allows you to use an older BIOS (LEGACY BIOS).
This is useful for older operating systems and is generally supported without any issues. - OVMF: allows you to use UEFI firmware.
UEFI has been supported since Windows 7, and the Secure Boot that depends on it has been supported since Windows 8.
UEFI is also supported by recent Linux distributions.
- SeaBIOS: allows you to use an older BIOS (LEGACY BIOS).
- Hyper-V: if Windows (Server) is installed as a guest operating system, enable this setting to expose Hyper-V extensions.
- USB Controller: allows you to choose the USB controller version to use.
This can help resolve compatibility issues. For example, Windows XP and 7 do not support USB 3.0 natively, or at all.
This can also help resolve the issue where a physical USB device you're trying to connect to the virtual machine isn't appearing.- 2.0 (EHCI): allows the use of a USB 2.0 (EHCI) controller.
This is supported in most cases. Additionally, some operating systems do not support USB 3.0 controllers or do not natively support them (e.g., Windows XP and 7). - 3.0 (nec XHCI): allows the use of a USB 3.0 controller.
- 3.0 (qemu XHCI): allows the use of QEMU's USB 3.0 controller.
- 2.0 (EHCI): allows the use of a USB 2.0 (EHCI) controller.
Sources :
Next, you'll see that two virtual CD drives will be used.
For the "OS Install ISO" setting, select the ISO file of the operating system you want to install in this virtual machine.
In our case, the Windows 10 v2004 (20H1) x64 ISO file.
Note: the files displayed are located in the "isos" user share mentioned at the beginning of this tutorial.
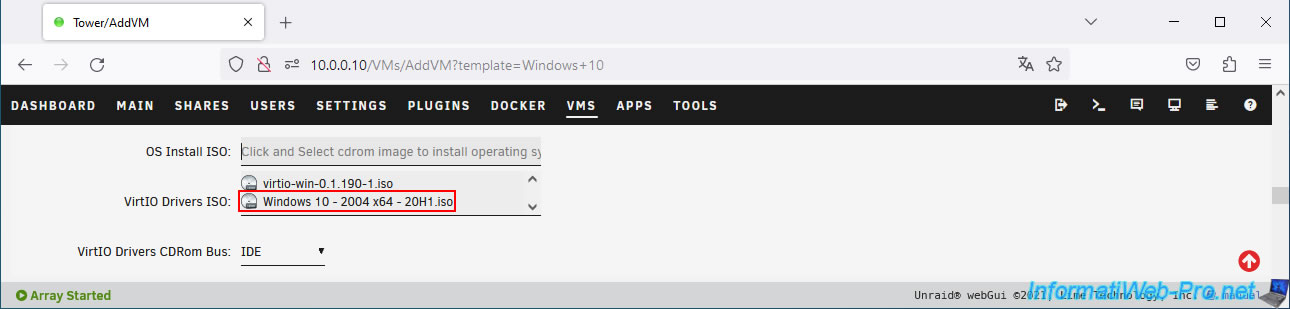
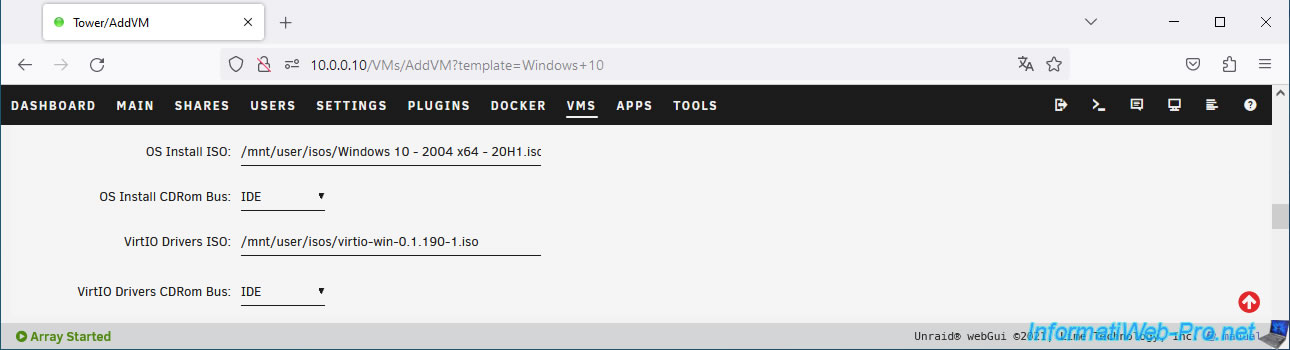
Once you've selected the ISO file of the operating system (OS) you want to install, you'll see that it's connected via IDE.
Now, make sure that a "virtio-win-...iso" ISO file is entered in the "VirtIO Drivers ISO" box.
This is the virtual CD containing the drivers Windows needs to detect the virtual hard drive used by your virtual machine, as well as its virtual network card and other peripherals related to the use of VirtIO.
In our case, this is the "virtio-win-0.1.190-1.iso" file.
If not, download the ISO file of the latest version of this driver CD by referring to step "3. Enable the Virtual Machine Manager on Unraid" of this tutorial.
Again, you can see that this second virtual CD drive is connected via IDE.
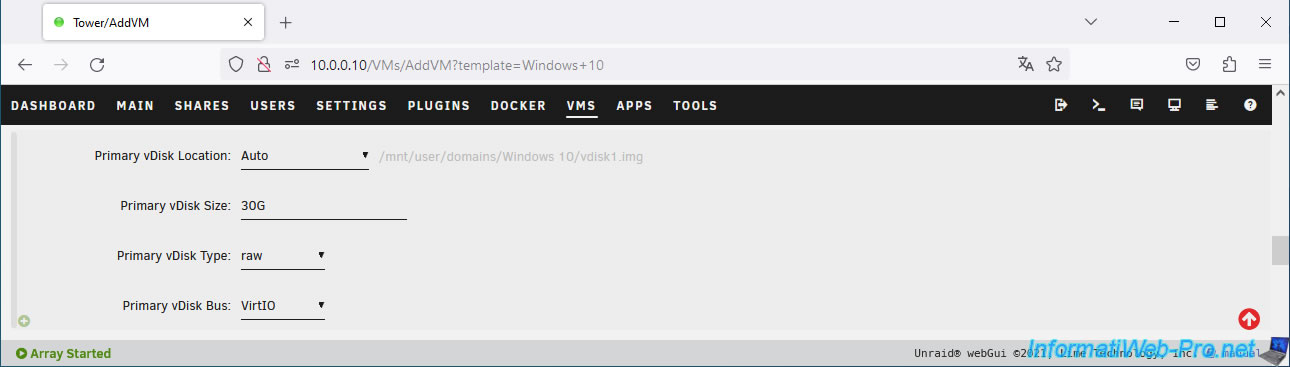
For the virtual hard disk, there is only one by default.
This one is named "Primary vDisk" in this form:
- Primary vDisk Location: By default, the value "Auto" is selected.
- Auto: this means that Unraid will store this virtual hard disk in the "domains" user share (as explained at the beginning of this tutorial).
In this "domains" share, Unraid will create a new folder with the name of your virtual machine, and each virtual hard disk will be named "vdiskX.img" (by default). - Cache - XX GB free: this allows you to store this virtual disk in the cache pool (defined in the "Main" tab of Unraid). This storage is faster since it is supposed to be composed entirely of SSDs.
However, frequently writing large amounts of data to an SSD may reduce its lifespan. - Disk X - XX GB free: this allows you to store this virtual disk on a specific disk in your array.
- Manual: this allows you to manually specify the location (folder) where this virtual disk will be created.
- Auto: this means that Unraid will store this virtual hard disk in the "domains" user share (as explained at the beginning of this tutorial).
- Primary vDisk Size: Allows you to specify the capacity (size) of this virtual disk.
In other words, the disk space that will be visible from the guest operating system and the maximum disk space it can occupy on your Unraid server. - Primary vDisk Type: Allows you to choose the type of virtual disk to use (raw or qcow2).
However, the "raw" format is recommended for better performance. - Primary vDisk Bus: Allows you to choose which storage controller this virtual disk should be connected to.
You can choose between: VirtIO, SCSI, SATA, IDE, and USB.
Note that in the case of "VirtIO," you will need to manually select the appropriate driver during Windows installation for this virtual disk to be detected.
However, you will see this later in this tutorial.
To add additional virtual disks, simply click the small "+" icon to the left of "Primary vDisk Bus".
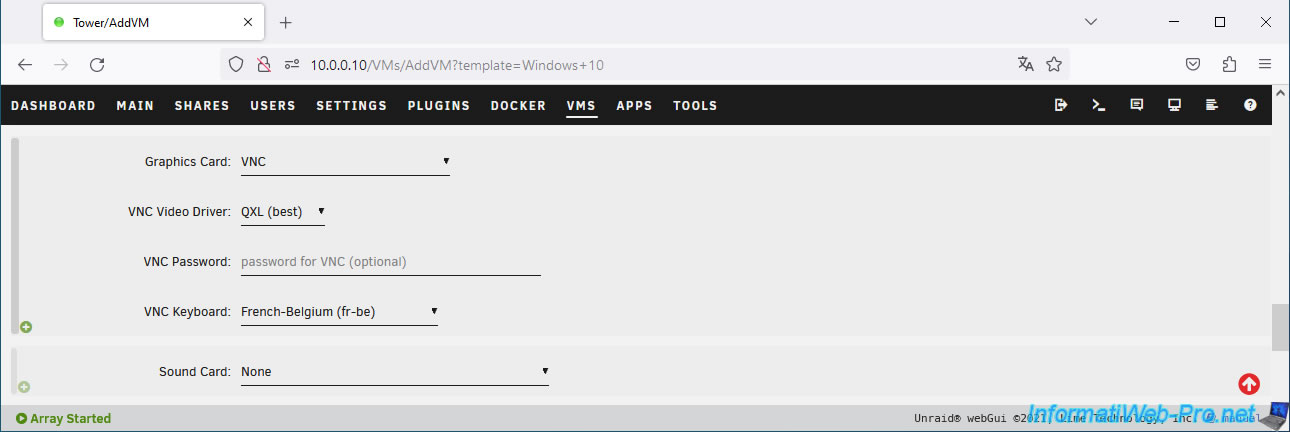
To see your virtual machine's screen and hear sound, you will need to configure these settings:
- Graphics Card: allows you to choose between a remote connection (VNC) or a physical graphics card not used by your Unraid server.
If your processor has a graphics card, configure your motherboard BIOS to use it first.
This will free up the graphics card and allow you to pass it to your virtual machine.
To do this, refer to our tutorial: Force the use of the internal graphics card (Onboard VGA). - VNC Video Driver: if "VNC" is selected above, this setting allows you to change the VNC driver used.
Default: QXL (best). Other available drivers are: Cirrus and vmvga. - VNC Password: allows you to protect remote access to your virtual machine's console with a password.
- VNC Keyboard: select your keyboard language.
For example: "French-Belgium (fr-be)" for Belgium or "French (fr)" for France. - Graphics ROM BIOS: if you selected your server's graphics card for the "Graphics Card" setting, this optional setting will allow you to use the BIOS file corresponding to your graphics card.
- Sound Card: in the case of a "VNC" connection, you will not have sound by default.
However, if you selected your physical graphics card for the "Graphics Card" setting above, you will need to select its "sound" section here.
Indeed, when you want to pass a physical graphics card to a virtual machine, you must always pass it in its entirety (its "video" section, its "sound" section, and its optional "USB" section, if it exists).
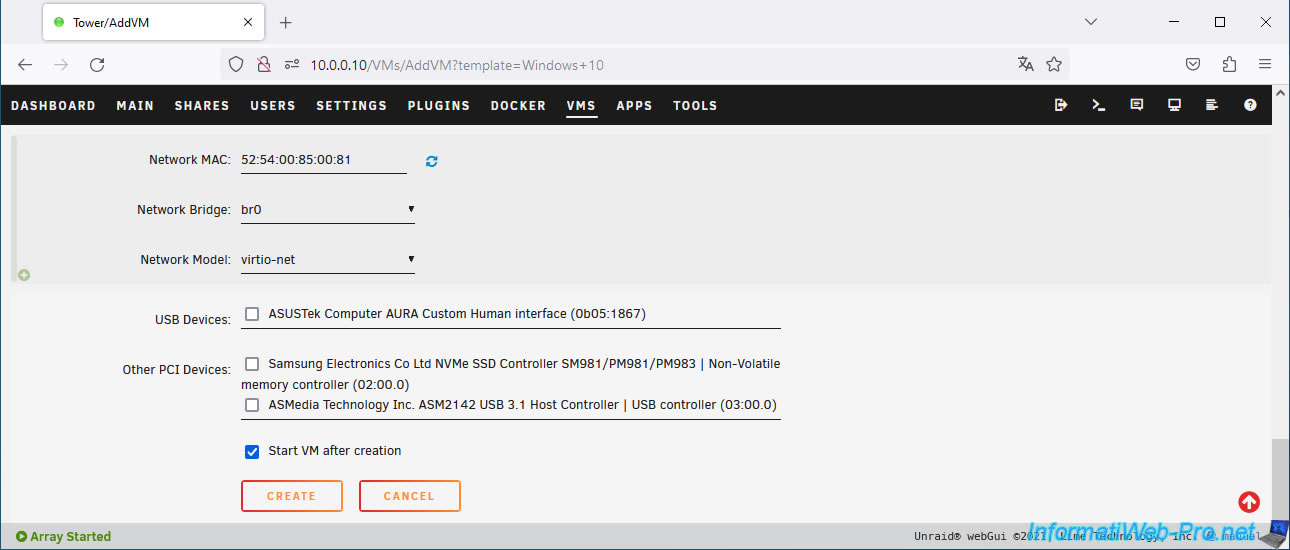
Finally, you can configure the network settings of this virtual machine:
- Network MAC: the MAC address (a unique physical address per network card) to use.
- Network Bridge: allows you to select the network bridge to use.
- virbr0: private network bridge allowing you to connect your virtual machines to a subnetwork that will not be accessible from other computers on the physical network or from your Docker containers.
With this type of network bridge, an internal DHCP server distributes IP addresses to your virtual machines on this subnet.
This network bridge is automatically configured when libvirt is launched.
This type of network bridge is the equivalent of the "NAT" mode available in VMware Workstation Pro, as well as in VirtualBox. - br0: public network bridge allowing you to connect your virtual machines directly to your physical local network. Your virtual machines will therefore be reachable by other computers on your physical network (if the firewall allows it).
With a public network bridge, your virtual machines will receive an IP address from your physical router's DHCP server.
This network bridge can be created by enabling the "Enable bridging" setting in the "Settings -> System Settings -> Network Settings" section.
This type of network bridge is the equivalent of the "Bridged" mode available in VMware Workstation Pro and the "Bridged Adapter" mode in VirtualBox.
- virbr0: private network bridge allowing you to connect your virtual machines to a subnetwork that will not be accessible from other computers on the physical network or from your Docker containers.
- Network Model: allows you to choose the type of virtual network card to use.
- virtio-net: improved stability and recommended default.
This replaces the "virtio" option, which was previously the only one available. - virtio: improved performance, but may cause stability issues.
- virtio-net: improved stability and recommended default.
- USB Devices: allows you to pass physical USB devices from your Unraid server to your virtual machine.
- Other PCI Devices: similar to the previous option, but applies to PCI devices (including storage controllers or USB controllers).
- Start VM after creation: leave this box checked to automatically start the virtual machine once you have finished creating it.
Once your virtual machine is configured, click on: Create.
Source : What is the difference between virtio and virtio-net ? - VM Engine (KVM) - Unraid.
Share this tutorial
To see also
-
NAS 1/8/2026
Unraid 6.9.2 - Add a storage disk
-
NAS 3/4/2026
Unraid 6.9.2 - Install the "Community Applications" plugin (old version)
-
NAS 5/27/2026
Unraid 6.9.2 - SWAG - Use a DDNS client (Duck DNS)
-
NAS 8/26/2026
Unraid 6.9.2 - VMs - Create a gaming virtual machine
You must be logged in to post a comment