Create a gaming virtual machine (without ACS support and with PCIe ACS overrides patch) on Unraid 6.9.2
- NAS
- Unraid
- 09 September 2026 at 14:08 UTC
-

- 2/4

7. Free up physical devices by assigning them to VFIO (using PCIe ACS overrides)
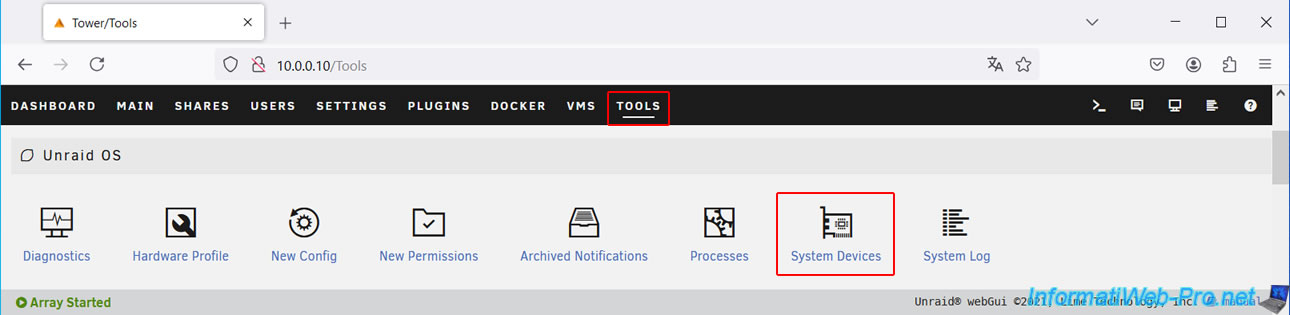
Now that the "PCIe ACS overrides" patch is enabled and loaded by the Linux kernel, go to the "Tools" tab, then click on "System Devices".
At the top of the page, you will see a large warning appear.
Plain Text
Warning: Your system has booted with the PCIe ACS Override setting enabled. The below list doesn't not reflect the way IOMMU would naturally group devices.

To see natural IOMMU groups for your hardware, go to the VM Manager page and set the PCIe ACS override setting to Disabled.
This indicates that Unraid started with the "PCIe ACS override" setting enabled, and the displayed list therefore does not reflect the list of IOMMU groups your devices should have been placed in by hardware.
Ignore this warning, as this patch is required in your case (with a home motherboard).
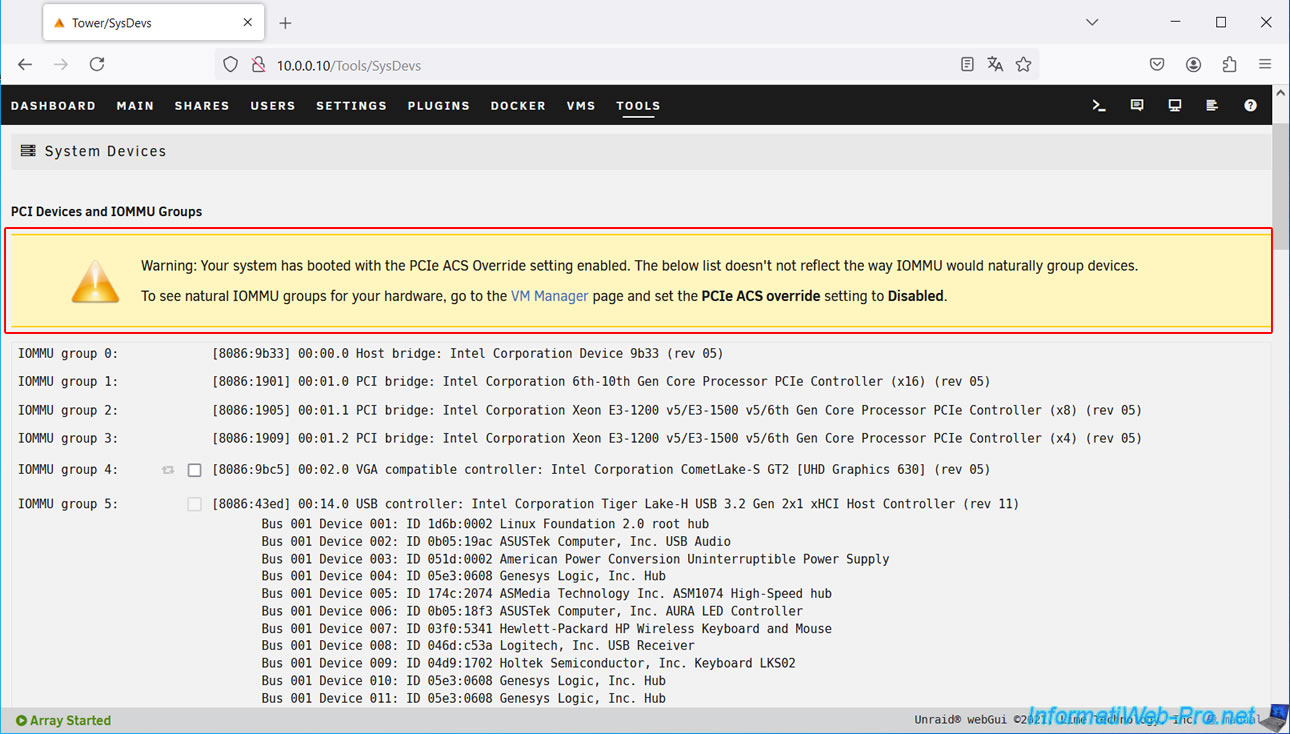
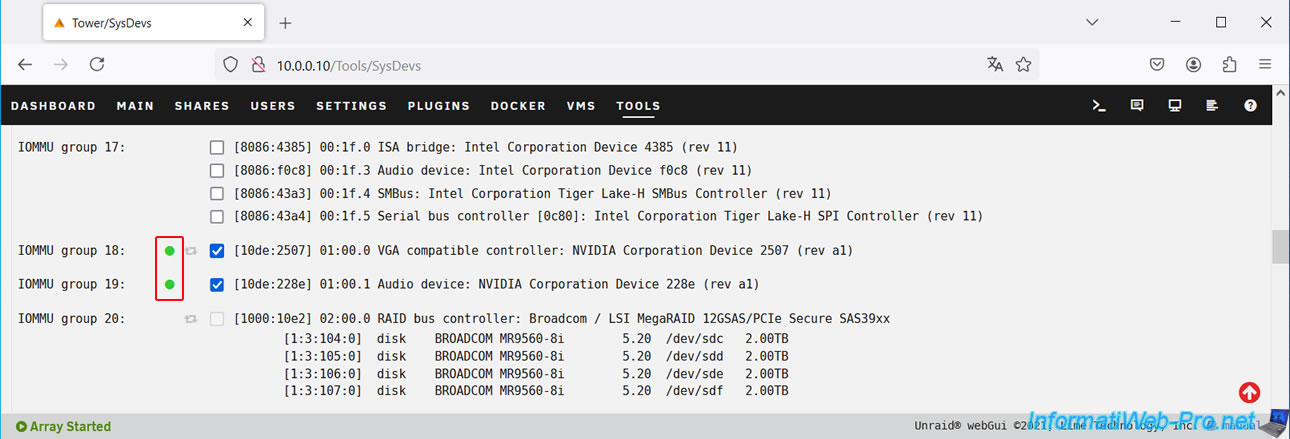
As you can see, in our case, our physical NVIDIA graphics card (connected via PCIe) is found in the IOMMU groups:
- IOMMU group 18: the graphic part "01:00.0 VGA compatible controller: NVIDIA Corporation...".
- IOMMU group 19: its audio part "01:00.1 Audio device: NVIDIA Corporation ...".
Check the boxes corresponding to your physical NVIDIA graphics card.
Note: your graphics card may also contain a USB controller in some cases. In this case, refer to the beginning of the IOMMU ID (in our case: 01:00.x) and check the box for it as well.
Your physical graphics card must always be assigned in full to the VFIO and passed entirely to your gaming VM. If you do not pass all the components of your graphics card, an error will occur in the Device Manager.
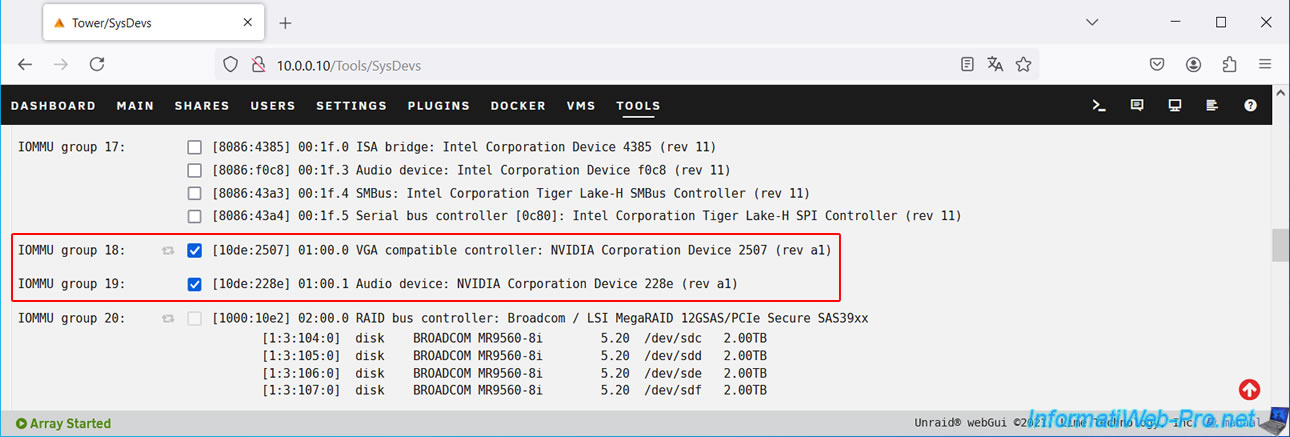
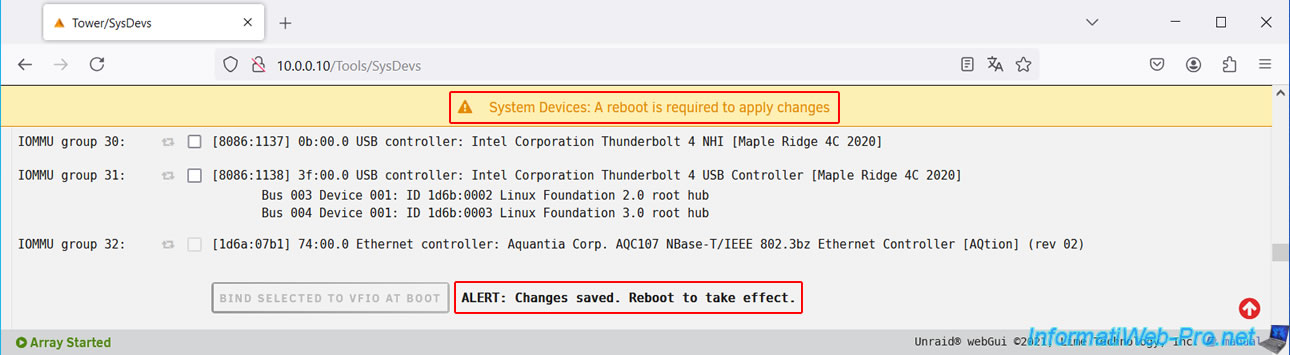
Next, click the "Bind selected to VFIO at boot" button (located at the bottom of the list).
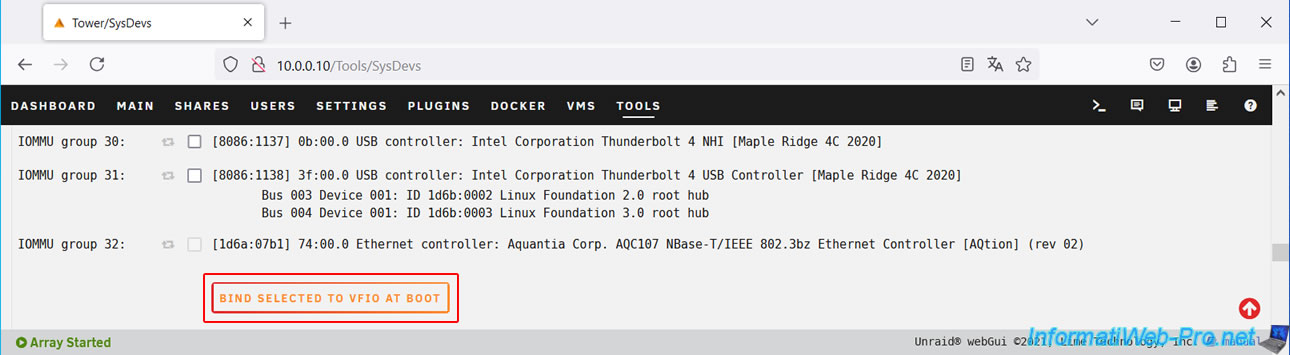
Next to the button you just clicked, you'll see the message "Alert: Changes saved. Reboot to take effect".
You'll also see the message "System Devices: A reboot is required to apply changes" appear at the top of the page.
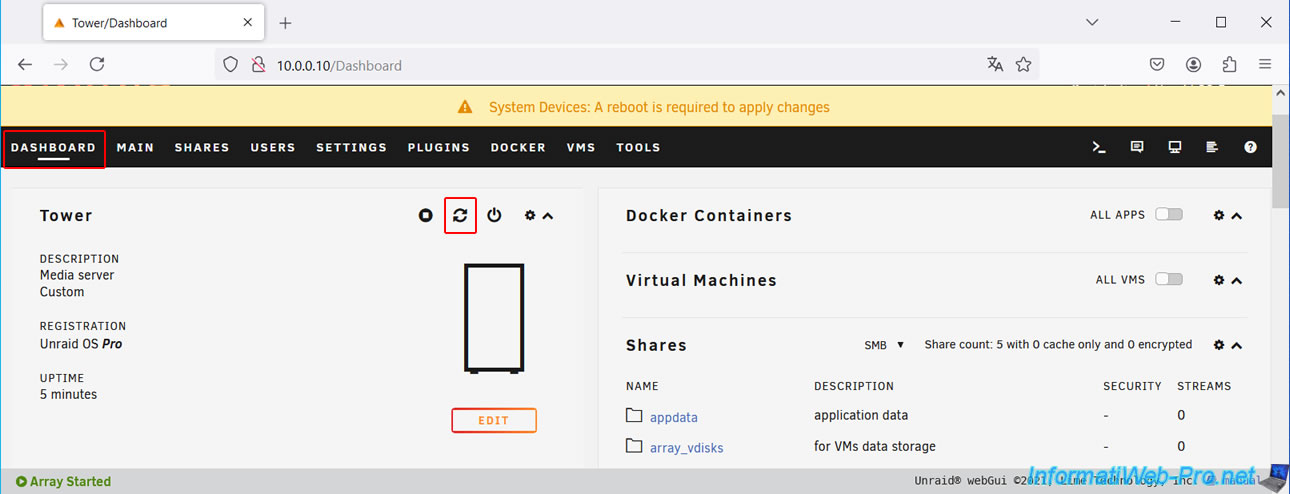
Again, go to the "Dashboard" tab and click on the 2nd icon to restart your Unraid server.
Once Unraid has restarted, go back to the "Tools -> System Devices" section and you will see green dots appear to the left of the different components of your physical NVIDIA graphics card (previously assigned to the VFIO).
8. Create a gaming virtual machine on Unraid
Now that Unraid is properly configured for GPU passthrough, you can create your gaming virtual machine.
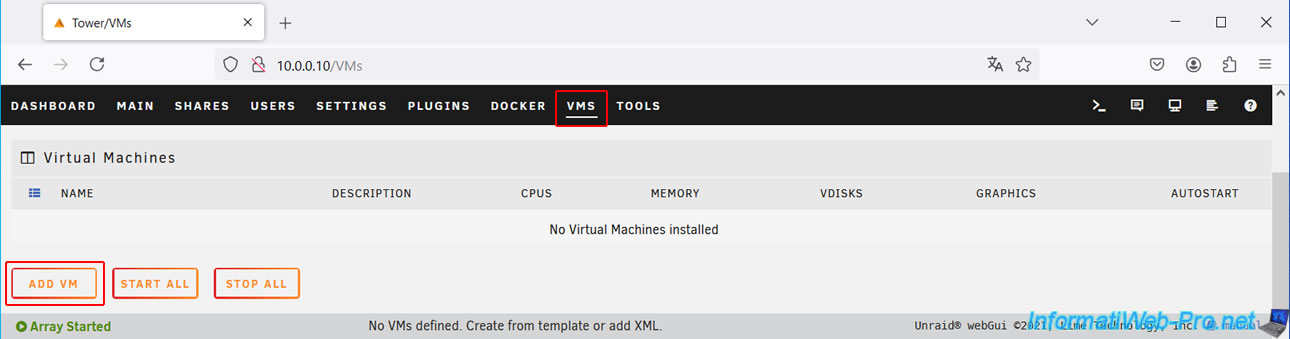
To do this, go to the "VMS" tab and click the "Add VM" button.
Choose "Windows 10" (which will allow you to install all games, including the latest ones).
Also, NVIDIA GeForce RTX graphics cards only support Windows 7, 10, and 11.
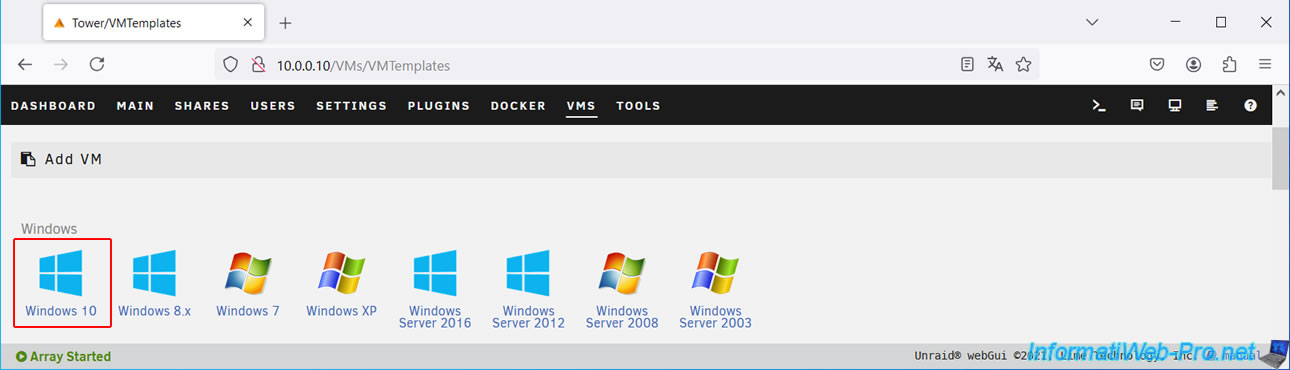
As in our "Unraid 6.9.2 - VMs - Create a gaming virtual machine" tutorial, we'll be using the game "Shadow of Tomb Raider".
So, we'll need:
- Windows 10 64-bit
- 16 GB of RAM
- a processor with at least 4 cores (8 threads)
- a graphics card with at least 6 GB of video memory (and in our case, we have 8 GB of video memory on our RTX 3050)
Configure these settings like this:
- Name: Windows 10 (gaming VM).
- CPU Mode: Host Passthrough ([your processor model]).
This allows your gaming VM to directly use your physical processor. - Logical CPUs: assign a sufficient number of logical cores to your gaming VM.
In our case, we'll use 8 cores (so that the desired game runs properly).
However, avoid selecting core "0" as this will likely also be used by Unraid for its own operation. - Initial Memory: 16384 MB = 16 GB of RAM (16 x 1024 MB = 16384 MB).
The "Max Memory" value will automatically be adjusted to the same value. - Machine: Q35-5.1. In other words, the latest "Q35" version available.
The "Q35" machine type is recommended for playing recent games on Windows 10. - BIOS: OVMF. This allows you to support booting in UEFI mode.
This is also necessary to pass a graphics card to a VM (as indicated in the pop-up that will appear if you hover your mouse over this parameter value).
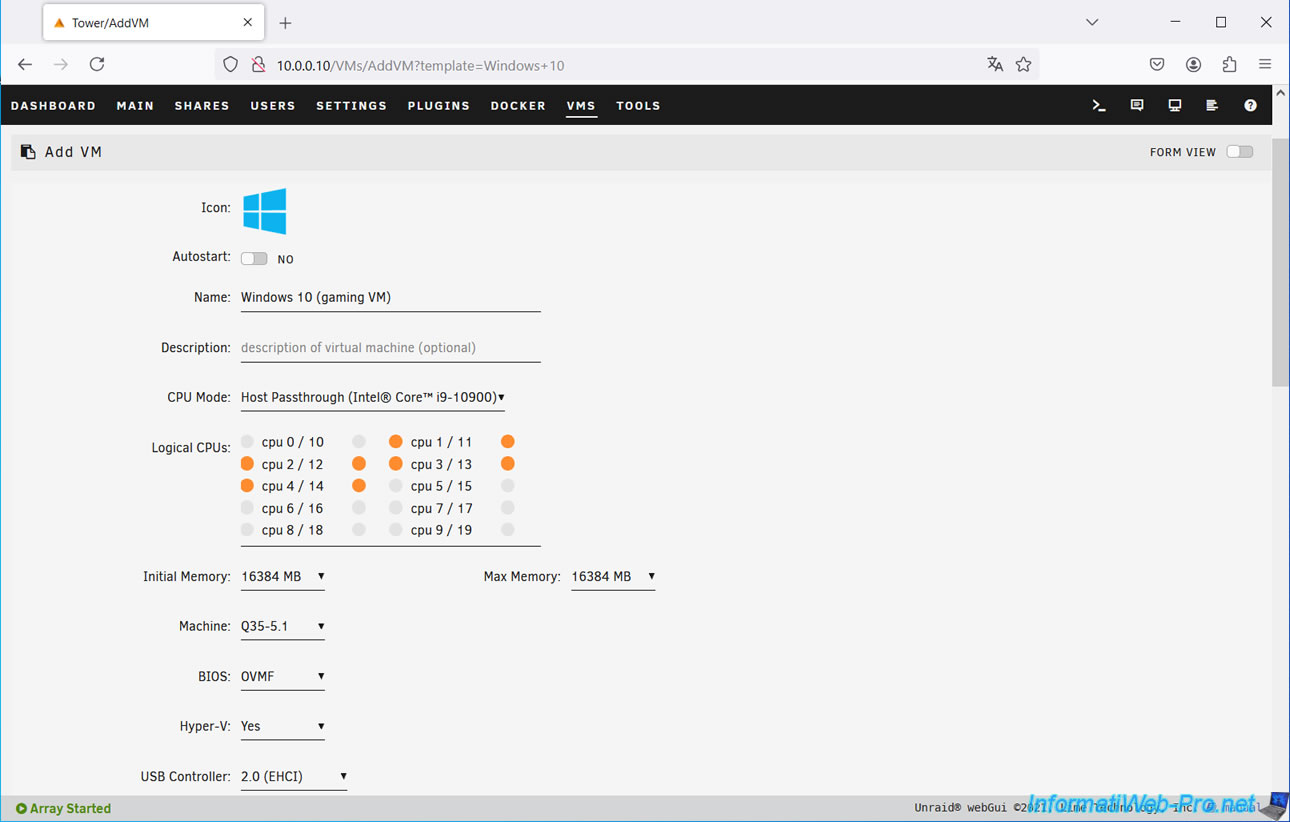
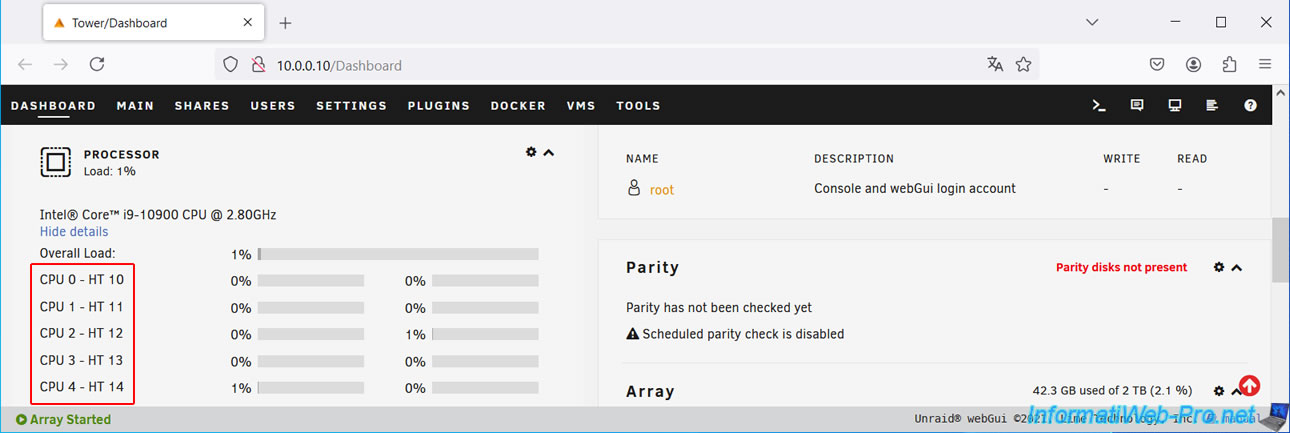
As you can see, we've chosen four physical cores (and therefore eight threads).
The term "HT" refers to Intel's hyperthreading (which allows you to create two logical cores on each physical core of your processor).
For the "OS Install ISO" setting, select your Windows 10 ISO from the list that appears.
In our case, "Windows 10 - 2004 x64 - 20H1.iso".
Note: these are the files located in the "isos" share on your Unraid server.
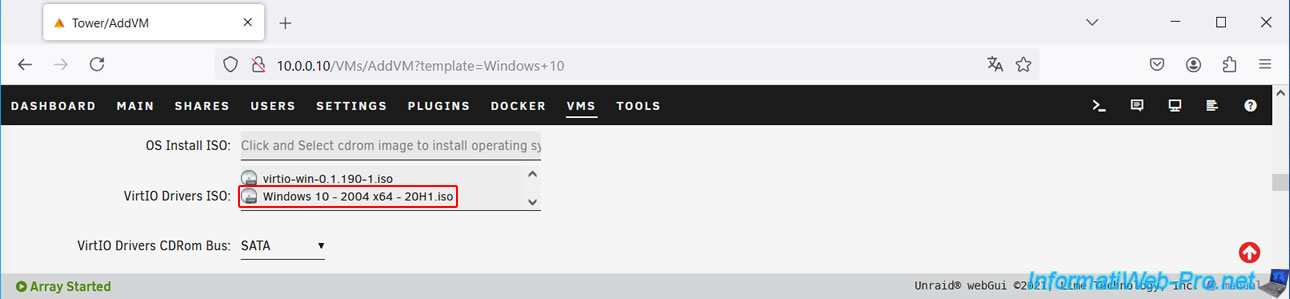
For the "VirtIO Drivers ISO" setting, select the "virtio-win-...iso" ISO previously downloaded by Unraid (via the "Settings -> VM Manager" section).
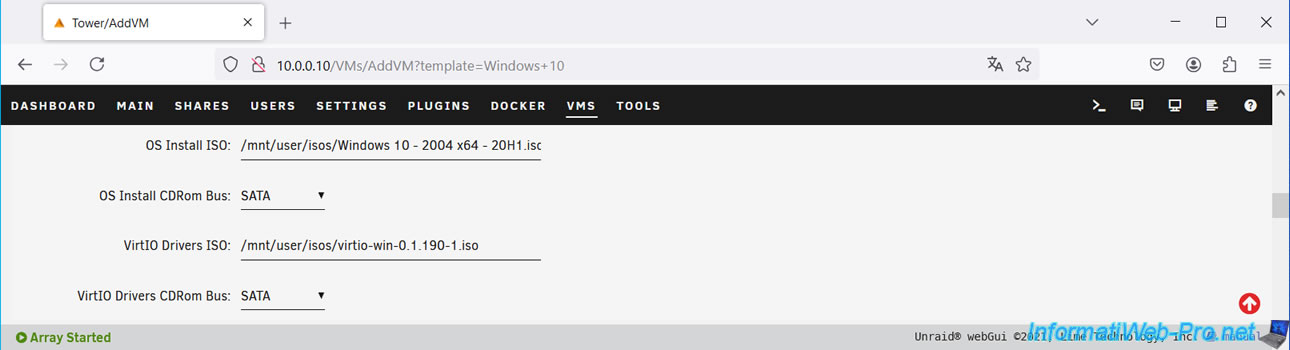
For the first virtual hard disk (Primary vDisk), select "Primary vDisk Location: Manual".
Then, select the location "user/ssd_vdisks" (if you created it) or "user/array_vdisks" (if not).
Specify "80G" for the size of this first virtual hard disk, which will contain only Windows 10.
Next, click the small "+" icon located in the bottom left corner of the image.
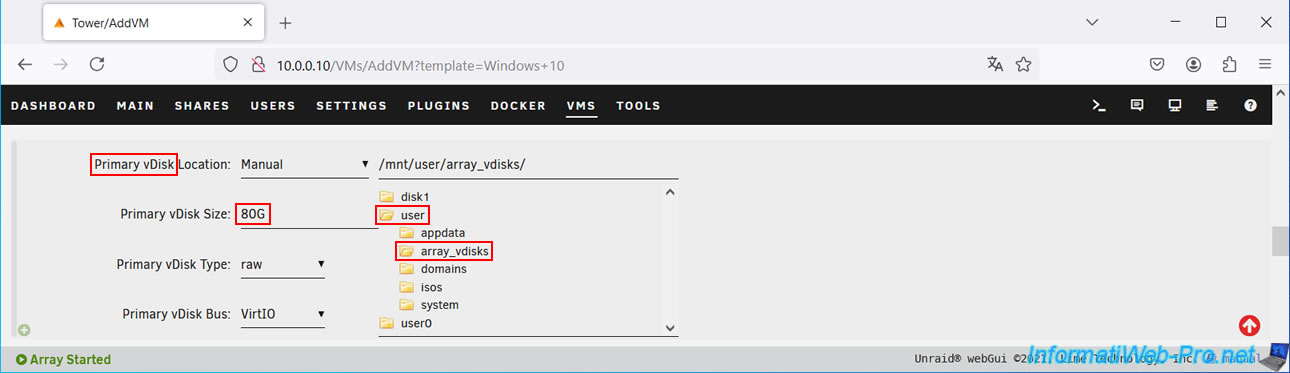
For the 2nd virtual hard disk (2nd vDisk):
- select "Primary vDisk Location: Manual".
- select the location "user/array_vdisks".
- specify "200G" for the size of this second virtual hard drive where you will install your games.
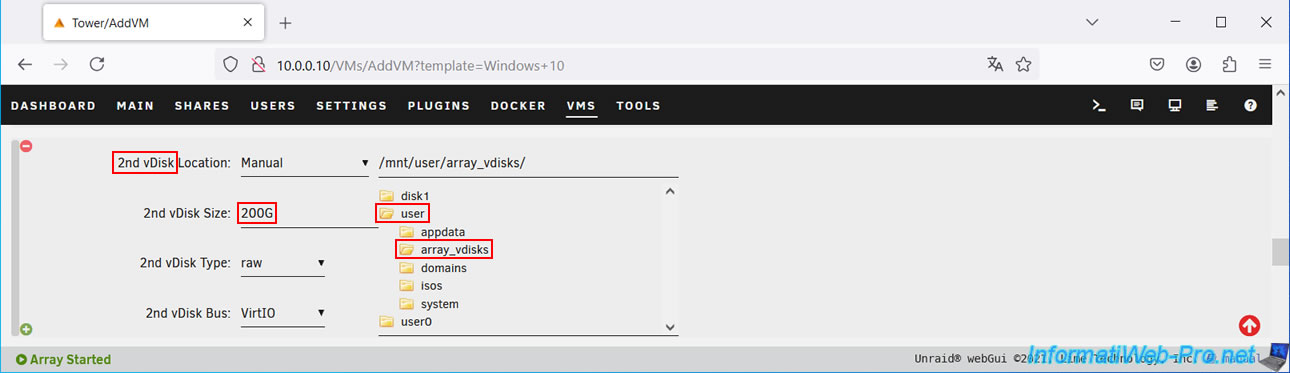
For graphics card, select your NVIDIA graphics card.
In our case, "NVIDIA Device (01:00.0)" (whose ID corresponds to the device previously assigned to the VFIO).
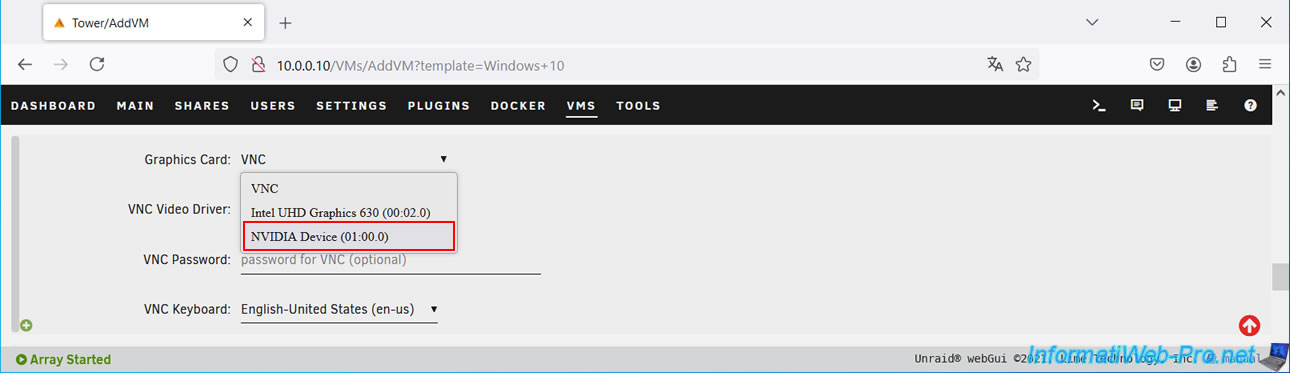
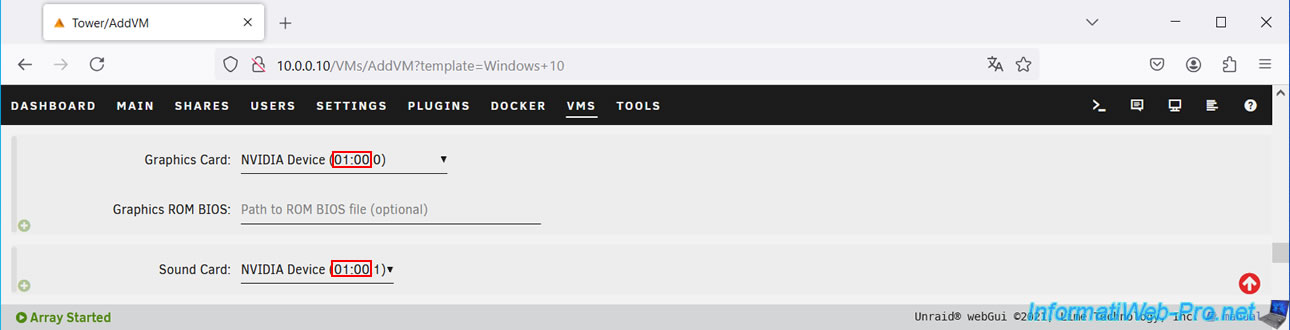
For sound card, select the audio component of your NVIDIA graphics card.
In our case, "NVIDIA Device (01:00.1)".
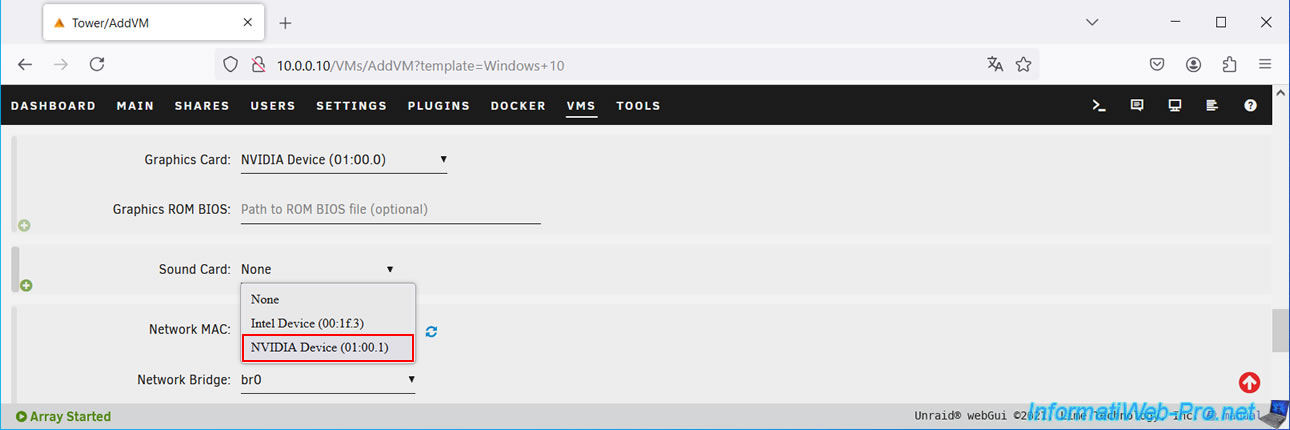
Important : make sure that the beginning of the sound card's IOMMU ID (in our case "01:00.1") matches the beginning of the IOMMU ID of the graphics part of your graphics card (in our case "01.00.0").
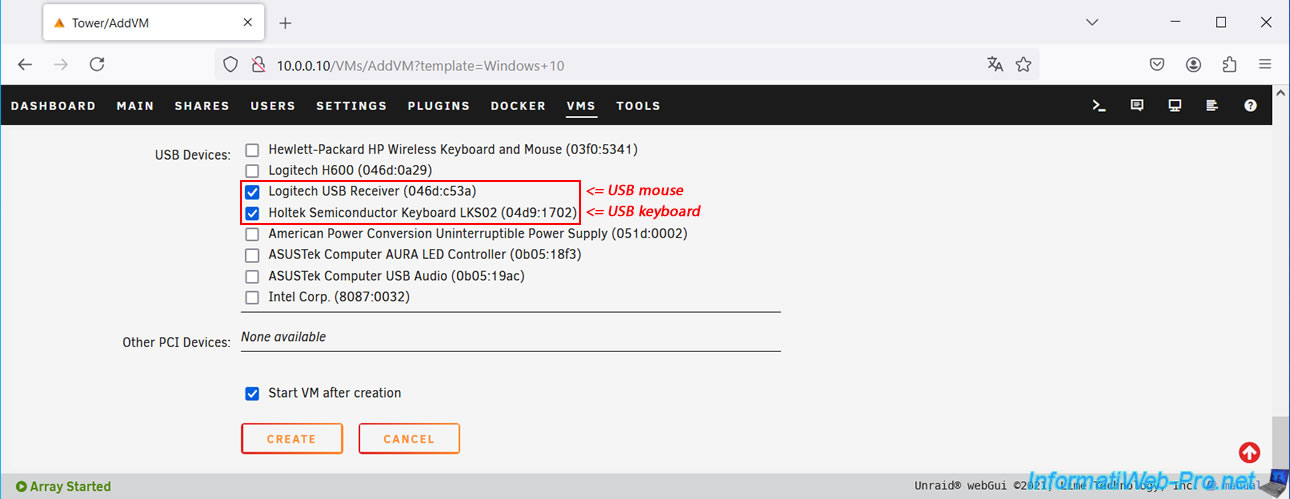
For USB devices, check the boxes for the keyboard and mouse you want to pass to your virtual machine.
In our case, these are the following devices:
- Logitech USB Receiver (046d:c53a).
- Holtek Semiconductor Keyboard LKS02 (04d9:1702).
Note: in our case, the "Hewlett-Packard HP Wireless Keyboard and Mouse (03f0:5341)" device corresponds to the USB dongle for our wireless keyboard and mouse, which allows you to use the Unraid console.
Once you have selected your keyboard and mouse as USB devices for this virtual machine, click "Create".
Warning : USB is not plug-and-play with Unraid.
It is therefore important that these are physically connected to your computer before starting your gaming VM. Additionally, if you unplug them while the gaming VM is running, plugging them back in won't work.
The gaming VM will need to be powered off and then powered back on for Unraid to reconnect them to your gaming VM.
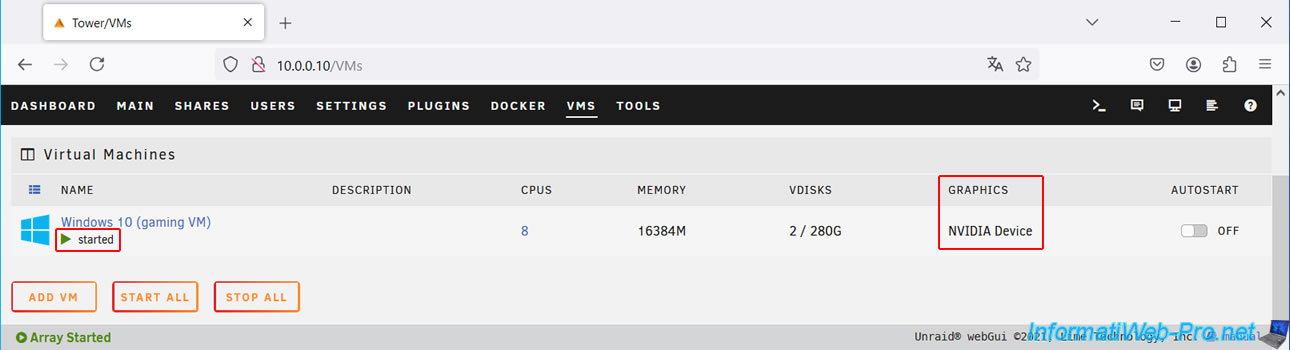
In the "VMS" tab, you will see that your virtual machine will have started and that the graphics card used is your NVIDIA graphics card.
If you have any problems, click on your VM icon, then on: Logs.
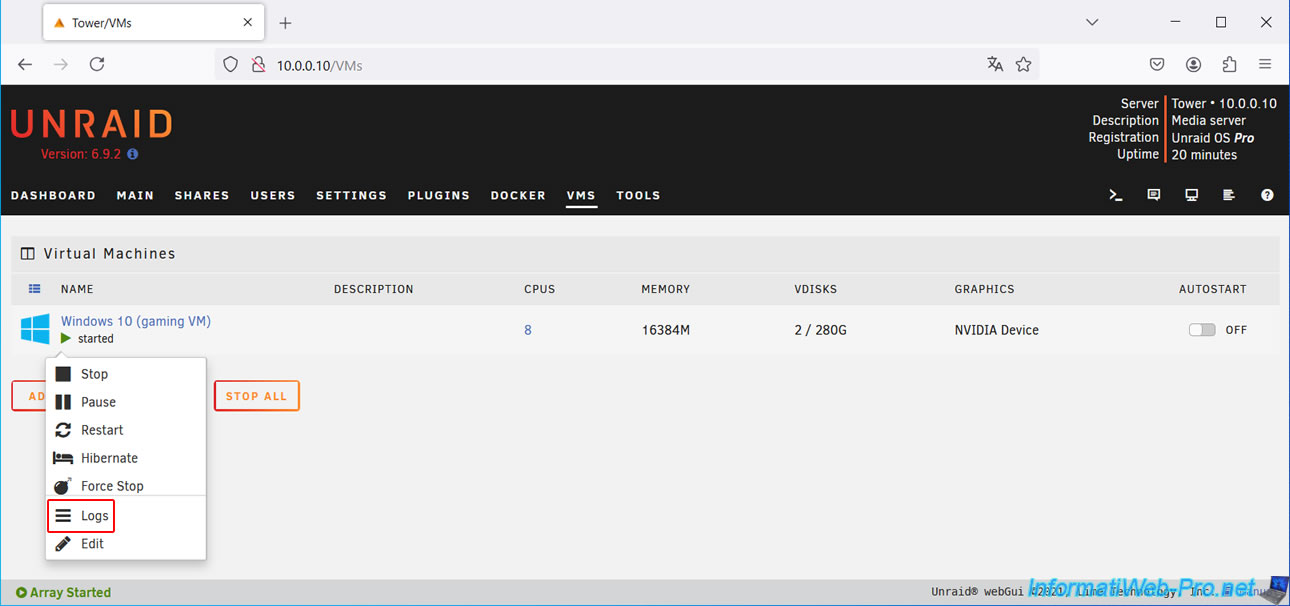
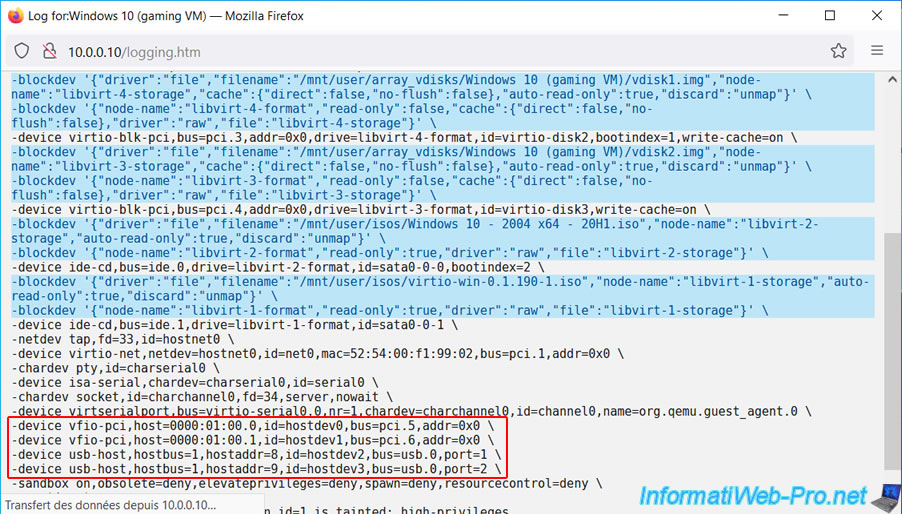
At the end of these logs, you will see the addition of:
- your physical graphics card (whose IDs are "01:00.0" for the graphics part and "01:00.1" for the audio part in our case) as a PCI device.
- your keyboard and mouse as USB devices.
Plain Text
-device vfio-pci,host=0000:01:00.0,id=hostdev0,bus=pci.5,addr=0x0 \
-device vfio-pci,host=0000:01:00.1,id=hostdev1,bus=pci.6,addr=0x0 \
-device usb-host,hostbus=1,hostaddr=8,id=hostdev2,bus=usb.0,port=1 \
-device usb-host,hostbus=1,hostaddr=9,id=hostdev3,bus=usb.0,port=2 \
Share this tutorial
To see also
-
NAS 1/30/2026
Unraid 6.9.2 - Create shares (network / user)
-
NAS 1/1/2026
Unraid 6.9.2 - Disable flash network sharing
-

NAS 2/25/2026
Unraid 6.9.2 - Install the "Community Applications" (CA) plugin
-

NAS 5/6/2026
Unraid 6.9.2 - SWAG - Install a reverse proxy (SWAG)
No comment