- VMware
- 24 December 2021 at 12:30 UTC
-

- 1/2


When you create a virtual machine with VMware Workstation, you probably have the habit of creating a single large hard drive which you then partition from the guest operating system.
However, the day you start to run out of space on a partition, you might not be able to expand it because of the partition that might be behind it.
To fix the problem, you will need to slice your virtual machine's virtual hard drive (or in other words, move each partition to a new virtual hard drive so you can easily expand them later).
Note : the last version available for this converter was version 6.2.0 at the time of writing this tutorial and it's only compatible with VMware Workstation 15.0.0 and earlier.
For this tutorial, we therefore used VMware vCenter Converter Standalone 6.2.0 and VMware Workstation Pro 15.0.0.
- Multiple partitions on the same virtual hard drive
- Slice a virtual hard disk with VMware vCenter Converter Standalone
- Converted virtual machine
- Upgrade the virtual machine's virtual hardware
1. Multiple partitions on the same virtual hard drive
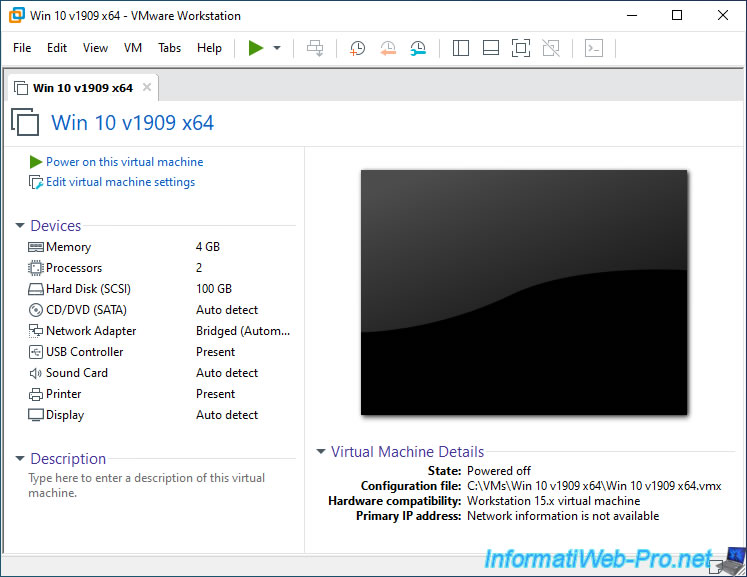
For this tutorial, we used a virtual machine on Windows 10 with a single virtual hard drive.

As you can see, from the operating system, we can see that this virtual hard disk has 2 partitions.
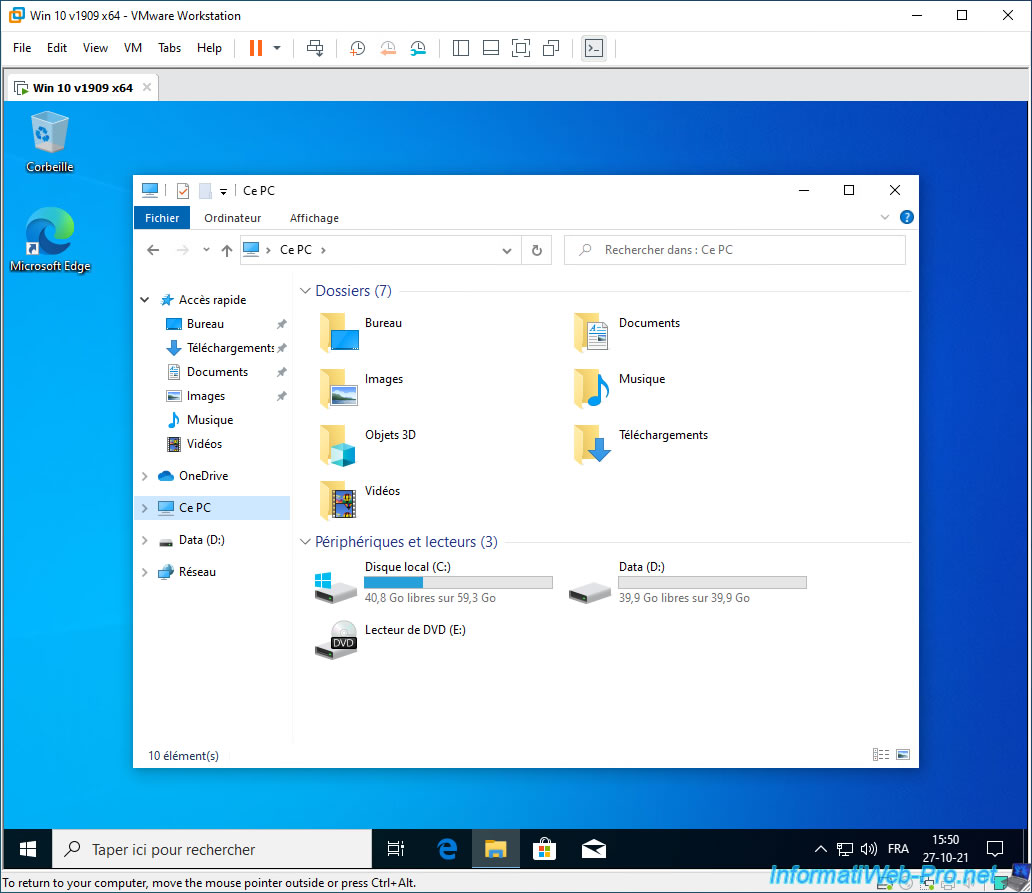
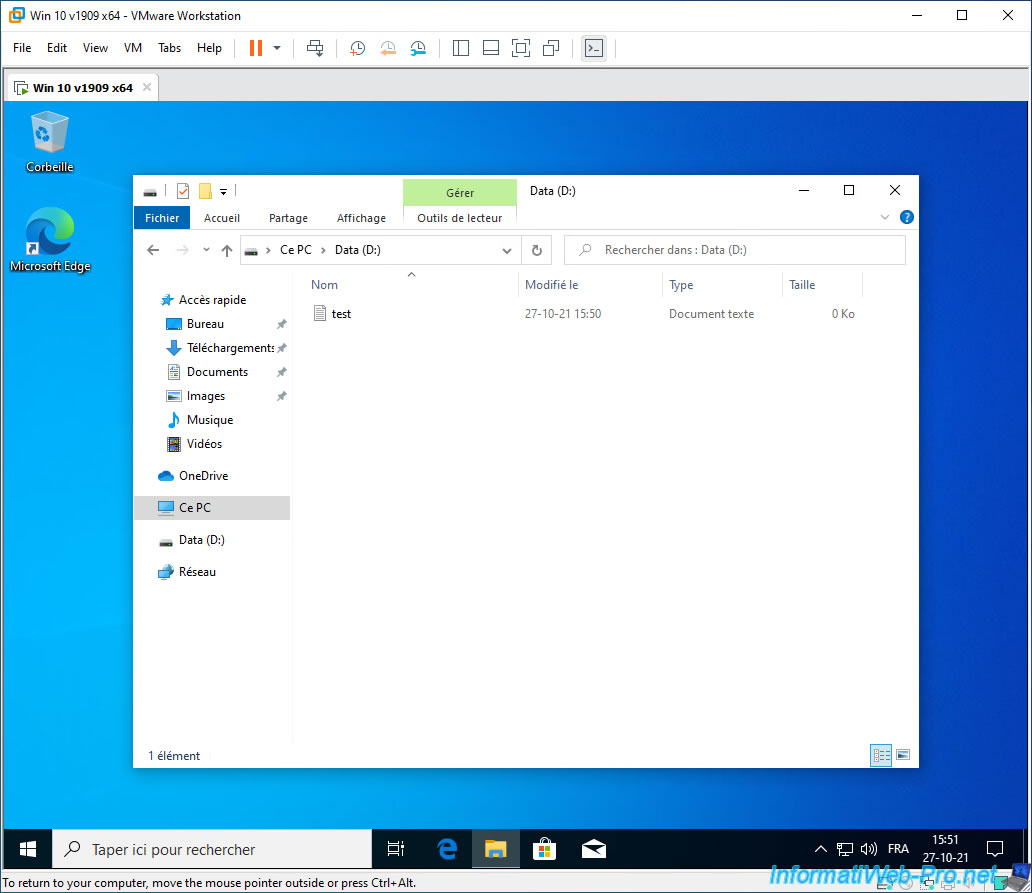
The "Data" partition contains an example test file.
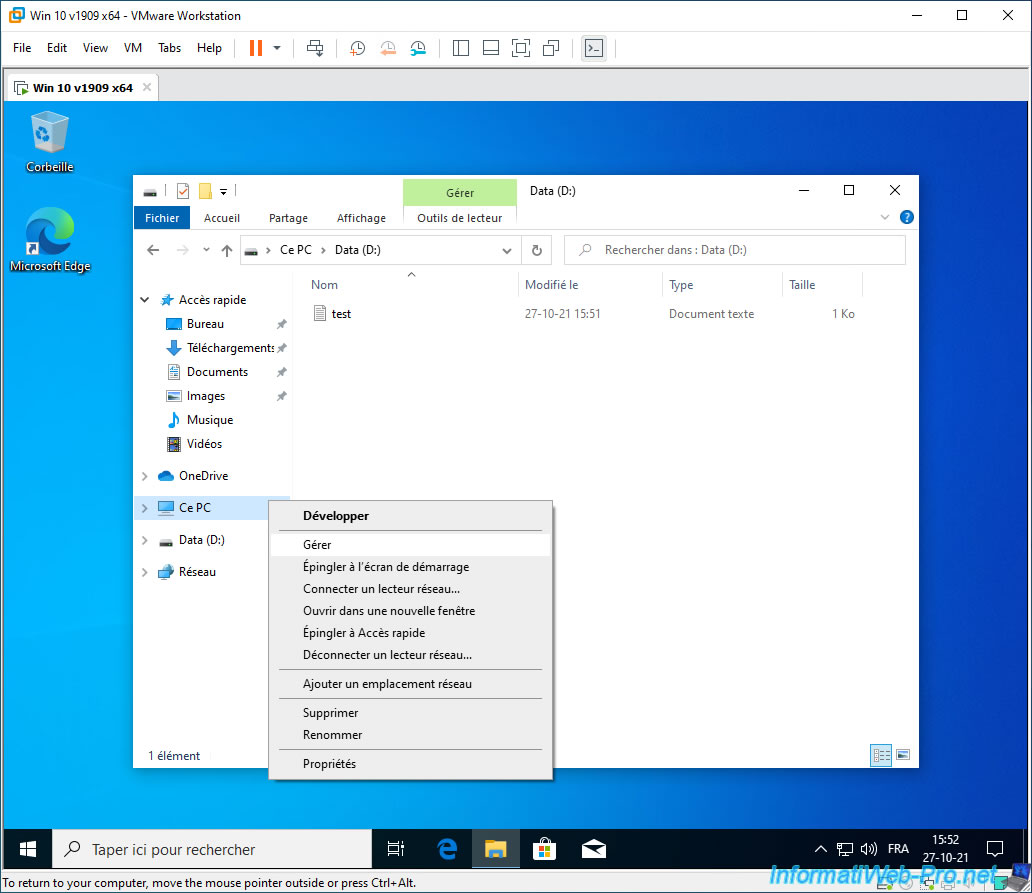
Right click "Manage" on "This PC".
As you can see, these partitions are on the same hard drive.
Which means that, in this case, we won't be able to extend the "C" partition when necessary.
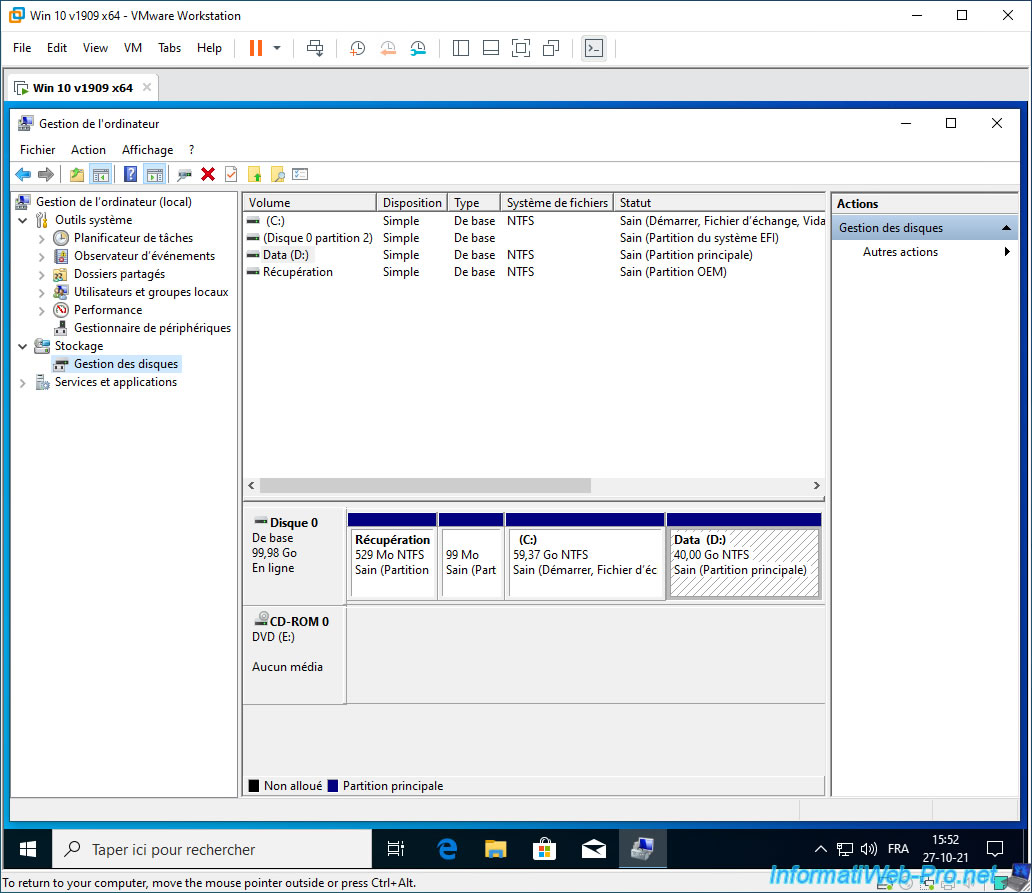
To solve this problem, we will need to create a new virtual hard drive to move the partition behind it (the "Data" partition).
2. Slice a virtual hard disk with VMware vCenter Converter Standalone
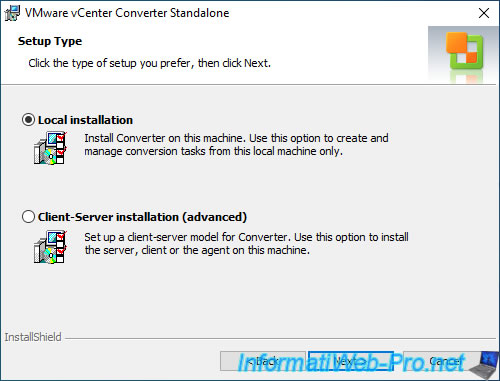
To get started, download "VMware vCenter Converter Standalone" and install it by selecting "Local installation" as the Setup Type.
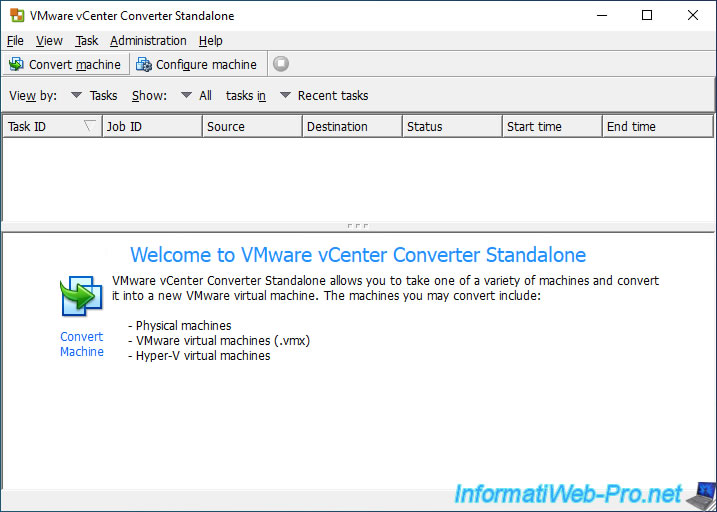
Then, launch VMware vCenter Converter Standalone as administrator (preferably) and click : Convert machine.
In the conversion wizard that appears, select "Select source type: Powered off", then "VMware Workstation or other VMware virtual machine" from the list.
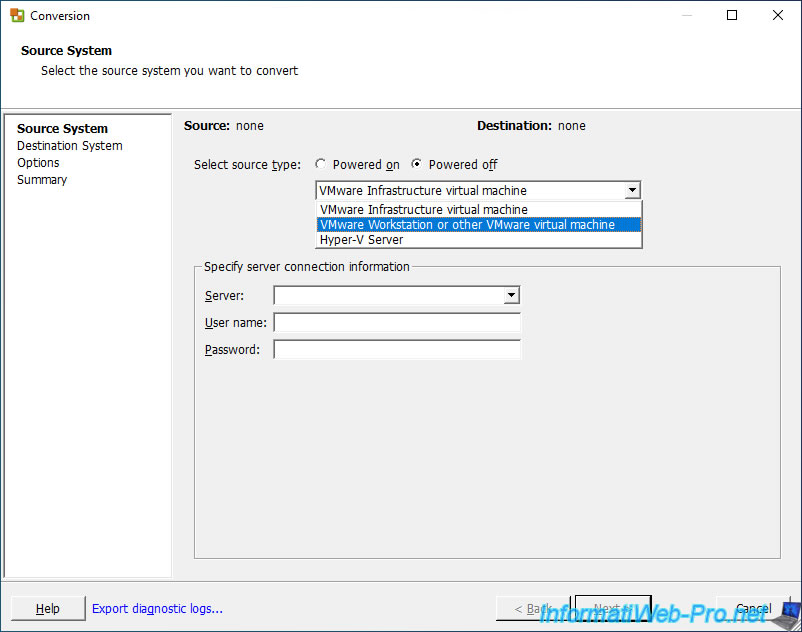
Now, click on the "Browse" button that has appeared.
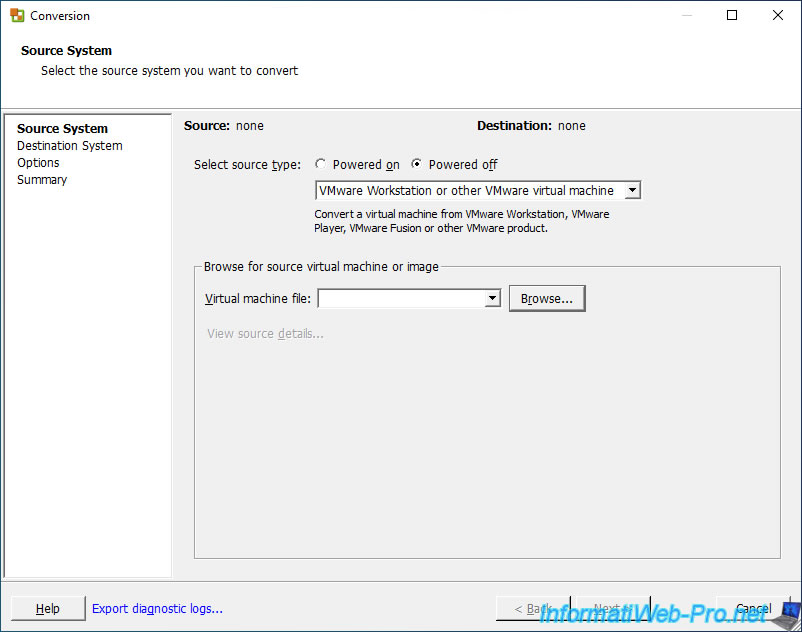
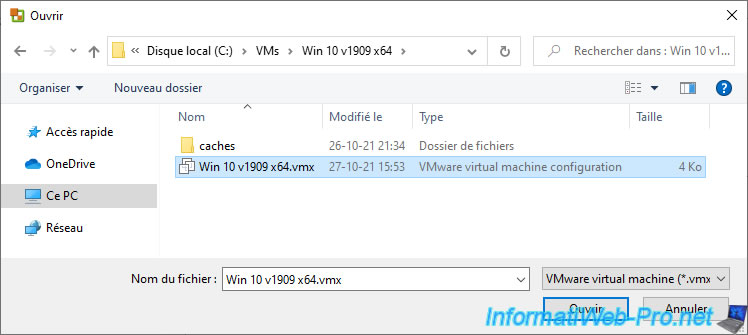
Select the configuration file (.vmx) of your virtual machine created from VMware Workstation.
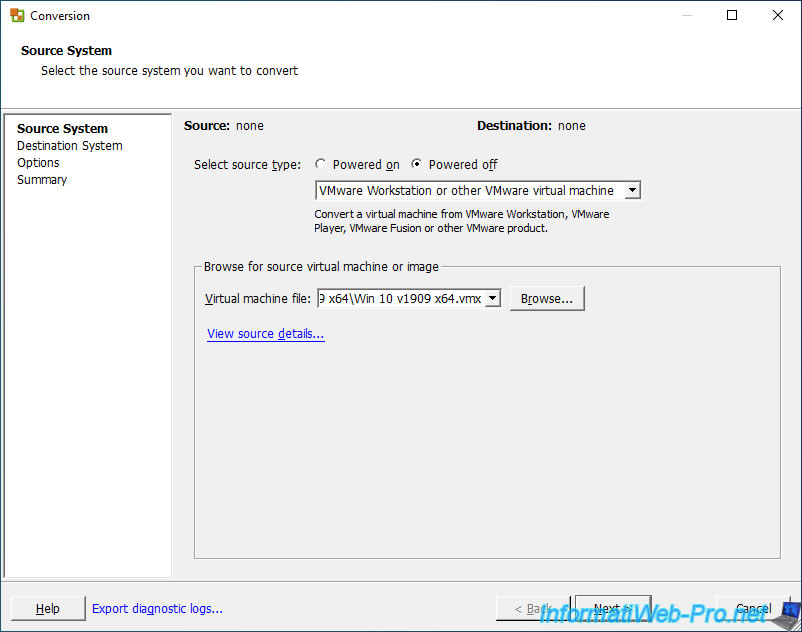
To obtain information about the virtual machine (and test whether VMware vCenter Converter Standalone can read its configuration file), click on the "View source details" link.
Otherwise, click directly on : Next.
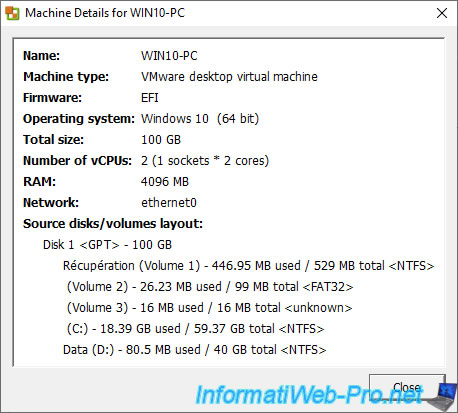
If this virtual machine was created with a supported version of VMware Workstation, a "Machine Details for [VM name]" window will appear.
If the "Unable to obtain hardware information for selected machine" error appears, restart your physical computer and relaunch VMware vCenter Converter Standalone as administrator.
According to what is indicated on the VMware site : Unable to obtain hardware information for the selected machine (2059581).
Note that in our case, this error occurred when we wanted to convert a virtual machine created with a too recent version of VMware Workstation (in this case : VMware Workstation Pro 16).
So, make sure you've created your virtual machine with a supported version of VMware Workstation (in short : version 15.0.0 at most).
![]()
In the "Select destination type" list, select "VMware Workstation or other VMware virtual machine".
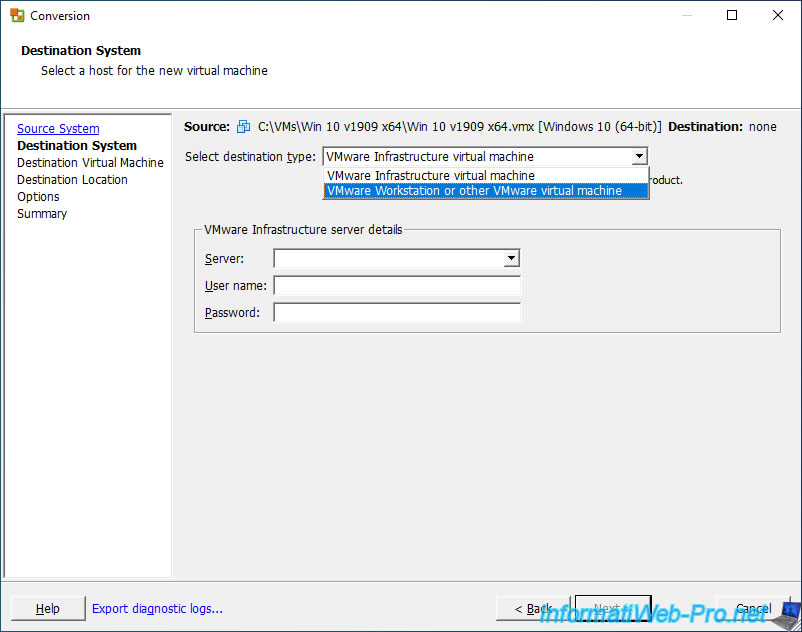
Then, select the destination VMware product. So : VMware Workstation.
As you can see, the most recent version for the destination virtual machine will be : VMware Workstation 11.x/12.x. This means that the version of the virtual hardware that will be used will be version 11.x.
However, you will only need to upgrade its virtual hardware using VMware Workstation after the conversion is complete to reuse the desired virtual hardware version.
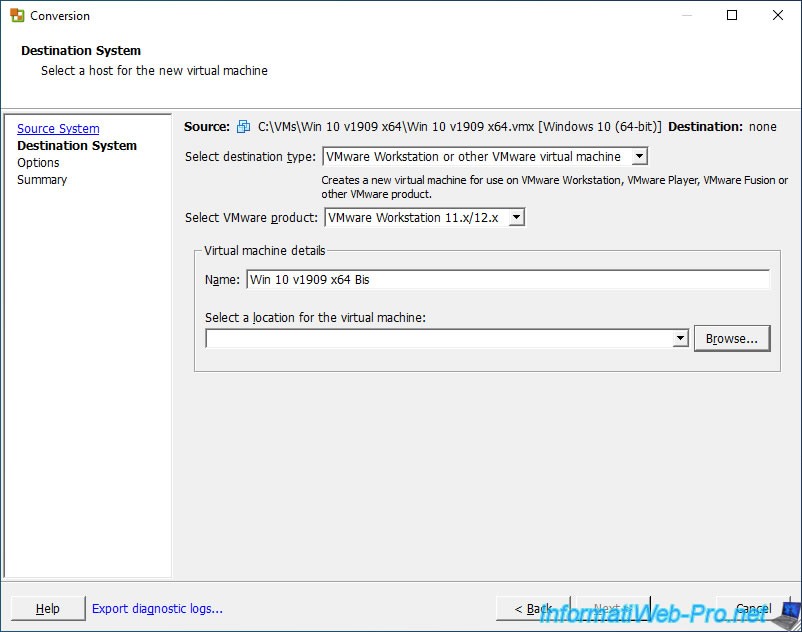
For virtual machine details, specify :
- Name : the name of the new virtual machine that will be created.
- Select a location for the virtual machine : the location where you want to store this virtual machine (using the "Browse" button).
Click on the "Browse" button.
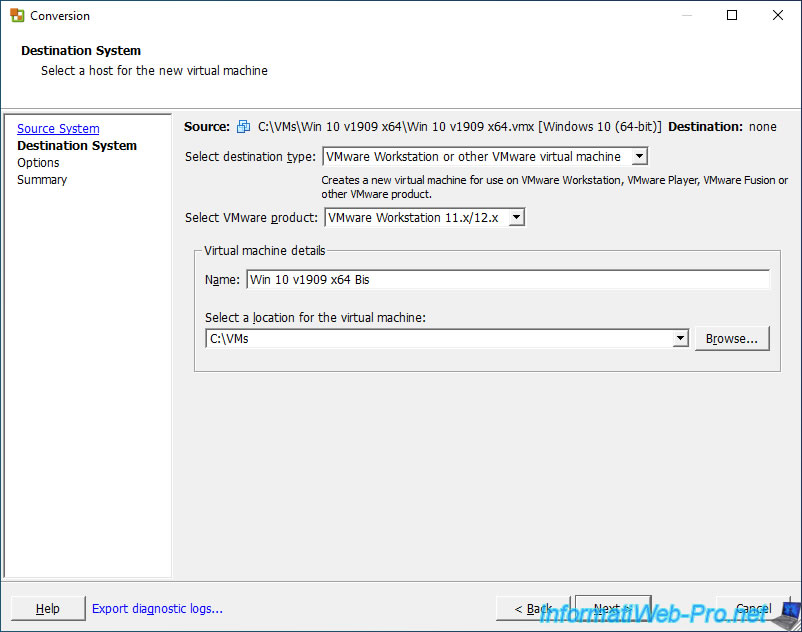
In our case, we store the virtual machines in the "C:\VMs" folder of this computer.
Note that a folder with the name of the new virtual machine will be created in the folder selected here.

Once the destination folder has been selected, click on : Next.
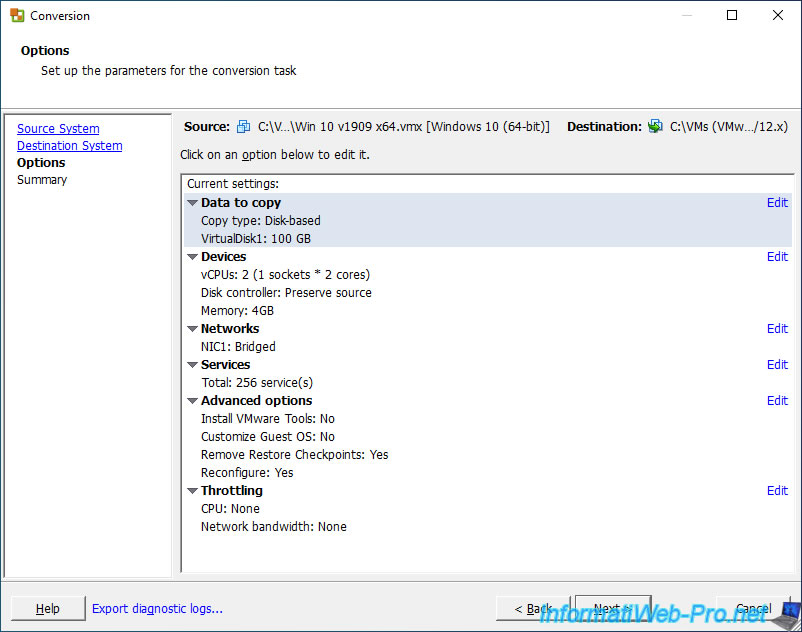
At the top of the list of available conversion options, click on the "Data to copy" option.
Then, in the "Data copy type" list that appears, select "Select volumes to copy".
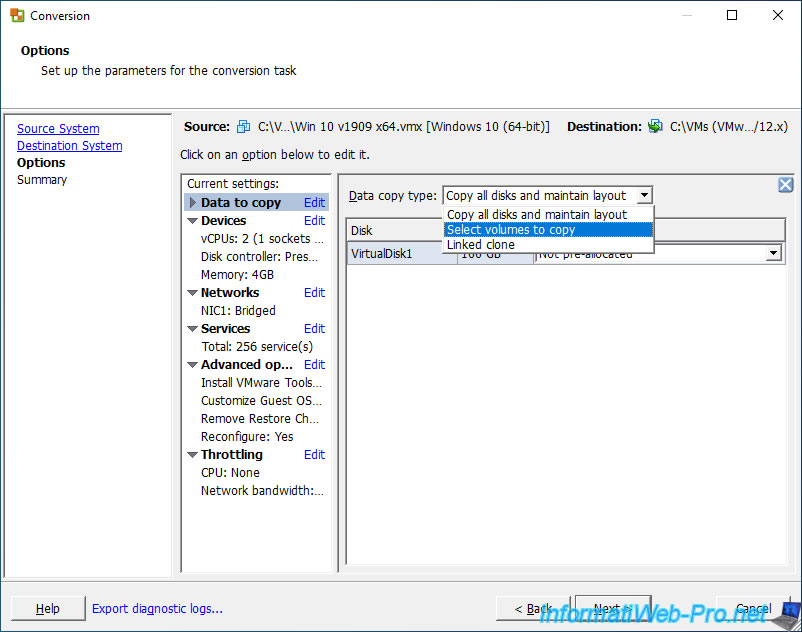
Click on the "Advanced" link that appears to the right of the "Data copy type" list.

Then, go to the "Destination layout" tab and click on the "Add disk" button to create a new empty virtual hard disk.
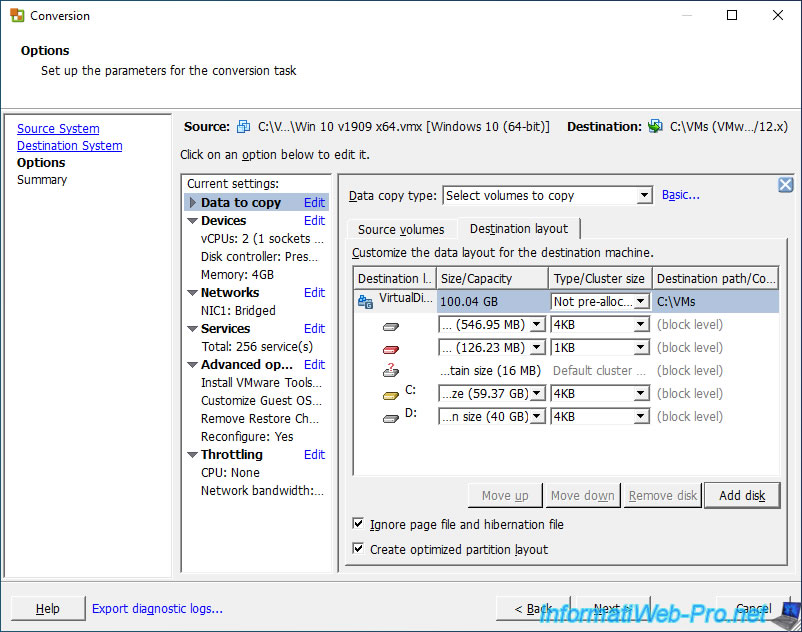
Select the partition (volume) you want to move to your new virtual hard drive (empty at the moment) and click the "Move down" button.
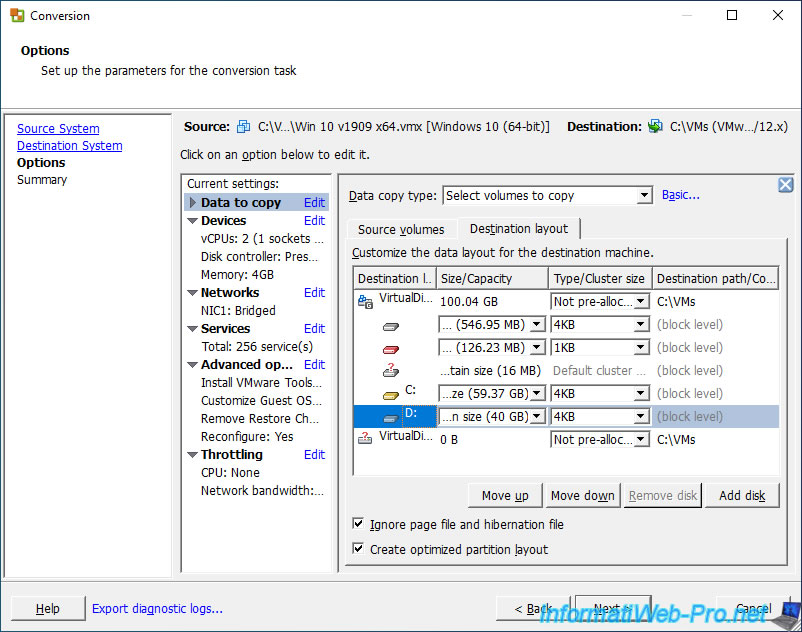
The desired partition (volume) has been moved to the new virtual hard disk.
Click on Next.
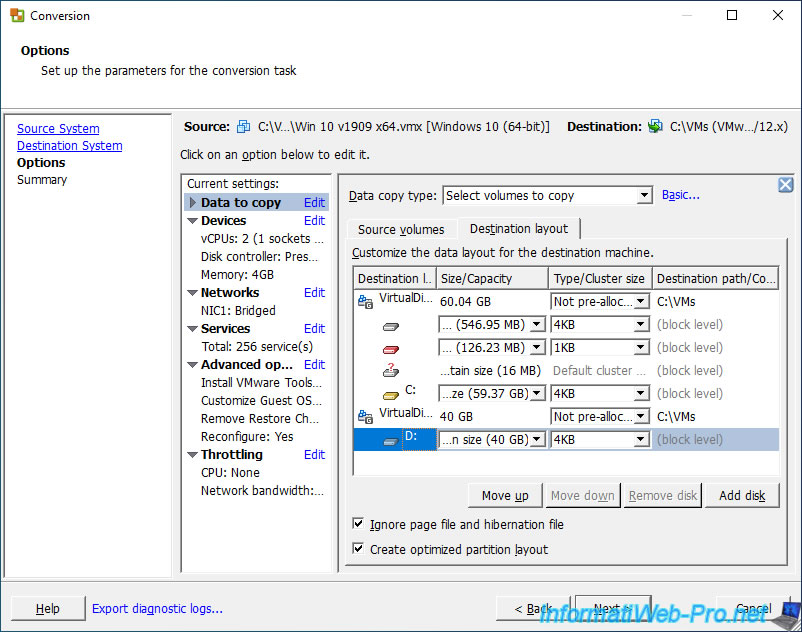
Note that the size of the virtual hard disks has been automatically adapted to the volumes that will need to be there.
For each virtual hard disk, you can change its type of provisioning if you wish thanks to the "Type/Cluster size" column :
- Pre-allocated : space will be pre-allocated on your physical hard drive and the size of the ".vmdk" file will correspond to its size (indicated in the "Size/Capacity" column).
- Not pre-allocated : space will NOT be pre-allocated. This means that the ".vmdk" file will only take up on your physical hard disk the space necessary to store the data that are in it.
Then, the corresponding ".vmdk" file will grow larger as you store data inside it. - Split pre-allocated : space will be pre-allocated (as with the "Pre-allocated" option), but the ".vmdk" file will be split into 2 GB files (if the size of the virtual hard disk is less than 2 TB). Otherwise, it will be split into 2 TB files.
- Split not pre-allocated : the space will NOT be pre-allocated (as with the "Not pre-allocated" option), but the virtual hard disk will be split into 2 GB files (if the virtual hard disk is less than 2 TB in size) or in 2 TB files (otherwise).
If the maximum size of your virtual hard disks exceeds the amount of free space available on the destination location (on your physical computer), a warning will be displayed :
Plain Text
Warning: The size of the source disks may exceed the capacity of '[VM destination path]'.
You can ignore this warning, but make sure not to fill your computer's physical hard drive to the maximum to prevent your virtual machine from being abruptly suspended when there is no more 1 byte free on it.
![]()
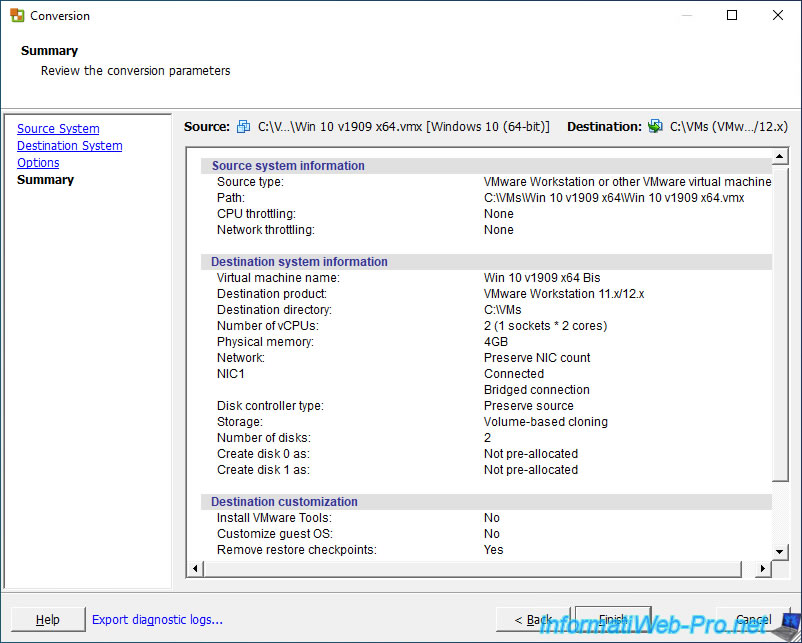
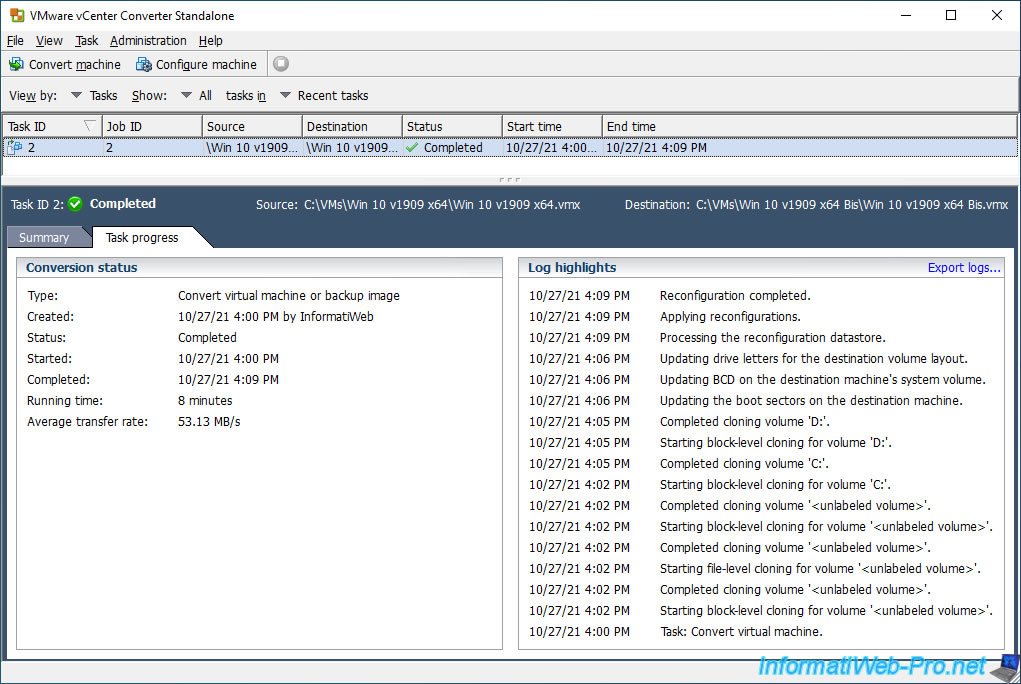
A summary of the conversion parameters appears.
Click on "Finish" and wait a few seconds.
Then, the "Convert virtual machine or backup image" task will appear.
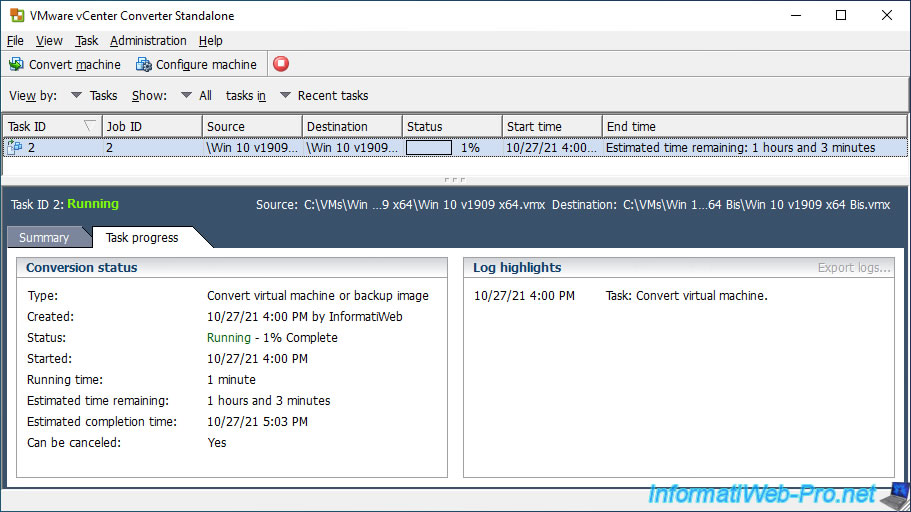
As you can see, VMware vCenter Converter Standalone will first clone volume "C" (where Windows 10 is in our case).
Plain Text
Starting block-level cloning for volume 'C:'.
Note that unnamed volumes correspond to hidden Windows partitions : Recovery Partition (OEM partition), EFI System Partition, ...
These partitions were also displayed in the "Options" step of the conversion wizard when configuring the destination layout.
Plain Text
Completed cloning volume '<unlabeled volume>'.
Starting block-level cloning for volume '<unlabeled volume>'.
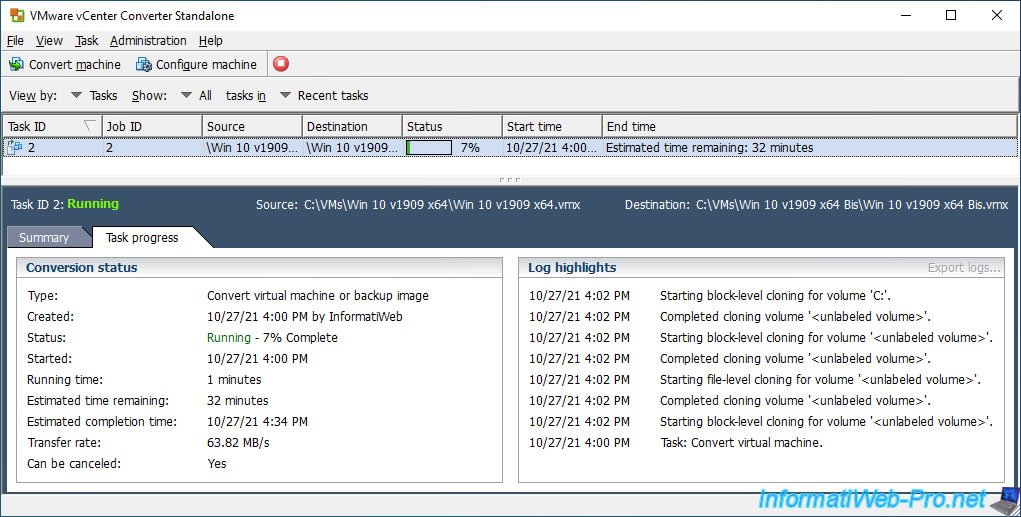
Then, it will switch to the following partition (volume) : D.
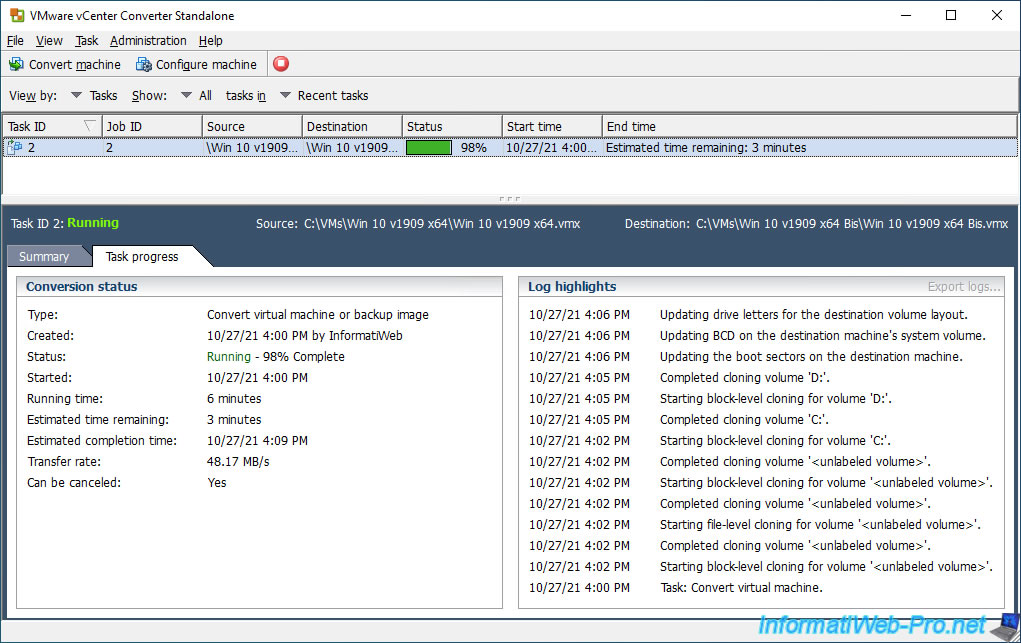
At the end of the conversion, VMware vCenter Converter Standalone will perform normal reconfigurations so that your virtual machine is able to boot correctly on the operating system installed on it.
Then, the status of this conversion task will be : Completed.
Share this tutorial
To see also
-

VMware 3/16/2013
VMware Workstation - Boot a VM on the BIOS / EFI firmware
-

VMware 2/7/2020
VMware Workstation 15 - Installation on Linux
-

VMware 12/10/2021
VMware Workstation 15.5 - Convert a Virtual PC virtual machine to a VMware VM
-
VMware 11/20/2020
VMware Workstation 15.5.5 / 15.5.6 - Installation on Windows 7
You must be logged in to post a comment