- VMware
- 17 July 2020 at 11:35 UTC
-


VMware Workstation is a professional and complete virtualization solution that can be configured as you wish.
In this article, you will find the necessary explanations for each setting available in VMware Workstation.
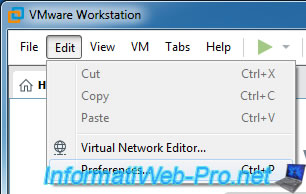
To begin, go to the VMware Workstation settings by clicking on Edit -> Preferences.
- Workspace
- Keyboard and mouse (Input)
- Keyboard shortcuts (Hot Keys)
- Display
- Unity mode
- USB
- Updates
- VMware Improvement Program (Feedback)
- Shared VMs
- RAM management (Memory)
- Process priority (Priority)
- Autorun and printers (Devices)
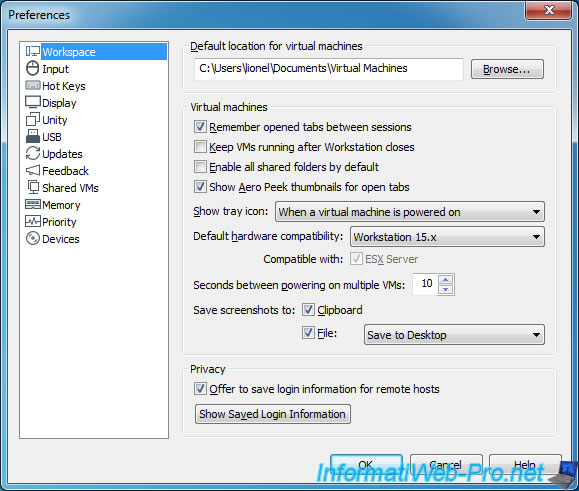
1. Workspace
In the "Workspace" section, you can first choose the default location for virtual machines.
You will also find settings related to virtual machines :
- Remember opened tabs between sessions : allows you to automatically reopen the virtual machines that were open at the previous closing VMware Workstation
- Keep VMs running after Workstation closes : allows you to leave virtual machines running when closing VMware Workstation.
By default, this option is not enabled, but in this case, VMware Workstation will ask you if you are trying to close VMware Workstation. You will have the choice to power off the virtual machines or let them run in the background if you wish. - Enable all shared folders by default : by default, this option is disabled to protect you from the folder sharing configured in the virtual machine settings that you start if you are not the creator of this virtual machine. For example, if you download a virtual machine (also called a Virtual Appliance) over the Internet and it's configured to share a sensitive folder of the host PC, this protection will protect you from potential host PC attack from the virtual machine.
- Show Aero Peek thumbnails for open tabs : allows you to preview the VM guest OS when hovering VMware Workstation icon in the taskbar. This option can only be used from Windows 7 if the Windows Aero Peek feature is enabled.
- Show tray icon : to display a VMware icon in the taskbar (next to the time) :
- Always
- When a virtual machine is powered on : when at least one virtual machine is started
- Never - Default hardware compatibility : allows you to choose the hardware compatibility that will be selected by default when you create new virtual machines.
Choosing an earlier version can allow you to create virtual machines that are compatible with older versions of VMware Workstation and other VMware products.
But, using the latest version available will allow you to enjoy the best performance possible and enjoy all the features offered by your version of VMware Workstation. - Compatible with ESX Server : this option is linked to the previous one and allows you to add or not the support of ESX Server (which is the predecessor of ESXi). However, this option is checked and grayed out from version 6.0 and can only be changed for version 5.0 of the virtual hardware.
- Seconds between powering on multiple VMs : since starting a virtual machine always requires a lot more resources (processor, RAM, ...) than when it's already started, VMware Workstation always waits 10 seconds (by default) between each machine start when you try to launch several VMs at once. This avoids overloading the processor of the host PC at a specific time.
- Save screenshots to Clipboard / File : allows you to choose whether screenshots made from VMware Workstation should be copied to the host OS clipboard and/or as a file (by default on the desktop).
For the files, they can be automatically saved :
- Always ask for location : in a folder that you specify each time
- Save to Desktop : on the desktop
- Browse for custom location : in a selected custom folder
Finally, you will be able to choose whether VMware Workstation should offer you to save the login information for remote hosts, as well as to show saved login information.
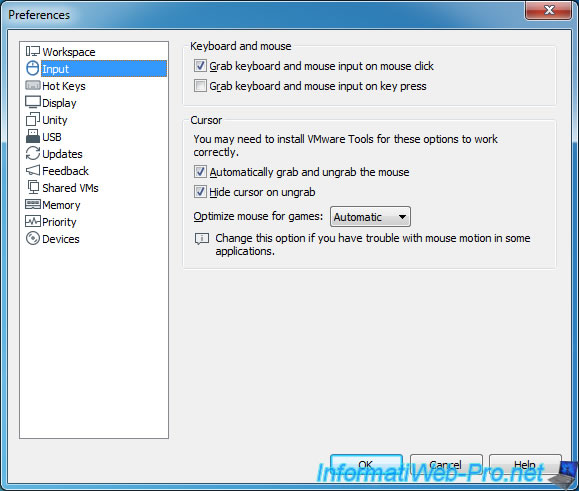
2. Keyboard and mouse (Input)
In the "Input" section, you will be able to choose the authorized behavior(s) for the capture of the keyboard and the mouse by the virtual machine :
- Grab keyboard and mouse input on mouse click : capture the keyboard and mouse on a mouse click on the virtual machine
- Grab keyboard and mouse input on key press : the same except that it will be when on key press
For the cursor, you will be able to :
- Automatically grab and ungrab the mouse : capture and exit the mouse cursor automatically from the virtual machine
- Hide cursor on ungrab : hide the cursor when it leaves the virtual machine
- Optimize mouse for games : optimize mouse management in games or some programs installed in a virtual machine
Note that the cursor management options will only work if the VMware Tools are installed in the virtual machine.
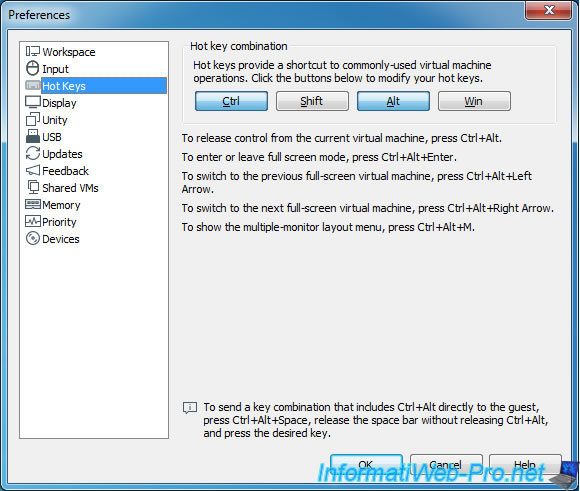
3. Keyboard shortcuts (Hot Keys)
When you use a virtual machine and want to return to the host PC, you may need to (especially when VMware Tools are not installed) press the "Ctrl + Alt" shortcut keys.
In this "Hot Keys" section, you can change this keyboard shortcut if you wish.
These shortcut keys will also allow you to :
- release control of the virtual machine by pressing the 2 keys configured by default : Ctrl + Alt
- enter or exit the full screen mode by also pressing the "Enter" key.
- switch to the previous virtual machine in full screen by pressing : Ctrl + Alt + Left Arrow
- switch to the next virtual machine in full screen by pressing : Ctrl + Alt + Right Arrow
- display the multiple-monitor layout menu by pressing : Ctrl + Alt + M (since version 15.5)
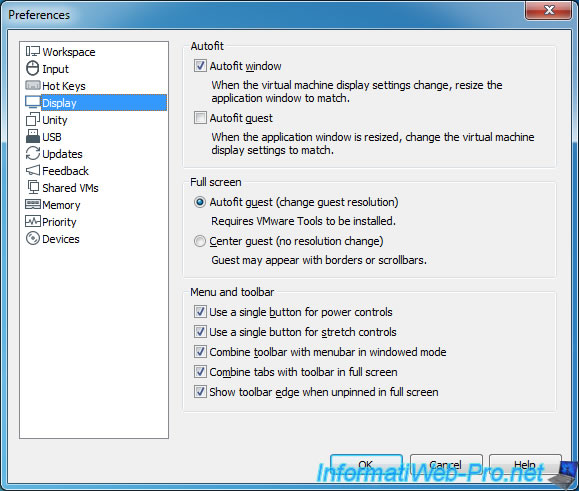
4. Display
In the "Display" section, you can configure the resizing conditions of the virtual machine :
- Autofit window : the virtual machine window will be automatically resized according to the resolution used in the guest OS
- Autofit guest : the resolution in the guest OS will be adapted according to the resizing of the virtual machine window from the host PC
Then, you can configure the full screen mode :
- Autofit guest (change guest resolution) : allows you to adapt the resolution in the guest OS according to the full-screen resolution of the host PC IF the VMware Tools are installed in the virtual machine.
- Center guest (no resolution change) : allows you to put a virtual machine in full screen without changing the resolution in the guest OS. The guest OS will therefore be centered on the host PC screen and scroll bars may appear if the resolution configured from the guest OS is higher than that of the host PC.
Finally, you can configure VMware Workstation menus and toolbars to :
- Use a single button for power controls
- Use a single button for strech controls
- Combine toolbar with menubar in windowed mode : display the menu bar (File, Edit, ...) and the toolbar (VM power options, ...) on a single line instead of 2 when using a virtual machine in windowed mode.
- Combine tabs with toolbar in full screen : display the menu bar, the tabs with the different open virtual machines, and the toolbar on a single line instead of 2 when you use a virtual machine in full-screen mode.
- Show toolbar edge when unpinned in full screen : by default, when you use a virtual machine in full-screen, a toolbar is permanently displayed at the top. If you hide it by clicking on the pin at the top left, a colored line will remain displayed at the top of the screen to indicate that the toolbar is always at the top of the screen.
However, if you want to create a tutorial with a virtual machine, or even record the screen of it, you must first disable this option so that the line at the top of the screen disappear completely in full screen mode.
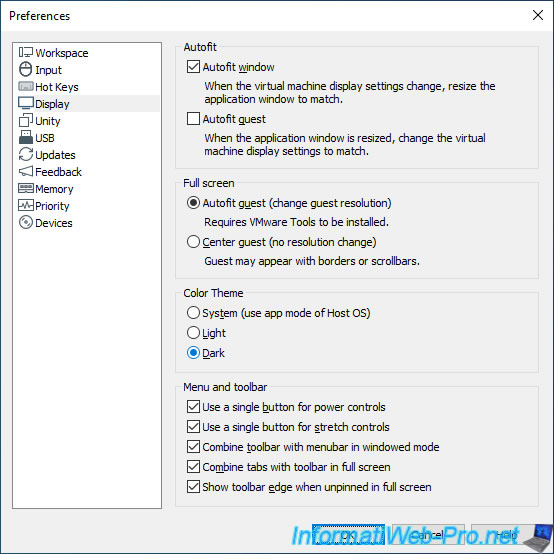
Since version 16 of VMware Workstation Pro, if your physical computer (host PC) is running Windows 10 v1809 or later, you can also enable the dark mode using the "Colot Theme" options :
- System (use app mode of Host OS) : dark or light theme depending on the choice selected in the Windows 10 settings.
- Light : use the light (white) theme.
- Dark : use the dark (black) theme.
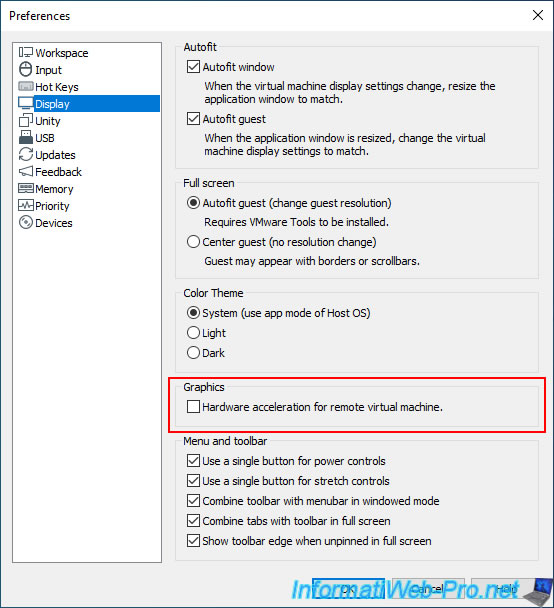
Since version 16.2.0 of VMware Workstation Pro, you will see that a new option "Hardware acceleration for remote virtual machine" has appeared.
In other words, you will be able to use hardware acceleration when using remote virtual machines (hosted on a VMware ESXi hypervisor mainly).
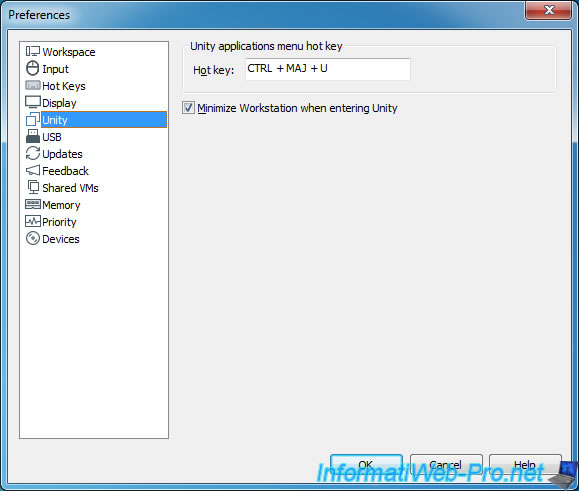
5. Unity mode
When you enable the Unity mode on a virtual machine, by default, VMware Workstation is minimized in the taskbar.
To disable this behavior, simply disable the "Minimize Workstation when entering Unity" option.
In addition, instead of clicking the Unity icon above the virtual machine, you can also use the "CTRL + SHIFT + U" shortcut configured here or change it if you wish.
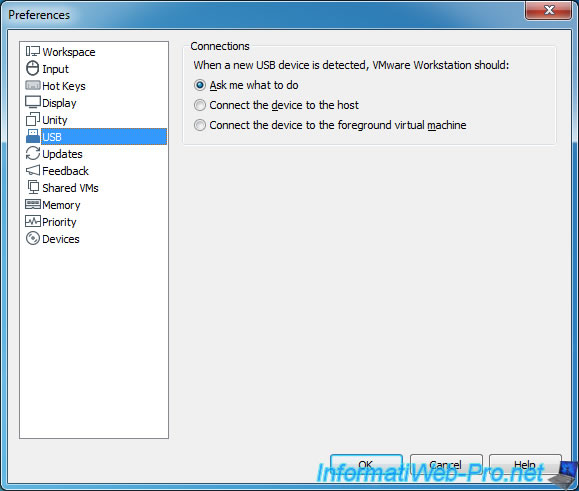
6. USB
In the "USB" section, you will be able to choose the default behavior that VMware Workstation will need to use when you connect an USB device (external hard disk, USB key, ...) to the host PC :
- Ask me what to do : VMware Workstation will ask you what to do
- Connect the device to the host : connect the USB device to the host OS by default
- Connect the device to the foreground virtual machine : connect the USB device by default to the guest OS.
Warning : this option can be risky if one of your virtual machines is infected by a virus (or more precisely a worm that would spread on your USB key, your external hard drive plugged into USB or any other USB device)
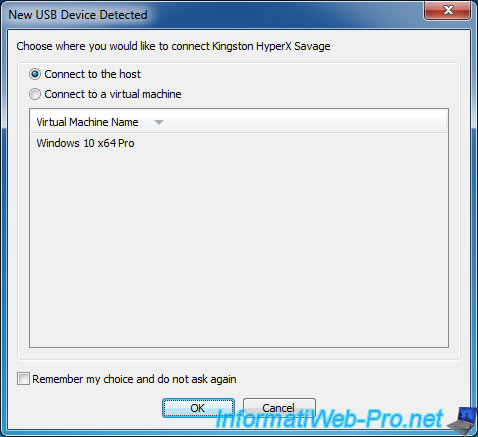
If you have selected the default option "Ask me what to do" and you connect an USB key (for example) when at least one of your virtual machines is started, a "New USB Device Detected" window will be displayed.
As you can see, VMware Workstation will ask you if it should :
- Connect to the host : connect it to the host PC
- Connect to a virtual machine : connect it to the virtual machine
If you check the "Remember my choice and do not ask again" box, VMware Workstation will select the corresponding "Connect the device to ..." option in the previously explained USB settings.
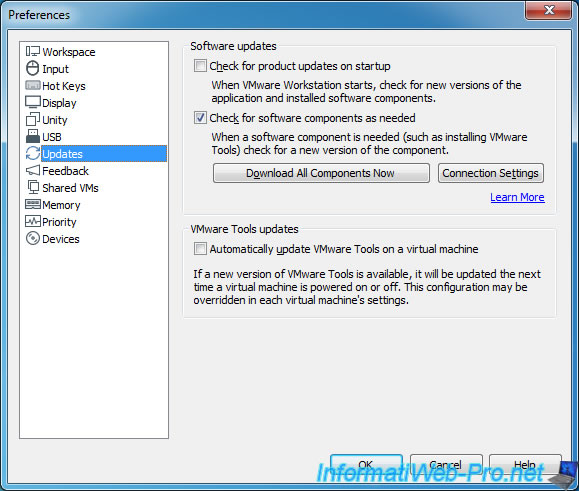
7. Updates
In the "Updates" section you can choose :
- Check for product updates on startup (obsolete) : whether VMware Workstation should check at each startup whether a new version of VMware Workstation or one of its components (the VMware Tools for the different supported guest operating systems) is available.
- Check for software components as needed : check new component releases (VMware Tools) only when necessary. This allows you to not download and install components for OSs that you will never virtualize, for example and download them only the day you need them.
- Download All Components Now : allows you to directly download all existing components for VMware Workstation so you don't have to wait to install them the day you need them.
- Connection Settings : allows you to configure or not a proxy to use it if your company requires it for example.
- Automatically update VMware Tools on a virtual machine : automatically update or not the VMware Tools in your virtual machines.
Except if the virtual machine is configured to update them manually.
Warning : automatic checking for new versions (and updates) of VMware Workstation Pro no longer works since Broadcom's acquisition of VMware.
Broadcom has disabled the automatic checking feature for new versions of VMware Workstation Pro.
This means you'll need to create a free account on the Broadcom support website to manually download each update or new version of VMware Workstation Pro.
Source : Important Update: Change in Product Update Process for VMware Workstation and VMware Fusion.
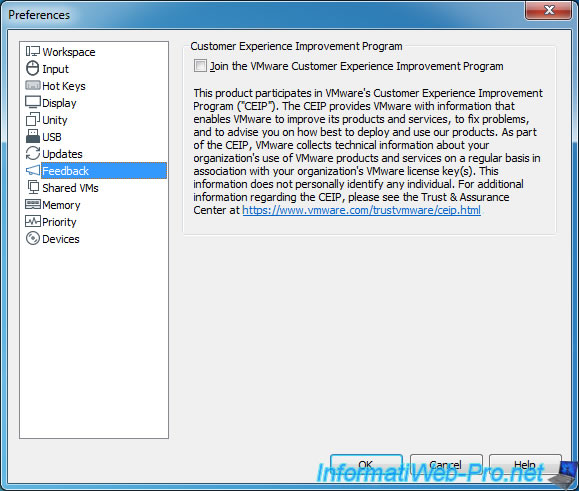
8. VMware Improvement Program (Feedback)
In the Feedback section, you can choose whether to join the VMware Customer Experience Improvement Program (CEIP) or not.
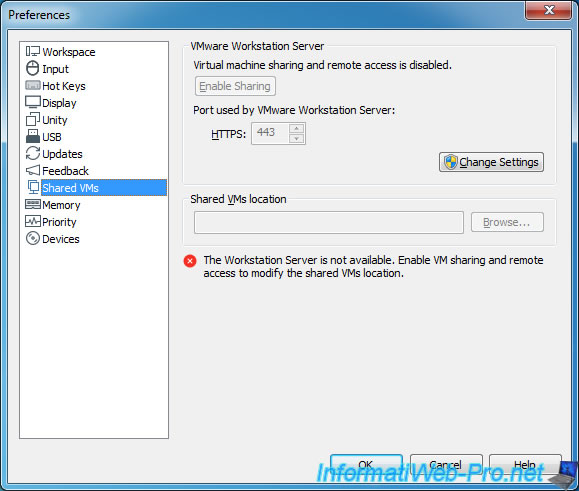
9. Shared VMs
In the "Shared VMs" section, you will be able to :
- enable or disable the VMware Workstation Server
- choose the port to use (default : HTTPS 443 TCP)
- choose where to store virtual machines to share
As indicated on the "VMware Workstation 16 Pro Release Notes" page of the VMware site, sharing virtual machines (thanks to VMware Workstation Server which was integrated into VMware Workstation) is no longer possible since version 16 of VMware Workstation.
Note that administrator rights will be required to change these settings.
To learn more about these settings, refer to our tutorial : Share virtual machines and manage access to them
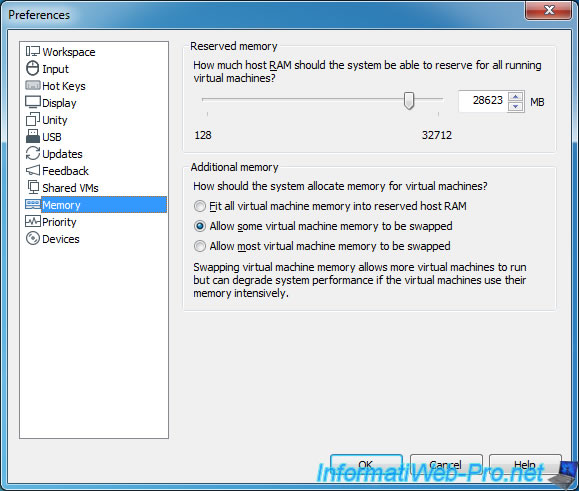
10. RAM management (Memory)
In the "Memory" section, you will be able to choose the amount of RAM that VMware Workstation can reserve for the started virtual machines : Reserved memory.
You will also be able to choose how VMware Workstation will allocate RAM of the host OS to virtual machines :
- Fit all virtual machine memory into reserved host RAM : place the RAM of all virtual machines in the RAM of the host OS
- Allow some virtual machine memory to be swapped* : allows VMware Workstation to change the RAM location of some VMs from RAM to hard drive and vice versa if needed
- Allow most virtual machine memory to be swapped* : same, but this will affect almost all virtual machines
*Note that swapping allows you to run more virtual machines even if the amount of random access memory (RAM) needed for them is not enough, but this may affect their performance.
11. Process priority (Priority)
In the "Priority" section, you can choose the default priority to use for your virtual machines when :
- Input grabbed : the cursor is captured by the virtual machine
- Input ungrabbed : the cursor is NOT captured by the virtual machine
However, be aware that these 2 options can also be changed from the settings of the desired virtual machine.
For snapshots, you will be able to :
- Take snapshots in the background when possible : allows you to create snapshots in the background while still using your virtual machines
- Restore snapshots in the background when possible : restore snapshots in the background
Warning : these options will only be used after a complete shutdown of your virtual machines.

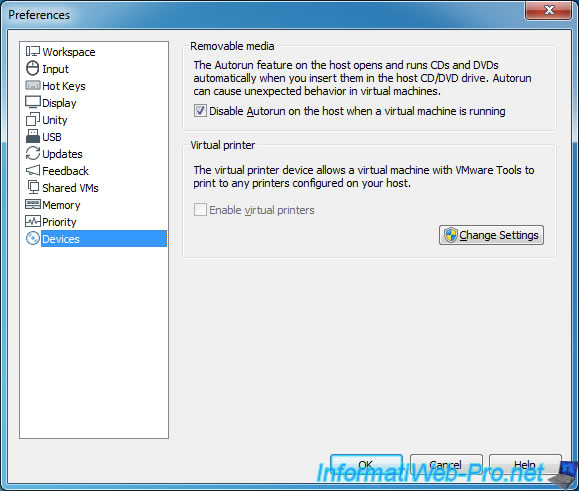
12. Autorun and printers (Devices)
Finally, in the "Devices" section, you can choose :
- Disable Autorun on the host when a virtual machine is running : disable the automatic execution of a program on the CD/DVD inserted in the host CD/DVD drive via the "Autorun" feature of Windows.
- Enable virtual printers : enable or disable the VMware "Virtual Printers" feature that allows virtual machines to print informations directly to the printer configured on the host PC (if VMware Tools and the "Virtual Printer" program, since version 15, are installed)
Share this tutorial
To see also
-

VMware 3/16/2013
VMware Workstation - Boot a VM on the BIOS / EFI firmware
-

VMware 2/7/2020
VMware Workstation 15 - Installation on Linux
-

VMware 12/24/2021
VMware Workstation 15 - Slice the virtual hard disk of a VM
-

VMware 12/10/2021
VMware Workstation 15.5 - Convert a Virtual PC virtual machine to a VMware VM
You must be logged in to post a comment