- VMware
- VMware ESXi
- 17 December 2025 at 14:08 UTC
-

- 1/4

On VMware ESXi, you can virtualize Unraid to test this NAS solution using a simple physical USB key (to which the Unraid evaluation license will be linked).
Unraid storage will consist of virtual hard drives stored in a datastore within your VMware ESXi hypervisor.
Before you begin, follow steps 1 and 2 of our previous tutorial "Virtualize Unraid 6.9.2 with VMware Workstation 17.5.1" to create your Unraid USB key and download the "PlopKexec" tool, which you will need to boot your virtual machine from your physical USB key where Unraid is installed.
Warning : although you can technically virtualize Unraid on VMware ESXi, this is not officially supported by Lime Technology (the company that created Unraid).
- Add the PlopKexec ISO to a VMware ESXi datastore
- Create and configure Unraid virtual machine on VMware ESXi
- Connect your Unraid USB key to your Unraid virtual machine
- Known issue: USB port version different between host and VM
- Change the USB controller version of your Unraid virtual machine
- Start Unraid evaluation period
- Configure Unraid array
- Install the plugin: Community Applications
- Install VMware Tools on Unraid
- Enable automatic array startup
- Test VMware Tools
1. Add the PlopKexec ISO to a VMware ESXi datastore
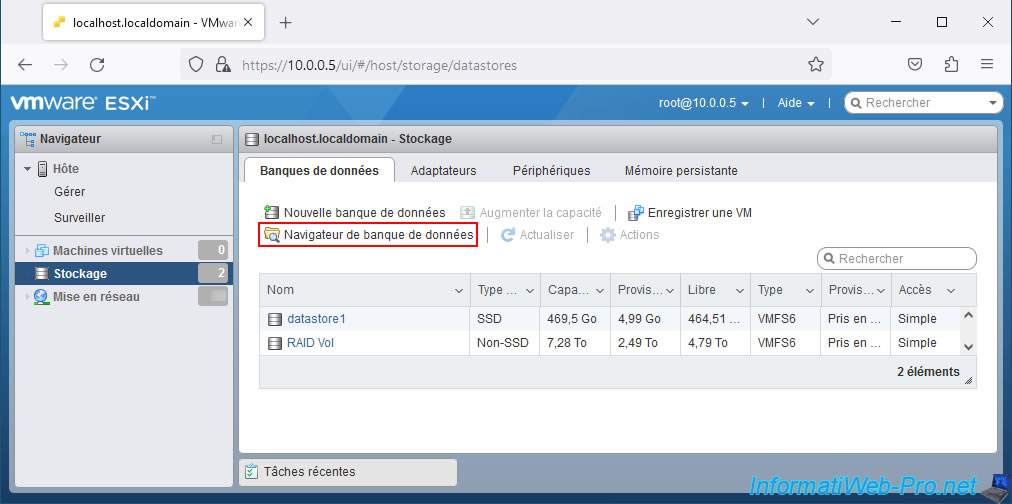
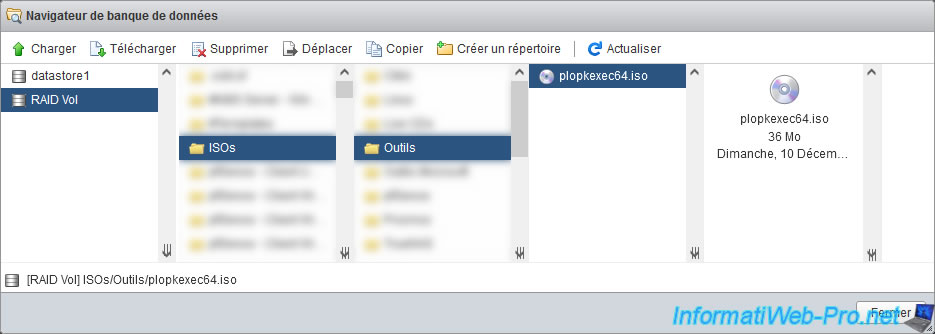
In your VMware ESXi hypervisor web interface, go to "Storage -> Datastores" and click on: Datastore browser.
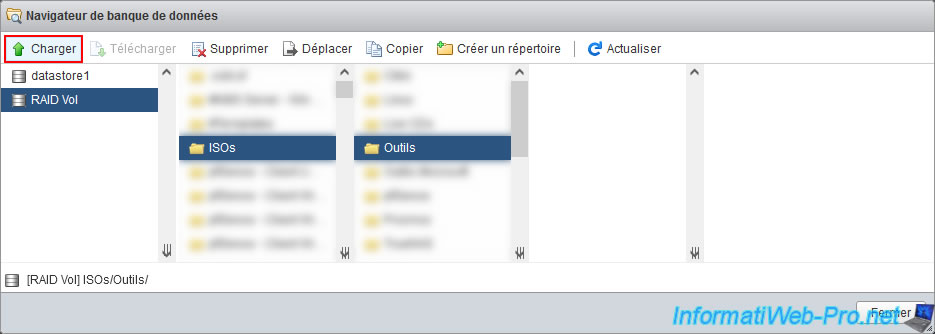
Select the datastore or folder where you want to store the PlopKexec ISO file and click: Load.
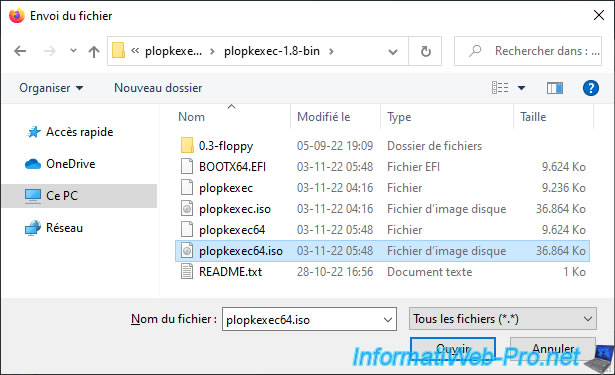
Select the "plopkexec64.iso" file and click Open.
The file "plopkexec64.iso" appears in the desired folder.
2. Create and configure Unraid virtual machine on VMware ESXi
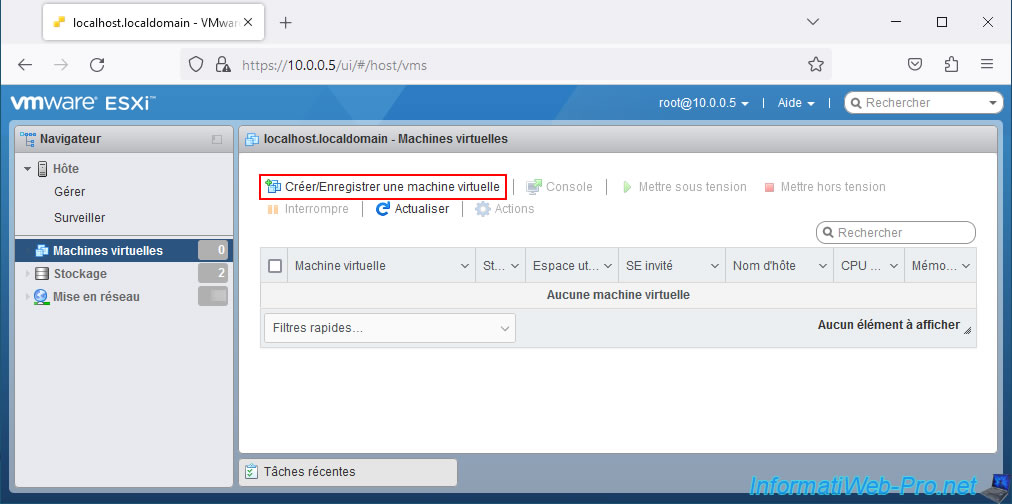
To create your Unraid virtual machine on VMware ESXi, go to "Virtual Machines" and click on: Create / Register VM.
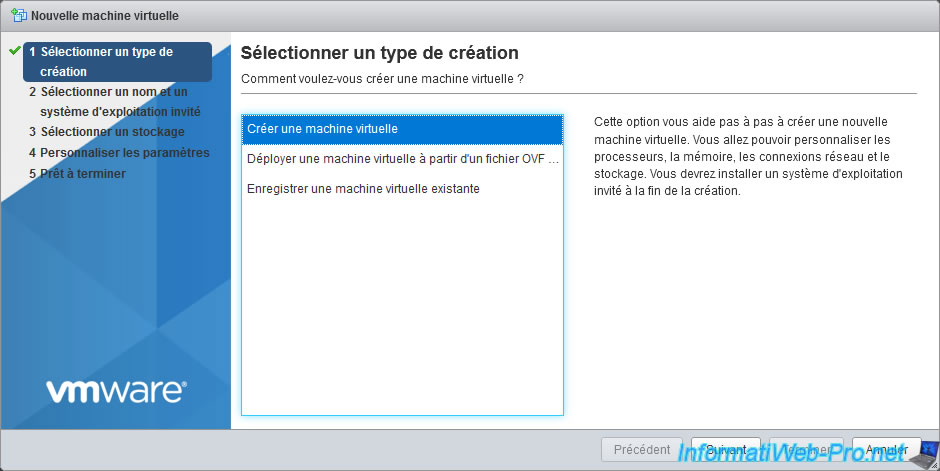
Select "Create a virtual machine".
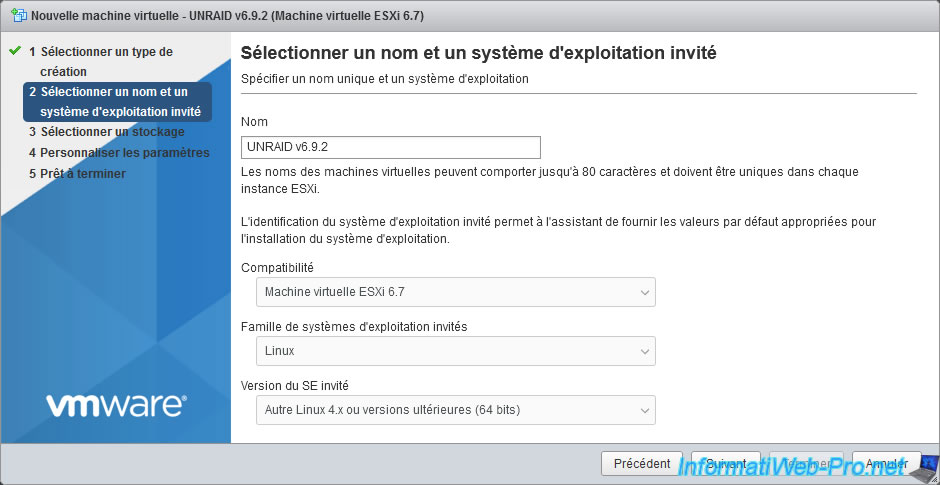
Enter a name for your virtual machine.
For example: UNRAID v6.9.2.
Next, knowing that Unraid version 6.9.2 is based on Linux kernel version 5.10.28, select these options:
- Compatibility: ESXi 6.7 virtual machine. (= Your version of VMware ESXi.)
- Guest operating system family: Linux.
- Guest OS version: Other Linux 4.x or later (64-bit).
Because VMware ESXi 6.7 does not offer an option for Linux 5.x.
If you have a newer version of VMware ESXi that offers a "Linux 5.x (64-bit)" option, then choose it.
To find out which Linux kernel version your version of Unraid uses, refer to the "Release Notes | Unraid Docs" page.
On this page, select your version of Unraid and check the Linux kernel version used in the "Changelog" section of the page.
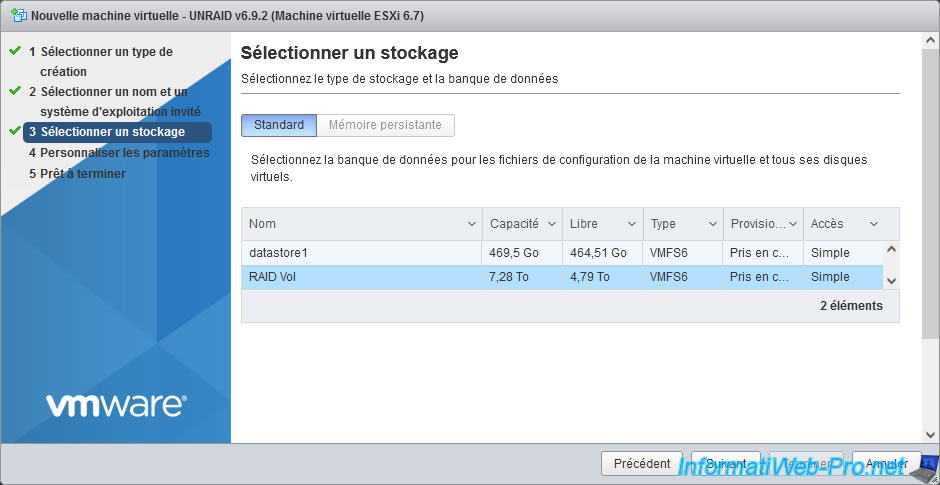
Select the datastore where you want to create your Unraid virtual machine.
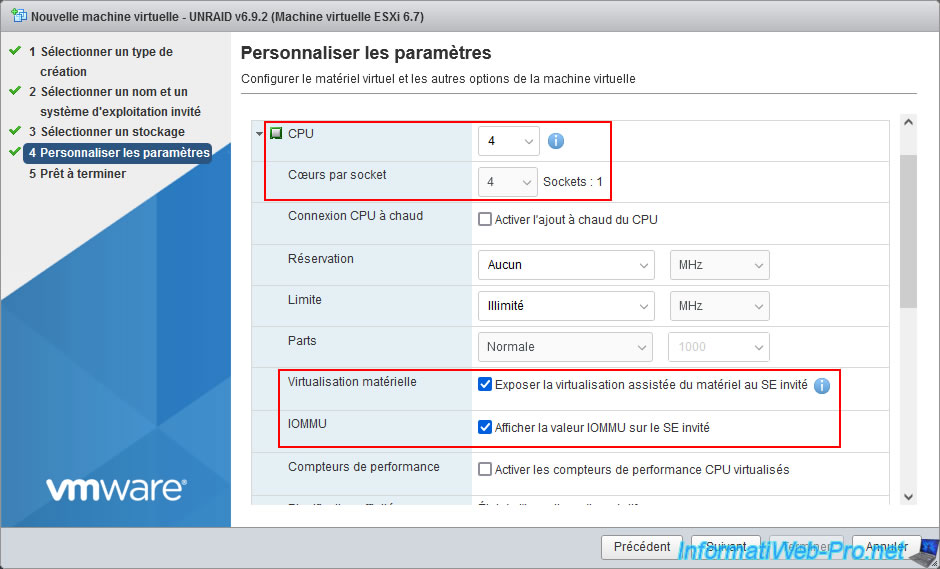
In the "Customize Settings" step, you will need to configure many components. (See following images.)

To begin, for the "CPU" section, enter at least "4" in the "CPU" box, then select the same value (4) for the "Cores per socket" option.
This will ensure that a single processor with four cores will be allocated to this virtual machine.
This is one of Unraid's prerequisites.
Next, to be able to virtualize virtual machines on Unraid, or even pass peripherals to a virtual machine created on Unraid, enable these two options:
- Hardware Virtualization: Expose hardware-assisted virtualization to the guest OS.
This allows the creation of virtual machines on Unraid.
This corresponds to Intel VT-x and AMD-V. - IOMMU: Display the IOMMU value on the guest OS.
This allows the transition of devices from the VM created on VMware ESXi to a virtual machine created on Unraid.
IOMMU (for AMD) corresponds to Intel VT-d (for Intel).
To learn more about Unraid prerequisites, refer to our tutorial: Unraid 6.9.2 - Install and configure Unraid 6.9.2.
For the "Memory" (RAM) section, allocate at least 4096 MB (4 GB) of RAM to be able to run applications via Docker on Unraid.

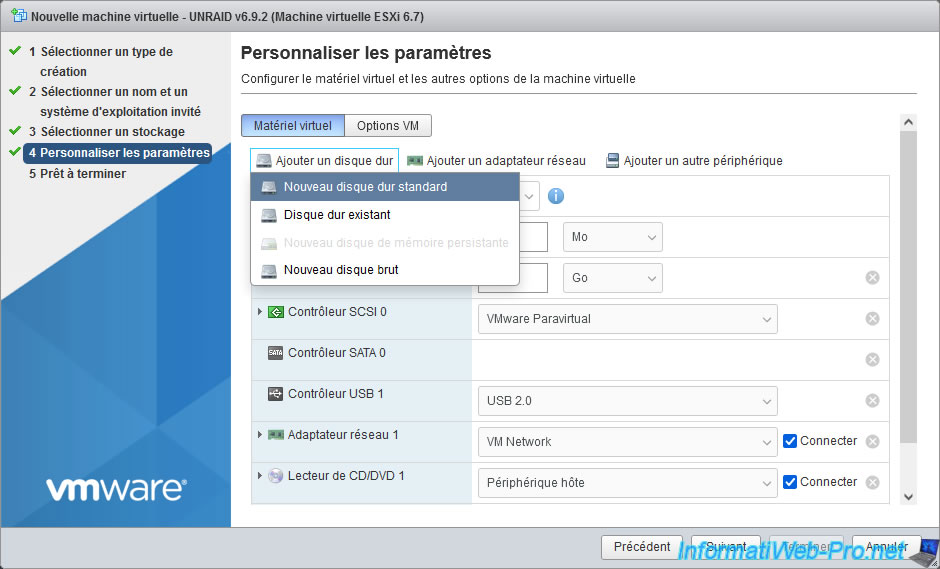
For virtual hard drives, you can use IDE, SATA, or NVMe storage controllers.
Please note: As is also the case with VMware Workstation Pro, you cannot use a SCSI controller for your Unraid virtual machine.
Indeed, regardless of the type of SCSI controller (LSI Logic SAS, LSI Logic Parallel, or VMware Paravirtual) used on VMware ESXi, SCSI virtual hard drives will never appear on Unraid.
In our case, we are using a SATA controller for the disks that will be part of the Unraid array.
Indeed, you can connect multiple disks to a single SATA controller without any problems on Unraid.
Unlike the IDE controller, which is physically limited to hard drives, and the NVMe controller, which is more complicated to use for Unraid,
Indeed, for the NVMe controller, Unraid will only recognize one disk per NVMe controller.
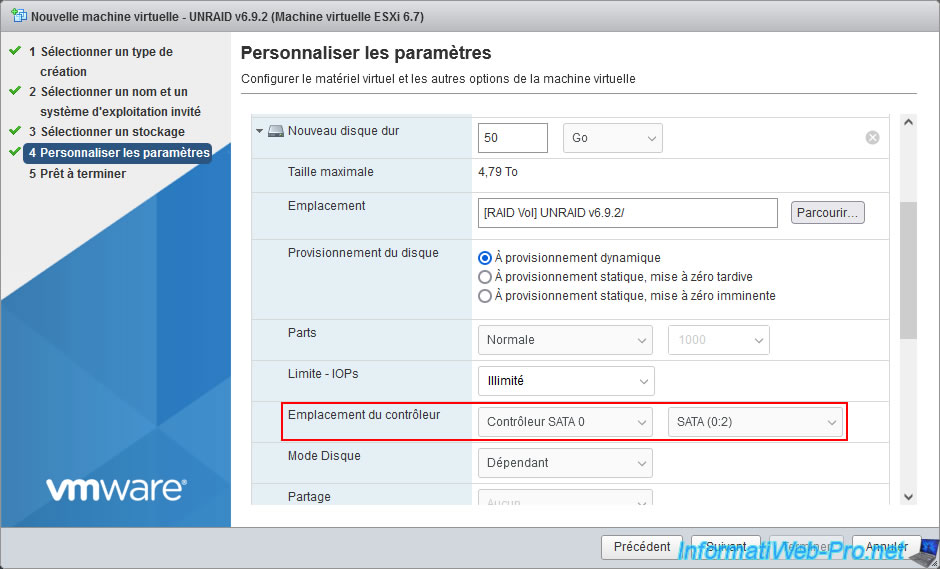
For the 1st virtual hard disk present by default, configure these parameters:
- Specify the desired capacity (size).
However, you must specify the same capacity (size) for all data disks.
In our case, the virtual hard disks in our array will each have a capacity of 50 GB. - Disk Provisioning: Thin provisioning. This allows you to save disk space on your VMware ESXi server.
- Controller Location: SATA Controller 0. The position of the virtual hard disk on the SATA controller is irrelevant.

At the top of the list, double-click "Add Hard Drive -> New Standard Hard Drive".
2 new virtual hard drives appear.

Again, for the 2 added virtual hard drives:
- Specify the same capacity (size) as the previous virtual hard disk.
- Select "Thin Provisioned" to save disk space.
- Select SATA 0 controller. The disk's position on this controller does not matter.
You now have three virtual hard disks of the same size that you can use for your Unraid array.
One disk will be used for parity and the others for data storage.
Important : on Unraid, the minimum number of disks required is two.

In Unraid, you can create a device pool, which will be named "Cache" by default.
Generally, you will use SSDs.
To simulate SSD usage, we chose to use the NVMe connection supported by VMware ESXi.
Note: Unraid only recognizes one virtual disk per NVMe controller.
However, Unraid will consider the files stored on its cache to be unprotected if you only use one SSD.
You will therefore need to connect each virtual disk to a separate NVMe controller for them all to appear in the Unraid web interface.
To do this, double-click: Add Device -> NVMe Controller.
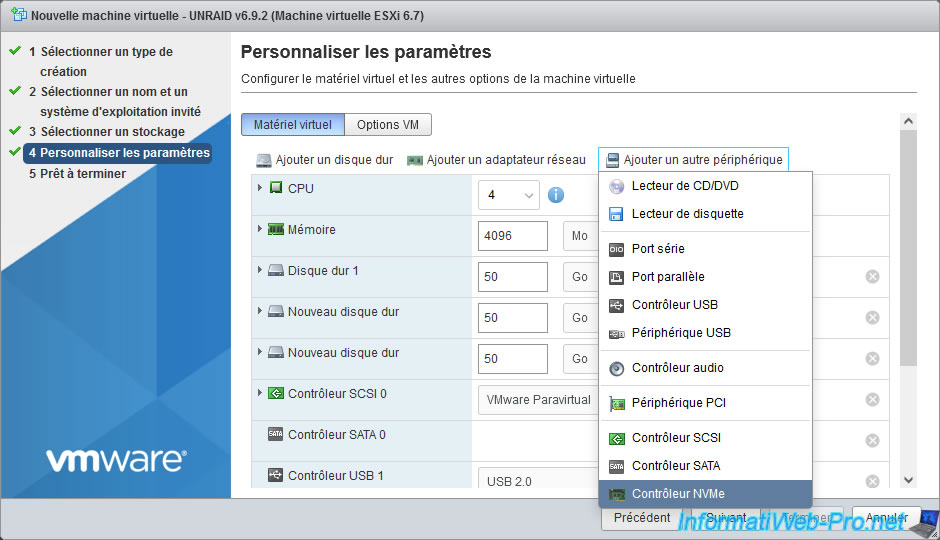
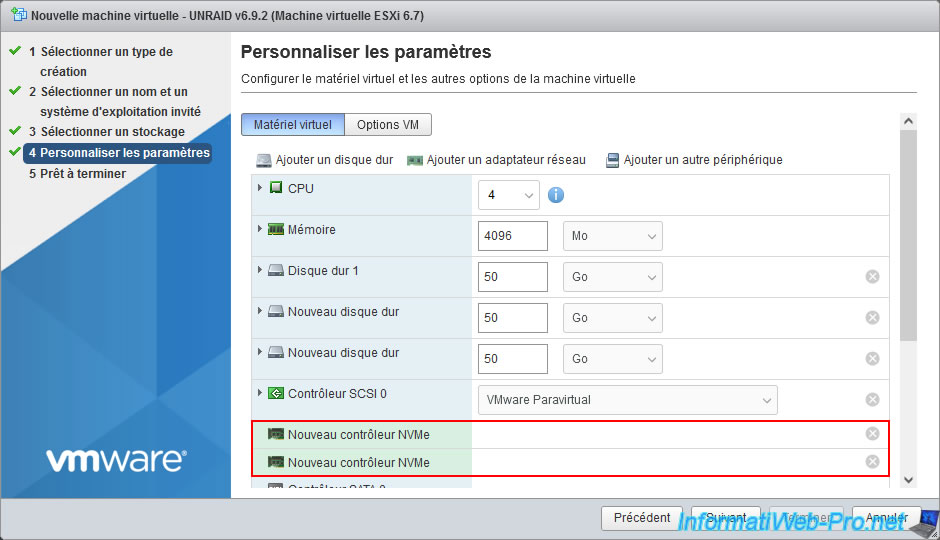
2 lines "New NVMe Controller" appear.
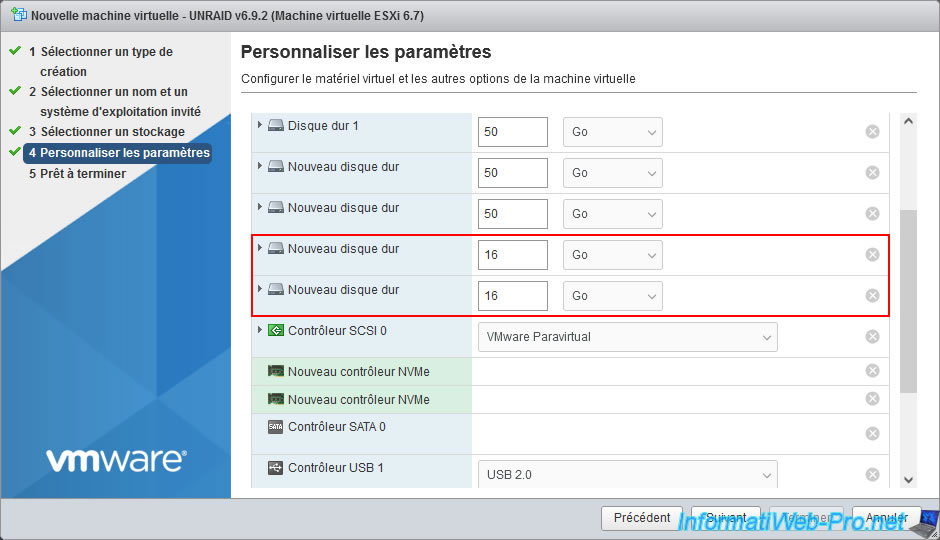
Now, double-click on "Add Hard Disk -> New Standard Hard Disk" to create 2 new virtual disks.

The 2 new virtual disks appear.
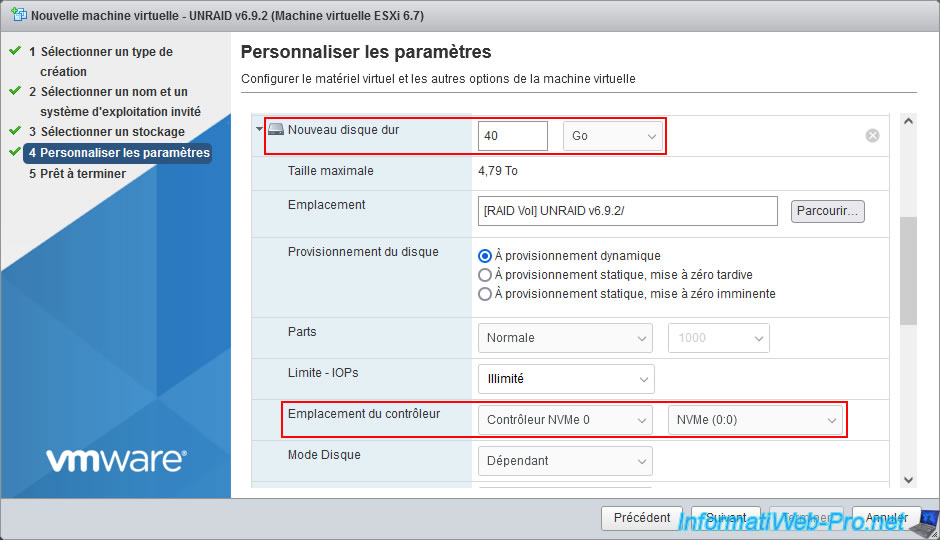
For your first SSD:
- Indicates the desired capacity (size) for your first SSD.
This capacity (size) may differ from the one specified for your SATA virtual hard drives, but it must be the same on all your virtual NVMe SSDs.
In our case: 40 GB. - Disk Provisioning: Thin Provisioning.
Again, this allows you to save disk space on your VMware ESXi server. - Controller Location: NVMe Controller 0.
Warning : make sure this first virtual SSD is connected to the NVMe controller with the number "0".
This doesn't matter as to the position, so leave the default value "NVMe (0:0)".
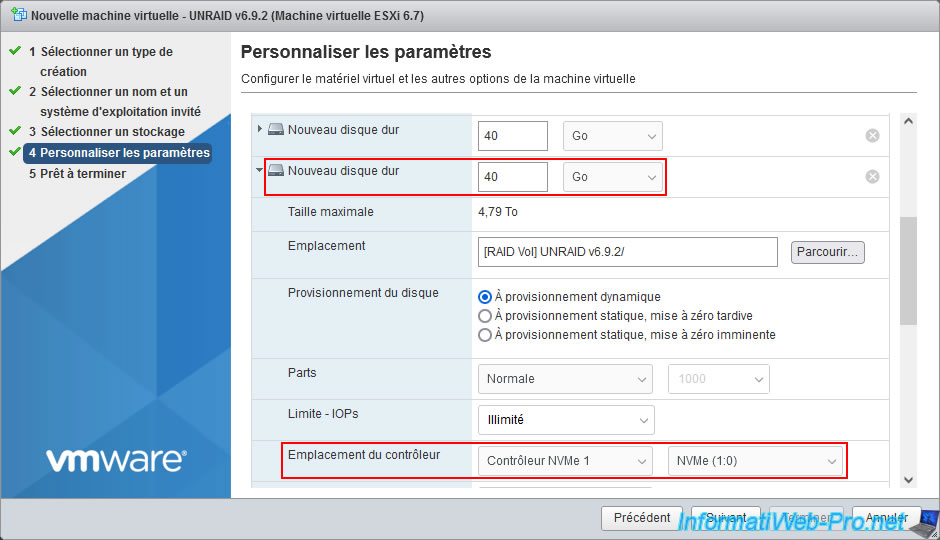
For the second virtual SSD, configure the settings in the same way.
Except for the controller location.
Important : this second virtual SSD must be connected to your NVMe controller with the number "1".
Again, the location on this controller is not important, so leave the default value "NVMe (1:0)".
Share this tutorial
To see also
-

VMware 12/23/2022
VMware ESXi 6.7 - Improve the performance by using a physical HDD
-

VMware 2/10/2023
VMware ESXi 6.7 - VMware Host Client web client presentation
-
VMware 9/21/2022
VMware ESXi 7.0 / 6.7 - Clone virtual machines (without vCenter)
-
VMware 5/30/2022
VMware ESXi 7.0 / 6.7 - Install VMware ESXi and create your first VM
You must be logged in to post a comment