- VMware
- 14 February 2024 at 15:15 UTC
-

- 1/5

When deploying the VMware vSphere solution in your enterprise with multiple VMware ESXi servers, you will need VMware vCenter Server to manage them all from one place.
With VMware vCenter Server, you will also be able to perform other advanced actions that are not available in the web interface (VMware Host Client) of VMware ESXi (vSphere).
Previously, we published numerous tutorials regarding VMware ESXi 6.7 and what it was possible to do directly on this hypervisor.
In this tutorial, we will therefore install version 6.7 of VMware vCenter Server under Windows Server 2016.
Warning : although this Windows version of vCenter Server still exists in version 6.7, this has been deprecated in favor of the VCSA virtual version.
- Prerequisites
- Synchronizing clocks from an NTP server
- Creating the reverse lookup zone on your DNS server
- Installing VMware vCenter Server 6.7 with an external database
- VMware vCenter Server web interface
- Services installed on Windows Server
1. Prerequisites
1.1. General prerequisites
To install the Windows version of VMware vCenter Server, you will need 2 or 3 servers running Windows Server:
- server 1: an Active Directory domain controller (AD DS).
- server 2 (optional): a server joined to your Active Directory domain where you will install the Microsoft SQL Server database server.
- server 3: a server joined to your Active Directory domain where you will install VMware vCenter Server 6.7.
Important : if you want to use an external database that will be stored on a Microsoft SQL Server. Be sure to install VMware vCenter Server on a second server so that Microsoft SQL Server and VMware vCenter Server each have their own system resources.
Of course, these servers must have a static IP address, as is the case with any server.
1.2. Prerequisites for installing VMware vCenter Server on Windows Server
In our case, our 3 servers are on Windows Server 2016, because VMware vCenter Server 6.7 is supported by this version of Windows Server.
However, if you want to use another version of Windows Server, you must first refer to the "Supported host operating systems for Windows vCenter Server installation" page on the Broadcom site to ensure that the version of Windows Server desired is supported by the version of VMware vCenter Server you want to install.
Although the Windows version of VMware vCenter Server can be installed on a physical server or on a virtual server, VMware recommends installing it on a virtual server.
In addition, this Windows version will no longer exist with version 7.0 of VMware vSphere and you will therefore be forced to use the VCSA Virtual Appliance which must be deployed as a VM on a VMware ESXi (vSphere) server.
Source: Farewell, vCenter Server for Windows
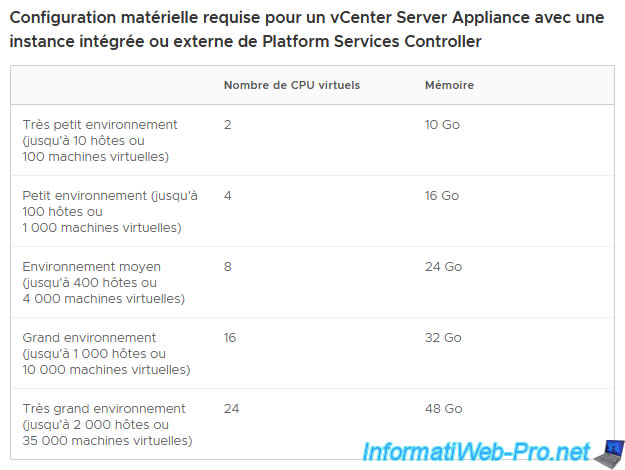
For the hardware resources required (for the physical server or the VM running Windows Server), it depends on the size of your deployment.
However, the minimum is a processor with 2 cores and 10 GB of RAM.
Sources :
- 11.2 Physical or Virtual vCenter Server
- Hardware Requirements for the vCenter Server Appliance and Platform Services Controller Appliance
1.3. Prerequisites for external database: Microsoft SQL Server (optional)
For the database required by VMware vCenter Server 6.7, you have the choice between:
- the PostgresQL integrated database
- an external database stored on a compatible Microsoft SQL Server (paid) or its Express version (free)
Per the "Database Requirements for vCenter Server on Windows" page in the VMware documentation, you can use the integrated PostgresSQL database for deployments of up to 20 hosts and 200 virtual machines.
But, on larger deployments, you will need to use an external database that you create beforehand on a compatible Microsoft SQL Server (paid) database server or on its Express version (free).
For this tutorial, we will install Microsoft SQL Server 2016 on Windows Server 2016 because this version of SQL Server is supported by VMware vCenter Server 6.7.
However, be aware that the Express version of Microsoft SQL Server 2016 is supported by VMware vCenter Server 6.7, but not by version 6.5 of VMware vCenter Server.
If you have another version of SQL Server, go to the "Broadcom - Product Interoperability Matrix" page on the Broadcom website and go to the "3rd Party Solution Interoperability" tab.
Next, select the desired VMware product (solution):
- Solution : VMware vCenter
- Version : 6.7.0
Below, select the desired database.
For example: SQL Server 2016 Standard (SP2) - 64-bit.

Sources :
- Database Requirements for vCenter Server on Windows
- Prepare Microsoft SQL Server Database Before Upgrading vCenter Server (6.5)
For more information about the system requirements for deploying VMware vCenter Server, refer to: System Requirements for the New vCenter Server Appliance and Platform Services Controller Appliance.
2. Synchronizing clocks from an NTP server
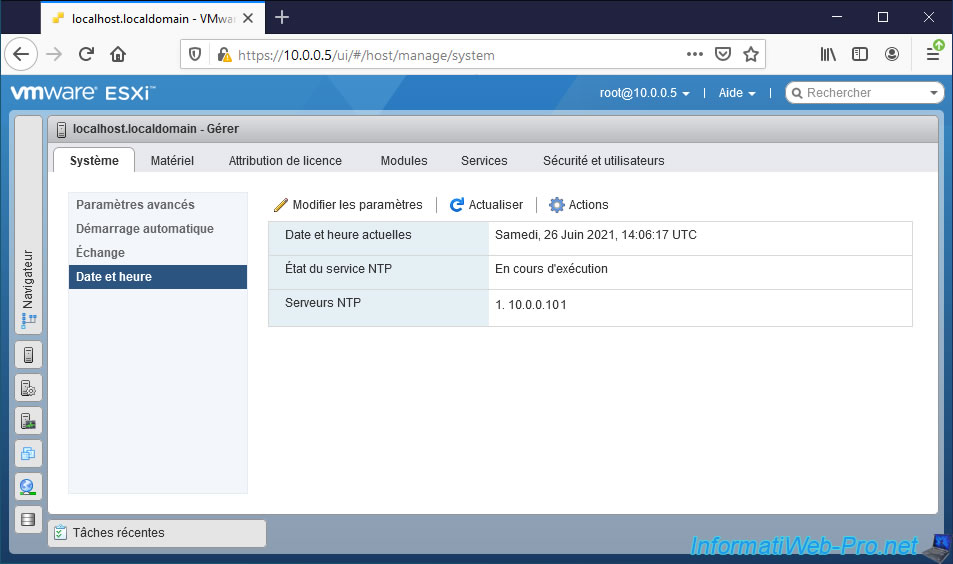
To avoid having errors with SSL certificates, authentications, SAML tokens, installation of VMware vCenter Server, ... it is important that all your servers (both your VMware ESXi hypervisors and your servers running Windows Server) and client stations synchronize their clocks from the same time server (NTP).
Source : Synchronizing Clocks on the vSphere Network
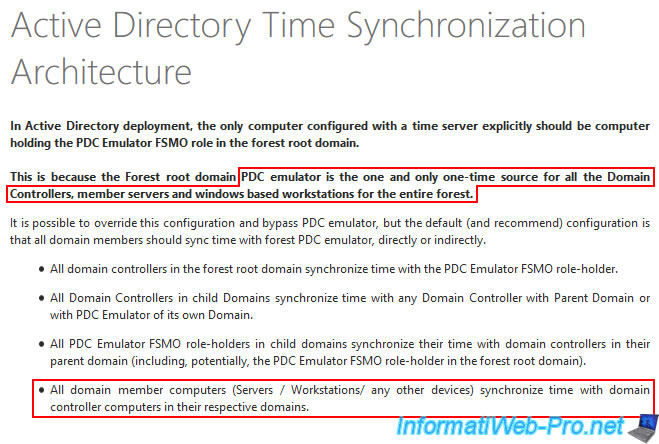
By default, the clock of all domain controllers, servers, and client computers that are members of your Active Directory infrastructure is automatically synchronized from the domain controller designated as master for the "PDC emulator (Primary Domain Controller emulator)" role.
If the server where you wish to install VMware vCenter Server 6.7 is linked to your Active Directory domain as requested in the prerequisites above, this prerequisite is therefore already met.
Source : Active Directory: Time Synchronization
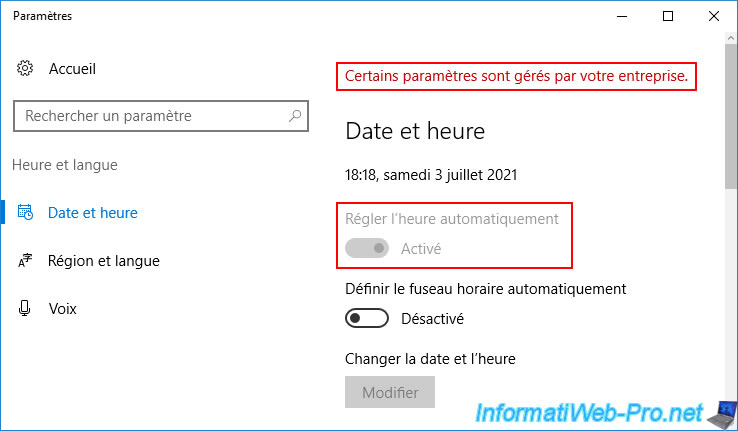
You can also check this by right-clicking "Adjust date/time" on the clock displayed in the Windows taskbar.
As you can see, each server joined to your Active Directory domain is automatically configured so that the time is set automatically and you will not be able to change it.
Additionally, you may see the message "Some settings are managed by your organization". This always appears when Group Policies (GPO) are used for certain Windows settings.
For your VMware ESXi (vSphere) servers, refer to the step "Synchronize the date and time of the hypervisor using the NTP protocol" of our tutorial on joining a VMware ESXi hypervisor to an Active Directory domain.
Warning : if you have several domain controllers in your infrastructure, make sure to indicate the IP address of the one with the FSMO role "PDC Emulator (Primary Domain Controller Emulator)" (as explained previously).
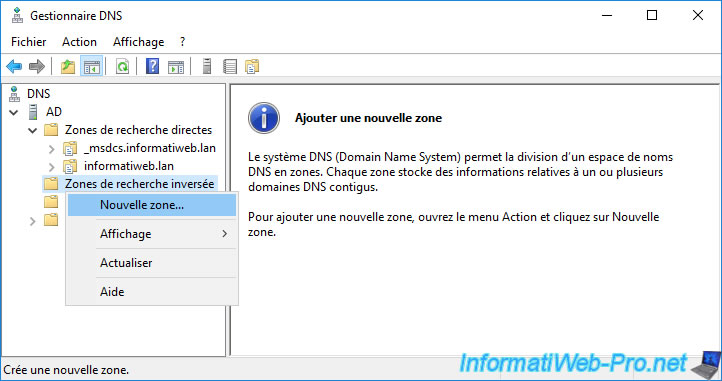
3. Creating the reverse lookup zone on your DNS server
For VMware products to function properly, it is recommended that you create the reverse lookup zone on your company's DNS server (if you have not already done so).
Additionally, in the case of VMware vCenter Server, the installation of the web server supporting vSphere Web Client will fail if the installer cannot obtain the fully qualified domain name (FQDN) from its IP address.
Which requires the creation of the reverse lookup zone (IP address resolution to DNS domain name).
To do this, open the DNS manager of your DNS server (usually it is on the same server as the Active Directory domain controller) and right-click "New Zone" on "Reverse Lookup Zones".
Next, refer to our procedure "Create a reverse lookup zone (IP address -> domain)" and leave the default choices for the Active Directory options if you are unsure which one to choose.
These will be the recommended choices that will be used in this case.
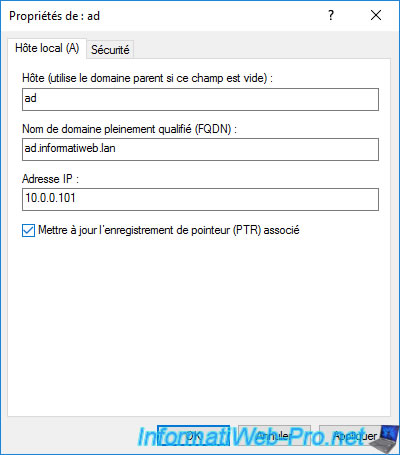
Once the reverse lookup zone is created, you will need to create the corresponding pointers (PTR) in the reverse lookup zone.
To do this, go to the forward search box and double-click on the 1st DNS record with a readable name.
In our case: ad.
Note: the required DNS records are already created, because these were automatically created by the Active Directory domain controller when you joined your servers to your Active Directory domain.

Check the box "Update associated pointer (PTR) record" and click OK.
If the box is already checked, uncheck it, then click "Apply."
Then check this box again and click OK.
Now, the corresponding pointer (PTR) has been created in the reverse lookup area.
Repeat the same operation for the other type "A" (IPv4) and "AAAA" (IPv6) DNS records in your forward lookup zone.
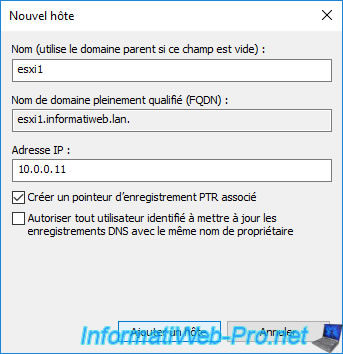
Then, in the forward lookup zone, right-click "New Host (A or AAAA)".
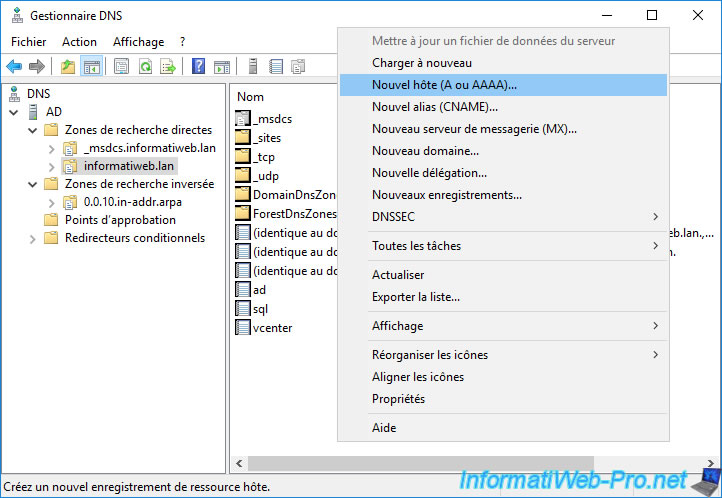
Create a 1st DNS record for your 1st VMware ESXi server:
- Name: esxi1
- Fully qualified domain name (FQDN): esxi1.informatiweb.lan (this field will automatically update with the name shown above)
- IP address: the IPv4 or IPv6 address of your 1st VMware ESXi server
Next, check the "Create associated pointer (PTR) record" box to also create the pointer in the reverse lookup zone and click "Add Host".
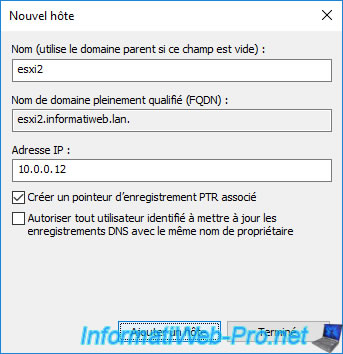
Also create an "A" or "AAAA" type record for your 2nd VMware ESXi server:
- Name: esxi2
- IP address: the IPv4 or IPv6 address of your 2nd VMware ESXi server
Check the box again for creating the associated pointer (PTR) and click: Add Host.
Here are the DNS records you should have.
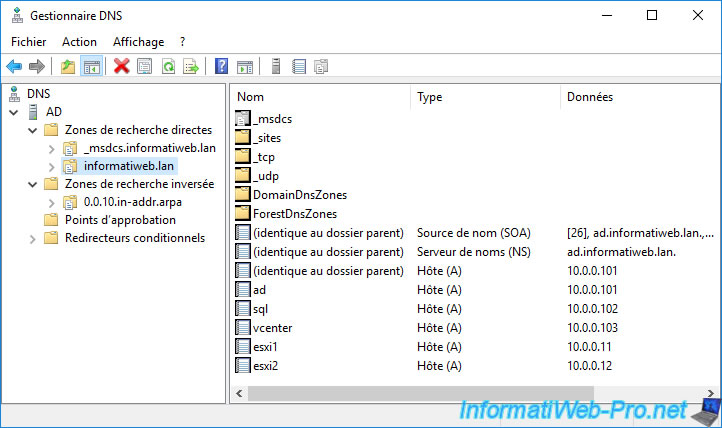
Source : DNS Requirements for the vCenter Server Appliance and Platform Services Controller Appliance.
Share this tutorial
To see also
-
VMware 3/13/2024
VMware ESXi 6.7 - Synchronize the clock of ESXi hosts from a time server (NTP)
-
VMware 3/8/2024
VMware ESXi 6.7 - Synchronize the clock of VCSA from a time server (NTP)
-
VMware 7/31/2024
VMware vSphere 6.7 - Add an Active Directory identity source
-
VMware 5/22/2024
VMware vSphere 6.7 - Change default console
You must be logged in to post a comment