- VMware
- 24 February 2023 at 09:37 UTC
-


As we explained previously in our "Understand the basics of network management on VMware ESXi 6.7" article, your virtual machines can have access to the physical network thanks to several layers : port groups, virtual switches (vSwitch) , ...
In this tutorial, you will see how to create a new virtual switch with a new port group and connect your virtual machines to another physical network if desired using additional physical network cards.
- Current network configuration
- Add a virtual standard switch (vSS)
- Add a physical network adapter (physical NIC) to a virtual standard switch (vSS)
- Add a port group
- Connect a virtual machine to your new port group
1. Current network configuration
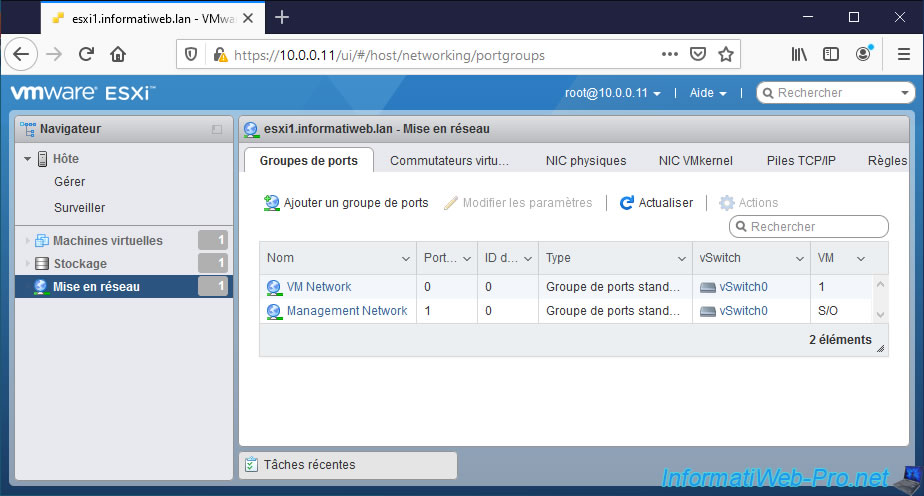
At the moment, our VMware ESXi hypervisor has 2 port groups.
These are the 2 existing port groups by default :
- VM Network : for network and Internet access for your virtual machines.
- Management Network : for managing your hypervisor from a computer or server in your company.
Your hypervisor is accessible through this port group using a VMKernel virtual network adapter.
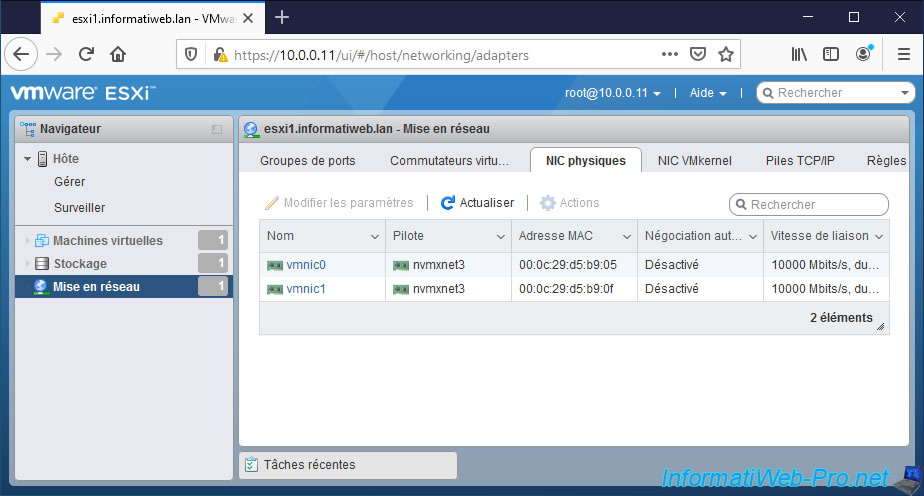
Currently, our hypervisor has 2 network adapters as you can see below.
Note : if your server has a network card with 2 RJ45 connectors, VMware ESXi will display 2 physical network cards (vmnic).
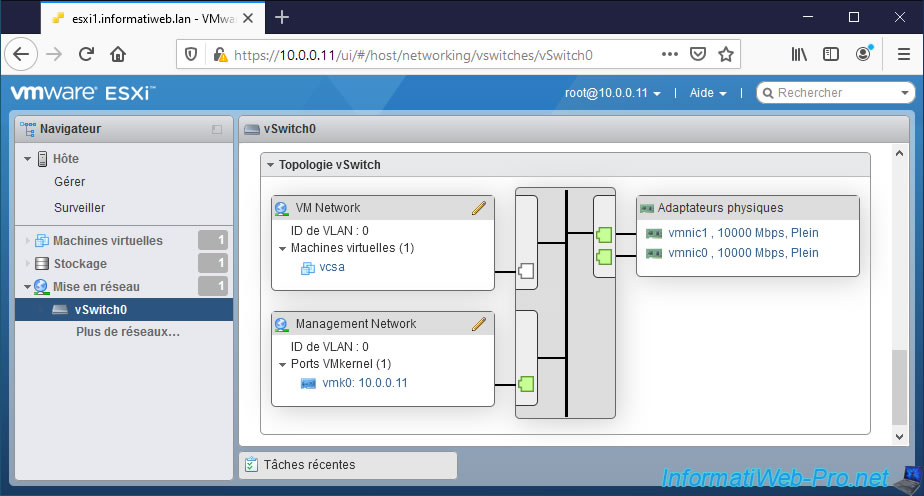
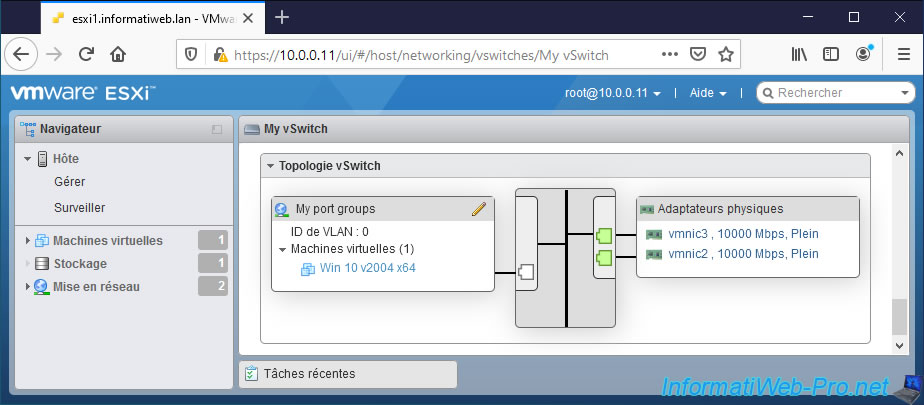
If you go to the "Virtual switches" tab and click on "vSwitch0" (the virtual switch created automatically during the installation of VMware ESXi), you will see that its topology contains :
- the "VM Network" port group (cited above), as well as the list of virtual machines connected to it (even if the VMs are turned off).
- the "Management Network" port group (cited above) with the VMKernel network card which is used by default for the management network.
- physical adapters (physical network cards on your server).
In our case, we have associated 2 of them for fault tolerance / load balancing. But, by default, there is only the "vmnic0" physical network card.
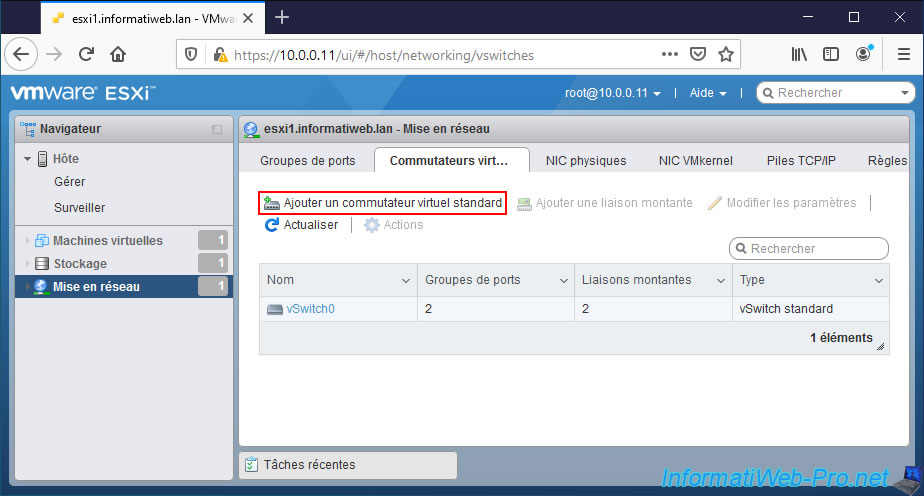
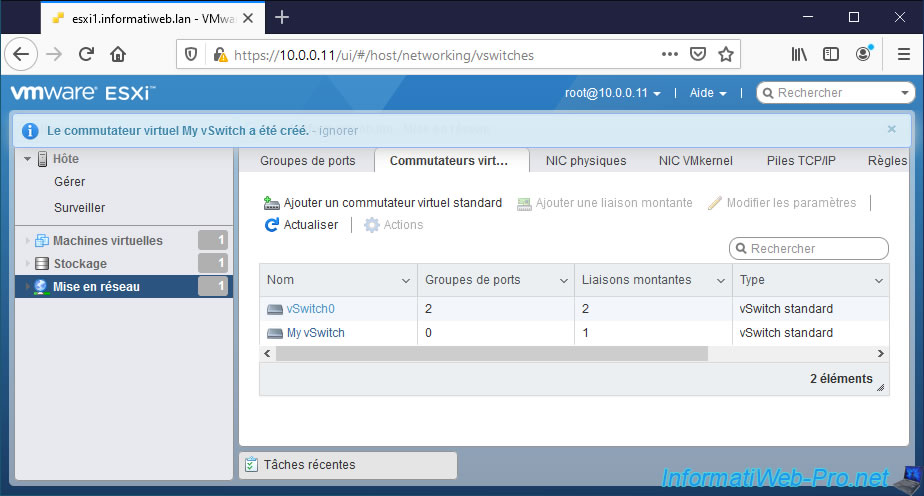
2. Add a virtual standard switch (vSS)
On VMware ESXi, you can only create standard virtual switches (vSS).
Unlike VMware vSphere which will also allow you to create distributed virtual switches (vDS).
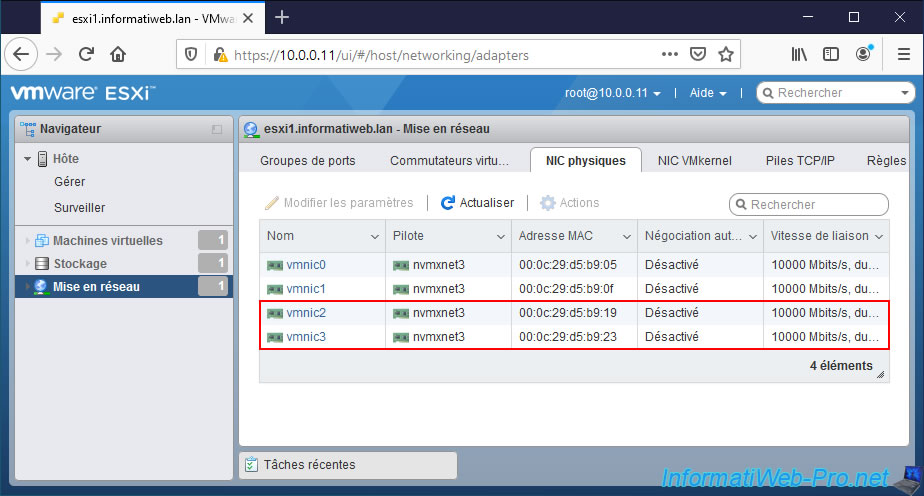
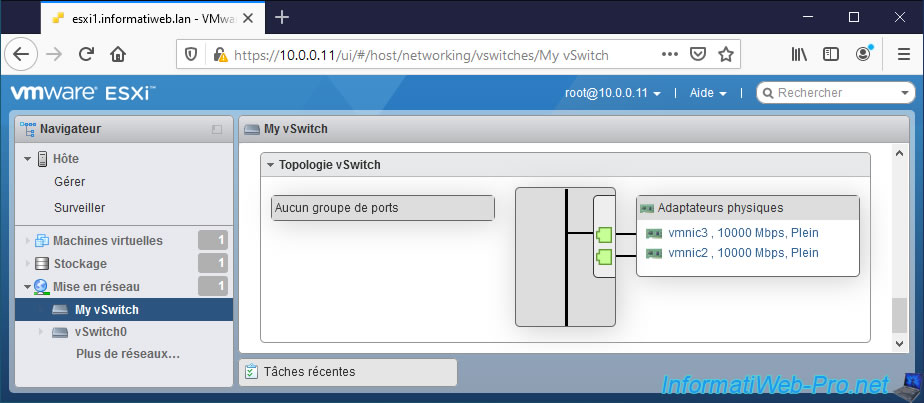
For this tutorial, we added 2 physical network cards to our server.
In the image below, these are the network cards : vmnic2 and vmnic3.
When you want to add a new port group and create a new virtual switch on VMware ESXi, you need to create your new virtual switch first.
Indeed, if you click on "Add port group", you will see that you will not be able to create a new virtual switch at the same time.
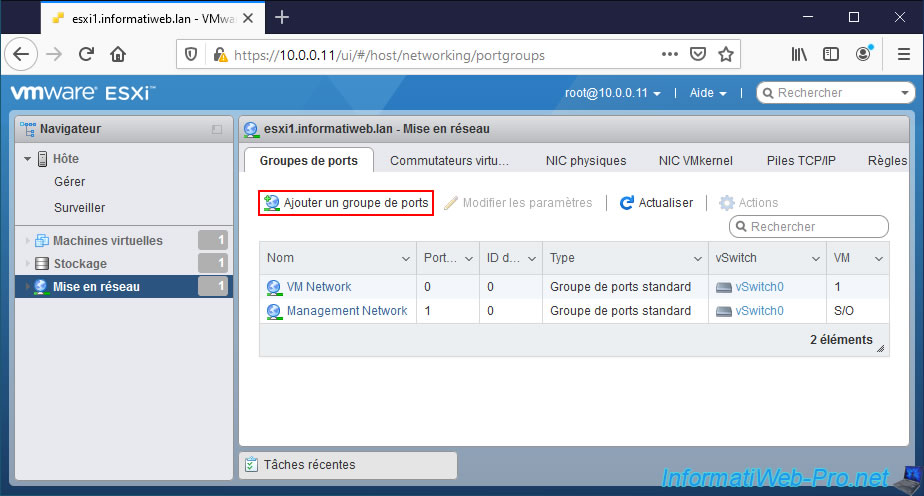
As you can see, VMware ESXi only offers you virtual switches (vSwitch) that already exist on your hypervisor.
Note : you can create multiple port groups on a single virtual switch if desired and isolate network traffic from them by using a different VLAN ID on each port group.

So, you need to start by creating a new virtual switch.
To do this, in "Networking -> Virtual switches", click on : Add standard virtual switch.
In the "Add standard virtual switch - [new vSwitch name]" window that appears, select the uplink (physical NIC) you want to associate with this virtual switch.
Note that you can add uplinks (physical NICs) later to this virtual switch if desired.
So, in our case, we choose "vmnic2" for the moment.
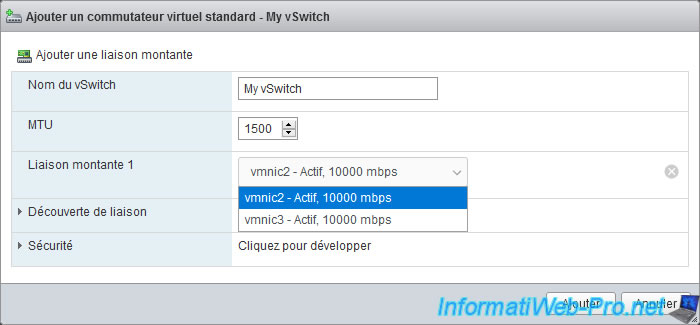
When you create a switch, you can specify :
- vSwitch name : name under which this standard virtual switch (vSS) will appear in the VMware ESXi interface.
- MTU : maximum size of data packets in bytes. You can specify a value greater than 1500 to enable jumbo frames (required by some professional solutions).
But, this value can't exceed 9000 bytes. - Uplink x : physical NIC(s) to assign to this virtual switch.
This is optional, but allows for example a VM (via a port group) or your hypervisor (via a VMkernel network card) to communicate with your physical network and access the Internet (if applicable).
The value in "mbps" corresponds to the speed supported by your network card.
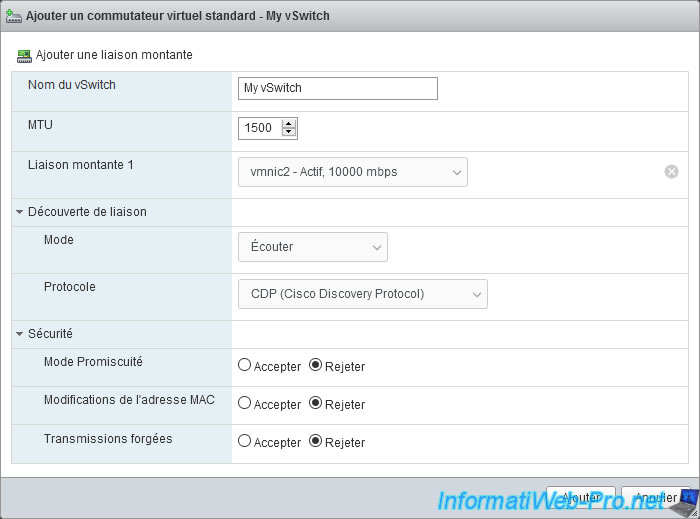
In our case, it's a 10 Gbps (10000 mbps) network card. - Link discovery - Mode :
- Listen : detects and displays information about the associated physical switch.
But the administrator will not have access to information about this vSS switch. - Advertise : allows the administrator to access information for this vSS switch.
But no information will be detected or displayed on the physical switch. - Both : discover and display information about the associated physical switch.
Also allows the administrator to access information for this vSS switch. - None : no information will be detected or displayed on the physical switch, nor will the administrator have access to information for this vSS switch.
- Listen : detects and displays information about the associated physical switch.
- Link discovery - Protocol : Cisco Discovery Protocol (CDP) is a Layer 2 network discovery protocol created by Cisco Systems.
CDP is the only network discovery protocol available on standard virtual switches (vSS). - Security :
- Promiscuous mode : allows you to authorize or not the promiscuous mode.
- Accept : when promiscuous mode is enabled, all network packets are sent to every virtual machine connected to this standard virtual switch. Which is useful for monitoring the network through software like Wireshark.
- Reject : when promiscuous mode is disabled, your virtual machine only receives network packets that are intended for it.
This prevents a malicious user from trying to recover sensitive data that is not intended for him.
- MAC address changes : allows or not the operating system to change the MAC address used by the virtual machine .
- Accept : when the modification of the MAC address is authorized, the guest operating system can use a different MAC address (in a software way) different from that defined in the settings of the virtual machine (in the ".vmx" configuration file).
- Reject : when the modification of the MAC address is prohibited, a malicious user will not be able to modify the MAC address of the virtual network card of the virtual machine with a software.
- Forged transmits :
- Accept : no filtering is performed and all outgoing frames are therefore allowed.
- Reject : outgoing frames (coming from your virtual machines) whose source MAC address is different from the "physical" one (defined in the ".vmx" configuration file of your VM) will be ignored and therefore lost.
- Promiscuous mode : allows you to authorize or not the promiscuous mode.
Note : if you want to virtualize a hypervisor (VMware ESXi, Hyper-V, ...), it's important that the 3 security settings mentioned above are configured on "Accept" so that network access and your nested virtual machines Internet access to work properly.
Once the virtual standard switch (vSS) is configured, click Add.
Source : Edit Virtual Switch Settings in the VMware Host Client.
The "Virtual switch [vSwitch name] was successfully created" message appears.
3. Add a physical network adapter (physical NIC) to a virtual standard switch (vSS)
As you can see, by default, if you assign only one physical network adapter (physical NIC) to a virtual standard switch (vSS), a warning will appear :
Plain Text
This virtual switch has no uplink redundancy. You should add another uplink adapter.
To fix this issue, make sure you have an additional (unassigned) physical NIC on your VMware ESXi host and click : Add Uplink.
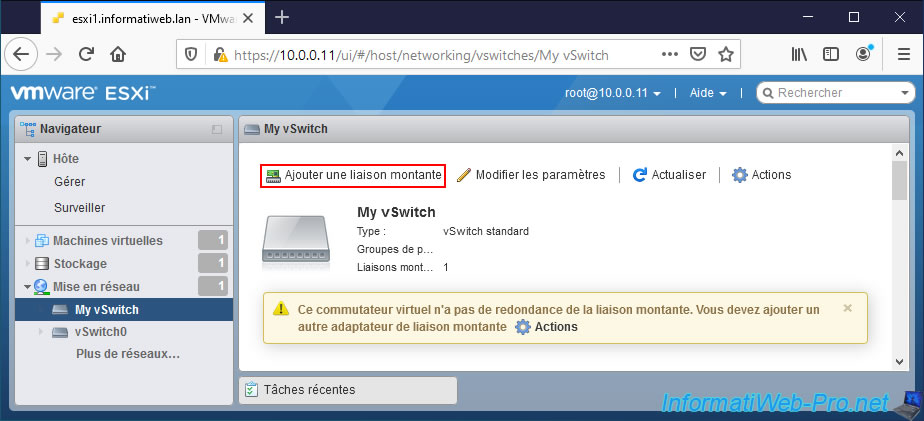
If an additional physical network adapter (physical NIC) is available (not currently used by your host), this will appear in green as "Uplink 2".
In our case, this physical NIC is named "vmnic3" on our VMware ESXi host.
When you modify a standard virtual switch (vSS), you will find the same settings already explained previously, as well as new settings.
For the "NIC teaming" section, this allows you to configure how faults concerning network links should be detected and to choose whether you want to do fault tolerance and/or load balancing .
For detailed information on the settings in this "NIC teaming" section, refer to step "4. Associate network adapters (NIC Teaming)" of our tutorial on the basics of network management on VMware ESXi 6.7.
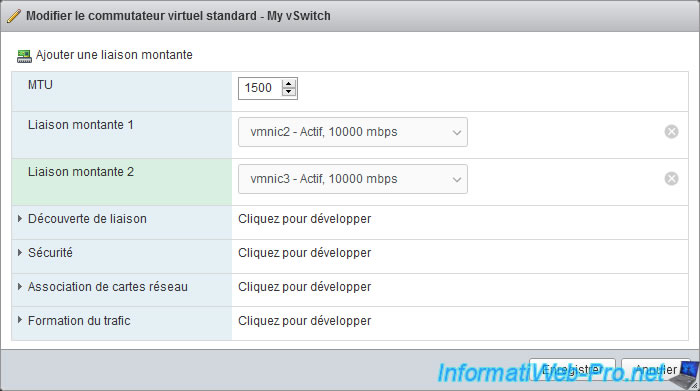
In the "Traffic shaping" section, you will find several additional settings :
- Status : enables or disables the bandwidth limitation per port using the following settings.
- Average bandwidth : allows you to limit the amount of data (in KB) per second on a port (average authorized load).
- Peak bandwidth : same as the previous setting, but when a burst bonus is used.
This setting is for sending and receiving data. - Burst size : allows you to limit the amount of data (in KB) that can be sent in a burst.
If this setting is set, a port can temporarily benefit from higher bandwidth than the average bandwidth configured above. - Note : indicates that these settings are applied to traffic from each virtual network adapter of your virtual machines. Which corresponds to the term "port" used previously.
Source : Edit Virtual Switch Settings in the VMware Host Client - VMware Docs.
Warning : in the case of a standard virtual switch (vSS), as is the case here, the bandwidth limitation will only be applied to outgoing traffic.
To also limit the bandwidth for incoming traffic, you must use a virtual distributed switch (vDS). Which is only available with VMware vSphere and not on a single VMware ESXi host.
Once the additional physical network adapter has been added and the desired settings changed (if applicable), click Save.

The "Virtual switch [vSwitch name] was successfully saved" message appears.
At the top of the page, you will see that the number of uplinks is 2 instead of 1.
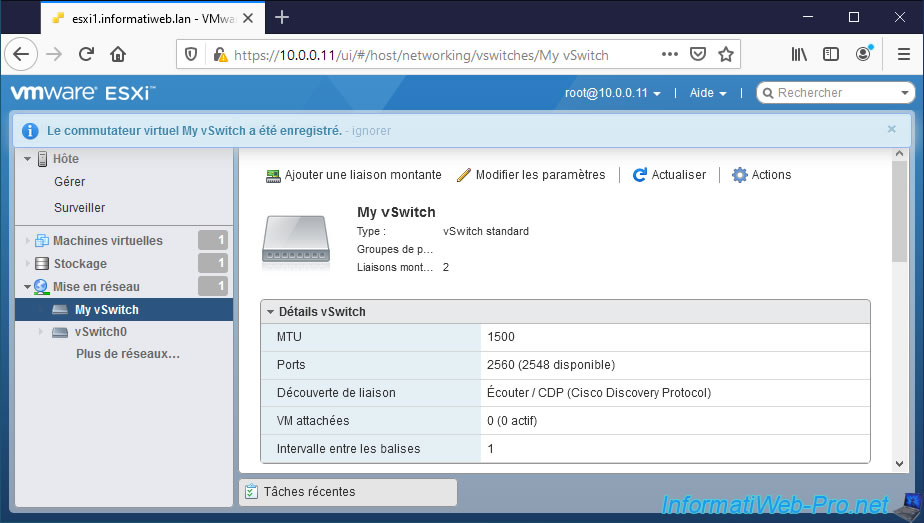
If you look at the bottom of this page, you will find a "vSwitch topology" section where you will easily see that 2 physical adapters (physical NICs) are assigned to this one.
4. Add a port group
For you to be able to connect your virtual machines to your new virtual switch (My vSwitch), you must add at least one port group to it.
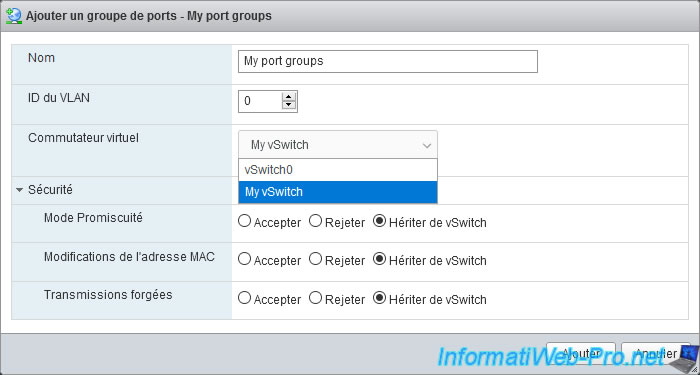
To do this, in "Networking -> Port groups", click on : Add port group.

Provide a name for your new port group, select the new virtual switch you just created, and click Add.
As you can see, when you add a new port group, there are several settings available :
- Name : name under which this port group will appear in the interface of your VMware ESXi hypervisor.
- VLAN ID : allows you to isolate network traffic from specific virtual machines by using different VLAN IDs on different port groups.
To not use this concept of VLAN, leave the default value "0". - Virtual switch : allows you to choose the virtual switch on which you want to add this port group.
- Security : by default, the values of the 3 available settings (Promiscuous mode, MAC address changes and Forged transmits) are inherited from the virtual switch (vSwitch) selected above.
Hence the fact that the "Inherit from vSwitch" option is selected by default.
To find out what these security settings are for, refer to the explanations cited above in step "2. Add a virtual standard switch (vSS)".
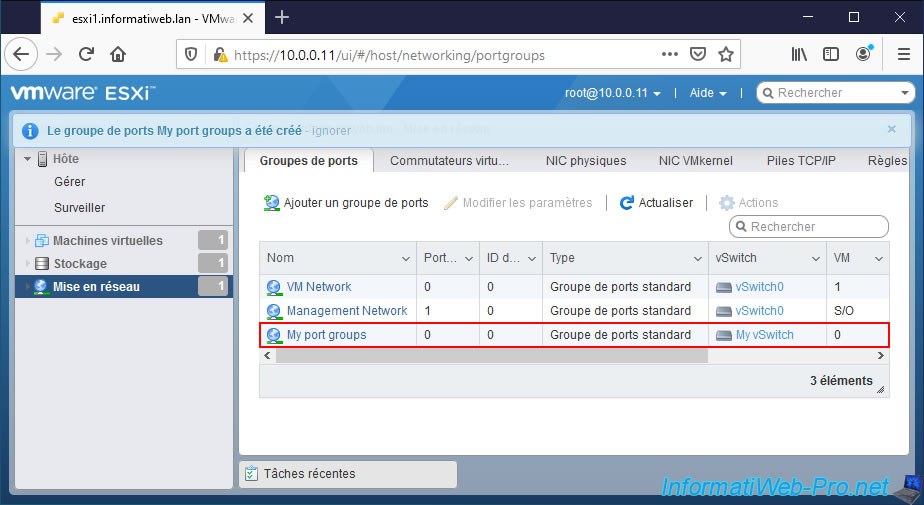
The "Port group [port group name] was successfully created" message appears.
5. Connect a virtual machine to your new port group
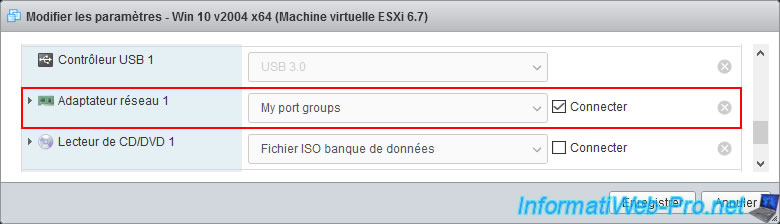
Now that the virtual network is correctly configured on your VMware ESXi hypervisor, you just need to modify the configuration of your virtual machine and select your new port group for the virtual network adapter of this one.
In our case, we select our new port group named "My port groups".
If you go back to "Networking -> Virtual switches" and click on the name of your new virtual switch (My vSwitch in our case), you will be able to see the name of your virtual machine appear in the "vSwitch topology" section. .
Note that VMware ESXi shows you all VMs (referenced in your inventory) using the relevant port group, although some VMs may be powered off (shut down) at the moment.
Share this tutorial
To see also
-
VMware 3/3/2023
VMware ESXi 6.7 - Add a VMkernel interface
-
VMware 3/24/2023
VMware ESXi 6.7 - Enable Jumbo frame support
-
VMware 3/17/2023
VMware ESXi 6.7 - Limit outbound bandwidth
-
VMware 3/10/2023
VMware ESXi 6.7 - TCP/IP stacks
You must be logged in to post a comment