Create snapshots of a VMware ESXi 7.0 and 6.7 virtual machine (VM) to quickly restore its state
- VMware
- 16 September 2022 at 12:50 UTC
-

- 2/2

4. Create a snapshots hierarchy and manage snapshots
If you want to perform more complex tests in a virtual machine, be aware that you can also create a hierarchy of snapshots.
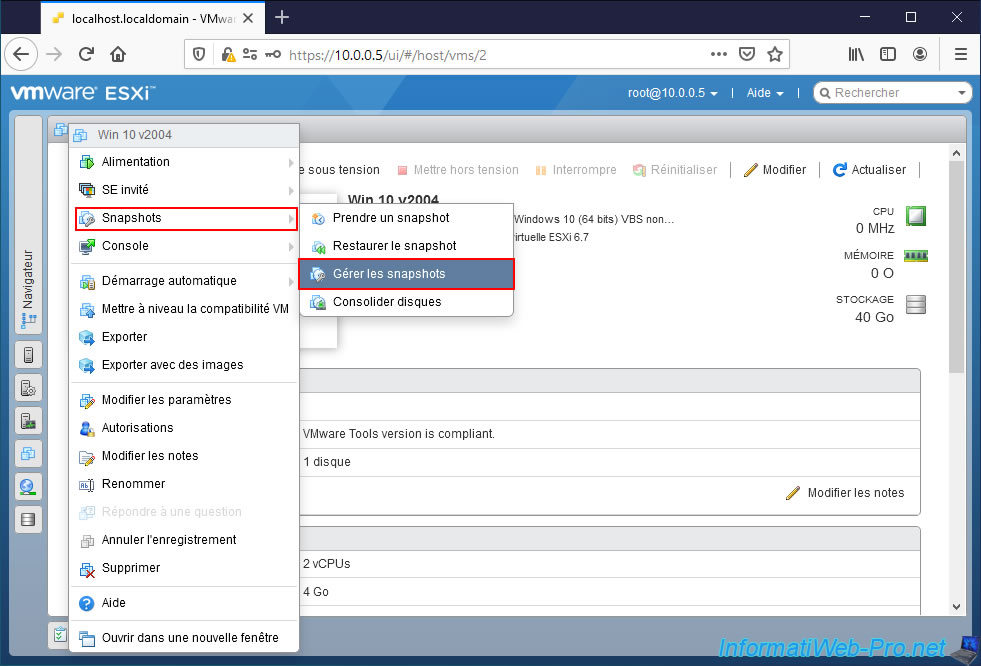
To do this, click on : Actions.
Then, on : Snapshots -> Manage snapshots.
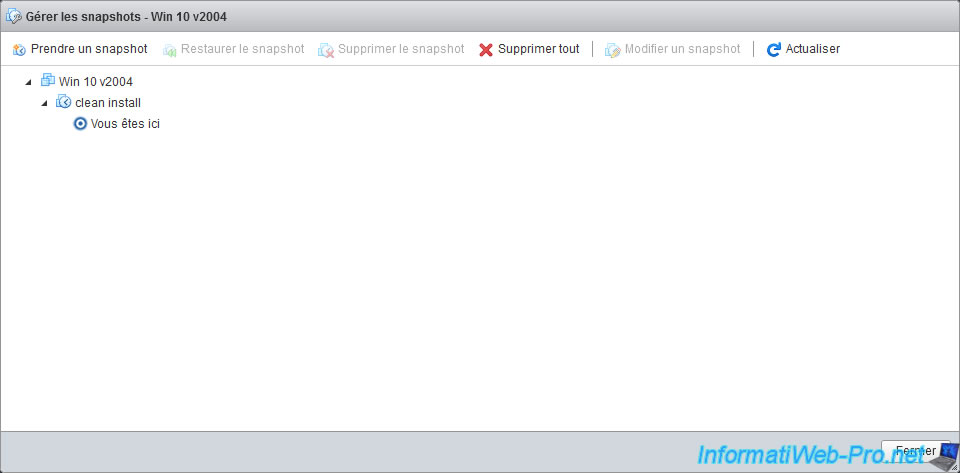
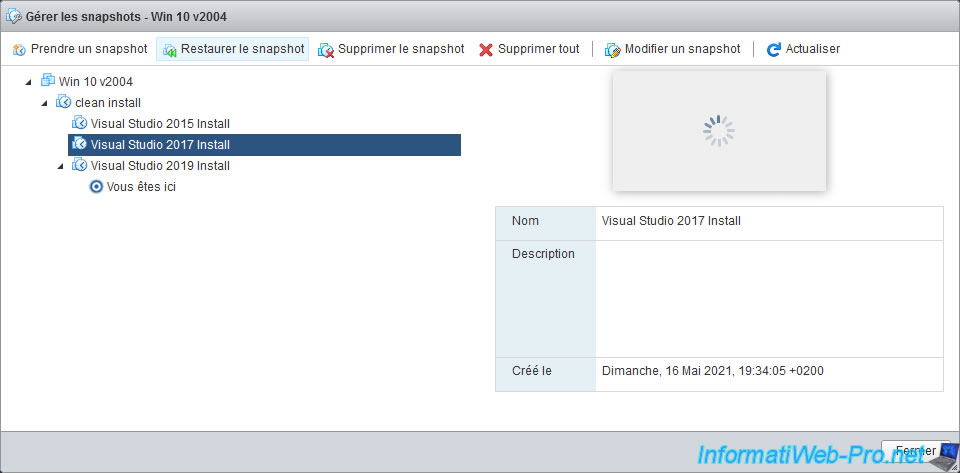
In this "Manage snapshots" window that appears, you will find :
- the name of the root virtual machine
- the different snapshots (if there are any)
- the current state of your virtual machine (you are here)
In our case, there is only one snapshot. This therefore depends on the virtual machine and its current state depends on the virtual machine + this snapshot.
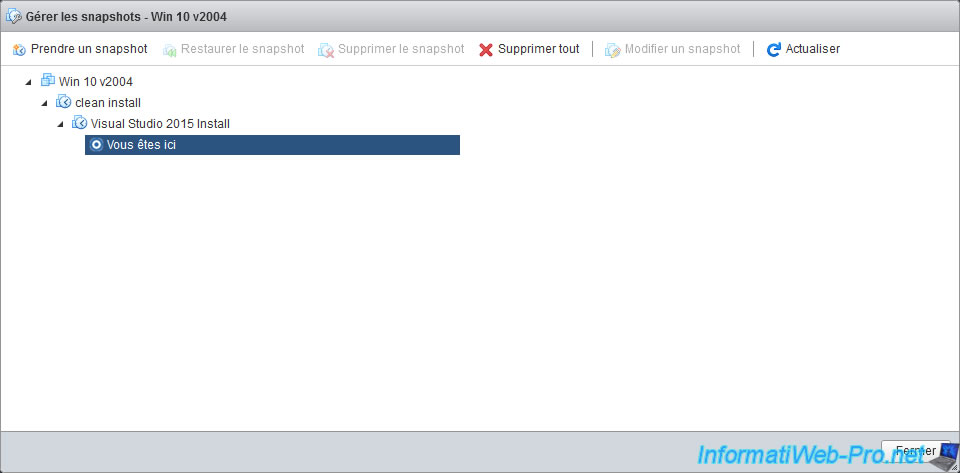
To explain snapshot management in more detail, we will take an example where you test several versions of a program, but keeping each version to be able to choose the one you prefer.
For the example :
- we created a "clean install" snapshot right after installing Windows
- then, we installed "Visual Studio 2015" in the virtual machine
- then we shut down the virtual machine
- then, we created a "Visual Studio 2015 Install" snapshot
Thanks to the snapshots created, we can therefore restore our virtual machine to the state in which it was :
- just after installing Windows thanks to the "clean install" snapshot
- or just after installing Visual Studio 2015 using the "Visual Studio 2015 Install" snapshot
Although the 2015 version works, we still want to test a different version of Visual Studio.
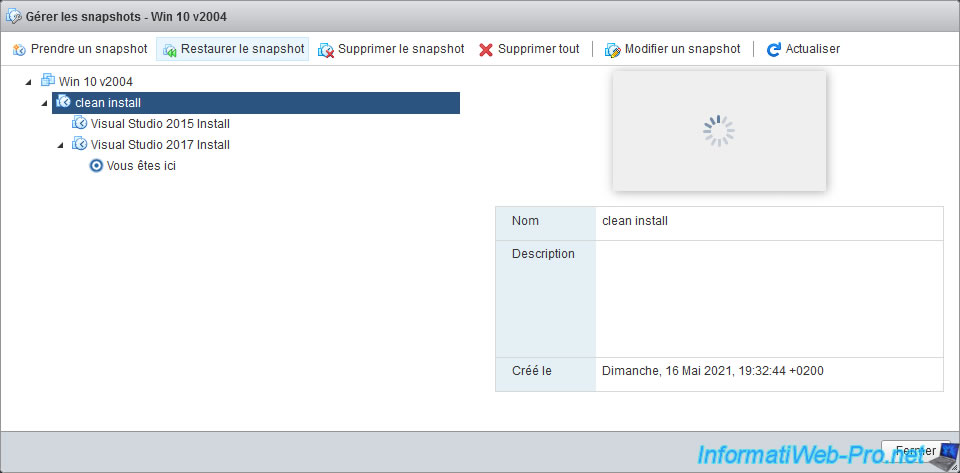
So, we select the "clean install" snapshot and click on "Restore snapshot".
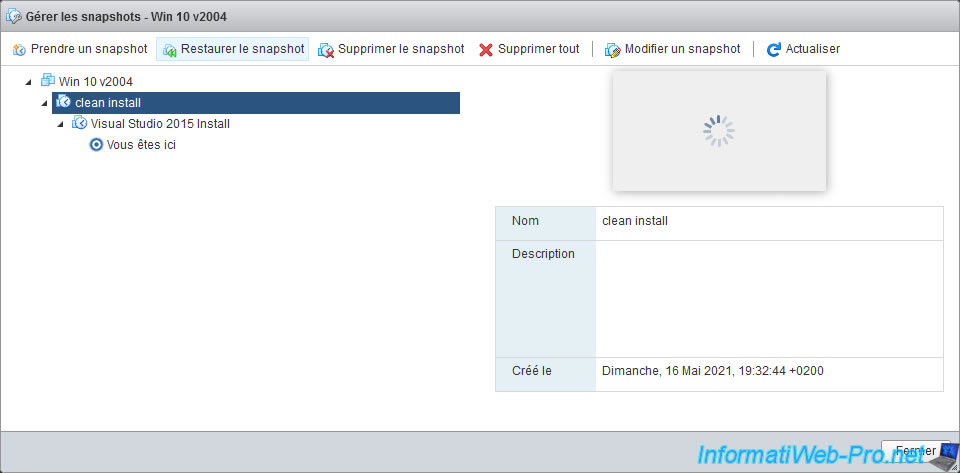
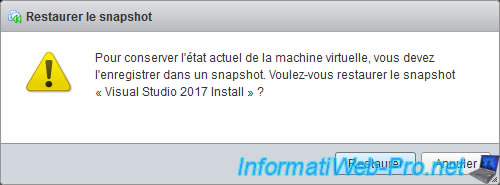
We confirm the restoration of this snapshot.
Note that VMware ESXi tells you that the current state of the virtual machine (therefore, the "you are here" line) will be lost.
However, no snapshot will be deleted.

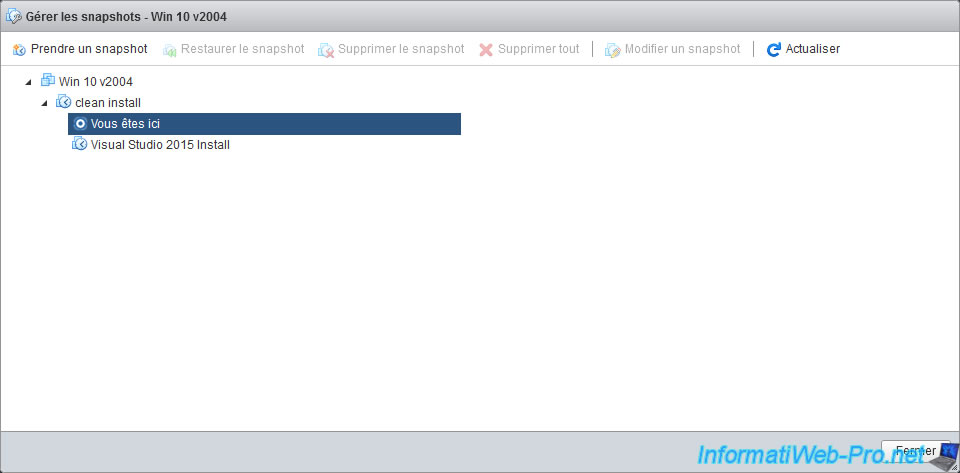
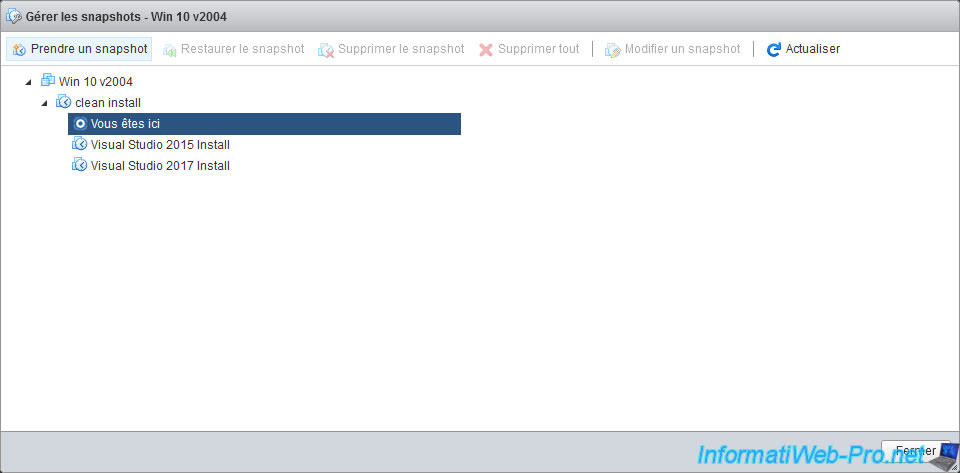
As expected, the "You are here" line appears below the "clean install" snapshot.
If we start our virtual machine, we will therefore not find the installation of "Visual Studio", but only a clean installation of Windows.
As you can see, our previous "Visual Studio 2015 Install" snapshot has been kept as expected.
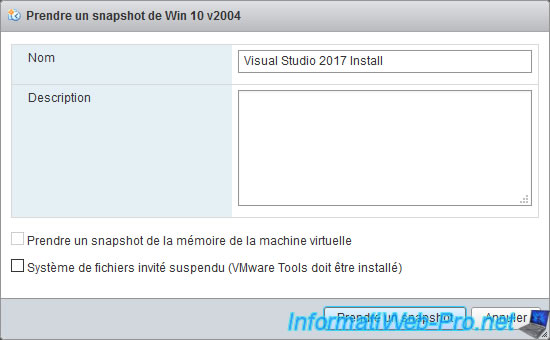
We start our virtual machine, then we install the 2017 version of Visual Studio, and we create a new snapshot after it's installed.
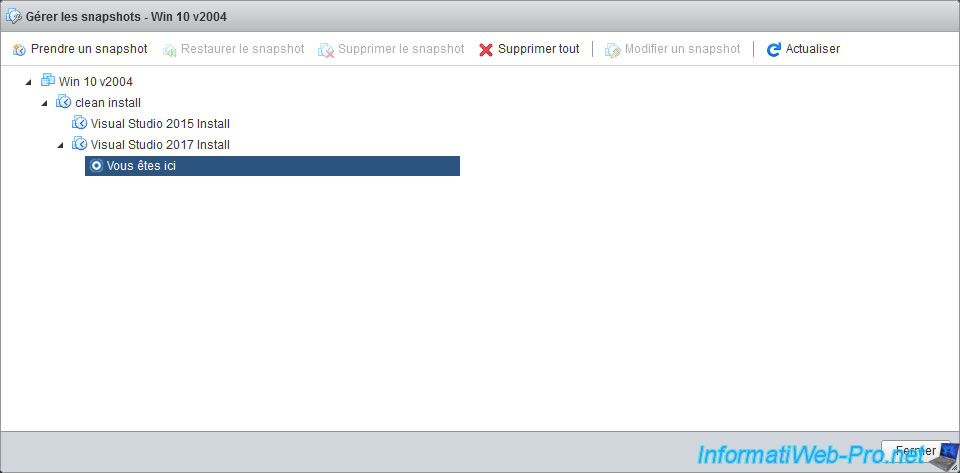
For the moment, VMware only takes into account our "clean install" and "Visual Studio 2017 Install" snapshots when we start our virtual machine.
We are still not satisfied, so we restore the "clean install" snapshot again.
We confirm the restoration of the snapshot.

And we end up again under the "clean install" snapshot.
If we start our virtual machine, we will only see a clean install of Windows. The 2 installations of Visual Studio will not be visible from the guest operating system.
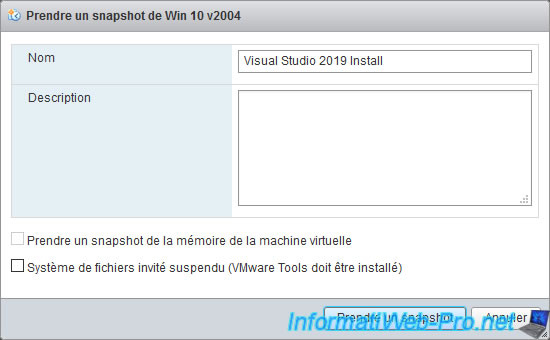
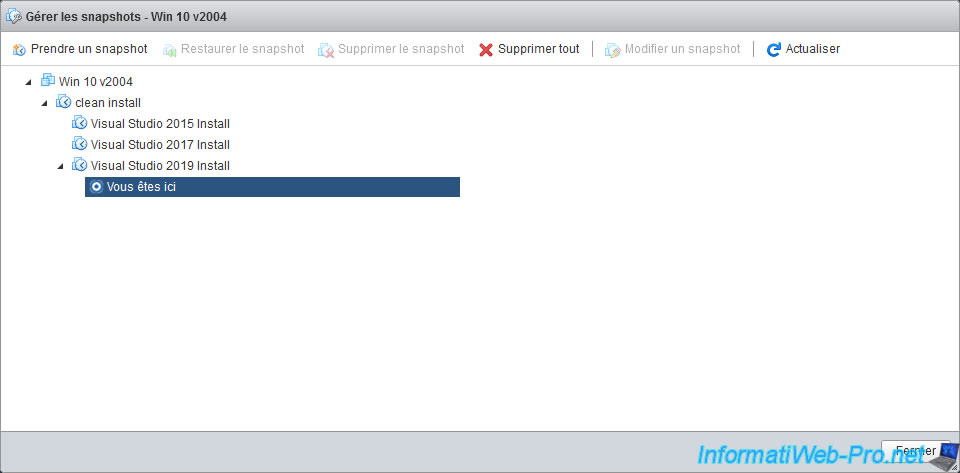
We install the 2019 version of Visual Studio and create a new snapshot.
This time, VMware ESXi will use our "clean install" and "Visual Studio 2019 Install" snapshots.
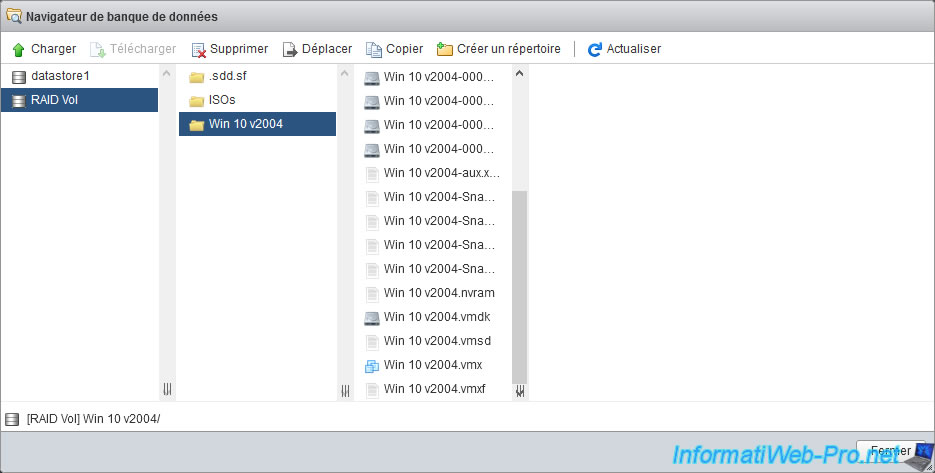
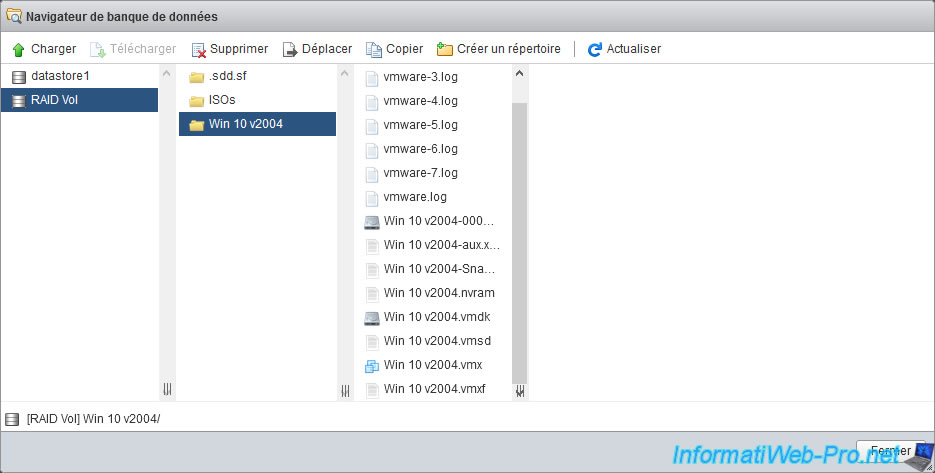
Note that each time you create a snapshot, ".vmdk", "-xxxxxx.vmdk" and ".vmsn" files are created and each time contain the changes made to the virtual machine since the previous snapshot (or its baseline state, if applicable).
It's for this reason that creating a high number of snapshots dependent on each other (as is the case in this example) is not a good idea in the long term, as it reduces the performance of your virtual machine.
However, it's still useful for short duration tests.
Infos :
- the ".vmsd" file contains data relating to all the snapshots of this virtual machine
- some file types (including "...-flat.vmdk" files) don't appear as separate files in the datastore browser.
Source : Snapshot Files - VMware Docs
In short, after having tested different versions of Visual Studio, we decided to keep the 2017 version (for example).
To do this, we select our "Visual Studio 2017 Install" snapshot and click on "Restore snapshot".
We confirm the restoration of the snapshot.
Now VMware ESXi will use our "clean install" and "Visual Studio 2017 Install" snapshots.
The 2019 version will therefore have disappeared and the 2017 version will have reappeared in the virtual machine.

Now that we are sure we want to use the 2017 version, we can delete the other snapshots (which are not currently in use) to reclaim storage space on our VMware ESXi hypervisor.
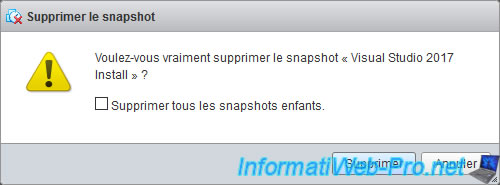
To do this, we select our "Visual Studio 2015 Install" snapshot and click on "Delete snapshot".
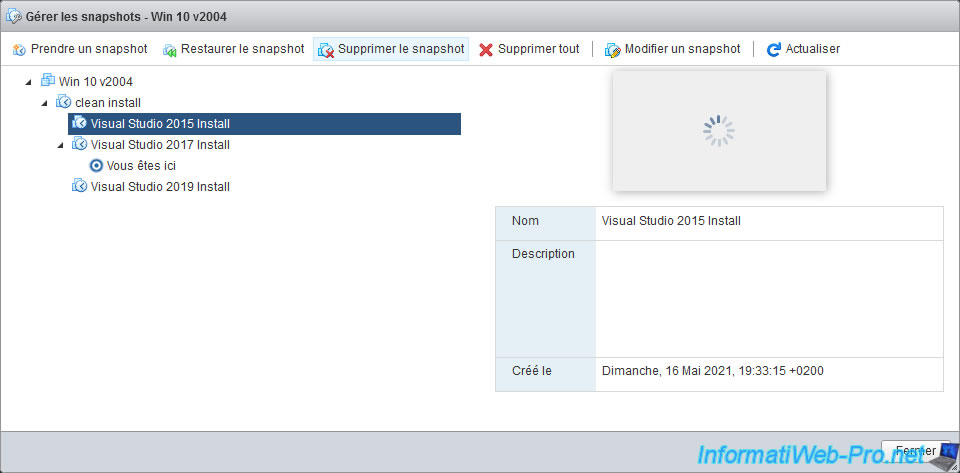
We confirm the deletion of this snapshot.
By default, only this snapshot will be deleted, but if there were also child snapshots, you could also delete them by checking the "Remove all children snapshots" box.

Same for the snapshot for the 2019 version.
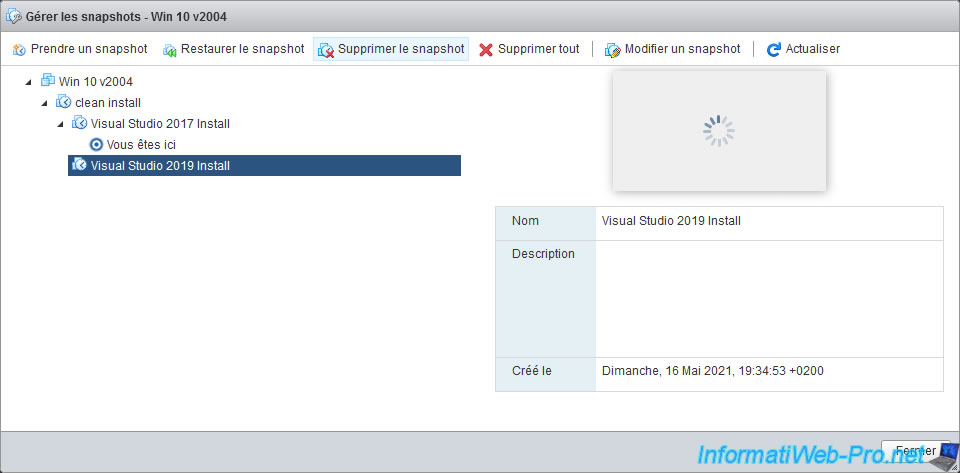
We also confirm its deletion.

Now, we have :
- the base state of the virtual machine
- the snapshot to restore the clean installation of Windows
- the snapshot to restore the clean installation of Visual Studio 2017
- the current state of our virtual machine.
To recover space, you can easily delete the various snapshots that are between the base state of the virtual machine ([VM name]) and the current state of the virtual machine (You are here) without losing data.
Indeed, if you delete the "Visual Studio 2017 Install" snapshot, Visual Studio 2017 will not disappear from the virtual machine, because you only delete the snapshot file allowing you to return to this state.
No data will therefore be deleted, as VMware ESXi will simply merge the necessary files.
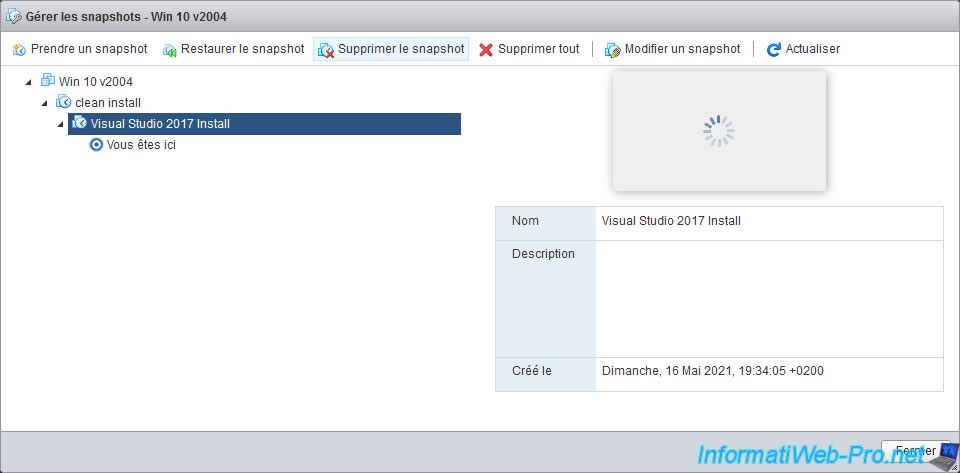
We confirm the deletion of this snapshot.
Warning : don't check the box below.
Now, we have only one snapshot left, but as expected, Visual Studio 2017 is still present in the virtual machine.
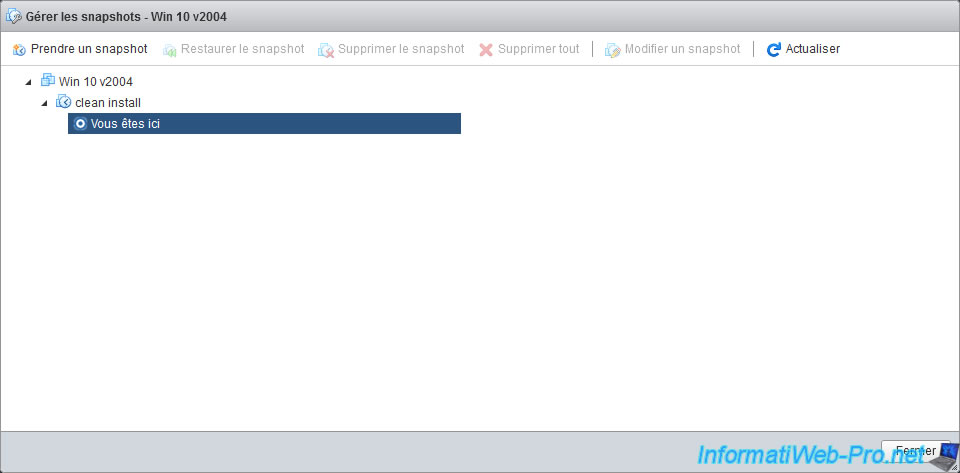
As you can see, almost all of the extra ".vmdk" and ".vmsn" files (created when creating the different snapshots) are gone.
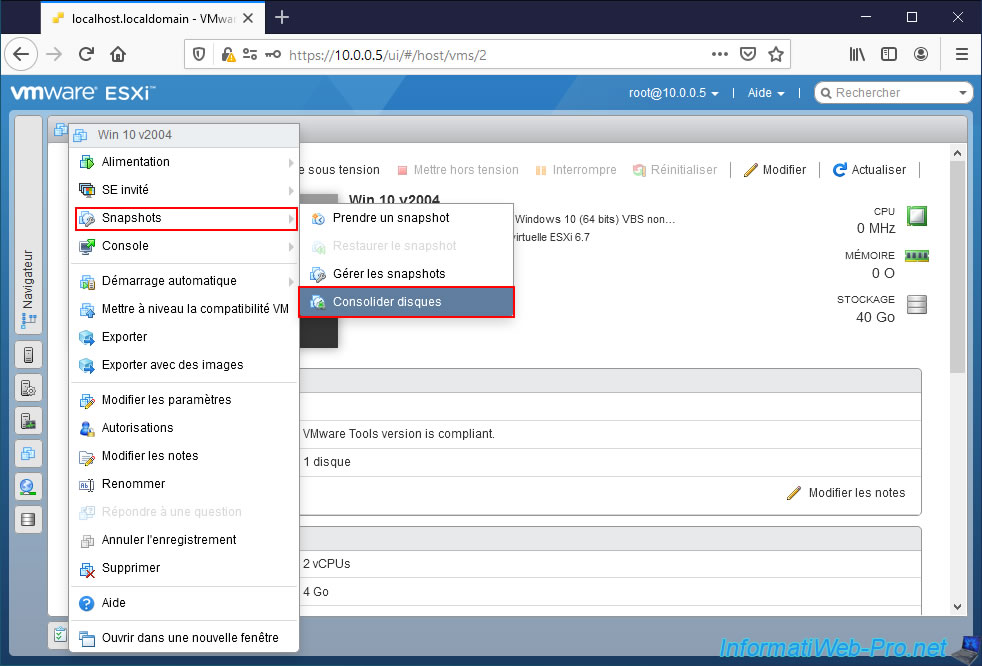
5. Consolidate snapshots
When you create or delete multiple snapshots, there may be redundant data. This unnecessarily reduces the performance of your virtual machine.
To remove this redundant data and reclaim storage space on your server, you have the option of consolidating your virtual machine's disks.
To do this, click on : Actions -> Snapshots -> Consolidate disks.
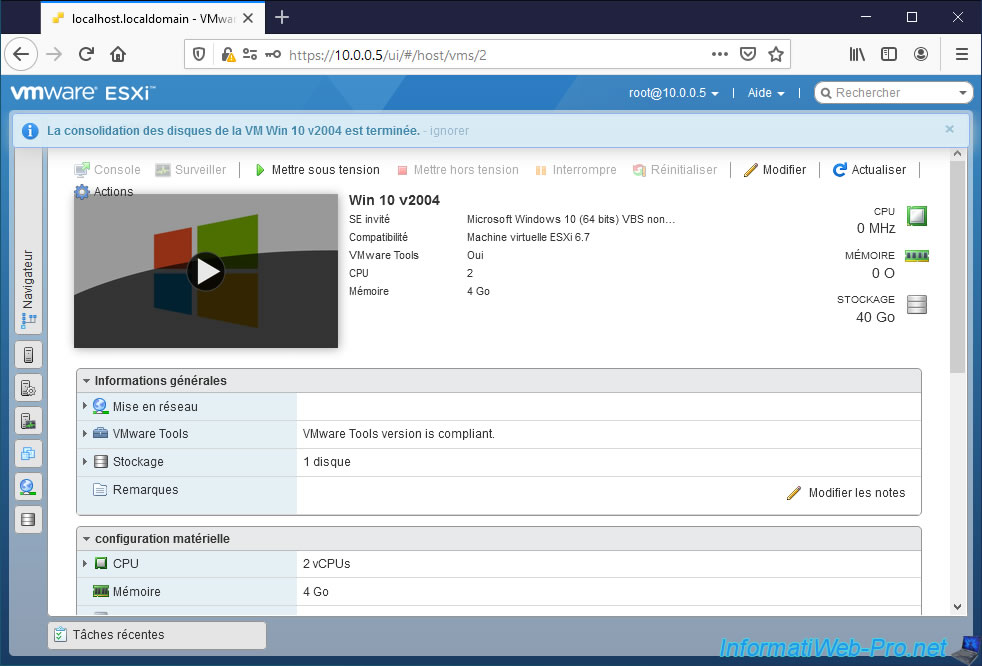
When the process is complete, the message "Disk consolidation for VM [VM Name] has completed" will appear.
6. Can't extend a virtual hard disk after creating a snapshot
While using snapshots can be very interesting in many cases, it also comes with some limitations.
And in particular, the inability to extend (enlarge) the size of a virtual hard disk for a virtual machine where you would have created at least one snapshot.
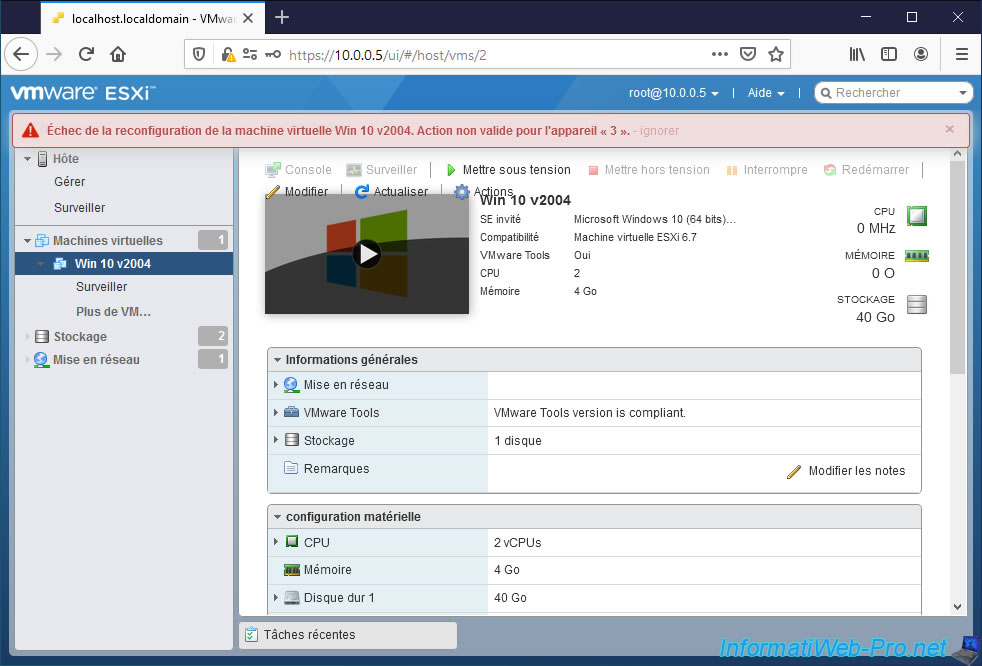
To check it, click on : Modify.
Then, try to increase the size of a virtual hard disk.

An error message appears in red :
Plain Text
Failed to reconfigure virtual machine [Virtual machine name]. Invalid operation for device "3".
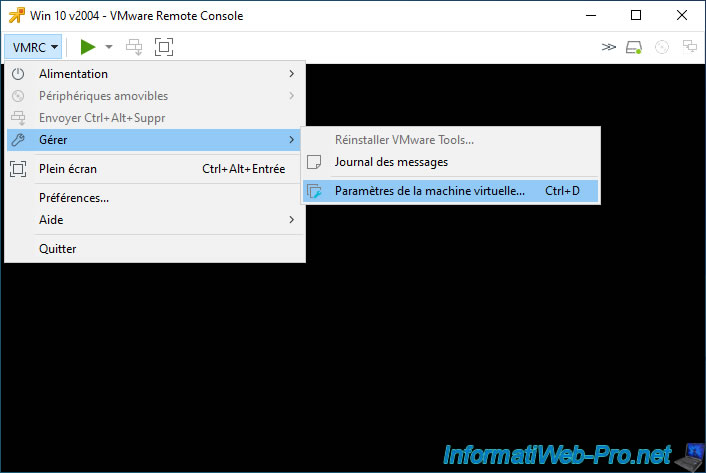
To see it more easily, you will need to use the VMRC software.
Once this software is installed, click on : Actions -> Console -> Launch remote console.

In the "[Virtual machine name] - VMware Remote Console" window that appears, go to : VMRC -> Manage -> Virtual Machine Settings.
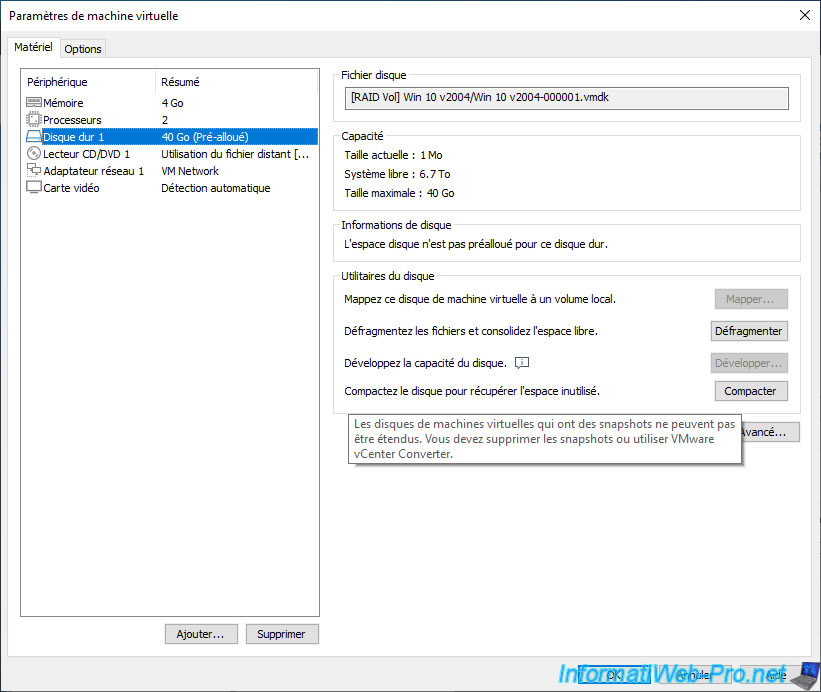
As you can see, VMware Remote Console (VMRC) tells you that virtual machine disks that have snapshots can't be extended.
Unless you delete the snapshots or use VMware vCenter Converter.
Share this tutorial
To see also
-

VMware 5/25/2022
VMware ESXi 6.0 - Install the VMware Host Client web client
-

VMware 5/27/2022
VMware ESXi 6.5 - Add a network driver in the installation ISO
-

VMware 1/27/2023
VMware ESXi 6.7 - Enable virtualization-based security (VBS)
-

VMware 12/2/2022
VMware ESXi 6.7 - Install and use the VMRC console on Linux
No comment