Create a site-to-site (S2S) VPN tunnel via PPTP/L2TP on Windows Server 2022, 2016 and 2012

6.3. Create VPN tunnels and configure routing between your physical sites (Brussels and Paris)
6.3.1. Create the VPN tunnel between site 1 (Brussels) and site 2 (Paris)
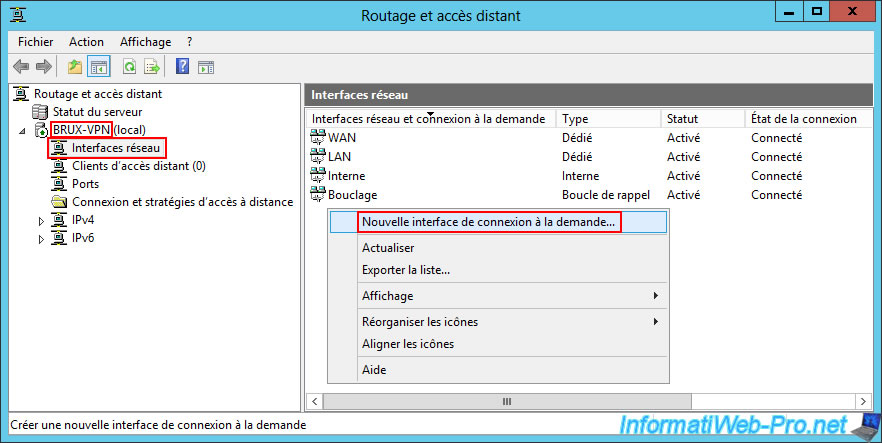
On the VPN server at Site 1 (Brussels), go to the "Network Interfaces" section and right-click "New Demand-dial Interface" in the right-hand section.
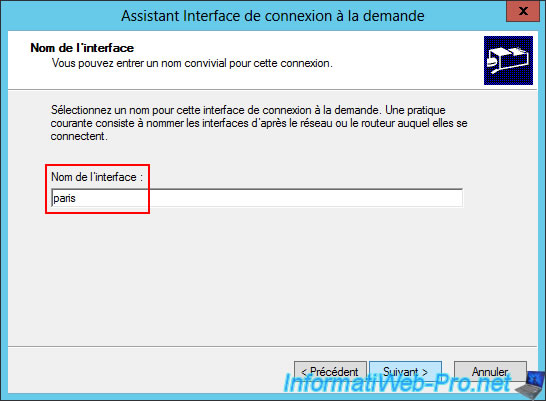
As the interface name, enter the name of the remote site (for example) you wish to connect to.
In our case, we simply entered "Paris".
This indicates that this on-demand connection will allow you to access the network of site 2 (Paris) from the local network of site 1 (Brussels).
Warning : a VPN tunnel must also be created on the remote VPN server for the reverse connection to be possible.
But you'll see that later in this tutorial.
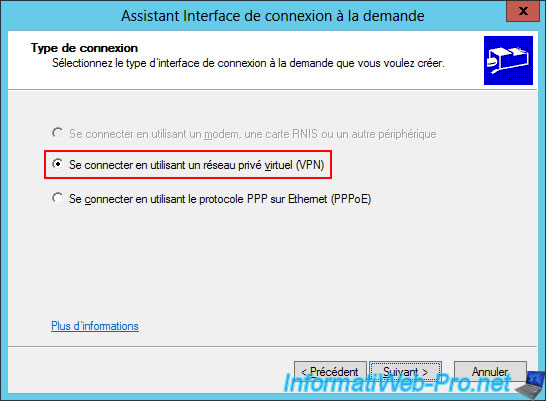
For the connection type, select "Connect using a virtual private network (VPN)".
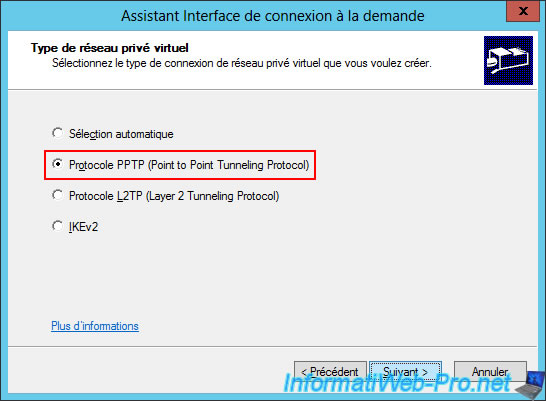
For the Virtual Private Network (VPN) type, select "Point to Point Tunneling Protocol (PPTP)" first, as it is easier and faster to configure.
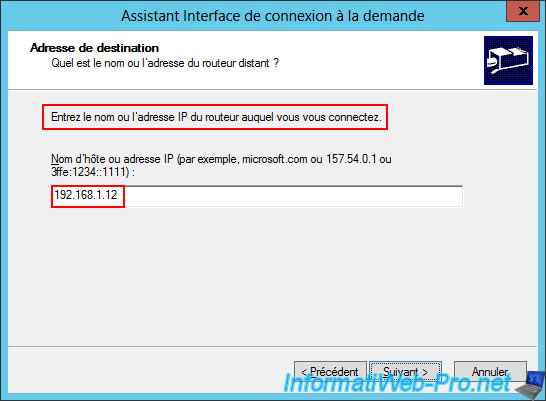
In the "Destination Address" step, Windows Server asks you to enter the IP address of the router you wish to connect to.
Warning : this is actually the public address of the remote site (site 2 (Paris) in this case).
However, having performed our tests locally using several switches, we simply entered the IP address of the WAN interface of our remote VPN server "paris-vpn".
In practice, you will need to enter the public IP address (provided by the ISP) of the remote site (site 2 (Paris)) and have correctly forwarded the VPN ports in the remote site's router.
The remote site's router is located between the Internet and the WAN interface of your remote VPN server.
To find out which ports to forward in the remote site's router, refer to step "2. Configuring hardware firewalls" of this tutorial.
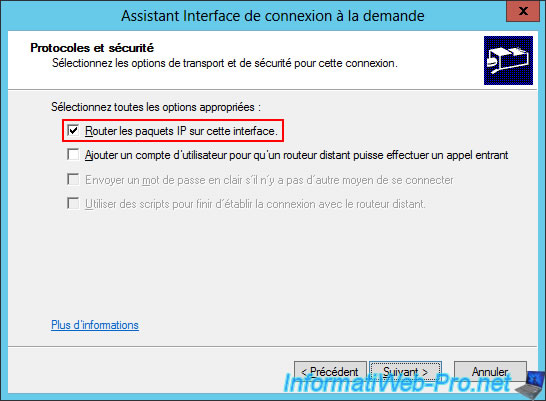
In the "Protocols and Security" step, only check the "Route IP packets on this interface" box.
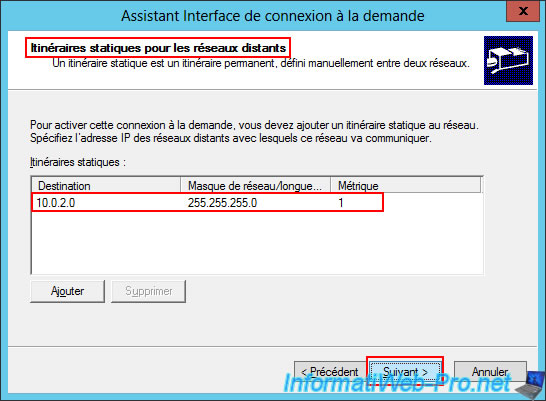
To ensure proper routing of network packets between your local network and the remote site's network(s), a "Static Routes for Remote Networks" step allows you to specify which network IDs are available at the remote site.
To do this, click "Add".
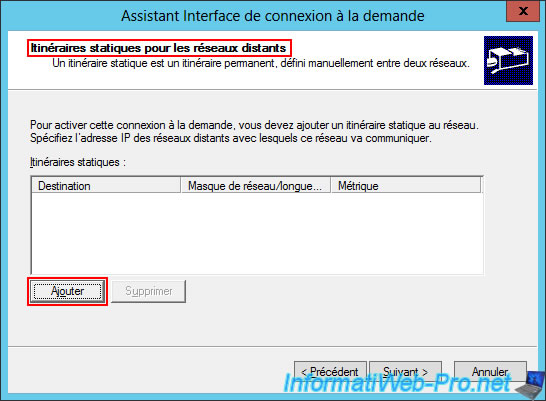
Enter the network ID used at the remote site (site 2 (Paris) in this case).
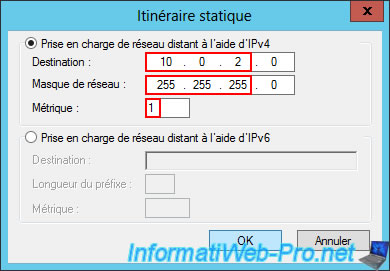
So, we specify:
- Destination: 10.0.2.0.
- Subnet Mask: 255.255.255.0.
- Metric: 1.
The metric theoretically (as it's not mandatory) corresponds to the number of routers between the server and the destination network.
If Windows finds multiple static routes for the same destination network, it will use the one with the lowest metric, as this is expected to be the fastest path.
In our case, there will only be one, so simply enter the number "1".
Source : Create a Static Route | Microsoft Learn.
The static route you created appears.
Click "Next".
Note: if multiple network IDs are used at the remote site, add an additional static route per network ID of the remote site.
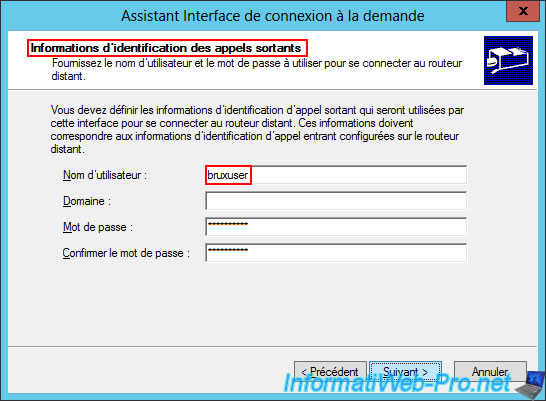
In the "Outbound Call Credentials" step, enter the credentials of the user account previously created on the remote site (in step "4.2. Create a user on Site 2 (Paris) so that Site 1 (Brussels) can connect to the VPN server at Site 2 (Paris)" of this tutorial).
In this case, the user "bruxuser" connects to the "paris-vpn" server.
Note: since the VPN server at the remote site (Site 2 (Paris)) is in a workgroup and is therefore a local user account, simply leave the "Domain" box blank.
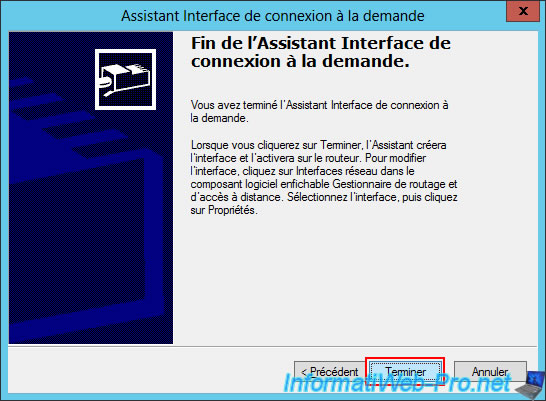
Click "Finish".
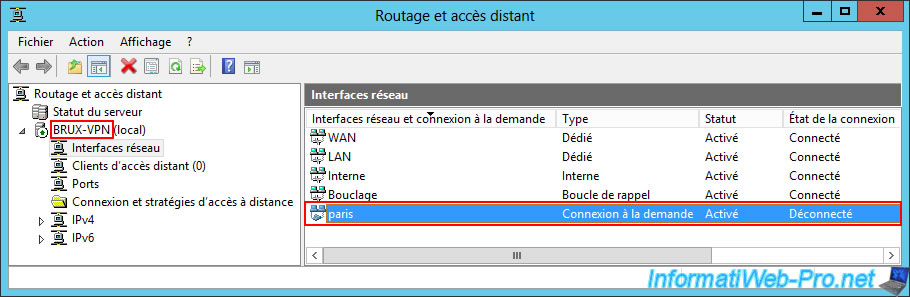
In the "Network Interface" section of the "BRUX-VPN" VPN server at Site 1 (Brussels), you will see that a "Paris" on-demand connection has been created (so you can access the resources at Site 2 (Paris) from your Site 1 (Brussels)).
Double-click on this "Paris" on-demand connection.
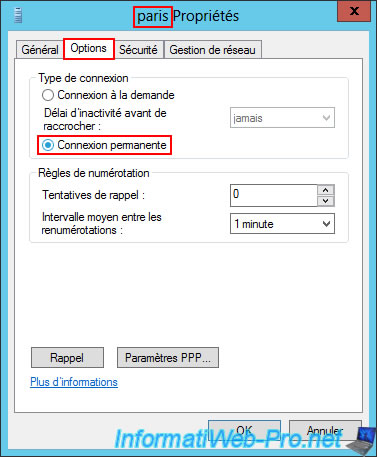
Next, go to the "Options" tab and you'll see that by default, this is an on-demand connection.
However, to ensure the VPN tunnel remains established between your two VPN servers (to create a "site-to-site" link), it is strongly recommended that you configure this on-demand connection to remain connected at all times.
To do this, select the "Persistent Connection" connection type.
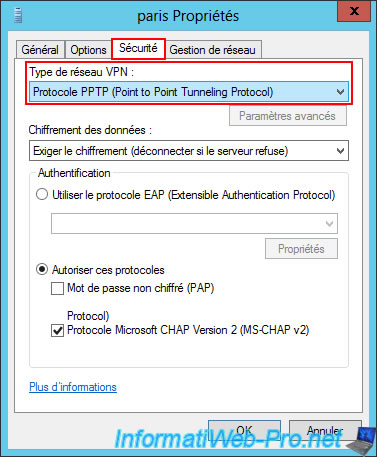
Next, go to the "Security" tab and you will see that the VPN network type used is "Point to Point Tunneling Protocol (PPTP)" as you chose when creating the on-demand connection.
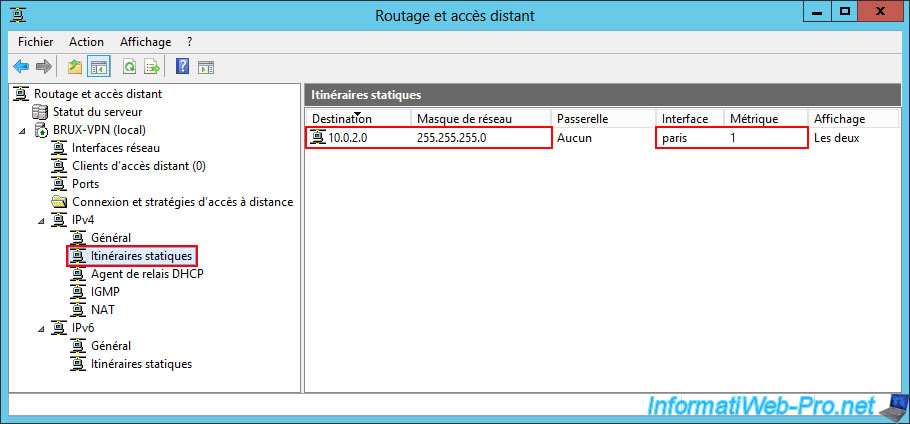
In the "IPv4 -> Static Routes" section, you will see that the static route (specified when creating the demand-dial connection) appears and that your server knows that the network ID "10.0.2.0" (which is the one used on site 2 (Paris)) will be accessible via the "paris" interface (the name of the demand-dial connection you just created).
6.3.2. Configure routing between site 1 (Brussels) and site 2 (Paris)
Even if your server knows it can access the remote network (in our case: 10.0.2.0) via the "paris" demand-dial connection you just created, this isn't enough for network packet routing to work properly.
In fact, your server's "router" function also needs to be aware of this new network to perform routing correctly.
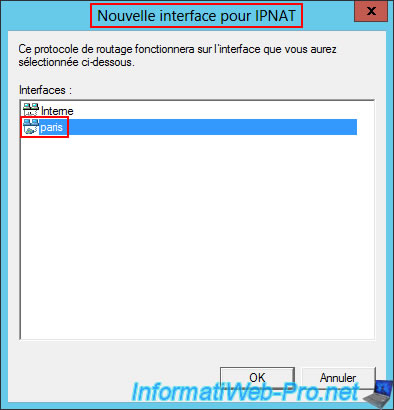
To resolve this routing issue between your local network and the remote site network (Paris in this case), you need to go to the "IPv4 -> NAT" section and right-click "New Interface" (in the right-hand side).
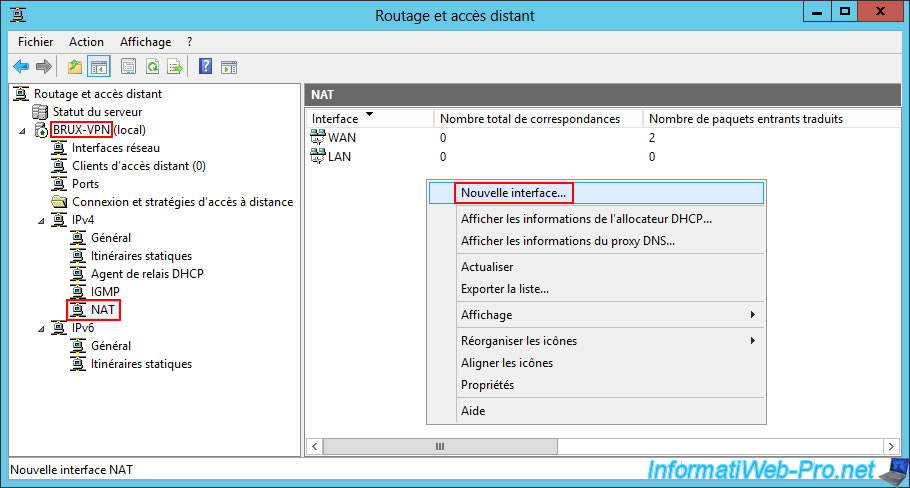
In the "New Interface for Network Address Translation (NAT)" window that appears, select the "paris" interface (whose name corresponds to the on-demand connection you just created on this VPN server) and click OK.
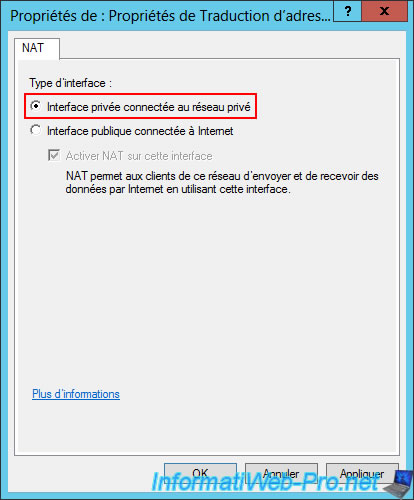
Simply select the "Private interface connected to private network" option and click OK.
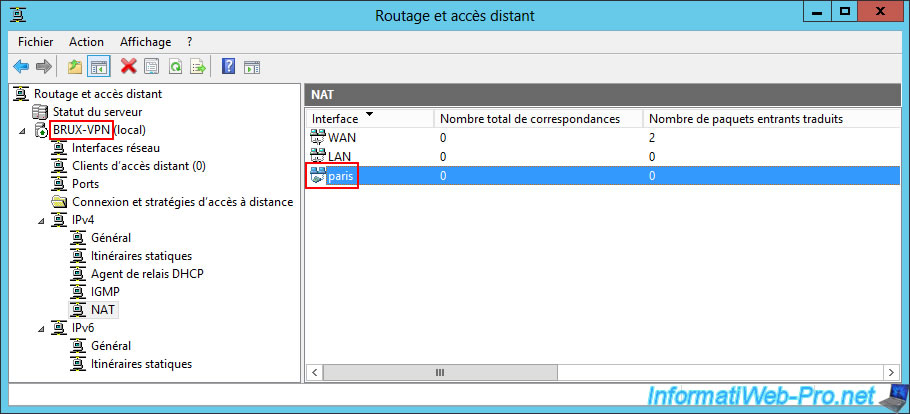
The demand-dial interface now appears in the "IPv4 -> NAT" section of your server.
This allows your server to route your network packets between these three networks:
- WAN: Internet.
- LAN: local area network.
- Paris: communication between your local site (Brussels) and the remote site (Paris).
Note: yes, a router can route packets between multiple networks, not just between the local area network (LAN) and the Internet (WAN) as is usually the case in your home.
Right-click on your server name and click "All Tasks -> Restart".
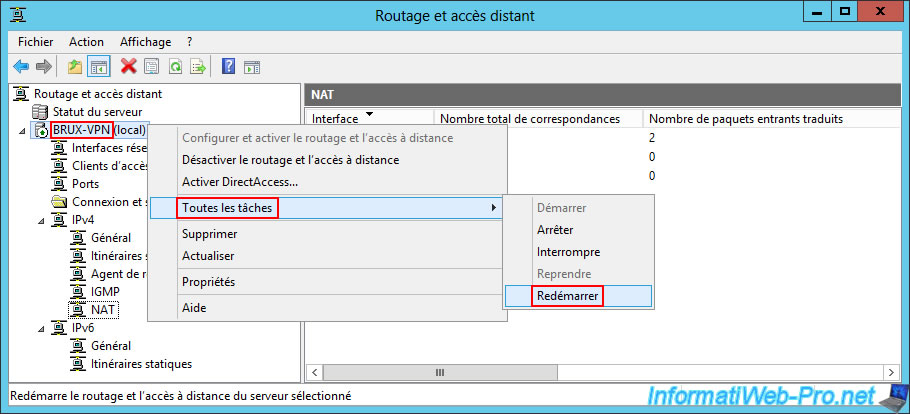
Please wait while the Routing and Remote Access service on BRUX-VPN restarts.

Share this tutorial
To see also
-
Windows Server 4/28/2012
WS 2003 - NAT and network routing
-
Windows Server 8/8/2012
WS 2008 - NAT and network routing
-

Windows Server 4/22/2015
WS 2012 - NAT and network routing
-

Windows Server 12/3/2016
WS 2012 - Routing and VPN server
No comment