- RAID
- 21 March 2025 at 08:38 UTC
-

- 1/3

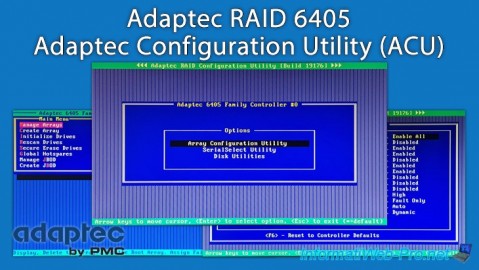
To manage your Adaptec RAID controller and its resources (RAID arrays, RAID logical disks, physical disks, ...), you can use ACU (Adaptec Configuration Utility) accessible when your computer or server starts up.
Note: ACU is only accessible if your computer or server boots in LEGACY BIOS mode.
If your computer or server boots in UEFI mode, you will need to access the "PMC maxView Storage Manager" option available in a menu (usually named "Advanced") in your motherboard BIOS.
- Access ACU (Adaptec RAID Configuration Utility)
- Array Configuration Utility (configure RAID arrays)
- SerialSelect Utility (controller settings and battery status)
- Disk Utilities (manage physical disks)
1. Access ACU (Adaptec RAID Configuration Utility)
When your computer starts up, this is displayed:
Plain Text
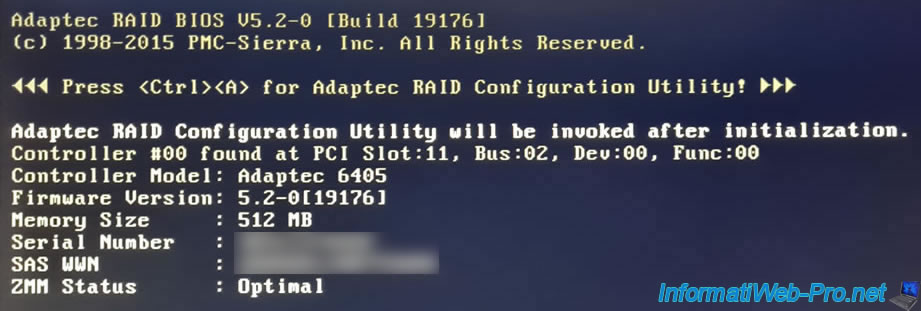
Adaptec RAID BIOS V5.2-0 [Build 19176].
(c) 1998-2015 PMC-Sierra, Inc. All Rights Reserved.

Press <Ctrl><A> for Adaptec RAID Configuration Utility!

Booting the Controller Kernel...
As shown on the screen, to access ACU (Adaptec RAID Configuration Utility), press "CTRL + A" (on a QWERTY keyboard) or "CTRL + Q" (on an AZERTY keyboard).

Once you have pressed these 2 keys, you will see an additional line appear at the top of the screen.
Plain Text
Adaptec RAID Configuration Utility will be invoked after initialization.
Which means that ACU will appear once your Adaptec RAID controller has finished initializing.

The BIOS of your Adaptec RAID controller continues to boot and this is displayed.
Plain Text
Controller #00 found at PCI Slot:11, Bus:02, Dev:00, Func:00
Controller Model: Adaptec 6405
Firwmare Version : 5.2-0[19176]
Memory Size : 512 MB
Serial Number: ...
SAS WWN : ...
ZMM Status : Optimal
2. Array Configuration Utility (configure RAID arrays)
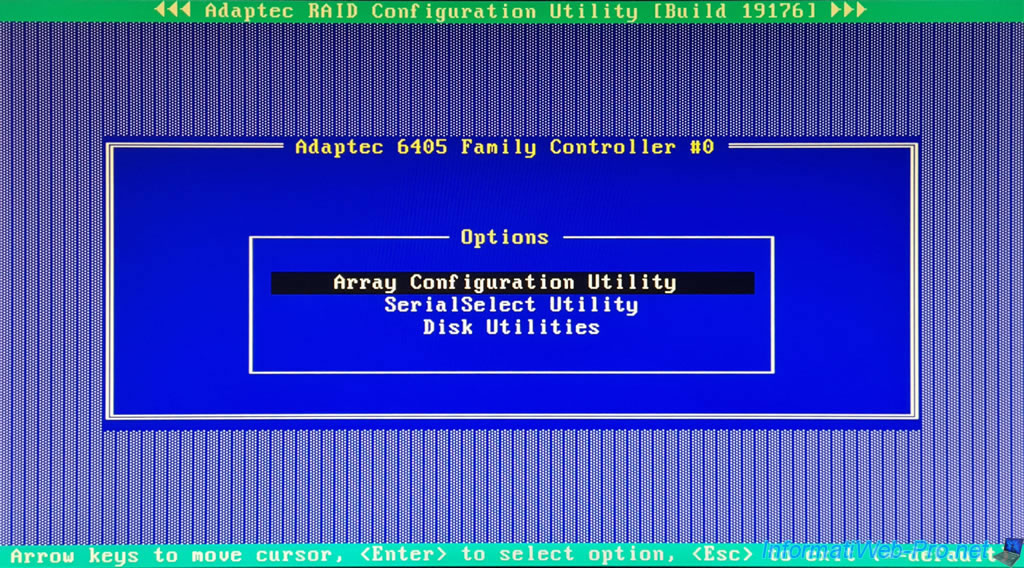
Once the Adaptec RAID controller is initialized, ACU (Adaptec RAID Configuration Utility) appears.
In ACU (Adaptec RAID Configuration Utility), you will find 3 sections:
- Array Configuration Utility: to manage and create RAID arrays.
- SerialSelect Utility: to manage Adaptec RAID controller settings.
- Disk Utilities: to manage the physical disks connected to your Adaptec RAID controller.
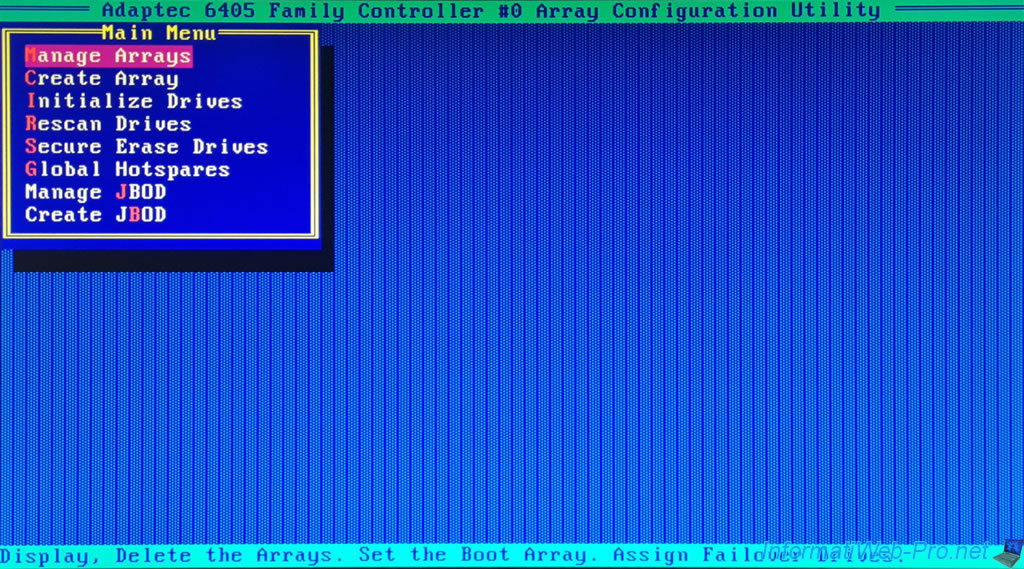
In this "Array Configuration Utility" section, you will be able to:
- Manage Arrays: manage your RAID arrays.
- Create Array: create a RAID array.
- Initialize Drives: initialize drives for trouble-free use in a future RAID array.
- Rescan Drives: rescan available drives to detect new hot-plugged drives.
- Secure Erase Drives: securely erase a physical drive.
- Global Hotspares: manage the hotspares that will be used in the event of a disk failure in one of your RAID arrays to automatically rebuild the missing disk.
- Manage JBOD: manage your JBOD arrays (a JBOD logical disk is simply an aggregation (a set) of several physical disks WITHOUT fault tolerance).
- Create JBOD: create a JBOD array.
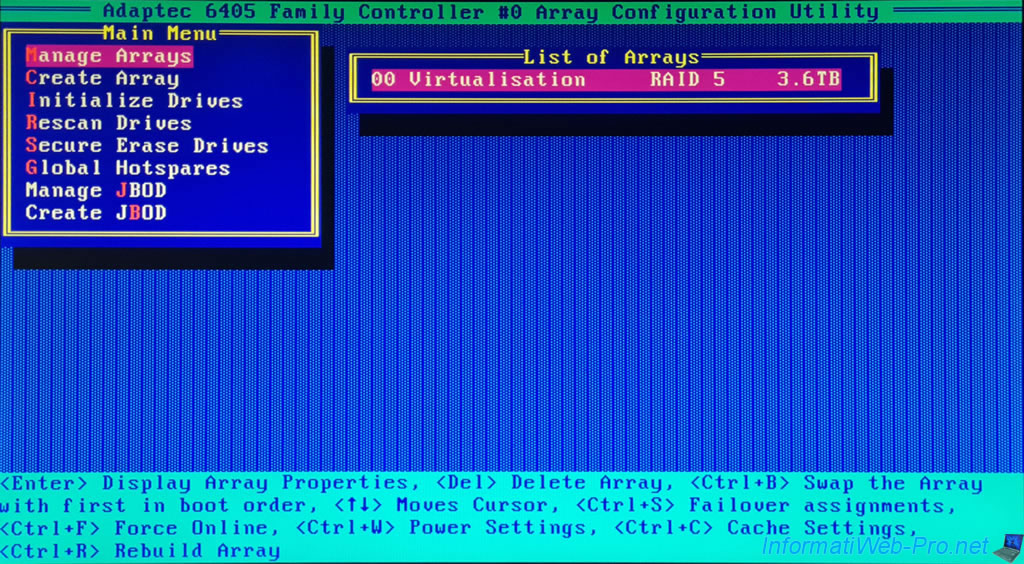
2.1. Manage Arrays (manage RAID arrays)
The "Manage Arrays" option allows you to see the list of RAID arrays (List of Arrays) already created on your Adaptec RAID controller.
For each of them, you will see: its number, its name, its RAID level (in our case: RAID 5) and its usable capacity.
Note: if you have already created multiple RAID arrays on your RAID controller, you can place the selected RAID array first for the boot order by pressing the "CTRL+B" keys (<Ctrl+B> Swap the Array with first in boot order).
Indeed, a boot option referring to your Adaptec RAID controller will be visible in the boot order of your motherboard BIOS.
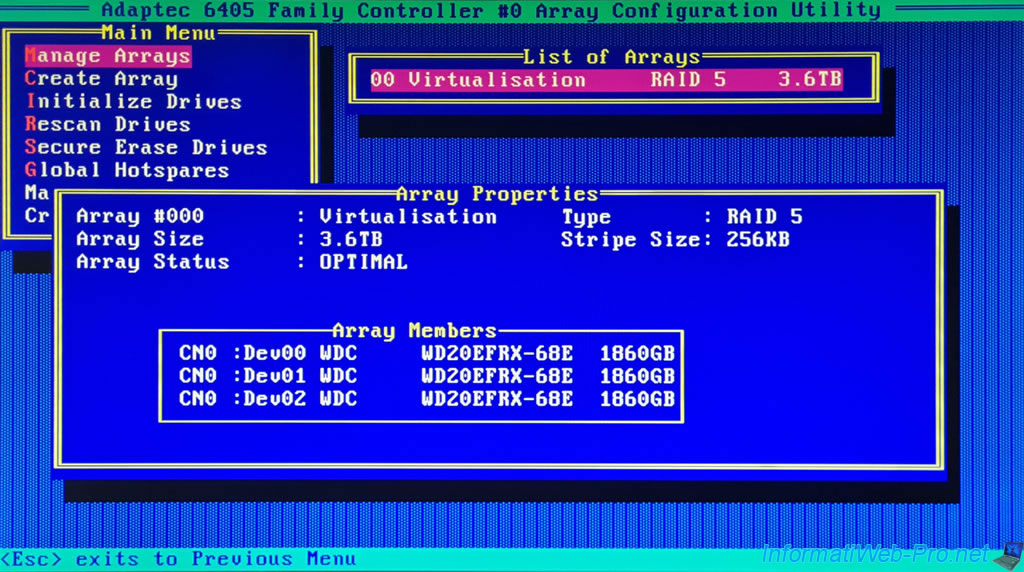
If you press "Enter" (<Enter> Display Array Properties), an "Array Properties" window will appear with:
- Array#: the number of the selected RAID array.
- Array Size: the usable capacity (disk space) (therefore not counting the space reserved for parity) on the RAID array.
- Array Status: the OPTIMAL status when an array is fully initialized/created.
When created, the status is "BUILD/VERIFY x%". This allows you to know the progress of creating a RAID array. - Type: the RAID level used.
In our case: RAID 5. - Stripe Size: the stripe size used.
- Array Members: the list of physical disks (connected to your Adaptec RAID controller) used for this RAID array with its make, model and actual capacity.
Note: to return to the RAID array list, press "Esc".
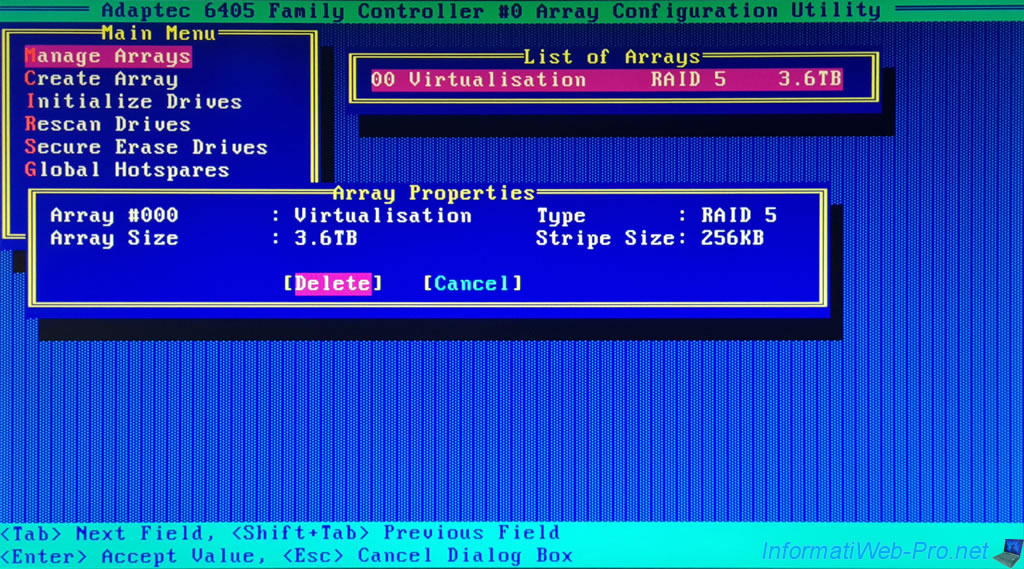
To delete the selected RAID array, press "Del" (<Del> Delete Array), then select "Delete" and press Enter (<Enter> Accept Value) to confirm deletion of this RAID array.
By pressing the "CTRL + S" keys (<Ctrl+S> Failover assignments), you will be able to assign physical disks as "hotspares".
These will only be used when a physical disk in a RAID array fails to automatically rebuild the missing disk on that hotspare.
If there is no free physical disk (not used by one of your RAID or JBOD arrays), an error message will be displayed telling you the capacity (size) that the disk must have for the selected RAID array .
Plain Text
There are no valid free drives or assigned hotspares.
1860GB is the required hotspare space for this array.

To force a RAID array (and its RAID logical drives) online, simply press the "CTRL + F" keys (<Ctrl+F> Force Online).
If the array is already online, the error below will appear.
Plain Text
Force Online only applies for offline arrays.
Force Upload is useful if a RAID logical drive does not appear in the operating system installed on your computer.

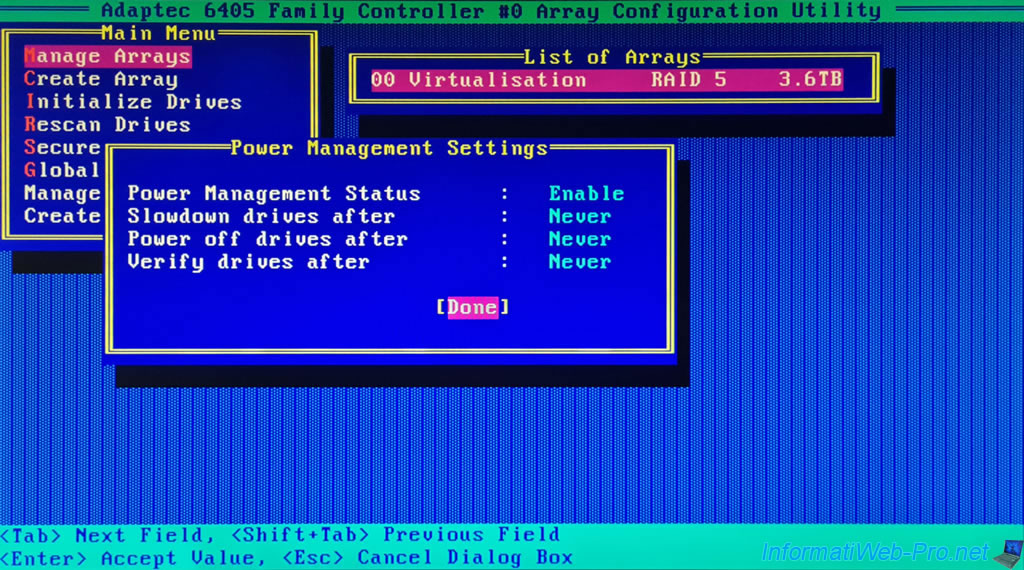
To manage the power settings for the physical disks in this RAID array, press the "CTRL + W" keys (<Ctrl+W> Power Settings).
In the "Power Management Settings" window that appears, you can:
- Power Management Status: Enable or Disable power management for this RAID array.
- Slowdown drives after: define the inactivity period (from 3 min to 3 h) after which the physical disks of this RAID array will be slowed down in low consumption mode or not (Never).
- Power off drives after: similar to the previous option, but for stopping these physical disks.
The possible values are identical (including the "Never" option), but this delay must obviously be longer than that defined above. - Verify drives after: the time interval at which the RAID controller will check the health of this RAID array and its disks.
This saves electricity when an array is not used for at least some time.
Source : Adaptec RAID Controller Installation and User’s Guide | Adaptec (page 83).
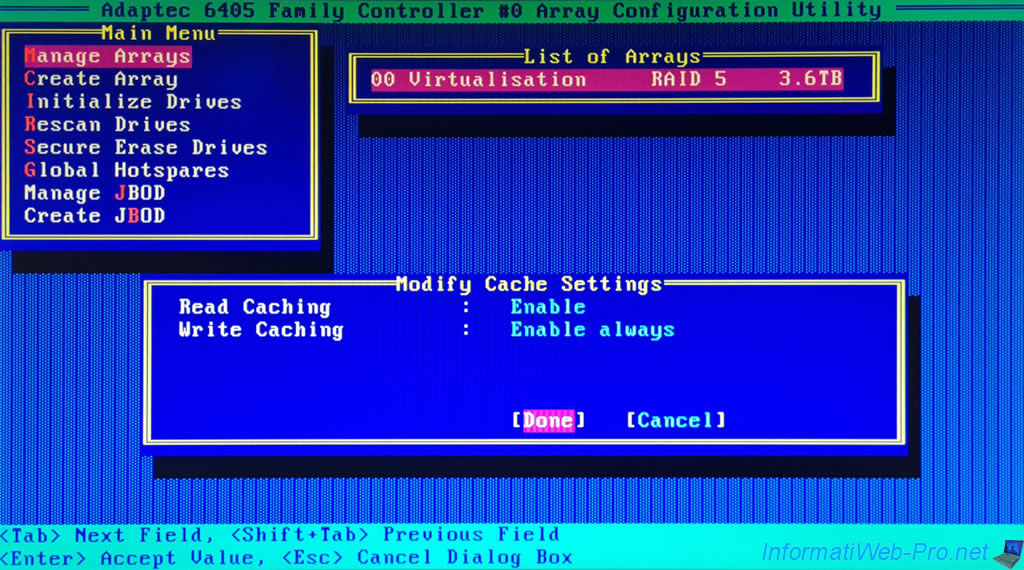
To enable or disable the use of read and/or write cache for the selected RAID array, press the "CTRL + C" keys (<Ctrl+C> Cache Settings).
In the "Modify Cache Settings" window, you can:
- Read Caching: Enable or Disable read caching for this RAID array.
- Write Caching: enable or disable write caching for this one.
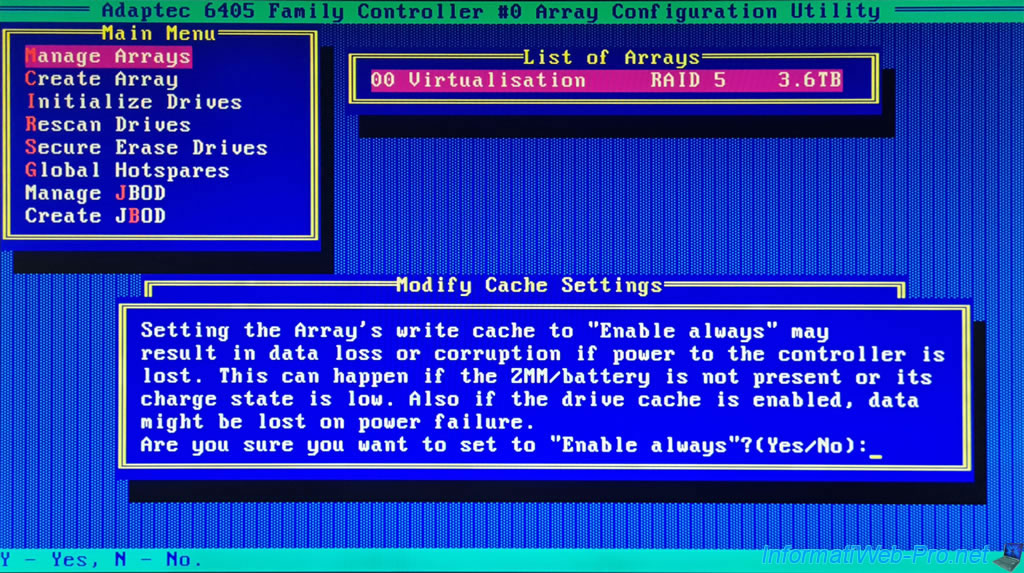
- Enable always: always enable write cache, even if there is no battery (ZMM) connected to your Adaptec RAID controller or it is not sufficiently charged.
Warning: in the event of a power outage, data loss may occur. - Enable with ZMM: enable write cache only when a battery (ZMM) is plugged into your Adaptec RAID controller and the battery is sufficiently charged.
Recommended if you have a battery (ZMM) plugged into your Adaptec RAID controller. - Disable: disable write cache to prevent data loss in the event of a power outage.
- Enable always: always enable write cache, even if there is no battery (ZMM) connected to your Adaptec RAID controller or it is not sufficiently charged.
If you select "Enable always" for the write cache of the selected RAID array, a warning will appear to warn you that data loss or corruption may occur if the Adaptec RAID controller loses power.
This will happen if there is no battery (ZMM) plugged into this Adaptec RAID controller.
Plain Text
Setting the Array's write cache to "Enable always" may result in data loss or corruption if power to the controller is lost. This can happen if the ZMM/battery is not present or its charge state is low. ...
If a RAID array is degraded (when one of its physical disks has failed), you can start rebuilding it by pressing the "CTRL + R" keys (<Ctrl+R> Rebuild Array).
The controller will scan the disks and then retrieve the necessary information about them.
Plain Text
Scanning for drives ...
Updating Drive Information ...


If no array is degraded, the error below will appear.

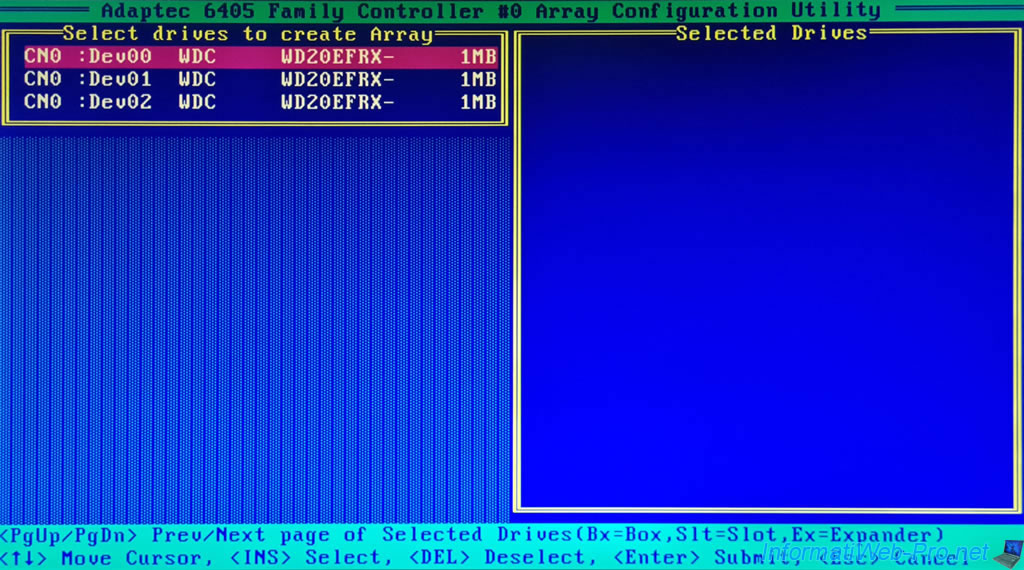
2.2. Create Array (create a RAID array)
The "Create Array" option allows you to create a new RAID array on your Adaptec RAID controller.
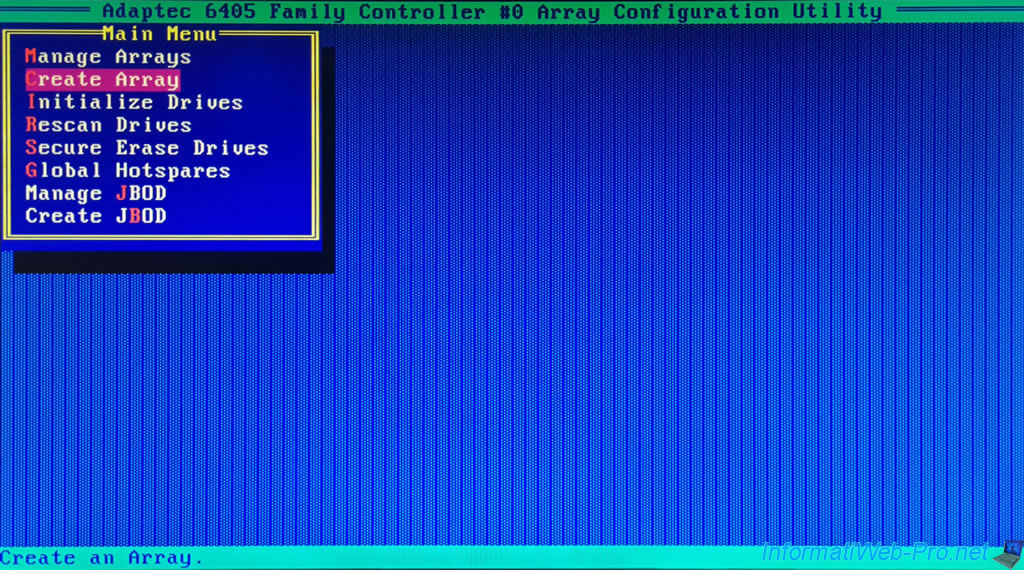
Select the drives to use for this array by selecting them with the arrows, then pressing the "Insert" key (<INS> Select) to add them to the Selected Drives list.
To find out how to create a RAID array on an Adaptec RAID controller, refer to our tutorial: Adaptec RAID 6405 - Create and configure a RAID 0, 1, 5, ...
Share this tutorial
To see also
-
RAID 11/16/2015
Adaptec maxView Storage Manager v1 - Presentation
-
RAID 3/26/2025
Adaptec RAID 6405 - Adaptec maxView configuration tool via BIOS (UEFI mode)
-
RAID 1/14/2022
Adaptec RAID 6405 - Add Adaptec AFM-600 (ZMM) battery
-
RAID 3/28/2025
Adaptec RAID 6405 - Create a RAID volume via BIOS (UEFI mode)
You must be logged in to post a comment