Create a gaming virtual machine (gaming VM) on Unraid 6.9.2
- NAS
- Unraid
- 26 August 2026 at 13:14 UTC
-

- 2/5

6. Create a gaming virtual machine on Unraid
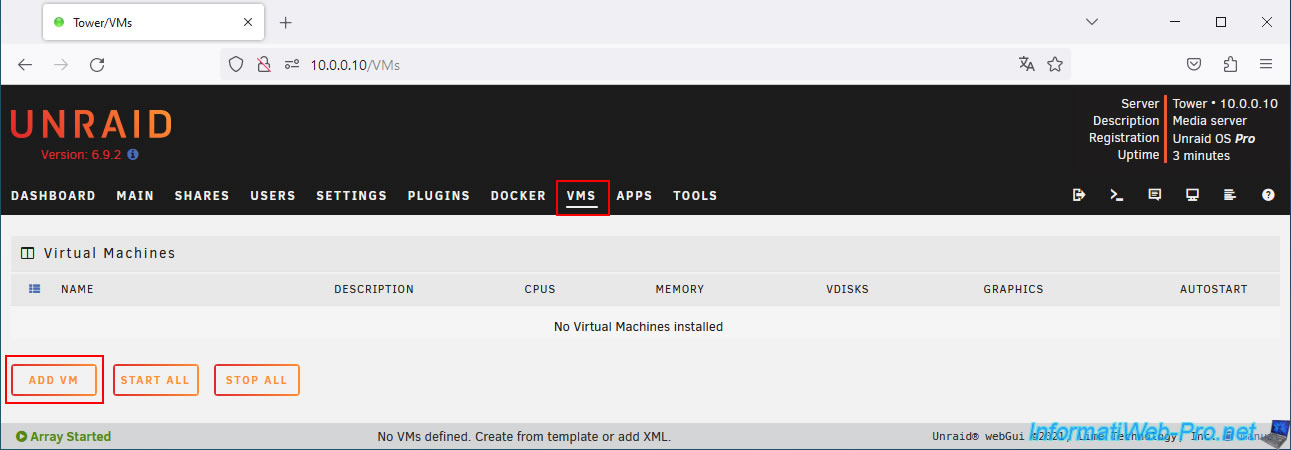
Now that your Unraid server is properly configured, go to the "VMS" tab and click on: Add VM.
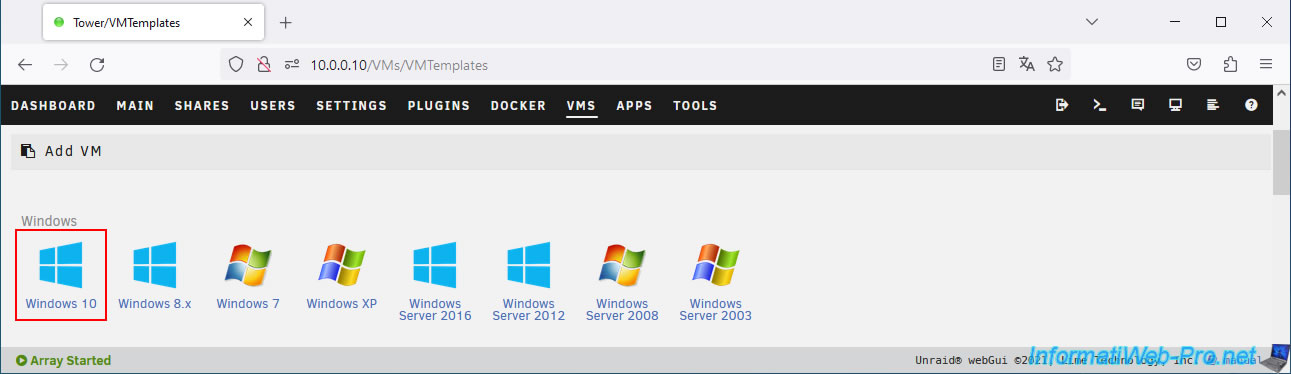
Choose the version of Windows you want to install.
In our case: Windows 10.
Note: if you have an Nvidia RTX graphics card, it's likely that the available Nvidia driver is only compatible with Windows 7 and 10.
This is certainly the case for our Nvidia RTX 3070 graphics card.
Next, also check your game's compatibility.
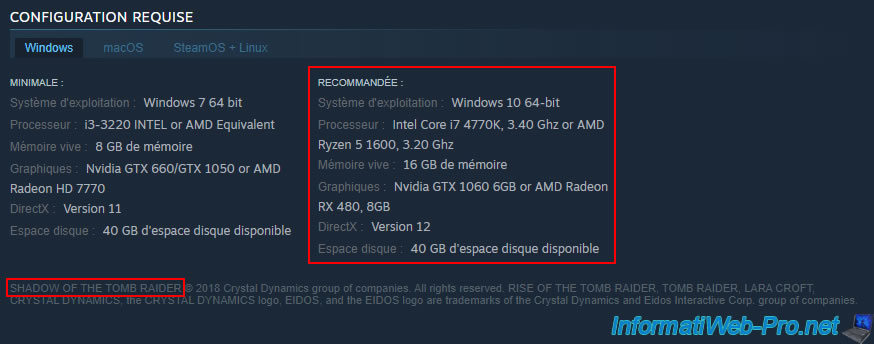
For this tutorial, we chose to install the game "Shadow of Tomb Raider," which we purchased a few years ago.
According to the system requirements for this game, available on Steam (where we purchased it), Steam recommends using:
- Windows 10 64-bit.
- an Intel i7 4770K processor or newer.
- 16 GB of RAM.
- an Nvidia GTX 1060 graphics card with 6 GB of video memory.
- DirectX version 12 (which your graphics card must support).
- 40 GB of hard disk space.
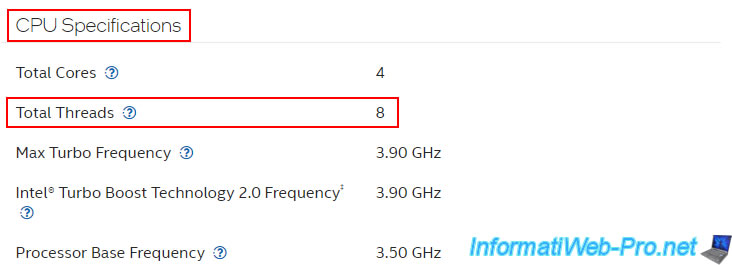
For the "Intel i7 4770K" processor referenced by Steam, this corresponds to a processor with 4 physical cores (therefore 8 threads with hypertreading).
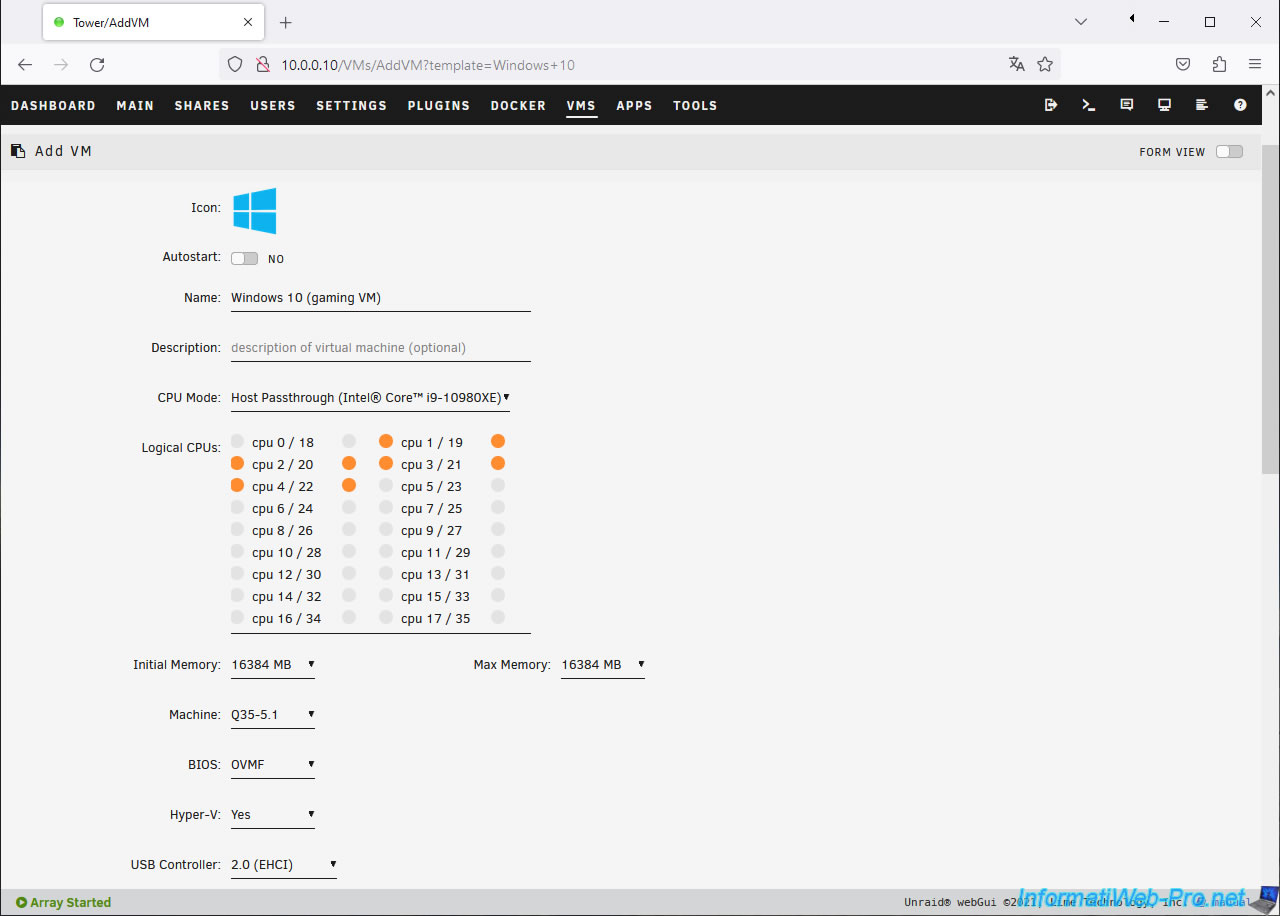
On the "Add VM" page that appears, configure these settings:
- Name: Windows 10 (gaming VM).
- CPU Mode: Host Passthrough ([your processor model]).
This allows your virtual machine to directly use your physical processor rather than a QEMU-emulated processor, which would be very slow. - Logical CPUs: assign enough logical cores to your virtual machine.
In our case, we assigned 8 cores (as recommended by Steam for the game we want to install in our virtual machine).
Note that we simply avoided selecting core "0" since it may also be used by our Unraid server for its own operations. - Initial Memory: 16384 MB = 16 GB of RAM (16 x 1024 MB = 16384 MB).
The "Max Memory" value will automatically be adjusted to the same value. - Machine: Q35-5.1. Select the latest available "Q35" version.
As indicated in the pop-up that appears if you hover over this parameter value, Q35 is used for virtual machines.
This is therefore recommended for playing recent games on Windows 10. - BIOS: OVMF. Enables support for booting in UEFI mode. This is also necessary for switching a graphics card to a virtual machine (as indicated in the pop-up displayed if you hover over this parameter value with your mouse).
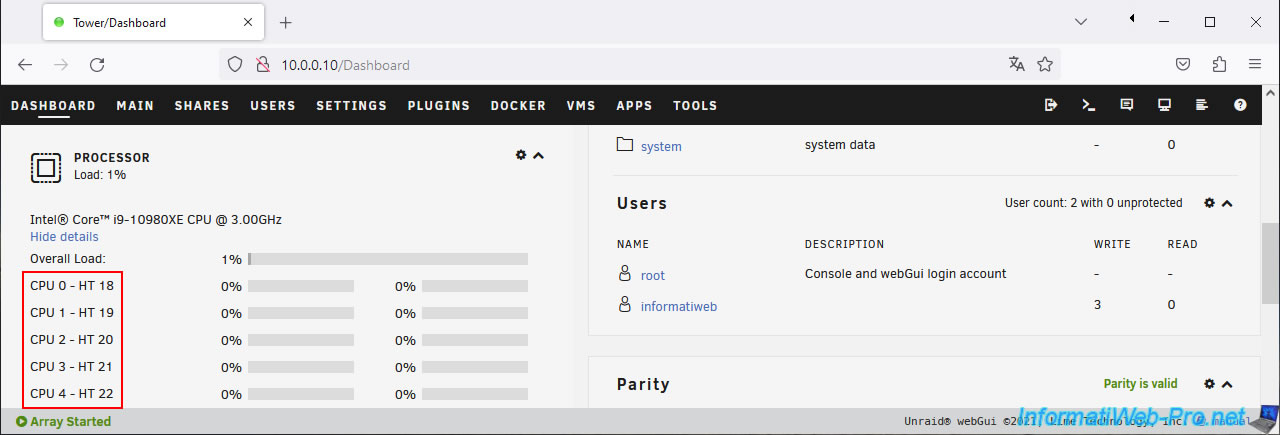
If you look in the "Dashboard" tab of your Unraid server, you'll see that the cores listed on the configuration page of your future virtual machine are grouped by physical core.
For example, in our case, the first physical core of our processor is composed of two logical cores (CPU 0 - HT 18).
Note: the "HT" keyword refers to hyperthreading for Intel processors. This allows each physical core to be split into two logical cores to run two threads simultaneously on each physical core.
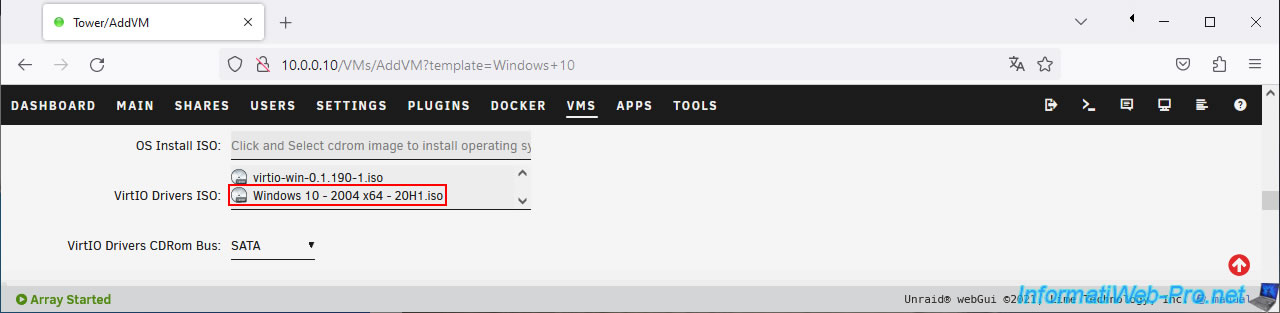
For the "OS Install ISO" setting, select the Windows ISO file previously stored in the "isos" share of your Unraid server.
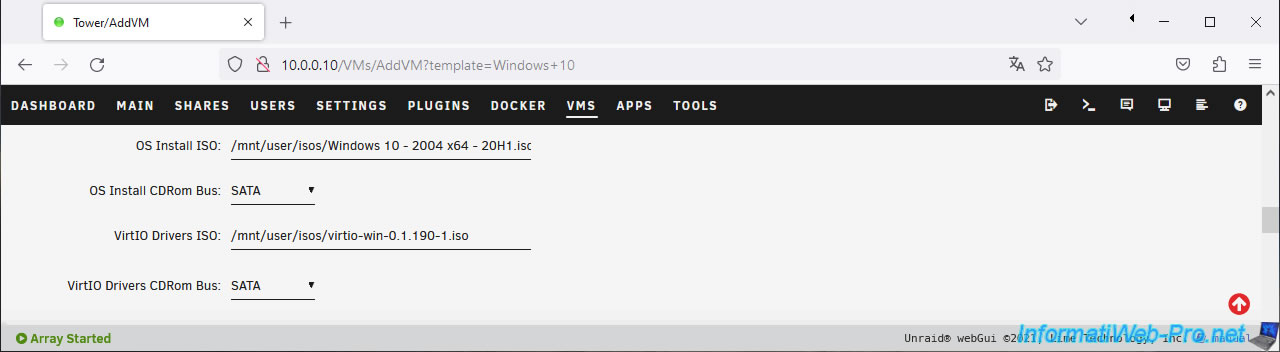
The driver CD entered in the "VirtIO Drivers ISO" field is already set as the default.
If it isn't, you forgot to download it previously.
To do this, open a new tab and go to "Settings -> VM Manager."
Then, click the "Download" link to the right of the "Default Windows VirtIO driver ISO (optional)" setting.
Finally, select the downloaded ISO file here. If necessary, specify the path manually.
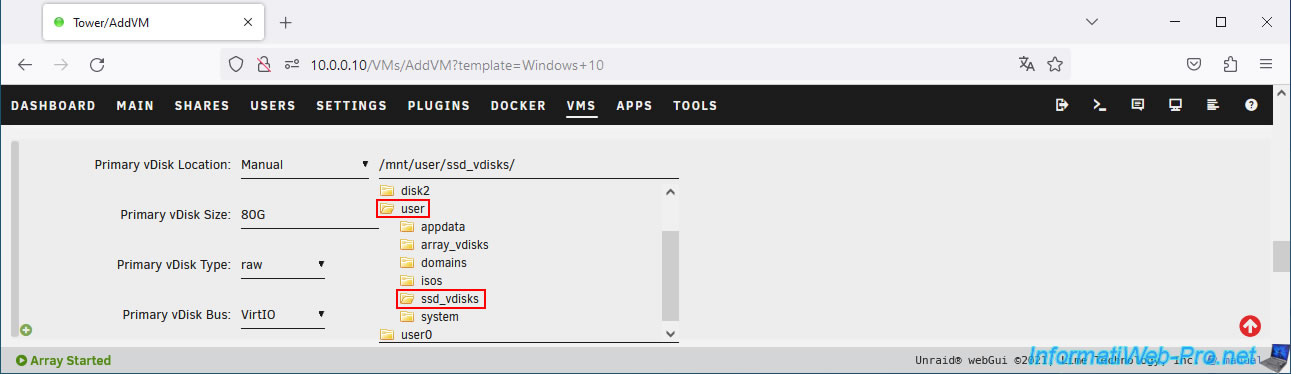
For your virtual machine's first virtual hard drive (Primary vDisk), select "Manual" as the Primary vDisk Location, then select the "user/ssd_vdisks" folder.
This will indicate the path "/mnt/user/ssd_vdisks/". This will speed up Windows since this virtual hard drive will be stored on your Unraid server's SSDs.
For the Primary vDisk Size of this first virtual hard drive, specify 80 GB (for Windows 10).
You will be installing the games on a separate virtual hard drive.
Next, click the small "+" icon located in the bottom right corner of the "Primary vDisk..." block.
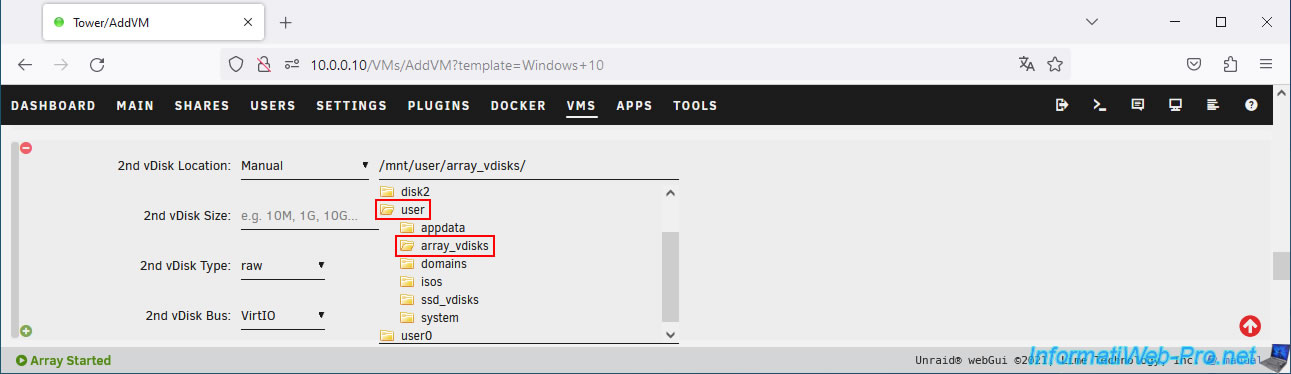
For the second virtual hard drive, select the "Manual" location again.
But this time, select the "user/array_vdisks" folder. This will display the path "/mnt/user/array_vdisks/".
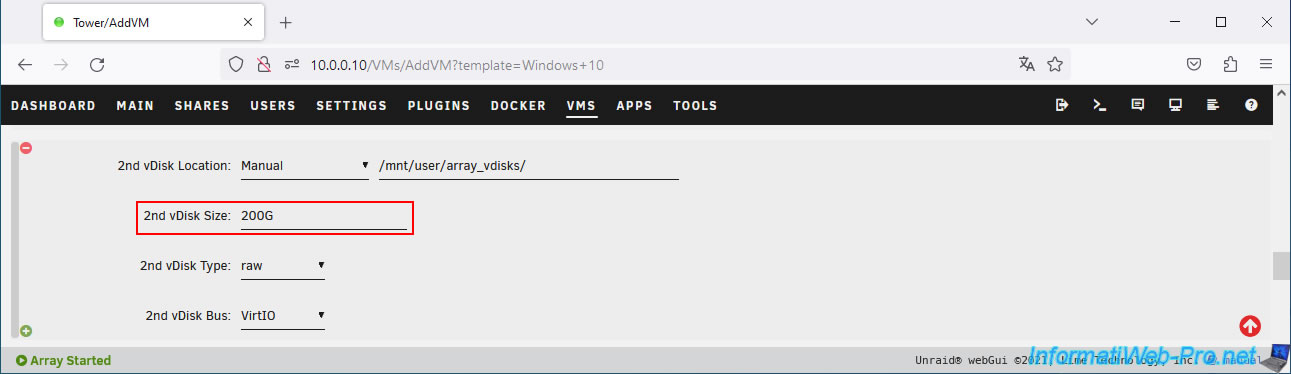
Specify a size large enough to store your games.
In our case, we specified "200GB". Steam indicates that our game only requires 40GB of disk space.
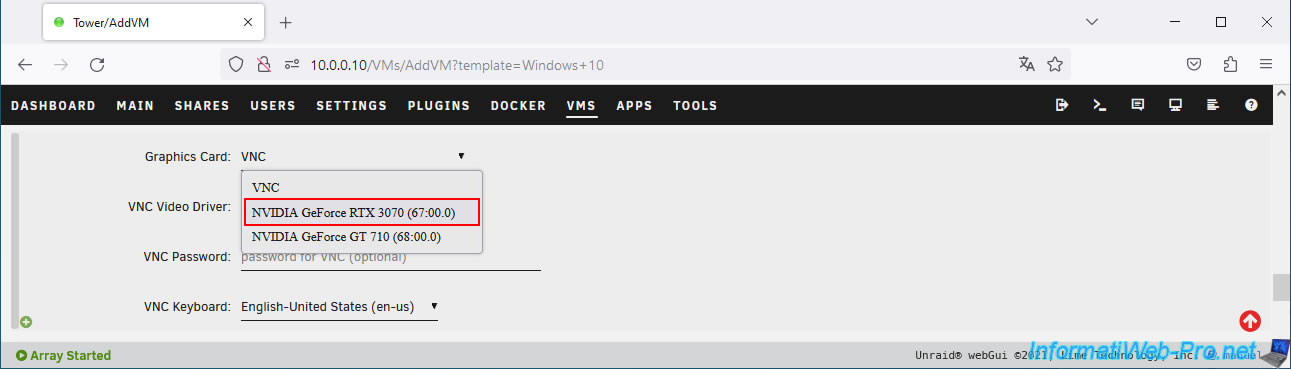
For the graphics card, by default, Unraid allows you to access your virtual machine's console via the VNC protocol.
However, in this case, we will directly use our physical graphics card to control this virtual machine. This will also provide much better graphic performance since it will use a real graphics card and not a virtual one.
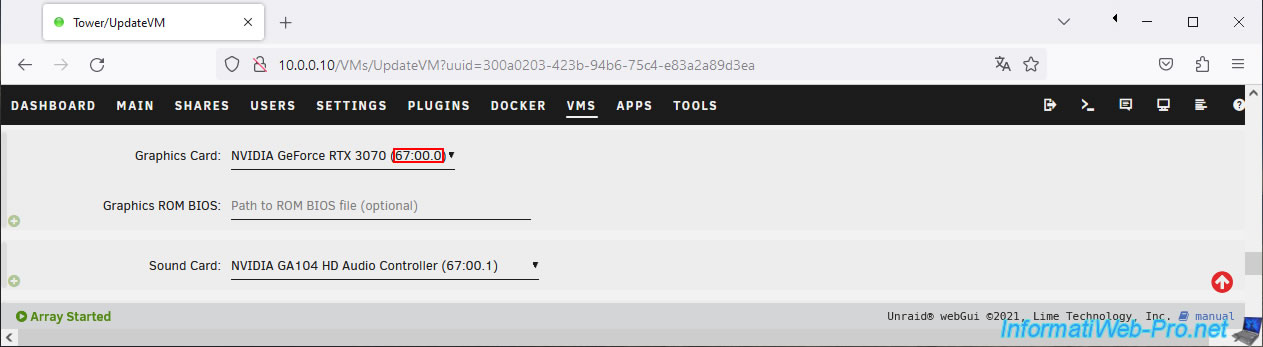
In our case, we select our graphics card "NVIDIA GeForce RTX 3070 (67:00.0)".
Note that you will find the IOMMU identifier (e.g., 67:00.0) previously identified when you assigned your graphics card to VFIO.
For the Sound Card, select the audio component of the same graphics card.
To do this, locate the beginning of the IOMMU identifier (in our case: 67:00), which must be identical for the audio component.
In our case, we are passing the audio component "NVIDIA GA104 HD Audio Controller (67:00.1)" of our graphics card "NVIDIA GeForce RTX 3070 (67:00.0)".
Warning : it is important to pass all components of your physical graphics card to your virtual machine so that it can function properly in the virtual machine.
Otherwise, this device will not work and will return an error code 43 since the graphics card passed is incomplete.
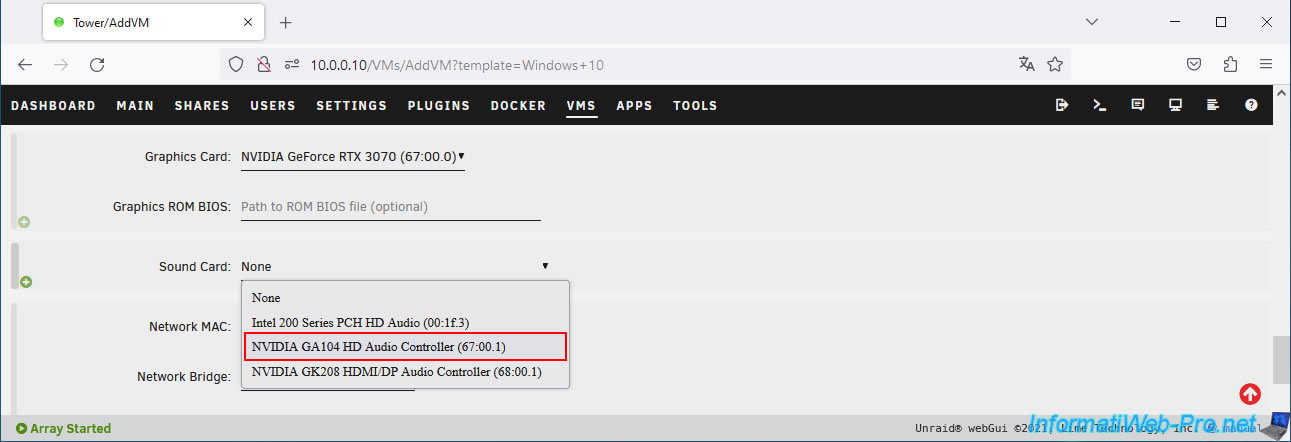
Important : the beginning of the IOMMU device identifier must be the same for all parts of your graphics card.
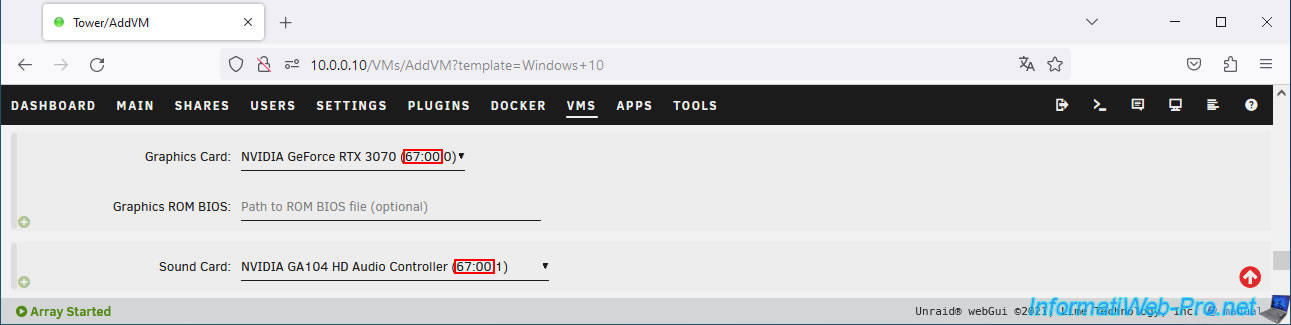
Finally, check the necessary boxes for:
- USB Devices: the USB devices you want to connect to your virtual machine.
Such as a USB keyboard and mouse, for example. - Other PCI Devices: PCI devices you would like to connect to your virtual machine (and which you previously excluded from your Unraid server by assigning them to the VFIO).
In our case, we used our motherboard's USB 3.1 controller to connect our mouse and keyboard via our KVM box to our virtual machine.
In our case, this controller is named "ASMedia Technology Inc. ASM2142 USB 3.1 Host Controller | USB controller (03:00.0)".
Finally, click on the "Create" button.
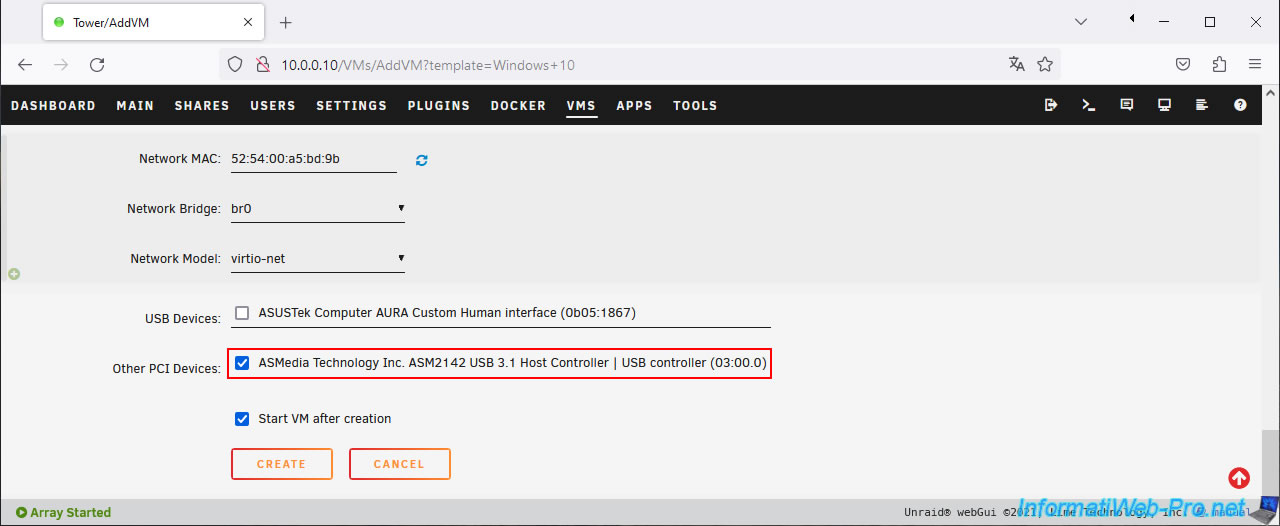
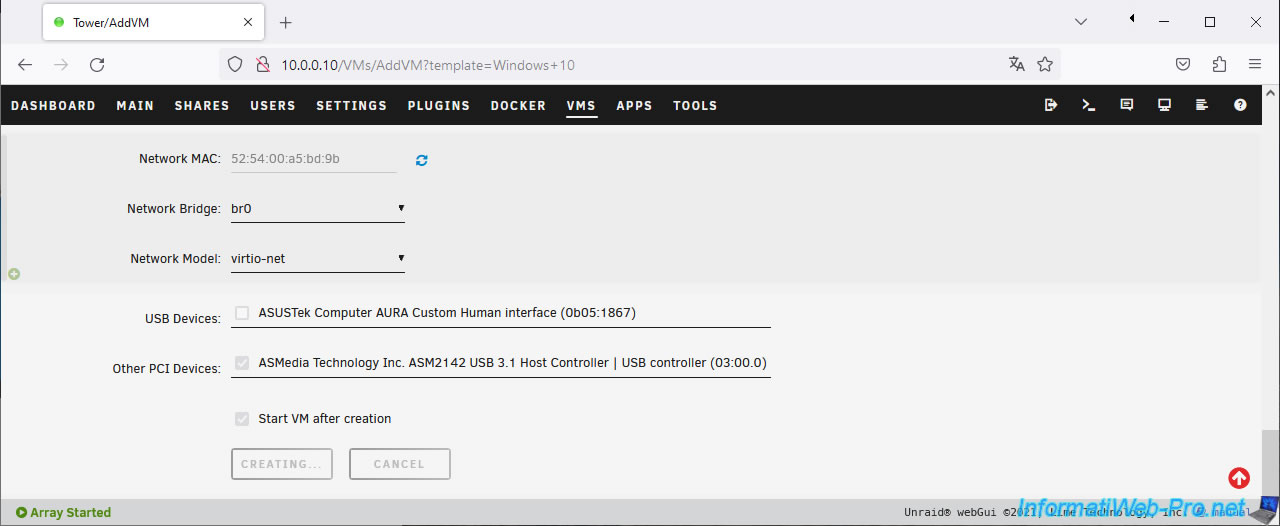
Wait a few seconds while the virtual machine is created.
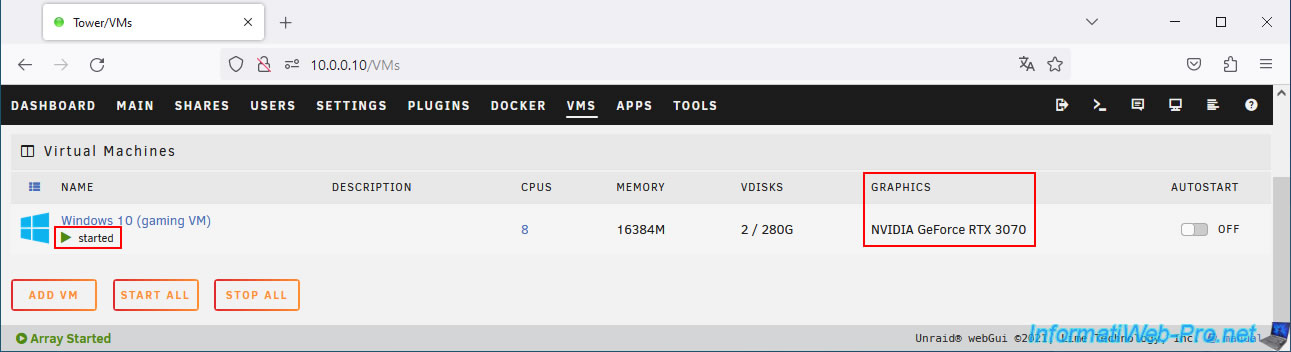
As expected, the virtual machine starts (started) and it uses your physical graphics card (graphics: NVIDIA GeForce RTX 3070).
7. Fix black screen issue (if applicable)
While this should work in most cases, sometimes your virtual machine appears as "started" but your screen remains black.
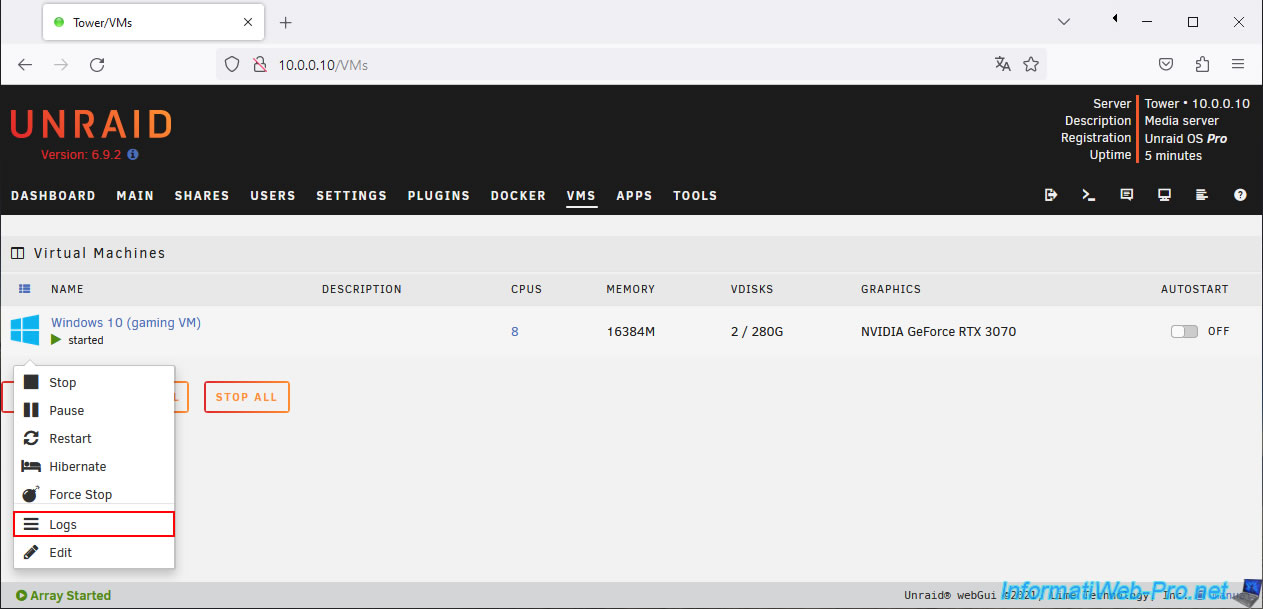
To check the problem with your virtual machine, click on your virtual machine icon, then click Logs.
In our case, we actually noticed 2 error messages referring to our IOMMU device "67:00.0" (which corresponds to our graphics card, if you check this identifier in the previous screenshots).
Plain Text
2023-11-26T14:05:22.331508Z qemu-system-x86_64: vfio_region_write(0000:67:00.0:region1+0x1dc238, 0x0,8) failed: Device or resource busy
2023-11-26T14:05:22.331516Z qemu-system-x86_64: vfio_region_write(0000:67:00.0:region1+0x1dd220, 0x98989800989898,8) failed: Device or resource busy
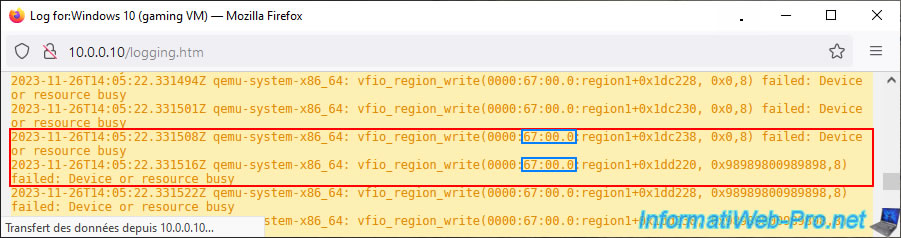
As you can see, the IOMMU ID shown in the error message refers to our "NVIDIA GeForce RTX 3070 (67:00.0)" graphics card that we passed to our virtual machine.
Having recently changed a setting in the BIOS before starting this tutorial, we quickly found the source of the problem.
If you're also experiencing this issue, enter your motherboard's BIOS and go to the "Boot" tab.
Then, go to the "CSM (Compatibility Support Module)" section.
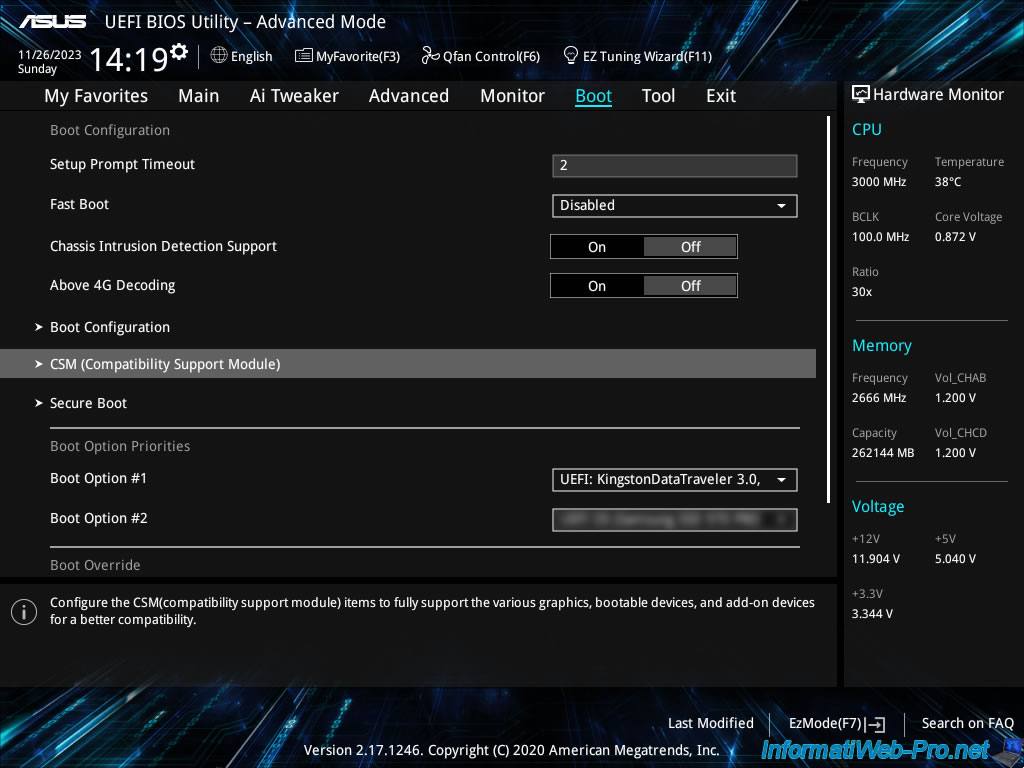
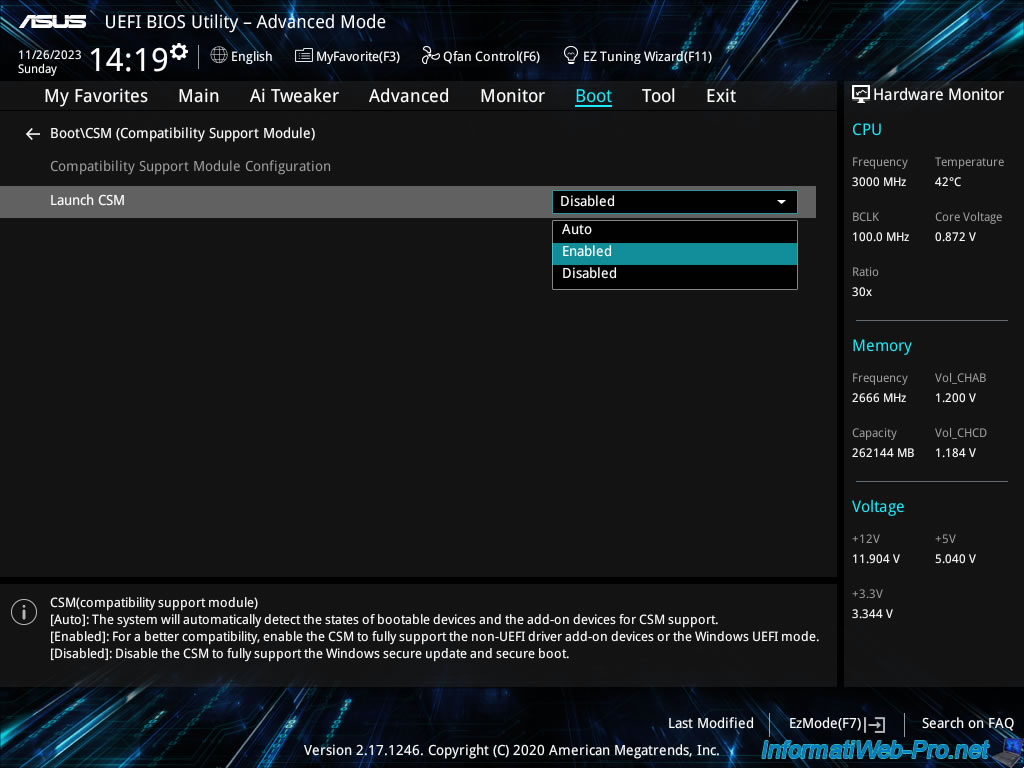
As you can see, the "CSM" module is currently disabled.
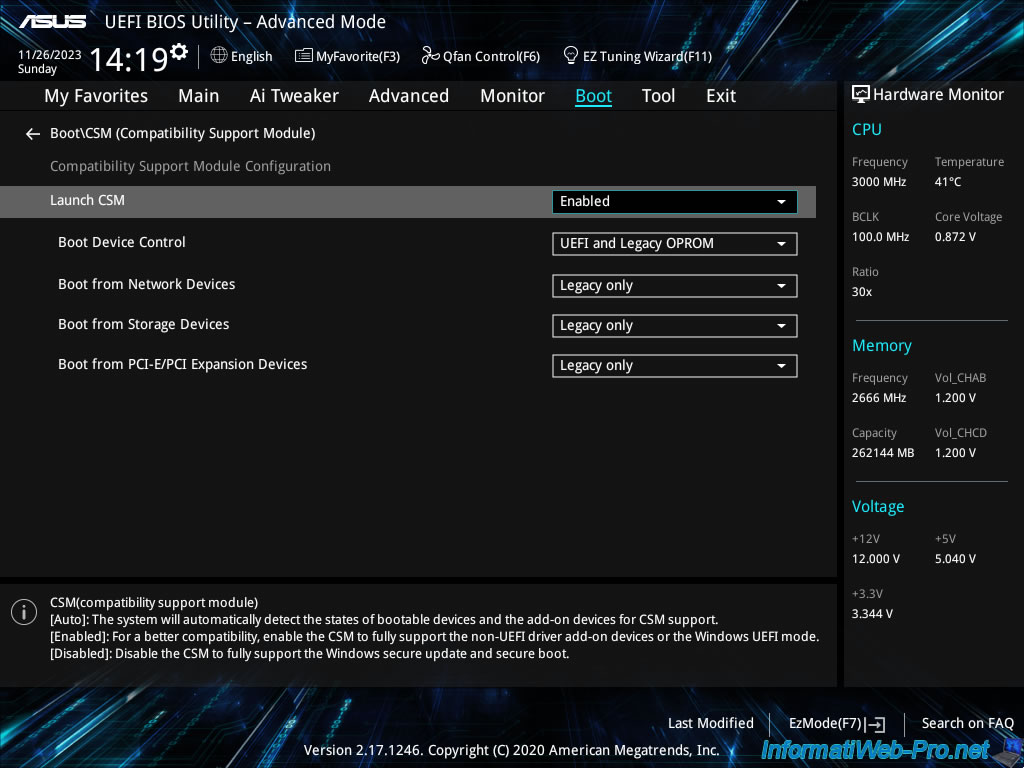
Re-enable it by selecting "Launch CSM: Enabled".
Several options reappear below.
Leave the values as they are.
Go to the "Exit" tab and click on "Save Changes and Reset".
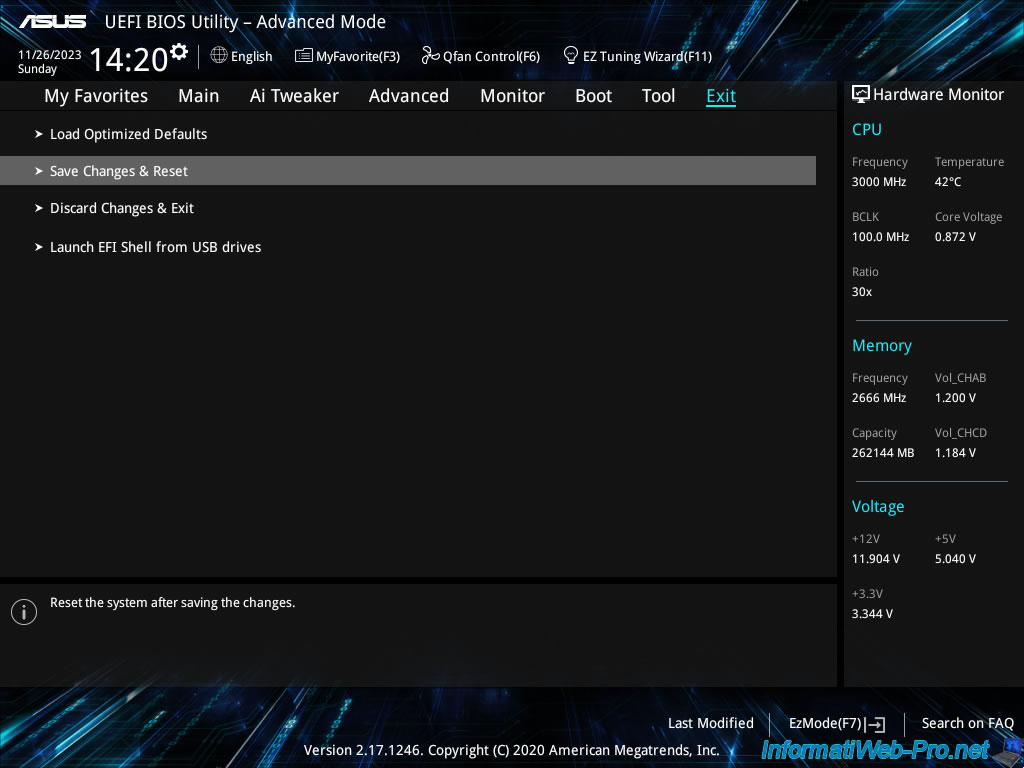
Confirm saving this change by clicking OK.
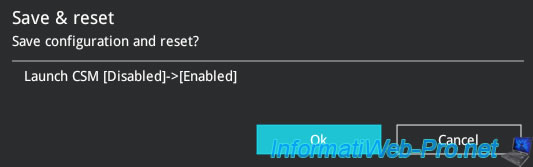
Now, restart the virtual machine and you'll see that the problem is resolved.
In other words, if you want to use PCI or GPU passthrough, avoid disabling the "CSM (Compatibility Support Module)" module in your Unraid server's motherboard BIOS.
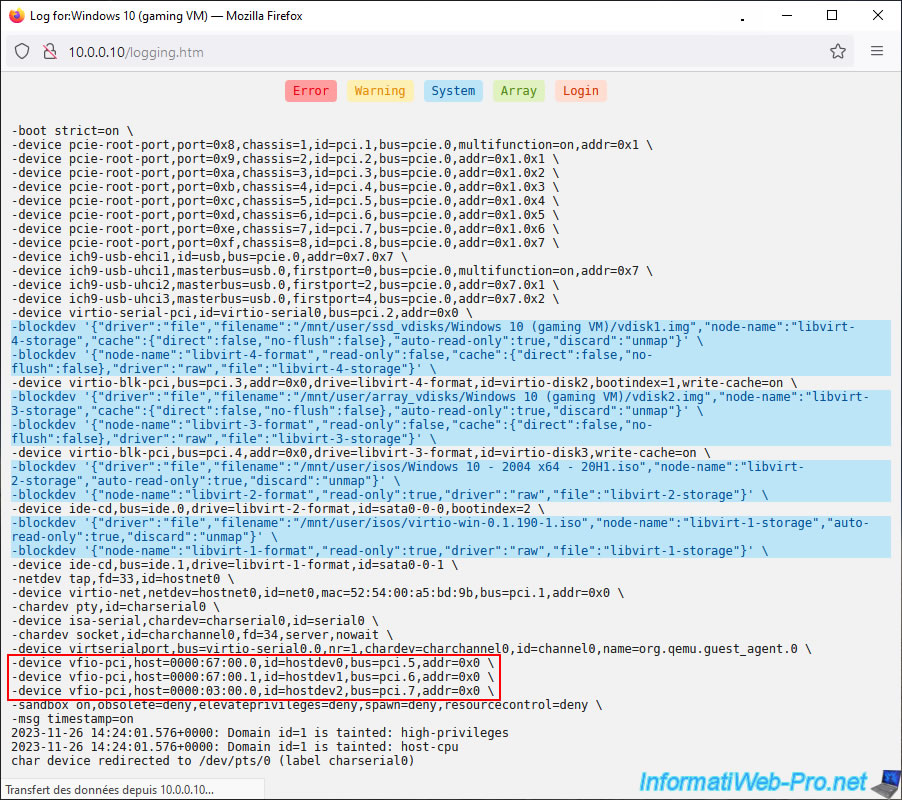
Among the displays, you'll also find the list of PCI devices, including the graphics card, passed to your virtual machine.
In our case:
- 67:00.0 : the graphics part of our NVIDIA GeForce RTX 3070 graphics card.
- 67:00.1 : its HD audio part.
- 03:00.0 : the USB 3.1 controller on our motherboard.
Share this tutorial
To see also
-
NAS 4/8/2026
Unraid 6.9.2 - Docker - Install a media server (Jellyfin)
-
NAS 6/24/2026
Unraid 6.9.2 - Docker - Install the office suite (Collabora) for Nextcloud
-
NAS 5/13/2026
Unraid 6.9.2 - SWAG - Locally access the reverse proxy (SWAG)
-
NAS 7/29/2026
Unraid 6.9.2 - VMs - Backing up a VM automatically
No comment