- NAS
- Unraid
- 13 May 2026 at 08:17 UTC
-

- 1/4

When you want to access services hosted on your Unraid server from outside, you install a reverse proxy, specifically "SWAG."
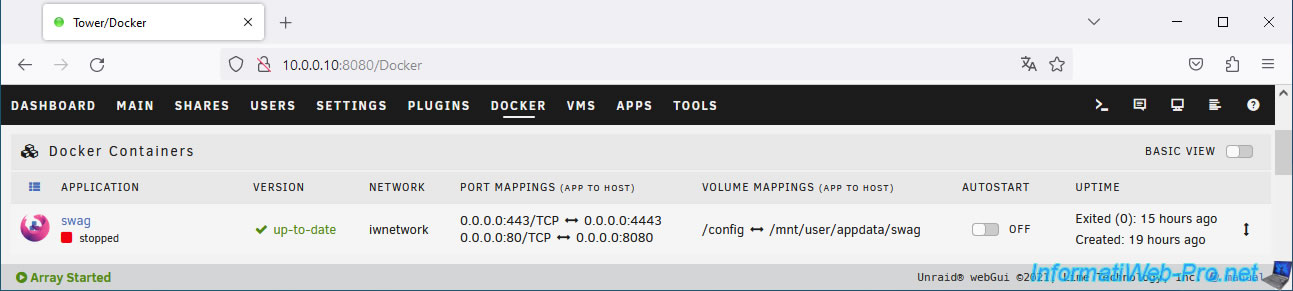
The problem is that when you try to install SWAG, Unraid warns you that one or more ports are already in use by an application (in this case, SWAG's ports 80 and 443 conflict with those used by the Unraid web interface).
To solve this problem, you use other port numbers (e.g., 8080 for HTTP and 4443 for HTTPS) for the SWAG reverse proxy.
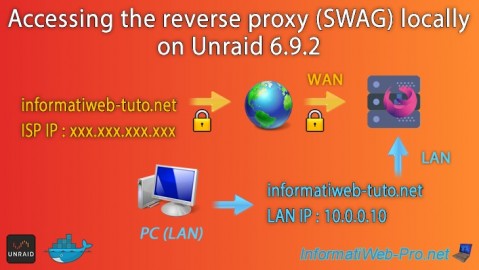
This works, but another problem arises: the domain used with your reverse proxy to access your services from outside points to the external (WAN) IP address of your router.
The problem is that you cannot access your external (WAN) IP address or the domain pointing to it from the corresponding local network.
Indeed, loopback is prohibited by default in home routers.
The quick solution is to enable NAT reflection (if your router supports it, but this is generally not the case) or search the internet for the following keywords followed by your router model: NAT reflection, hairpinning, OR loopback.
The other solution to access your services by specifying only the desired domain name or subdomain referenced in the SWAG configuration, whether you are at home or away, is to use ports 80 and 443 for SWAG's HTTP and HTTPS protocols. Then, thanks to split-DNS, your computer and your smartphone will connect:
- At home: to Unraid's local IP address on ports 80 and 443 (which will be used by your SWAG reverse proxy).
- Outside: to your Box's external (WAN) IP address. The port forwarding defined on your Box will connect ports 80 and 443 of your Box to ports 80 and 443 of the Unraid server (which, again, are used by SWAG).
- Change the ports used by the Unraid web interface
- Change the ports used by the reverse proxy (SWAG)
- Change port forwarding in your Box (or router)
- Access to SWAG from outside
- Solution 1: Split-DNS via Windows hosts file
- Solution 2: split-DNS via a local DNS server (Pi-hole) to be installed on Unraid
- Install a local DNS server (Pi-hole) on Unraid
- Configure local DNS records in Pi-hole on Unraid
- Manually specify the IP address of your local DNS server (option 1)
- Distribute your local DNS server IP address via your DHCP server (option 2)
- Distribute your local DNS server IP address via Pi-hole's DHCP server (option 3)
1. Change the ports used by the Unraid web interface
To begin, stop your SWAG container (if it hasn't already) to free up the ports it is currently using.
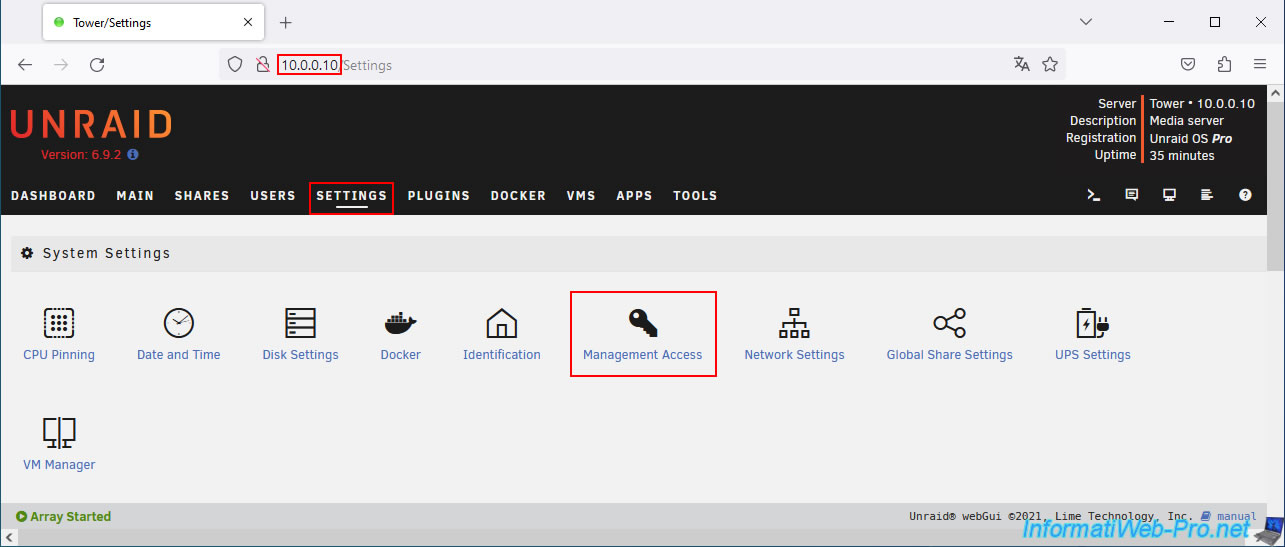
Then, go to "Settings -> System Settings -> Management Access".
Change the web interface ports by specifying for example:
- HTTP port : 8080
- HTTPS port : 4443
Then, click on: Apply.
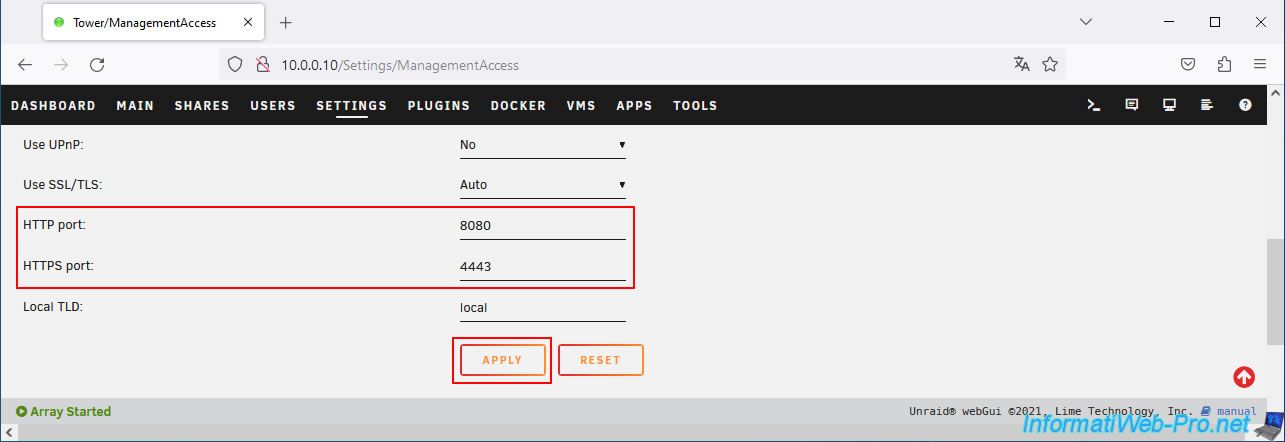
Now, the Unraid web interface is accessible via HTTP on port "8080" (which you will therefore have to indicate each time in the address bar) and via HTTPS (if applicable) on port 4443.
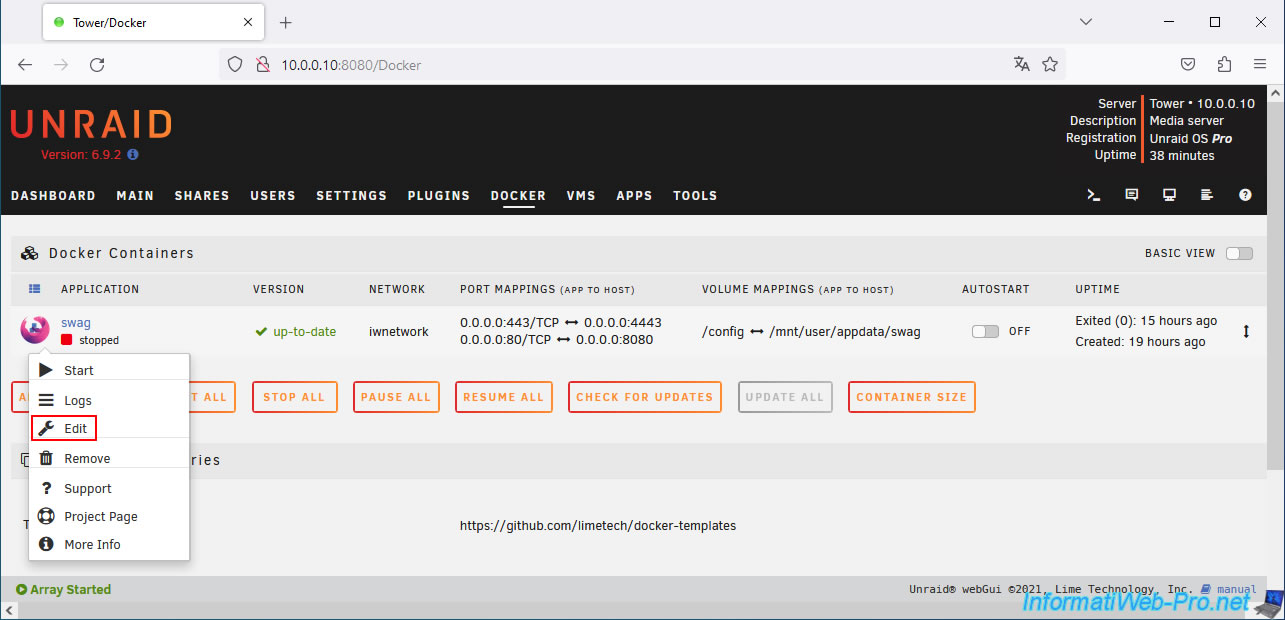
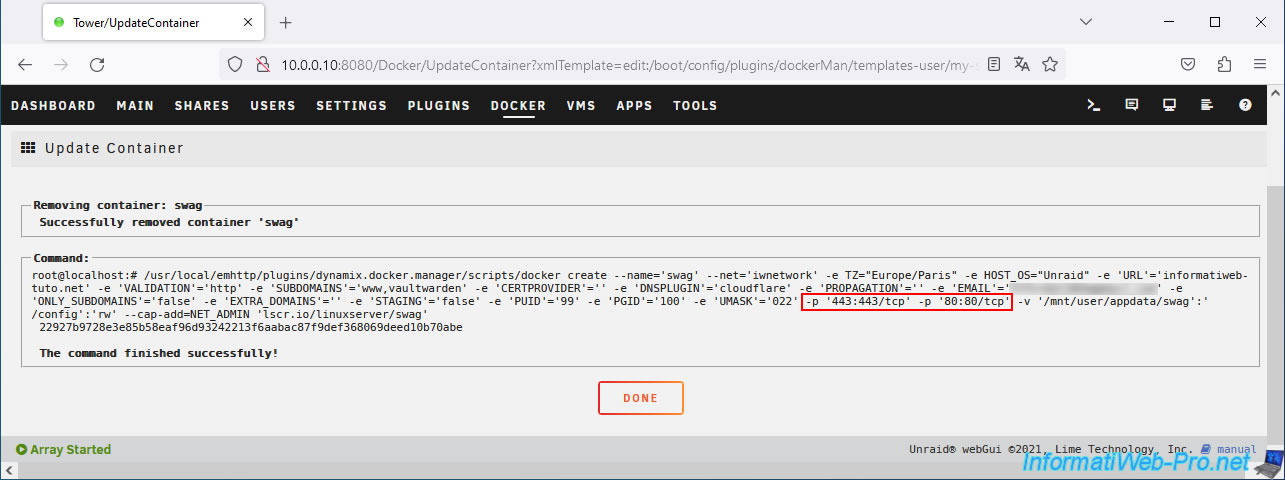
2. Change the ports used by the reverse proxy (SWAG)
Now that ports 80 (HTTP) and 443 (HTTPS) of your Unraid server are free, go to the "Docker" tab, click on the "swag" icon and click on "Edit".
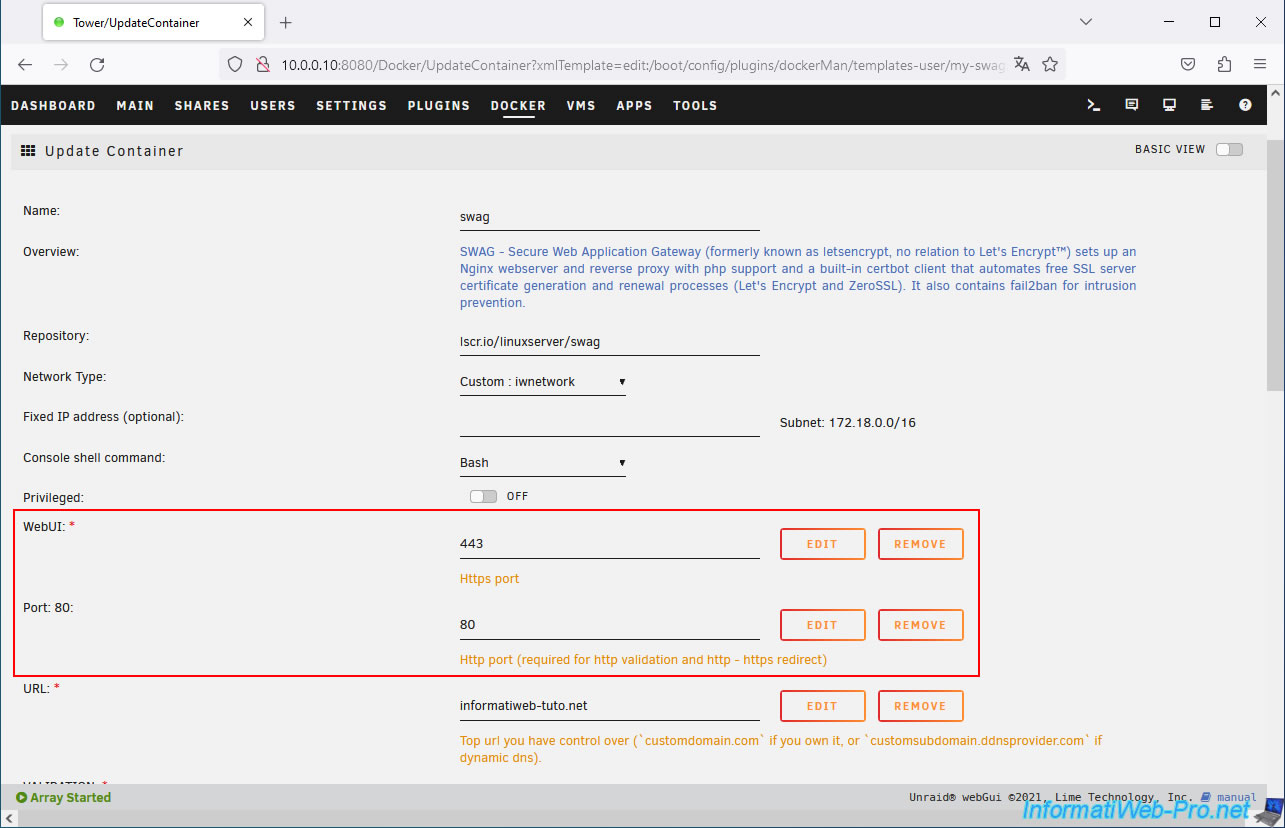
Edit these fields like this:
- WebUI: 443 (concerns HTTPS port).
- Port 80: 80 (concerns the HTTP port).
Then, at the bottom of the page, click on: Apply.
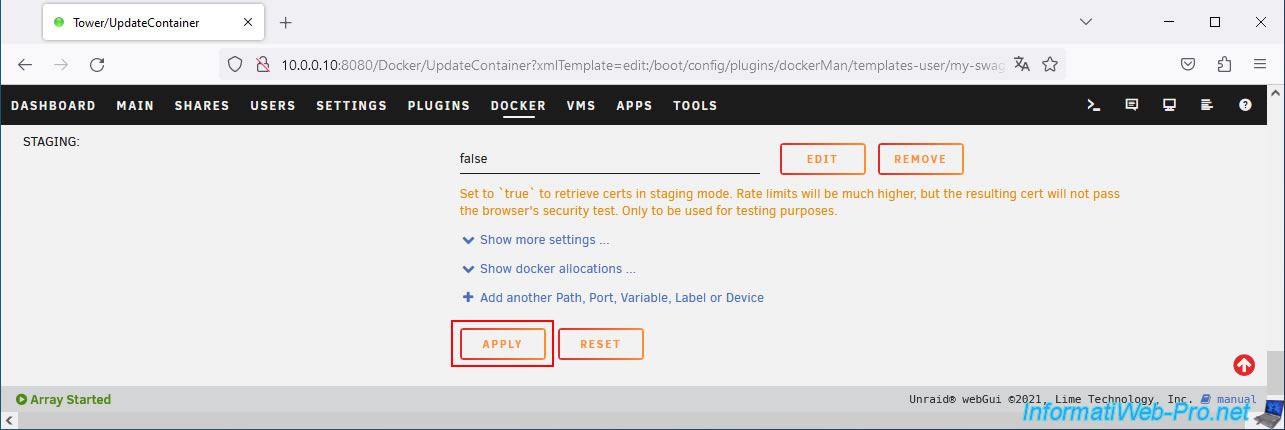
The container configuration has been updated.
Click Done.
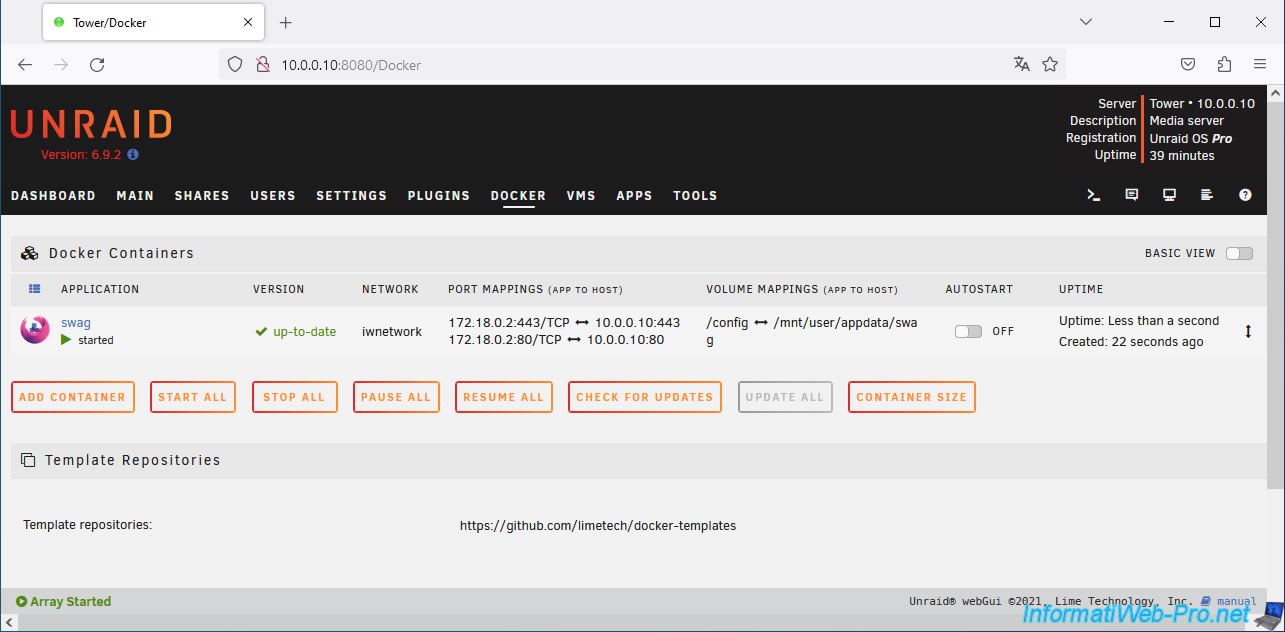
Start your "swag" container by clicking on its icon, then on: Start.

Your "swag" container has started and is now using ports 80 and 443 on the Docker network, as well as on your physical network.
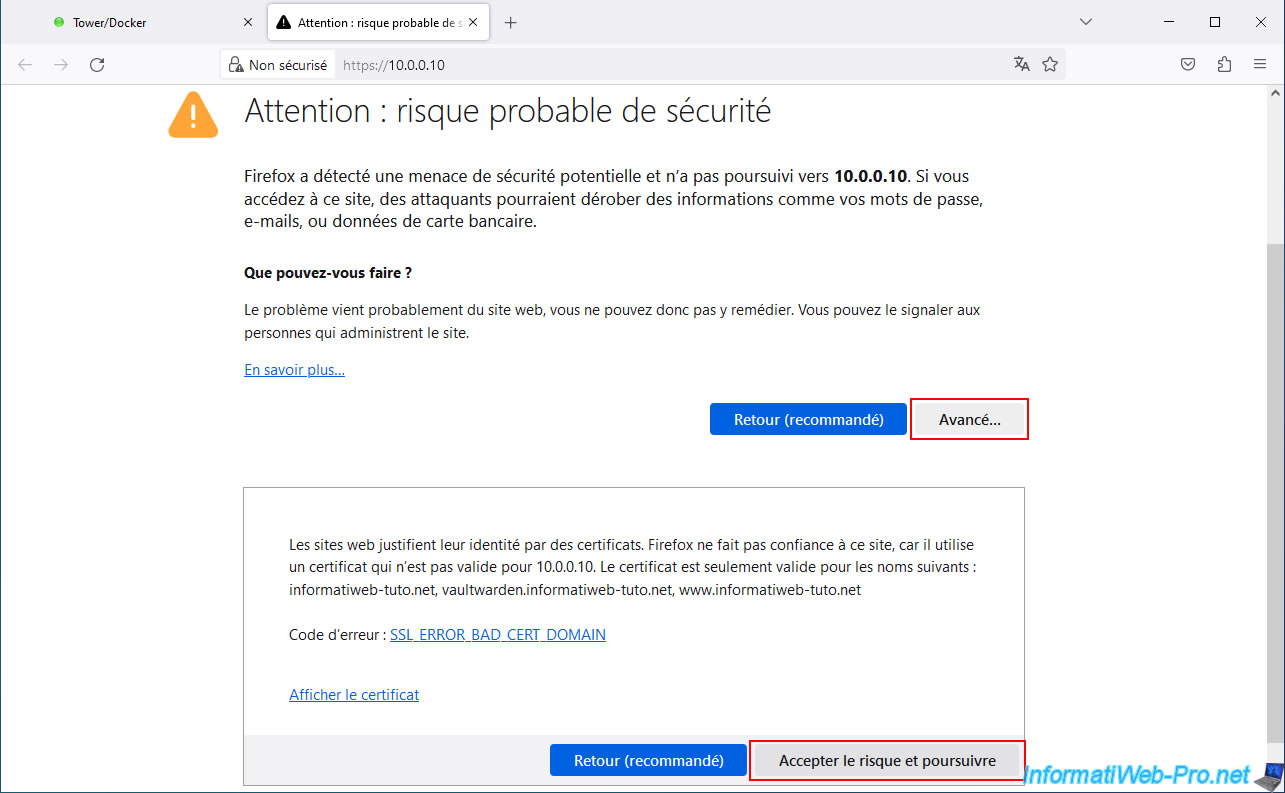
Try accessing your Unraid server's IP address without specifying a port in the address bar.
You should normally see a warning page (due to the SWAG reverse proxy certificate, which is only valid for your associated domain name and not for the specified IP address).
Ignore the warning to access this site.
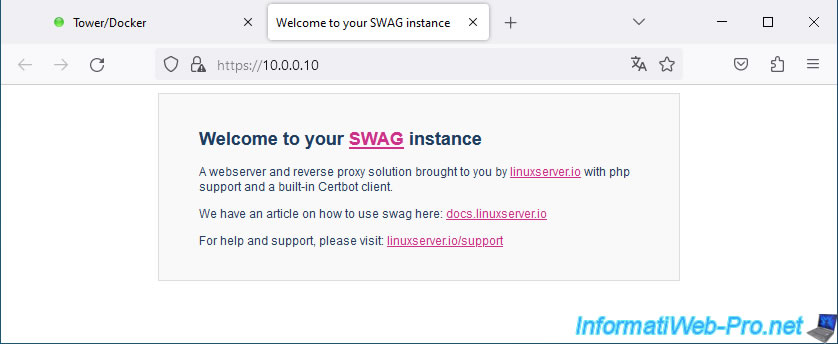
As expected, you will see the "Welcome to your SWAG instance" page appear.
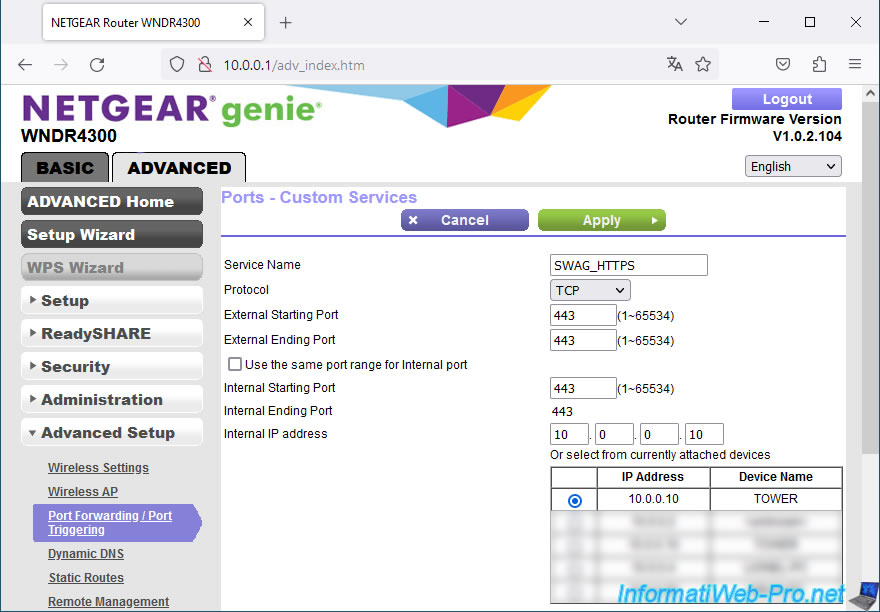
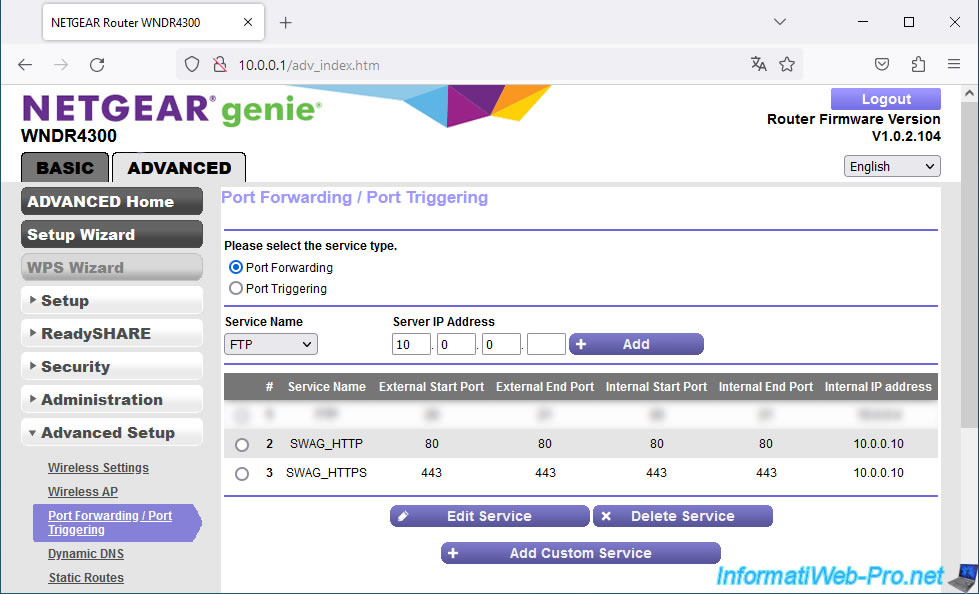
3. Change port forwarding in your Box (or router)
Since you've changed the ports used by your reverse proxy (SWAG), you'll need to update your port forwarding rules on your box (or router).
In other words, for SWAG's HTTP protocol, redirect external TCP port 80 to port 80 on your Unraid server (the port used by SWAG).

For SWAG's HTTPS protocol, redirect external TCP port 443 to your Unraid server's port 443 (which is therefore used by SWAG).
Which gives this.
4. Access to SWAG from outside
From a computer outside your home, via a VPN, or via a smartphone with a 3G subscription, try accessing your domain listed in SWAG.
In our case, we're using the Opera web browser with its built-in VPN. This allows us to test access from outside our network without leaving our home.
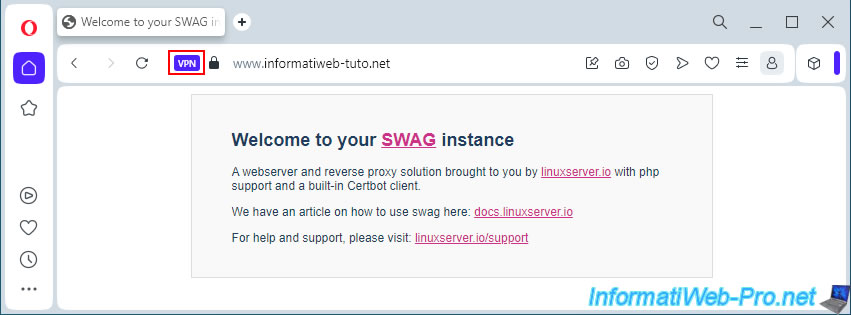
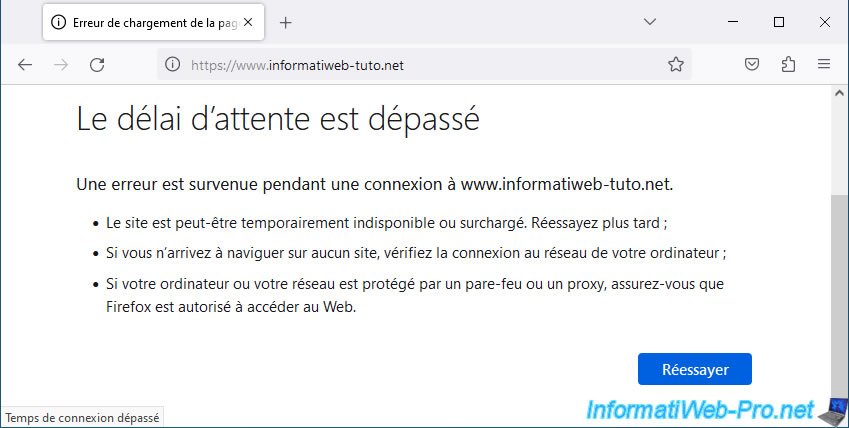
As a reminder, you cannot access your external (WAN) IP address from your local network.
If you type your domain name (which points to your external (WAN) IP address) into another web browser from home, it's normal to see an error page.
In the case of Mozilla Firefox, you'll see this message: "Timed out".
Note: it's your router (or router) that's blocking the packets, and there's nothing you can do about it (unless you enable NAT reflection, which is generally not supported by your router).
5. Solution 1: Split-DNS via Windows hosts file
In a test environment, if you want to quickly resolve the issue on a single computer, you can use the Windows "hosts" file.
However, this solution is not possible on smartphones (at least not with an official operating system).
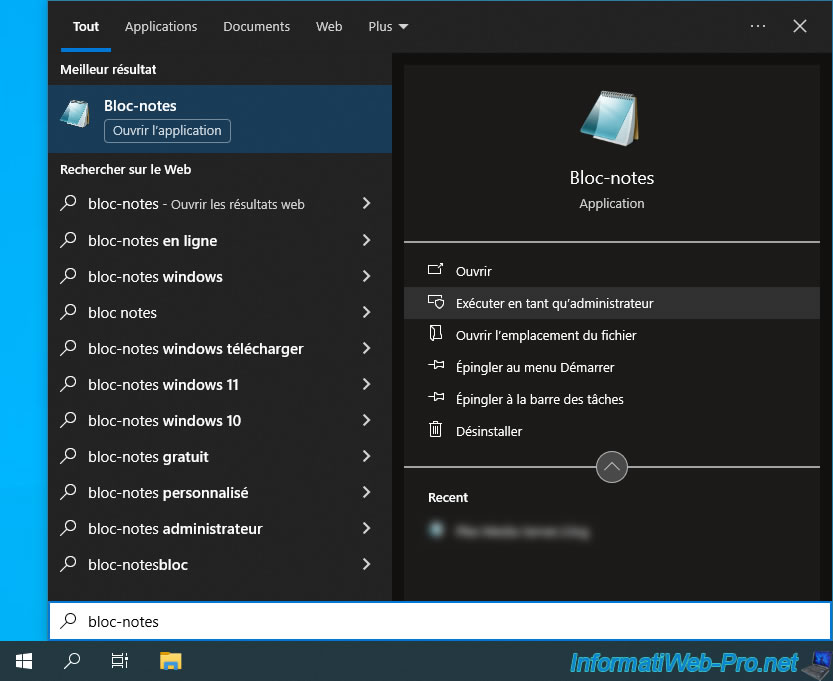
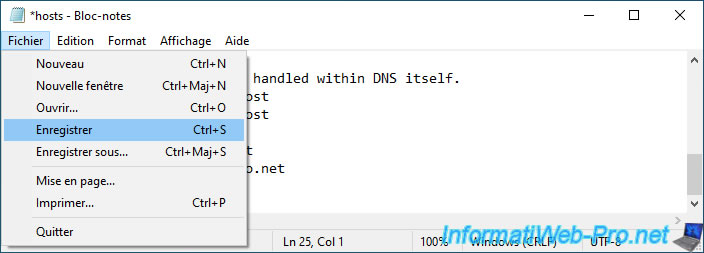
In short, open the Start menu and launch Windows Notepad as an administrator.
Important : administrator rights are required to edit the Windows "hosts" file.
Note: "Split-DNS" = using two different DNS zones for the same domain.
In this case, assign local IP addresses for the local DNS zone and external (WAN) IP addresses for the DNS zone available on the Internet.
This way, you can use the same domain on your local network and outside your home without experiencing loopback issues (trying to access its external IP address from your own local network).
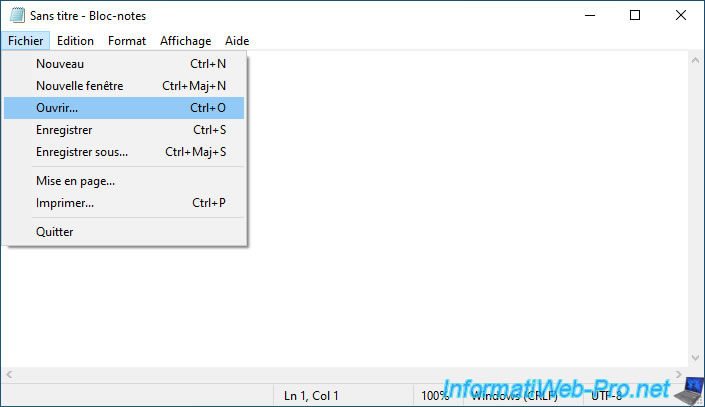
Go to the "File -> Open" menu in Notepad.
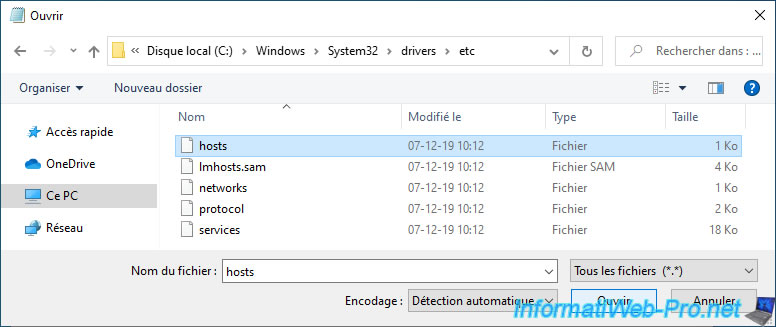
Go to the "C:\Windows\System32\drivers\etc" folder and select "All Files (*.*)" from the list in the lower right corner.
Then, select the "hosts" file that appears and click "Open."
Important : yhis file has no extension, so you must select "All Files (*.*)" from the list in the lower right corner for it to appear.
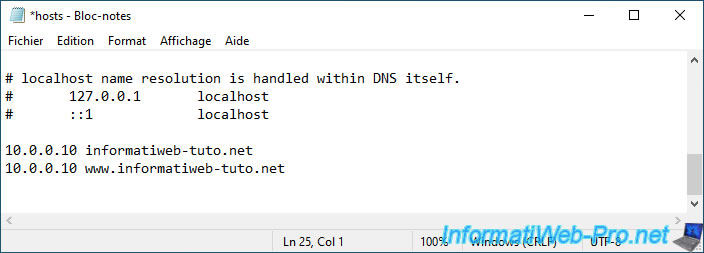
Add as many lines as you have domains and subdomains referenced in SWAG.
Each line associates an IP address (on the left) with a domain (on the right).
This way, your computer will use the IP addresses indicated in this "hosts" file for the listed domains rather than contacting the usual DNS server (your ISP's, Google's, or another, depending on your network configuration).
Note: in our case, our Unraid server has the IP address "10.0.0.10" and we use the domain "informatiweb-tuto.net" to access our services hosted on our Unraid server through our SWAG reverse proxy.
Go to the "File" menu and click "Save."
Warning : if Notepad asks you where to save the file, you forgot to launch Notepad as an administrator.
Open a command prompt.
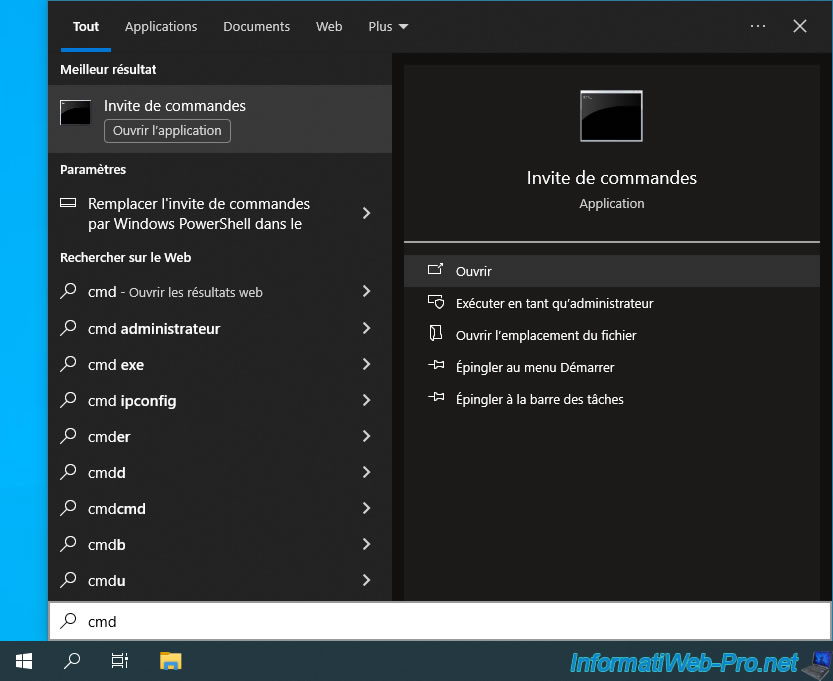
Flush your computer's DNS cache so that it uses the new IP addresses specified in the "hosts" file rather than the external (WAN) IP address you defined in your domain configuration.

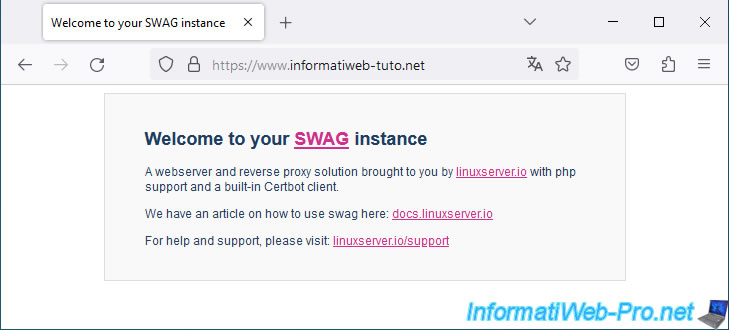
Try accessing your domain name at home from any web browser (without using a VPN) and you will see the SWAG page appear.
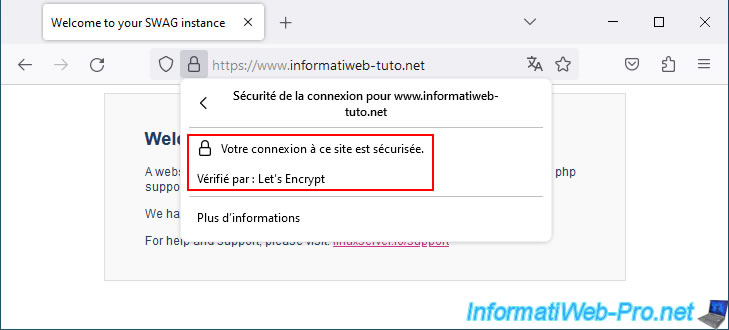
Since the certificate verification is based on the domain name used and NOT the associated IP address, the certificate is valid and your web browser therefore tells you that the connection is secure.
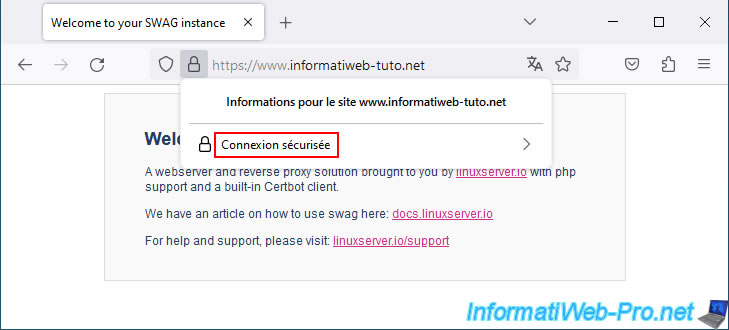
As expected, the certificate comes from Let's Encrypt (free certificate authority used by SWAG).
Share this tutorial
To see also
-
NAS 2/11/2026
Unraid 6.9.2 - Customize the web interface
-

NAS 4/8/2026
Unraid 6.9.2 - Docker - Install a media server (Jellyfin)
-

NAS 1/28/2026
Unraid 6.9.2 - Replace the parity disk
-
NAS 6/17/2026
Unraid 6.9.2 - SWAG - Access Nextcloud via reverse proxy and personal domain
You must be logged in to post a comment