Download and install pfSense CE 2.6 on VMware Workstation Pro
- Firewall
- pfSense
- 09 May 2025 at 11:57 UTC
-

- 3/4

6. Configure the IP address of the pfSense WAN and LAN interfaces
6.1. Configure the pfSense LAN IP address
To begin, we will configure the IP address of the pfSense LAN interface.
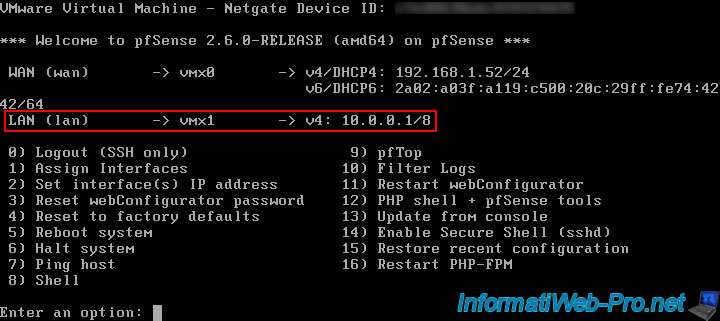
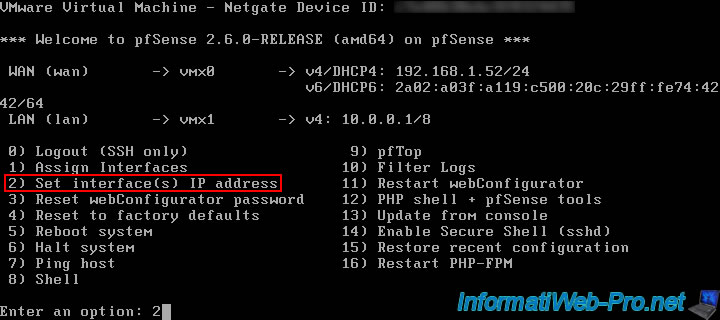
To do this, choose the "2) Set interface(s) IP address" option from this menu.

Choose the LAN interface by typing the number 2.
Plain Text
Available interfaces:

1 - WAN (vmx0 - dhcp, dhcp6)
2 - LAN (vmx1 - static)

Enter the number of the interface you wish to configure: 2

Specify the static LAN IP address to set for pfSense.
In our case, we will use the LAN IP address "10.0.0.1" (which is an IP address used by default for routers on a 10.x.x.x network).
Warning : it is important that the pfSense DHCP server does not distribute this IP address so as not to create an IP address conflict on this LAN network.
Hence it is also useful to use the 1st digit or the last possible digit for this subnet.
Plain Text
Enter the new LAN IPv4 address. Press <ENTER> for none:
> 10.0.0.1

Indicate the subnet mask to use (in CIDR notation) whose current values are shown below.
Common examples: 2555.255.255.0 (24) for the 192.168.1.x network or 2555.0.0.0 (8) for the 10.x.x.x network.
Plain Text
Subnet masks are entered as bit counts (as in CIDR notation) in pfSense.
e.g. 255.255.255.0 = 24
255.255.0.0 = 16
255.0.0.0 = 8

Enter the new LAN IPv4 subnet bit count (1 to 32):
> 8

As indicated by pfSense, for the LAN network, this value should be left empty.
So just press Enter.

In our case, we will not use IPv6
So just press Enter.
Plain Text
Enter the new LAN IPv6 address. Press <ENTER> for none:
>
![]()
Enable the pfSense DHCP server so that it can distribute IP addresses on the LAN network.
To do this, answer "y" to the question "Do you want to enable the DHCP server on LAN? (y/n)".
Next, define an IP address range that pfSense can distribute, but avoid creating too large a range to avoid a bug.
In our case, we set the IP address range "10.0.0.10" to "10.0.0.254" to be able to set static IP addresses on servers (between 10.0.0.2 and 10.0.0.9 inclusive) and not create new ones. conflict with broadcast address ending with ".255".
Plain Text
Enter the start address of the IPv4 client address range: 10.0.0.10
Enter the end address of the IPv4 client address range: 10.0.0.254
Disabling IPv6 DHCPD...

pfSense will then ask you if you want to reactivate HTTP access to your web interface (if you answer "y") or if you want to keep HTTPS-only access (if you answer "n") to it.
In our case, we answered "n".
Note: reactivating HTTP access for the web interface is only useful if the HTTPS version no longer works (because of a configuration problem with the certificates used, for example).
Source : Do you want to revert to HTTP as the webconfigurator protocol? y/n | Netgate Forum.
Plain Text
Do you want to revert to HTTP as the webConfigurator protocol? (y/n) n

The address of the pfSense web interface appears.
Press Enter.
Plain Text
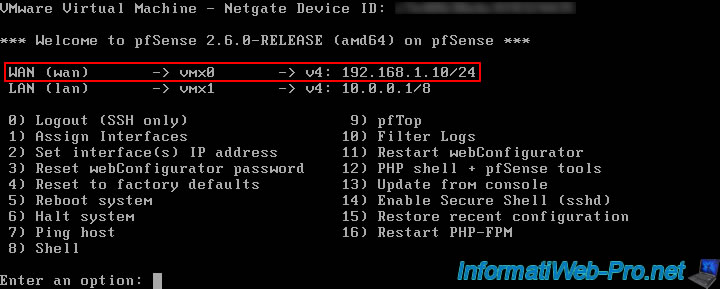
Please wait while the changes are saved to LAN...
Reload filter...
Reloading routing configuration...
DHCPD...

The IPv4 LAN address has been set to 10.0.0.1/8
You can now access the webConfigurator by opening the following URL in your web browser:
https://10.0.0.1/

Press <ENTER> to continue.
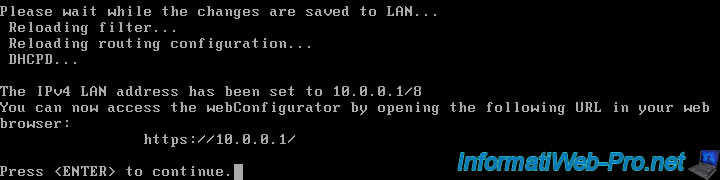
As you can see, the IP address of the LAN interface has been changed.
Note that, by default, the pfSense web interface is only accessible from the LAN interface and not from the WAN interface for security reasons.
Which corresponds to the behavior of a usual router.
6.2. Configure the pfSense WAN IP address
To configure the pfSense WAN IP address, use the "2) Set interface(s) IP address" option again.
However, this time, specify 1 to select the WAN interface.

To prevent pfSense from changing its IP address on the WAN network, we will define a static IP address for it.
To do this, answer "n" to the question below.
Plain Text
Configure IPv4 address WAN interface via DHCP? (y/n) n
![]()
Specify the WAN IP address to use for pfSense.
In our case "192.168.1.10", because the router of our physical network has the IP address "192.168.1.1".
![]()
Select the corresponding subnet by specifying its CIDR notation.
So in our case, 24 to use the subnet mask "255.255.255.0" (which corresponds to the network "192.168.1.x").

For the WAN network, provide the IP address of the parent router if there is one.
In our case, the router of our physical network has the IP address "192.168.1.1".
In general, this is the IP address of your Box (provided by your ISP).
Plain Text
For a WAN, enter the new WAN IPv4 upstream gateway address.
For a LAN, press <ENTER> for none:
> 192.168.1.1

As said before, in our case we will not use IPv6, so answer "n" to the question below to disable obtaining an IPv6 address from the DHCPv6 server (if applicable) of the parent network for the pfSense WAN interface.
Plain Text
Configure IPv6 address WAN interface via DHCP6? (y/n) n
![]()
Since you refuse to automatically obtain an IPv6 address from the parent network's DHCPv6 server, pfSense offers to define it manually.
Leave blank and just press Enter to disable IPv6.
Plain Text
Enter the new WAN IPv6 address. Press <ENTER> for none:
>
Disabling IPv4 DHCPD...
Disabling IPv6 DHCPD...

Again, pfSense asks you if you want to restore HTTP access for its web interface.
- Answer "y" to access the pfSense web interface via HTTP (not secure).
- Answer "n" to access the pfSense web interface only via HTTPS (secure).
Preferably, answer "n" for security reasons.
![]()
The new pfSense WAN IP address appears.
Press Enter to return to the main menu.
Plain Text
Please wait while the changes are saved to WAN...
Reloading filter...
Reloading routing configuration...
DHCPD...

The IPv4 WAN address has been set to 192.168.1.10/24.

Press <ENTER> to continue.
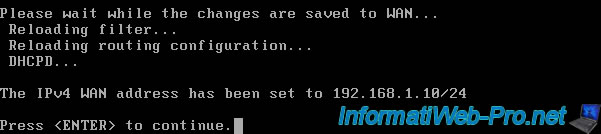
The WAN IP address has been changed and the IPv6 address has disappeared (if applicable) since we have not configured IPv6.
7. Connect a client PC to the pfSense LAN network
For this tutorial, we installed a new virtual machine under Windows 10.
To connect this virtual machine to the pfSense LAN network, go to its settings by clicking on "Edit virtual machine settings" (if it is turned off).
Otherwise, go through the "VM -> Settings" menu.
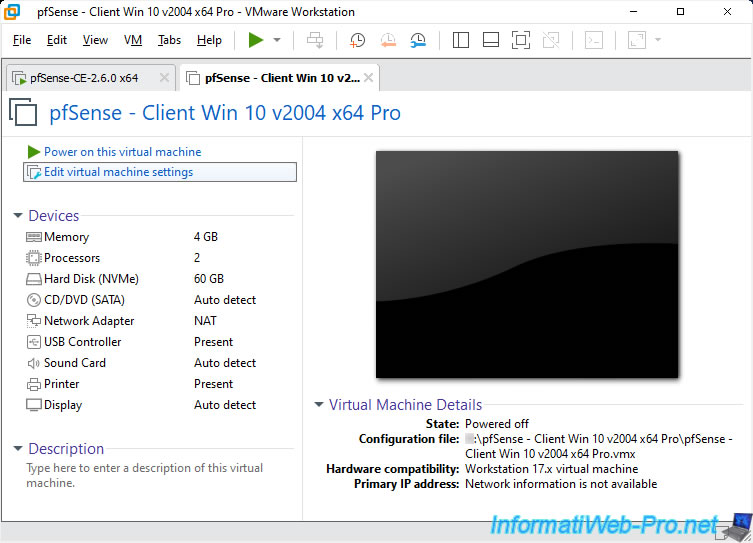
Next, select the virtual network adapter (Network Adapter) of this virtual machine and select the "Custom: pfSense LAN" network.

8. Initial configuration of pfSense via web interface
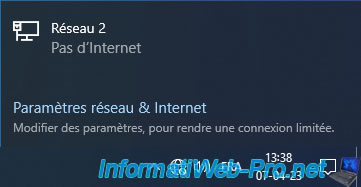
At the moment, your client VM (in our case, our Windows 10 VM) may not have access to the Internet at the moment.
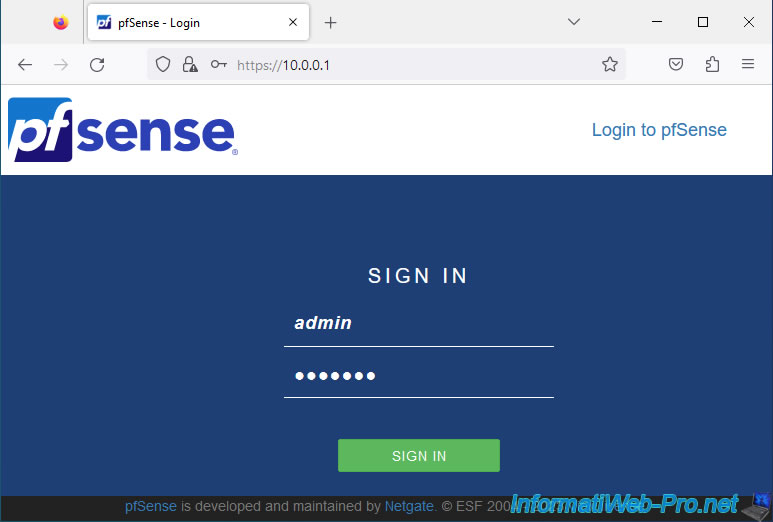
From this client machine, access the pfSense web interface using the pfSense LAN IP address.
Which gives in our case: "https://10.0.0.1/".
As with any web interface using the HTTPS protocol, by default a self-signed certificate is used.
Hence the display of this security warning.
Skip it to access the pfSense web interface.

Log in as admin with the default pfSense credentials: admin / pfsense.
Source : Default Username and Password | pfSense Documentation.
When you access the pfSense web interface for the first time, a "pfSense Setup" configuration wizard will appear.
Click Next.
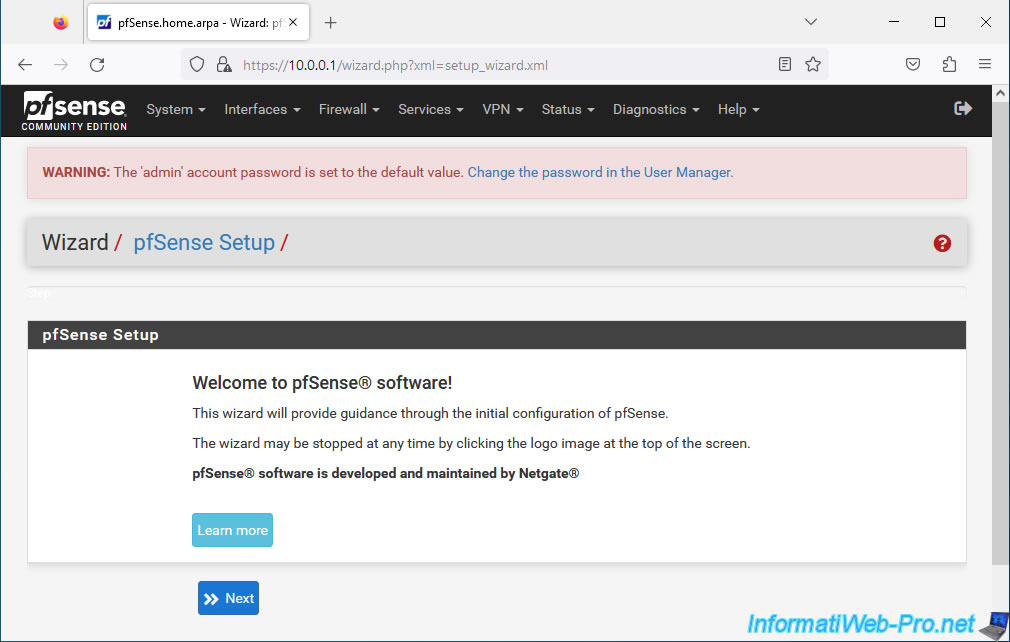
As you can see in step "1. Netgate Global Support is available 24/7", Netgate offers paid 24/7 support for pfSense if you want it.
But this requires a subscription plan that matches the size and requirements of your environment.

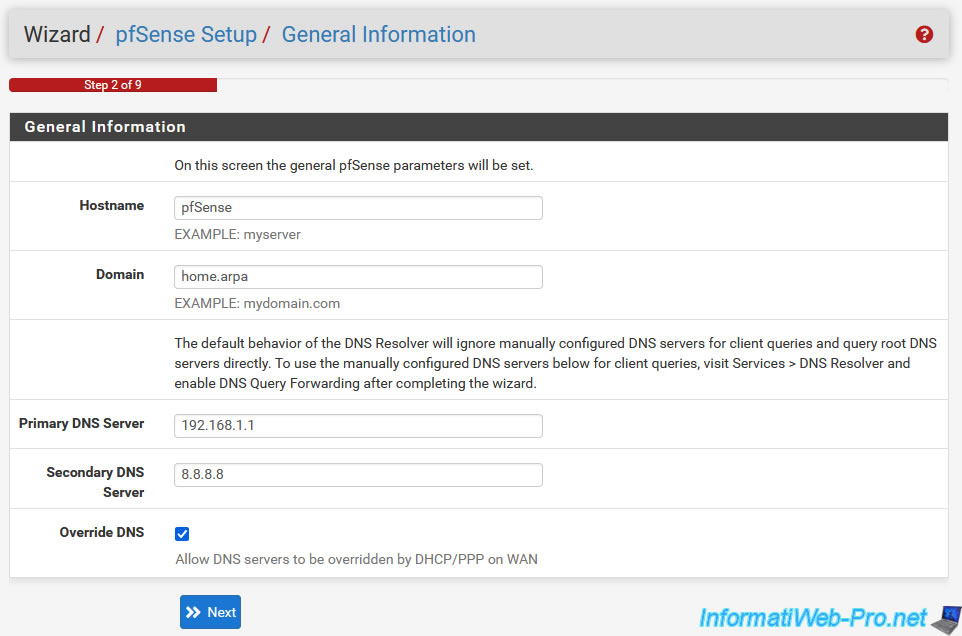
In step "2. General Information", you can configure:
- Hostname: the host name of your pfSense machine.
- Domain: the domain used on your network.
Which is practical when you have an Active Directory infrastructure or simply a local DNS server to manage local domain names. - Primary DNS Server: primary DNS server used by pfSense.
- Secondary DNS Server: secondary DNS server used by pfSense (optional).
- DNS Override: if enabled, this allows use of DNS servers received from the WAN network DHCP server.
Which corresponds to your ISP's DNS servers if pfSense is connected directly to the Internet and not via an intermediate router.
If disabled, pfSense will use the DNS servers manually specified here.
Warning : by default, the pfSense DNS resolver will ignore the DNS servers configured here for requests from client PCs.
In other words, by default, only your pfSense virtual machine will use these DNS servers.
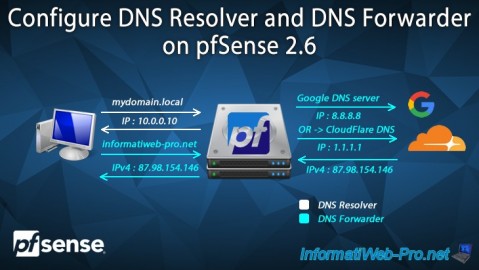
If you want clients to also use these DNS servers, you will need to enable DNS query redirection via the "Services -> DNS Resolver" menu.
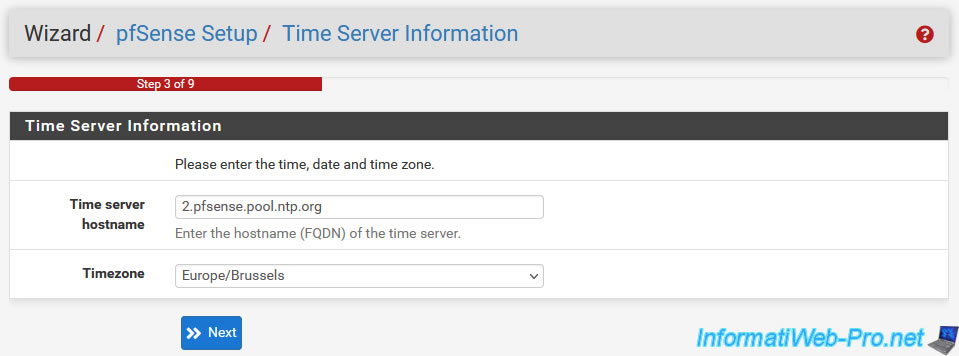
In step "3. Time Server Information", you can configure:
- Time server hostname: the time server (NTP) to use to synchronize pfSense time from it.
What is necessary for authentication operations to work correctly. - Timezone: the time zone to use.
For example: "Europe/Brussels" (for Belgium) or "Europe/Paris" (for France).
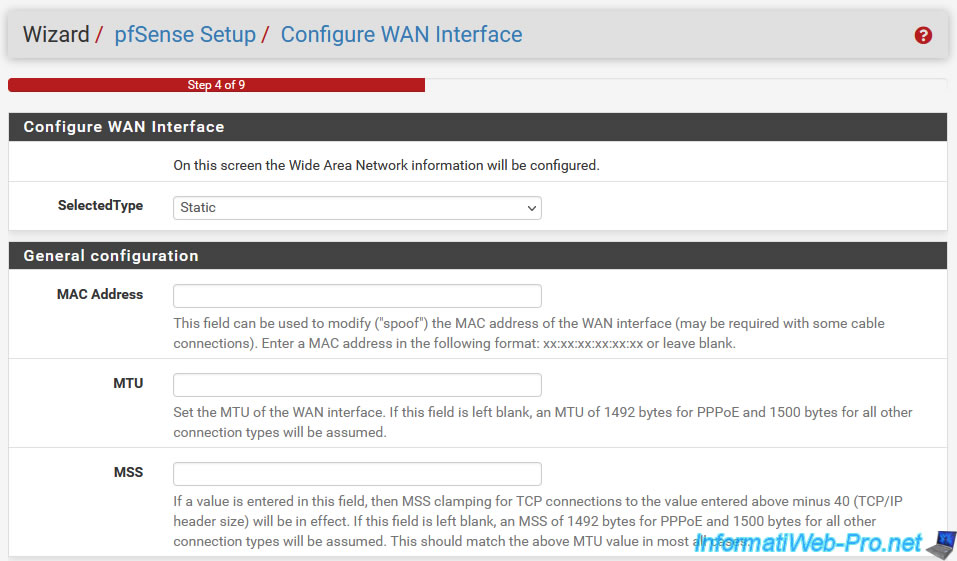
In step "4. Configure WAN Interface", you can configure:
- Configure WAN Interface - SelectedType: allows you to select how to configure the pfSense WAN interface.
- Static: set a static IP address for the pfSense WAN interface.
- DHCP: use a WAN IP address obtained from the parent network (WAN) DHCP server.
- PPPoE: connect pfSense directly to the Internet via an ADSL/VDSL (or similar) connection using PPPoE settings provided by the ISP.
- PPTP: connect pfSense directly to the Internet for ISPs (Internet Service Providers) that require a connection via the PPTP protocol.
Same: settings provided by the ISP.
Warning: this type of configuration CANNOT be used to connect the WAN interface to a VPN via the PPTP protocol.
- General configuration: general settings for the pfSense WAN interface.
- MAC Address: allows you to modify the MAC address of the pfSense WAN interface.
- MTU: defines the maximum size of a network frame.
By default, a value of 1492 bytes will be used if the WAN interface is configured as "PPPoE".
Otherwise, the default (standard) value of 1500 bytes will be used.
If you want to enable Jumbo frames, then you will use a 9000 byte frame. - MSS: similar to MTU, except that this size only concerns the (really useful) data in the TCP packet.
In other words, the MSS does not include the headers of the frame sent over the network.
The sizes used by default are the same as for the MTU.
If you selected "Static" for the WAN interface type (at the top of the page), you will be able to define a static IP address for the pfSense WAN interface in the "Static IP Configuration" section.
Although we have already done it from the pfSense console, in our case.
- IP Address: the static IP address to assign to the pfSense WAN interface.
In our case: 192.168.1.10. - Subnet Mask: the associated subnet (in CIDR format) to use.
As a reminder, the current values are: 24 (= 255.255.255.0) and 8 (= 255.0.0.0). - Upstream Gateway: the IP address of the parent router.
In our case, the IP address of our Box is: 192.168.1.1.

If you selected "DHCP" for the WAN interface type, you will be able to configure the DHCP option available in the "DHCP client configuration" section.
This value of this "DHCP Hostname" option will be sent with the DHCP request and is requested by some ISPs.

If you selected "PPPoE" for the WAN interface type, you will be able to specify the PPPoE settings for your Internet connection in the "PPPoE Configuration" section.
- PPPoE Username: the PPPoE username for your Internet connection
- PPPoE Password: its password.
- Show PPPoE password: check the "Reveal password characters" box to display the password clearly rather than with asterisks.
- PPPoE Service name: the PPPoE service name (required by some ISPs).
- PPPoE Dial on demand: check the "Enable Dial-On-Demand mode" box to ensure that the PPPoE connection is established only when Internet access is required. Which is useful if you have a very limited Internet quota.
- PPPoE Idle timeout: if you use connection on demand (via the option above), this allows you to set the time during which the connection remains established even when there is no data passing to or from Internet.
Note: these PPPoE settings are provided by your ISP.

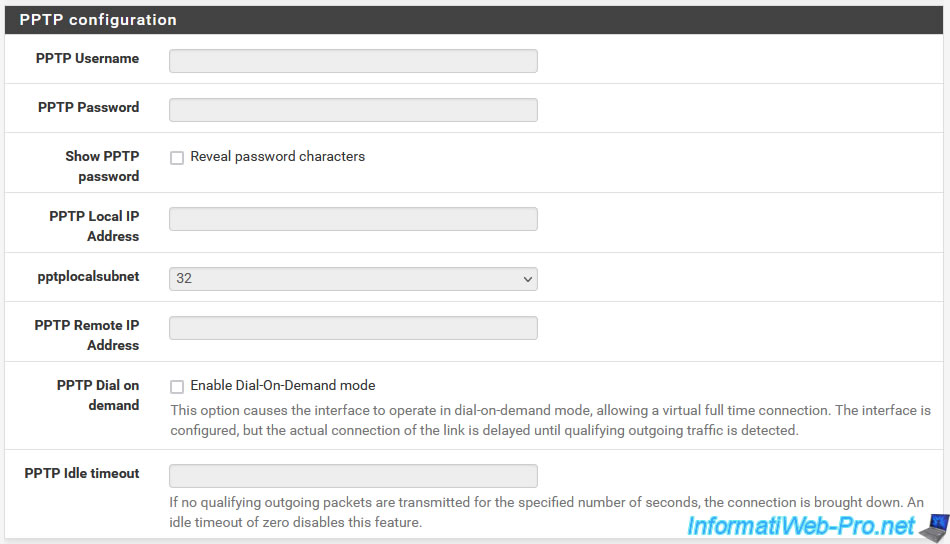
If you selected "PPTP" for the WAN interface type, you will be able to specify the PPTP settings for your Internet connection in the "PPTP Configuration" section.
Important : as stated in the official pfSense documentation, this only allows you to connect to the Internet using the PPTP settings provided by your ISP.
This does not allow you to connect to a VPN server using the PPTP protocol.
- PPTP Username: the PPTP username provided by your ISP.
- PPTP Password: its password.
- Show PPTP password: checking the "Reveal password characters" box allows you to display the typed password rather than hiding it with asterisks.
- PPTP Local IP Address: the local IP address that pfSense will use to connect via PPTP.
- pptplocalsubnet: the subnet mask (in CIDR format) to use.
- PPTP Remote IP Address: the IP address of your ISP's PPTP server.
- PPTP Dial on demand: checking the "Enable Dial-On-Demand mode" box will allow you to establish the PPTP connection only when Internet access is required.
- PPTP Idle timeout: in case the on-demand connection is enabled via the option above, specifies the time during which the PPTP connection will remain established, even if no data is passing through the Internet.
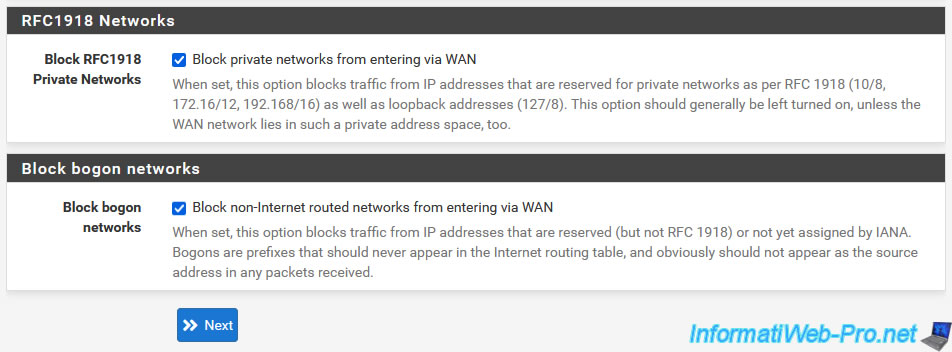
At the bottom of the page, you will find 2 options to block different network types:
- Block RFC 1918 Private Networks: blocks connections established from private networks (e.g. 192.168.x.x or 10.x.x.x) to the WAN interface.
Indeed, by default, only Internet IP addresses should communicate with the pfSense WAN interface if pfSense is connected directly to the Internet (= without an intermediate router). - Block bogon networks: blocks connections from networks that should not exist on the Internet, including reserved and unassigned IP address spaces.
Blocking these bogon networks is only useful on the WAN interface to protect you against attacks and 2 lists (an IPv4 list and an IPv6 list) are used and updated every 1st of the month from the Netgate server (the manufacturer from pfSense).
Source : Rule Methodology - Block Bogon Networks | pfSense Documentation.
Then, in step "5. Configure LAN Interface", you can configure the LAN interface of pfSense.
- LAN IP Address: to use a static IP address on this LAN interface, specify the LAN IP address to use.
In our case, it is already defined since we configured it previously via the pfSense console.
If you want to use a dynamic IP address, which is strongly discouraged since it is the default gateway IP address that your clients will use, type "dhcp". - Subnet Mask: the subnet mask to use (in CIDR format).
Reminder: 8 for 255.0.0.0 or 24 for 255.255.255.0 for the most common examples.

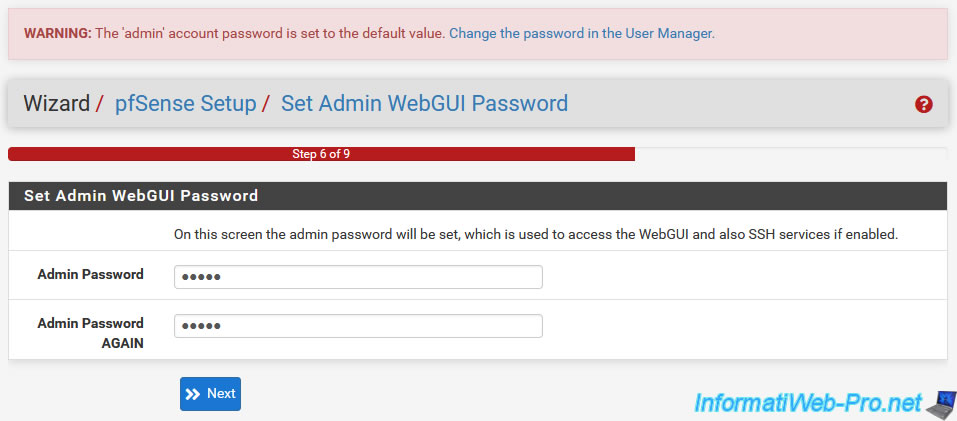
As you can see from the beginning at the top of the page, pfSense tells you that the password for the "admin" account is still the default and it invites you to change it.
Which is highly recommended.
In step "6. Set Admin WebGUI Password", you can configure change the password of this "admin" account:
- Admin Password: the new password to use.
- Admin Password AGAIN: retype the new password to use.
As pfSense tells you, this "admin" account can be used to connect to the pfSense web interface, but also via SSH (if this service is activated in the pfSense configuration).
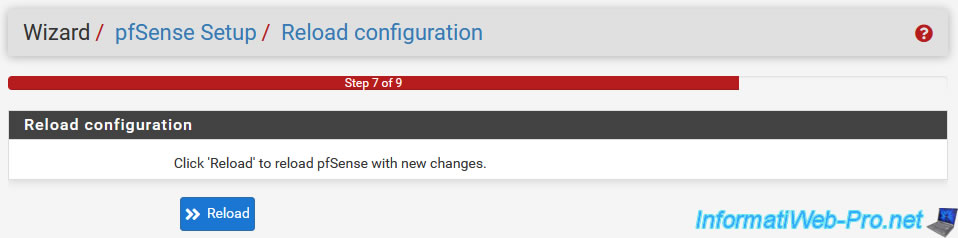
In step "7. Reload configuration", click on "Reload" so that the new configuration is used by pfSense.
In step "8. Reload in progress", simply wait while the new configuration is applied.
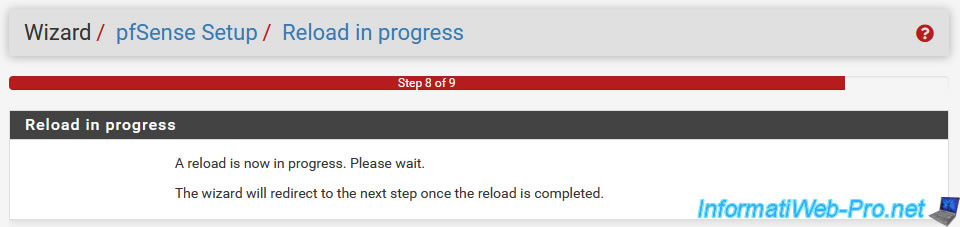
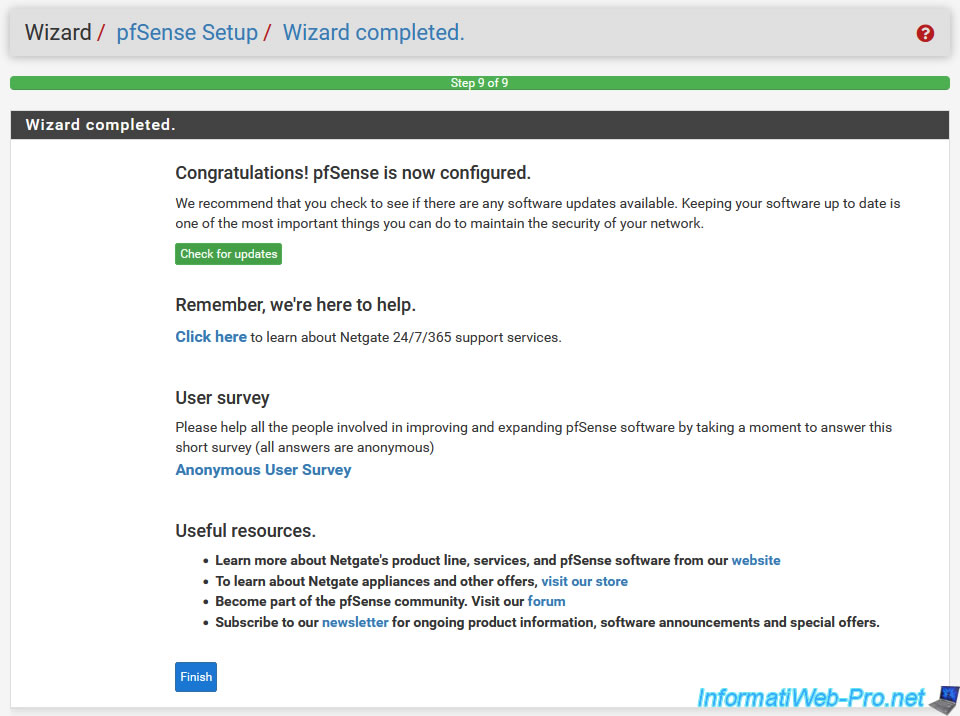
Once the pfSense configuration has been updated, step "9. Wizard completed" will appear with the message "Congratulations! pfSense is now configured".
For more information regarding the pfSense configuration steps you just saw, refer to the page : Setup Wizard | pfSense Documentation.
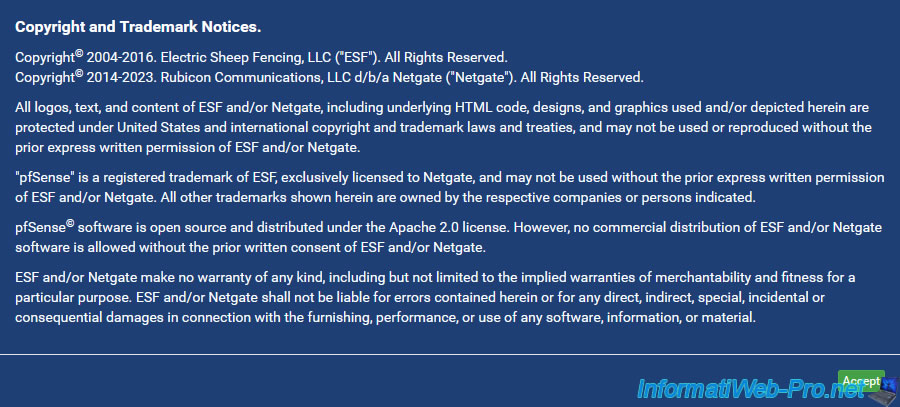
Accept the notice that appears.
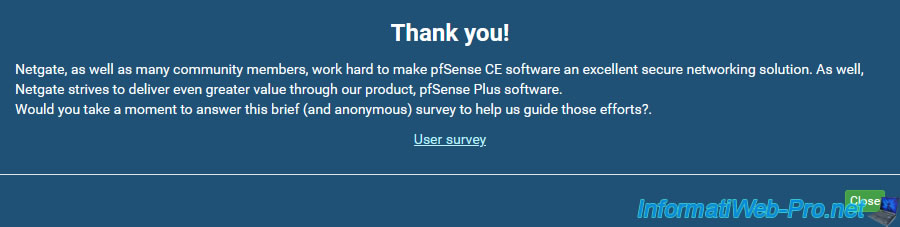
Click Close.
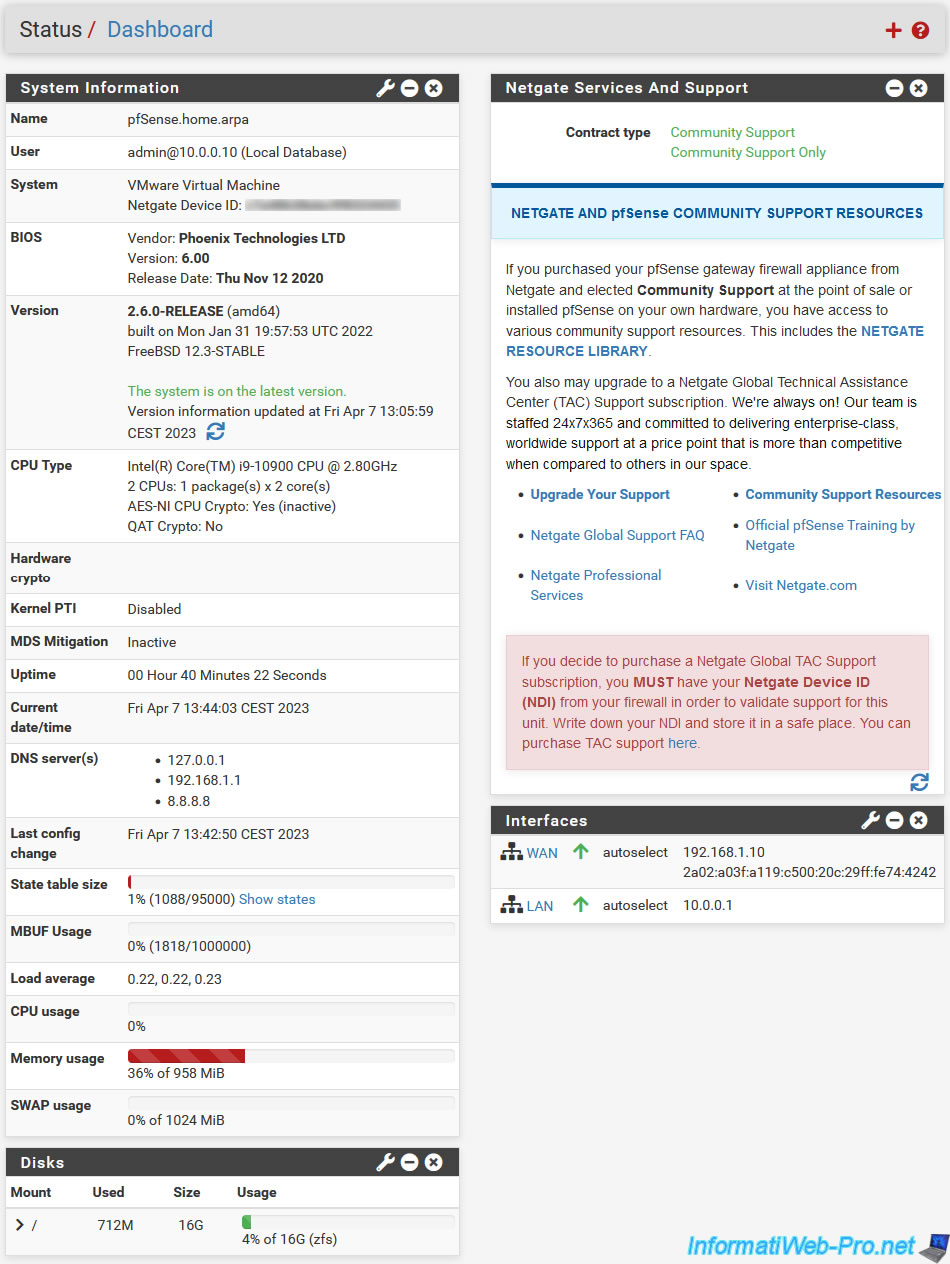
Then, the pfSense dashboard will appear with system information in the "System Information" section:
- Name: the host name of the pfSense machine, followed by the domain name of your network indicated when configuring pfSense via the web interface.
- User: the username with which you are connected (default: admin), as well as the IP address from which you access this web interface (in our case, the IP address "10.0.0.10" which corresponds to the IP address of our client PC under Windows 10).
- System:
- brand and model of the computer or server on which pfSense is installed.
In our case, it is a VMare virtual machine: VMware Virtual Machine. - Netgate Device ID: the Netgate ID of your device that you will need if you want to contact Netgate (paid) support.
- brand and model of the computer or server on which pfSense is installed.
- BIOS: manufacturer name, version and release date of the BIOS used by your motherboard.
- Version: version of pfSense installed, as well as whether it is up to date or not.
- DNS server(s): IP addresses of the DNS servers used by pfSense.
As a reminder, by default, only pfSense uses them. Not customers on your network.
To do this, you must also activate the redirection of DNS requests via the "Services -> DNS Resolver" menu.
In the "Interfaces" section, you will find the list of pfSense interfaces:
- WAN: the interface connected to the Internet (directly or via an intermediate router) with its IP address(es).
- LAN: the interface connected to the local network (LAN) with its IP address(es). In other words, the network to which you will connect your client machines.
Share this tutorial
To see also
-
Firewall 7/30/2025
pfSense 2.6 - Backup and restore configuration
-
Firewall 8/8/2025
pfSense 2.6 - Configure a LACP link (LAGG)
-
Firewall 6/11/2025
pfSense 2.6 - Create a DMZ and configure the firewall
-
Firewall 6/4/2025
pfSense 2.6 - DNS resolution
No comment