- Firewall
- pfSense
- 03 September 2025 at 07:43 UTC
-

- 1/5

In large companies, with headquarters and offices located in different geographic locations, it may be beneficial to be able to access one site's resources from another site.
In particular, to centralize user accounts, policies, ... on the Active Directory domain controller located at the company's headquarters.
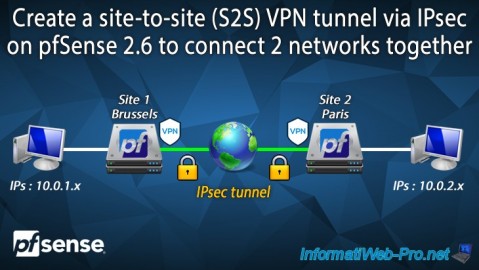
To do this, simply create a site-to-site VPN tunnel using IPsec with an instance of pfSense on each geographic site.
In this tutorial, we will simulate a company with a head office in Brussels (Belgium) and an office in Paris (France).
Site 1 will therefore be that of Brussels and site 2 will be the Paris office.
Important : for clarity, we have changed the theme used by pfSense on the remote site.
Thus, the pfSense pages with a white background correspond to site 1 in Brussels and the pages with a black background correspond to site 2 in Paris.
- Configure site 1 in Brussels for IPsec
- Configure site 2 in Paris for IPsec
- Connect IPsec tunnel
- View logs for IPsec
- Testing ping via IPsec tunnel
- Testing access to a website from a remote site
- Add the IPsec widget to the pfSense dashboard (optional)
1. Configure site 1 in Brussels for IPsec
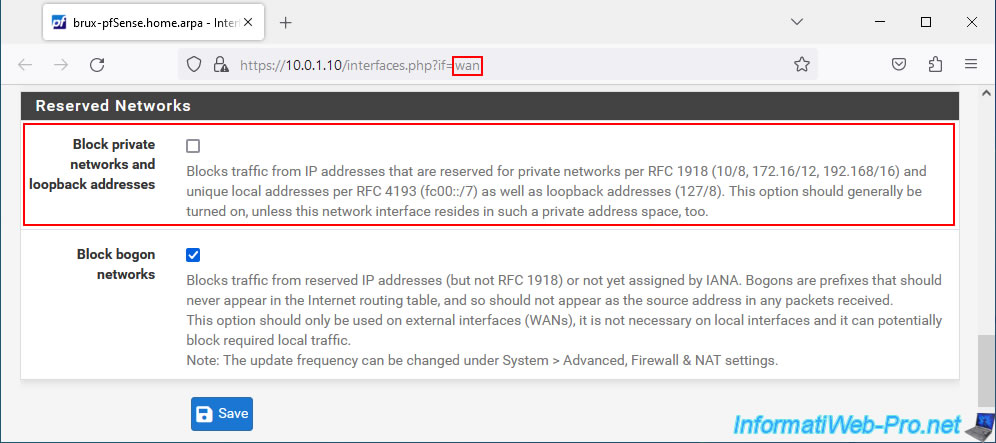
1.1. Allow private networks on the WAN interface of site 1 (Brussels)
To begin with, if in your case, pfSense has a private IP address (eg: 192.168.1.x, 10.0.0.x, ...), you will need to modify the configuration of its WAN interface.
To do this, go to "Interfaces -> WAN" and uncheck the "Block private networks and loopback addresses" box located at the bottom of the page.
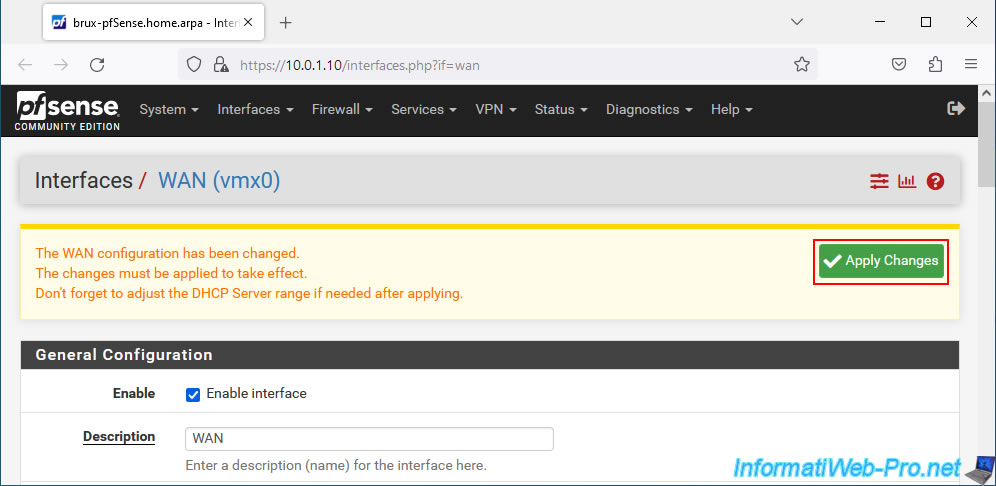
Then, click: Save.
Then, at the top of the page, click "Apply Changes".
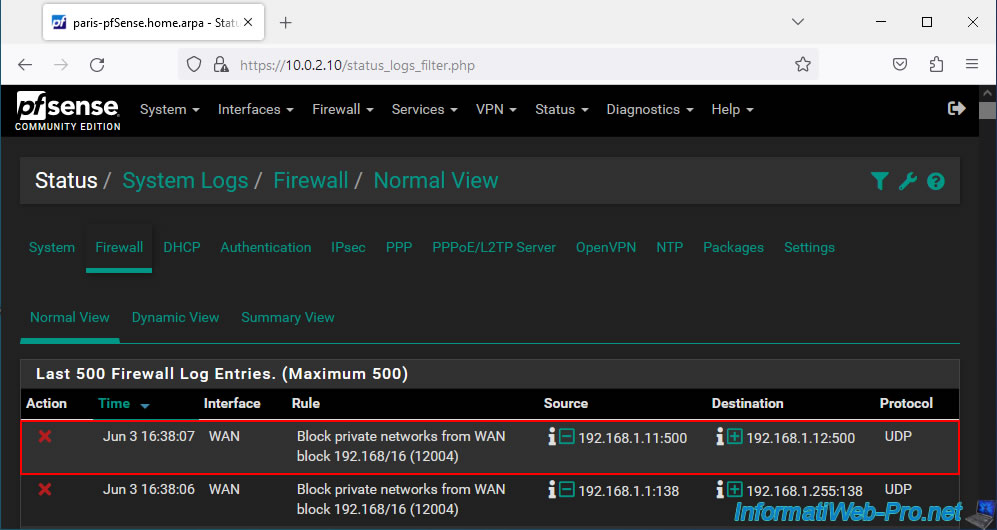
Otherwise, once you have created your VPN tunnels, you will notice that the IPsec tunnel status will remain "Connecting".

Additionally, in the log (accessible via the "Status -> System Logs -> Firewall" menu), you will see that network traffic coming from private networks on the pfSense WAN network is blocked.
By the way, the source corresponds to "[WAN IP address of the pfSense machine trying to connect via IPsec]:[port 500 used by IKE]" and the destination corresponds to "[WAN IP address of the current pfSense machine which is blocking access via IPsec]:[port 500 used by IKE]".
Plain Text
WAN / Block private networks from WAN block 192.168/16 (12004) / 192.168.1.11:500 / 192.168.1.12:500 / UDP
1.2. Configure phase 1 of the IPsec tunnel on site 1 (Brussels)
When you want to create an IPsec tunnel between 2 sites, you must configure 2 phases:
- Phase 1: to negotiate how the key exchange will be carried out (IKEv1 or IKEv2), manage the authentication (secret pre-shared key or certificate), ...
- Phase 2: for data encryption. You can create as many P2 tunnels as there are subnets available on the remote site.
Warning : the version of IKE used, the authentication method, the secret pre-shared key, the encryption algorithms used, ... must be the same on the source and destination sites.
Otherwise, the IPsec tunnel will not be established.
To start, on the pfSense machine at site 1 (Brussels), go to: VPN -> IPsec.
Note: to learn more about IPsec, see the "IPsec Terminology | pfSense Documentation" page.
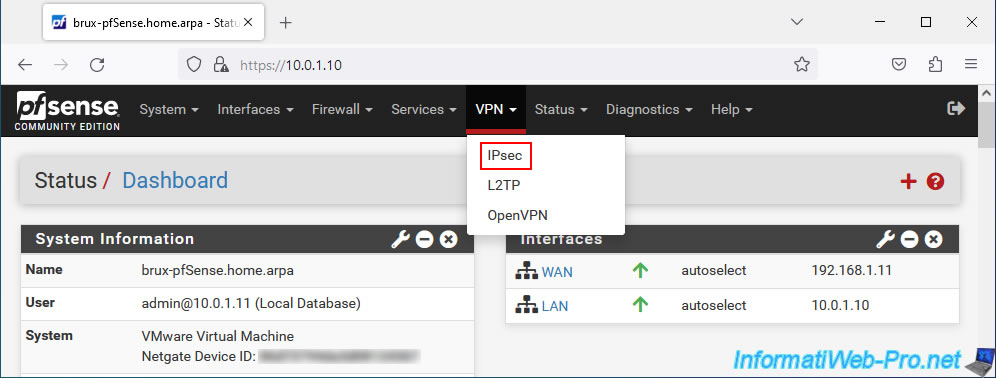
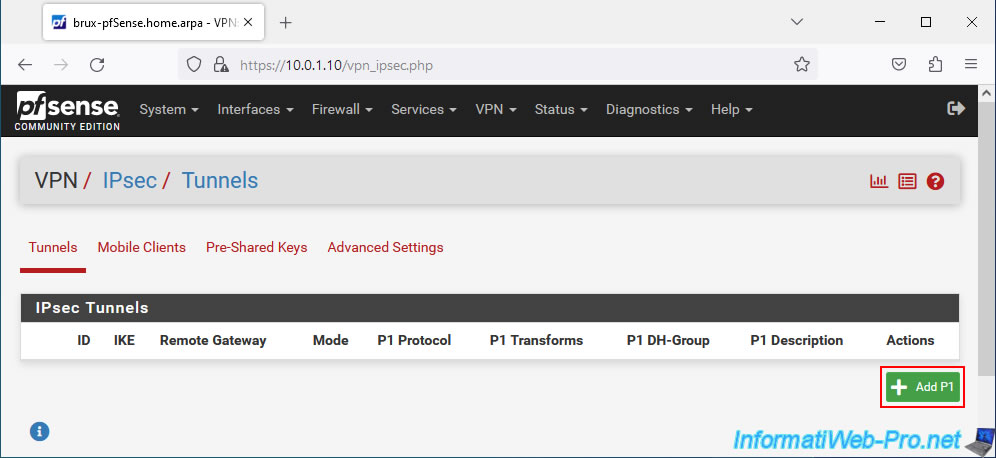
Then, on the "VPN / IPsec / Tunnels" page that appears, click on: Add P1.
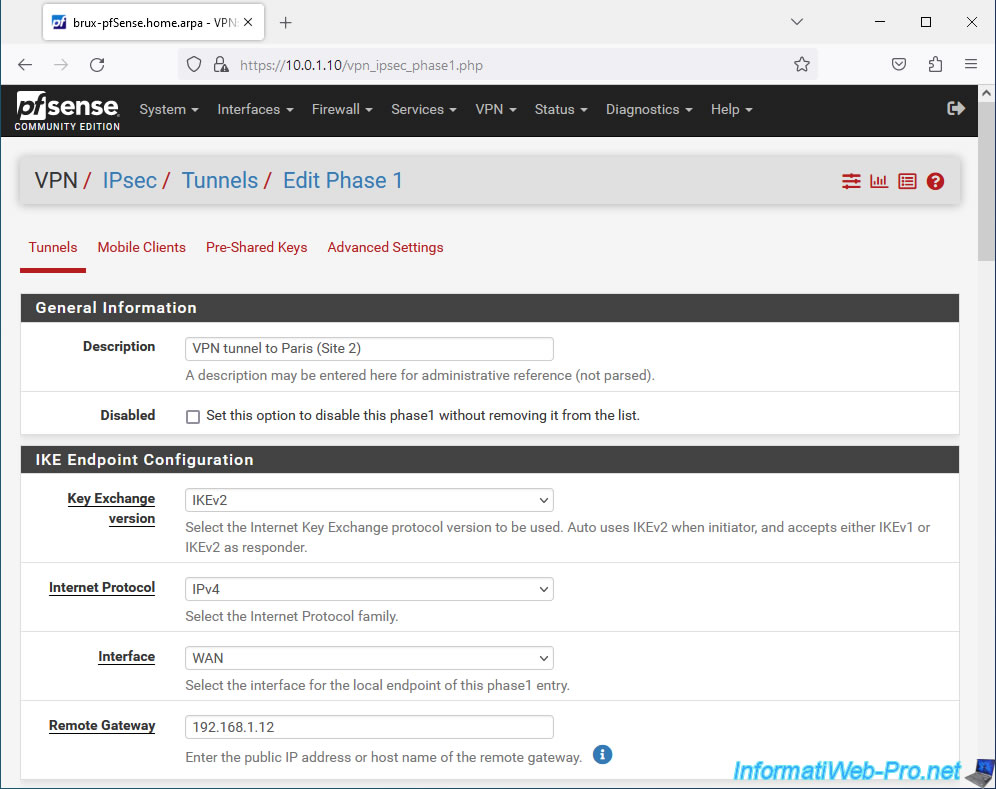
On the "Edit Phase 1" page that appears, configure these settings:
- Description: an indicative description for this P1 tunnel.
In our case, "VPN tunnel to Paris (Site 2)" given that this P1 tunnel will allow access to site 2 in Paris from a computer / server located on site 1 in Brussels. - IKE Enpoint Configuration - Key Exchange version: preferably use IKEv2. Otherwise, use IKEv1 for compatibility reasons if the remote site does not support IKEv2.
- Internet Protocol: IPv4. Allows you to create an IPsec tunnel between 2 IPv4 WAN addresses (that of the source site and that of the remote site).
If both sites have a public IPv6 address, then you can also create an IPv6 tunnel if you wish. - Interface: WAN. The IPsec tunnel will connect the WAN interfaces of the 2 pfSense machines (the source one and that of the remote site). Indeed, the IPsec tunnel passes via the Internet.
- Remote Gateway: specify the public IP (WAN) address of the remote pfSense machine.
In our case, the remote WAN IP address is "192.168.1.12", because we are testing this in a virtual environment.
But, in business, you will need to indicate the public IP address of the company's remote site provided by its ISP (Internet Service Provider).
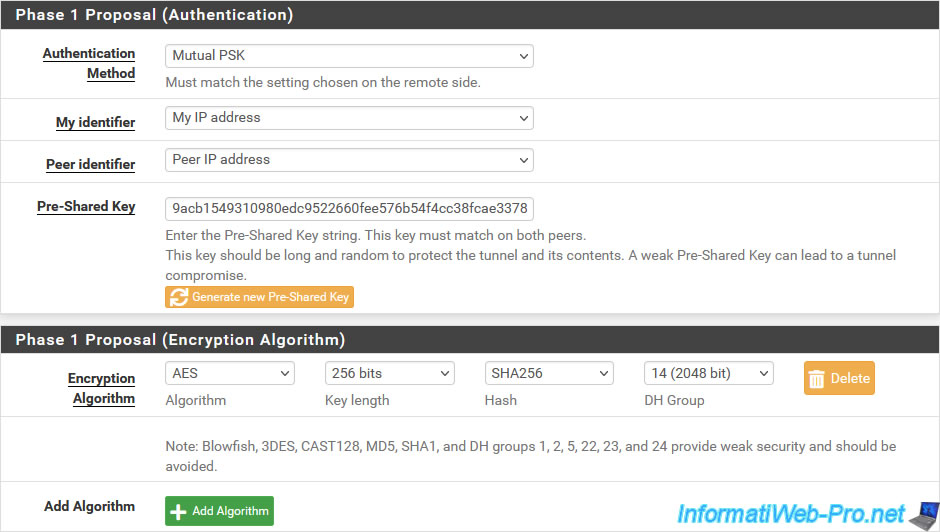
Next, you can configure the authentication method and the algorithm to use for encryption:
- Phase 1 Proposal (Authentication): configure IKE tunnel authentication.
- Authentication Method: allows you to use a secret pre-shared key (Mutual PSK) which must be identical on the source site and on the remote site or a certificate.
- My identifier: identifier sent to the pfSense machine on the remote site and which identifies the source pfSense machine.
Leave the "My IP address" option selected by default, as shown in the Netgate documentation. - Peer identifier: identifies the remote peer on the pfSense machine at the remote site.
Again, leave the "Peer IP address" option selected by default. - Pre-Shared Key: on site 1, click "Generate new Pre-Shared Key" to generate a secure secret pre-shared key.
Important: this same key must also be indicated when you configure phase 1 of the IPsec tunnel on the remote pfSense machine.
- Phase 1 Proposal (Encryption Algorithm): encryption algorithm to use for tunnel P1.
- Encryption Algorithm: select the options below (as per pfSense documentation).
- Algorithm: AES.
Name of the encryption algorithm to use. - Key length: 256 bits.
Length of key to use. The larger the key size, the more secure it is. But the larger the key size, the more CPU resources will be used. - Hash: preferably SHA256.
Hash algorithm to use.
Note that the SHA1 algorithm has a risk of collision (2 different values corresponding to the same hash) and it is therefore not recommended at present. - DH Group: 14 (2048 bit).
Again, the higher the size selected, the more secure it is. But at the cost of performance due to higher processor (CPU) usage.
- Algorithm: AES.
- Encryption Algorithm: select the options below (as per pfSense documentation).
Note that pfSense allows you to add several encryption algorithms to ensure better compatibility for establishing the IPsec tunnel. When establishing the P1 tunnel, the best encryption algorithm supported on both sides will be used automatically.
Important : for security reasons, it is best to define a single encryption algorithm to avoid allowing algorithms that would be less secure and could be used by hackers to attempt to connect to your network via IPsec via vulnerabilities that would be discovered later.
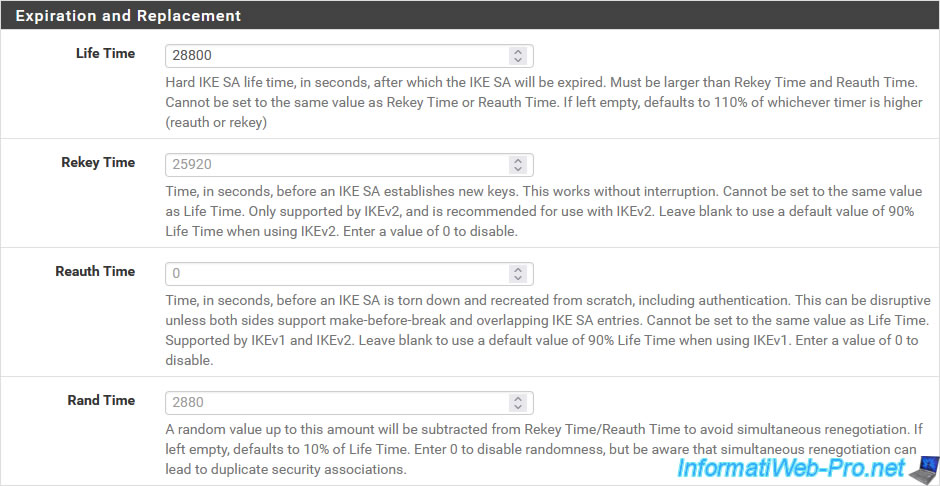
In the "Expiration and Replacement" section, you can configure several parameters:
- Life Time: lifespan of the IKE SA (or ISAKMP SA) tunnel after which it expires.
- Rekey Time: time before which the IPsec service will attempt to generate new keys which will be used without interruption by the 2 endpoints (source and remote pfSense machines).
This option is only supported by IKEv2. - Reauth Time: time before which the IKE SA tunnel will be destroyed, then recreated from scratch by the IPsec service.
This option is supported by IKEv1 and IKEv2, but should be avoided with IKEv2.
Hence the value "0" indicated by default. Which disables this feature. - Rand Time: allows you to add a random value to the rekey process to prevent both endpoints from trying to regenerate keys at the same time.
Leave the default value "28800" specified for the "Life Time" option.
Note: generally, you will not need to modify them since pfSense automatically calculates them so that the values used by default are those recommended in your case.
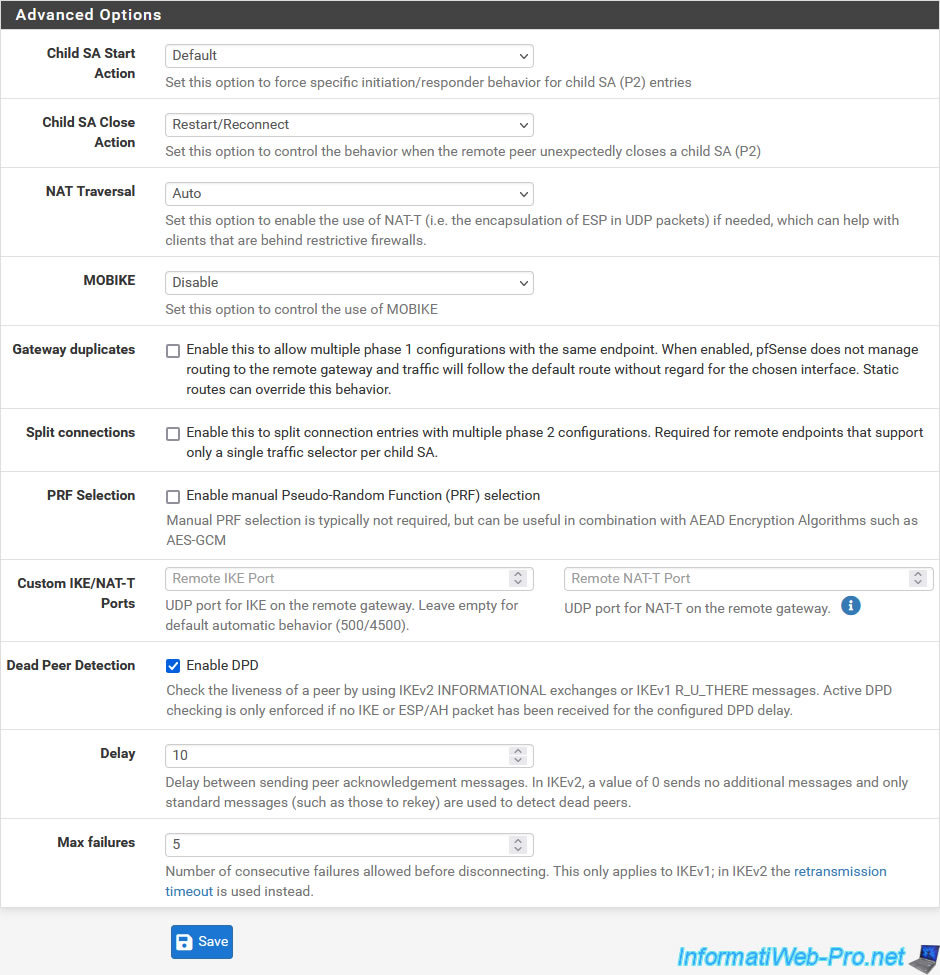
Finally, you will find an "Advanced Options" section where the 2 most interesting options are the first 2 proposed.
- Child SA Start: allows you to choose the behavior to adopt for the child IPsec P2 tunnel when starting or restarting the IPsec service.
- Default: the chosen behavior will depend on the configured parameters.
- None (Responder Only): allows you not to attempt to initialize the tunnel.
Typically, you will use this value at the remote site to prevent both endpoints (pfSense machines) from attempting to initialize the same IPsec tunnel. - Initiate at start (VTI or Tunnel Mode): allows you to attempt to initialize the IPsec tunnel when starting the IPsec service.
- Initiate on demand (Tunnel mode Only): allows you to initialize the IPsec tunnel only when network traffic destined for a network affected by a P2 tunnel of this IPsec tunnel arrives on pfSense.
This can create a slight delay due to tunnel initialization when client requests wait for the tunnel to be established to access the remote site.
- Child SA Close Action: allows you to choose how IPsec should react when an IPsec tunnel (P2) is closed unexpectedly by a peer.
- Default: as with the previous setting, the behavior chosen will depend on the settings configured for this tunnel.
- Close connection and clear SA: when an IPsec tunnel (P2) is closed by a peer, it is simply removed and pfSense will not attempt to reestablish this P2 tunnel.
Which is the behavior to use in case of the destination endpoint configured as "None (Responder Only)" via the previous option. - Restart/Reconnect: when an IPsec tunnel (P2) is closed by a peer, pfSense will automatically attempt to reestablish it. So in the event of a network problem, the tunnel is automatically restored.
However, only use this option on one endpoint. For example: on the source endpoint. - Close connection and reconnect on demand: when an IPsec tunnel (P2) is closed by a peer, it will be removed and the P2 tunnel will be reestablished only if network traffic attempts to access the destination network concerned by this IPsec tunnel .
- NAT Traversal: makes it easier to traverse NAT, in the event that pfSense is behind a device performing NAT (in other words: a router).
Warning: this is only supported with IKEv1. - MOBIKE: allows you to maintain an active connection for devices that use several IP addresses (as may be the case for a mobile device moving from a Wi-Fi network to the mobile Internet (3G, 4G, etc.) )).
- Duplicate Gateways: allows multiple P1 tunnels to use the same remote endpoint address.
- Split connections: with IKEv2, by default, P2 tunnels are managed by the same P2 child tunnel.
Enabling this option allows each tunnel to be managed through a separate P2 child tunnel. Which may be necessary in some cases. - PRF Selection: allows you to manually select a pseudo-random function (PRF) rather than letting the IPsec service decide.
- Custom IKE/NAT-T Ports: allows you to use non-standard UDP port numbers for IKE and NAT-T.
By default, the ports used by IKE and NAT-T are respectively: 500 UDP and 4500 UDP. - Dead Peer Detection: enables automatic dead peer detection (DPD).
- Delay: delay between 2 checks for automatic detection of dead bets (DPD) if this is activated above.
- Max failures: number of failed attempts allowed before the remote peer is considered dead (inaccessible).
On site 1 (Brussels), configure only the first 2 parameters:
- Child SA Start Action: Default. Default behavior chosen based on your tunnel settings.
- Restart/Reconnect: if the tunnel is closed unexpectedly by the remote peer, pfSense will attempt to reestablish the IPsec tunnel.
Then, click Save.
Source : Phase 1 Settings | pfSense Documentation.
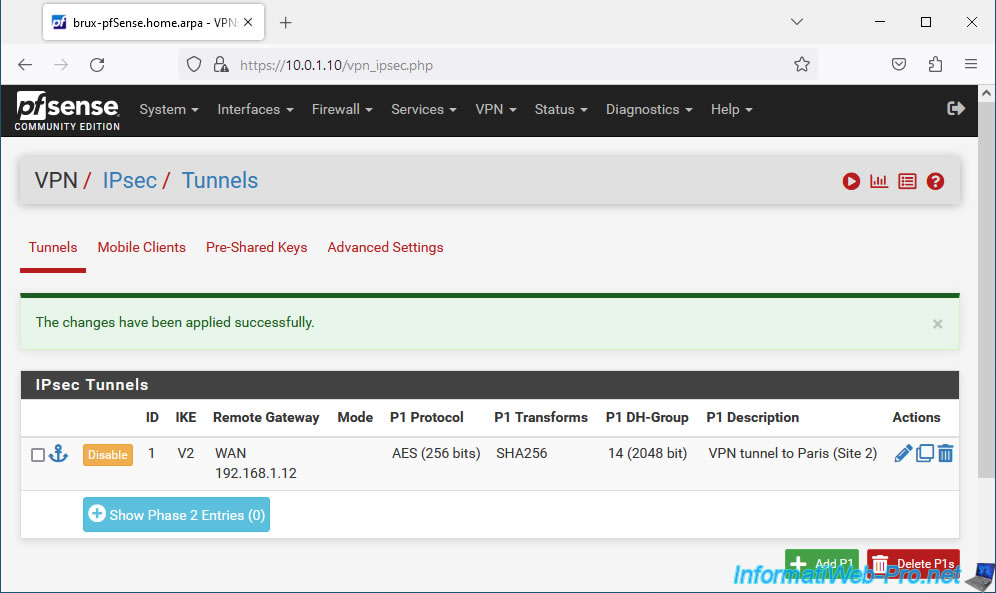
Click "Apply Changes".
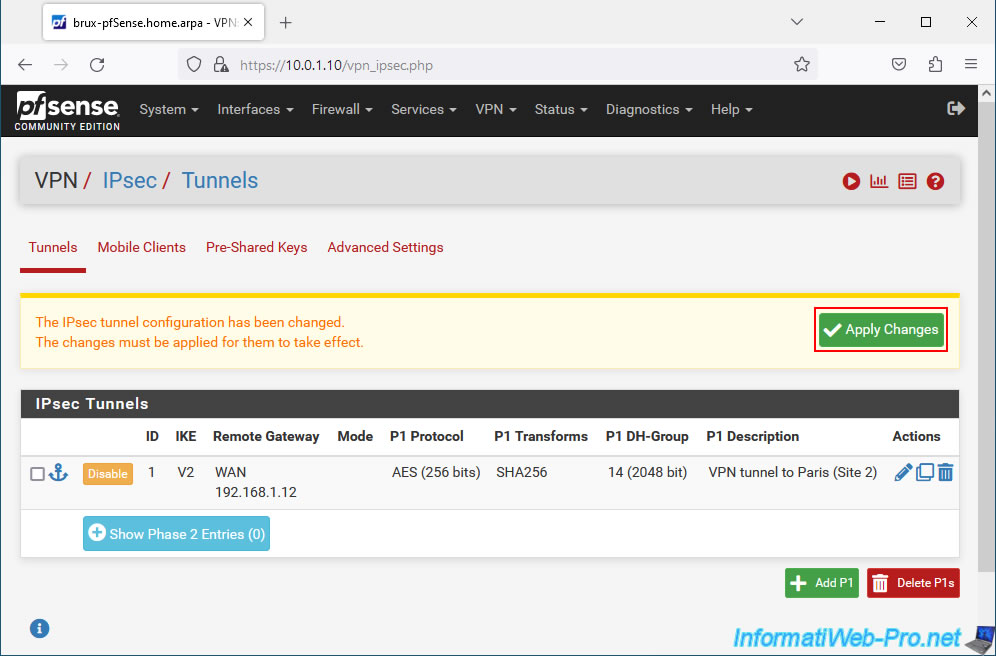
Your IPsec P1 tunnel has been created.
Share this tutorial
To see also
-
Firewall 6/25/2025
pfSense 2.6 - 1:1 NAT (IP address mapping)
-
Firewall 8/24/2025
pfSense 2.6 - Configure high availability (HA)
-

Firewall 9/5/2025
pfSense 2.6 - Create a VPN server (remote access) via OpenVPN (L3 mode)
-
Firewall 6/20/2025
pfSense 2.6 - NAT (port forwarding)
You must be logged in to post a comment