- VMware
- 25 March 2013 at 20:23 UTC
-

- 1/4


This tutorial will allow you to install Windows 95 in a VMware Virtual Machine and its drivers and networks that are not installed by default.
If we do this tutorial on Windows 95, it is to allow you to install it in a virtual machine and be able to install old games developed for Windows 95 or for nostalgic ;-).
Legals Informations:
Firstly, we wish to clarify that since Windows 95 is a shareware software protected by copyright, we unfortunately can not offer you the download.
We will still be able to download the bootable floppy disk (on which you can boot a computer) which is based on the beginning of this tutorial.
Tested with :
- VMware Workstation 9 (Paid version)
- VMware Player 6.0.3 (Free version)
- Preparation of CD and floppy disk
- Creating and configuring the VMware virtual machine
- Installing Windows 95
- Installing drivers : VMware Tools + VGA (manual mode)
- Sound driver installation
- Installation of network and Internet
1. Preparation of CD and floppy disk
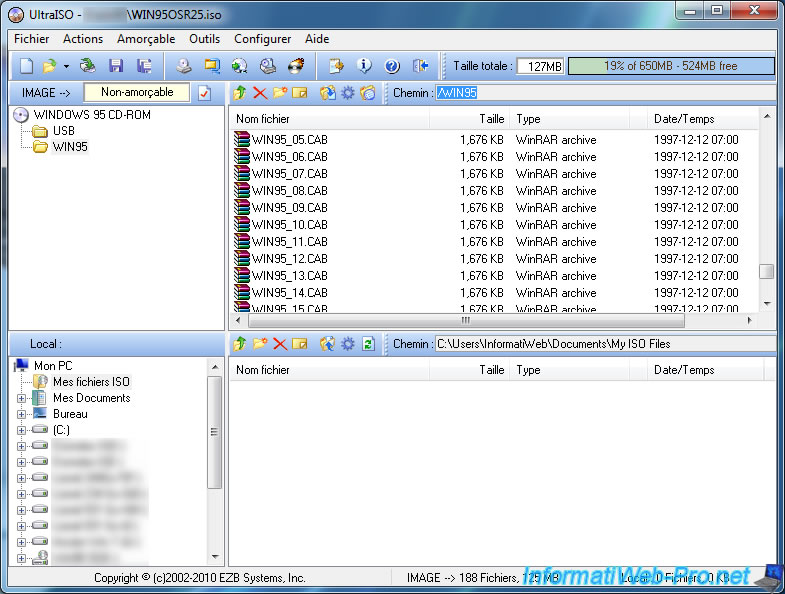
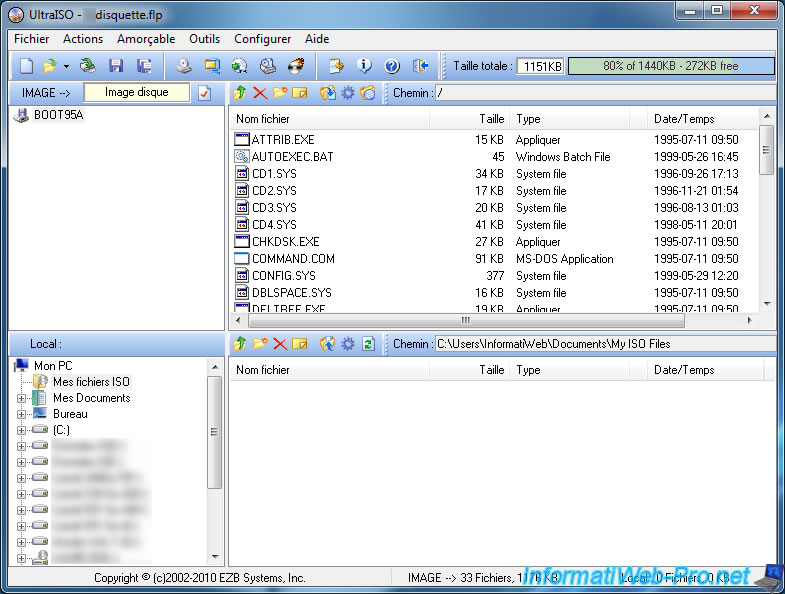
Before you begin, here's what looks like the Windows 95 CD. It contains the ".CAB" Setup and the contents disks as files.
Note : The "AOL30FR.EXE" file is also present.
If you've ever tried to install Windows 95 from a CD-ROM in VMware, you had to realize that errors were displayed during installation.
These errors are :
- Please insert the disk Windows 95 CD-ROM "and then click OK"
- The file 'xxxxxx.xxx' on Windows 95 CD-ROM was not found.
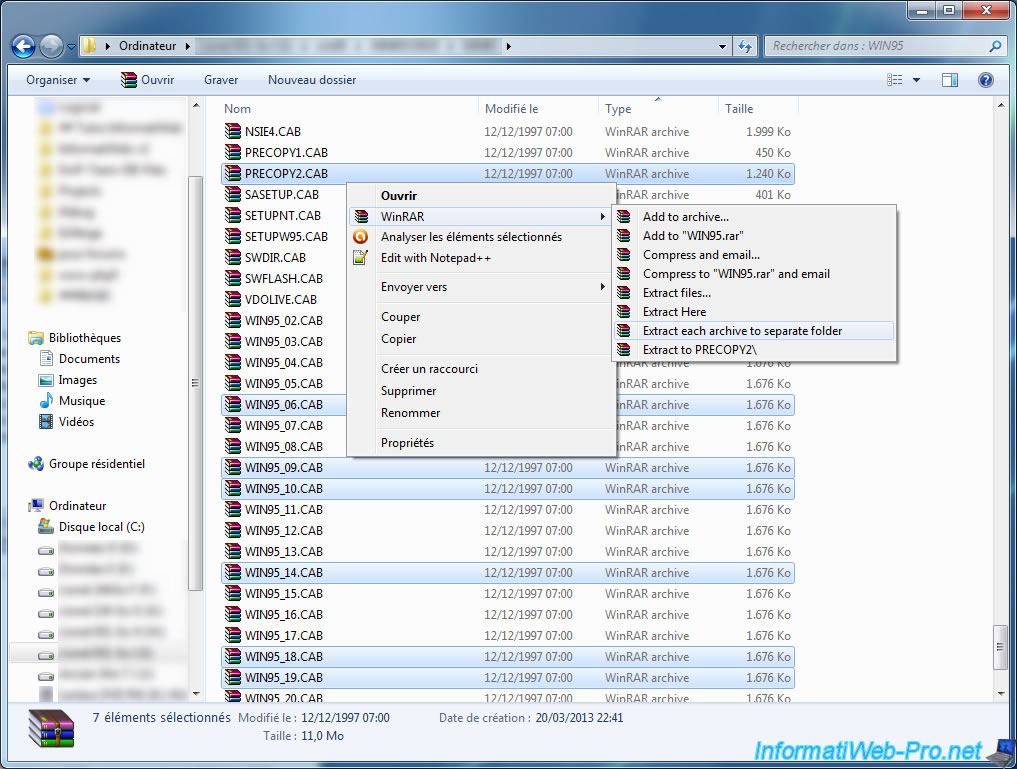
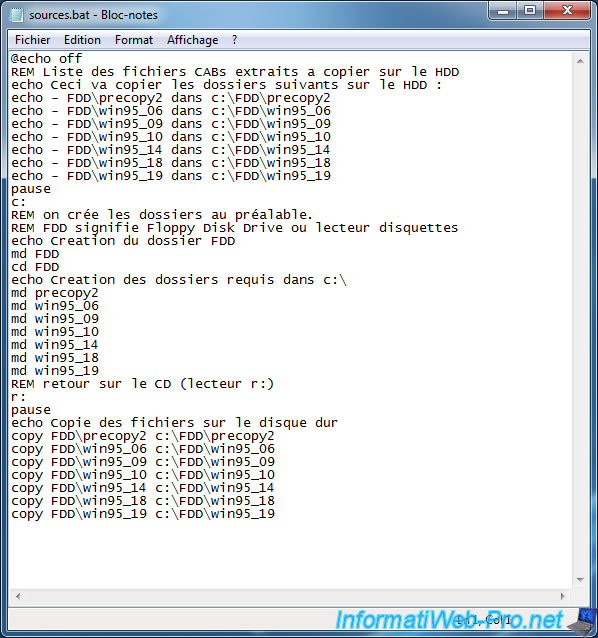
To solve these problems, we will have to extract the contents of "Precopy2.cab" file and the disks 6, 9, 10, 14, 18 and 19 represented by files "win95_06.cab", "win95_09.cab" and so on.
So unzip the following files : "precopy2.cab", "win95_06.cab", "win95_09.cab", "win95_10.cab", "WIN95_14.CAB", "Win95_18.cab" and "WIN95_19.CAB".
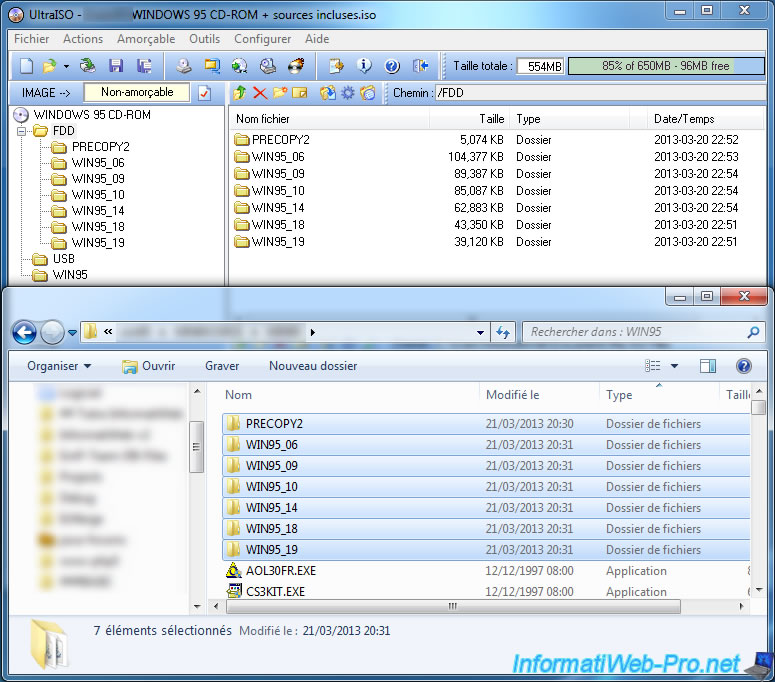
Then open the CD image and create a Windows 95 "FDD" folder in the root file. In this file, add the folders we just created by unzipping the CAB files in the FDD case.
Then save the changes.
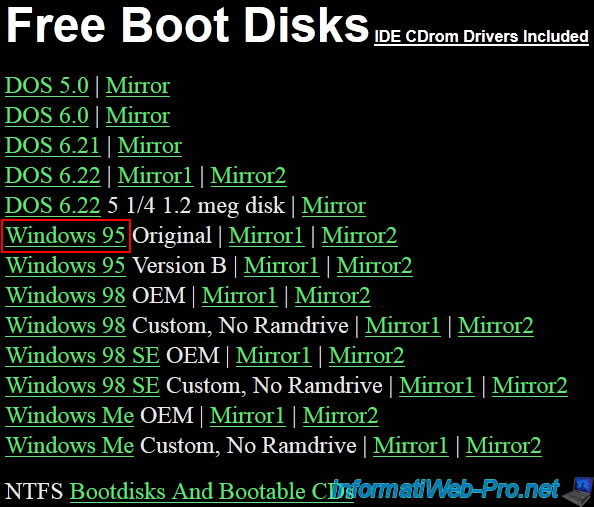
Now to the boot disk. To do this, go to the website "bootdisk.com" and download the disk "Windows 95 Original".
Or download the floppy in flp format : win95.flp
By default, the content of the disk is like this.
If you've ever tried to install Windows 95 from a CD-ROM in VMware, you had to realize that the CD disappeared during installation which will prevent us to get the files found on the CD-ROM.
We will create a batch file on the boot disk to automate the copy folders containing these files on the hard disk.
Here are the contents of this file :
Batch
@echo off
REM CABs list of extracted files to copy to the HDD
echo This will copy the following files to the HDD :
echo - FDD\precopy2 dans c:\FDD\precopy2
echo - FDD\win95_06 dans c:\FDD\win95_06
echo - FDD\win95_09 dans c:\FDD\win95_09
echo - FDD\win95_10 dans c:\FDD\win95_10
echo - FDD\win95_14 dans c:\FDD\win95_14
echo - FDD\win95_18 dans c:\FDD\win95_18
echo - FDD\win95_19 dans c:\FDD\win95_19
pause
c:
REM it creates the folders beforehand.
REM FDD means Floppy Disk Drive.
echo Creation of the FDD folder
md FDD
cd FDD
echo Creation of required folders in c:\
md precopy2
md win95_06
md win95_09
md win95_10
md win95_14
md win95_18
md win95_19
REM return on CD (r: drive)
r:
pause
echo Copying files to the hard disk
copy FDD\precopy2 c:\FDD\precopy2
copy FDD\win95_06 c:\FDD\win95_06
copy FDD\win95_09 c:\FDD\win95_09
copy FDD\win95_10 c:\FDD\win95_10
copy FDD\win95_14 c:\FDD\win95_14
copy FDD\win95_18 c:\FDD\win95_18
copy FDD\win95_19 c:\FDD\win95_19
Then save this file: sources.bat (Careful to put .bat behind the name of the file, otherwise it will not be recognized as a program during the installation of Windows 95).
Once created the file, add the bootable floppy disk.

2. Creating and configuring the VMware virtual machine
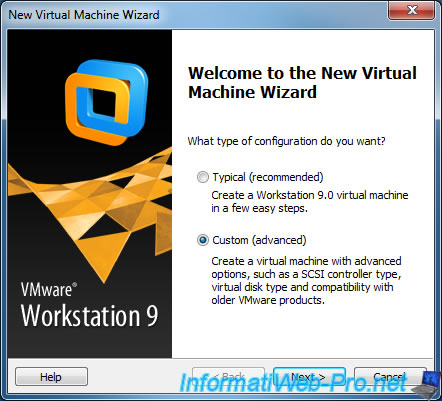
If you use VMware Workstation, you can create your virtual machine manually.
To create and configure the virtual machine, select "Custom (advanced)".
If you use VMware Player, you can't create a virtual machine with hardware compatibility 5.x.
To overcome this problem, we created a blank virtual machine :
- with 5.x compatibility hardware
- and configured to install Windows 95
This virtual machine has no data. It contains only the minimum requirements.
To download this basic virtual machine configuration, click this link : vmware_vm_5.x_compatibility.zip.
Note : Remember to configure the virtual machine to use the floppy and the Windows 95 CD (as explained further below).
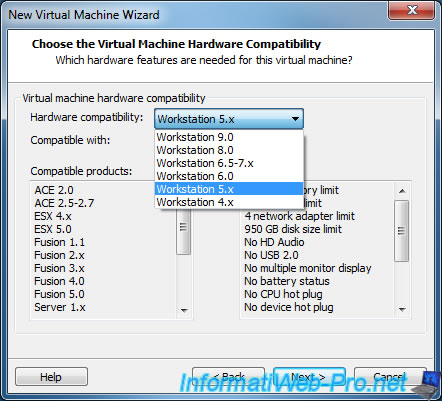
Then, select "Workstation 5.x" as hardware compatibility as indicated in the official documentation.
The machine will thus have older hardware and is therefore more compatible with the older version of Windows.
Note : You must select "Workstation 5.x" as hardware compatibility. Otherwise, you will have problems later (including the blue screen that occurred during the installation of the sound driver "Sound Blaster PCI 128").
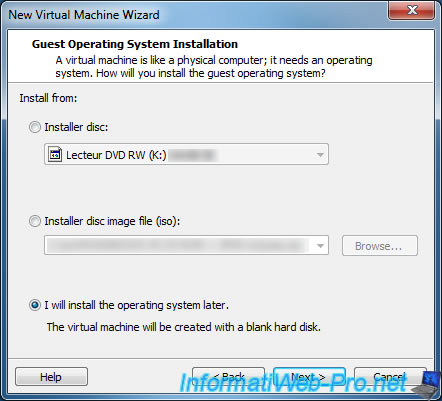
Select "I will install the operating system later" to ensure that the installation is done by mode automatically.
Select "Microsoft Windows 95".

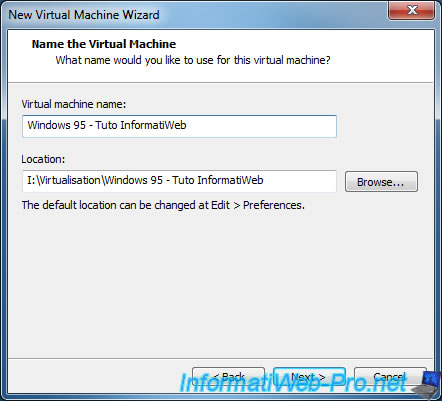
Enter a name for your virtual machine and select the folder where you want to store.
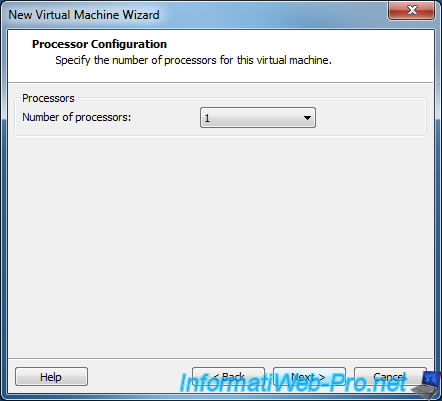
Leave a processor.
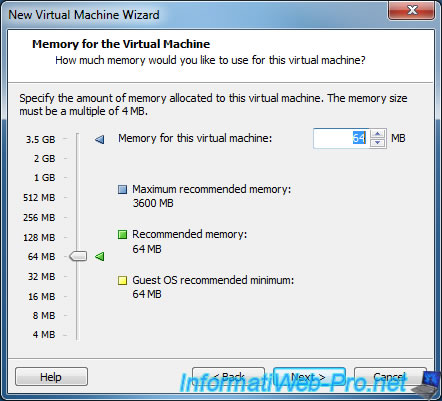
Avoid putting too much RAM. 64 MB is the recommended size and ample.
Click "Customize Hardware" to configure the diskette drive and CD / DVD drive of the virtual machine.

Click "New CD / DVD ..." and select the CD image file (iso format) that contains the "Precopy2" folders "WIN95_06" ... that we put in the "FDD" folder of the picture.
Note : Make sure the box "Connect at power on" is checked.
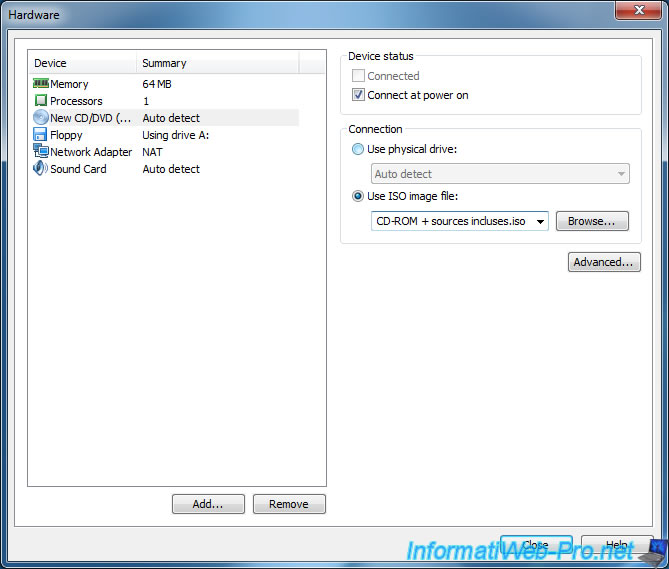
The Windows 95 CD is not bootable, we will also add the bootable floppy disk that will allow us :
- Create a partition on the virtual hard drive
- Format the partition with a name if you wish
- Copy the folders / files that we will need during installation
- Launching the installation of Windows 95
Note : Make sure the box "Connect at power on" is checked.
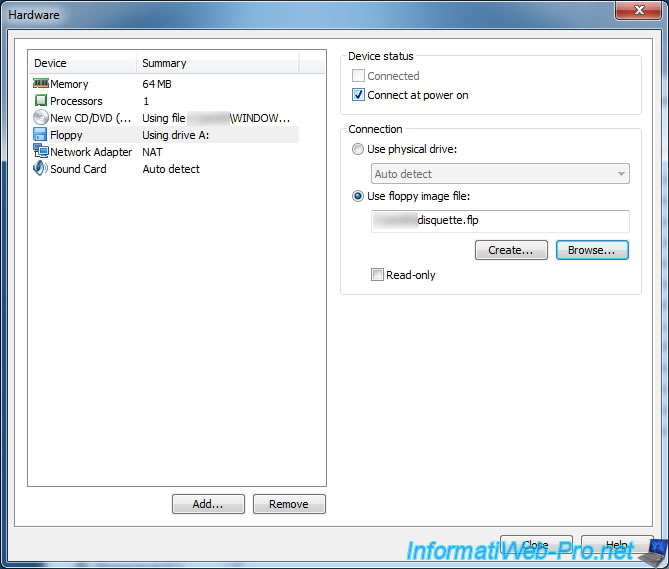
Finally, click Finish.

Share this tutorial
To see also
-
VMware 2/24/2016
VMware Workstation - Remotely access to a VM over VNC
-
VMware 1/31/2020
VMware Workstation 10 - Import Windows XP Mode of Microsoft
-
VMware 1/31/2020
VMware Workstation 11 / 10 - Virtualize Windows XP to make it fluid
-
VMware 8/14/2020
VMware Workstation 12 / 11 / 10 - Virtualize Citrix XenServer 6.5.0
You must be logged in to post a comment