- VMware
- 09 September 2022 at 07:22 UTC
-


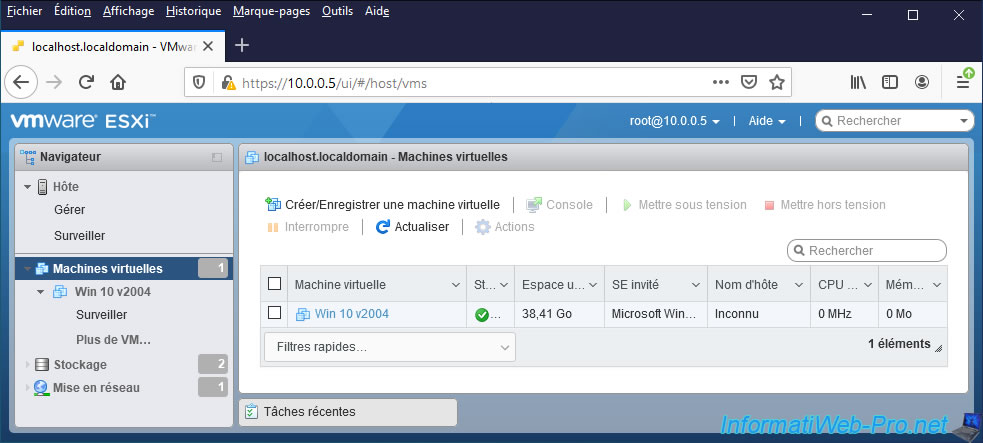
Using the web interface (VMware Host Client) of your VMware ESXi hypervisor, you can manage your virtual machines, monitor their resource usage and even access their console.
To do this, connect to this web interface and go to : Virtual Machines.
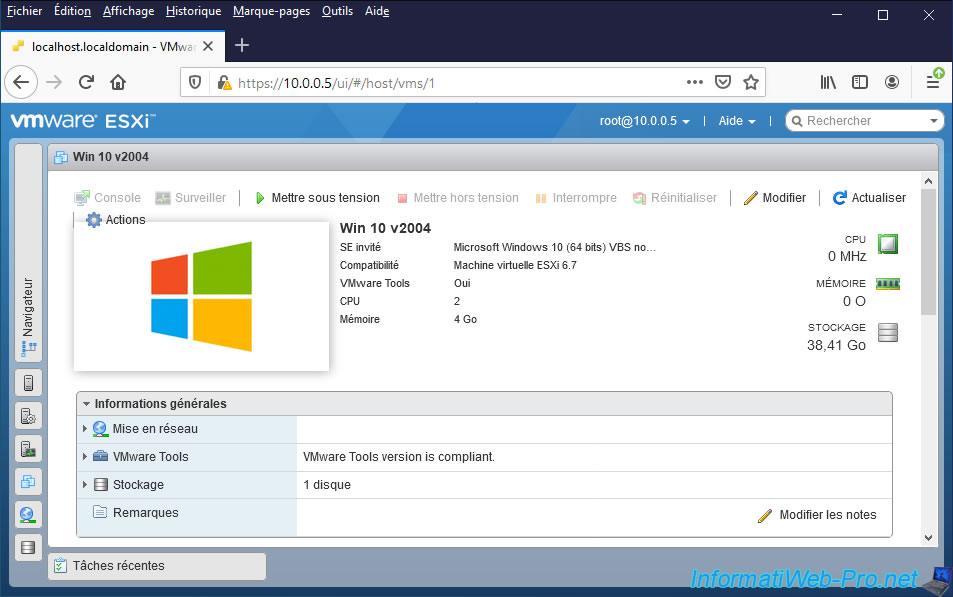
1. Virtual machine information
By clicking on the name of a virtual machine, you will find a lot of information about it :
- the name of it in bold
- Guest OS : the name and version of the guest operating system that you specified to VMware ESXi when creating the virtual machine and therefore the operating system that is supposed to be installed there.
Note that in the case of Windows 10 as a guest operating system, VMware ESXI will also tell you whether or not VBS (Virtualization Based Security) is enabled on this virtual machine. - Compatibility : compatibility level of this VM. In our case : ESXi 6.7 virtual machine.
This lets you know that this virtual machine can be used as is on an identical or newer version of VMware ESXi, as well as on other VMware products (such as "VMware Workstation", for example). - VMware Tools : indicates whether or not VMware Tools are installed in the virtual machine.
- CPUs : number of processor cores allocated to this one. Whether these are seen as one or more virtual processors.
- Memory : amount of RAM allocated to it. In other words, the maximum amount of RAM that it can use.
Unless you have set a lower limit in the virtual hardware options of this virtual machine for the use of this random access memory (RAM).
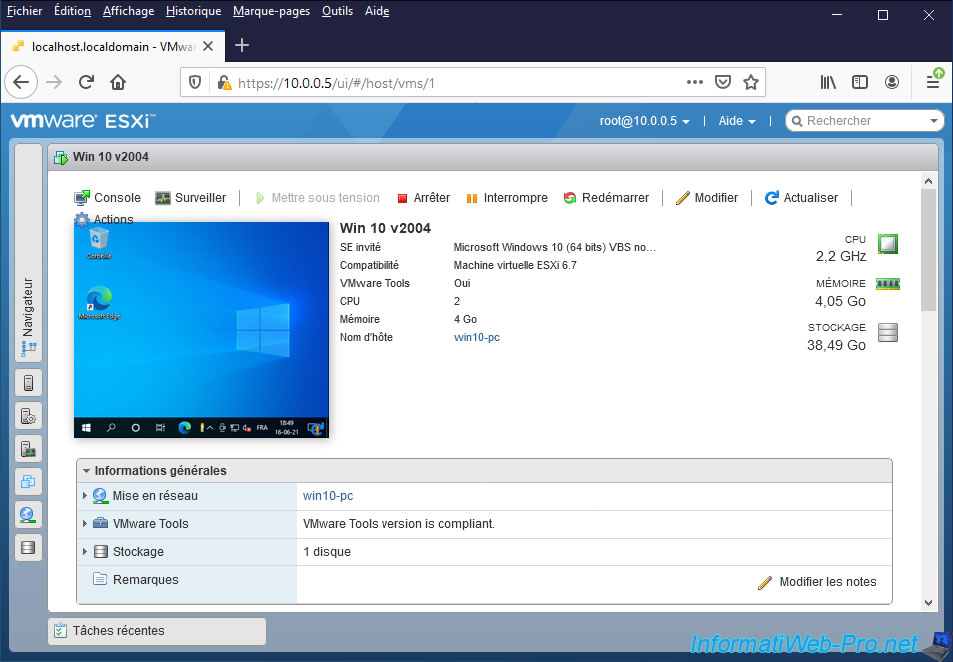
Start your virtual machine by clicking on "Power on" and you will be able to see the real-time use of system resources by this virtual machine on the right :
- CPU : frequency in MHz or GHz currently used
- Memory : amount of random access memory (RAM) currently in use
- Storage : storage space currently in use. This value can vary or be fixed depending on the provisioning chosen when creating the virtual hard disk of the virtual machine.
Indeed, if you have chosen a dynamic provisioning, the virtual hard disk will grow according to the data that you will store inside.
But, if you have chosen static provisioning, space will have been previously reserved on the physical disk. This value will therefore not change.
In the "General Information" section, you will be able to see :
- Networking : the current name of the virtual machine defined in the guest operating system (only when the virtual machine is started and VMware Tools are running).
- VMware Tools : whether VMware Tools are installed and up to date. In our case, we see "VMware Tools version is compliant". This means that these are installed in the virtual machine and that these are up to date with the version of our VMware ESXi hypervisor.
- Storage : the number of hard disks used by this virtual machine.
- Notes : the notes that you added on this virtual machine by clicking on the "Edit notes" button located on the right.
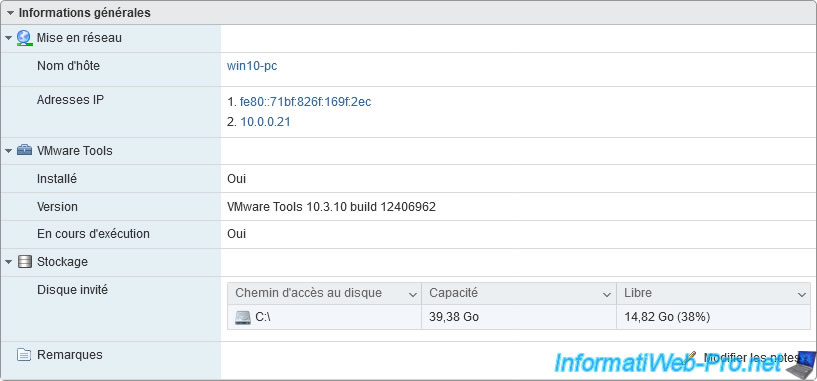
If you deploy the nodes present in this "General Information" section, you will be able to see :
- Networking :
- Host name : the name of the virtual machine defined in the guest operating system
- IP addresses : the IPv4 and IPv6 addresses (if applicable) assigned to this virtual machine
- VMware Tools :
- Installed : whether or not VMware Tools are installed
- Version : the version of VMware Tools installed in the virtual machine
- Running : whether or not VMware Tools are running. This is only the case when these are installed and the operating system has finished booting.
- Storage :
- Guest Disks : the list of partitions present on the virtual hard disks, their capacity and the free space available on them.
- Notes : notes that you added yourself on this virtual machine.
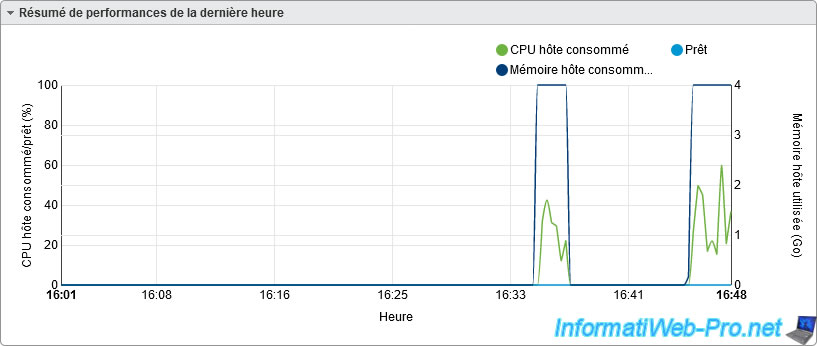
In the "Performance summary last hour" section located just below, you can easily see the history of the use of the processor (CPU) in percent (%) and RAM in GB for the last hour by this virtual machine.
In the "Hardware Configuration" section still below, you will see :
- CPU :
- CPU Cores : the number of physical processor logical cores allocated to this virtual machine.
- Sockets : the number of virtual processors that will be seen by the guest operating system.
- Core per Socket : used to specify how many cores to use per virtual processor in the virtual machine.
This makes it possible to create a single multi-core virtual processor or several processors with a single core, for example. - IOMMU : indicates whether the IOMMU (or its equivalent "VT-d" at Intel) is enabled or not for this virtual machine.
- Memory : the amount of RAM allocated to your virtual machine and therefore the maximum amount of RAM that this virtual machine can use.
Unless you have set a limit in your VM settings. - Hard disk :
- Backing : location (datastore + folder) where this virtual hard disk is located and name of the file under which it's stored on your datastore.
- Capacity : maximum size that this virtual hard disk can occupy on your datastore.
This therefore corresponds to the provisioned size and what may be different from the space currently occupied by this virtual hard disk on your datastore. - Thin provisioned : indicates whether dynamic provisioning was used for this virtual hard disk or not.
If yes, the file on that virtual hard drive will only take up the space required for the data in it.
If not, the space will have been previously reserved on the physical disk since this is a static provisioning. - Controller : indicates on which controller (IDE, SATA, SCSI or NVMe) this virtual hard disk is connected at which position.
- Mode : indicates whether this virtual hard disk is dependent or independent of the snapshot system.
If it's in "Dependent" mode (which is the case by default), the creation of a snapshot will also restore the state of the virtual hard disk to the state in which it was during the creation of the snapshot.
If this is in "Independent" mode, creating and restoring snapshots on your virtual machine will have no effect on this virtual hard disk.
- USB controller : indicates the version of the USB controller used by this virtual machine.
Note that the default choice made by VMware ESXi depends in particular on the operating system that you have virtualized.
For example, VMware ESXi will use a USB 2.0 controller by default with Windows XP and Windows 7. But, it will use an USB 3.0 controller with Windows 8, 8.1 and 10 that natively supports USB 3.0. - Network adapter :
- Network : indicates on which port group (default : VM Network) this virtual network adapter is connected, as well as whether the network cable must be virtually plugged into it or not when starting (powering on) the virtual machine.
- Connected : indicates whether the network cable is currently virtually plugged into it or not.
Note that when the virtual machine is powered off, the value will therefore always be "No". - MAC address : indicates which MAC address has been assigned to this virtual network adapter by VMware ESXi or by you if you have manually set it in your virtual machine's virtual hardware.
- Pass-through (Direct-path I/O) : indicates whether it's a physical network adapter passed to the virtual machine or not. Note that "Direct-path I/O" is more often known as "PCI passthrough".
- Video card :
- Total video memory : amount of video memory allocated to this virtual machine.
- Number of displays : number of physical screens that this virtual machine can use on the client workstation.
- 3D Graphics : indicates whether 3D is enabled or not and therefore whether 3D will be supported or not in the guest operating system.
- 3D Renderer : indicates how the 3D calculations will be managed. Either these will be managed in software by the processor (CPU) or in hardware by the graphics card (GPU).
If the value "Automatic" is displayed, it means that VMware ESXi will automatically choose the method best suited to your case. - 3D Memory : amount of 3D memory that will be allocated to your virtual machine.
- CD/DVD drive :
- Backing : indicates which ISO file or physical CD/DVD drive of the host (VMware ESXi hypervisor) is currently selected for this virtual CD/DVD drive
- Connected : indicates whether the ISO file is currently inserted in the virtual CD/DVD drive or if the CD/DVD from the physical CD/DVD drive of the host is currently inserted in the virtual CD/DVD drive.
Note that the value will always be "No" if the virtual machine is powered off. - Controller : indicates on which controller (IDE or SATA) it's connected and at which position.
- Select disc image : if the virtual CD/DVD drive is configured to use an ISO file present in a datastore, this option will be displayed on the right and will allow you to change the ISO file currently selected for this virtual CD/DVD drive.
- Others : indicates what additional hardware is used by this virtual machine, such as the type of SCSI controller used (for example : LSI Logic SAS), SATA, IDE, PS2, PCI and SIO controllers, and input devices (keyboard and pointing device).
Note that some of the informations listed above are only visible if you deploy the corresponding node.

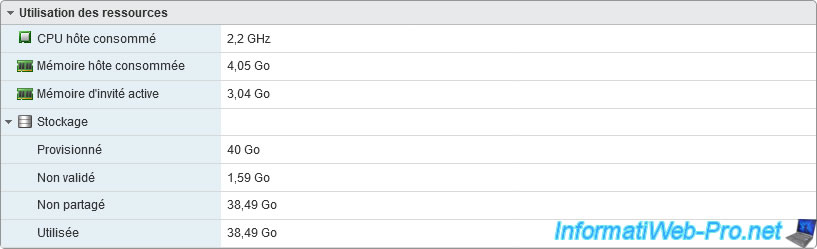
In the "Resource Consumption" section still below, you will see :
- Consumed host CPU : the frequency (in MHz or GHz) currently used by the virtual processor of your virtual machine.
- Consumed host memory : the amount of RAM (in MB or GB) currently used on the host (the VMware ESXi hypervisor).
- Active guest memory : amount of RAM used in the guest operating system
- Storage :
- Provisioned : always corresponds to the maximum size that the virtual hard disk can take in the host's datastore. Whether it has been provisioned dynamically (thin provisioned) or statically.
- Uncommitted : with dynamic provisioning (thin provisioning), this value is the difference between the provisioned space and the used space.
In this case, 40 GB (provisioned space) - 38.49 GB (used space) = approximately 1.59 GB (unvalidated space).
Source : Storage Views - uncommitted space and shared space - Not-shared : by default, a virtual hard disk can only be used by one virtual machine. The space used is therefore not shared.
- Used : storage space used on the datastore
2. Actions for the virtual machine
Using the options at the top of the desired virtual machine page, you can perform the most common actions :
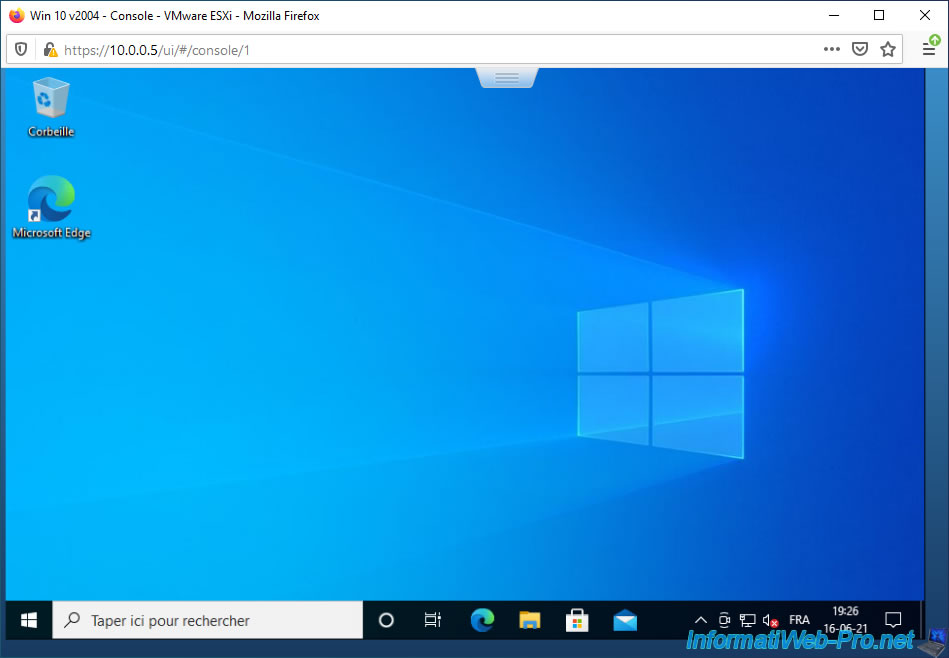
- Console : access the console of this virtual machine and manage it from your web browser or from the VMware Remote Console program (free) if it's installed on your computer.
- Monitor : access the "Monitor" section of your virtual machine to see the system resources used by it, see the events, tasks, ... which concern it.
- Power on : start the virtual machine
- Shut down / Power off : respectively allow to shut down the guest operating system properly (if VMware Tools are installed and running) or to force shutdown of the virtual machine by virtually unplugging the power outlet from this one.
- Suspend : allows you to properly pause the guest operating system (if VMware Tools are installed and running) if possible, and then suspend the virtual machine.
Note that you can manage the power of your virtual machine for this particular case by looking in its power management options. This is especially useful in case you want to use Wake on LAN (WoL). - Restart / Reset : respectively allow you to properly restart the guest operating system installed in the virtual machine (if VMware Tools are installed and running) or to force it to restart as if you had pressed the "Reset" button of this virtual machine.
- Edit : allows you to edit the virtual hardware, options of the VM, as well as other settings of this VM.
Although some options are still available, changing some settings or options requires that the virtual machine be shut down (powered off). - Refresh : allows you to refresh this page to update the action bar, as well as all the other information displayed on this page.
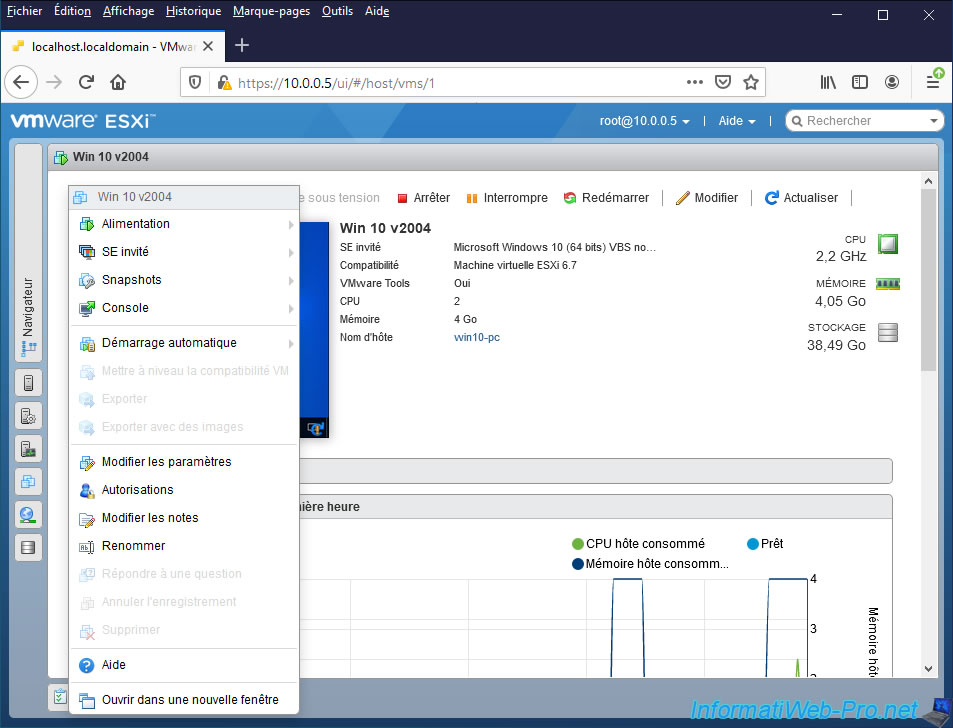
- Actions : provides access to many other actions that can be used on this virtual machine.

If you click on the "Actions" button, you will be able to :
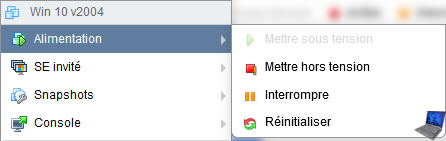
- Power : manage the power of the virtual machine.
- Guest OS : manage shutdown, restart, ... of the guest operating system (if VMware Tools are installed and running)
- Snapshots : allows you to manage the snapshots of the virtual machine
- Console : allows you to access the console of this virtual machine from your web browser or from the VMware Remote Console (VMRC) program
- Autostart : allows you to manage the automatic start of this one when you start your VMware ESXi hypervisor.
- Upgrade VM Compatibility : allows you to change the compatibility level of the virtual machine (and therefore also its virtual hardware) to benefit from new features, but at the expense of backward compatibility with older versions of VMware ESXi or others VMware products.
- Export : allows you to export the virtual machine in OVF format by exporting its configuration file (in OVF format), its associated virtual hard disks, as well as the configuration of its BIOS or EFI firmware (optional).
- Export With Images : same as the previous option, but also allows you to export the ISO file(s) that would be in a virtual CD/DVD drive and/or the virtual floppy disks that would be in the virtual floppy drive (if he is present).
- Edit settings : allows you to change the virtual hardware, options, and configuration settings of your virtual machine.
- Permissions : allows you to assign users and roles to this virtual machine.
To do this, refer to our tutorial : VMware ESXi 6.7 - Manage roles, users and permissions. - Edit notes : allows you to add or edit your personal notes for this VM. This is a field allowing you to write whatever you want to easily find the information you need for this virtual machine.
- Rename : allows you to rename the virtual machine.
- Answer question : allows you to answer a question that you have not answered. For example, if you are recovering a virtual machine from another computer or server and attempting to launch it on your VMware ESXi hypervisor, a question will appear asking if you have moved or copied it.
If you don't answer the question displayed and you close your web browser window, you can display this question again by clicking on this option. - Unregister : allows you to hide a virtual machine from your VMware ESXi hypervisor, but without physically deleting its files on the physical disk.
- Delete : allows you to remove the virtual machine from your VMware ESXi hypervisor and physically delete all the files that make up the virtual machine on the physical disk.
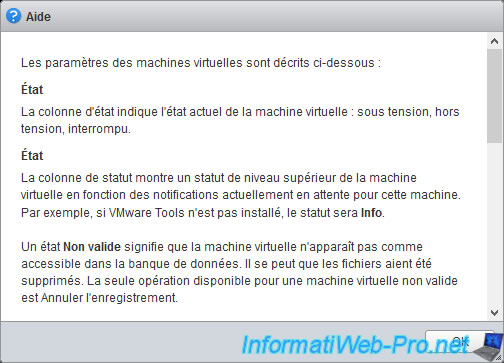
- Help : allows you to display detailed information about the data displayed on your virtual machine page.
- Open in a new window : allows you to open this page in a new window or a new tab (depending on the behavior adopted by your web browser).
In this "Actions" menu, the "Power" submenu allows you to manage the power supply to your virtual machine :
- Power on : allows you to start it
- Power off : allows you to suddenly cut off the electrical current of your virtual machine to force it to shut down
- Suspend : allows you to suspend the virtual machine (or in other words, to pause it), but without pausing the operating system first
- Reset : allows you to force it to restart (as if you had pressed the Reset button on the virtual machine).
The operating system will therefore be abruptly stopped, then restarted normally. Which can cause errors in the guest operating system.
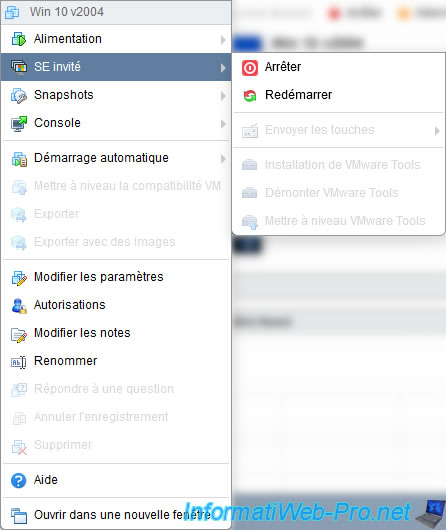
In this "Actions" menu, the "Guest OS" submenu allows you to correctly perform some actions in the guest operating system using VMware Tools :
- Shut down : allows you to ask the operating system to shut down properly
- Restart : allows you to ask the operating system to restart properly
- Send keys : allows you to send specific keys or key combinations to the guest operating system without your computer detecting the keystrokes.
However, this option requires that a browser console is currently open to work, otherwise this option will be grayed out. - Install VMware Tools : starts the installation of VMware Tools in the operating system.
This is useful when you have just installed the desired guest operating system in your virtual machine. - Unmount VMware Tools : allows you to remove the VMware Tools virtual CD from the virtual CD/DVD drive of your virtual machine.
However, under normal circumstances, you will not need to use this option since the virtual CD of VMware Tools is automatically ejected after their installation is complete. - Upgrade VMware Tools : in case you have recovered a virtual machine from an older version of VMware ESXi, from an older version of another VMware product, or you have updated your VMware ESXi hypervisor to a newer version , this will allow you to update the VMware Tools installed in the guest operating system to match the latest version offered by your version of VMware ESXi.
As you will understand, if the VMware Tools are not installed in the guest operating system or if they are not running, these options will therefore not be able to work. Except the options concerning the installation or the upgrade of VMware Tools.
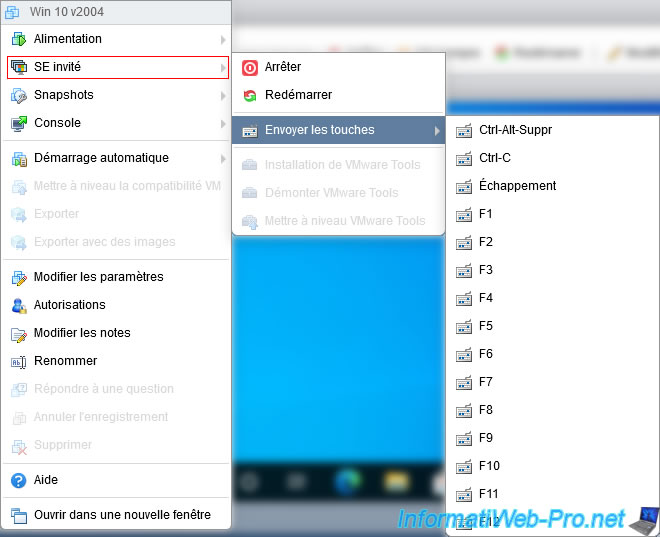
If your virtual machine is started (powered on) and you open a browser console, you will see that the "Guest OS -> Send Keys" option is now available.
As you can see, thanks to this "Send keys" submenu, you can send different keys or key combinations :
- Ctrl-Alt-Suppr : allows access to the Windows security screen, or to the task manager on older versions of Windows (such as Windows XP or earlier) or to restart the virtual machine (in the event that Linux is installed as a guest operating system)
- Ctrl-C : allows, for example, to stop a process which is currently running in an open command prompt in the guest operating system (with Windows).
- Escape : allows you to simulate pressing the "Esc" key on the keyboard
- F1, F2, ... : allows you to simulate pressing one of the "F" keys followed by a number located at the top of the keyboard
In this "Actions" menu, the "Snapshots" submenu allows you to :
- Take snapshot : quickly save the state of a virtual machine by creating a snapshot
- Restore snapshot : quickly restore the state of a virtual machine by restoring the last snapshot created on it
- Manage snapshots : manage created snapshots, create new ones, restore, delete, ... snapshots
- Consolidate disks : delete redundant data that would be present following the creation, restoration and/or deletion of different snapshots.
To learn more about snapshot management, refer to our tutorial : vmware-esxi-6-7-instantanes.

In this "Actions" menu, the "Console" submenu allows you to :
- Open a browser console : the console will therefore be displayed in the same page as the one currently open and a gray outline will appear around it.
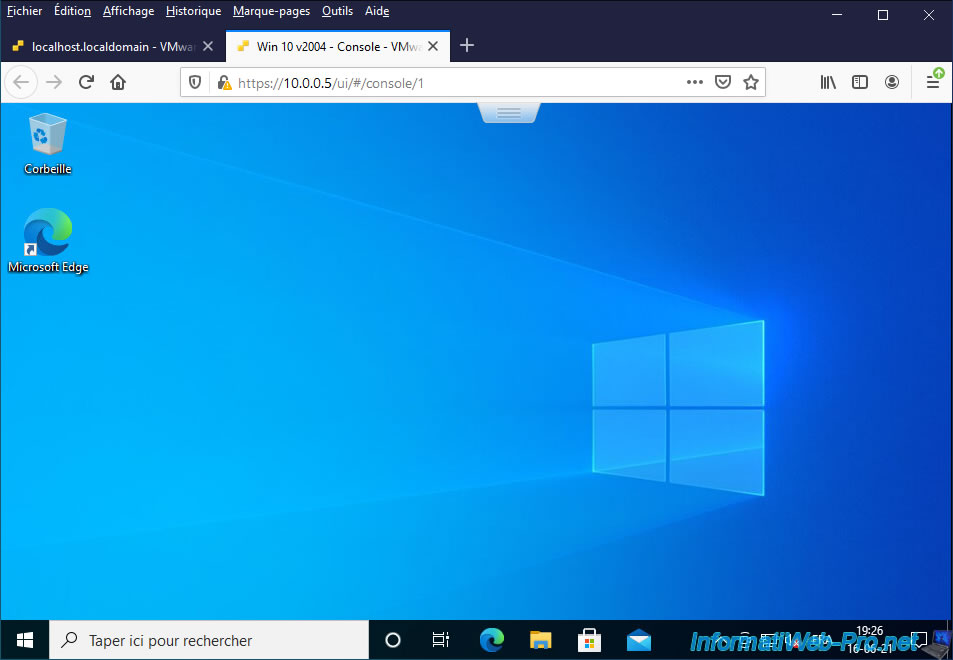
- Open console in new window : a new window will be opened with only the console of your virtual machine.
- Open console in new tab : same, but in a new tab of your web browser.
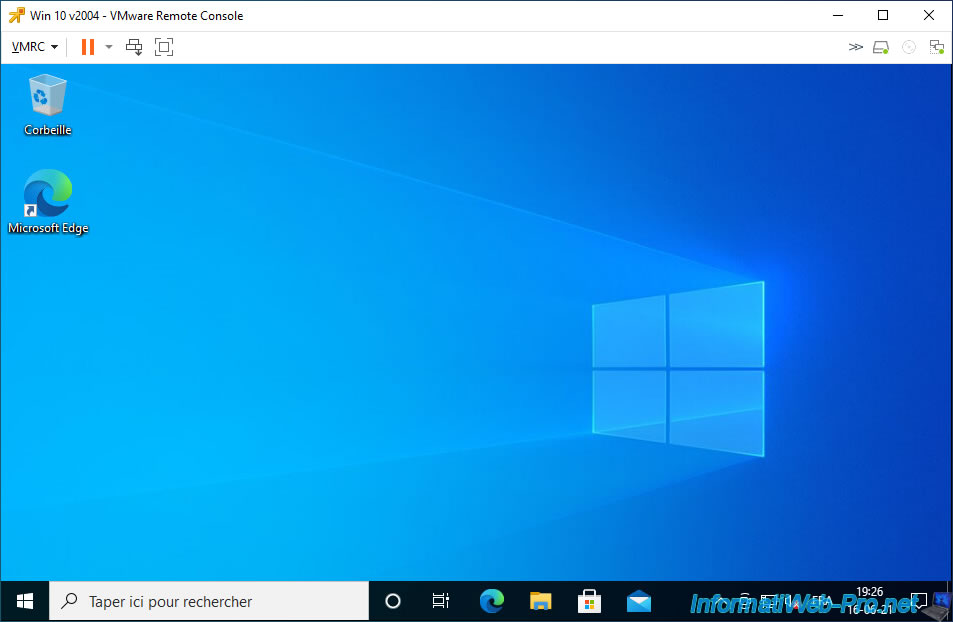
- Launch remote console : access the console of your virtual machine from a compatible VMware program (such as : VMware Remote Console (VMRC) which is free or VMware Workstation which is paid).
- Download VMRC : allows you to download the VMware Remote Console (VMRC) program from the official VMware website to be able to use the "Launch remote console" option above, in case you don't have another VMware product compatible installed on your computer.

As previously stated, opening a browser console will display your virtual machine's console in the same page that is currently open.
If you choose the option "Open console in new window", a new window will appear and the console will take all the space available in this window.
If you choose the option "Open console in new tab", the console will be opened in a new tab of your web browser.
If you choose the "Launch remote console" option, your web browser will ask you to choose the program to use.
Among the compatible programs, you will find "VMware Remote Console (VMRC)" and "VMware Workstation".
In this case, we have chosen "VMware Remote Console (VMRC)" which is a very good alternative to VMware Workstation Pro to manage virtual machines running on your VMware ESXi hypervisor.
Indeed, the management of a virtual machine from these 2 programs is quite similar.
In this "Actions" menu, the "Autostart" submenu allows you to :
- Enable : enable this virtual machine to start automatically when your VMware ESXi hypervisor starts.
Note that once the automatic start of this virtual machine is enabled, the "Enable" option will disappear and give way to the "Start later" option. - Start later : change the startup priority of this virtual machine so that it starts after the others
- Start earlier : change the startup priority of this virtual machine so that it starts before others
- Configure : configure the startup delay, the shutdown delay, ...
- Disable : disable the autostart of this VM when starting your VMware ESXi hypervisor.

If you click on the "Help" option of this "Actions" menu, you will find information concerning some informations displayed on the page, such as the state of your virtual machine, the space allocated or used, the hostname of the virtual machine, ...
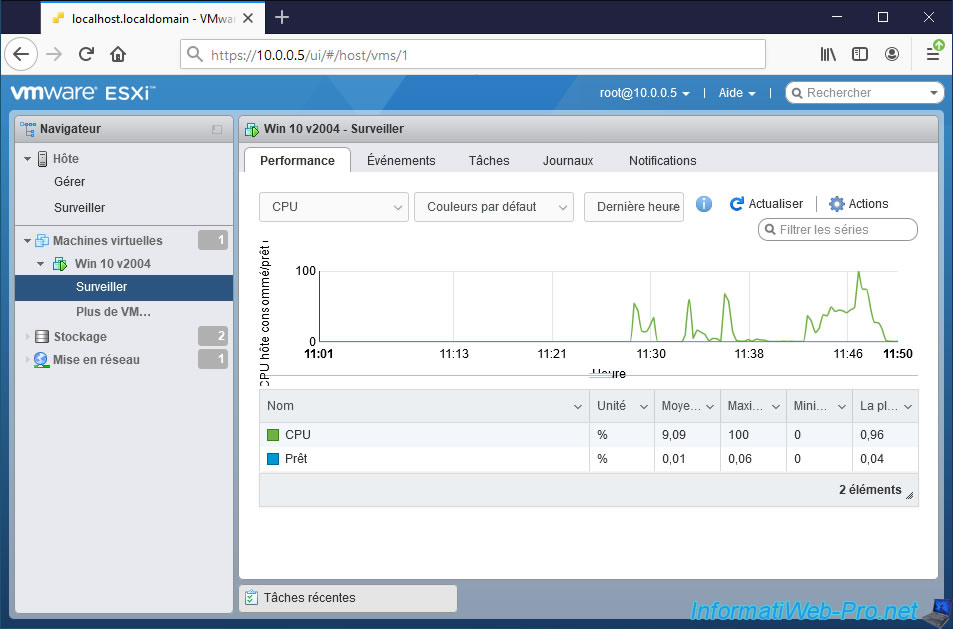
3. Monitor a virtual machine
When you deploy the node of a virtual machine, you will find a "Monitor" option which will allow you to consult the performances, the events, the tasks, ... concerning this one.
By default, in the "Performance" tab, you will find a graph with the percentage of virtual processor (CPU) use by it over the last hour (by default).
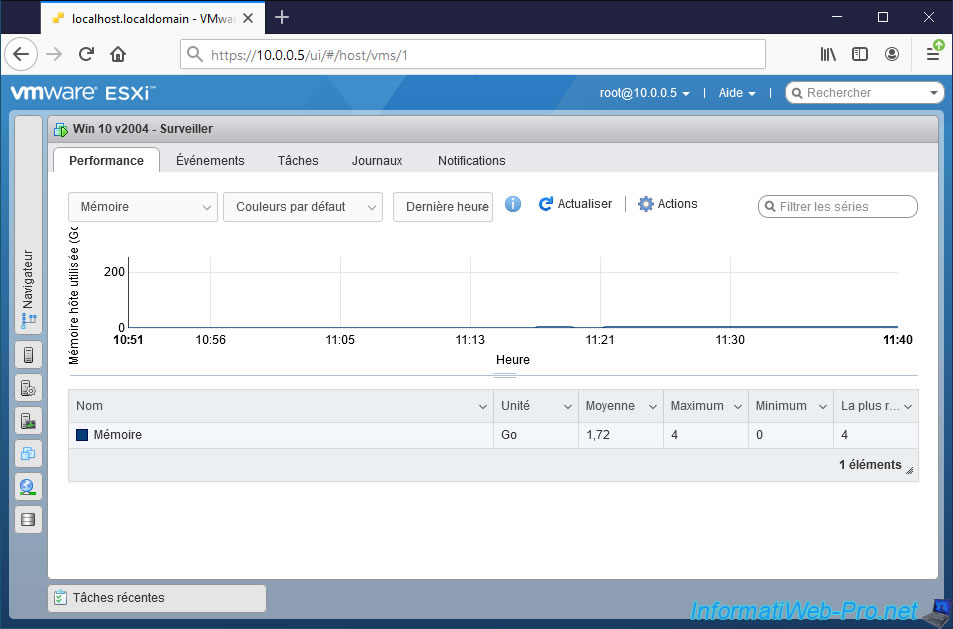
In the 1st list available on the left, you can also select "Memory" to see the use of the host memory (random access memory) used in GB.
You can also know the usage rate at the storage level by selecting "Disk".
For the use of the disk, you will find :
- disk I/O rate (aggregated)
- total read rate
- total write rate
- maximum latency
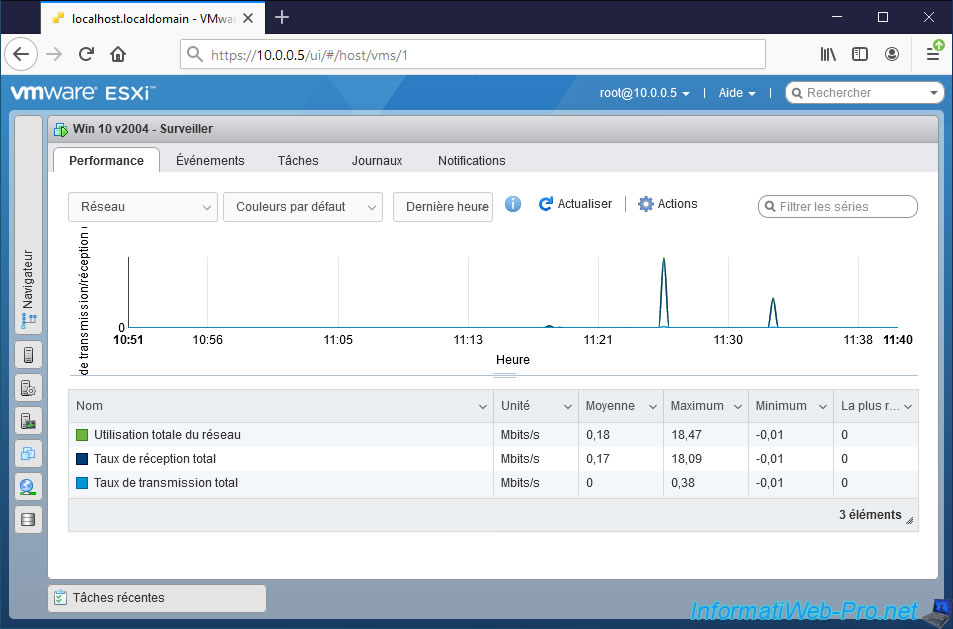
If you select "Network", you will be able to know :
- Total network usage : the network bandwidth used for sending and receiving
- Total reception rate : the network bandwidth used for reception (download)
- Total transmission rate : the network bandwidth used for data transmission
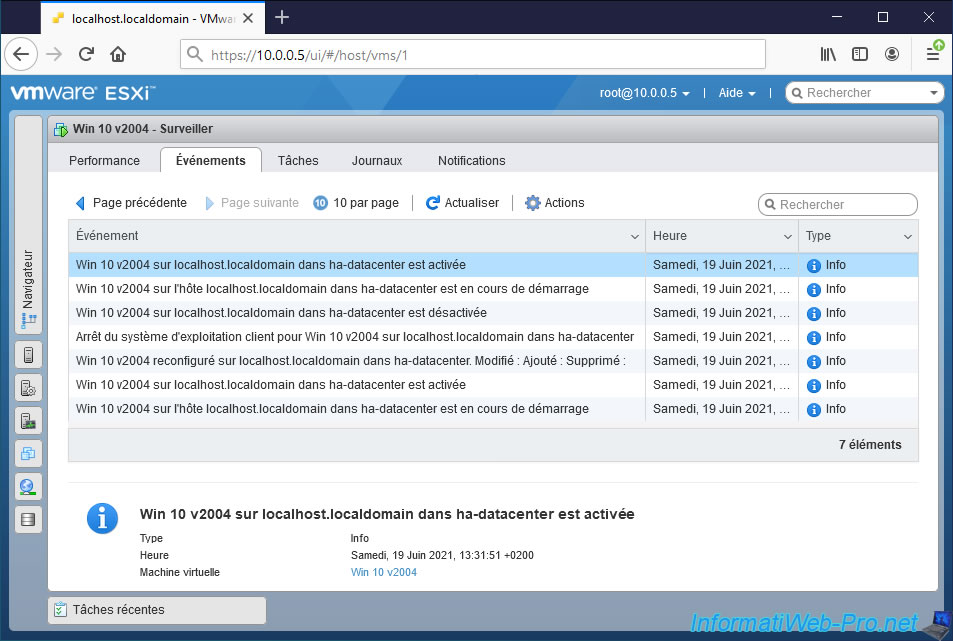
In the "Events" tab, you will be able to see the latest events that have occurred on this virtual machine.
For example : powered on (startup), powered off (shutdown), reconfiguration of the virtual machine.
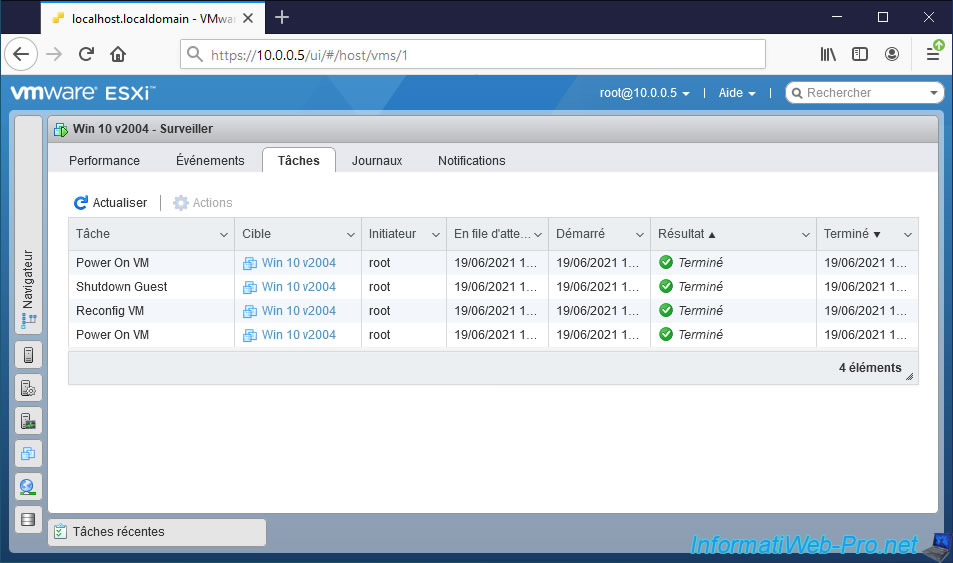
In the "Tasks" tab, you will find the latest tasks that have been launched on this virtual machine.
Such as :
- Power On VM : powering on (starting) a virtual machine
- Shutdown Guest : shutdown of the guest operating system installed in the virtual machine
- Reconfig VM : reconfiguration of the virtual machine. Or in other words, the modification of its virtual hardware and/or its settings
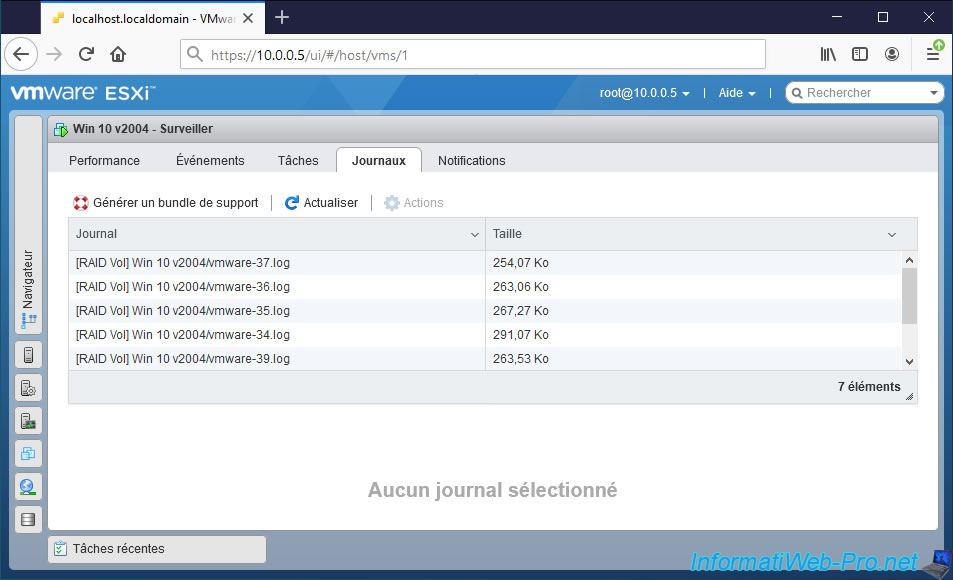
In the "Logs" tab, you will find a history of all the log files created each time your virtual machine is started.
These contain a lot of information that can be useful to VMware technical support in case you have a problem with your virtual machine.
The log file with the highest number is the most recent and therefore the most useful if a problem has recently arisen with this virtual machine.
Note that the "Generate Support Bundle" option allows you to create a compressed file including these log files, as well as many other files. Then, you can send this compressed file to VMware Support so that they can help you solve your problem.
However, be aware that this may contain sensitive information, so don't send it to just anyone.
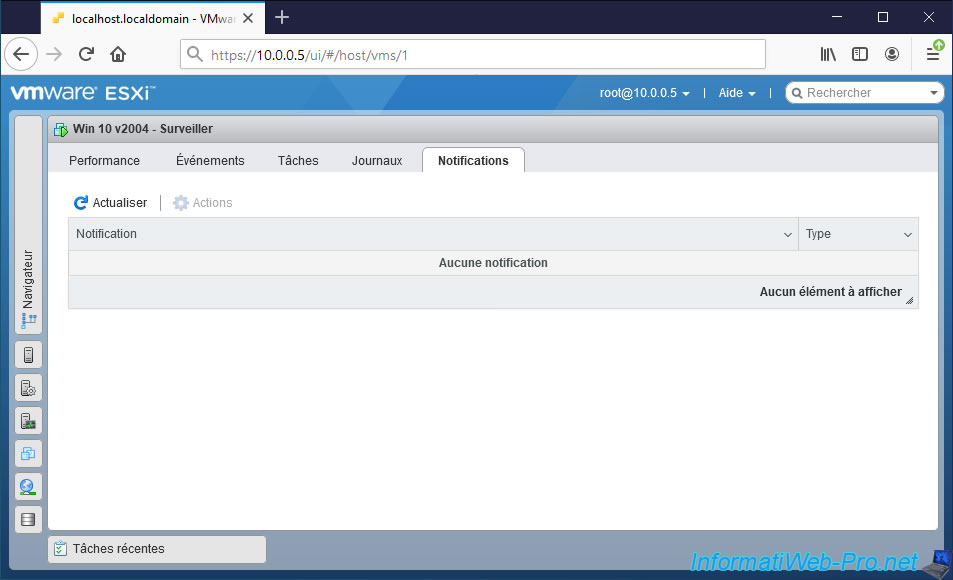
In the "Notifications" tab, you will find the notifications about this virtual machine.
Share this tutorial
To see also
-

VMware 5/25/2022
VMware ESXi 6.0 - Install the VMware Host Client web client
-

VMware 5/27/2022
VMware ESXi 6.5 - Add a network driver in the installation ISO
-

VMware 1/27/2023
VMware ESXi 6.7 - Enable virtualization-based security (VBS)
-

VMware 12/2/2022
VMware ESXi 6.7 - Install and use the VMRC console on Linux
You must be logged in to post a comment