Install VMware ESXi 7.0 or 6.7 and create your first virtual machine
- VMware
- 08 May 2024 at 13:32 UTC
-

- 2/3

4. Register VMware ESXi
To register VMware ESXi, if you have a serial number for VMware ESXi, specify the web address shown on the home screen of your VMware ESXi hypervisor.
In our case : https://10.0.0.5/
Then, log in as root with the password defined during the installation of VMware ESXi.

The 1st time you log in, VMware will ask you if you want to participate in the Customer Experience Improvement Program (CEIP).
However, in many cases, companies don't like this kind of function for reasons of confidentiality.
So, uncheck "Join the VMware Customer Experience Improvement Program" and click OK.

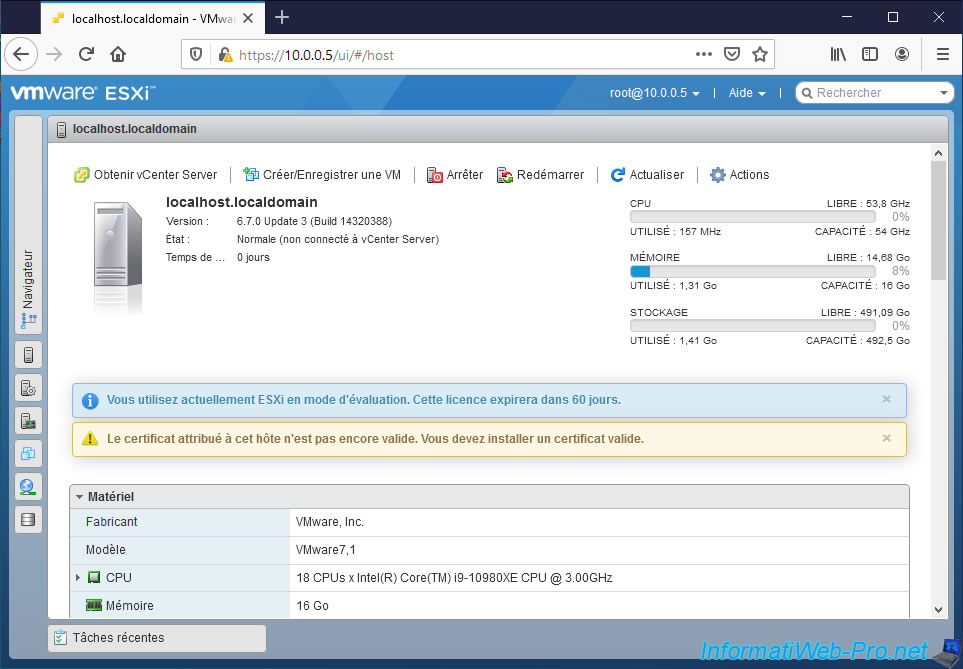
As you can see, by default VMware ESXi runs in evaluation mode and this evaluation license will expire in 60 days.
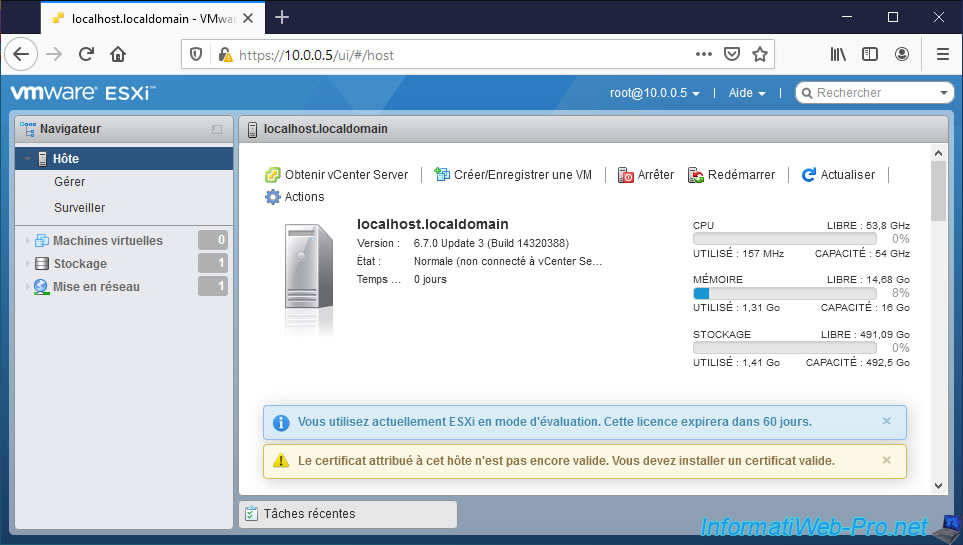
Click on the "Browser" tab on the left to open the menu.
Then, go to : Host -> Manage.
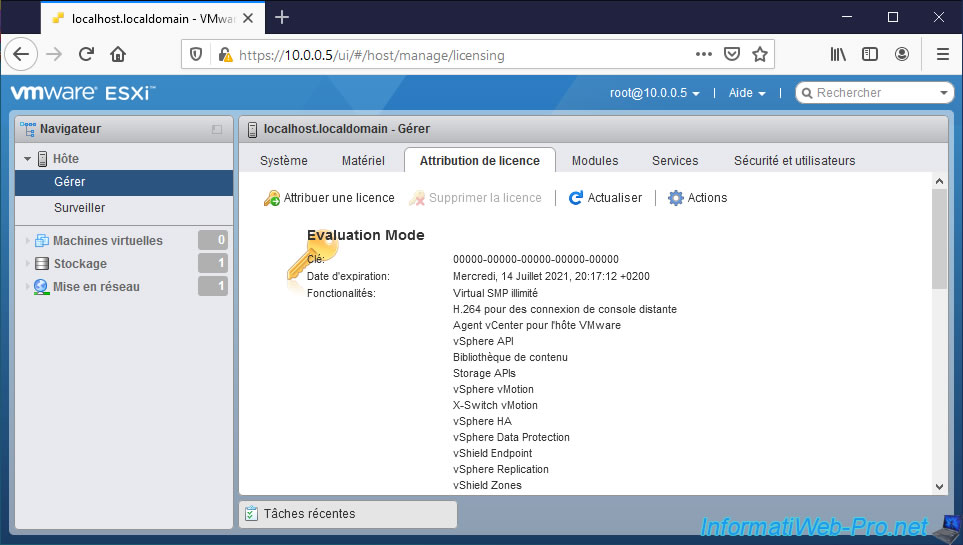
Then, go to the tab : Licensing.
As you can see, currently in trial mode, there are a lot of features.
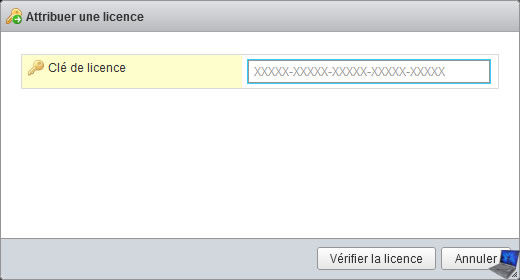
Click on : Assign license.
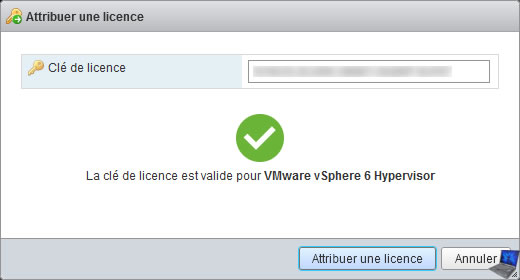
In the "License key" box, enter the serial number that VMware provided to you on the VMware ESXi download page and click : Check license.
If the specified serial number is correct, the "License key is valid for VMware vSphere 6 Hypervisor" or "License key is valid for vSphere 7 Hypervisor" message will appear (depending on your version of VMware ESXi).
To use it, click on : Assign license.
As you can see, the big list of features is gone, because VMware ESXi now works, in our case, as a free version.
Warning : the free version of VMware ESXi no longer exists since February 2024 following the acquisition of VMware by Broadcom.
If you want to continue using VMware ESXi after its 60-day evaluation period (which still exists), you will need to license VMware vSphere.
Note that perpetual (permanent) licenses no longer exist since this purchase. VMware vSphere is now available with a subscription only.
For more information regarding VMware vSphere editions, see our article "VMware ESXi 6.7 - What is VMware vSphere ?".
However, as long as the 60-day evaluation period has not expired, you can very well click on "Remove license" to reactivate paid features temporarily and thus learn how to use certain paid features (which would not be included in your edition of VMware vSphere).
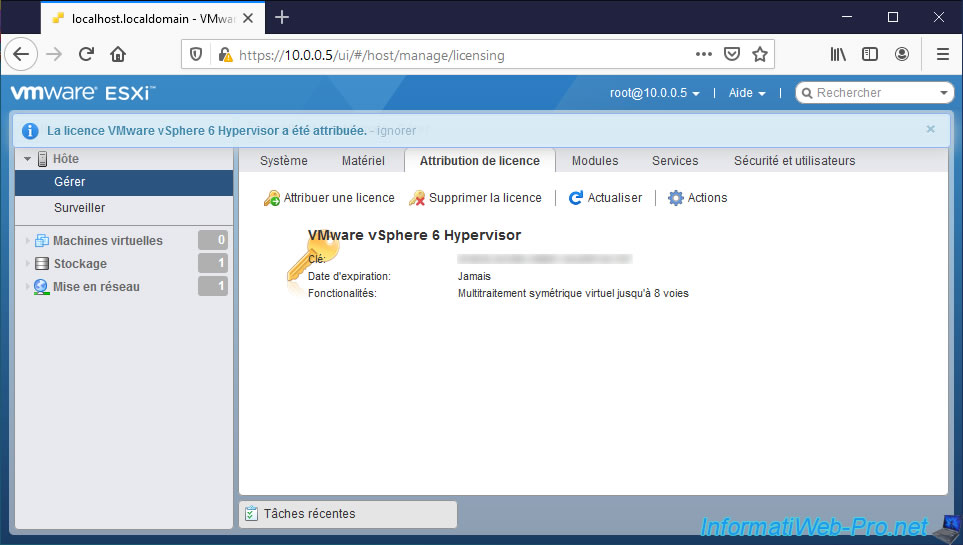
Once your VMware ESXi hypervisor is registered, the message about the evaluation mode will disappear from the web interface.
5. Storage on VMware ESXi 6.7
On VMware ESXi 6.7, you can use almost all of the disk space selected during installation to create VMs and store the ISO files of your guest operating systems.
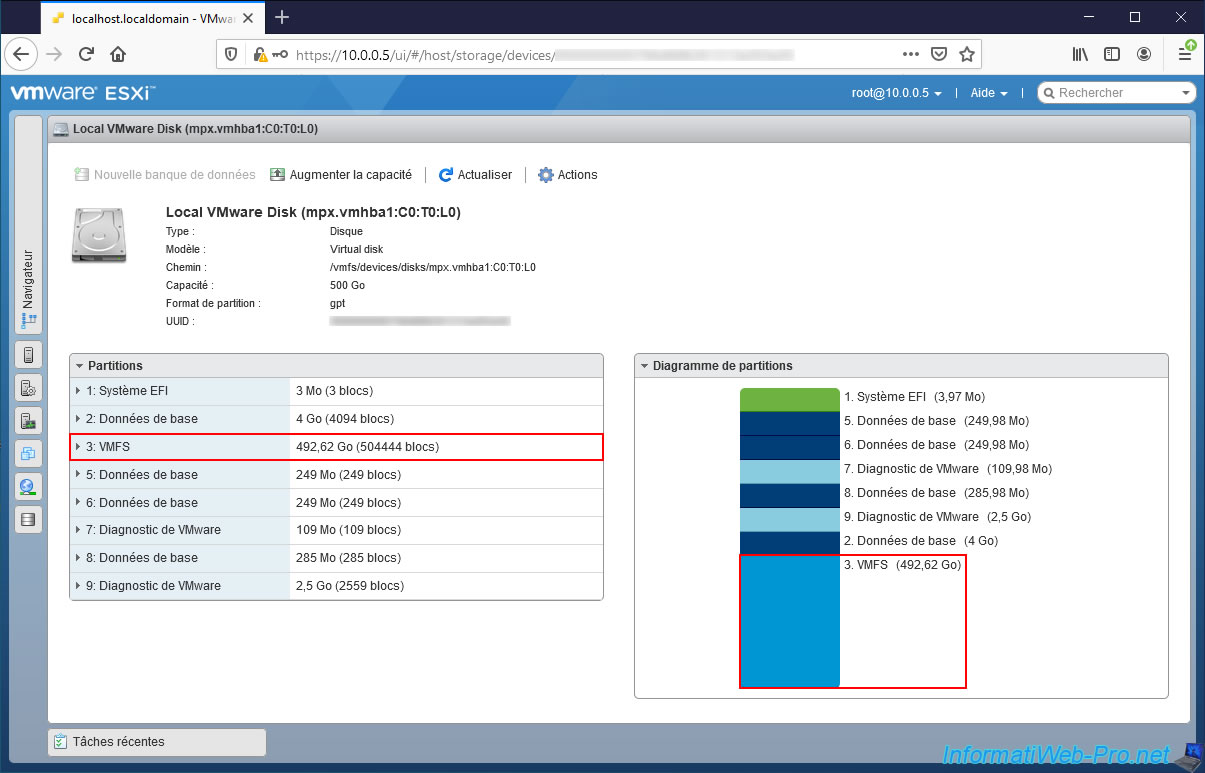
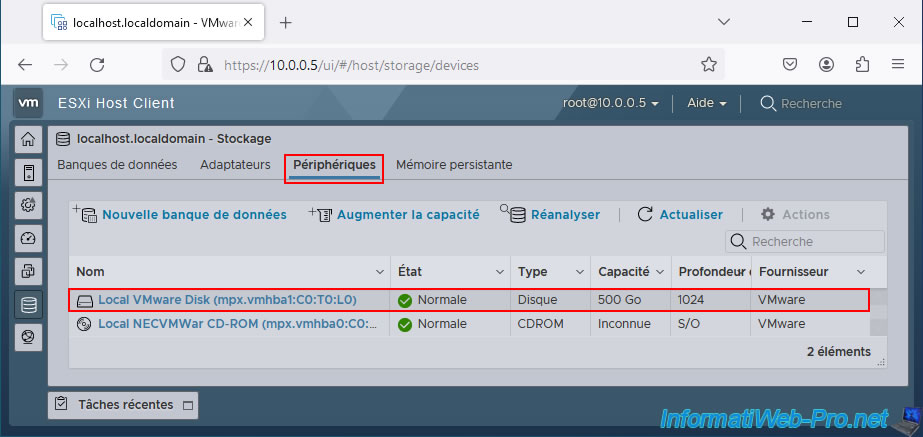
As you can see, on our VMware ESXi 6.7 hypervisor, by going to the "Storage -> Devices" section, we can see that we have a physical disk with a capacity of 500 GB.
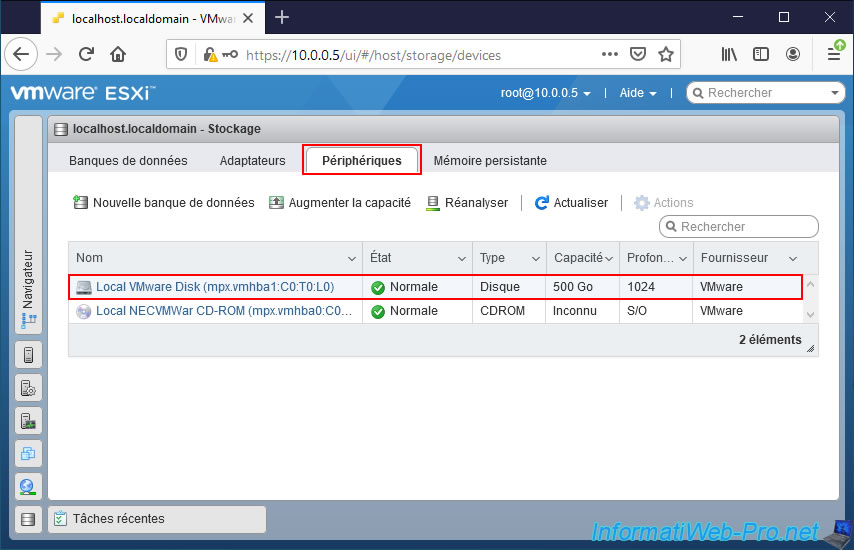
If you click on the name of this disk, you will notice that the large partition whose file system is "VMFS" takes up almost all the available space on your physical disk.
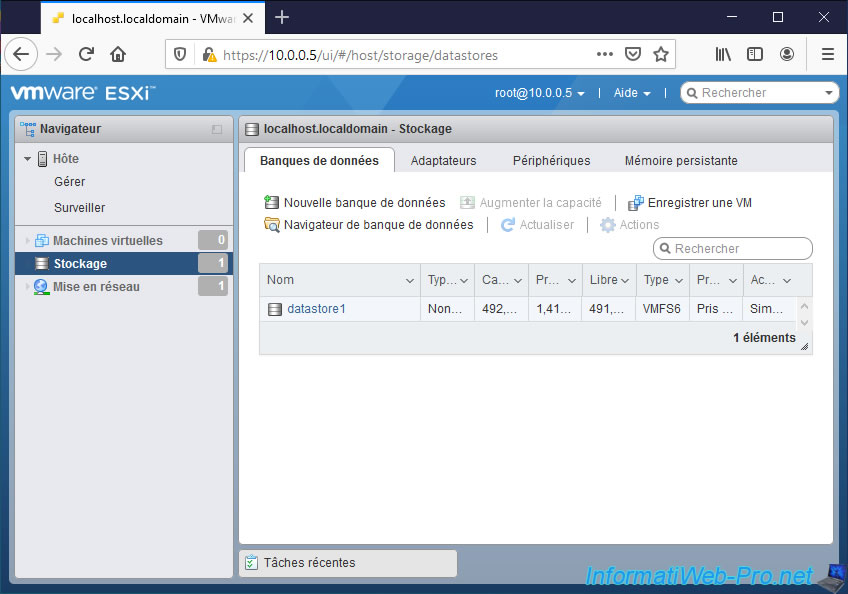
If you go to the "Storage -> Datastores" section of VMware ESXi 6.7, you will notice that the size of the VMFS partition (of the disk mentioned above) corresponds to the capacity of the "datastore1" datastore.
On VMware ESXi 6.7, we can therefore use approximately 492 GB on our 500 GB physical disk.
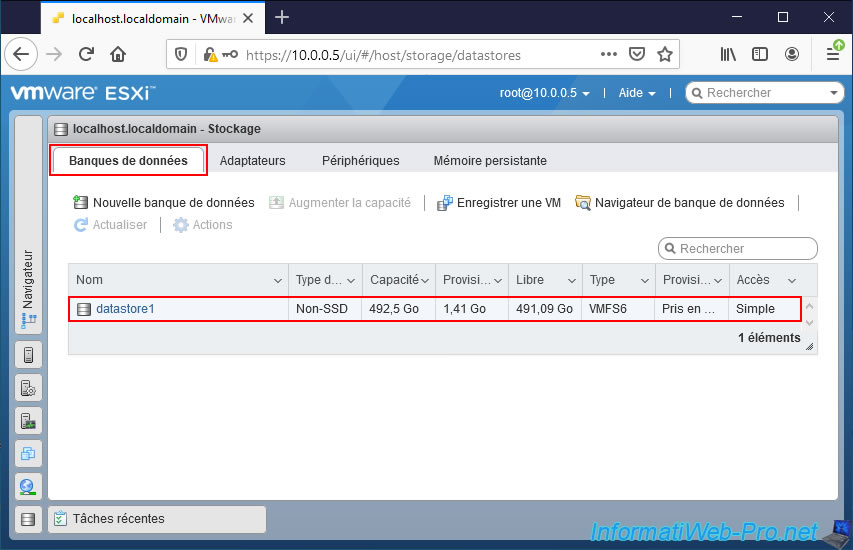
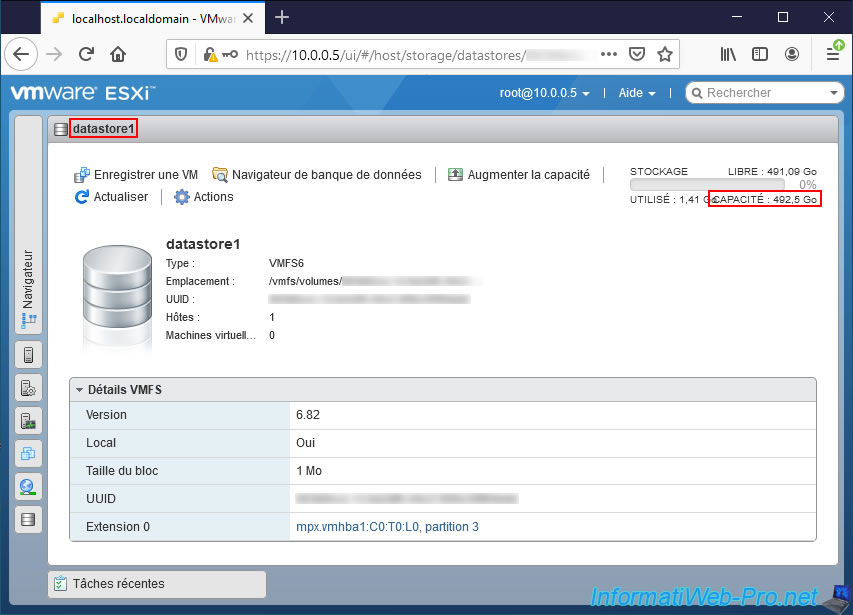
If you click on the name of this "datastore1" datastore, you will again see that the capacity is 492.5 GB.
So, the size of the VMFS partition present on your physical disk.
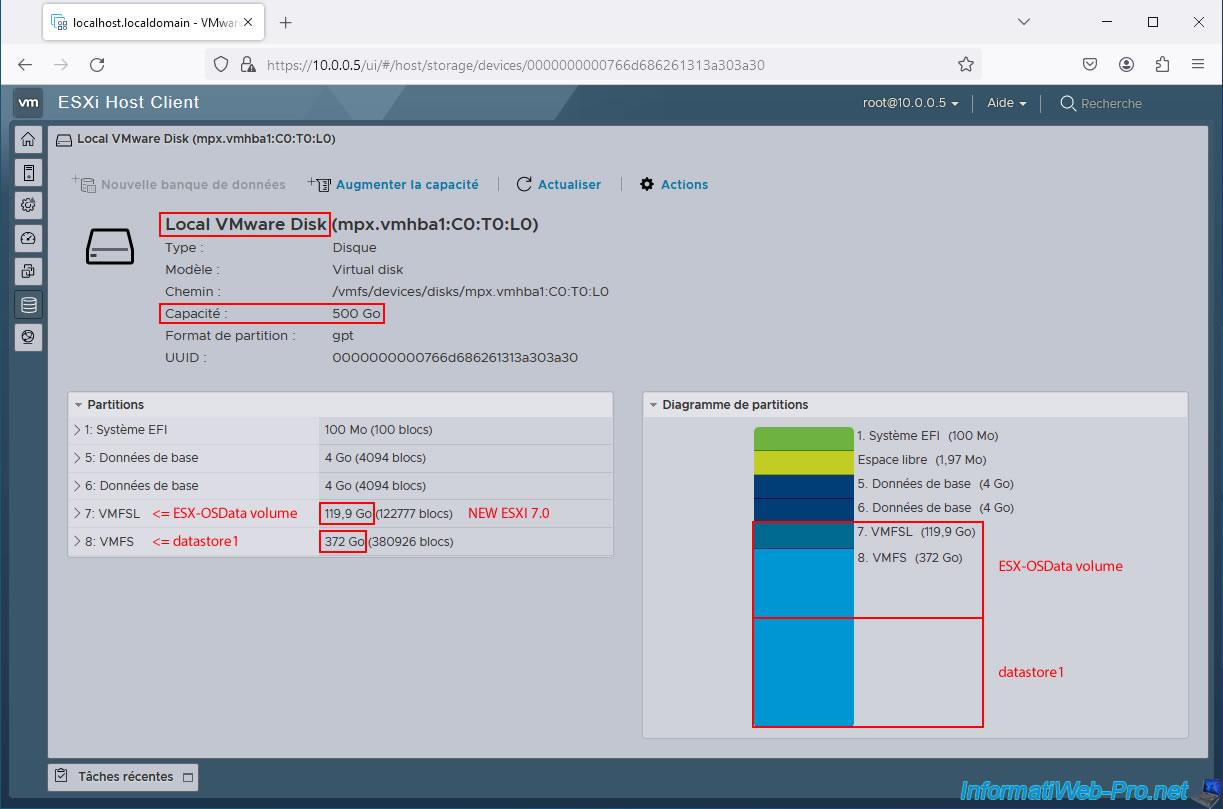
6. Storage since VMware ESXi 7 and new ESX-OSData partition volume type VMFS-L
Since VMware ESXi 7, you will notice that the size of the available disk space displayed by VMware ESXi 7 doesn't correspond to the capacity of the physical disk selected during its installation.
Indeed, since VMware ESXi 7, a new partition "ESX-OSData volume" whose file system is "VMFS-L" (or "VMFSL" in the VMware ESXi 7 web interface) is also present on the selected disk during installation.
If you go to the "Storage -> Devices" section of VMware ESXi 7, you will see that the capacity of your physical disk appears correctly.
In our case, VMware ESXi 7 therefore correctly sees our 500 GB physical disk.
If you click on the name of your physical disk, you will notice that a new partition of approximately 120 GB with the file system "VMFS-L" (or "VMFSL" in the VMware ESXi 7 web client) has appeared on the physical disk selected during installation.
This VMFSL partition corresponds to the new "ESX-OSData" partition of VMware ESXi 7 and its size is generally 120 GB (119.9 GB in our case). Even if you use a multi-gigabyte hard drive.
However, the official VMware ESXi 7 documentation states that the size of this partition can reach up to 138 GB.
The other large partition whose file system is "VMFS" always corresponds to the "datastore1" datastore created by default during the installation of VMware ESXi.
In our case, the VMFS partition is 372 GB in size.
Sources :
- ESXi Hardware Requirements - VMware Docs
- VMFSL partition taking 50% of disk space - VMware Technology Network VMTN
- Boot option to configure the size of ESXi system partitions - Broadcom
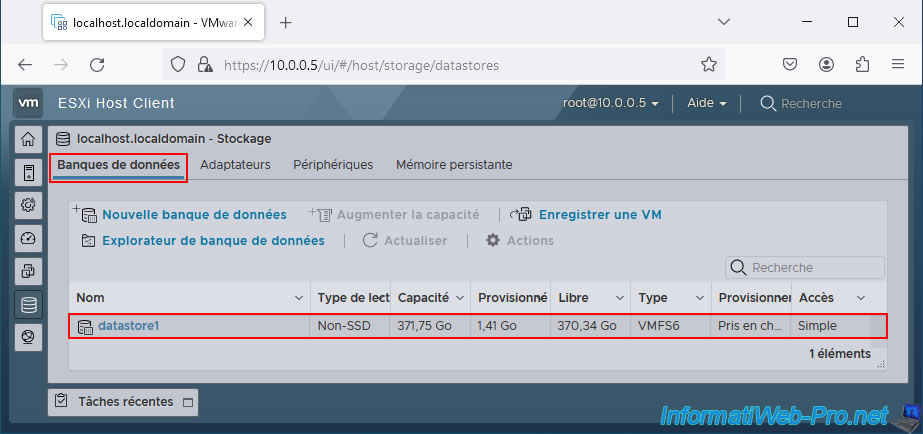
If you go to the "Storage -> Datastores" section of VMware ESXi 7, you will see that the capacity of the "datastore1" datastore corresponds to the size of the VMFS partition seen previously.
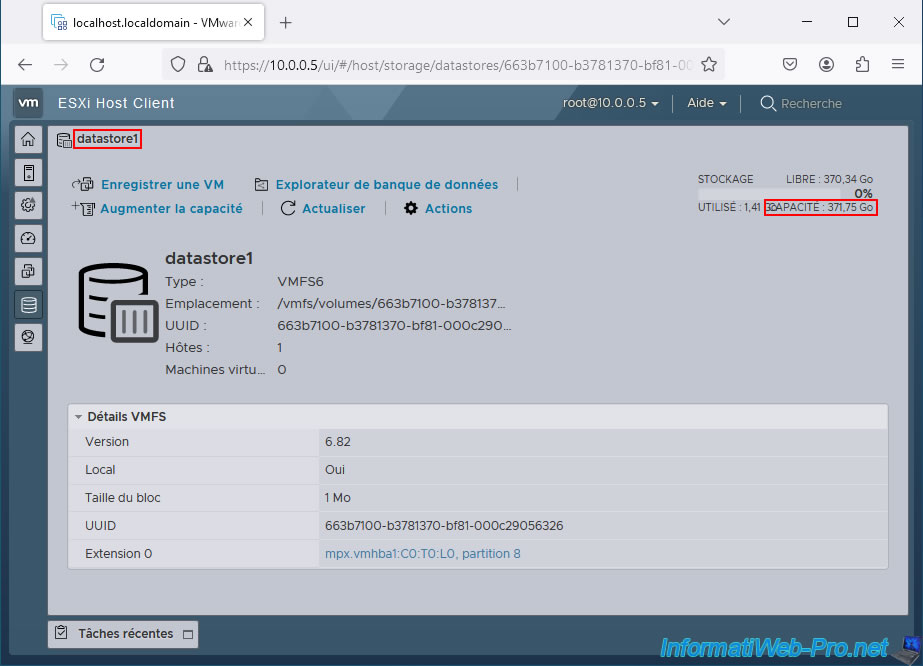
If you click on the name of this "datastore1" datastore, you will again see that the capacity displayed corresponds to the size of the VMFS partition presented previously.
7. Add iso files to the VMware ESXi datastore
To install a guest operating system (OS) in a virtual machine, you have 2 possibilities :
- insert the installation CD/DVD of it in the CD/DVD drive of your computer / server, then use it from the desired virtual machine
- store the ISO files of the desired operating systems in a datastore of your VMware ESXi hypervisor and use them in the virtual CD/DVD drive of the desired virtual machine.
Which is quite handy, since with a rack server there is no CD/DVD drive.
To store files in a datastore, go to the left menu and click on : Storage.
As you can see, by default there is only one datastore named : datastore1.
VMware ESXi is installed on this datastore.
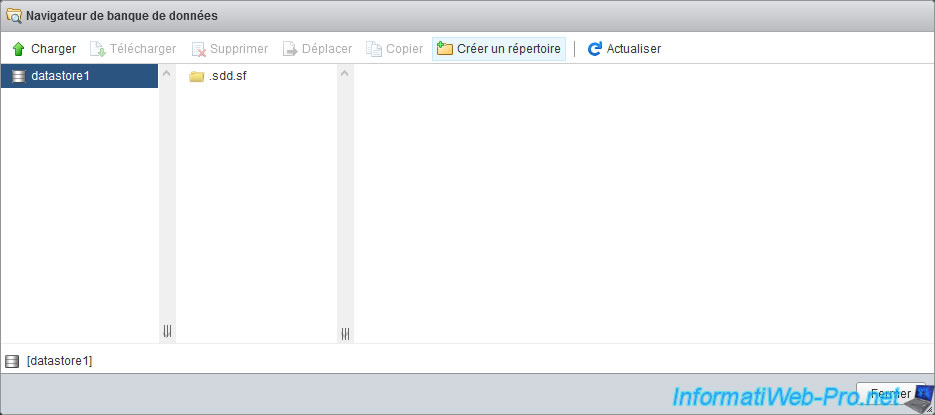
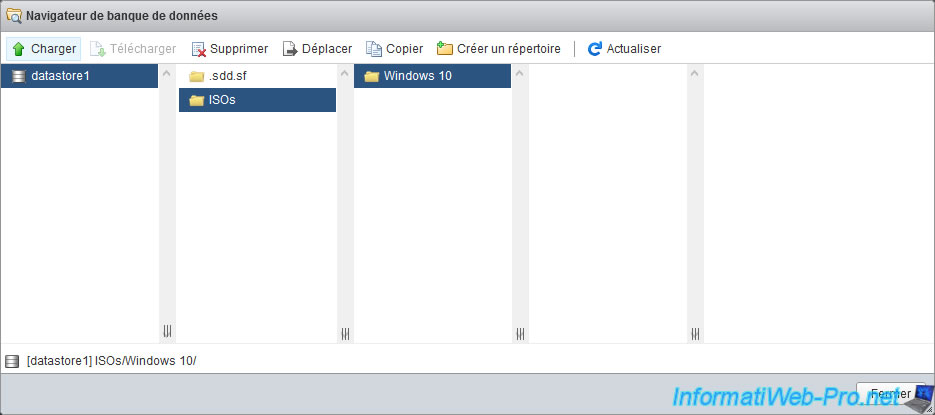
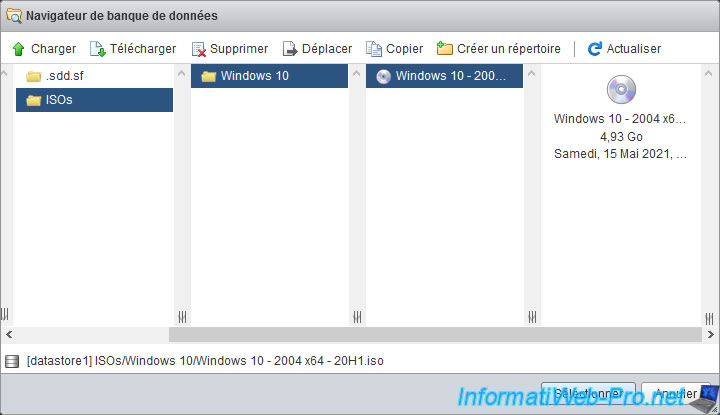
Select it and click on : "Datastore browser".

The datastore browser appears.
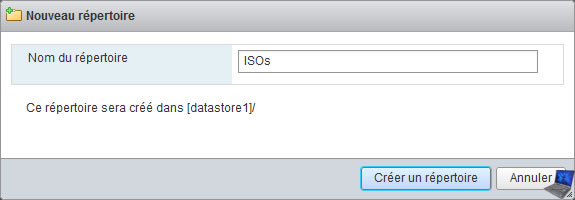
Select the "datastore1" and click on : Create directory.
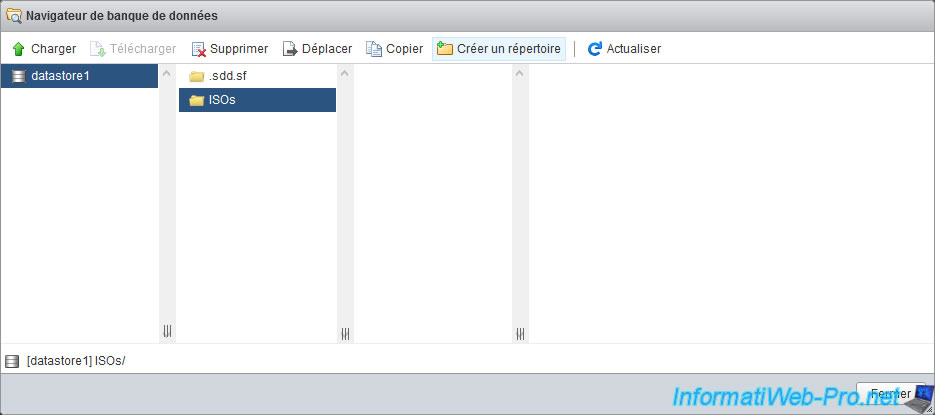
Specify for example "ISOs" as name and click on : Create directory.
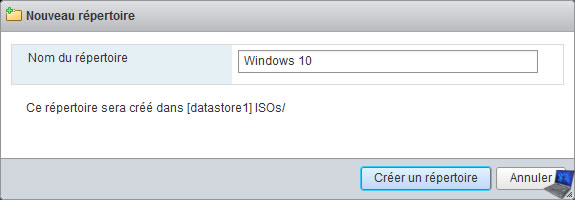
Select the "ISOs" folder you just created and click again on : Create directory.
For example, create one folder per operating system. In our case : Windows 10.
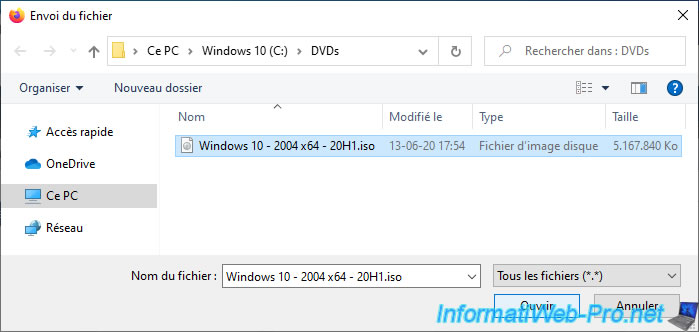
Then, select the new folder created (in our case : Windows 10) and click on the "Upload" button to send a file from your computer to this datastore.
Select the operating system ISO file that you want to install later in a virtual machine and click Open.
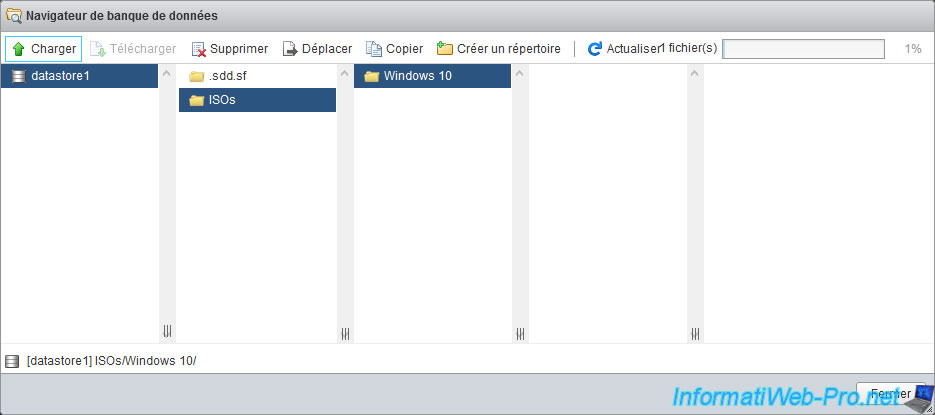
A progress bar will appear at the top right.
Wait while the file is being sent.
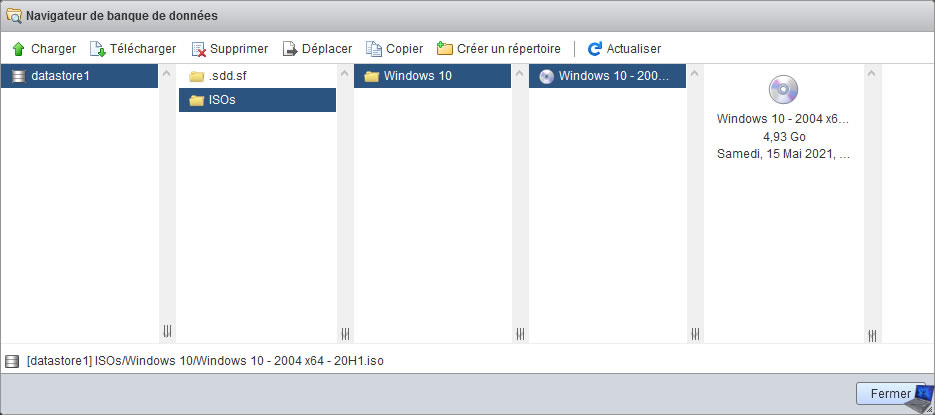
Once the file sending is complete, the sent ISO file will appear.
You can close this datastore browser by clicking on the "Close" button located at the bottom right.
8. Create a virtual machine
To create a virtual machine on your VMware ESXi hypervisor, go to the "Virtual Machines" menu and click : Create / Register VM.
In the "New virtual machine" wizard that appears, select "Create a new virtual machine" and click on : Next.

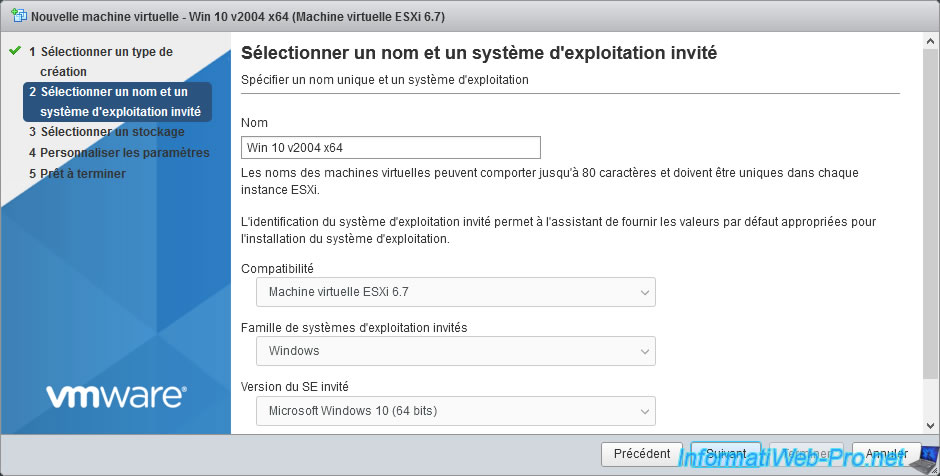
Provide a name for your new virtual machine and select :
- Compatibility : compatibility with VMware and therefore also the version of the virtual hardware that will be used for it
- Guest OS family : the type of guest operating system (Windows, Linux, ...)
- Guest OS version : the version of the operating system you want to install (Windows version, ...)
In our case, we will create a virtual machine compatible with the current version (6.7 / 7.0) of our VMware ESXi hypervisor and in which we will install Microsoft Windows 10 (64-bit).
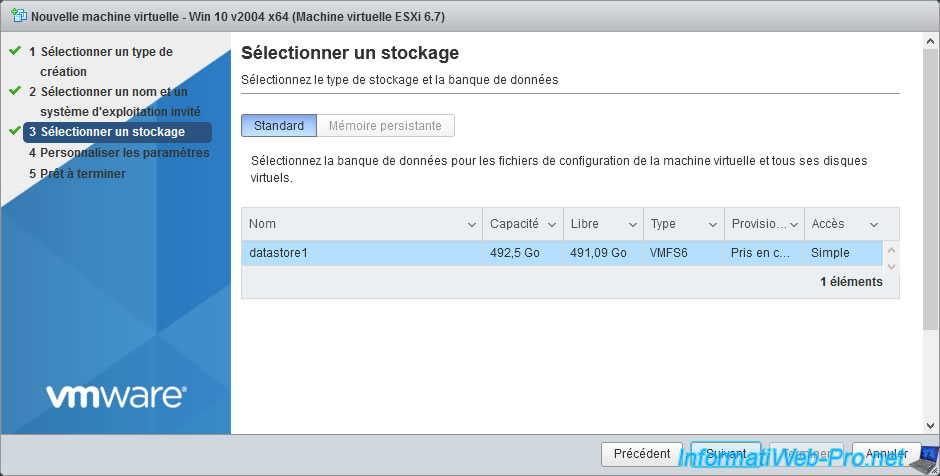
Select the datastore where you want to store this virtual machine (its configuration, as well as its virtual hard disk).
By default, there is only one. Namely, the one where VMware ESXi is installed.
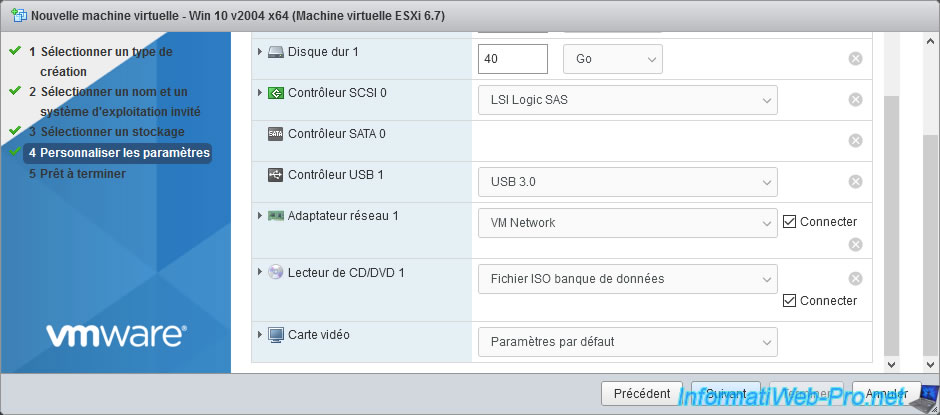
Configure at least these options :
- CPU : number of processors that will be allocated to the virtual machine.
In the case of Windows 10, it's better to allocate 2 for it to be more fluid. But, it depends from one guest operating system to another. - Memory : the amount of random access memory (RAM) that will be allocated to your virtual machine. For recent versions of Windows, allocate at least 4 GB (4096 MB) for the 64-bit version and 2 GB (2048 MB) for the 32-bit (x86) version.
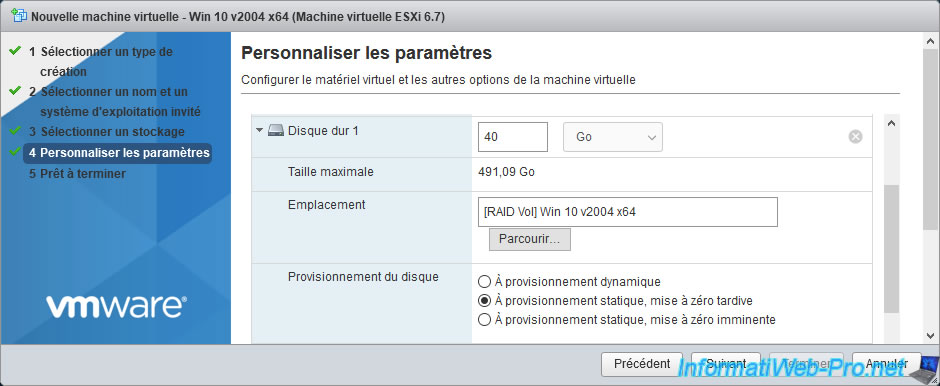
- Hard disk : Maximum size that the virtual hard disk can take on the physical hard disk of your VMware ESXi hypervisor.
Warning : by default, all the space indicated here will be reserved on the physical hard drive. - CD/DVD Drive 1 : allows you in particular to install the guest operating system in the virtual machine from a CD/DVD inserted in the CD/DVD drive of the server (Host device) or from an ISO file present in a datastore (Datastore ISO file).
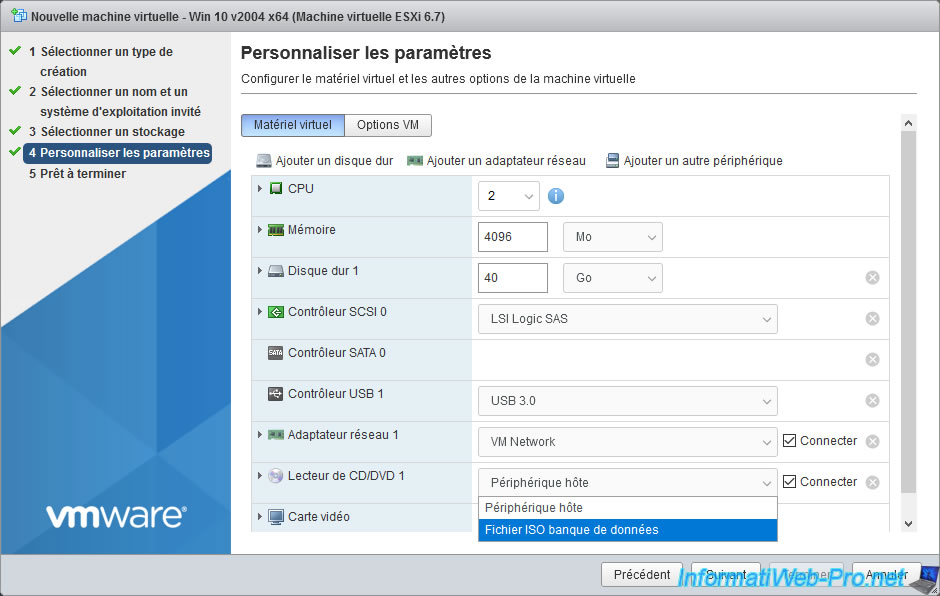
In our case, we are going to choose our "Windows 10 - 2004 x64 - 20H1.iso" file present in the "ISOs/Windows 10" folder of our "datastore1".
Select the desired ISO file, then click the "Select" button.
Warning : for the virtual hard disk of your virtual machine, VMware ESXi will use static provisioning by default. To see it, expand the "Hard disk 1" section.
As you can see, you will be able to choose between :
- Thin provisioned : the virtual hard disk file will grow larger as you store data in it from the guest operating system, and the size of the virtual hard disk will be limited to the capacity you specified.
- Thick provisioned, lazily zeroed : the desired size for this virtual hard disk will be reserved directly on the datastore. This means that in our case this disk will take 40 GB (on ESXi 6.7, but 48 GB since ESXi 7) on our datastore, even if this virtual hard disk is empty. For "lazily zeroed", it indicates that the blocks required for storing data in the virtual hard disk will be reset to zero on the physical disk from the moment you start storing data in the virtual hard disk.
- Thick provisioned, eagerly zeroed : same as the previous option, but with the difference that all the physical disk blocks necessary for the storage of this virtual hard disk will be reset directly to zero when the virtual hard disk is created. This means that the creation of this type of virtual hard disk could take much longer depending on the size indicated for it.
In summary, if you want to save storage space, select "Thin provisioned".
Then, click on Next.
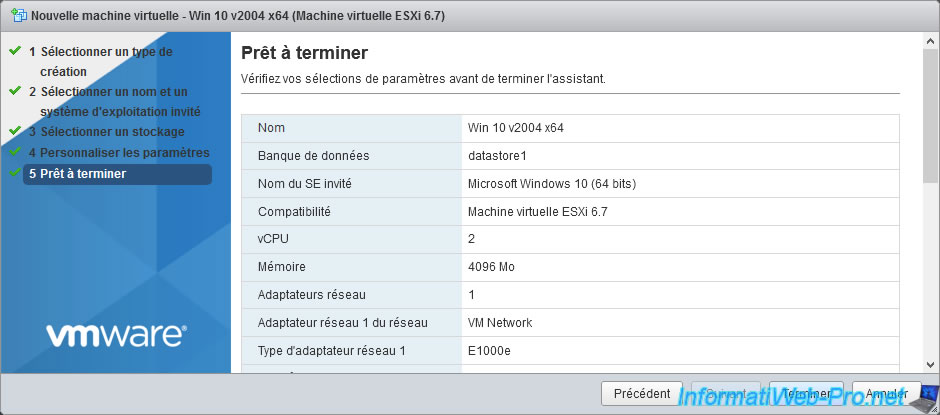
A summary of your virtual machine configuration is displayed.
Share this tutorial
To see also
-

VMware 5/25/2022
VMware ESXi 6.0 - Install the VMware Host Client web client
-

VMware 5/27/2022
VMware ESXi 6.5 - Add a network driver in the installation ISO
-

VMware 1/27/2023
VMware ESXi 6.7 - Enable virtualization-based security (VBS)
-

VMware 12/2/2022
VMware ESXi 6.7 - Install and use the VMRC console on Linux
No comment