Configure live migration with CredSSP or Kerberos constraint delegation for Hyper-V on WS 2012 R2 or WS 2016
- Microsoft
- 22 November 2019 at 10:37 UTC
-

- 2/3

5. Configure live migration to use CredSSP
To begin, create a folder on the remote server to store the virtual machines that you will migrate.
On your 2 Hyper-V servers (the source and destination servers), open the Hyper-V Manager and click : Hyper-V Settings.
Go to "Live Migrations" and check the "Enable incoming and outgoing live migrations" box.
Then, depending on the performance of your network, you can allow 1 or more simultaneous live migrations (by default : 2).
To improve the performance of live migration and avoid unnecessarily overloading the bandwidth of your company network, you can specify a specific network.
In our case, we connected our 2 servers with a switch and the network cards connected to it are called "Migrations".
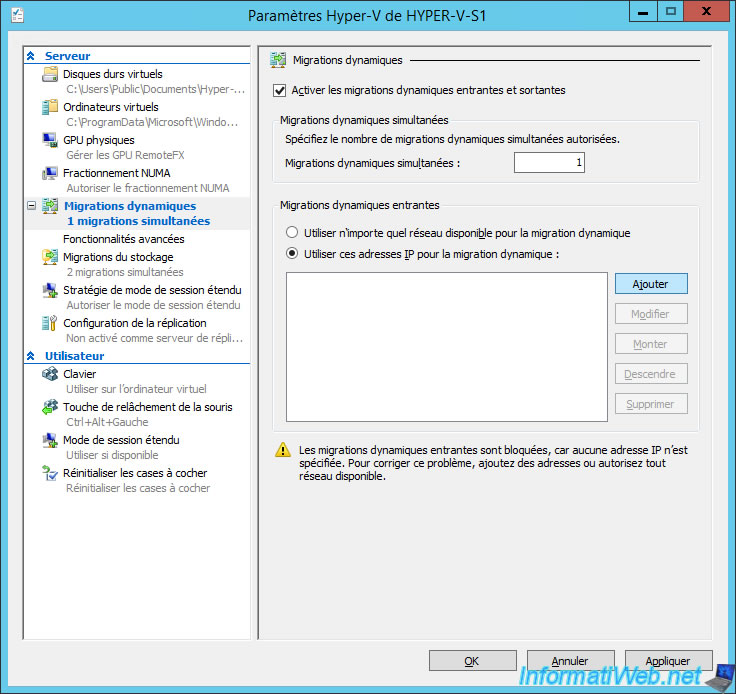
In our case, the network dedicated to migrations has the network ID "192.168.0.0" and the CIDR mask (requested here) is in our case : 192.168.0.0/24
If you don't know the CIDR mask to use in your case, refer to this page : CIDR

The added mask appears in the list.

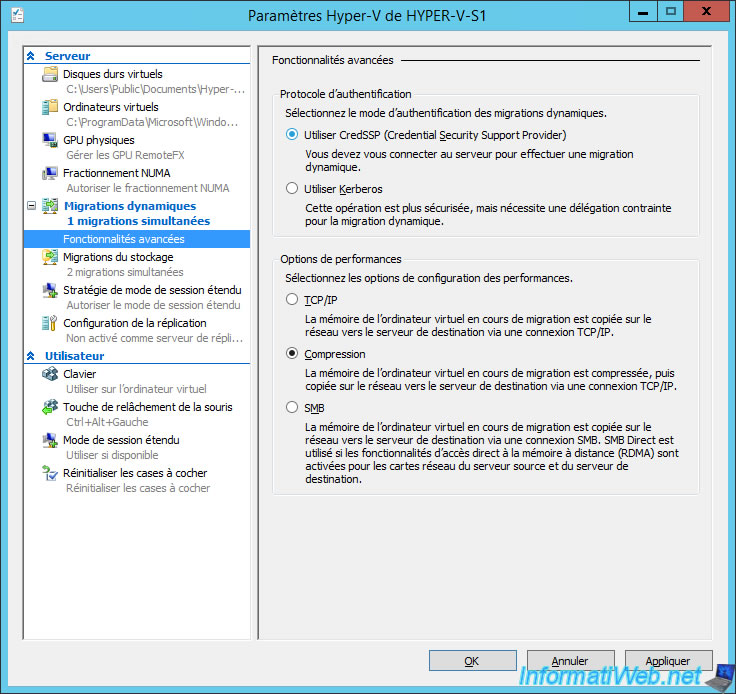
To choose which authentication protocol to use, deploy the "Live Migrations" item and click "Advanced Features".
Then, select "Authentication protocol : Use Credential Security Support Provider (CredSSP)".
For performance options, this will essentially depend on the performance of your network :
- TCP/IP : if the virtual machine is transferred over a fast TCP/IP network (in Gigabit Ethernet for example) without compression
- Compression : the data will be compressed before being sent over the network. In our case, we will choose this option.
- SMB : if you want to migrate the virtual machine to a SMB share (and preferably : a SMB v3 share that is suitable for this kind of use), we recommend that you choose this option.
So, if your network cards support RDMA, Hyper-V can use a SMB Direct connection.
Note that this feature should also be allowed in the firewall of your Hyper-V servers for it to work in the best conditions.
If your source server and your remote server have a RDMA-compatible network adapter, the data can be directly transferred between these two network cards without the resources (CPU / RAM) of the two servers being used.
This new technology therefore offers very good performance and also makes it possible not to temporarily alter the performance of your servers when migrations are in progress.
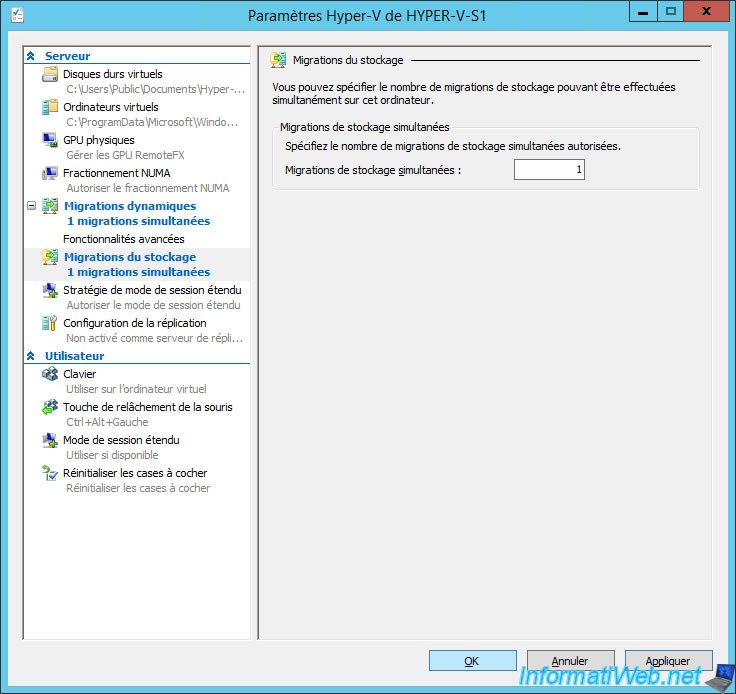
For storage migration, you can also choose the maximum number of simultaneous storage migrations you want to allow.
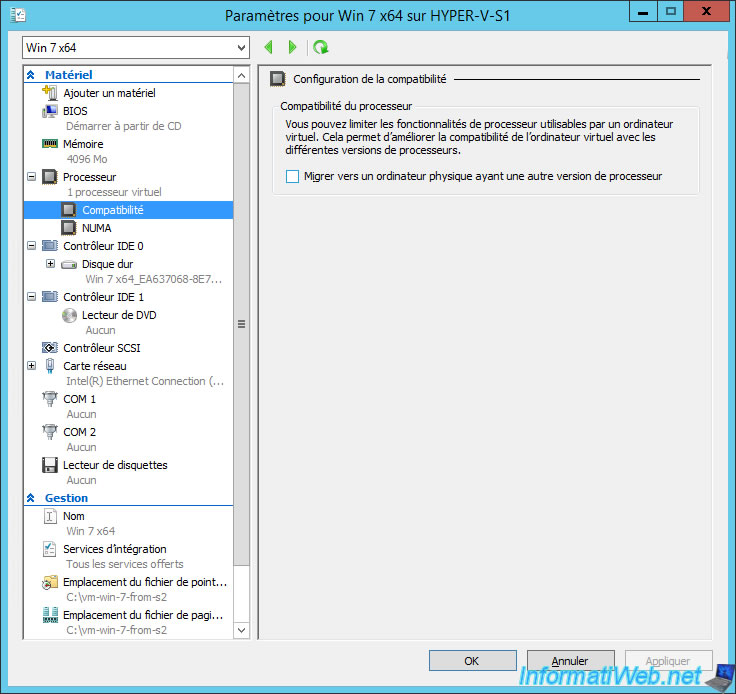
If your 2 Hyper-V servers don't have identical processors, you may need to enable the processor compatibility mode in the settings of the virtual machine that you want to migrate.
Don't forget to configure your 2nd Hyper-V server identically.
Warning : when using CredSSP for live migration, it's recommended that you close your session on the source and destination Hyper-V server and then reopen them.
Otherwise, you might get errors when you try to migrate a virtual machine from one Hyper-V server to another.
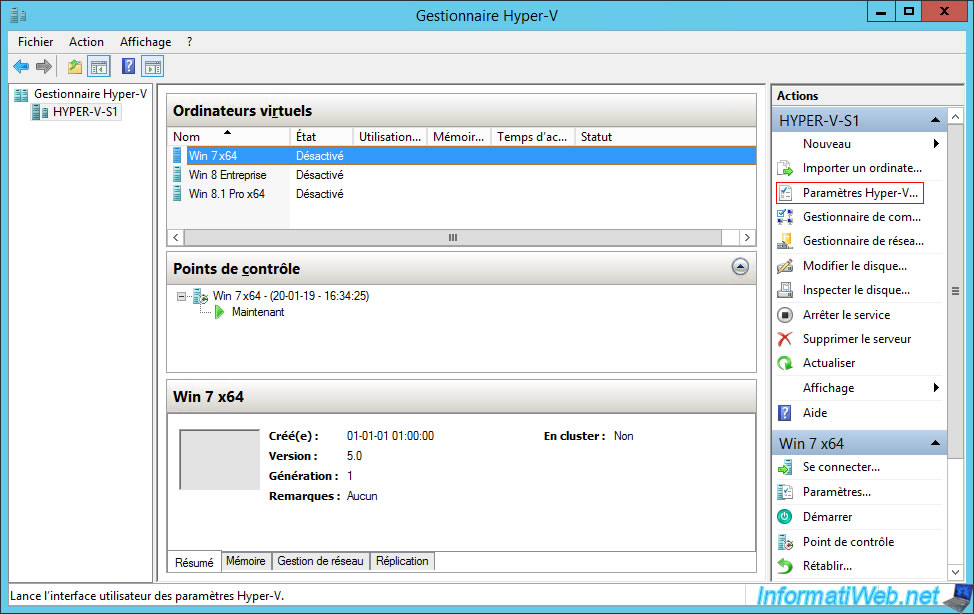
6. Live migration using CredSSP
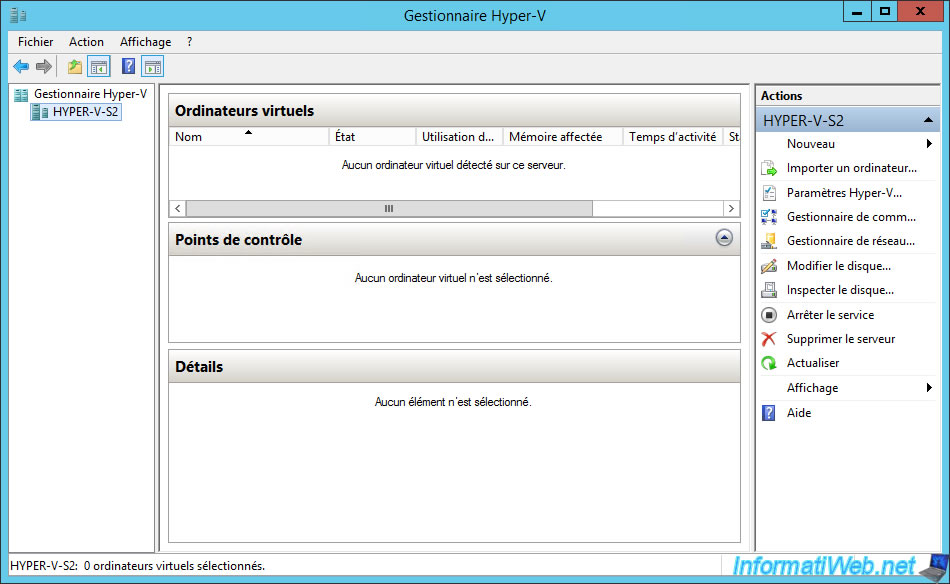
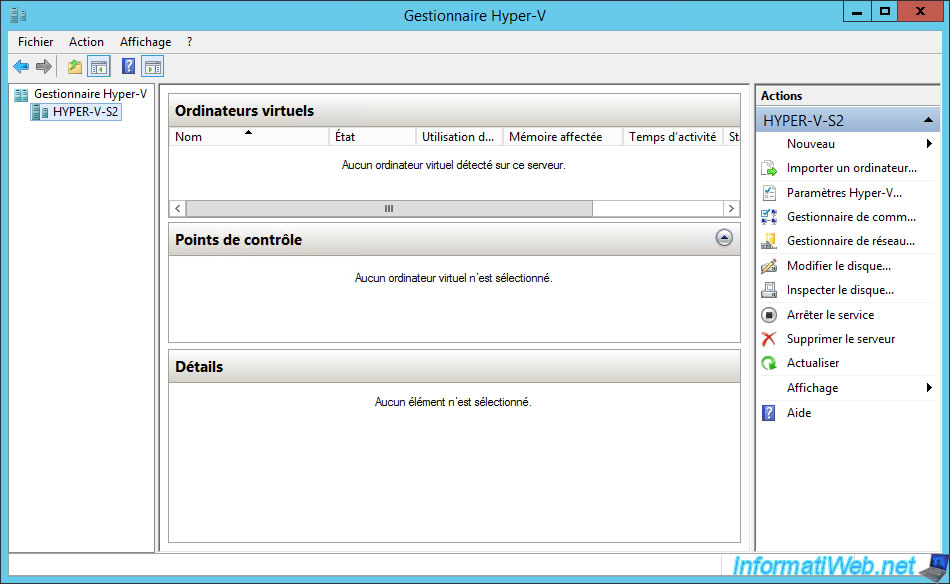
Now that live migration is enabled on both servers, we can attempt to migrate a virtual machine.
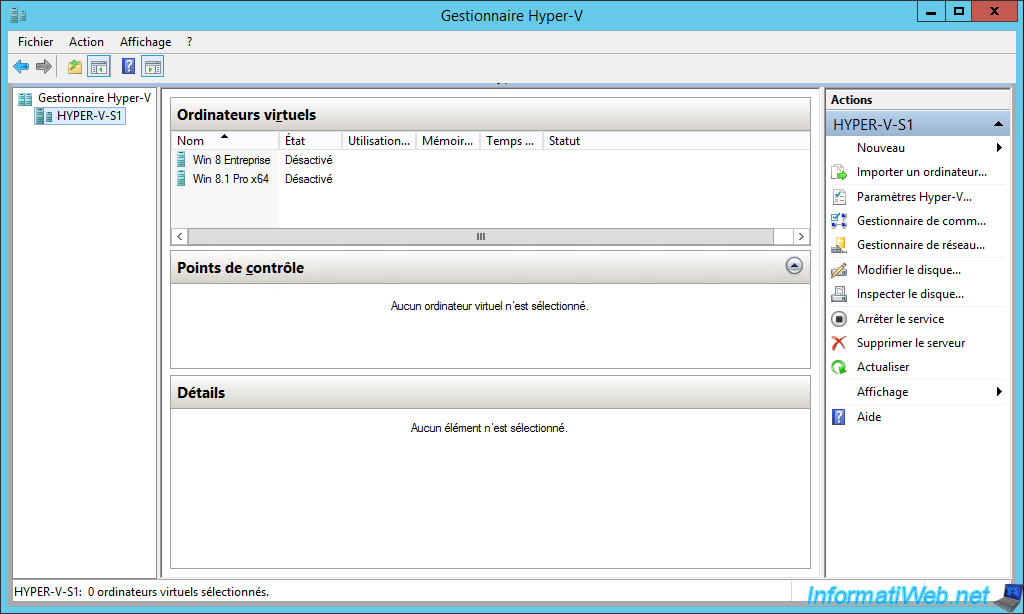
As you can see, our 2nd Hyper-V server doesn't have any virtual machines at the moment.
In our case, we will migrate our "Win 7 x64" virtual machine currently hosted on our Hyper-V-S1 server.
As we will use CredSSP for live migration, we will need to physically connect (or via remote desktop) to the source server (our Hyper-V-S1 server in this case).
In other words, you will not be able to add the source server in the Hyper-V Manager of the destination server to start live migration of a virtual machine.
In this case, an error will occur when you try to start its migration.
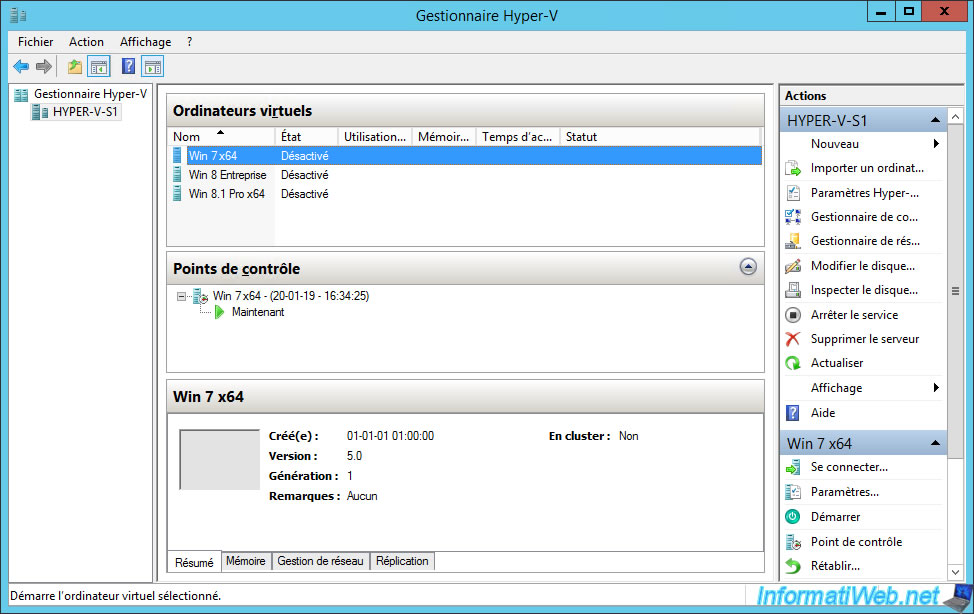
We start the virtual machine to show you that it can work hot too.
From the Hyper-V Manager of the source server, right-click the virtual machine to migrate and click Move.
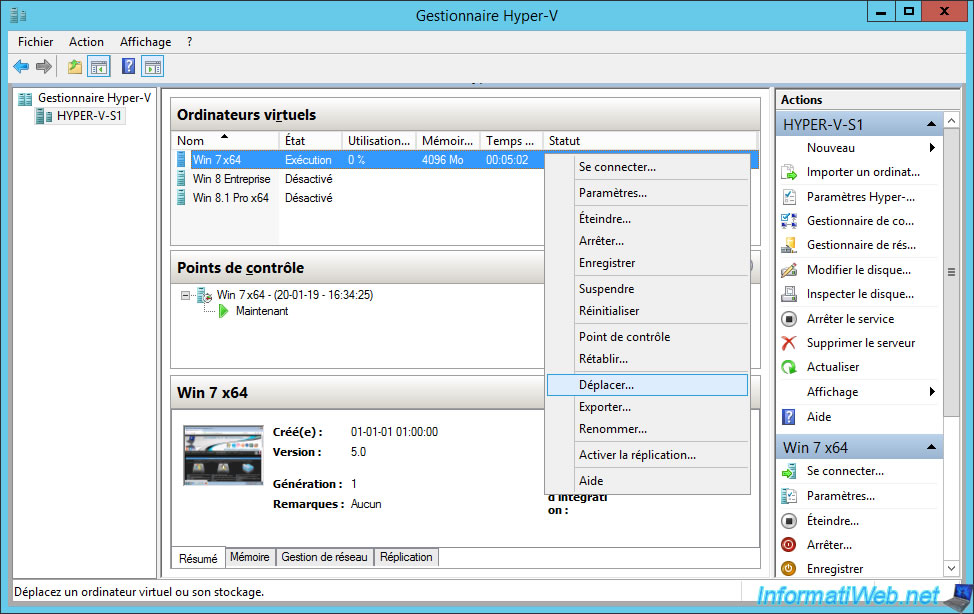
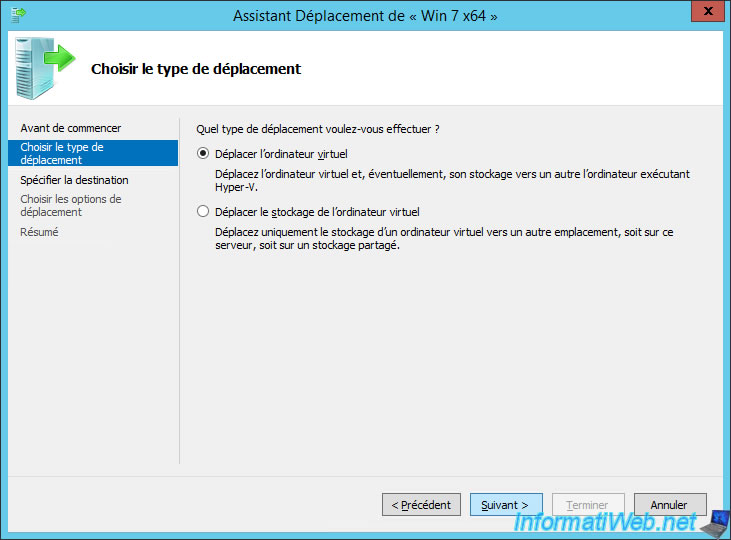
The Move VM Wizard appears.

The wizard will offer you to :
- Move the virtual machine : this option allows you to move the execution of the virtual machine to another server so that it uses the resources (CPU, RAM, ...) of the destination server.
As well as its storage (as explained below) if you wish. - Move the virtual machine's storage : this option lets you move storage only from the selected virtual machine. The virtual machine will therefore continue to work using the resources (CPU, RAM, ...) of the source server, but only its storage will be moved to another server (or to a shared volume of a cluster, for example, but we'll see that in a future tutorial).
In our case, we will move the virtual machine.
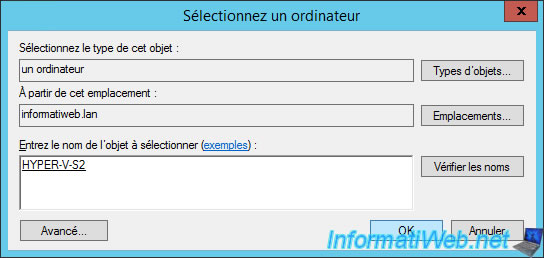
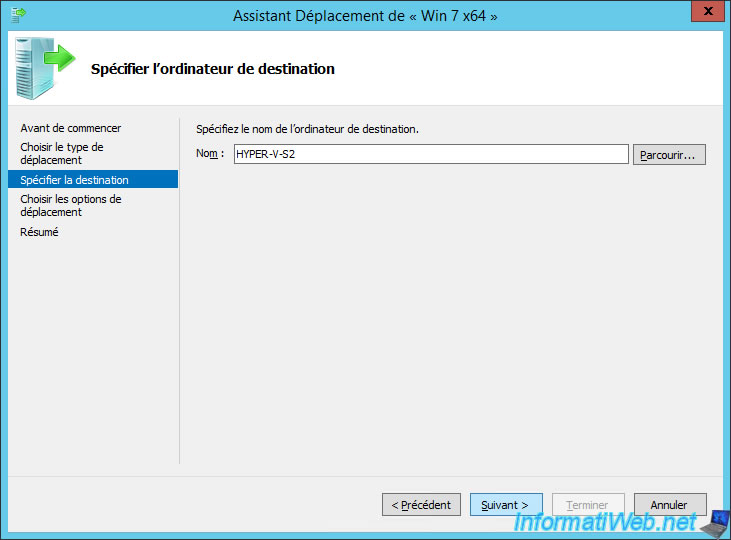
The wizard prompts you to specify the destination computer.
Click Browse to select it or directly enter the (NETBIOS or DNS) name of it.
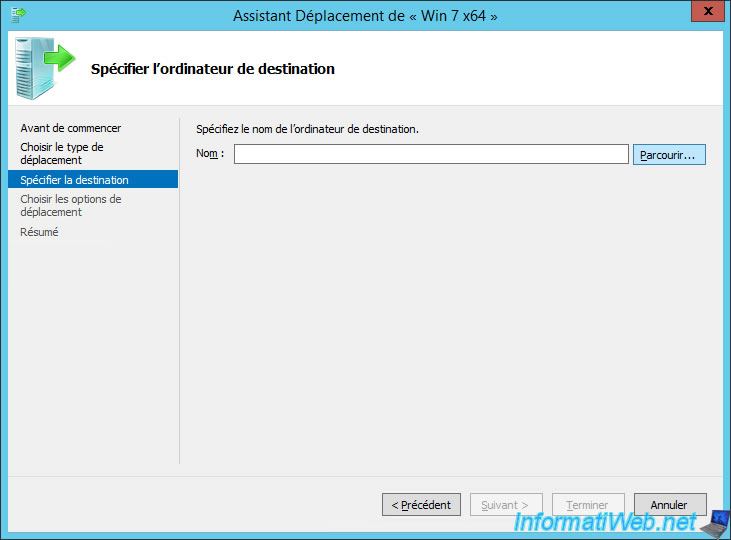
In our case, we select our "HYPER-V-S2" server.
Click Next.
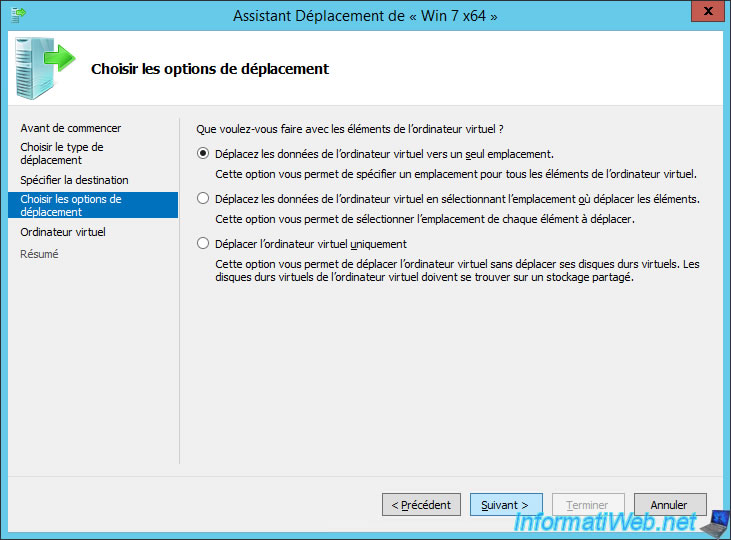
For move options, you will be able to :
- move the virtual machine's data to a single location
- move the virtual machine's data by selecting where to move the items : to choose a location for each item (virtual hard disk, ...)
- move only the virtual machine : in this case, only the execution of the virtual machine will be moved. The virtual machine will therefore use the resources (CPU, RAM, ...) of the destination server, but its storage (virtual hard disks, snapshots (checkpoints), ...) will remain on the hard disk of the source server.
In our case, we will move the execution of the virtual machine, as well as its storage in the same place.
So, we select the 1st option : Move the virtual machine's data to a single location.
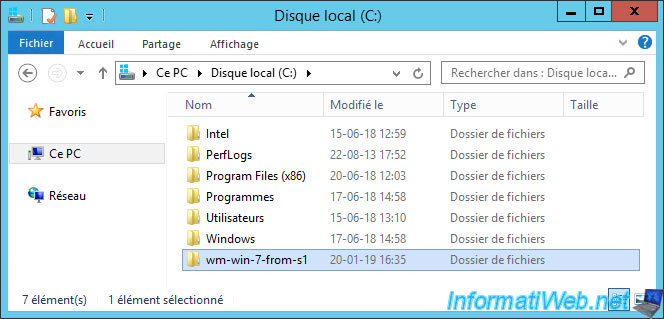
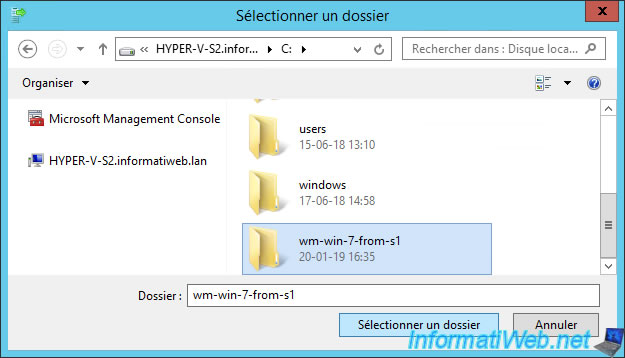
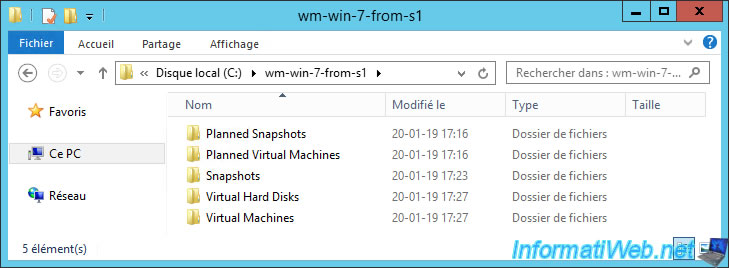
Choose the location where your virtual machine will be stored on the destination server by clicking Browse.
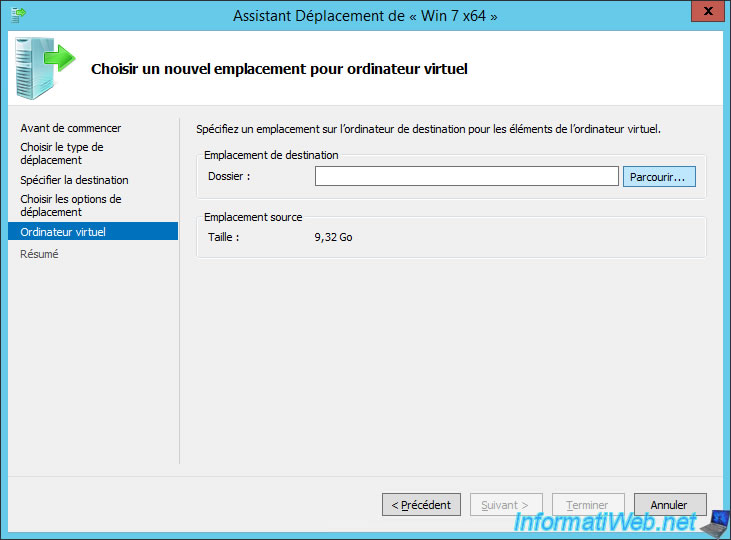
Choose the folder created previously on the destination server.
In our case : vm-win-7-from-s1.
Click Next.

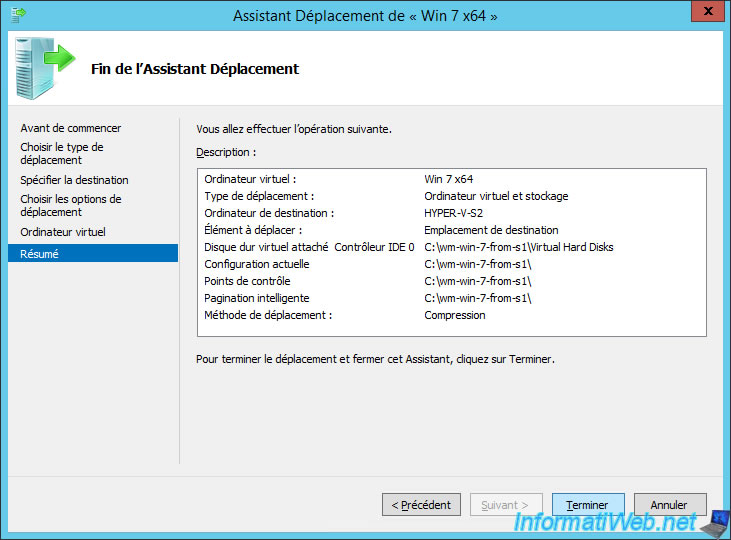
A configuration summary for this live migration is displayed.
Click Finish.
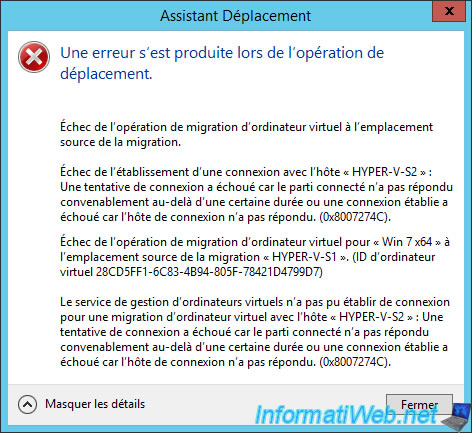
If you tried to move a computer from the source server from the destination server, an error will appear :
Plain Text
There was an error during move operation.
A connection attempt failed because the connected party did not properly respond after a period of time, or established connection failed because connected host has failed to respond. (0x8007274C).
Note : this kind of inconvenience will never happen with Kerberos constrained delegation.
In our case, we were physically on the source server, so live migration is smooth.

In the Hyper-V Manager, you will see that the status of your virtual machine is currently : Move virtual machine and storage (xx %).

Note that the virtual machine being migrated is still running.

When the migration is complete, the migrated virtual machine will disappear from the source server.
And it will appear on the remote server.
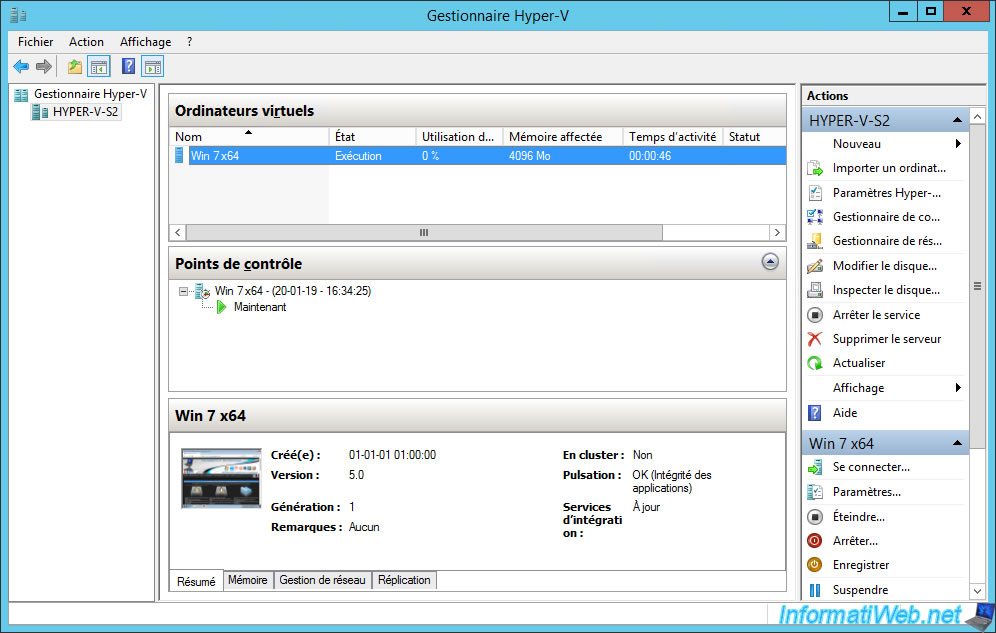
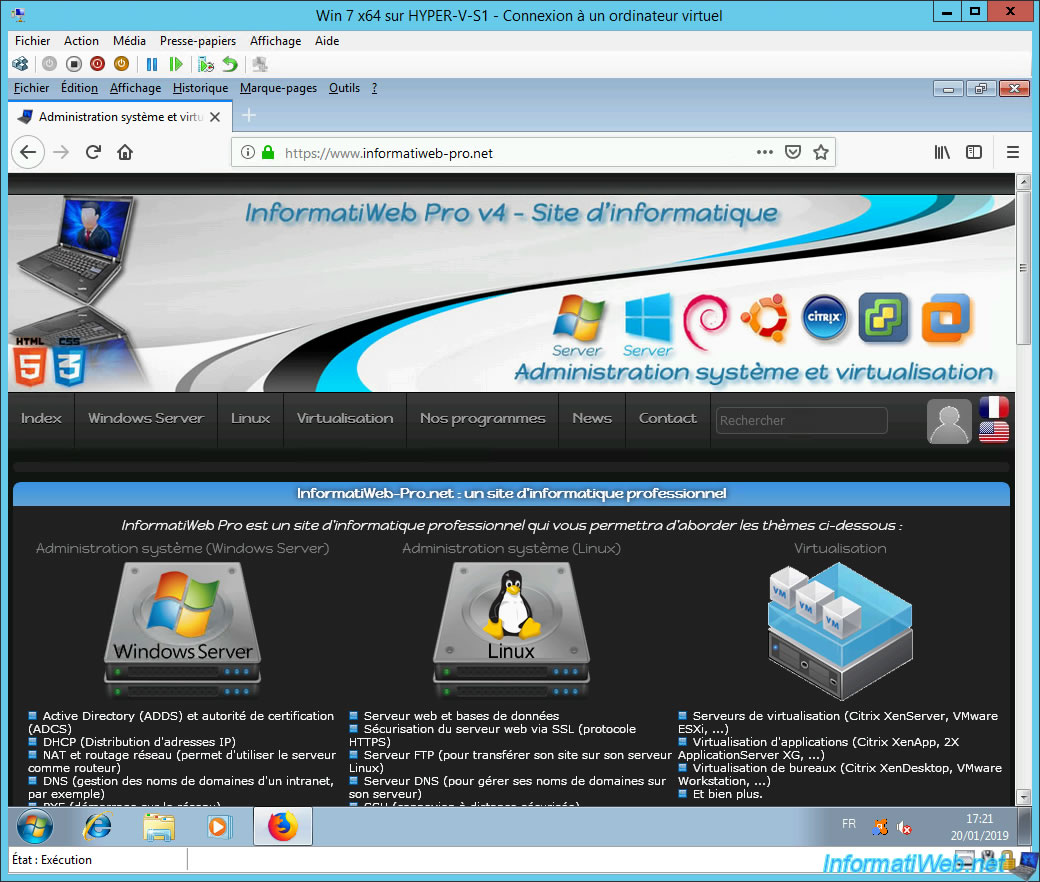
As you can see, the virtual machine continues to function normally, even though it runs on the remote server.
Hyper-V has migrated the storage, but also the RAM and other resources associated with this virtual machine to the remote server.
This is very practical in the enterprise, because it greatly reduces the downtime of service in case of migration required.
As you can see on the remote server, the storage of this computer has been successfully migrated dynamically without creating a service interruption.
Share this tutorial
To see also
-
Microsoft 9/6/2019
Hyper-V (WS 2012 R2 / 2016) - Create a generation 2 VM
-
Microsoft 8/10/2019
Hyper-V (WS 2012 R2 / 2016) - Install Hyper-V and create your first VM
-
Microsoft 11/8/2019
Hyper-V (WS 2012 R2 / WS 2016) - Automatically replicate virtual machines
-
Microsoft 11/15/2019
Hyper-V (WS 2012 R2 / WS 2016) - Automatically replicate virtual machines (securely)
No comment