- VMware
- 03 April 2024 at 07:56 UTC
-


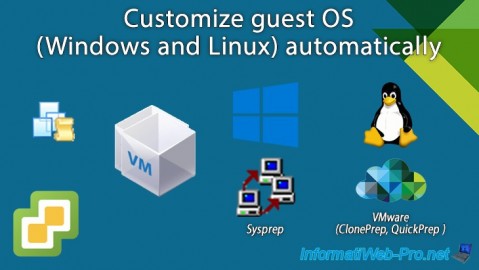
With VMware vCenter Server, you have the ability to clone virtual machines by automatically customizing the new virtual machine created using a set of configuration settings.
This feature of VMware vCenter Server is called "VM Customization Specifications" and allows you to automatically configure the computer name (NETBIOS name), license key / product key (on Windows), time zone to use, ... thanks to VMware ClonePrep, QuickPrep and Microsoft Sysprep (for Windows).
Source : Differences between Omnissa ClonePrep and Microsoft Sysprep (2003797).
Info: this only works if the virtual machine's operating system is installed in a virtual hard disk connected to the location
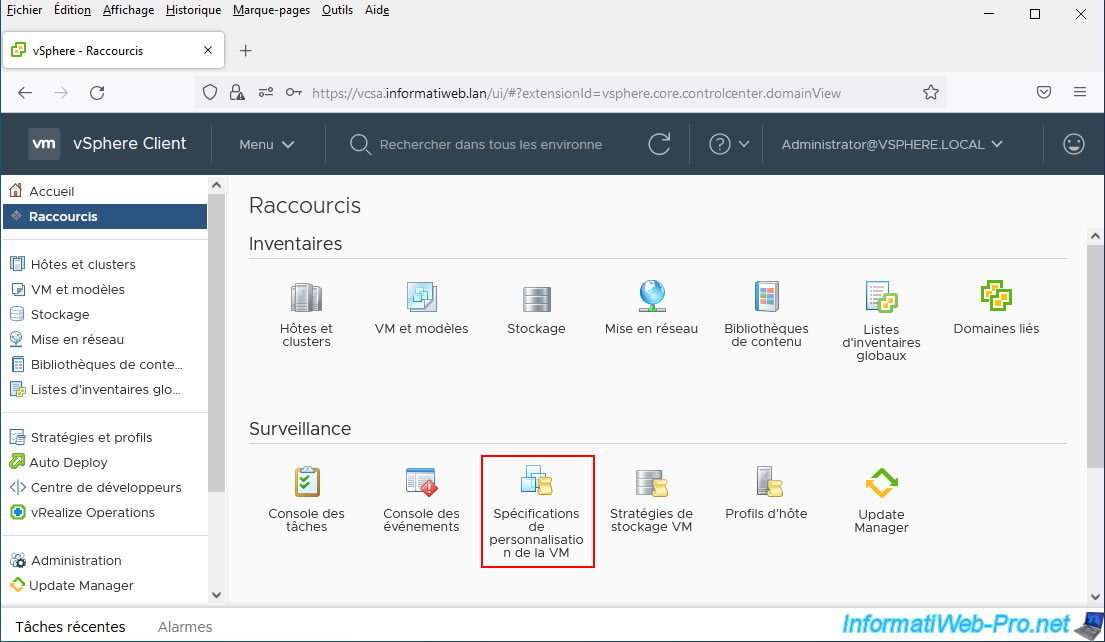
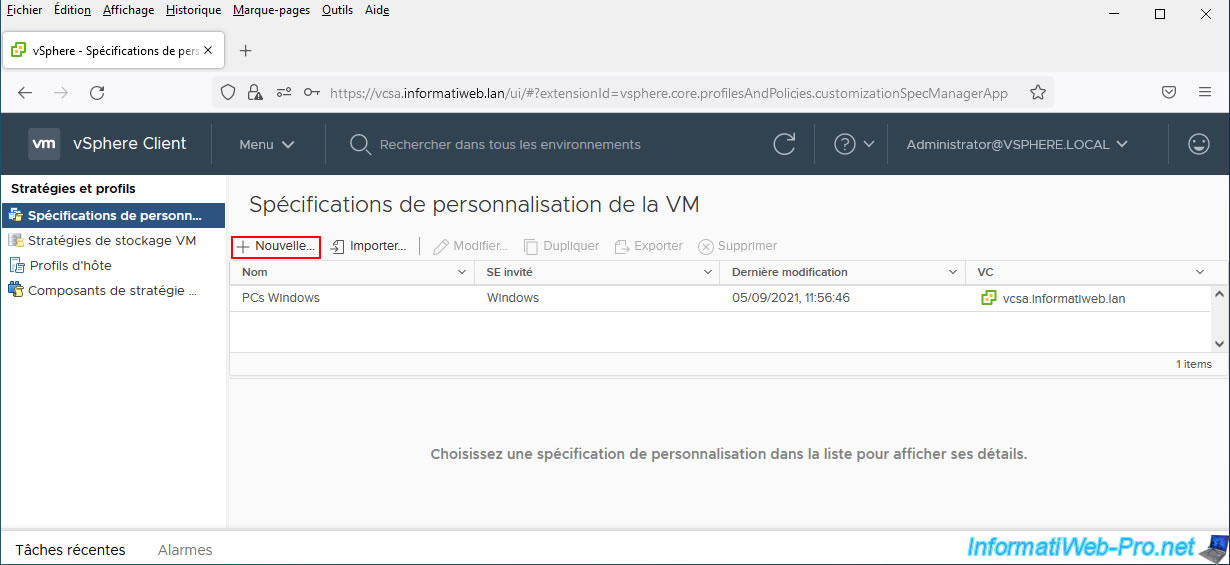
To access this feature, click "vSphere Client" at the top left to view all shortcuts for this client, then click: VM Customization Specifications.
- Prerequisites for guest operating system customization (Windows and Linux)
- VM Customization Specifications for Windows
- VM Customization Specifications for Linux
1. Prerequisites for guest operating system customization (Windows and Linux)
To be able to customize the guest operating system (Windows and Linux), it is necessary that the VMware Tools have been installed in it.
Additionally, the virtual hard disk must be connected to a virtual SCSI controller at slot 0:0.
If the guest operating system is Windows, the virtual machine must be running on a VMware ESXi 3.5 or later host.
If the guest operating system is Linux, it is necessary to have Perl installed in the guest operating system.
To find out if this package is installed on your Linux virtual machine, type the command:
Bash
dpkg -s perl
If this package is installed, this will be displayed:
Plain Text
Package: perl
Status: install ok installed
...
Source : Guest Operating System Customization Requirements.
2. VM Customization Specifications for Windows
To begin, we'll create a new VM customization specification for Windows.
To do this, click on: New.
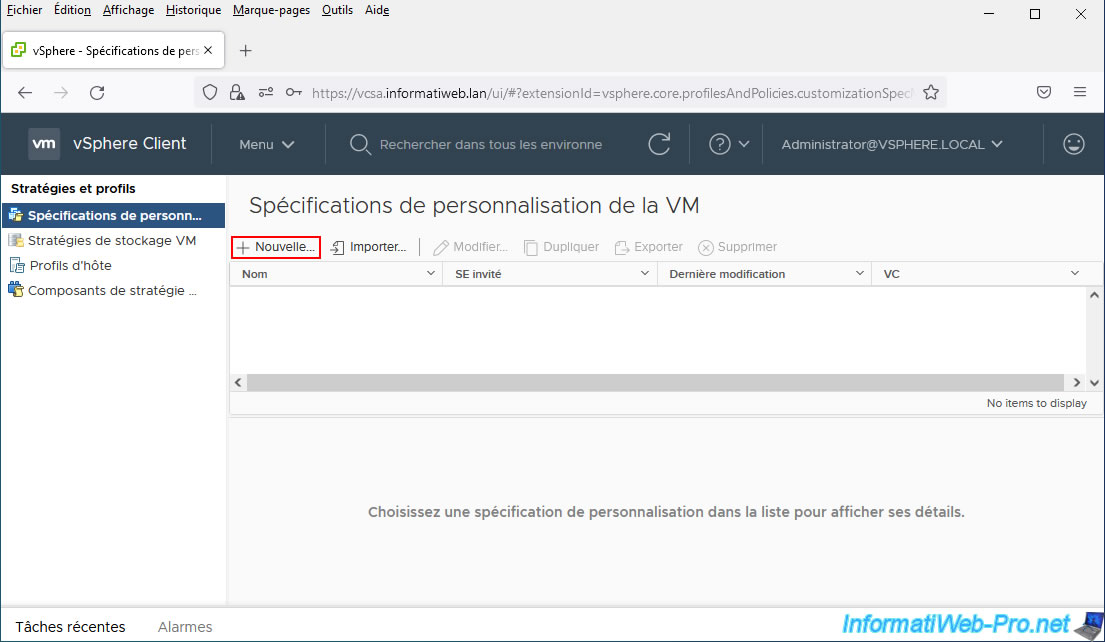
The "New VM Customization Specification" wizard appears.
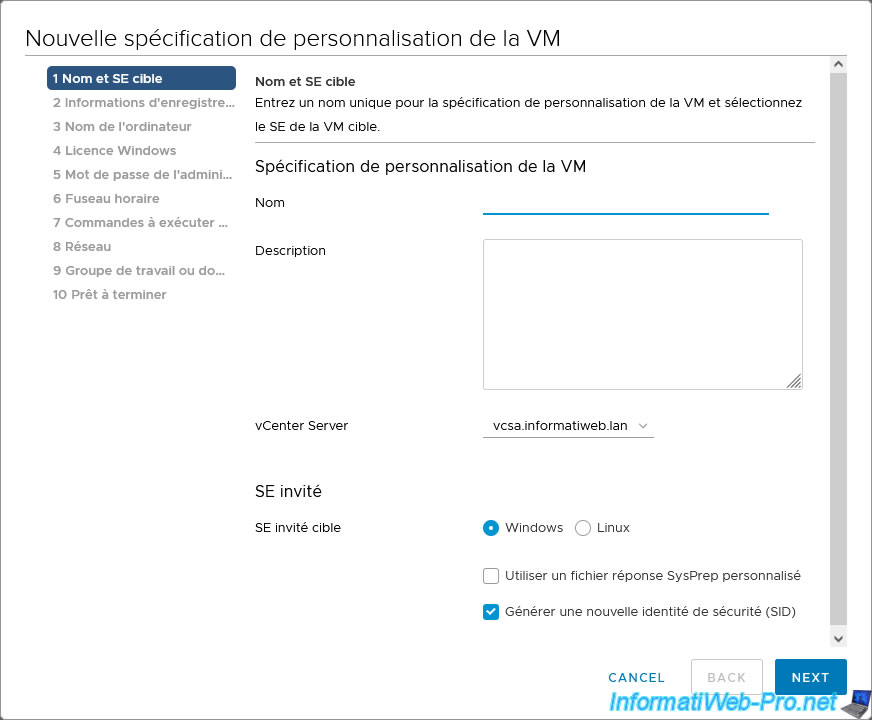
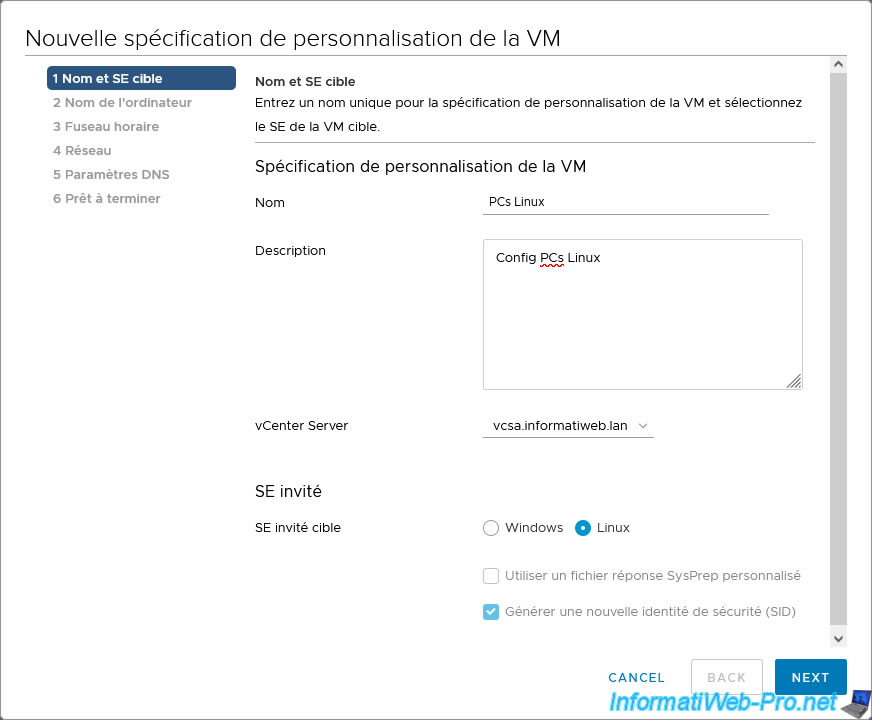
In this form, provide:
- Name: name under which this VM customization specification will appear in the list and when you want to customize the VM you want to clone.
- Description: a description that will appear when you select this customization specification from the list.
- vCenter Server: Your vCenter Server. In our case, there is only one.
- Target guest OS: The target operating system type. In this case: Windows.
For Linux, go to the next step in this tutorial. - for Windows, you will have the option to use a custom SysPrep answer file if you wish.
- for Windows, you will also be able to generate a new security identity (SID).
It is very important to check this box so that all your virtual machines running Windows or Windows Server have a different security identifier (SID).
Indeed, it is notably impossible to join 2 virtual machines with the same security identifier (SID) to the same Active Directory domain.

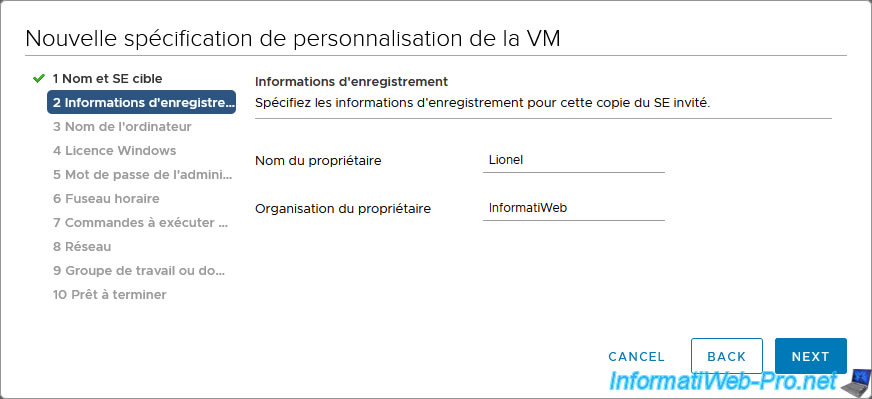
For registration information, provide:
- Owner name: the name of the person who will use this VM.
- Owner organization: the name of their company (or yours)
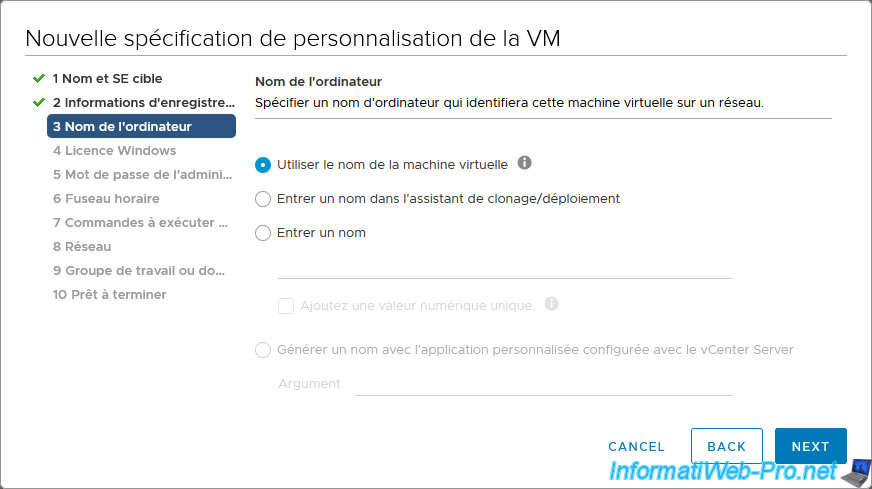
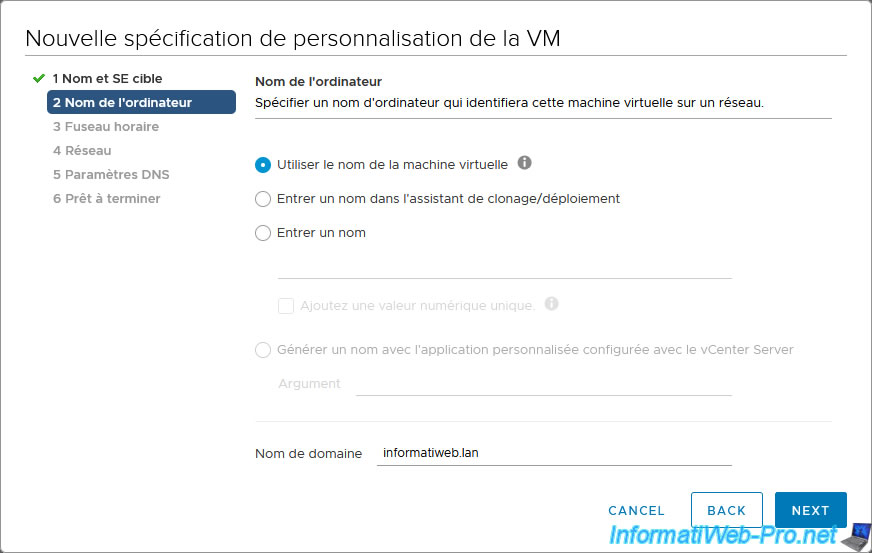
For the computer name (in other words, the NETBIOS name which will be configured in the guest Windows settings), you can choose:
- Use the virtual machine name: when you clone a virtual machine, you will specify the name under which vCenter Server should create the new virtual machine.
This name will also be used as the NETBIOS name in the guest operating system (Windows).
This option is the recommended one, as it allows the names of virtual machines in the vCenter Server (and VMware vSphere / ESXi) interface to be matched with those used in their guest operating system. - Enter a name in the Clone/Deploy wizard: this allows you to provide a name for your virtual machine in the vCenter Server interface and use a different name for the NETBIOS name that will be configured in the server guest system.
- Enter a name: directly enter the NETBIOS name of the new virtual machine here.
Warning: don't forget to check the "Append a unique numeric value" box offered here, so that all virtual machines created using this VM customization specification have a different NETBIOS name.
Otherwise, conflicts and various problems could arise randomly when using the various Windows features (including access to shared folders). - Generate a name using the custom application configured with the vCenter Server: allows you to pass an argument to a custom script (custom application) to manually manage the generation of names and IP addresses to assign to your virtual machines.
This feature requires Perl and detailed information regarding this feature is available on the "Create a vCenter Server Application to Generate Computer Names and IP Addresses" page of the official VMware documentation.
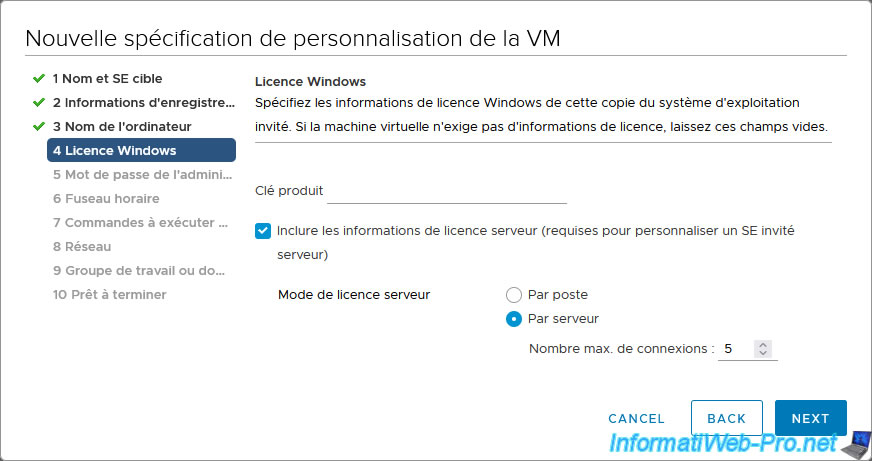
For the Windows license, you will have the option to specify the product key to use.
In the case of using volume licenses (VL), you can for example indicate the generic KMS product key corresponding to the desired version of Windows available on the Microsoft site: KMS client installation keys.
Note: in case you are looking for KMS keys for Windows Vista, they are available on an old Microsoft page which is no longer updated: Appendix A: KMS Client Setup Keys.
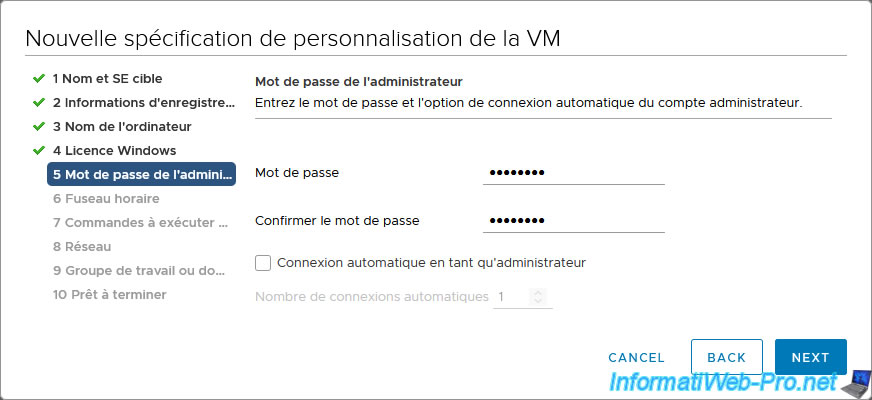
For the Administrator account integrated into Windows (but which is disabled by default), you can set a password for it.
You can also choose to automatically log in as administrator one or more times by checking the "Automatically logon as Administrator" box and defining the number of times you should be automatically logged in as administrator.
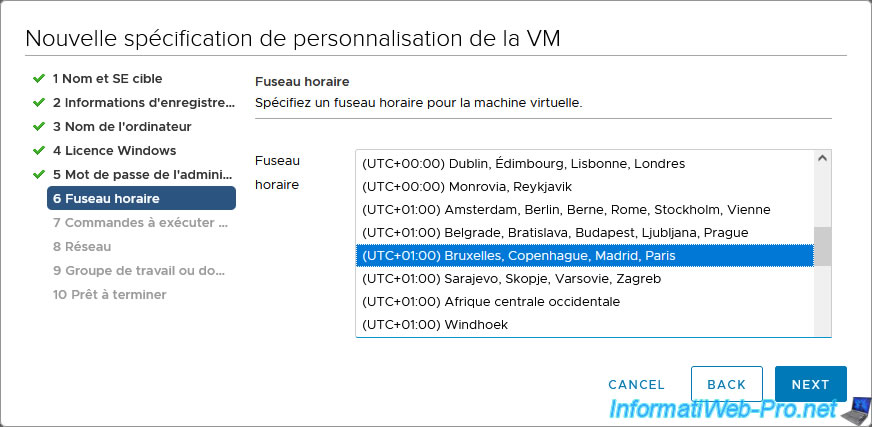
Select your time zone, then click Next.
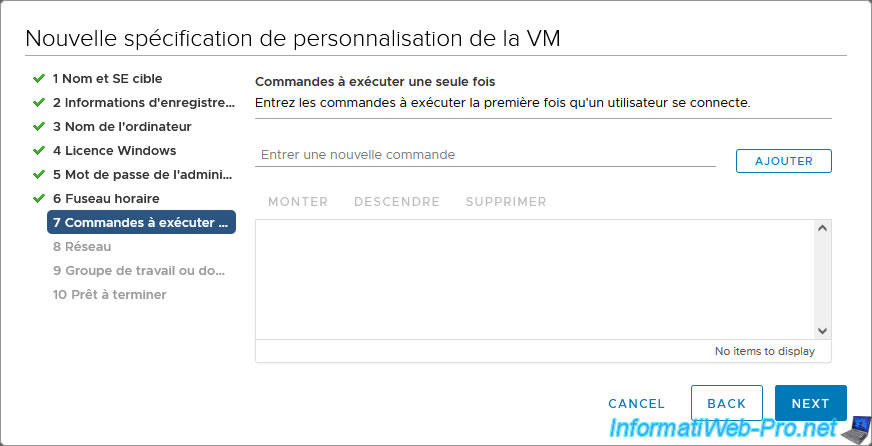
Allows you to execute commands (ref: sysprep Run Once) at the first connection of a user.
If you need administrator rights for these commands, remember to check the "Automatically logon as Administrator" box in step 5 of this wizard.
Note: the easiest way is to create a batch file (.bat) and add it here. So you can launch whatever you want with the desired settings without any problem.
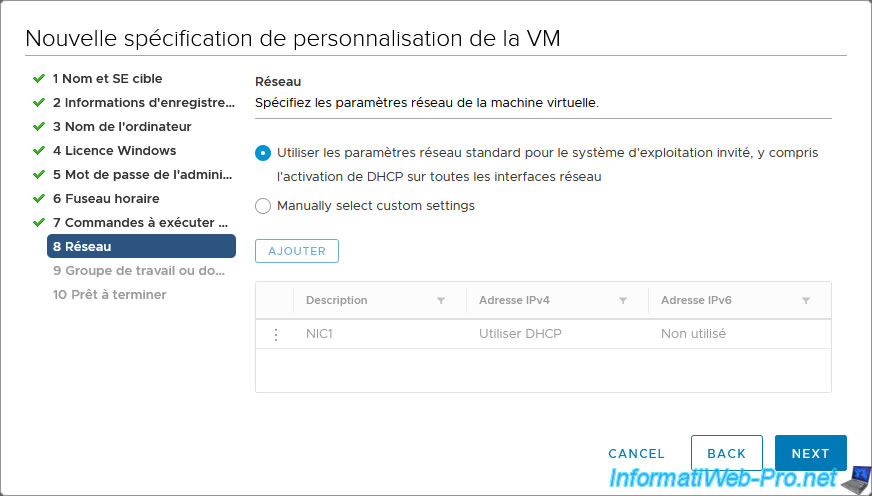
For the network, you can:
- automatically obtain an IP address using DHCP: Use standard network settings for the guest operating system, including enabling DHCP on all network interfaces.
- manually set network settings: Manually select custom settings.
In our case, our virtual machines will obtain an IP address automatically from our router's DHCP server.
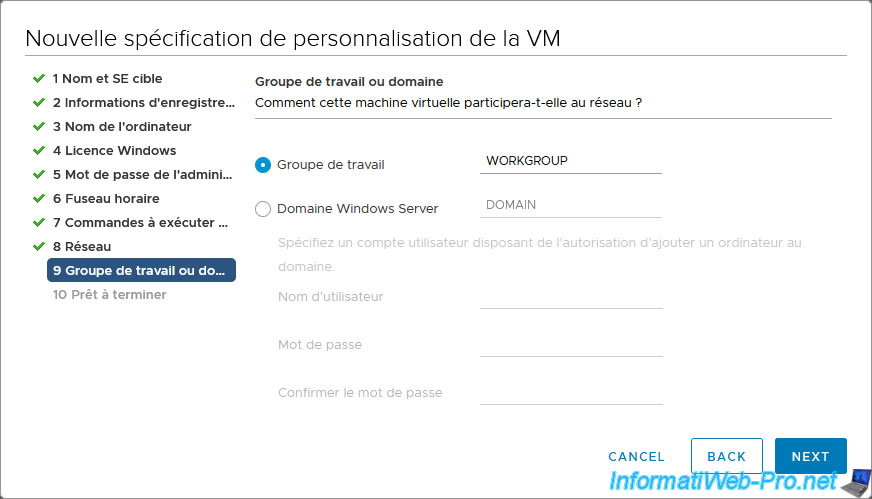
Then, you can choose if your virtual machine should be located:
- in a workgroup: usually "WORKGROUP", but you can use another if you wish.
- in an Active Directory (AD) domain: Windows Server domain.
If you want your virtual machine to be automatically linked to your Active Directory domain, you will need to specify:
- Windows Server domain: the Active Directory domain to join. For example: informatiweb.lan.
- Username: the name of a user authorized to join computers to your Active Directory domain.
- Password: this user's password.
- Confirm password: same.
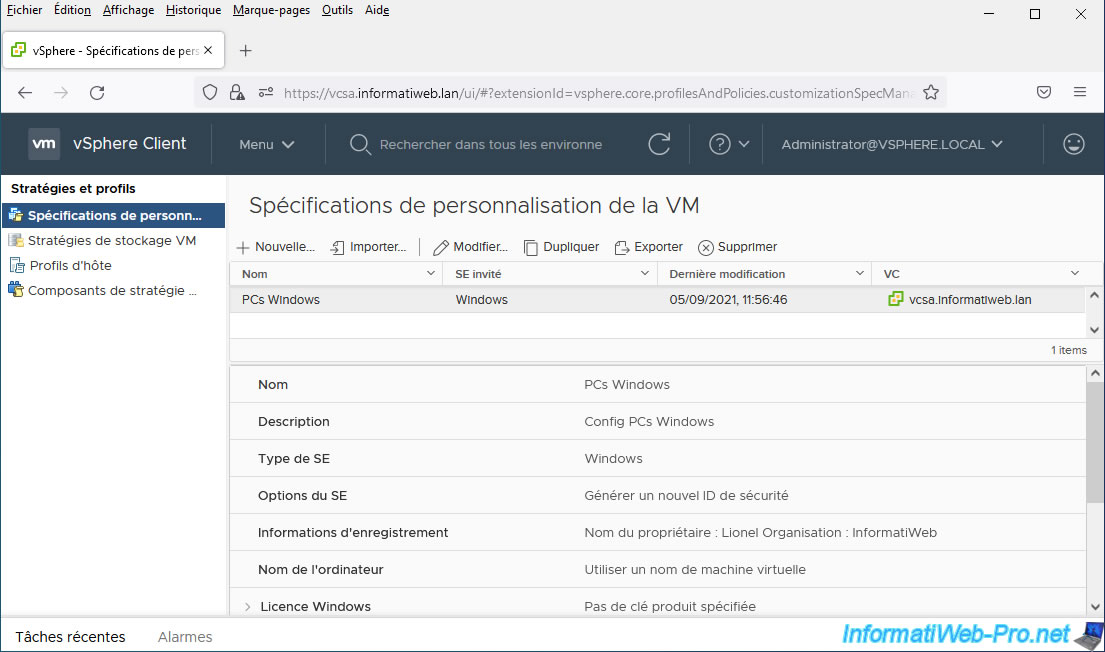
At the end of the wizard, a summary will be displayed with:
- Name: the name of this VM customization specification.
- OS type: in this case: Windows. In the other case, it would have been Linux.
- OS options: in our case it says "Generate new security ID", because the "Generate a new security identity (SID)" box was checked at the very beginning of this wizard.
- Registration info: the name of the owner and their organization which will be entered in the Windows settings.
- Computer name: indicates that in our case, the virtual machine name will also be used for the NETBIOS name in the guest operating system (Windows).
- Product key: if the Windows serial number (or KMS key) was entered in the wizard, it will appear here.
- Server license mode: indicates the server license mode that will be used (per station or per server), as well as the maximum number of simultaneous connections that can be authorized.
- Administrator log in: specifies whether or not you will automatically be logged in as an administrator in the virtual machine.
- Time zone: the previously selected time zone that will be automatically chosen in the guest operating system when customizing it.
- Network type: depends on the choice made for configuring network parameters (received from a DHCP server or static).
- Workgroup/Domain: indicates the name of the workgroup or domain that will be joined by the new VMs.

The created Windows customization specification appears in the list.
Source : Create a Customization Specification for Windows in the vSphere Web Client.
3. VM Customization Specifications for Linux
Now, we will create another VM customization specification, but for Linux.
To do this, click on: New.
For Linux, specify:
- Name: name under which this VM customization specification will appear in the list and when cloning a VM where you want to customize the guest operating system.
- Description: a description that will appear below it when you select it from the list of VM customization specifications.
- vCenter Server: your vCenter Server. In our case: vcsa.informatiweb.lan.
- Target guest OS: in this case Linux.
Note that the 2 options regarding SysPrep and Security Identity (SID) are grayed out, as these relate to features only available on Windows.
For the computer name (in the guest operating system), you will have the choice between:
- Use the virtual machine name: the virtual machine name specified for vCenter Server will also be used in the guest operating system (Linux).
This is recommended so that the names visible in the vCenter Server web interface match those used by the guest operating system of these virtual machines. - Enter a name in the Clone/Deploy wizard: enter a name for vCenter Server and another for the guest operating system.
- Enter a name: allows you to indicate the name of the future virtual machine here.
However, if you want to create multiple virtual machines with this VM customization specification, you will also need to check the "Add a unique numeric value" box so that all virtual machines have a unique computer name in their operating system guest. - Generate a name using the custom application configured with the vCenter Server: allows you to use a custom script for generating names and IP addresses which you will find more information on the page "Create a vCenter Server Application to Generate Computer Names and IP Addresses" from the VMware site.
- Domain name: for Linux, you are required to specify the domain (DNS) in which the virtual machine will be located. However, this only affects its DNS name, because no computer object will be created on your Active Directory domain controller since no AD credential (username/password) is asked for you connect to it.
In our case, our domain is "informatiweb.lan".
So when we create a copy of a virtual machine via this customization specification and specify "ubuntu-pc" as the VM name, this VM will have the names: ubuntu-pc and ubuntu-pc.informatiweb.lan.
For the time zone, you will need to select your zone.
For example: US for United States.
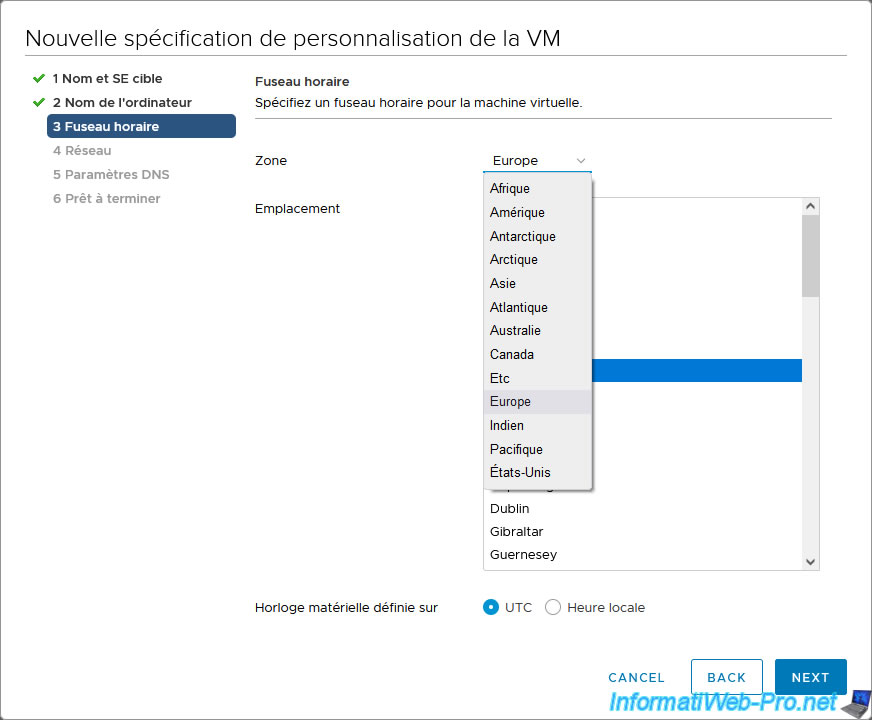
Next, select the city where you live.
For example: Alaska, Arizona, ...
Note : New York is in the "America" zone.
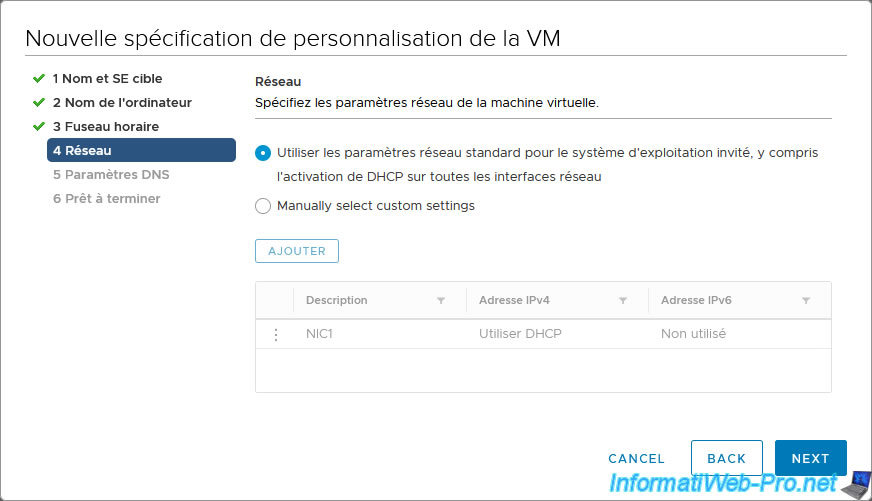
For network settings, you can choose to:
- automatically receive network settings (IP address, gateway address, DNS server addresses, ...) from the DHCP server on your network: Use standard network settings for the guest operating system, including enabling DHCP on all network interfaces.
- manually define the IP address, the gateway address, ... that the operating system should use: Manually select custom settings.
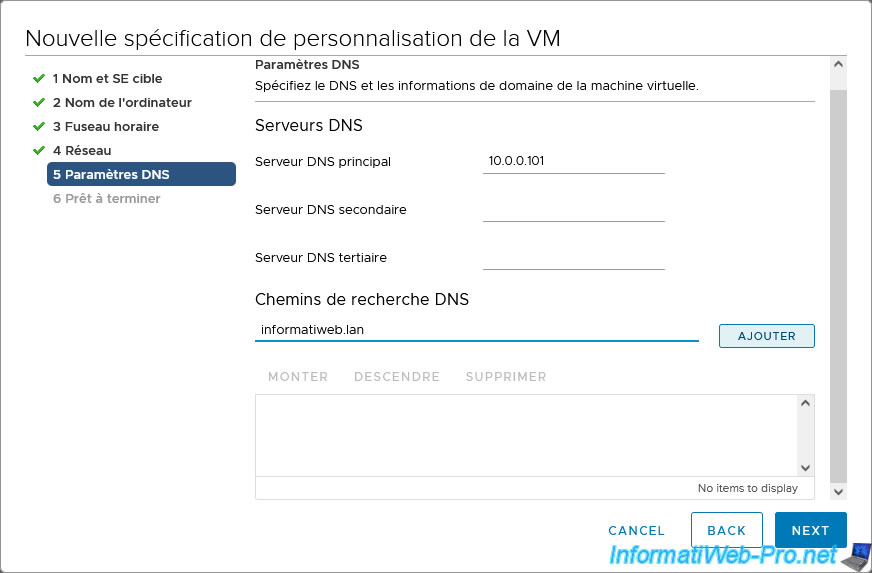
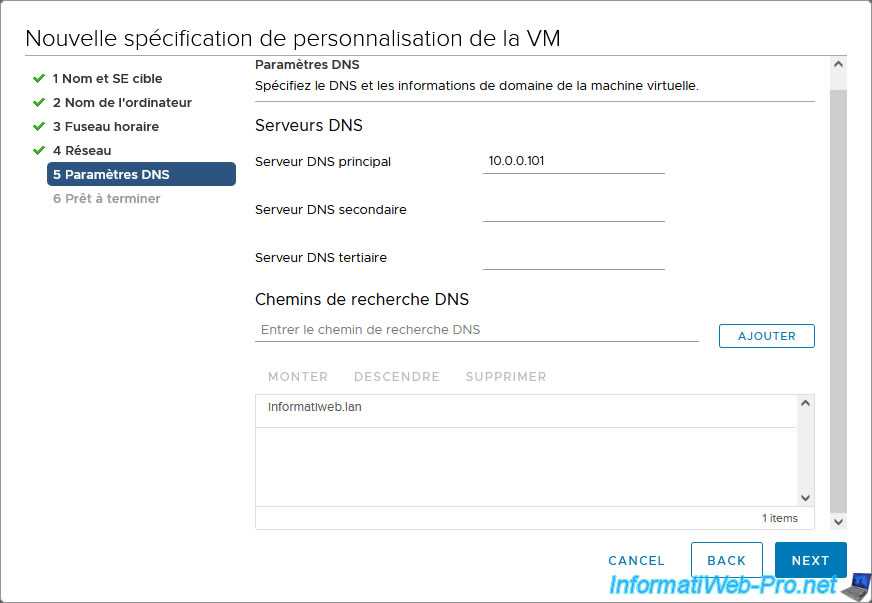
For DNS settings, you can specify:
- the IP address of the DNS servers to use: primary DNS server, secondary DNS server and tertiary DNS server.
- DNS search paths: correspond to the DNS domains to be used to find the fully qualified domain name (FQDN / DNS) to then be able to resolve this domain name into an IP address using one of the DNS servers specified just above.
In our case, we only have one domain (DNS), so we indicate our domain "informatiweb.lan", then we click on Add.
Source: Add a DNS Search Path and Domain.
Once you have added the desired DNS search paths, click Next.
A summary is displayed with:
- Name: the name under which this new VM customization specification will appear in the list, as well as when you want to clone a Linux virtual machine by customizing the guest operating system.
- OS type: in this case: Linux. The other option being: Windows.
- Computer name: Specifies how the operating system name will be configured.
In our case, the computer name in the guest operating system (Linux) will be the name given to the virtual machine. - Domain name: the domain name that the new virtual machine will be part of.
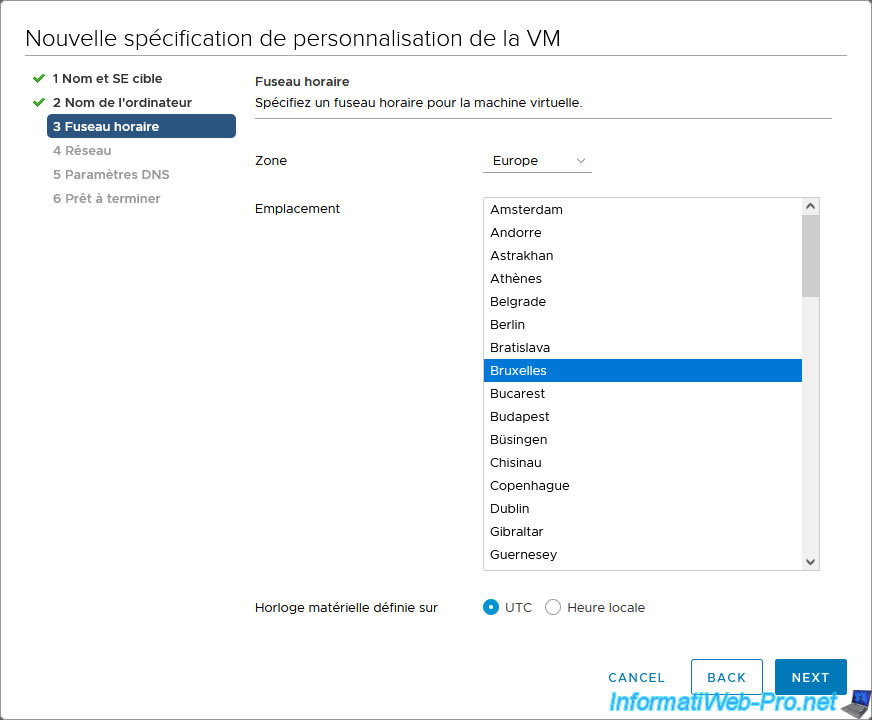
Note that this is a DNS domain name and Active Directory is not required. - Time zone: your time zone in "zone/location" format.
For example: Europe/Brussels or Europe/Paris. - Hardware clock: Indicates whether the hardware clock is set to UTC or not.
- Network type: Standard when you want the virtual machine to automatically receive its network settings from the DHCP server on your network (in a router or as a service on a server).
- Primary DNS server: Primary DNS server that will be used by the virtual machine.
- DNS search paths: the domain(s) that will be used to attempt to resolve short names (= domain-less) to IP addresses.
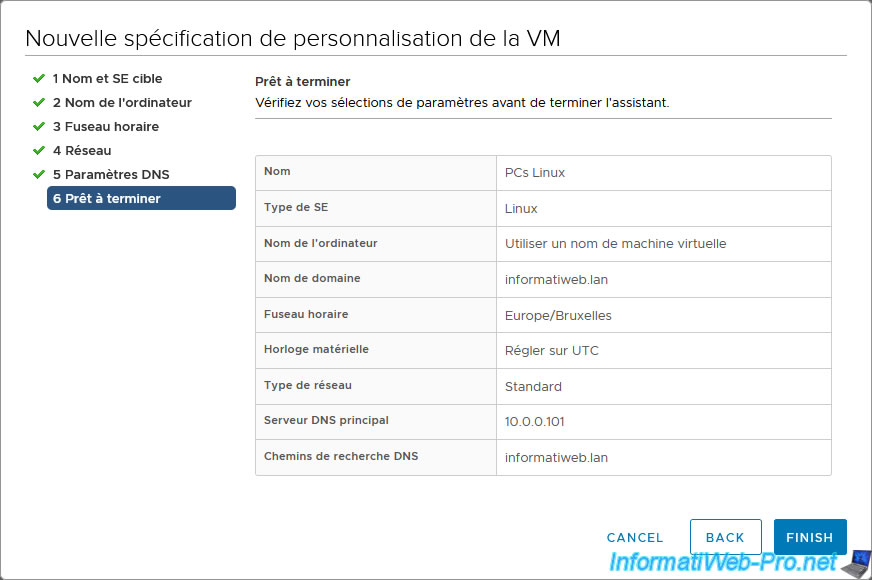
The new customization specification for Linux appears in the list of customization specifications for the VM.

Share this tutorial
To see also
-

VMware 12/20/2024
VMware vSphere 6.7 - Clone vApps
-
VMware 10/4/2024
VMware vSphere 6.7 - Clone virtual machines
-
VMware 10/9/2024
VMware vSphere 6.7 - Clone virtual machines to a content library
-
VMware 10/11/2024
VMware vSphere 6.7 - Convert a Hyper-V virtual machine to a VMware VM
You must be logged in to post a comment