Migrate virtual machines (VMs) via vMotion on VMware vSphere 6.7
- VMware
- 08 November 2024 at 12:24 UTC
-

- 4/4

7. Test network connectivity between 2 VMkernel vMotion interfaces
Rather than attempting to migrate a virtual machine from your source VMware ESXi host to your destination VMware ESXi host, you can test network connectivity between them from the command line.
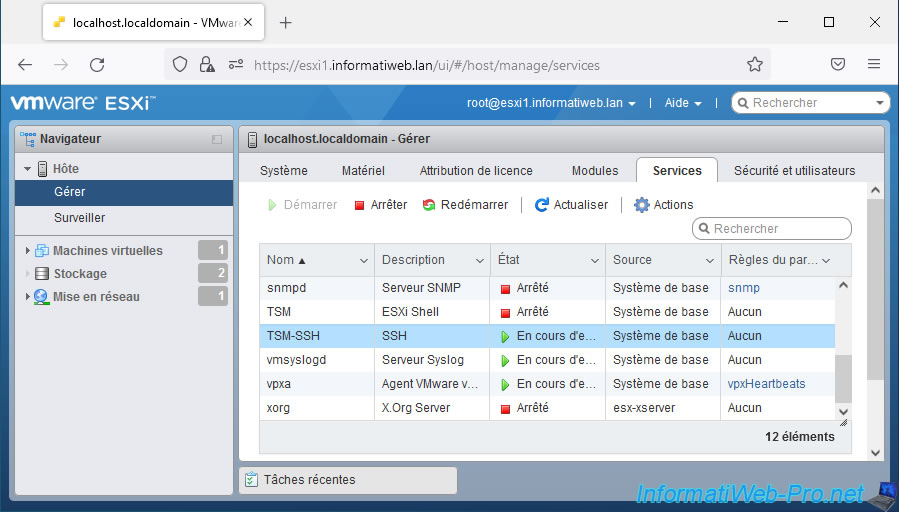
To do this, you must first start the "TSM-SSH" service on your VMware ESXi host so that the SSH protocol is enabled on it.
If you are using the web client (VMware Host client) on your VMware ESXi host, go to "Host -> Manage -> Services", select the "TSM-SSH" service and click "Start".
If you are using the web client (VMware vSphere Client) of your VMware vCenter Server, select the desired VMware ESXi host, then go to "Configure -> System -> Services".
Next, select the "SSH" service and click "Start".

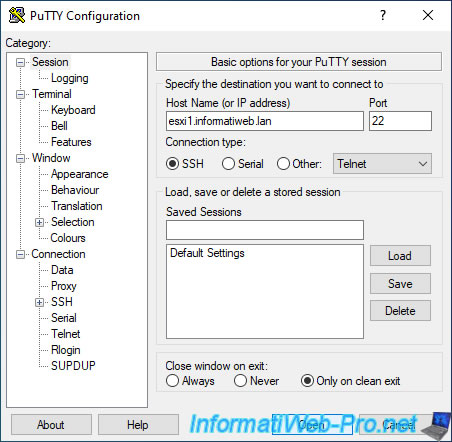
Launch your preferred SSH client (for example: PuTTY), provide the domain name or IP address of the VMware ESXi host where you just enabled the SSH protocol and click Open.
To list the VMkernel interfaces available on your VMware ESXi host, use the command:
Bash
esxcli network ip interface ipv4 get
Which gives this on our VMware ESXi host source "esxi1":
Plain Text
Name  IPv4 Address  IPv4 Netmask   IPv4 Broadcast  Address Type  Gateway   DHCP DNS
----  ------------  -------------  --------------  ------------  --------  --------
vmk0  10.0.0.11     255.255.255.0  10.0.0.255      STATIC        10.0.0.1     false
vmk1  10.10.0.11    255.255.255.0  10.10.0.255     STATIC        0.0.0.0      false
And this on the destination one (esxi2).
Plain Text
Name  IPv4 Address  IPv4 Netmask   IPv4 Broadcast  Address Type  Gateway   DHCP DNS
----  ------------  -------------  --------------  ------------  --------  --------
vmk0  10.0.0.12     255.255.255.0  10.0.0.255      STATIC        10.0.0.1     false
vmk1  10.10.0.12    255.255.255.0  10.10.0.255     STATIC        0.0.0.0      false
To find the system name of the TCP/IP stack used by each of these VMkernel interfaces, use the command:
Bash
esxcli network ip interface list |grep -E 'vmk|Netstack'
As you can see, in our case:
- the VMkernel interface "vmk0" created by default and used to manage our VMware ESXi host uses the default TCP/IP stack whose system name is: defaultTcpipStack.
- the VMkernel interface "vmk1" created during this tutorial and used for vMotion traffic between our VMware ESXi hosts uses the TCP/IP stack "vMotion" whose system name is: vmotion.
Plain Text
vmk0
   Name: vmk0
   Netstack Instance: defaultTcpipStack
vmk1
   Name: vmk1
   Netstack Instance: vmotion
To test the network connectivity between your 2 VMware ESXi hosts for vMotion traffic, you will need to use the "vmkping" command available on VMware ESXi.
Indeed, if you try to do a classic ping between your 2 hosts, the network packets will be sent via the VMkernel "vmk0" interface which provides, by default, the "Management" service. However, what we want to test is the connectivity between our VMkernel interfaces intended for the use of vMotion.
To test the network connectivity between your 2 VMkernel "vmk1" interfaces (where the vMotion service is activated), use the "vmkping" command by specifying:
- -S: the name of the TCP/IP stack used by the source VMkernel interface where vMotion is enabled.
In our case, the TCP/IP stack used is: vmotion. - -I: the name of the source VMkernel interface where vMotion is enabled.
In our case: vmk1. - [IP address]: the IP address of your destination VMware ESXi host for the VMkernel interface dedicated to vMotion traffic.
In our case: 10.10.0.12.
Note that if the "-S" parameter is not specified, the vmkping command will default to your VMware ESXi host's default TCP/IP stack.
Bash
vmkping -S vmotion -I vmk1 10.10.0.12
Plain Text
PING 10.10.0.12 (10.10.0.12): 56 data bytes
64 bytes from 10.10.0.12: icmp_seq=0 ttl=64 time=0.482 ms
64 bytes from 10.10.0.12: icmp_seq=1 ttl=64 time=0.761 ms
64 bytes from 10.10.0.12: icmp_seq=2 ttl=64 time=0.778 ms

--- 10.10.0.12 ping statistics ---
3 packets transmitted, 3 packets received, 0% packet loss
round-trip min/avg/max = 0.482/0.674/0.778 ms
If this error appears, make sure that:
- the network cables are correctly connected
- the IP address indicated corresponds to the VMKernel specified as a parameter (vmk1 in this case)
Plain Text
PING 10.0.0.12 (10.0.0.12): 56 data bytes
sendto() failed (Network is unreachable)
If you see this error, make sure you have specified the VMkernel interface through which you are using the "vMotion" TCP/IP stack.
This is because the "-S vmotion" parameter of this vmkping command expects to test the network connection via the "vMotion" TCP/IP stack.
Plain Text
Unknown interface 'vmk0': Invalid argument
To test vMotion network connectivity, you can also use the command below.
Again, you must specify:
- -I: the name of the VMkernel interface where the vMotion service is enabled.
In our case: vmk1. - --netstack: the system name of the TCP/IP stack used by the VMkernel interface specified via the "-I" parameter.
- -H: The IP address assigned to the VMkernel interface dedicated to vMotion on the destination VMware ESXi host.
Bash
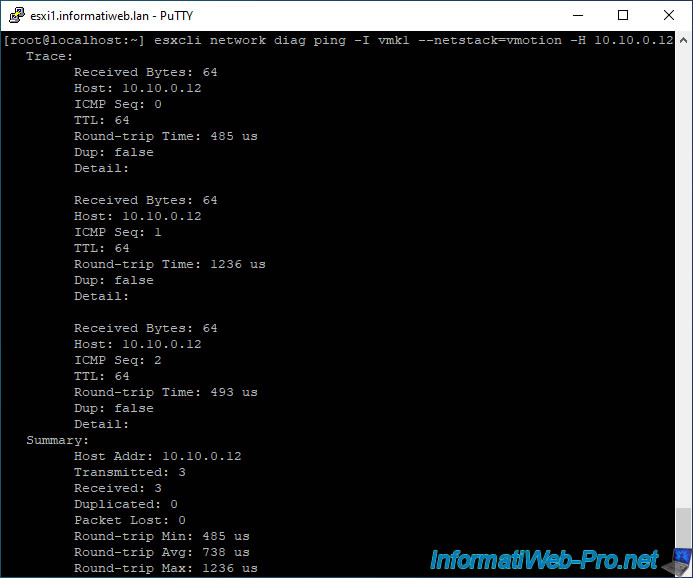
esxcli network diag ping -I vmk1 --netstack=vmotion -H 10.10.0.12
If it's good :
- you will find information in the "Trace" section
- you will see that 3 packets have been transmitted (Transmitted: 3)
- you will see that 3 packets have been received (Received: 3)
- you will see that no packets were lost (Packet Lost: 0)
Plain Text
   Trace:
         Received Bytes: 64
         Host: 10.10.0.12
         ICMP Seq: 0
         TTL: 64
         Round-trip Time: 485 us
         Dup: false
         Detail:

...

   Summary:
         Host Addr: 10.10.0.12
         Transmitted: 3
         Received: 3
         Duplicated: 0
         Packet Lost: 0
         Round-trip Min: 485 us
         Round-trip Avg: 738 us
         Round-trip Max: 1236 us
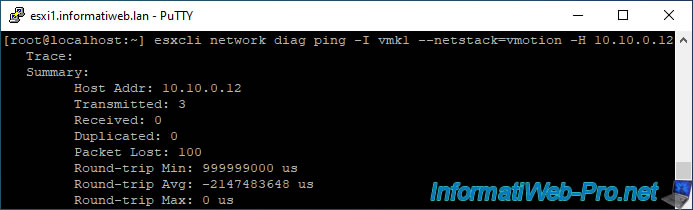
If there is a problem, you will see that:
- the "Trace" section is empty
- 3 packets were sent (Transmitted: 3)
- 0 packets were received (Received: 0)
- 100% of packets sent were lost (Packet Lost: 100)
Plain Text
   Trace:
   Summary:
         Host Addr: 10.10.0.12
         Transmitted: 3
         Received: 0
         Duplicated: 0
         Packet Lost: 100
         Round-trip Min: 999999000 us
         Round-trip Avg: -2147483648 us
         Round-trip Max: 0 us
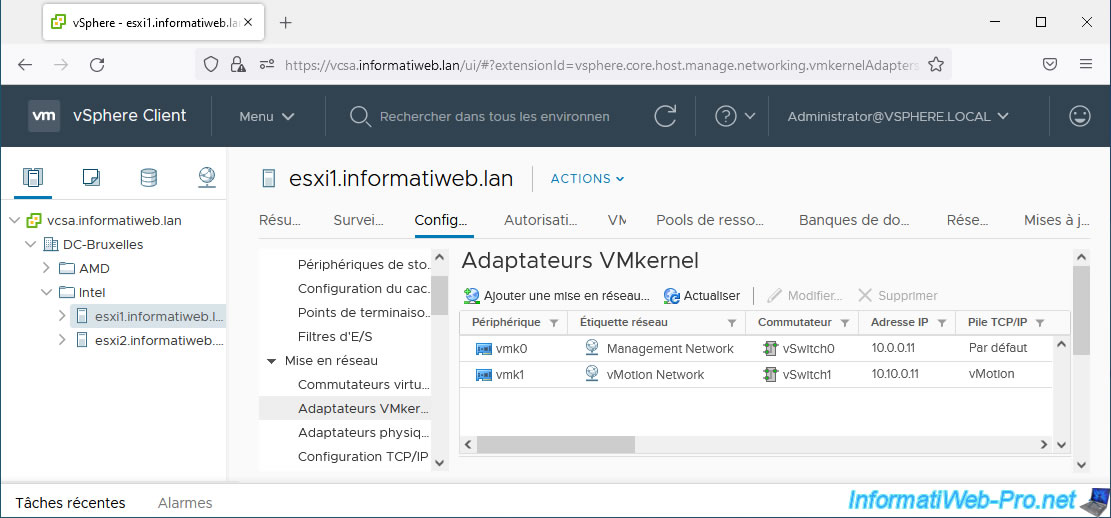
To know the name of your VMkernel interfaces, the IP address assigned to them and the TCP/IP stack used by each of them, you can also select your VMware ESXi host in the web client of your VMware vCenter Server and go to the section: Configure -> Networking -> VMkernel adapters.
However, be careful that the name of the TCP/IP stack displayed in this web client is different from the system name expected by the commands cited above.
The system names of TCP/IP stacks under VMware ESXi 6.7.0 are:
- Default: defaultTcpipStack
- vMotion: vmotion
8. Single virtual network per data center (data center)
On a VMware vCenter Server, a virtual network (or "port group" in the VMware ESXi web client) is unique per data center.
This means that you can easily migrate virtual machines from one VMware ESXi host to another without losing network connections if they are part of the same data center.
As you can see, in our case, we have a virtual network "VM Network" whose name is identical on our 2 VMware ESXi hosts.
This virtual network is the one created by default under VMware ESXi to provide network and Internet access (if applicable) to your virtual machines.
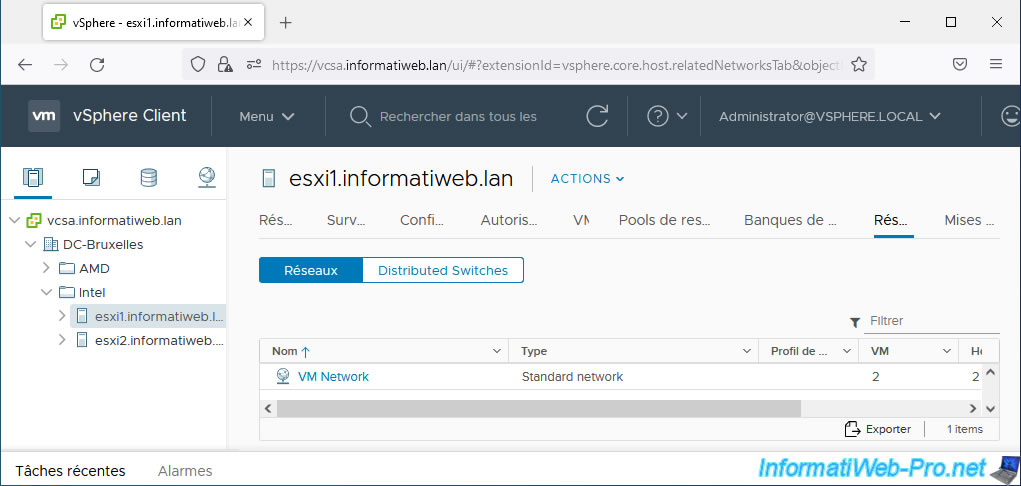

If you click on the name of this virtual network, you will see that it is used by 2 hosts.

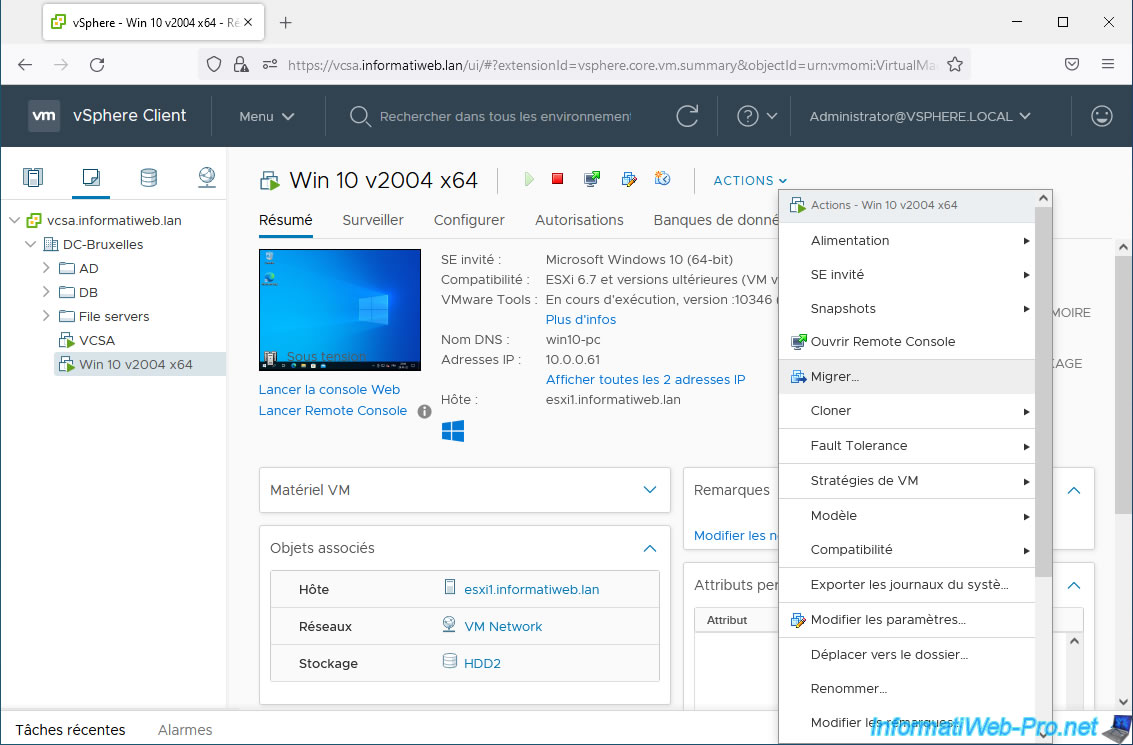
9. Migrate a virtual machine (hot or cold) from one VMware ESXi host to another via VMware vCenter Server (VCSA)
Now that everything is configured, you can easily migrate virtual machines from one VMware ESXi host to another from the "VMware vSphere Client" web client of your VMware vCenter Server (VCSA).

To migrate a virtual machine (whether it is started or not), select it, then click: Actions -> Migrate.
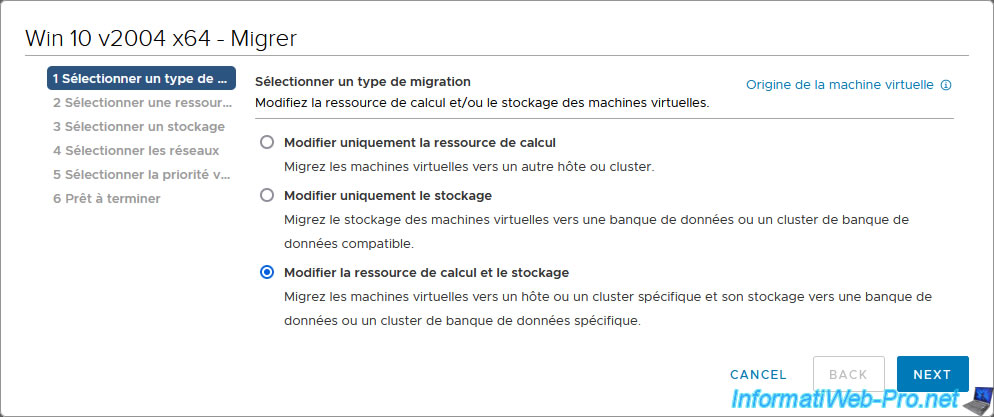
In the "[VM name] - Migrate" window that appears, for the migration type, select "Change both compute resource and storage", then click Next.
Explanations:
- Change compute resource only: allows you to migrate only the execution of a virtual machine from one host to another.
In other words, the data stored in RAM by the virtual machine will be migrated to the destination VMware ESXi host.
Once the virtual machine's compute resource is migrated, this virtual machine will use the system resources (CPU and RAM) of the destination VMware ESXi host.
But, its files (configuration file, virtual hard disks, ...) will not be moved.
Warning: this option requires that the virtual machine be on shared storage. - Change storage only: allows you to move the virtual machine files (".vmx" configuration file, ".vmdk" virtual hard disks, ...) from a datastore from one VMware ESXi host to another without having to shut down the virtual machine concerned.
- Change both compute resource and storage: allows you to migrate both at once (the RAM of the VM and its files).
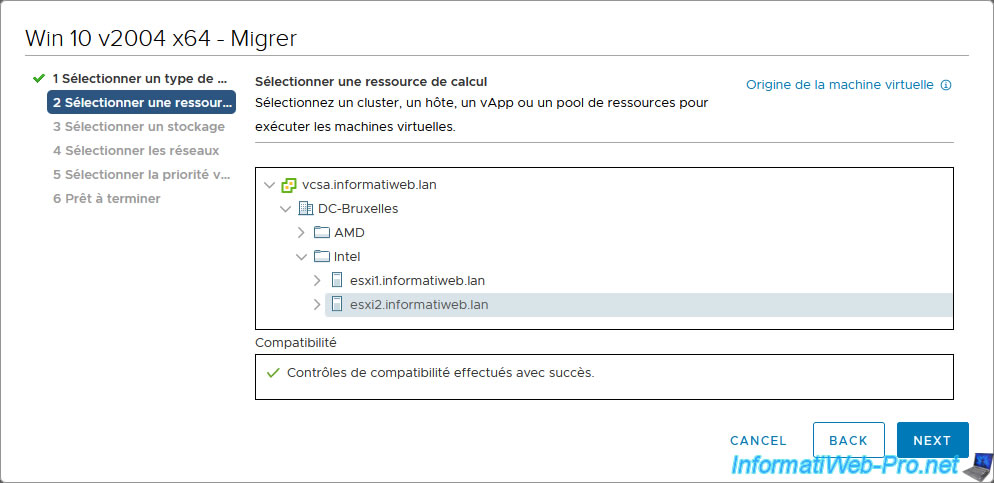
In the "Select a compute resource" step, select the VMware ESXi host to which you want to migrate this virtual machine, then click Next.
In our case: esxi2.informatiweb.lan.
In this tutorial, we will migrate a virtual machine between 2 hosts that are part of the same data center.
However, be aware that it is also possible to migrate virtual machines from one data center to another, or even from one vCenter server to another.
That said, this may require a specific edition of VMware vSphere. What you will see in other tutorials.
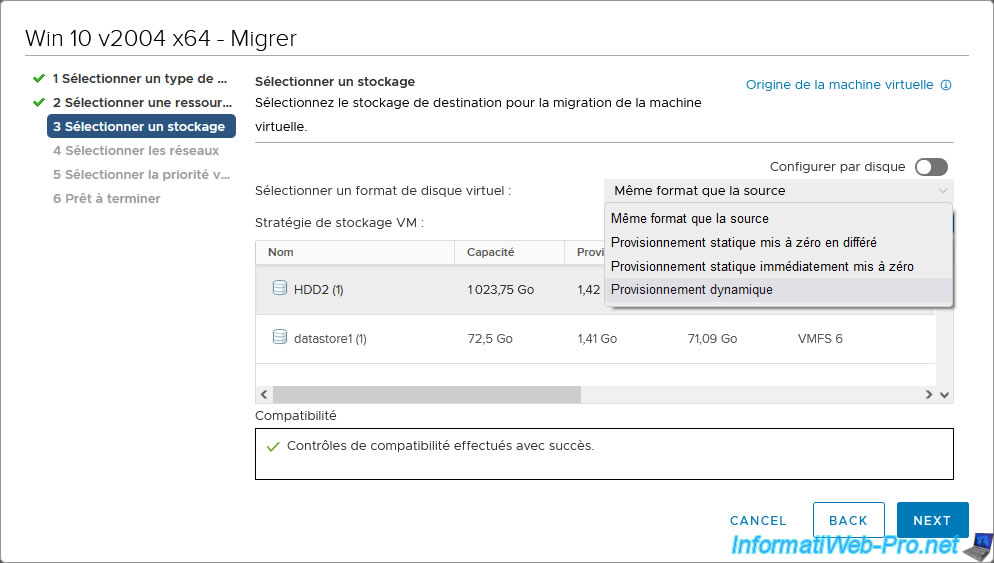
In the "Select storage" step, first select in which datastore of the destination VMware ESXi host you want to store this virtual machine.
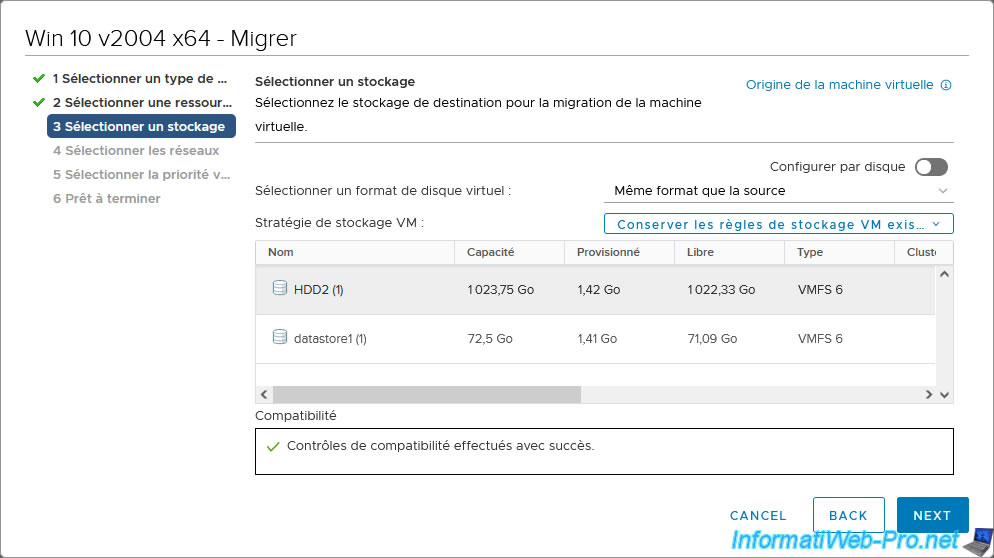
When you migrate a virtual machine, you have the option to change the virtual disk format (.vmdk) if you wish.
In other words: change the type of provisioning used (thick or thin).
By default, the destination format will be the same as the source format.
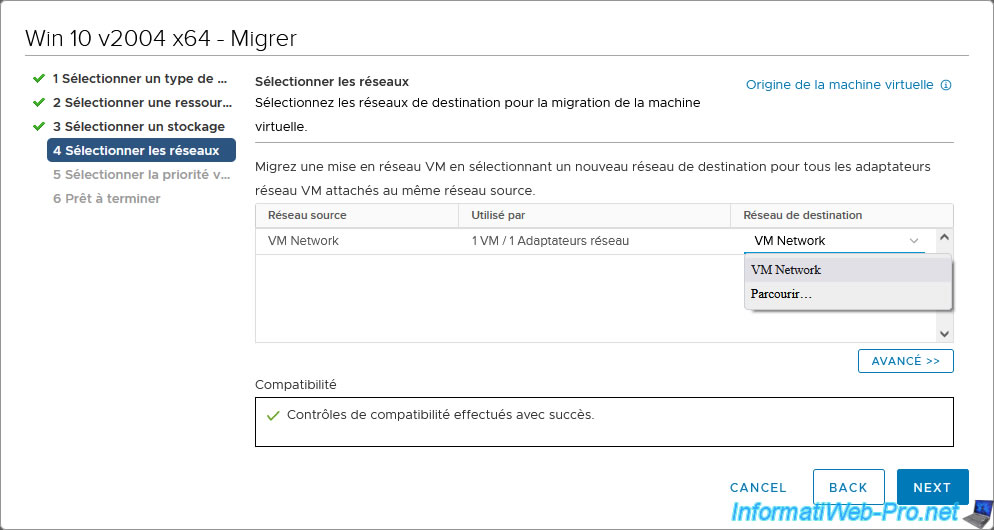
In the "Select networks" step, you can map the different virtual networks used by the source virtual machine to the virtual networks of the destination host.
By default, the selected destination network is the one whose name is identical to the source virtual network.
Hence the interest in using identical names on your different VMware ESXi hosts when a virtual network on one VMware ESXi host points to the same physical network on the other VMware ESXi host.
Warning : so that the virtual machine is still accessible on the network after its migration, it is important that the IP address of the source network is identical to that of the destination.
Otherwise, some manipulation may be required in the operating system for the virtual machine to obtain a new IP address corresponding to the remote network.
Important : virtual network names are unique only within a data center.
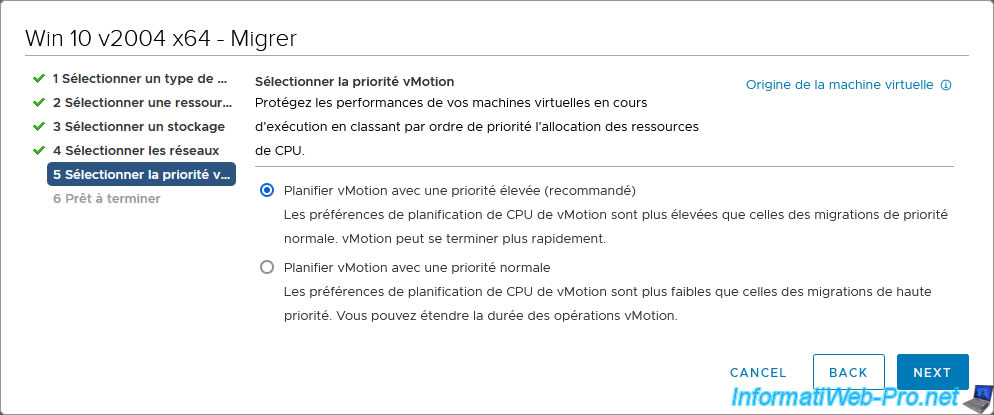
In the "Select vMotion priority" step, you can choose the priority of this vMotion migration:
- Schedule vMotion with high priority (recommended): allows you to prioritize this vMotion migration over other vMotion migrations that are potentially currently in progress.
- Schedule normal vMotion: allows you to launch this vMotion migration with normal priority.
Note that if no migration is currently in progress in your case, choosing either option will make absolutely no difference.
This will start directly in both cases.
However, choosing "Schedule normal vMotion" now will allow you to launch a priority migration a little later if necessary if you wish, even if the one with normal priority is not completed.
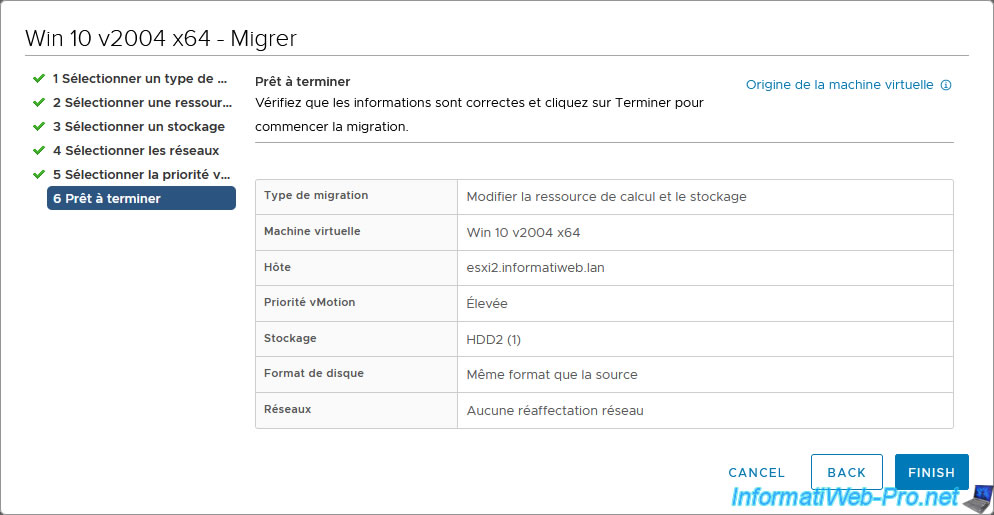
A summary of your virtual machine migration configuration appears.
Click "Finish" to start migrating this virtual machine.
Once the vMotion migration has started, you will see a "Replace virtual machine" task appear at the bottom of the screen with the name of the virtual machine being migrated as the target.
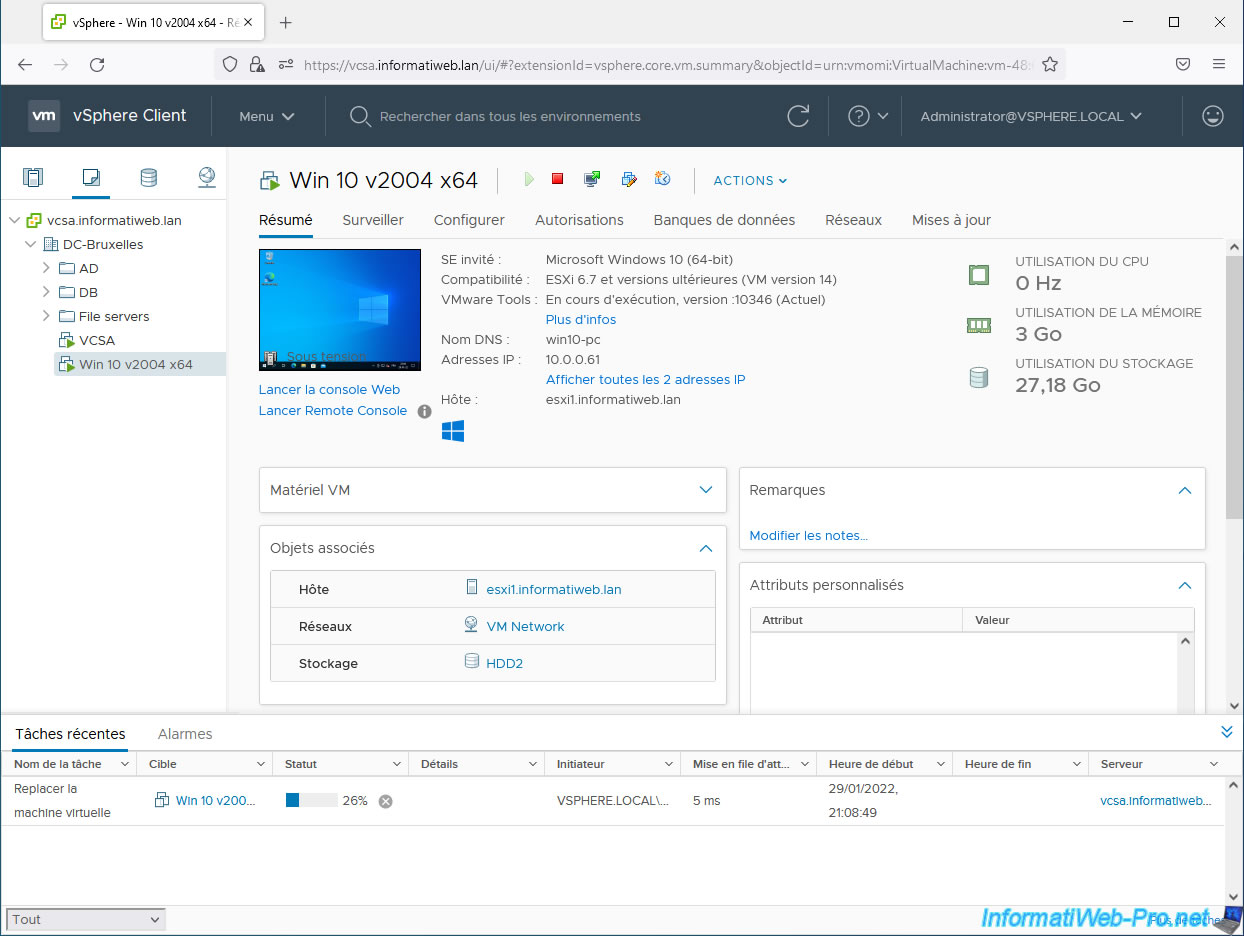
During the migration, several actions will be grayed out for the affected virtual machine.
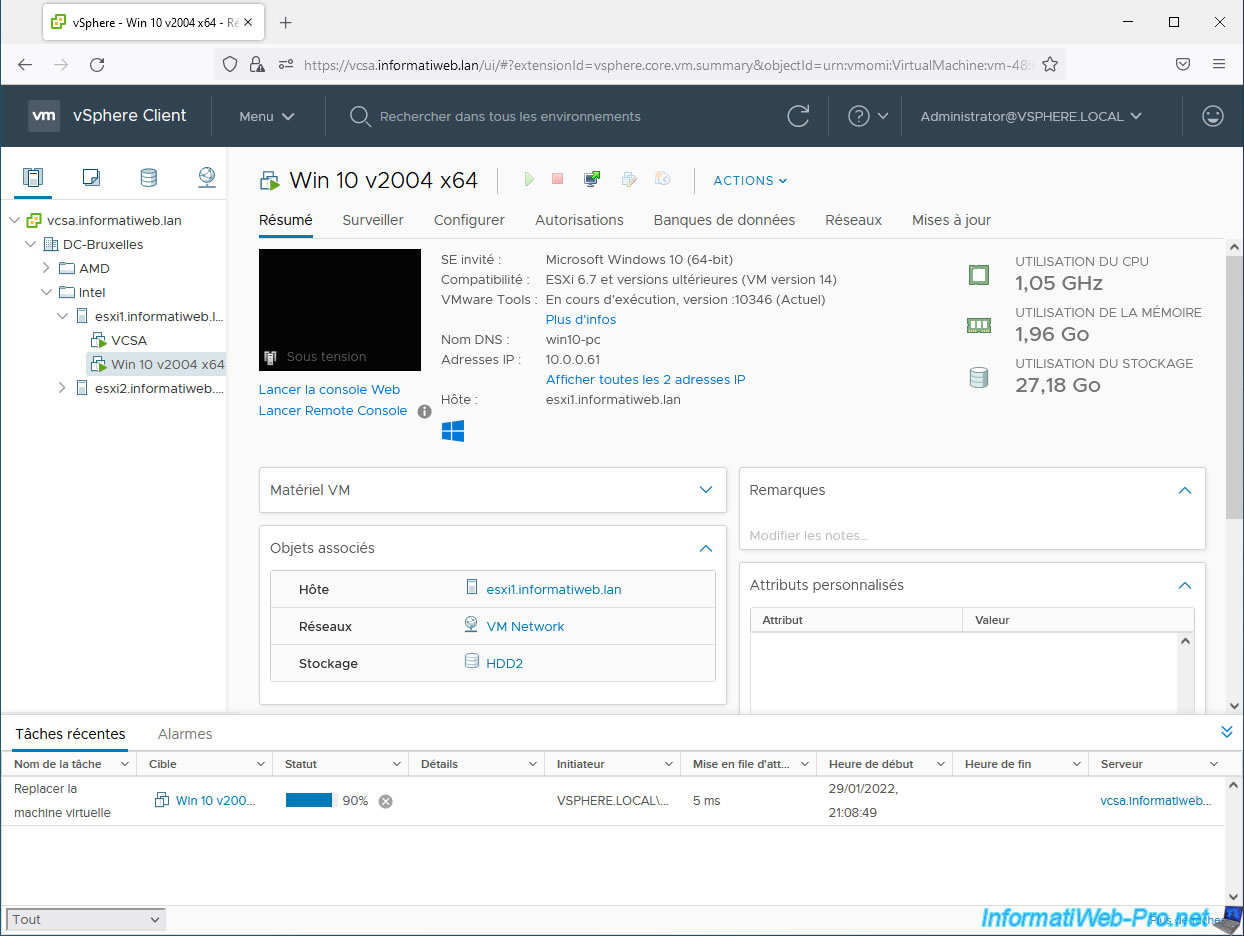
Towards the end of the migration of your virtual machine, you will see this appear in the details of your task: Migrating the active state of the virtual machine.
Then, once the migration of your virtual machine is complete, you will see that its host will have changed, as well as the datastore where it is located.
On the other hand, the state of its guest operating system will have been preserved and it will not have been interrupted during the migration.
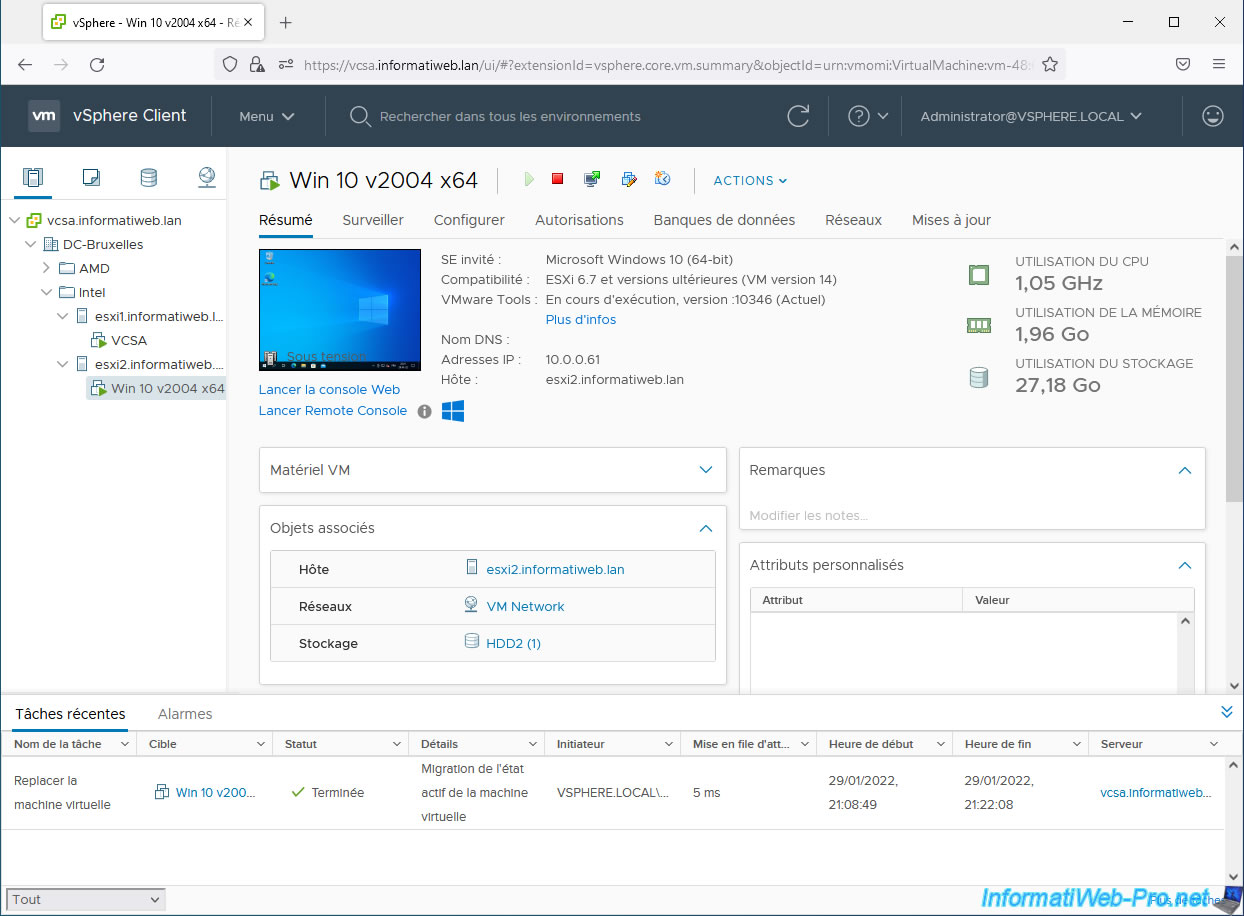
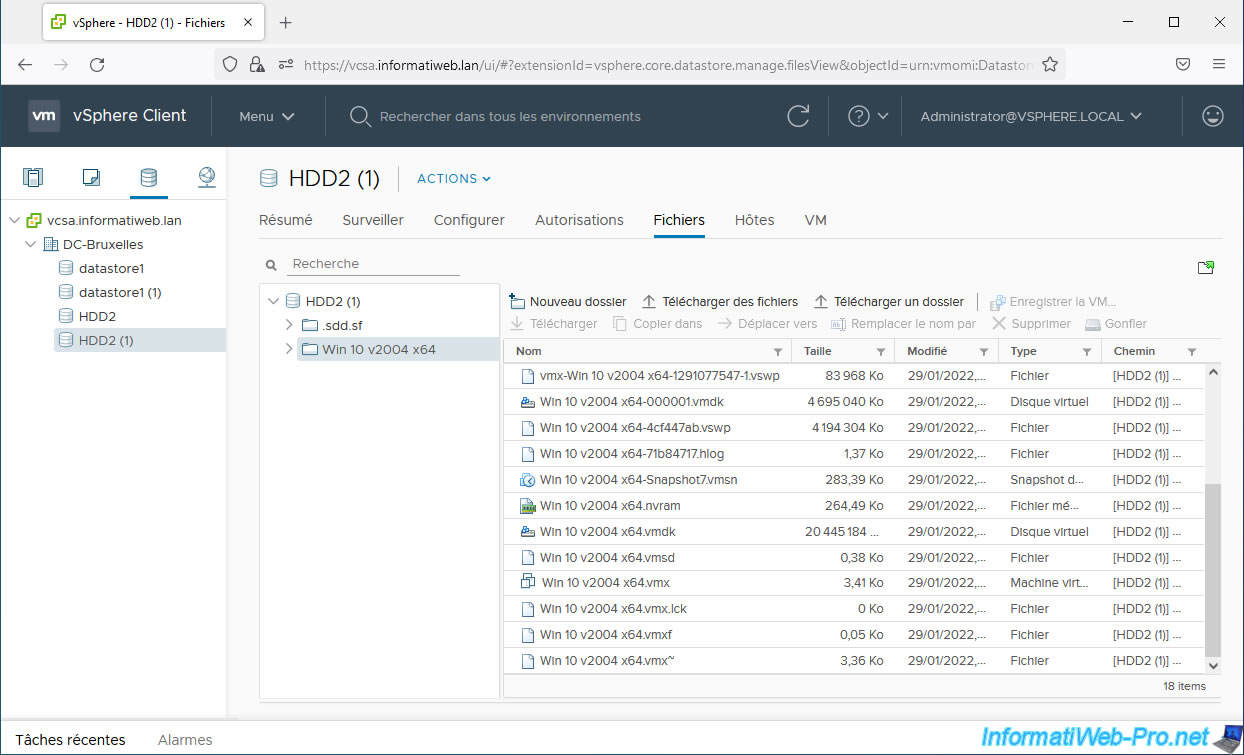
As you can see, because we changed the compute resource and storage, the files making up your virtual machine will also have been moved to the destination VMware ESXi host.
Note that migrating a virtual machine's storage will automatically rename all its files to its current name.
This can be practical in business to maintain a concordance between the name of the virtual machines visible in the inventory of your VMware vCenter Server and the name of the folders visible in your different datastores.
Share this tutorial
To see also
-
VMware 3/5/2025
VMware vSphere 6.7 - Cluster admission control
-
VMware 2/14/2025
VMware vSphere 6.7 - Create a cluster
-
VMware 2/19/2025
VMware vSphere 6.7 - Create a cluster and enable EVC mode
-
VMware 2/12/2025
VMware vSphere 6.7 - Create a datastores cluster and enable SDRS
No comment