- VMware
- 02 November 2022 at 10:10 UTC
-


When you install the VMware ESXi hypervisor, a series of services are present on it, only a part of which is running normally.
To authorize and secure access to these different services, a firewall is pre-installed and pre-configured on your VMware ESXi hypervisor. This allows by default to block ports currently unused by your hypervisor.
1. Manage VMware ESXi services
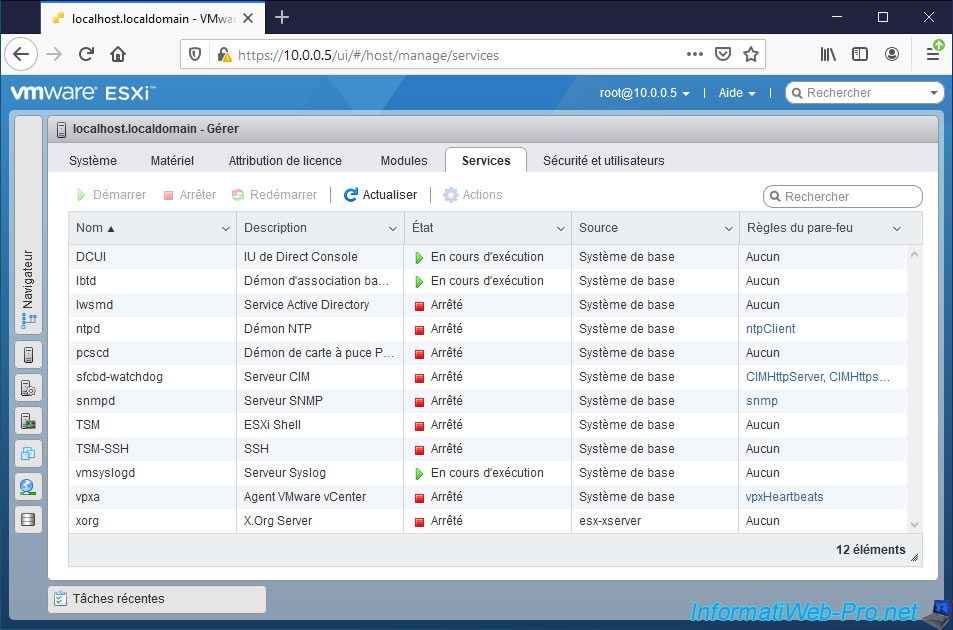
To see the list of services installed on your VMware ESXi hypervisor and manage them, connect to its web interface, then go to : Host -> Manage.
In the "Services" tab, you will find the list of services present on your VMware ESXi hypervisor, along with their status and the firewall rule associated with it.
Indeed, with VMware ESXi, it's possible to manage the opening and closing of specific ports of the firewall according to the state of the associated service.
So, when you stop a service, the port is automatically closed in the VMware ESXi firewall.
In the list of services, you will find in particular :
- DCUI (Direct Console UI) : which corresponds to the yellow and gray console you see on the screen (if a screen is plugged into your server).
Note that this DCUI console can also be used via SSH by launching the program of the same name (dcui). - lwsmd (Active Directory Service) : service used to join your VMware ESXi hypervisor to an Active Directory domain.
- ntpd (NTP) : service allowing you to synchronize the date and time of your hypervisor from an NTP (Network Time Protocol) server so that all your hypervisors (if any) can have exactly the same date and time at the close second.
This makes it possible to avoid some errors at the level of authentication for example. Especially if it's linked to an Active Directory domain. - snmpd (SNMP server) : service managing the sending of notifications and allowing this hypervisor to be monitored from monitoring software
- TSM (ESXi Shell) : service used to manage your VMware ESXi hypervisor from the command line (from the DCUI console, for example).
- TSM-SSH (SSH) : SSH server used to manage your VMware ESXi hypervisor remotely from the command line (from an SSH client, such as Putty) and/or to manage its files and folders using the SFTP protocol (which uses the same port) with software such as WinSCP, for example.
To learn more, refer to our tutorial : VMware ESXi 6.7 - Enable SSH protocol. - vmsyslogd (Syslog Server) : service managing the logging of messages from the VMKernel and other system components. These logs can then be transferred to another log collector (such as Syslog-NG, SexiLog, ...) if you wish.
- vxpa (VMware vCenter Agent) : allows you to manage the connection of your VMware ESXi hypervisor to a VMware vCenter server.
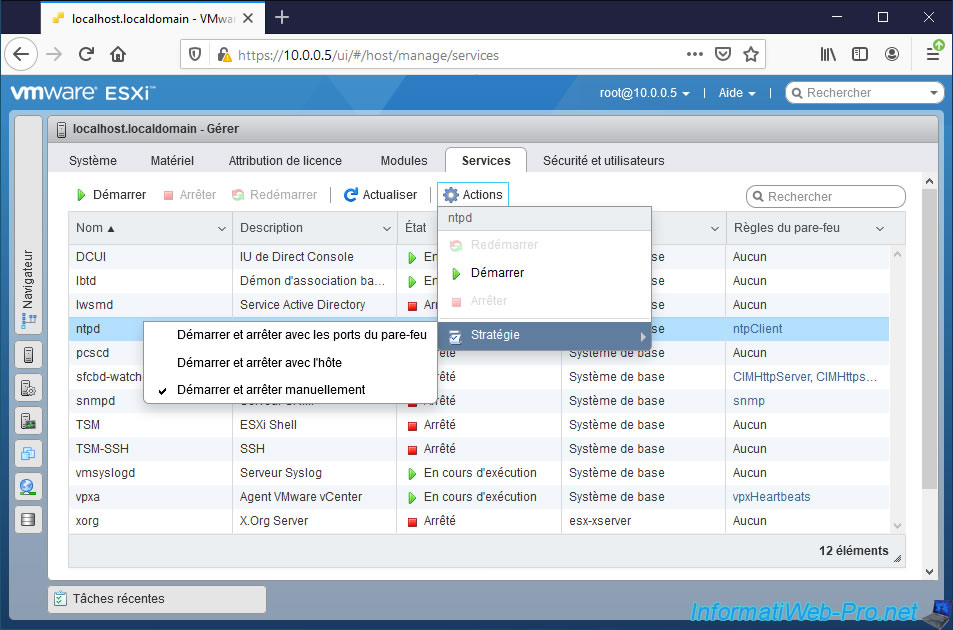
For each service, you can start, stop or restart it manually.
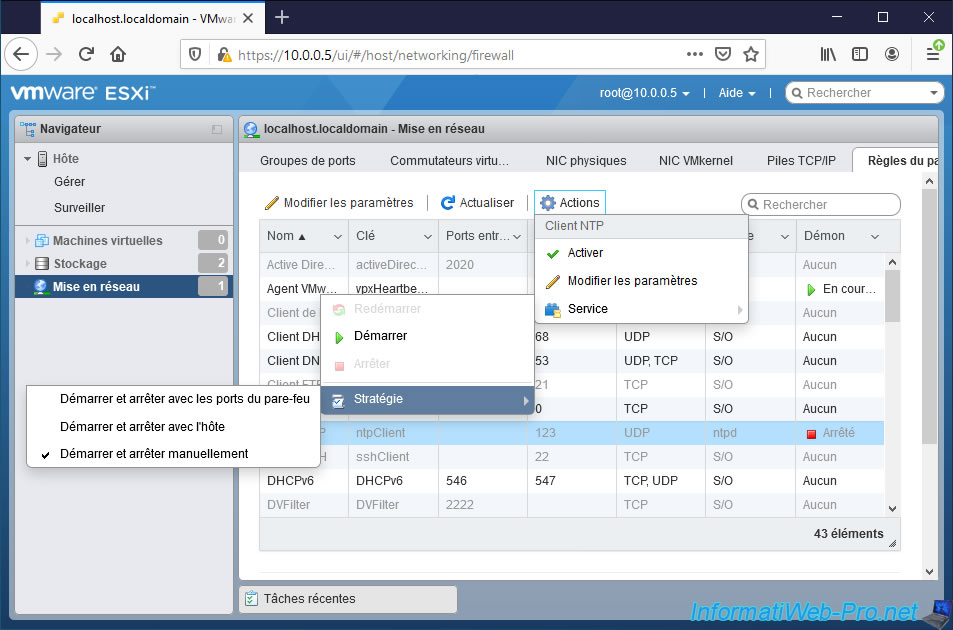
Then, if you click on "Actions", you will be able to change the start and stop policy to be used with a specific service :
- Start and stop with firewall ports : if you open the ports corresponding to this service in your VMware ESXi hypervisor, the service will be automatically started. Then, stopped when you close the corresponding ports in the firewall.
- Start and stop with host : the service will be automatically started when your server starts up and stopped when the server is stopped
- Start and stop manually : no start or stop will be performed automatically. If you want to use this service, you will have to start it by clicking "Start".
Then, to stop it, click on "Stop". Note however that if you stop or restart your server, this service will be stopped and it will not restart automatically.
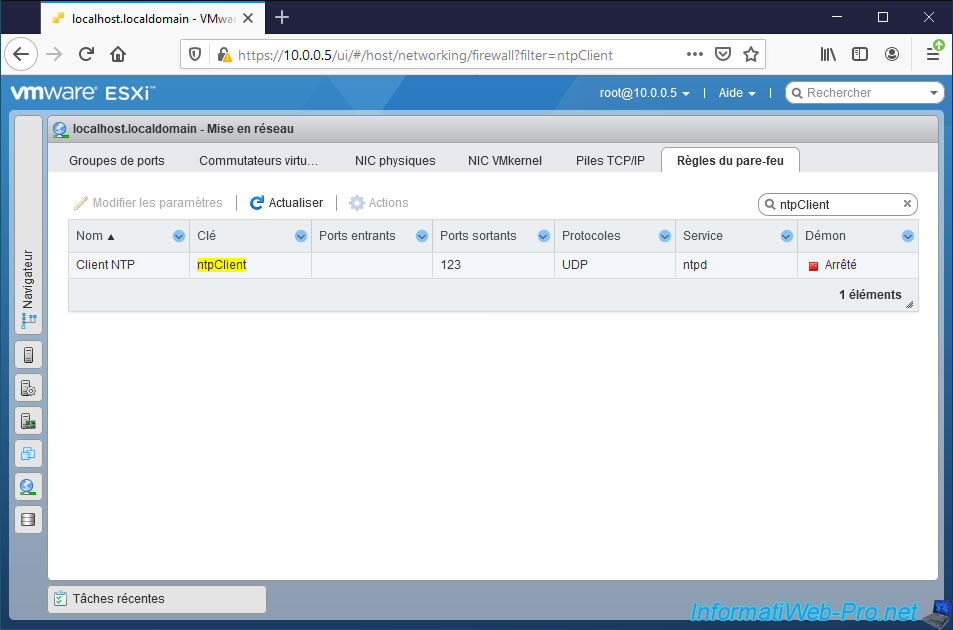
For some services (including "ntpd"), you can access the corresponding rule in the firewall by clicking on the link in the "Firewall rule" column.
For this "ntpd" service, the rule is named "ntpClient".
By clicking on this link, you will be automatically redirected to the "Networking -> Firewall rules" section of this web interface and the name of the desired rule will automatically be shown in the search box so that it appears directly on the screen.
2. Manage VMware ESXi firewall rules
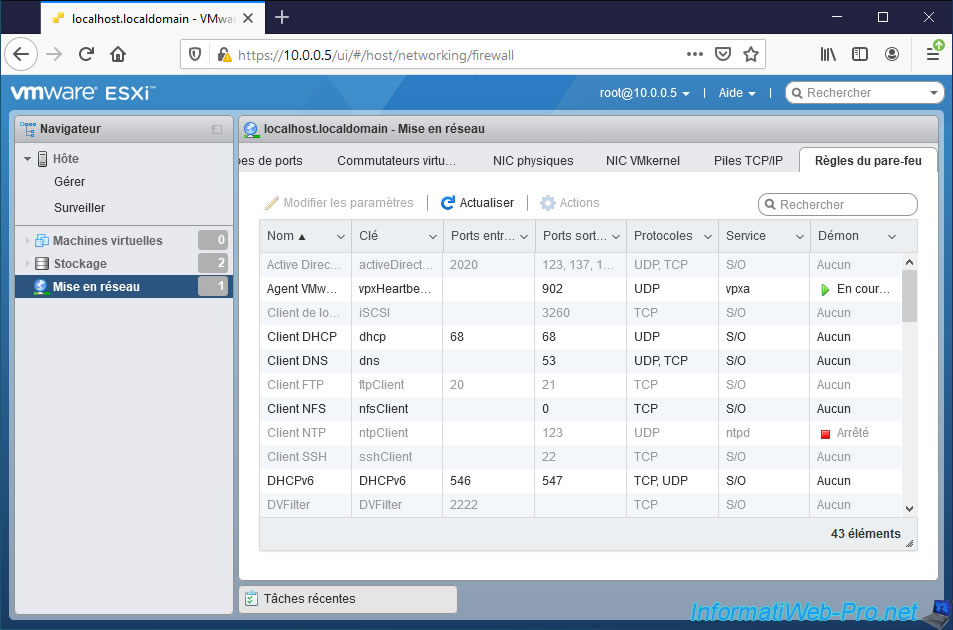
To manage the firewall rules for your VMware ESXi hypervisor, go to : Networking -> Firewall rules.
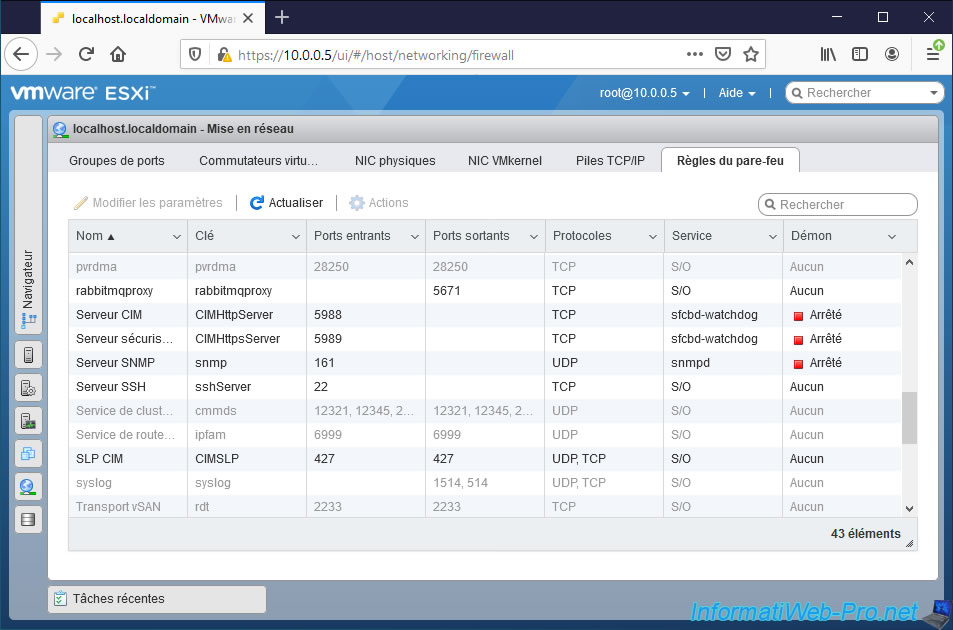
As you can see, by default, more than 40 rules are pre-configured. But, some of them are disabled (grayed out) by default.
Among the rules available by default, you will find in particular :
- Active Directory - All : allows you to authorize the hypervisor to bind to an Active Directory domain
- VMware vCenter Agent : concerns the remote management of your VMware ESXi hypervisor from a VMware vCenter Server
- DHCP Client : allows you to authorize sending a DHCP message over the network so that your VMware ESXi hypervisor can obtain an IPv4 address.
- DNS client : allows you to authorize domain name resolution (DNS) from a DNS server on your network or on the Internet
- FTP client : allows access to a FTP server from your VMware ESXi hypervisor
- NFS client : allows access to a NFS server from your VMware ESXi hypervisor
- NTP client : allows your VMware ESXi hypervisor to contact a NTP server to synchronize its date and time from there.
- SSH client : allows your hypervisor to connect to an SSH server
- SNMP server : allow monitoring of your hypervisor from monitoring software
- SSH Server : allows you to manage your VMware ESXi hypervisor remotely from the command line using the SSH protocol.
- and more
To edit a rule for this firewall, select it and click "Edit settings".
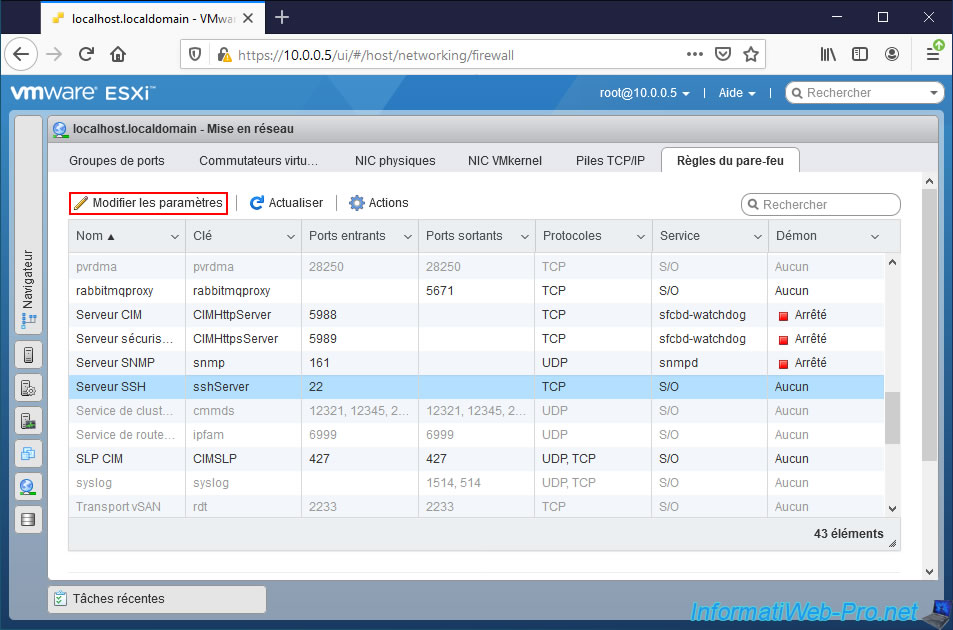
In the "Firewall Settings" window that appears, you can choose between :
- All connections from all IP addresses : this allows anyone to be allowed by default to connect to the port(s) affected by this rule.
- Only allow connections from the following networks : which makes it possible to limit access to the ports concerned by this rule to specific networks and/or to some specific computers / servers.
In the case of the "SSH Server" rule, you could therefore authorize remote management of your hypervisor via SSH from only specific computers to avoid hacker attacks (for example).
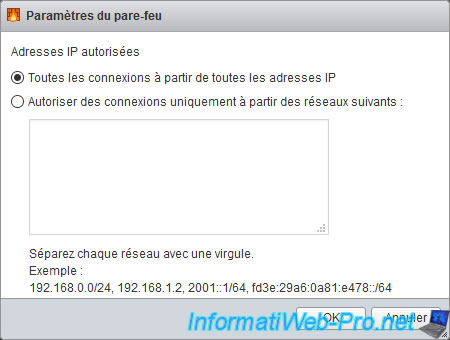
To limit access to ports affected by this firewall rule, select "Only allow connections from the following networks" and enter the network(s) and/or IP address you want to allow.
Here are some examples :
- 10.0.0.0/8 : allows you to authorize computers and/or servers whose network ID is 10.0.0.0 and the subnet mask is 255.0.0.0 (or "/8" in CIDR notation).
- 192.168.1.0/24 : allows you to authorize computers and/or servers whose network ID is 192.168.1.0 and the subnet mask is 255.255.255.0 (or "/24" in CIDR notation).
- 10.0.0.4 : to allow only the computer or server with an IP address of 10.0.0.4 to connect to the affected ports on your hypervisor.

As stated previously, some rules of this firewall are enabled and some are not. Those displayed in black are enabled and those displayed in gray are disabled.
For each rule of this firewall, you can click on "Actions" to :
- Enable or disable it
- Edit the settings of this one
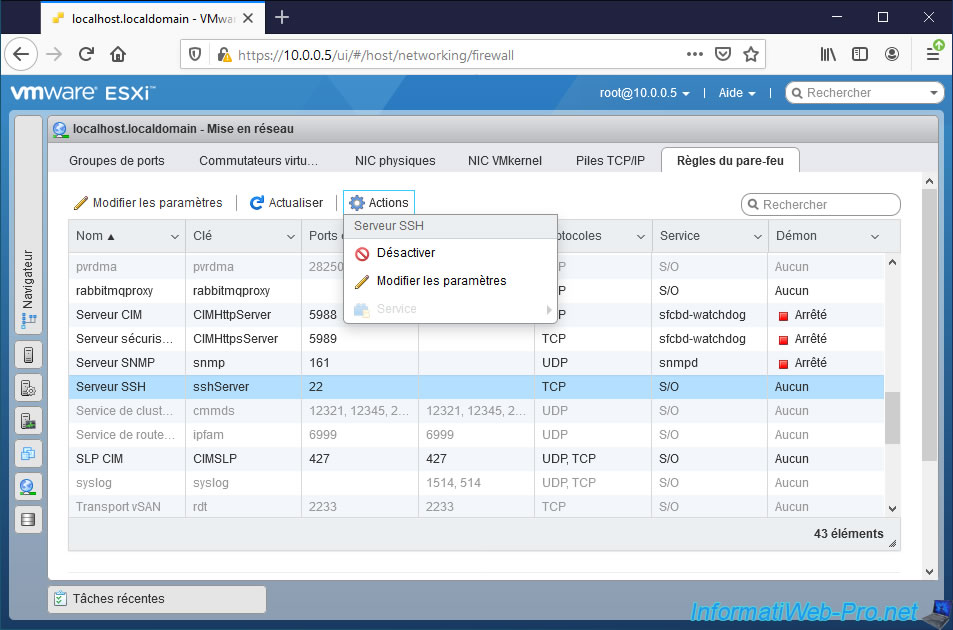
When a service is associated by VMware ESXi with a specific rule of its firewall, you can also access the "Service" submenu of the "Actions" menu.
In this case, you can start, stop or restart the service associated with it.
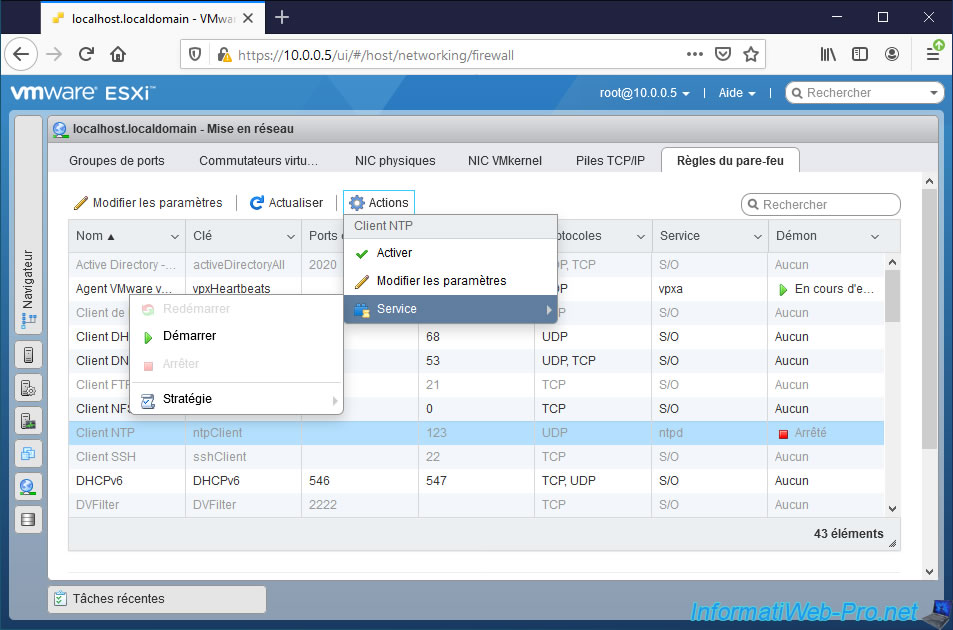
Then, in the "Policy" submenu, you can choose whether the associated service should start and stop automatically according to this firewall rule, from the start and stop of the host or manually.
For more information on these 3 possibilities, refer to the explanations given in the previous step of this tutorial.
Share this tutorial
To see also
-

VMware 5/25/2022
VMware ESXi 6.0 - Install the VMware Host Client web client
-

VMware 5/27/2022
VMware ESXi 6.5 - Add a network driver in the installation ISO
-

VMware 1/27/2023
VMware ESXi 6.7 - Enable virtualization-based security (VBS)
-

VMware 12/2/2022
VMware ESXi 6.7 - Install and use the VMRC console on Linux
You must be logged in to post a comment