- VMware
- 03 March 2023 at 13:44 UTC
-


On VMware ESXi, there are various network components that allow your virtual machines and your VMware ESXi hypervisors to communicate with each other.
For your hypervisors to communicate with each other, you need a VMkernel interface.
As you will see in this tutorial, a VMkernel interface can be used for managing your VMware ESXi hypervisor, for migrating VMs between them, ...
- Default VMkernel interface for hypervisor management
- Best practices
- Add a new virtual standard switch (vSS)
- Network configuration on the 2nd VMware ESXi hypervisor
- Test network connectivity between 2 VMkernel interfaces
1. Default VMkernel interface for hypervisor management
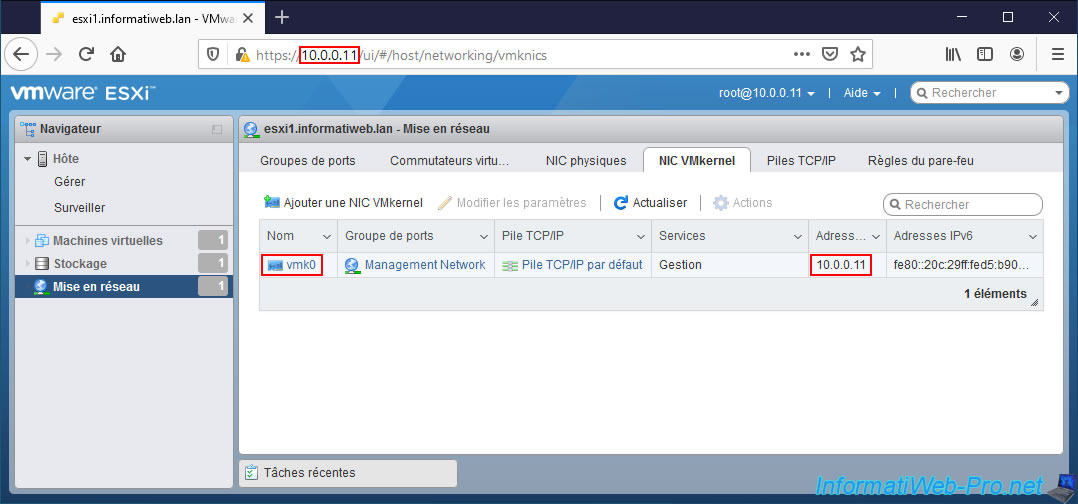
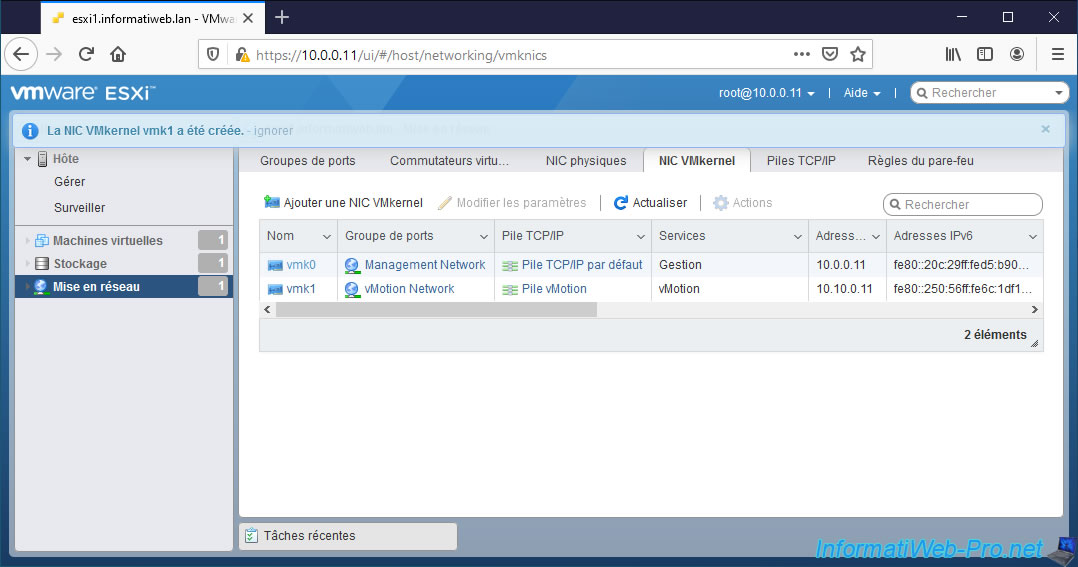
Access the web interface of your VMware ESXi hypervisor and go to : Networking -> VMkernel NICs.
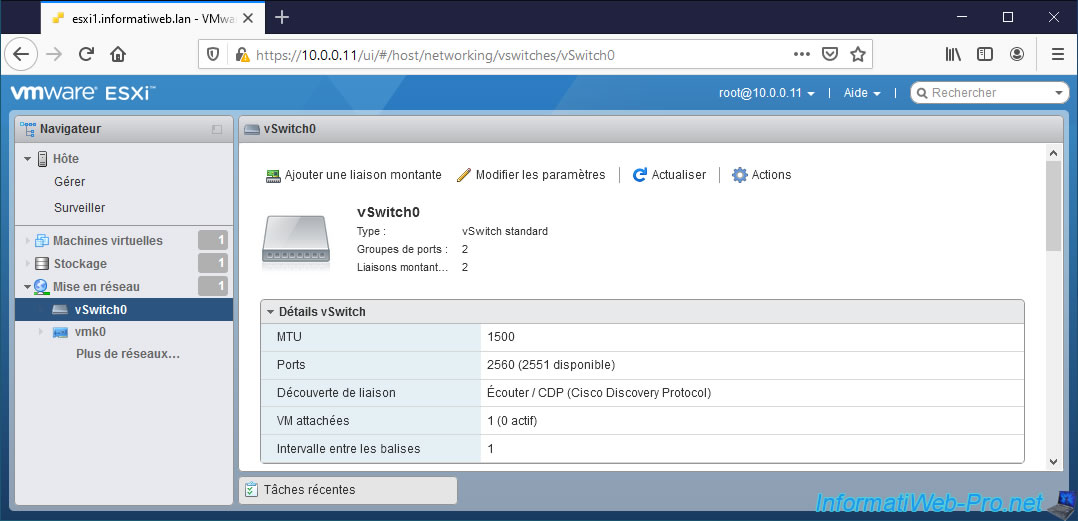
As you can see, by default, a VMkernel interface is already present :
- Name : vmk0.
- Portgroup : Management Network.
- TCP/IP stack : Default TCP/IP stack.
- Services : Management.
- IPv4 address : 10.0.0.11
- IPv6 addresses : fe80::...
If you look at the displayed IPv4 address, you will easily understand that it's the IP address of your VMware ESXi hypervisor.
And more specifically, the one you specify to manage your VMware ESXi hypervisor (whether via its web interface or via SSH). This is also the one you can configure from the DCUI (Console Direct User Interface) console.
By the way, the service provided by this VMkernel interface is "Management" (as you can see in the image below).
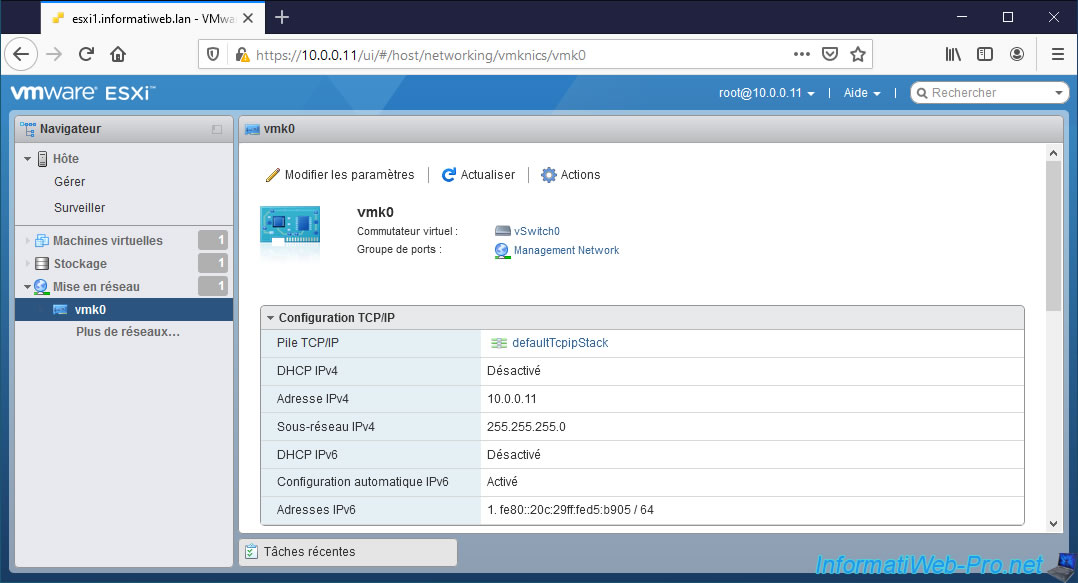
Click on its name (vmk0).
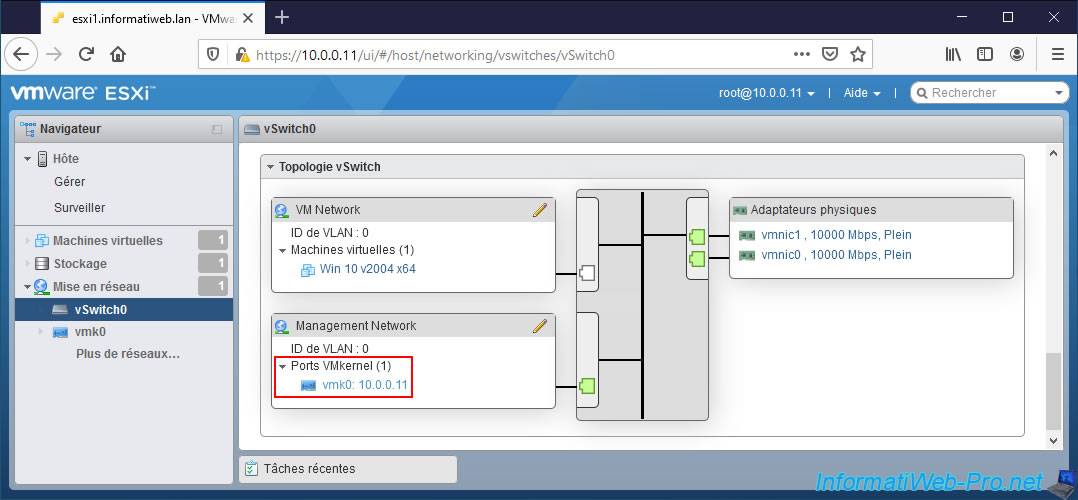
As you can see on the "vmk0" page that appears :
- this VMkernel interface is on the "vSwitch0" virtual switch (created by default when installing your hypervisor).
- this VMkernel interface is in the "Management Network" port group (also created by default)
- this VMkernel interface has a TCP/IP configuration and therefore in particular an IP address.
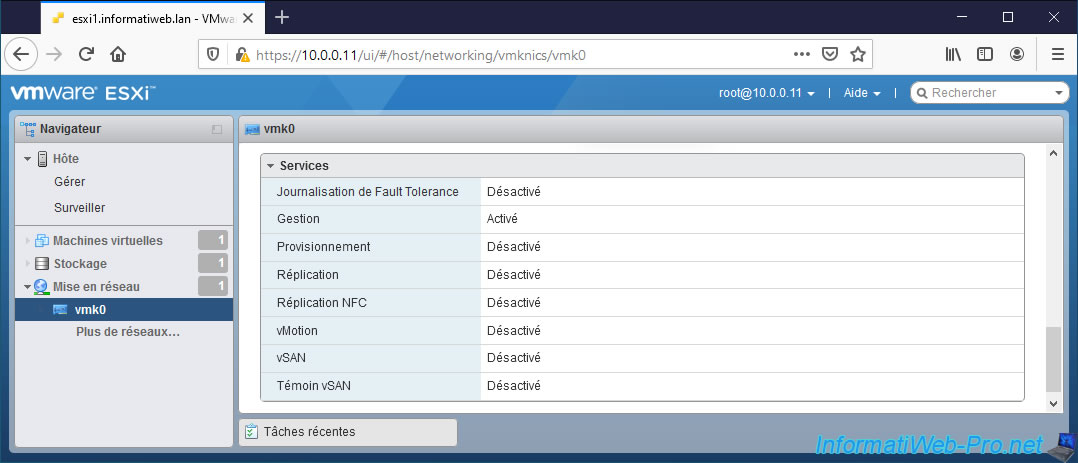
At the bottom of the page, you can see that a VMkernel interface can be used to provide different types of services.
In this case, the "Management" service.
If you click on the "vSwitch0" link present at the top of the page, you will find information concerning the virtual switch (vSwitch0) on which this VMkernel interface "vmk0" is located.
At the bottom of the page, you will find the topology of this "vSwitch0" virtual switch.
As you can see :
- a VMkernel interface (or "VMkernel port") is part of a port group. "Management Network" in this case.
- the port group is created on a virtual switch.
- the virtual switch has at least one physical adapter. By default, there is only one.
Important : since the VMkernel interface allows your hypervisor to communicate via the physical network, the virtual switch on which it's located must have at least one physical network adapter.
2. Best practices
As indicated on the "Networking Best Practices" page of the official VMware documentation, it's recommended to isolate the different networks of your hypervisor (management network, vMotion network (migration of VMs), ...) to get better performance and improve security.
In addition, if you don't isolate the different networks of your hypervisor, it's possible that a service saturates the network bandwidth and that your VMware ESXi hypervisors become inaccessible. This may cause alerts in VMware vCenter Server (VCSA), for example.
To isolate the different networks of your hypervisor, VMware recommends that you use different virtual switches (and therefore also different physical network adapters).
If this is not possible, then VMware advises you to separate your different VMkernel interfaces by placing them in different port groups on the same virtual switch by setting different VLAN IDs on these port groups.
This makes it possible to best isolate the network traffic of your different VMkernel interfaces and therefore of the different services (management, vMotion, ...) of your hypervisor.
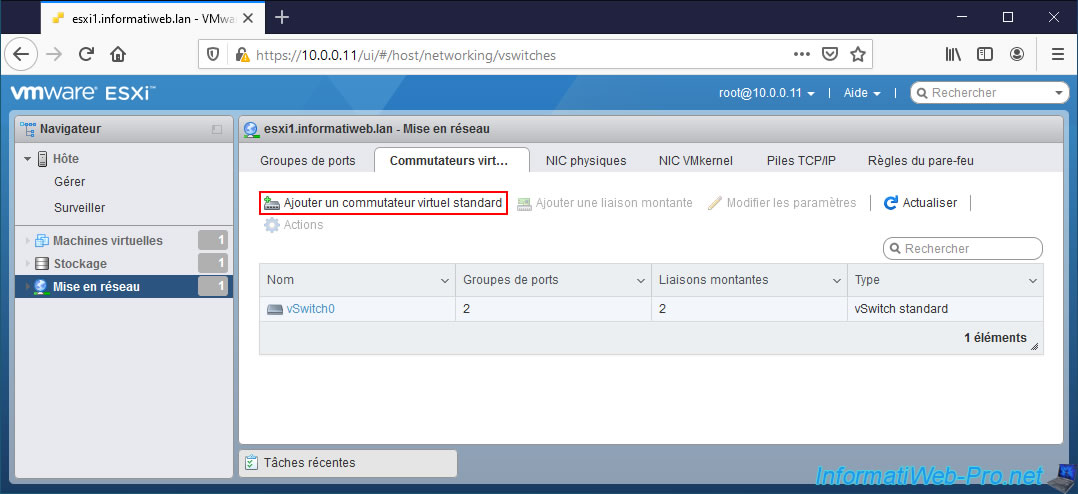
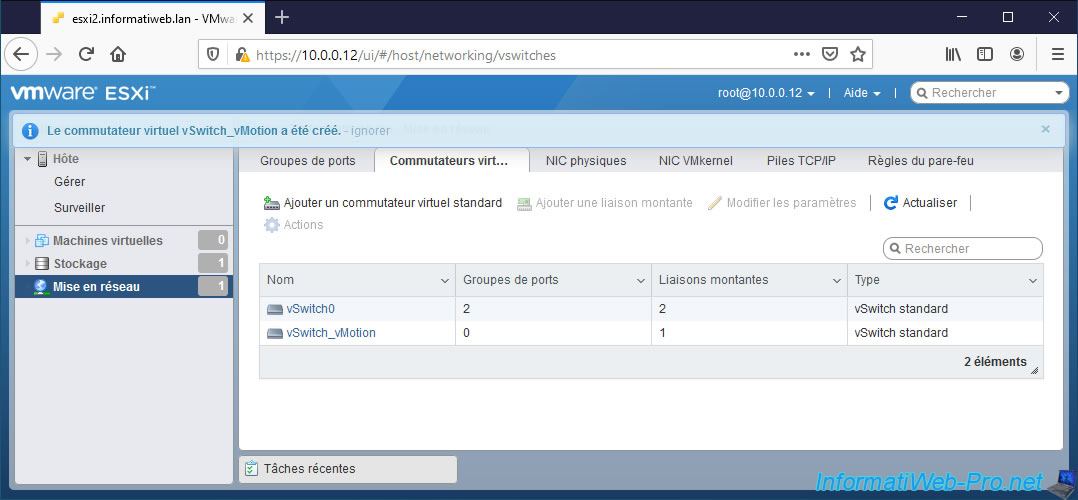
3. Add a new virtual standard switch (vSS)
As explained earlier, VMware recommends that you isolate network traffic from your various VMkernel interfaces.
To do this, go to "Networking -> Virtual switches" and click on "Add standard virtual switch".
Note : for this tutorial, we will create a VMkernel interface for migrating VMs (via vMotion).
However, the purpose is only to show you how to correctly create a VMkernel interface on VMware ESXi and how to correctly test the network connectivity between them.
Moreover, the migration of VMs is only possible on VMware vSphere (via vCenter Server).
In the "Add standard virtual switch - ..." window that appears, provide "vSwitch_vMotion" (for example) as the name and make sure to assign at least one uplink (= physical adapter = physical NIC) to this one.
Indeed, as explained previously, since a VMkernel interface allows a VMware ESXi hypervisor to communicate via the physical network, the virtual switch on which you want to create it necessarily needs an uplink.
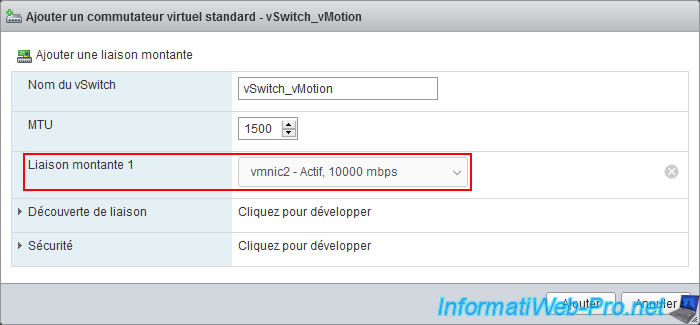
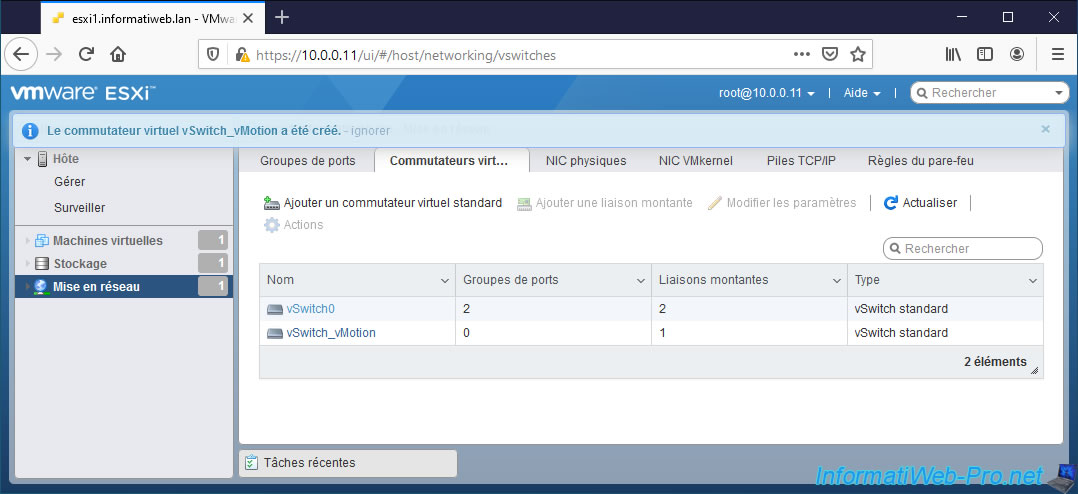
The "Virtual switch vSwitch_vMotion was successfully created" message appears.
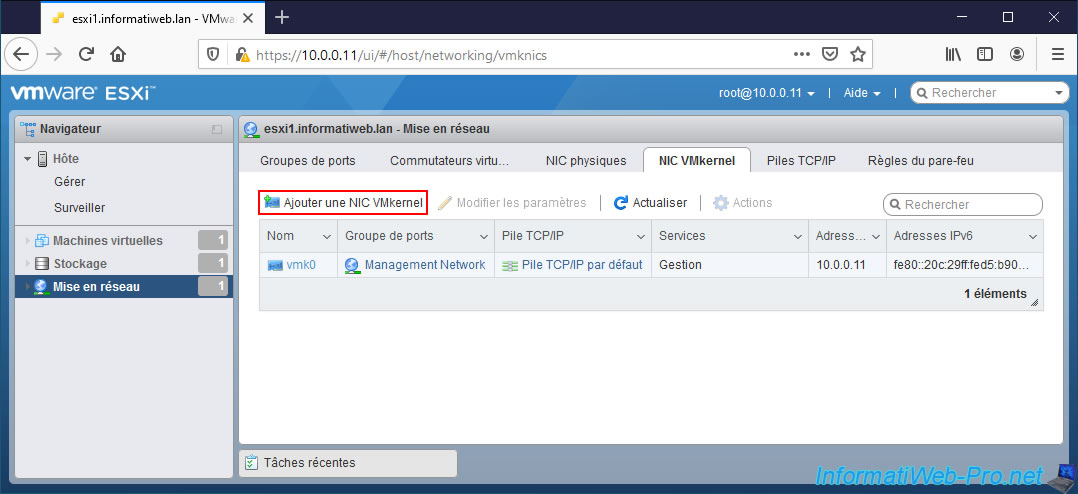
4. Add a VMkernel interface (VMkernel NIC)
To add a new VMkernel interface (VMkernel NIC) from the VMware ESXi web interface, go to "Networking -> VMkernel NICs" and click : Add VMkernel NIC.
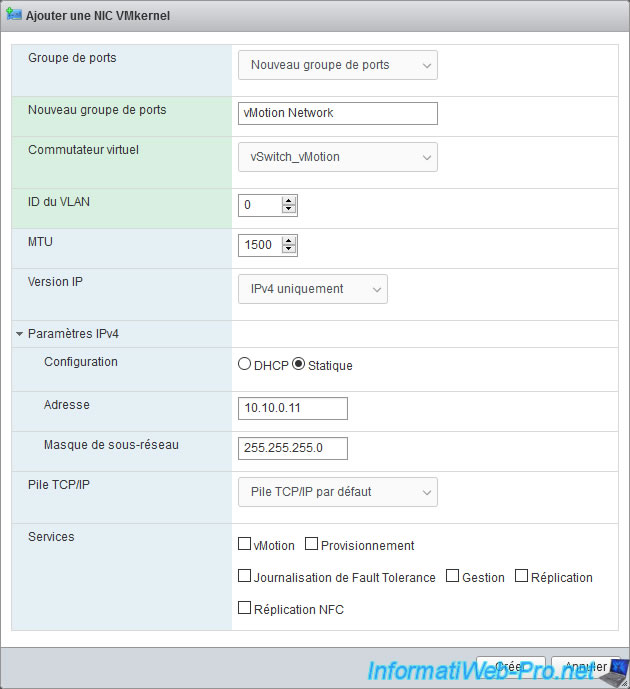
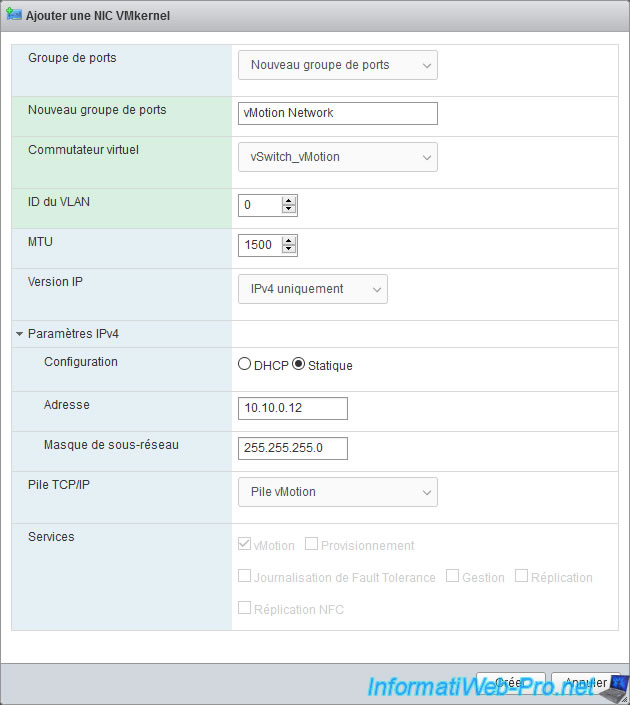
In the "Add VMkernel NIC" window that appears, you will find several settings :
- Port group : as you have seen previously, a VMkernel interface is part of a port group.
So, choose "New port group" to automatically create a new one on your virtual switch (which you will select a little further down). - New port group : specify the name of the new port group to be created on your virtual switch.
In our case, we named it "vMotion Network". - Virtual switch : select the new "vSwitch_vMotion" virtual switch you just created.
- VLAN ID : 0 to not use VLANs.
However, remember that if you can't separate your VMkernel interfaces using different virtual switches, VMware recommends that you use port groups with different VLAN IDs. - MTU : amount of data (in bytes) that can be sent in a network packet.
A value greater than 1500 allows the use of jumbo frames. - IP version : allows you to specify whether you want to use IPv4 only or IPv4 and IPv6.
In our case, we will use IPv4 only. - IPv4 settings :
- Configuration : choose whether you want to use a dynamic IP address automatically received from a DHCP server on your physical network or whether you want to use a static IP address.
In our case, we are simulating the use of vMotion. This implies using a separate network (on which we don't have a DHCP server in our case).
So, we select "Static". - Address : in the case of a static IP address, specify the IPv4 address to define for this VMkernel interface.
In our case, we will use the IP address "10.10.0.11". - Subnet mask : the subnet to use.
In our case, we are using a non-standard "255.255.255.0" subnet on our 2 VMkernel interfaces.
Which means that in our case, the networks "10.0.0.x" and "10.10.0.x" are different.
- Configuration : choose whether you want to use a dynamic IP address automatically received from a DHCP server on your physical network or whether you want to use a static IP address.
- TCP/IP stack : TCP/IP stack to use. Using different TCP/IP stacks allows using different gateway addresses (if desired), as well as better separating network traffic for different services (management, vMotion, ...).
- Provisioning stack : this stack can be used for provisioning traffic (see the information cited below in the "Services -> Provisioning" section), NFC (Network File Copy) traffic during long distance migration via vMotion, ...
If you select this TCP/IP stack for one of your VMkernel adapters, provisioning traffic will be disabled on all adapters using the default TCP/IP stack. - vMotion stack : this stack can be used for live migration traffic via vMotion of virtual machines.
Again, if you select this TCP/IP stack for one of your VMkernel adapters, vMotion traffic will be disabled on all adapters using the default TCP/IP stack. - Default TCP/IP stack : TCP/IP stack used by default for VMware ESXi hypervisor management, as well as for management of it via vCenter Server (VCSA) and also supports all other types of system traffic (vMotion, iSCSI, ...).
In summary, if in doubt, use the default TCP/IP stack, as was the case prior to vSphere 6.0 where other types of TCP/IP stacks didn't exist.
- Provisioning stack : this stack can be used for provisioning traffic (see the information cited below in the "Services -> Provisioning" section), NFC (Network File Copy) traffic during long distance migration via vMotion, ...
- Services : service you want to allow (use) on this VMkernel interface.
- vMotion : network traffic related to the migration of virtual machines between VMware ESXi hypervisors.
Requires VMware vSphere and more specifically a VMware vCenter Server (VCSA) to which your VMware ESXi hypervisors must be linked.
Warning : this network traffic is not encrypted. - Provisioning : network traffic related to cloning and migrating snapshots and cold virtual machines (powered off VM).
- Fault Tolerance Logging : network traffic related to data transferred from a Primary VM (protected with Fault Tolerance) to the Secondary VM (copy of the Primary VM).
- Management : network traffic related to the management of VMware ESXi hosts (via the web interface or via vCenter Server), as well as traffic between your hosts in the case of high availability (vSphere HA).
- Replication : outbound network traffic related to replicating data from the source VMware ESXi host to the destination host.
- NFC replication : inbound network traffic to the target site related to data replication from the source VMware ESXi host.
- vMotion : network traffic related to the migration of virtual machines between VMware ESXi hypervisors.
Sources :
As explained previously, in the case of vMotion, it's recommended to use the TCP/IP stack "vMotion stack" provided for this purpose.
Note that when you select the "vMotion stack" TCP/IP stack, all the boxes in the "Services" section are grayed out and the only box that will be checked will be "vMotion".
Then, click Create.
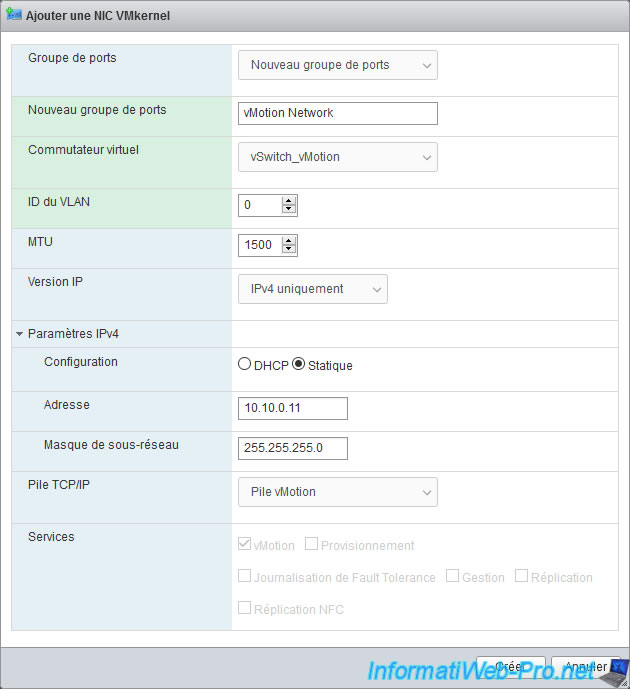
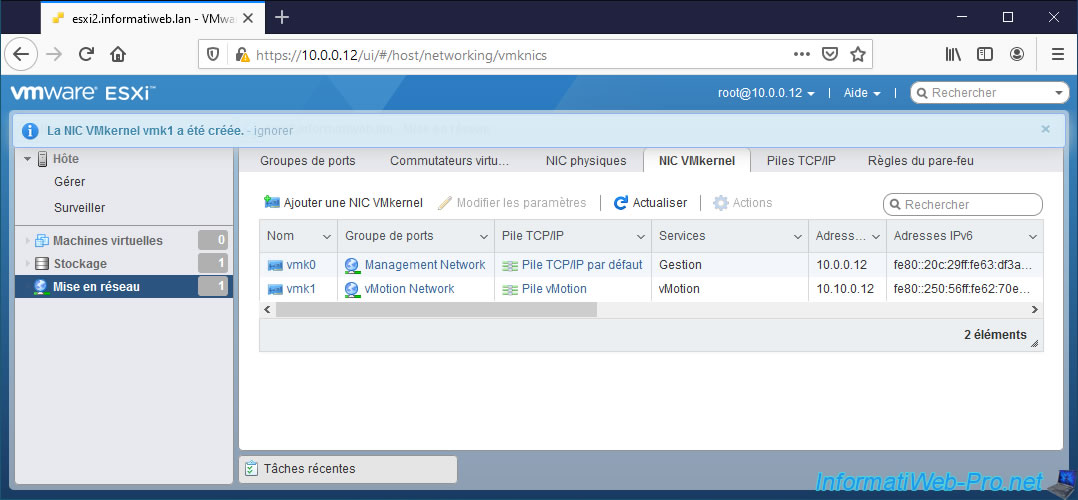
The "VMkernel NIC vmk1 was successfully created" message appears.
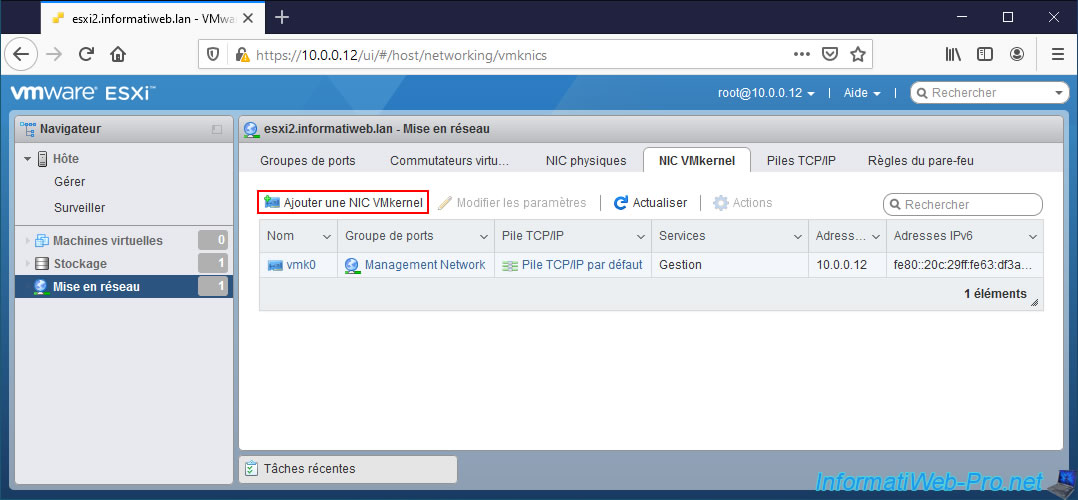
5. Network configuration on the 2nd VMware ESXi hypervisor
So that your 2 VMware ESXi hypervisors can communicate with each other using the VMkernel interfaces, you must create another VMkernel interface for the same service on the other VMware ESXi hypervisor.
On your 2nd VMware ESXi hypervisor, go to "Networking -> Virtual switches" and click "Add standard virtual switch".
For the procedure to use, refer to the explanations given above.

On our 2nd VMware ESXi hypervisor, we created our new "vSwitch_vMotion" virtual switch as on our 1st hypervisor.
Once the virtual switch has been created on your 2nd VMware ESXi hypervisor, go to "Networking -> VMkernel NICs" and click on : Add VMkernel NIC.
The configuration is almost the same, except that the IP address set on it in our case is "10.10.0.12" instead of "10.10.0.11".
The VMkernel vmk1 interface was created on our 2nd VMware ESXi hypervisor.
6. Test network connectivity between 2 VMkernel interfaces
To test the network connectivity between 2 VMkernel interfaces, you will need to connect to your VMware ESXi hypervisors using the command line (via SSH).
To do this, go to "Host -> Manage -> Services" and start the "TSM-SSH" service.
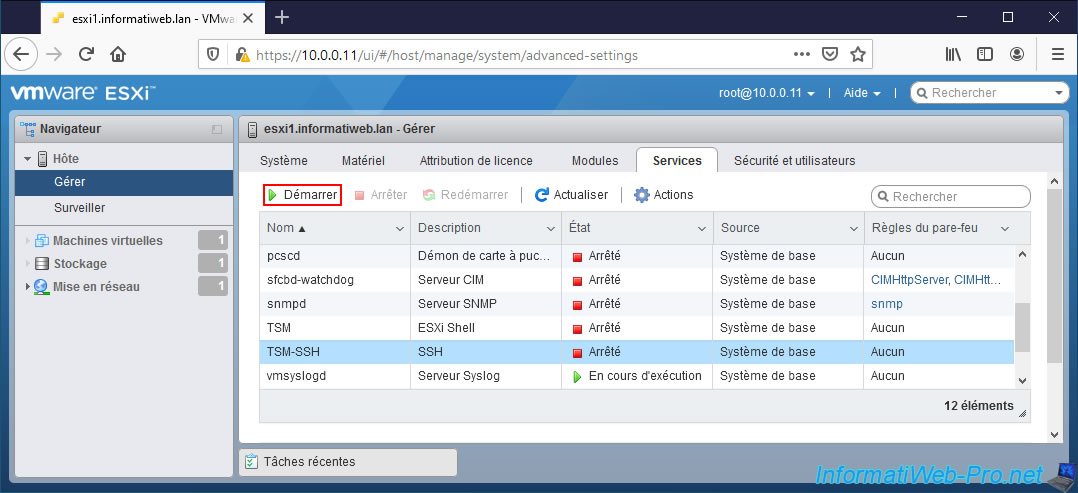
Then, connect in SSH to your VMware ESXi hypervisors.
On Windows, you can use PuTTY.
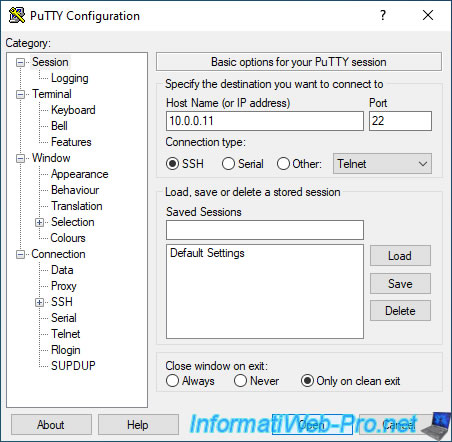
Log in as root and list the VMkernel interfaces of your VMware ESXi hypervisor using the command :
Bash
esxcli network ip interface ipv4 get
Which gives for our 1st hypervisor :
Plain Text
Name  IPv4 Address  IPv4 Netmask   IPv4 Broadcast  Address Type  Gateway   DHCP DNS
----  ------------  -------------  --------------  ------------  --------  --------
vmk0  10.0.0.11     255.255.255.0  10.0.0.255      STATIC        10.0.0.1     false
vmk1  10.10.0.11    255.255.255.0  10.10.0.255     STATIC        0.0.0.0      false
For our 2nd hypervisor, this gives :
Plain Text
Name  IPv4 Address  IPv4 Netmask   IPv4 Broadcast  Address Type  Gateway   DHCP DNS
----  ------------  -------------  --------------  ------------  --------  --------
vmk0  10.0.0.12     255.255.255.0  10.0.0.255      STATIC        10.0.0.1     false
vmk1  10.10.0.12    255.255.255.0  10.10.0.255     STATIC        0.0.0.0      false
To correctly test network connectivity between 2 VMkernel interfaces, it's necessary to know the name of the TCP/IP stack it uses.
To find out the system name of the TCP/IP stacks used by your VMkernel interfaces, use the command below :
Bash
esxcli network ip interface list |grep -E 'vmk|Netstack'
Which gives in our case :
- the "vmk0" VMkernel interface is the one created by default which is used for management traffic and which uses the default TCP/IP stack (defaultTcpipStack).
- the "vmk1" VMkernel interface is the one you created in this tutorial for vMotion traffic and which uses the "vMotion stack" (vmotion) TCP/IP stack if you followed our tutorial correctly.
Plain Text
vmk0
   Name: vmk0
   Netstack Instance: defaultTcpipStack
vmk1
   Name: vmk1
   Netstack Instance: vmotion
On our 1 VMware ESXi hypervisor, we can therefore test network connectivity for vMotion traffic using the command below.
- -S vmotion : indicates that the "vMotion Stack" TCP/IP stack should be used to test network connectivity.
Otherwise, the "vmkping" command will use the default TCP/IP stack. Which will fail in this case. - -I vmk1 : specifies to test network connectivity using the "vmk1" VMkernel interface (which is the one you created for vMotion traffic).
- 10.10.0.12 : indicates that the remote VMware ESXi hypervisor IP address is "10.10.0.12".
Note that this is the IP address set for the VMkernel interface "vmk1" (not "vmk0") on the remote hypervisor.
Bash
vmkping -S vmotion -I vmk1 10.10.0.12
If the command succeeds, you will get a result like this :
Plain Text
PING 10.10.0.12 (10.10.0.12): 56 data bytes
64 bytes from 10.10.0.12: icmp_seq=0 ttl=64 time=0.728 ms
64 bytes from 10.10.0.12: icmp_seq=1 ttl=64 time=0.959 ms
64 bytes from 10.10.0.12: icmp_seq=2 ttl=64 time=0.830 ms

--- 10.10.0.12 ping statistics ---
3 packets transmitted, 3 packets received, 0% packet loss
round-trip min/avg/max = 0.728/0.839/0.959 ms
If you use the wrong IP address, for example specifying the IP address of the management interface (vmk0) of your remote hypervisor instead of the one defined for vMotion traffic (vmk1), you will get this error :
Plain Text
PING 10.0.0.12 (10.0.0.12): 56 data bytes
sendto() failed (Network is unreachable)
Note that to test network connectivity between 2 VMkernel interfaces, you absolutely must use the "vmkping" command mentioned above.
Indeed, if you use the "ping" command available on Linux and Windows, the network packets will always go out through the default network interface and therefore using the default TCP/IP stack.
Unless you are testing network connectivity for management traffic, otherwise this error will most likely appear.
Bash
ping 10.10.0.12
Plain Text
PING 10.10.0.12 (10.10.0.12): 56 data bytes

--- 10.10.0.12 ping statistics ---
3 packets transmitted, 0 packets received, 100% packet loss
If you forget to specify the VMkernel interface you want to use to test network connectivity between your 2 hypervisors, the error below may appear.
Indeed, in our case, we are trying to test network connectivity via the "vMotion stack" TCP/IP stack (by specifying the "-S vmotion" parameter).
Plain Text
Unknown interface 'vmk0': Invalid argument
To test network connectivity, you can also use another command :
Bash
esxcli network diag ping -I vmk1 --netstack=vmotion -H 10.10.0.12
If the connection is successful, you will get a result like this :
- Host Addr : remote IP address.
- Transmitted : number of packets sent. In this case : 3.
- Received : number of packets received. In this case : 3.
Plain Text
   Trace:
         Received Bytes: 64
         Host: 10.10.0.12
         ICMP Seq: 0
         TTL: 64
         Round-trip Time: 383 us
         Dup: false
         Detail:

         ...
   Summary:
         Host Addr: 10.10.0.12
         Transmitted: 3
         Received: 3
         Duplicated: 0
         Packet Lost: 0
         Round-trip Min: 353 us
         Round-trip Avg: 492 us
         Round-trip Max: 741 us
On the other hand, in case of error, you will see this :
- Transmitted : number of packets sent. In this case : 3.
- Received : number of packets received. In this case : 0.
- Packet Lost : percentage of lost packets. In this case : 100%.
In other words, the network test failed because the packets sent never came back.
Plain Text
   Trace:
   Summary:
         Host Addr: 10.10.0.12
         Transmitted: 3
         Received: 0
         Duplicated: 0
         Packet Lost: 100
         Round-trip Min: 999999000 us
         Round-trip Avg: -2147483648 us
         Round-trip Max: 0 us
Share this tutorial
To see also
-

VMware 2/24/2023
VMware ESXi 6.7 - Create a new virtual network
-
VMware 3/24/2023
VMware ESXi 6.7 - Enable Jumbo frame support
-
VMware 3/17/2023
VMware ESXi 6.7 - Limit outbound bandwidth
-
VMware 3/10/2023
VMware ESXi 6.7 - TCP/IP stacks
You must be logged in to post a comment