Hot-plug USB devices (keyboard, mouse, ...) to a virtual machine (via the USB Manager plugin) on Unraid 6.9.2
- NAS
- Unraid
- 23 September 2026 at 14:58 UTC
-

- 2/2

5. Manually connect USB devices (keyboard, mouse, ...) to a running VM
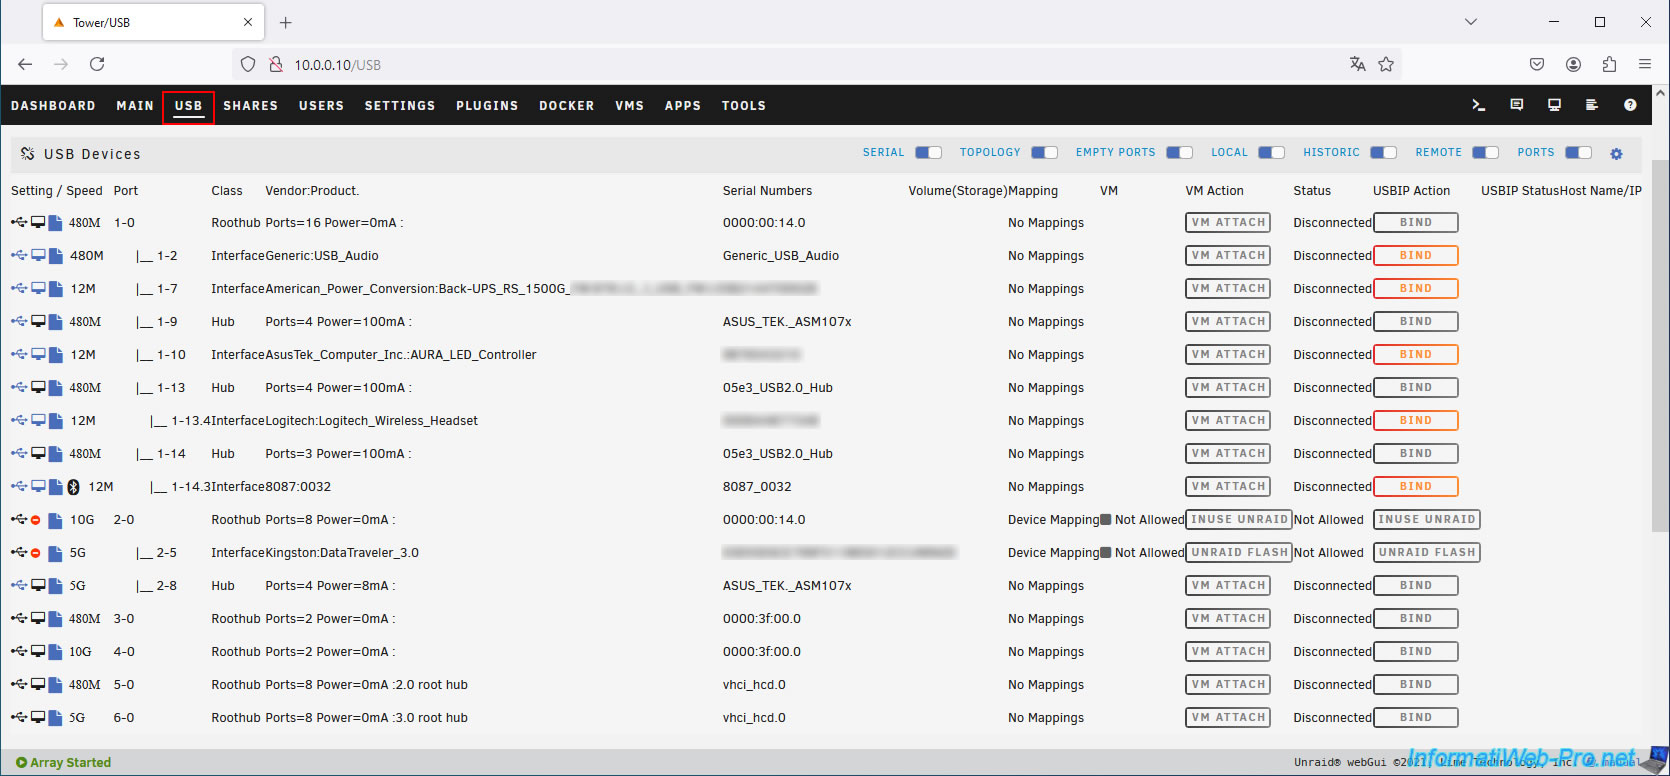
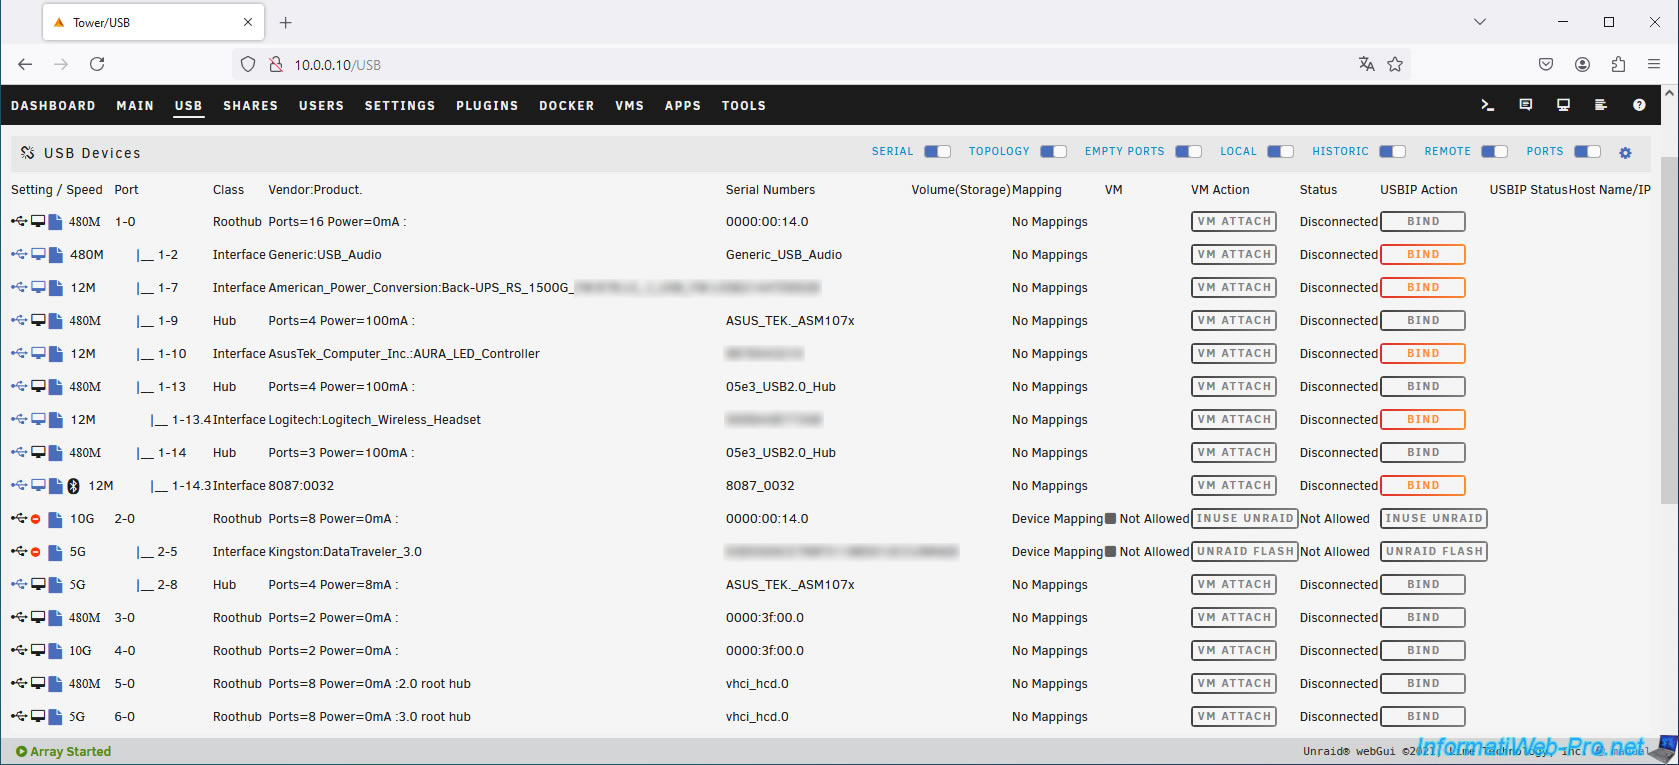
To see the list of USB devices recognized in real time by your Unraid server, go to the "USB" tab.
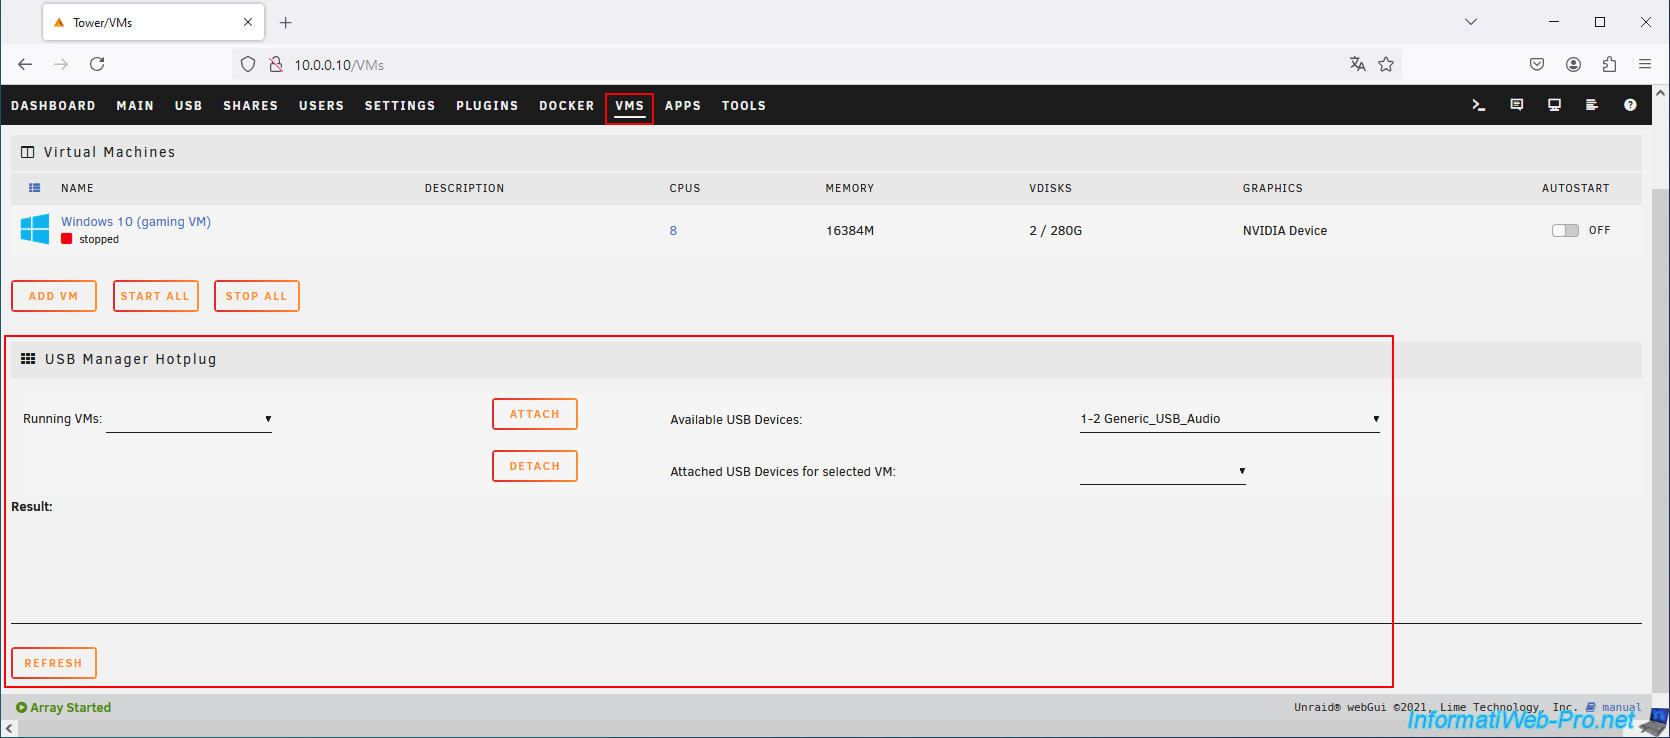
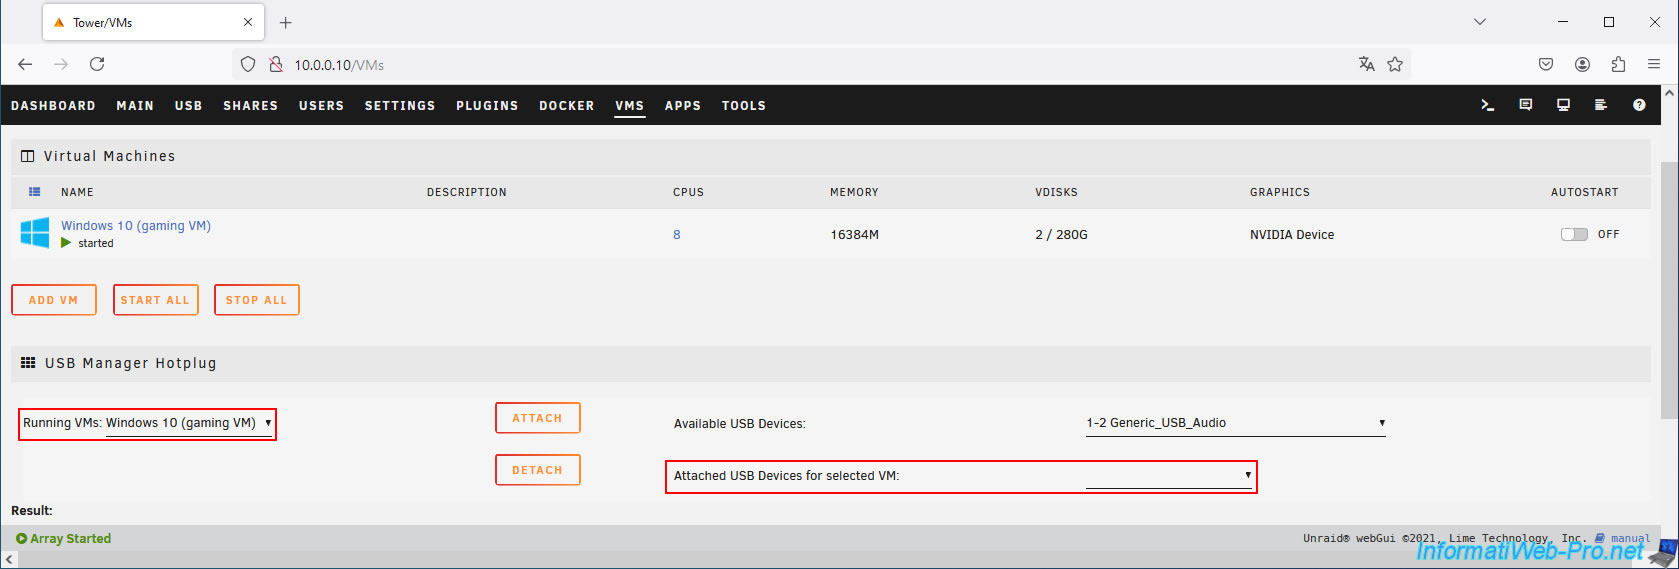
Next, go to the "VMs" tab and you'll see a "USB Hotplug Manager" section appear.
This section allows you to manually connect one or more USB devices from your Unraid server to your gaming virtual machine, one by one, to a virtual machine that's already running.
Important : USB devices connected to a virtual machine will not be automatically reconnected later if you unplug them and then physically plug them back into your Unraid server.
If you want this to happen automatically, refer to the next step of this tutorial.
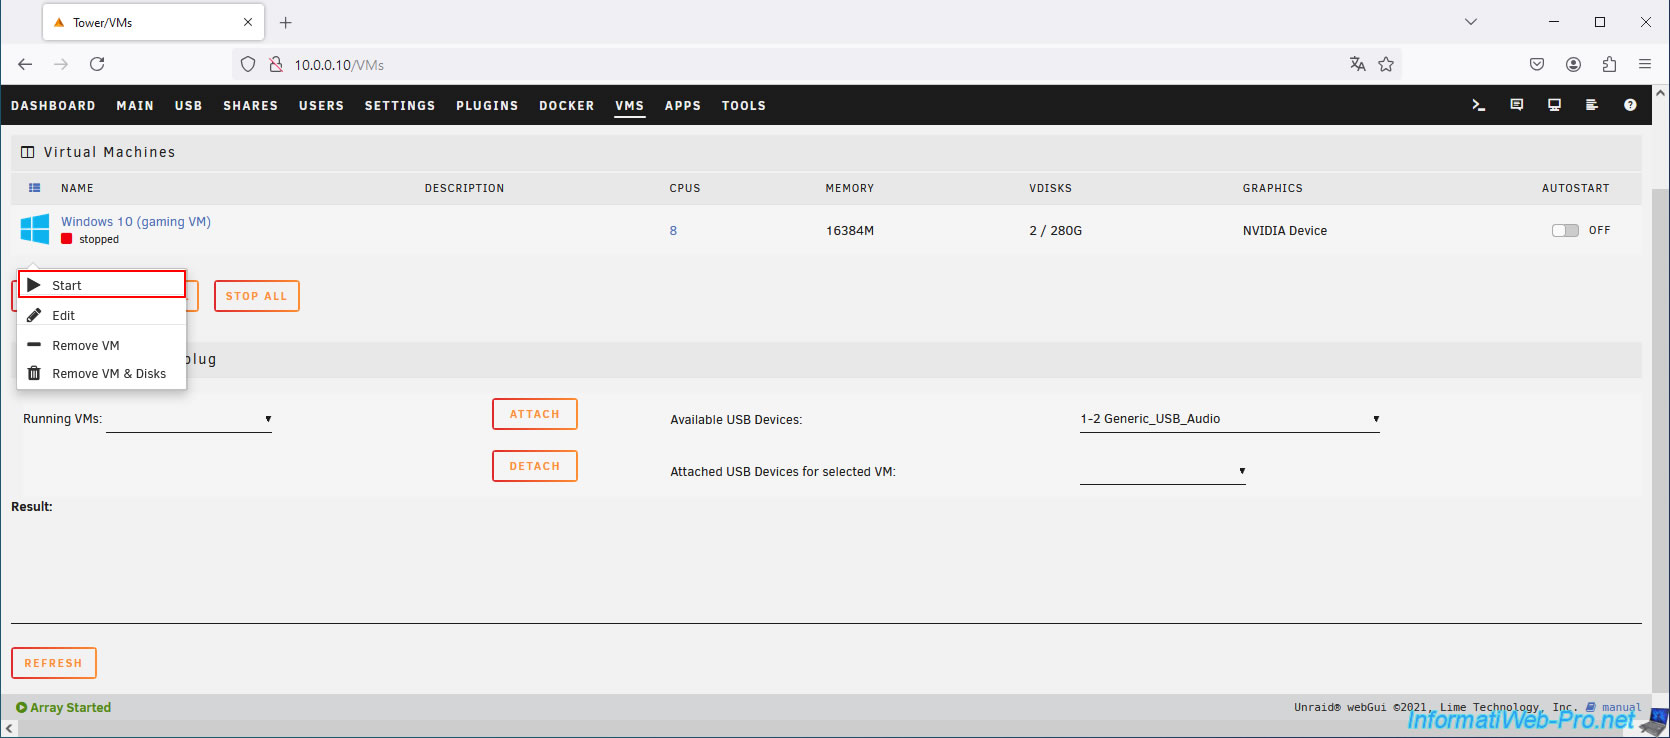
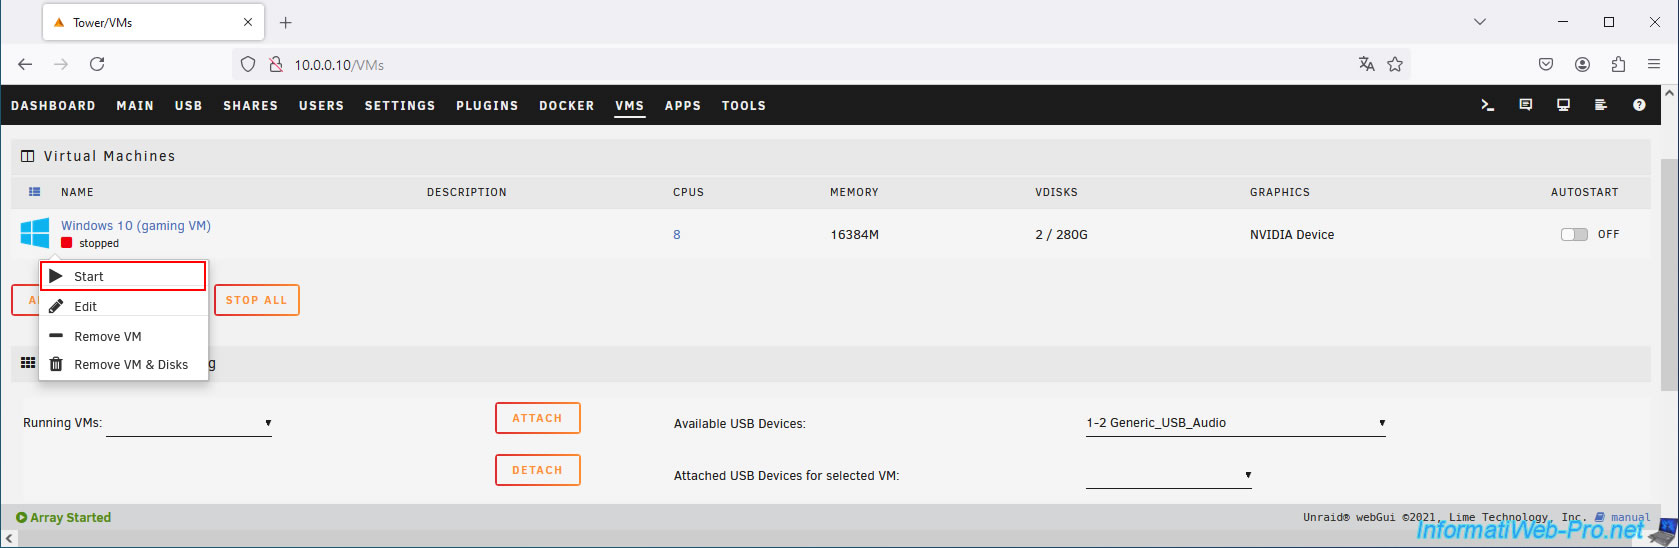
To get started, start your gaming virtual machine by simply clicking on your gaming VM icon and then clicking "Start".
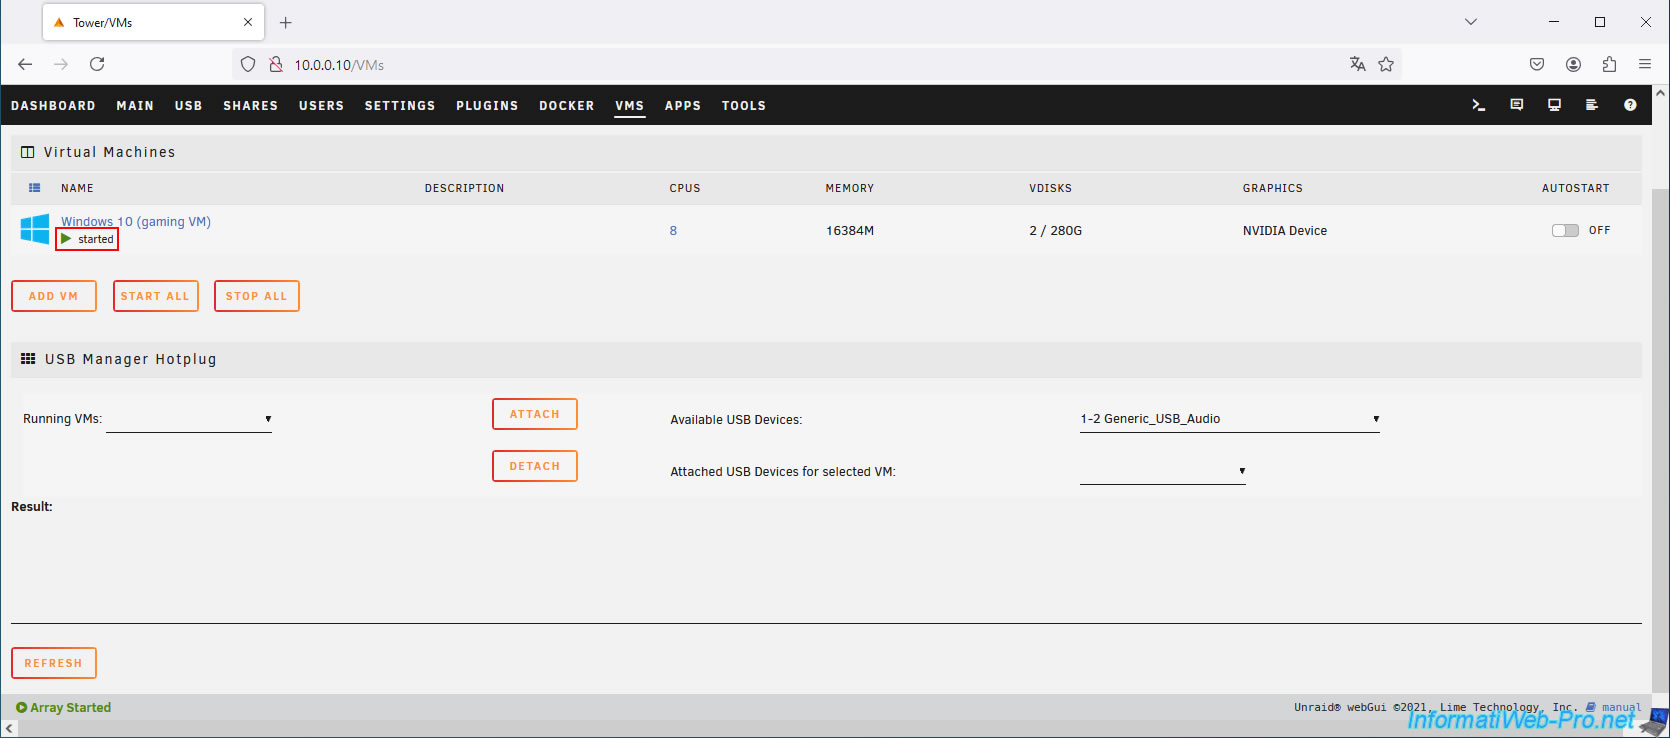
Now, your virtual machine is started (without keyboard or mouse for now).
Select the position on your physical KVM that corresponds to your gaming VM (the HDMI cable of which is connected to the graphics card that you've added to your gaming VM) and go to the "USB" tab of the Unraid web interface.
To do this, you'll need to use a laptop or smartphone.
As expected, your USB keyboard and mouse appear in the list as children of a USB Hub (which corresponds to your physical KVM).
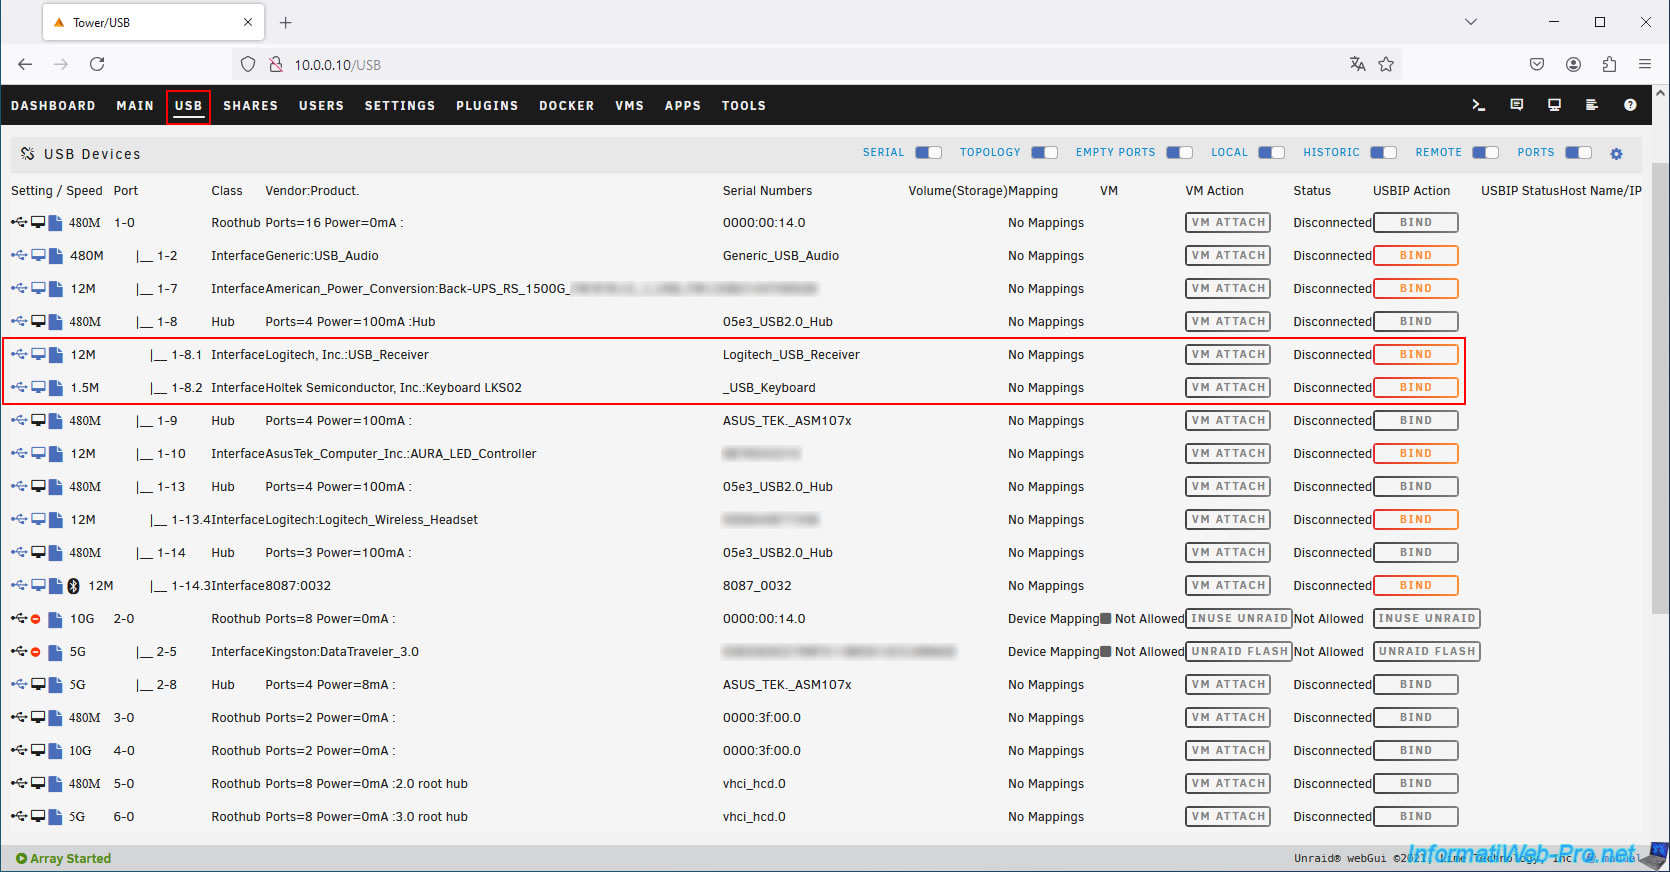
To connect them to your already running gaming VM, go to the "VMs" tab of the Unraid web interface or refresh this page if you left it open.
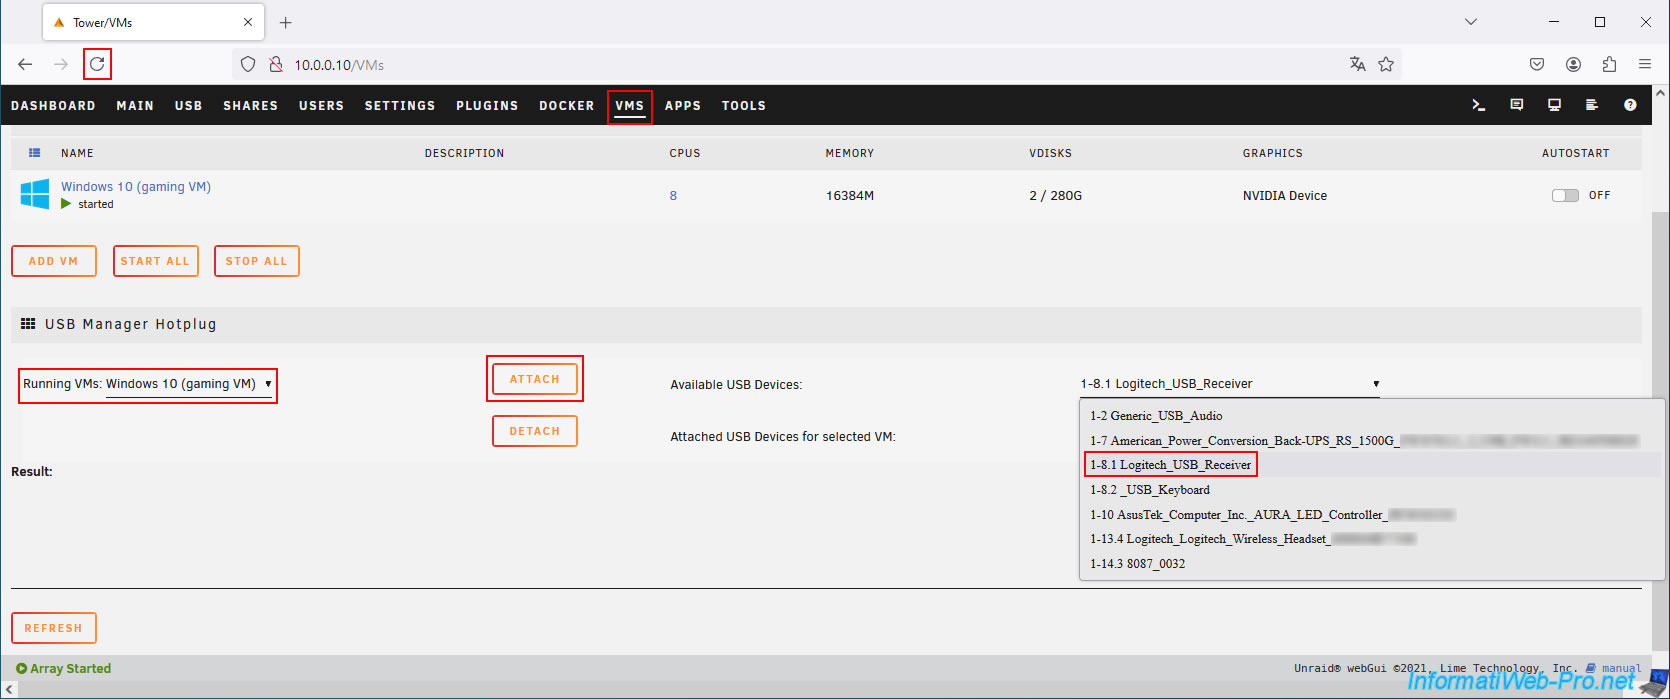
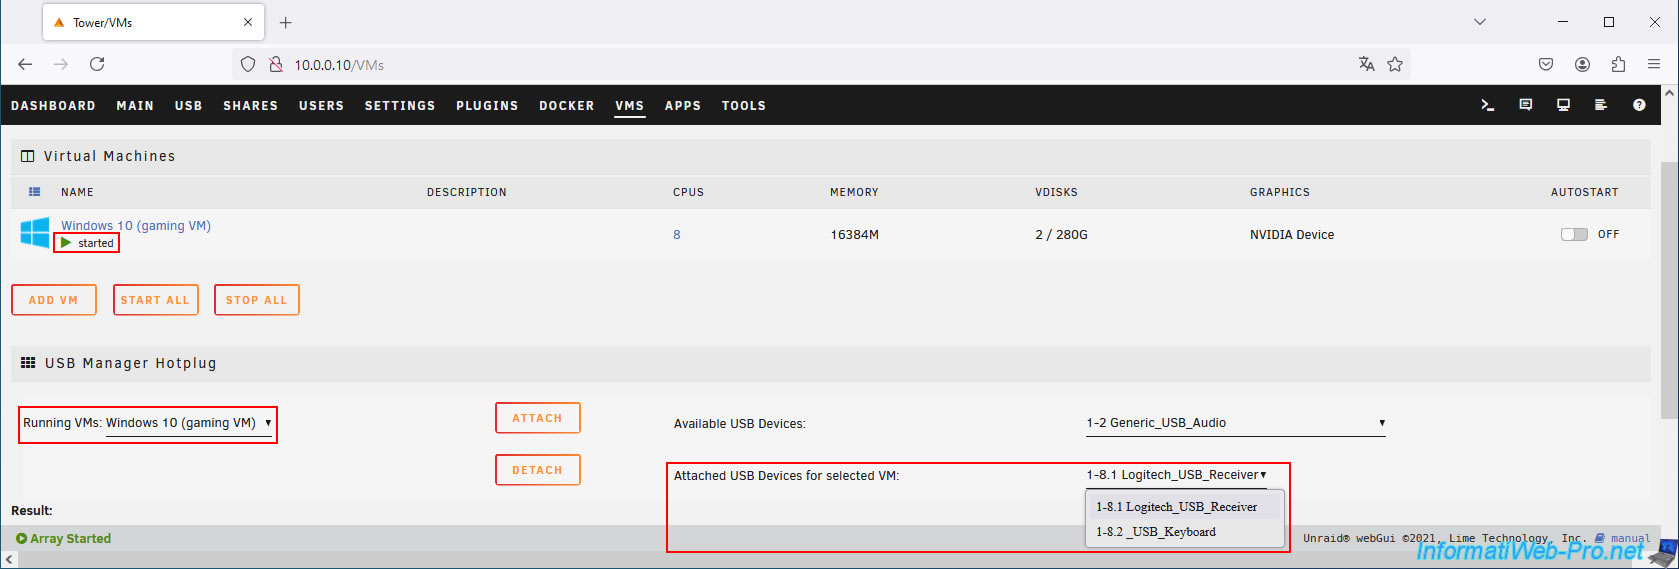
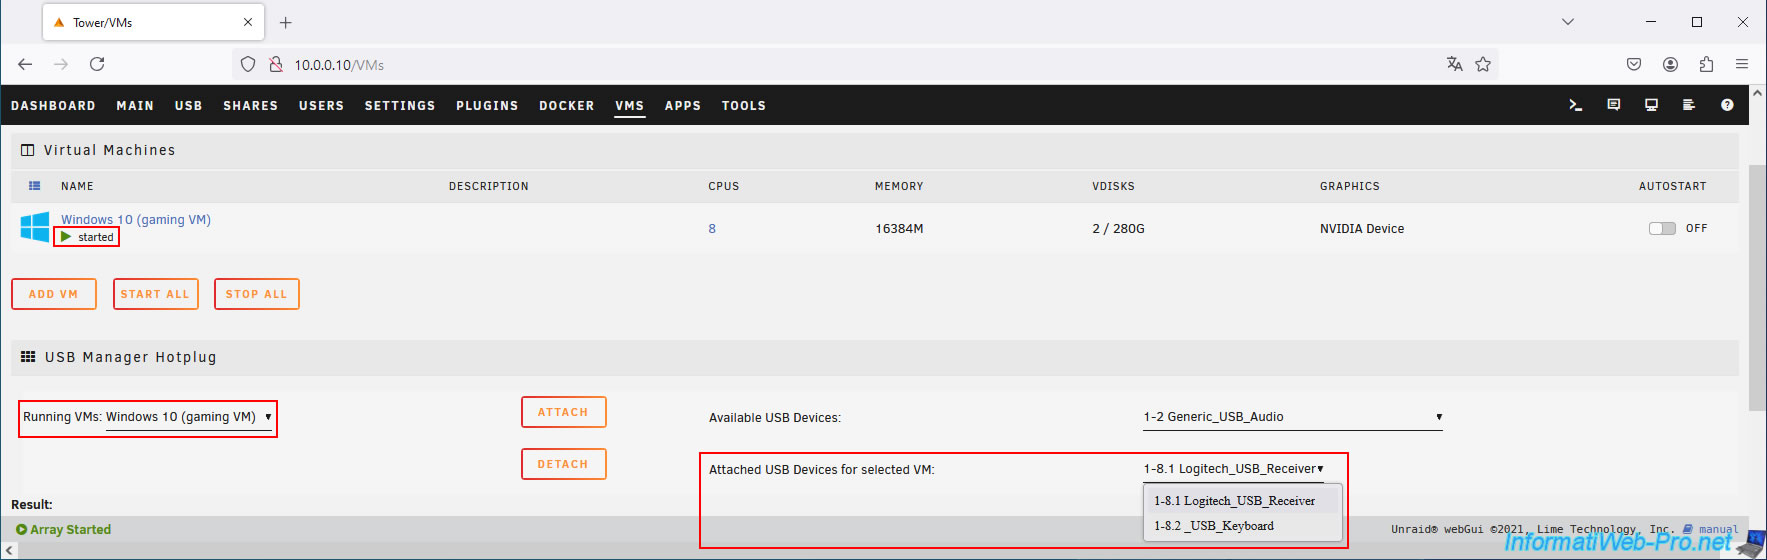
Then, select your gaming virtual machine from the "Running VMs" list.
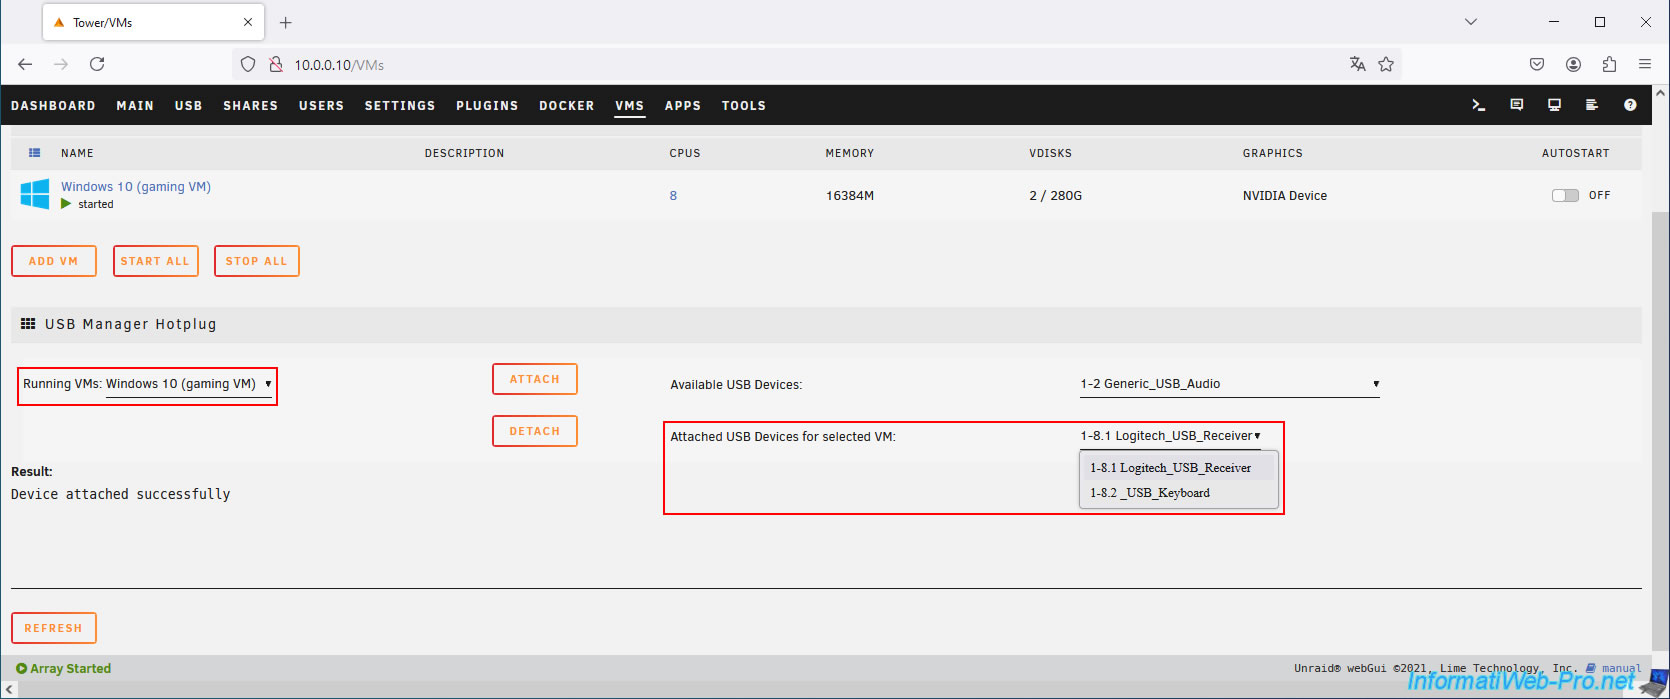
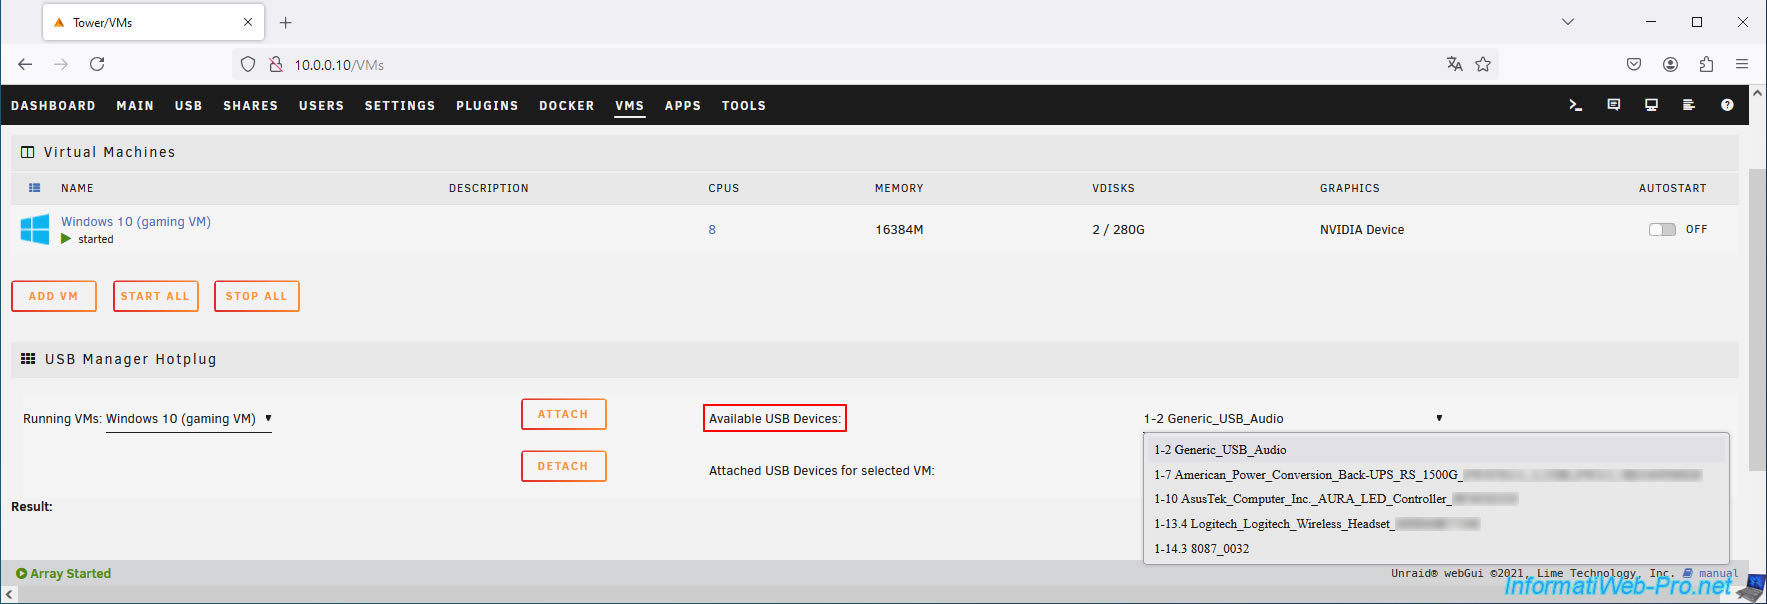
Select your USB mouse (in our case "Logitech_USB_Receiver") from the list of available USB devices on your Unraid server and click "Attach" to connect it to your gaming virtual machine.
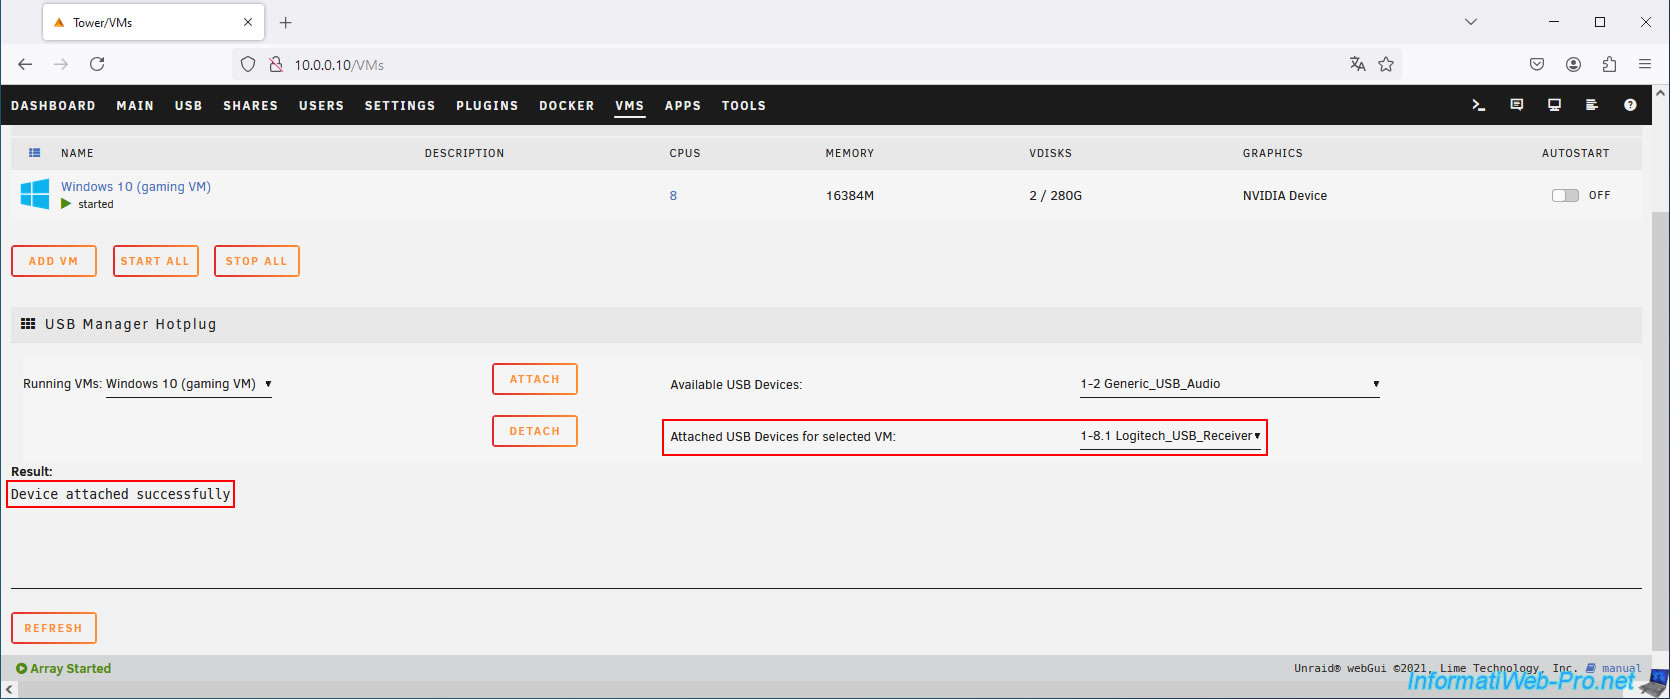
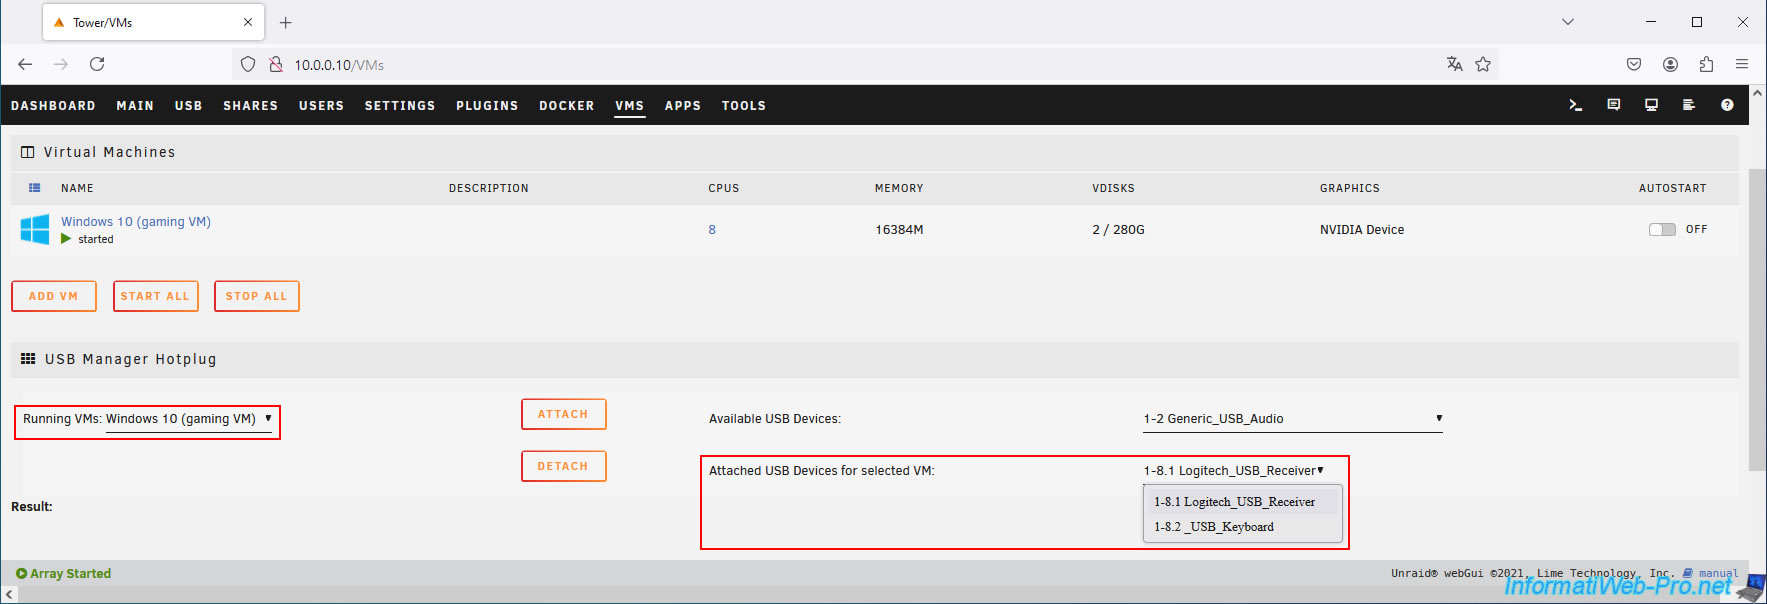
The message "Device attached successfully" appears and your USB mouse appears in the list of devices connected to your gaming virtual machine (Attached USB Devices for selected VM).
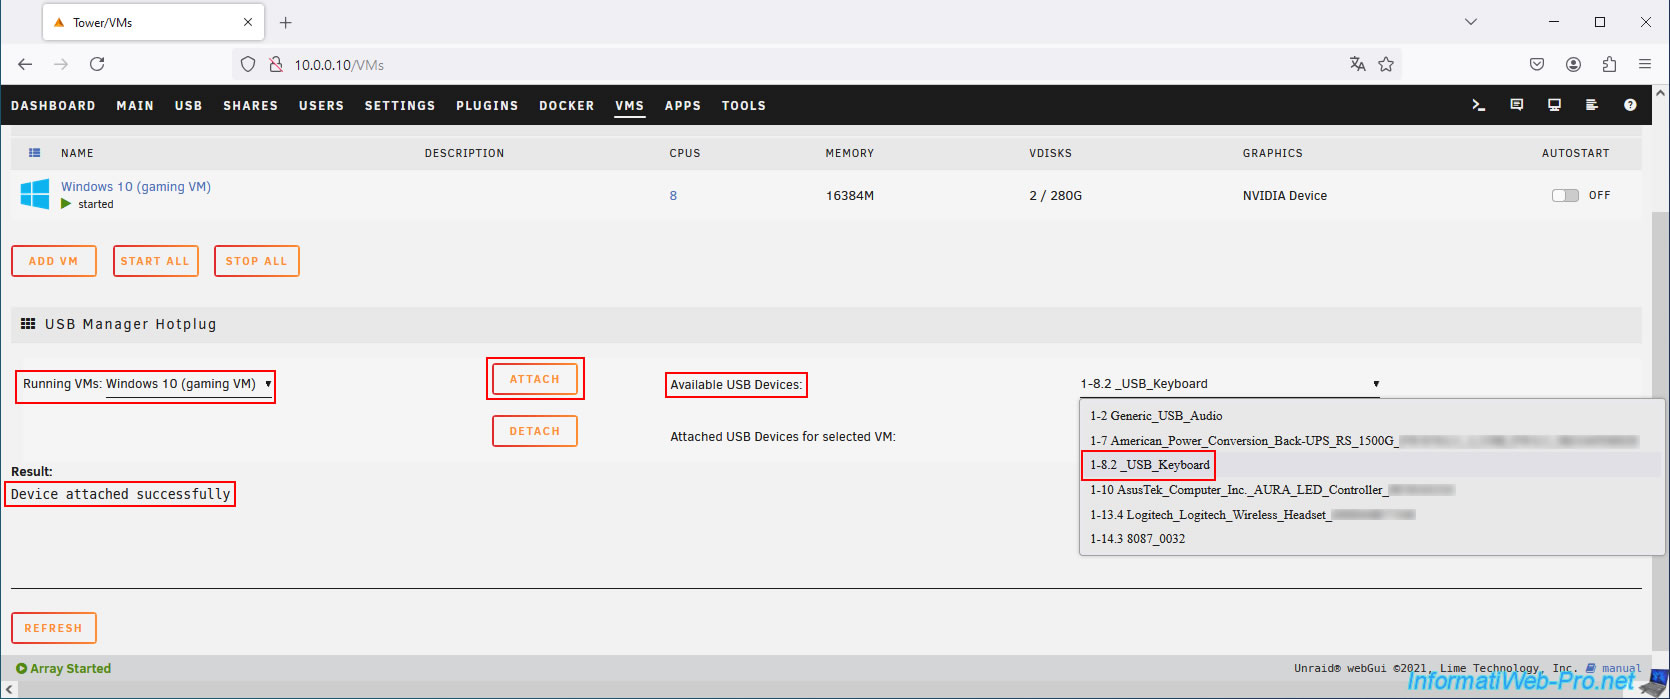
Do the same for your USB keyboard:
- select your gaming virtual machine from the "Running VMs" list.
- select your USB keyboard (in our case, "USB_Keyboard") from the "Available USB Devices" list.
- click the "Attach" button to also connect it to your gaming VM.
Now, if you look at the "Attached USB Devices for selected VM" list, you will see that your USB mouse and USB keyboard are connected to your gaming virtual machine.
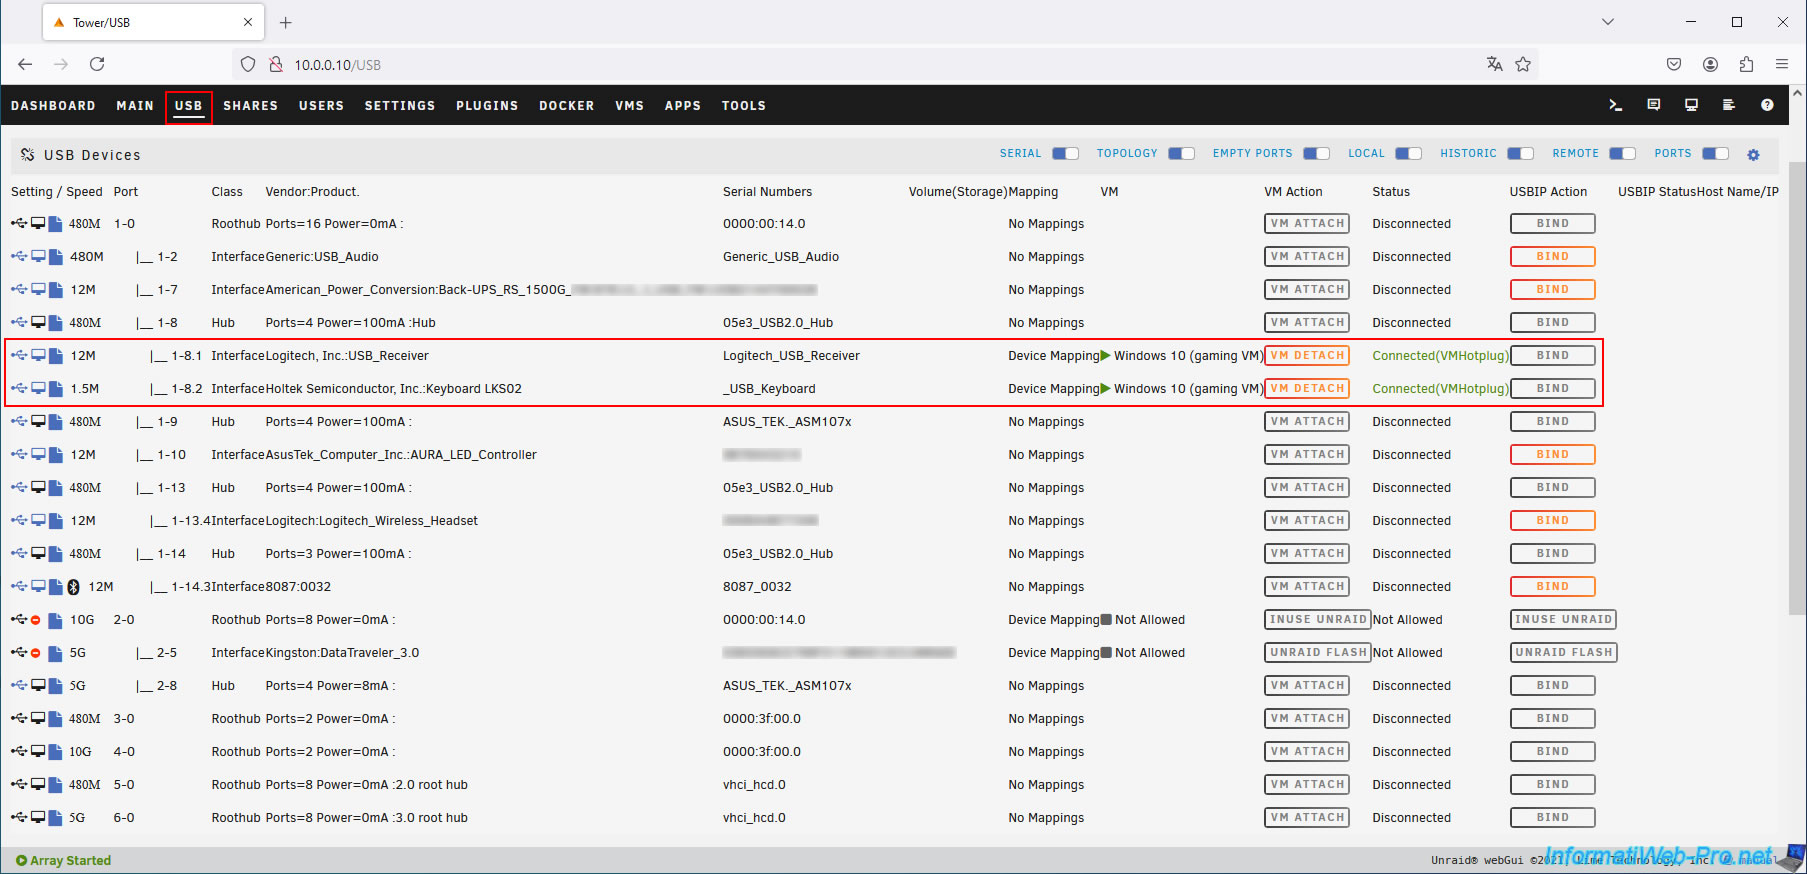
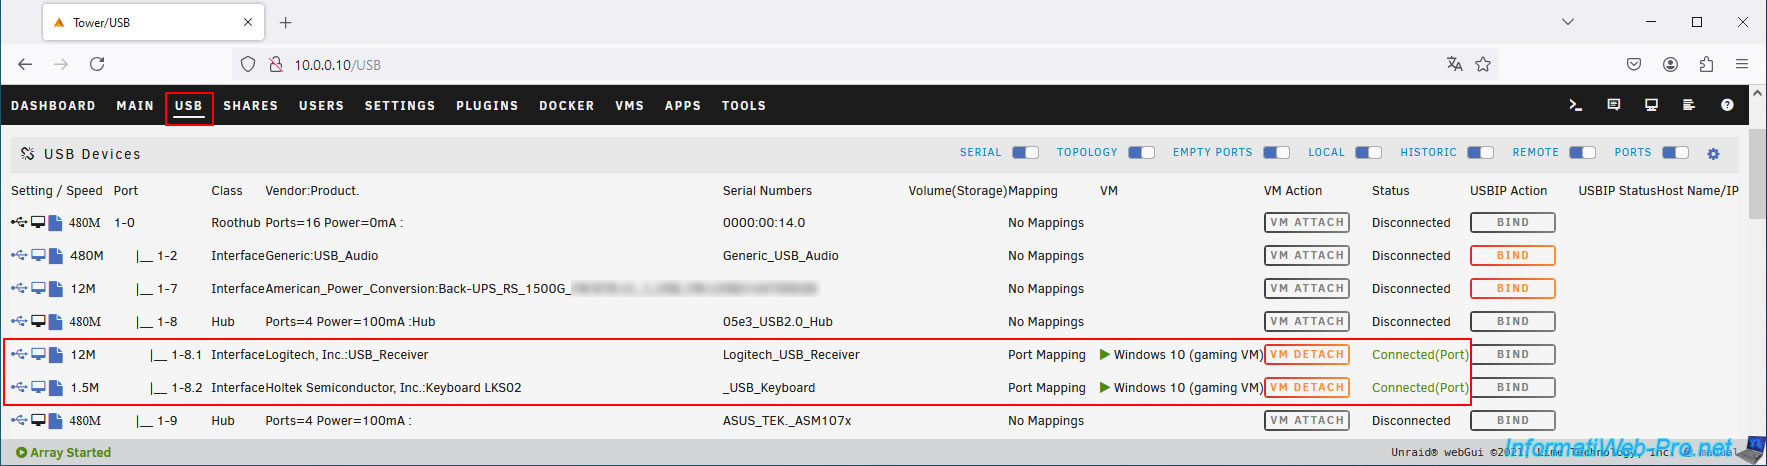
In the "USB" tab, you will see that your USB mouse and USB keyboard are currently connected to your gaming virtual machine.
Plain Text
1-8.1 Interface Logitech, Inc. USB Receiver Logitech USB Receiver Device Mapping |> Windows 10 (gaming VM) VM DETACH Connected(VMHotplug)
1-8.2 Interface Holtek Semiconductor. Inc. Keyboard LKS02 _USB_Keyboard Device Mapping |> Windows 10 (gaming VM) VM DETACH Connected(VMHotplug)
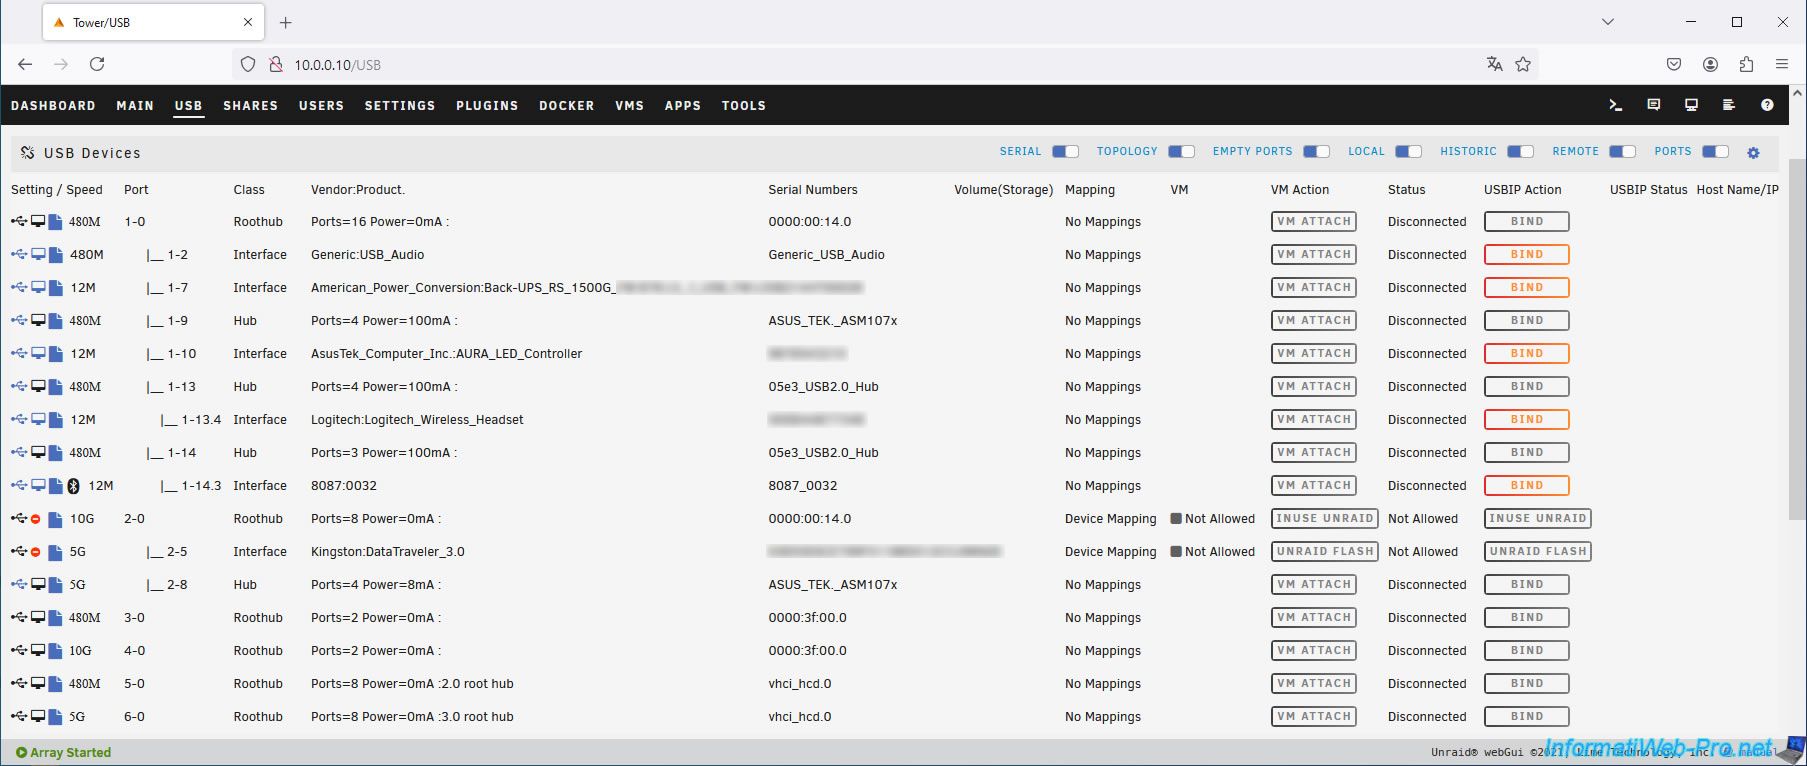
If you select another PC (other than your physical Unraid server and gaming VM) on your physical KVM, your keyboard and mouse will disappear from the list.
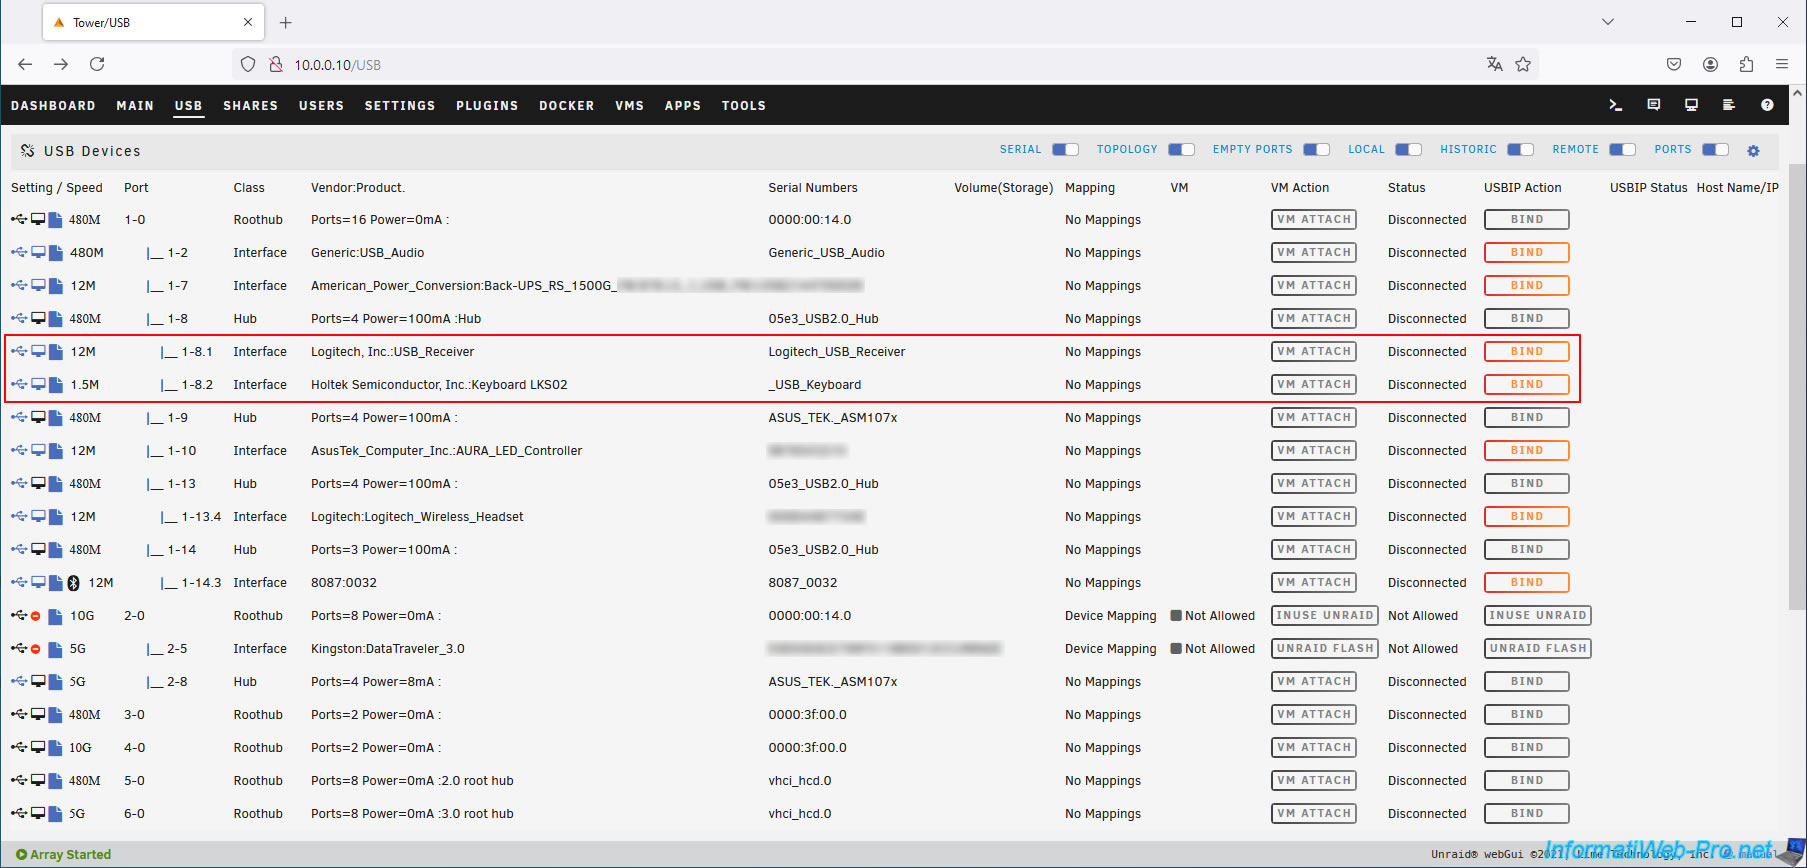
If you reselect your gaming VM on your physical KVM, your keyboard and mouse will reappear in the list of USB devices detected by Unraid.
However, you'll notice that they won't automatically reconnect to your gaming VM.
6. Automatically connect specific USB devices (keyboard, mouse, ...) to a VM
6.1. Configure mapping of specific USB devices (keyboard, mouse, ...) to a VM
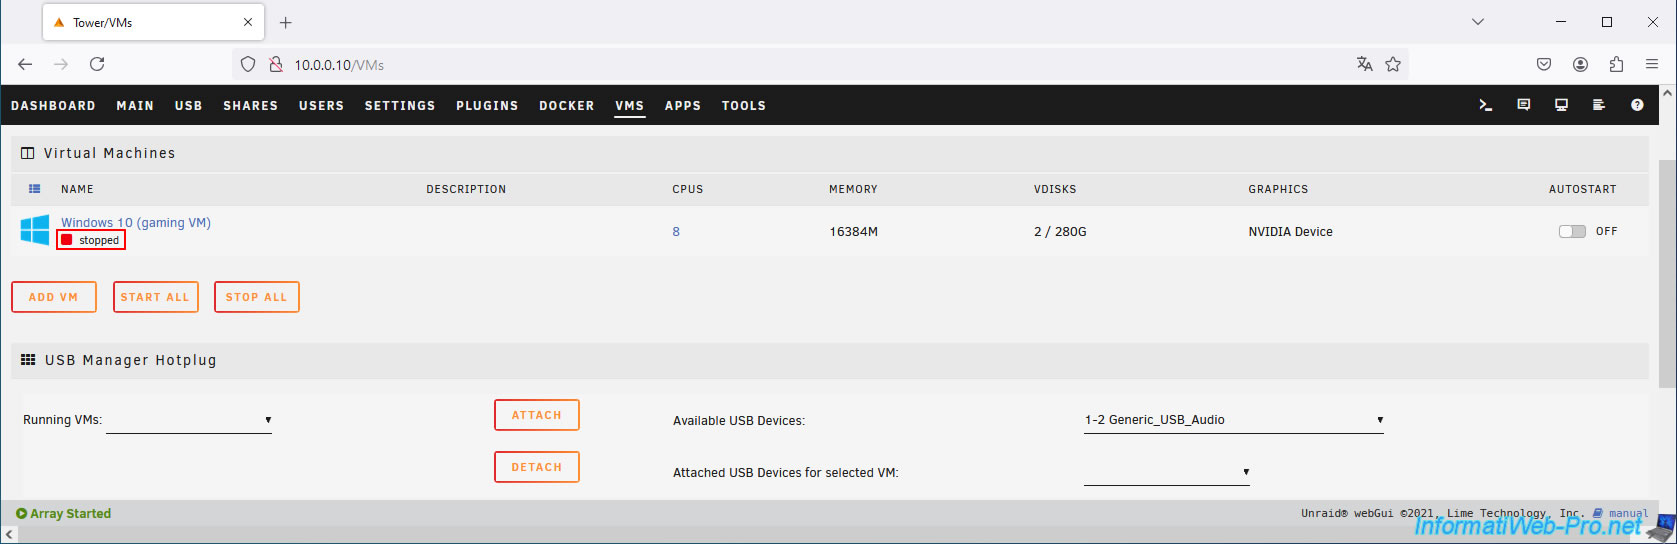
As you can see, our virtual gaming machine is currently off.
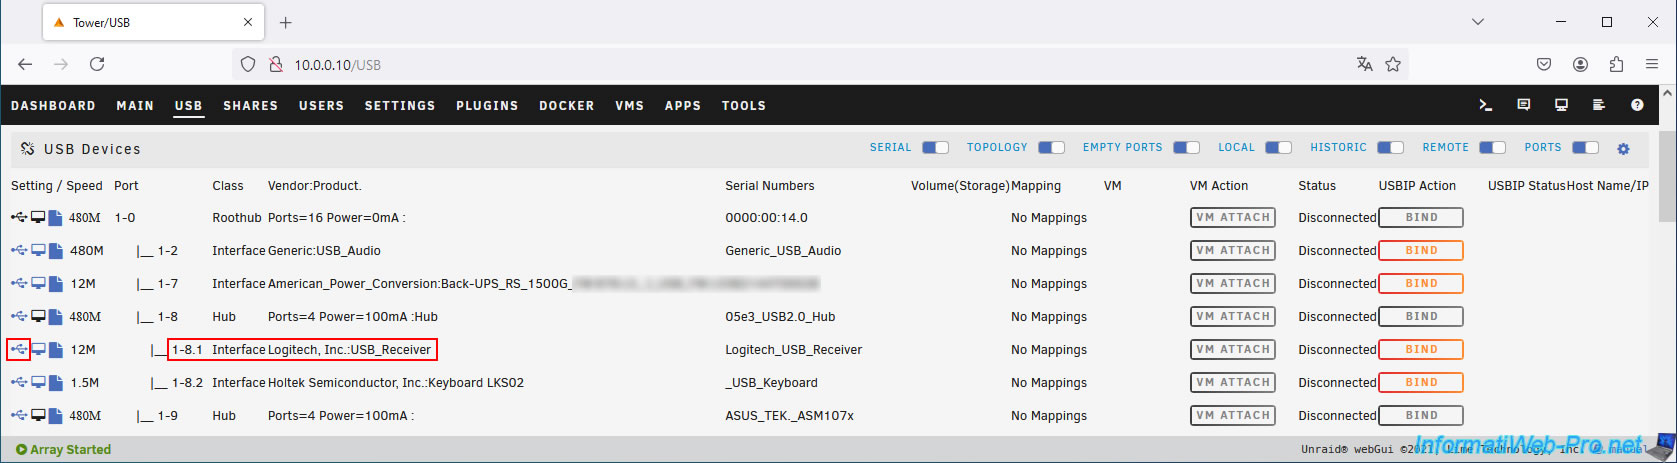
In the "USB" tab, we can see our keyboard and mouse appear (because we selected our gaming VM on our physical KVM, even though the VM is currently powered off).
Click the USB icon on the far left next to your USB mouse (in our case, "1-8.1 Interface Logitech, Inc.: USB Receiver").
Important : on your physical KVM, you must absolutely select the position corresponding to your gaming VM (and therefore corresponding to the HDMI cable connected to the physical graphics card connected to your gaming VM).
Indeed, you will need to map the port numbers detected by Unraid (corresponding to the USB ports where the keyboard and mouse are connected when you select your gaming VM on the physical KVM).
Warning : you must use a mapping based on the desired USB port number, not the desired USB device name.
The goal is to connect the keyboard and mouse only when you select the gaming virtual machine on your KVM. However, if you use USB device name based mapping, these would also be connected to the VM when you select your physical Unraid server on your physical KVM.
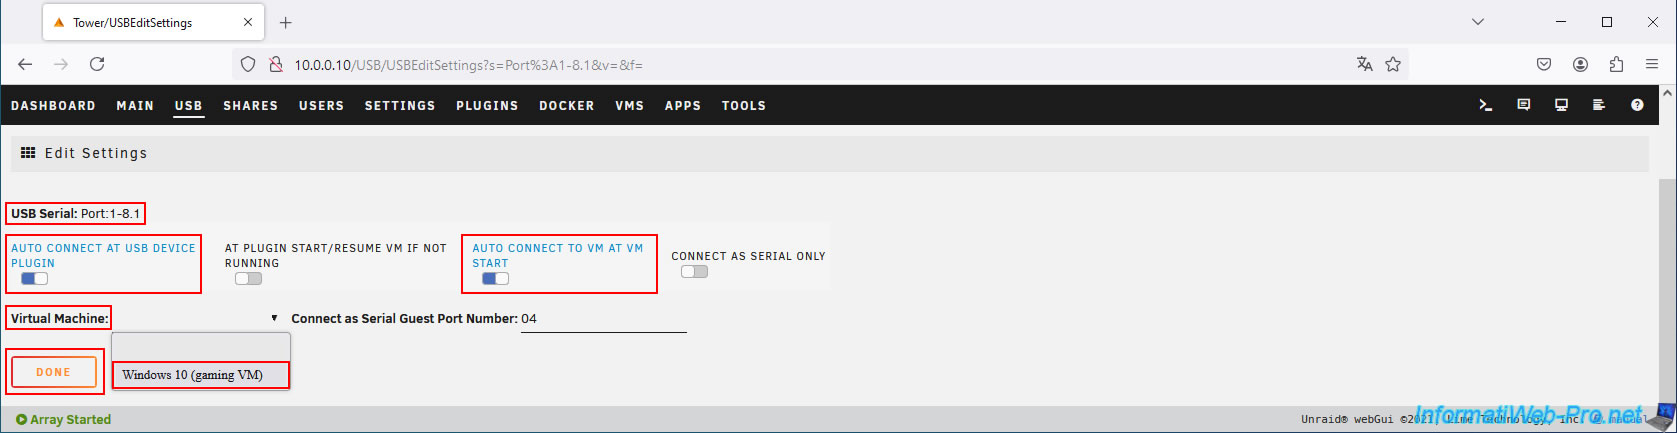
As you can see, the mapping will be based on the USB port number "1-8.1" (in our case), which corresponds to the USB port where the keyboard is connected only when we select the gaming VM on our physical KVM.
If we select our Unraid server, the USB port number will be different and the keyboard will remain connected to the Unraid console.
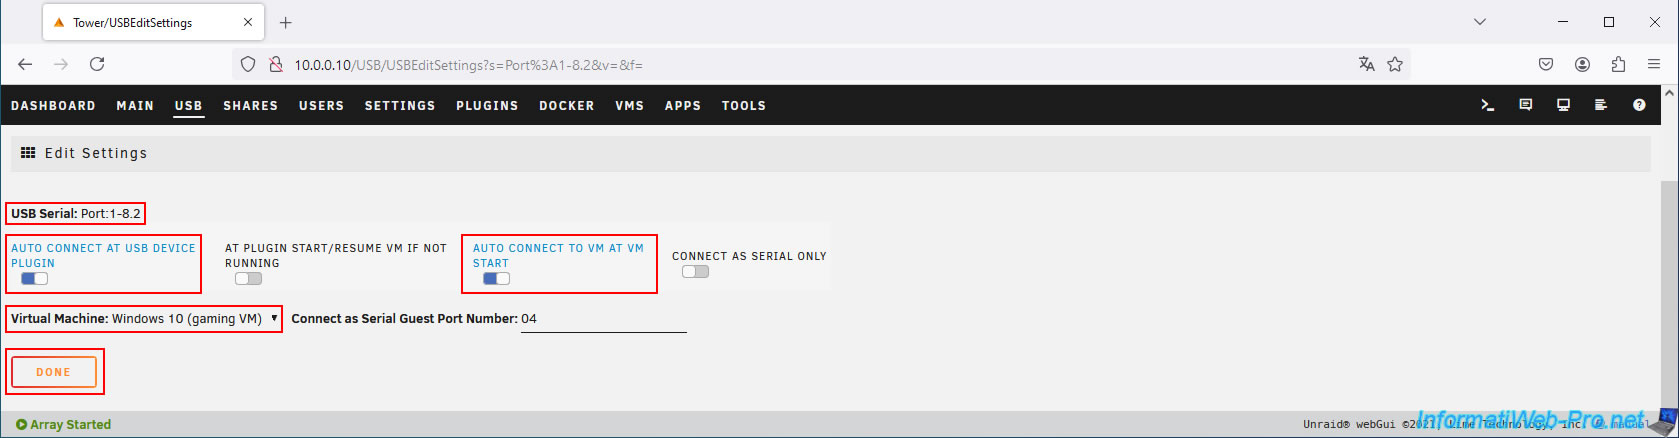
Enable the options:
- Auto connect at USB device plugin: Automatically reconnects the USB device connected to the target physical USB port when it is detected by the USB Manager plugin.
- Auto connect to VM at VM start: Similar to the previous option, but to automatically connect the desired USB device when the desired virtual machine starts.
For the "Virtual Machine" option, select the name of your gaming VM.
The USB device plugged into the targeted physical USB port will be automatically connected and reconnected to this virtual machine when you select your gaming virtual machine on your physical KVM.
Click "Done".
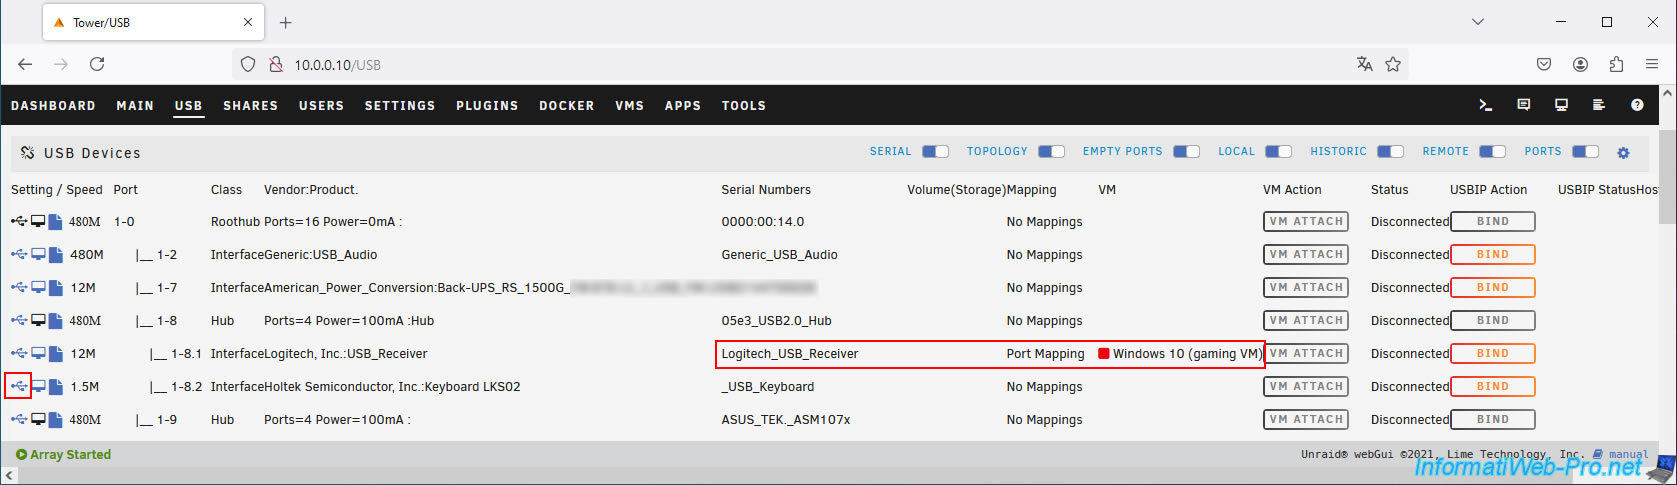
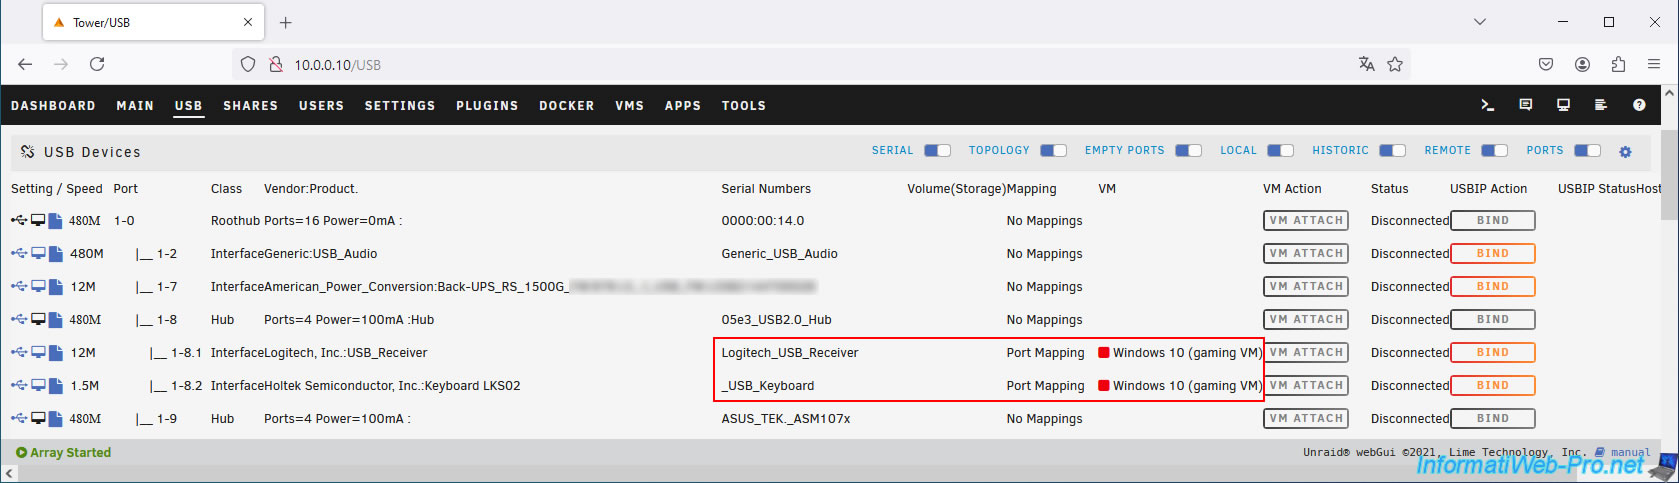
In the "USB" tab, you will see that a port mapping will appear between your USB mouse and your gaming virtual machine.
Plain Text
Logitech_USB_Receiver Port Mapping [] Windows 10 (gaming VM)
Now, click on the USB icon located to the left of your USB keyboard (in our case "1-8.2 Interface Holtek Semiconductor, Int.:Keyboard LKS02") to also map it to your virtual gaming machine based on the USB port number.
This time, the mapping will be for the physical USB port "1-8.2".
As before:
- enable the "Auto connect at USB device plugin" setting to automatically reconnect the USB keyboard to your gaming VM when it is detected by the plugin on that USB port number.
- enable the "Auto connect to VM at VM start" setting to automatically connect the USB keyboard to your gaming VM when the VM starts.
- select your gaming virtual machine from the "Virtual Machine" list.
Then, click "Done".
Note: the advantage of this technique is that this configuration only needs to be done once.
As long as you don't touch the KVM cables physically connected to your Unraid server, the USB port numbers will not change, and the mapping will always be valid.
Now, your USB keyboard and mouse are mapped to your gaming virtual machine.
6.2. Automatically connect your USB keyboard and mouse to your gaming VM when it starts
Start your gaming virtual machine by going to the "VMs" tab in Unraid.
Once your virtual machine is started, you will see that your USB keyboard and mouse will automatically appear in the "Attached USB Devices for selected VM" list (if your gaming VM is still selected on your physical KVM).
If you change the selected PC on your physical KVM, the keyboard and mouse will no longer be connected to your gaming VM since you have decided to control another PC with your physical KVM.
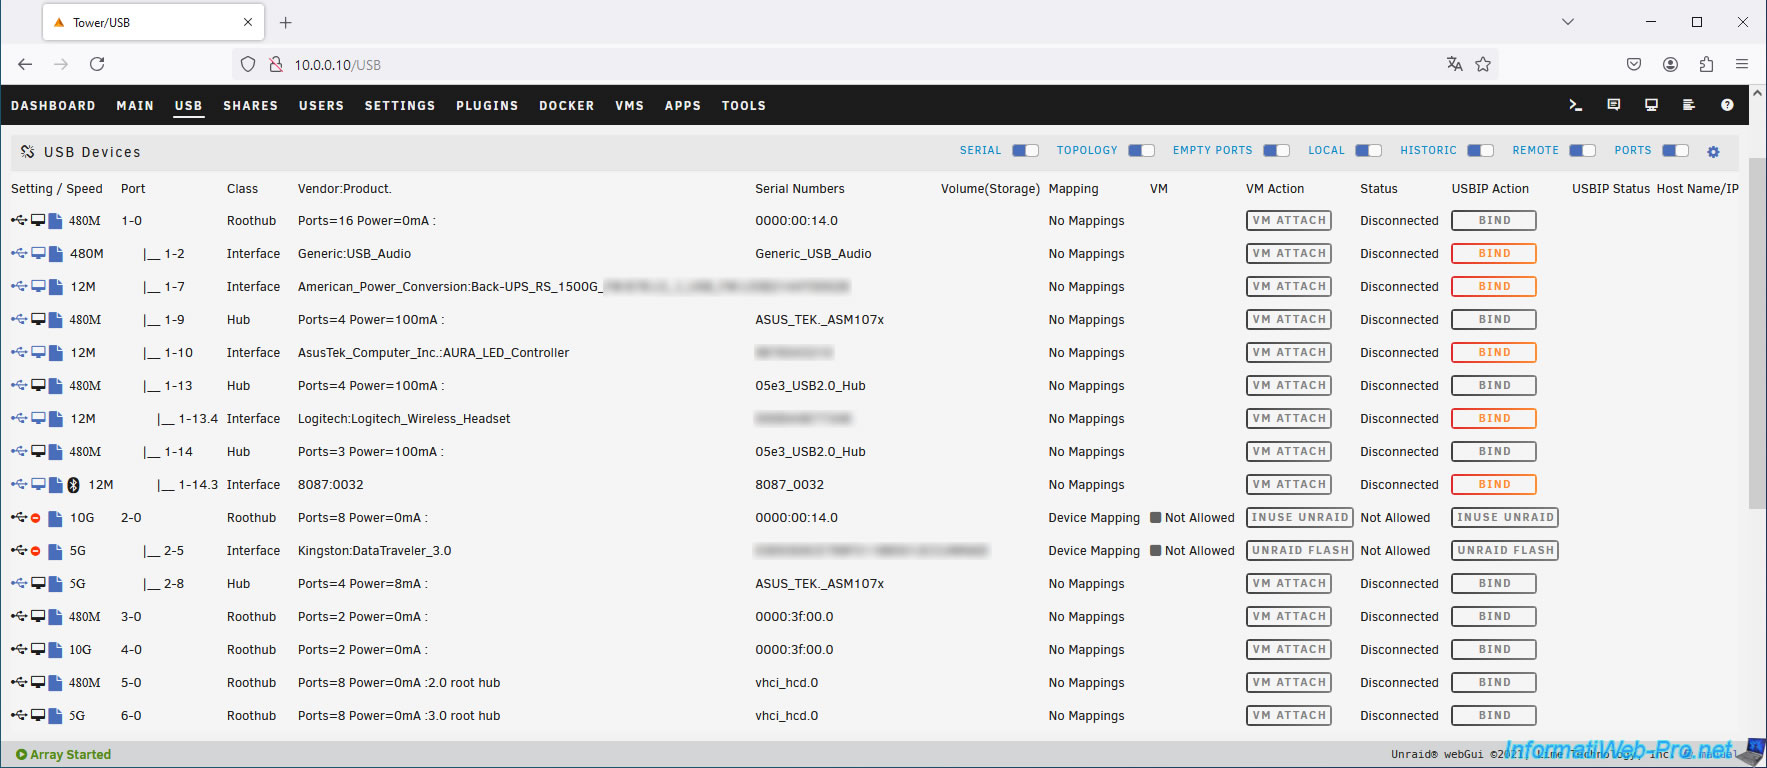
If you go to the "USB" tab, you will indeed notice that your USB keyboard and mouse have disappeared from the list, because your Unraid server does not currently see them.
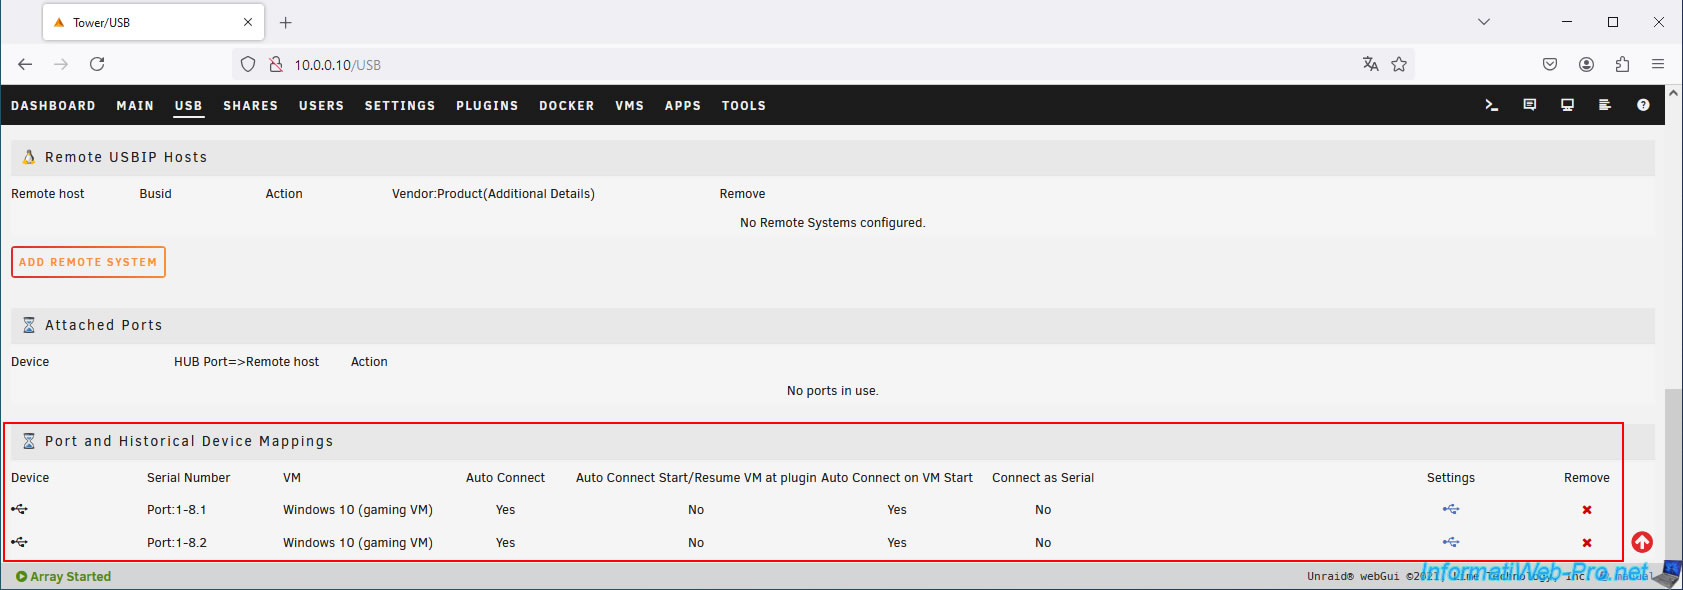
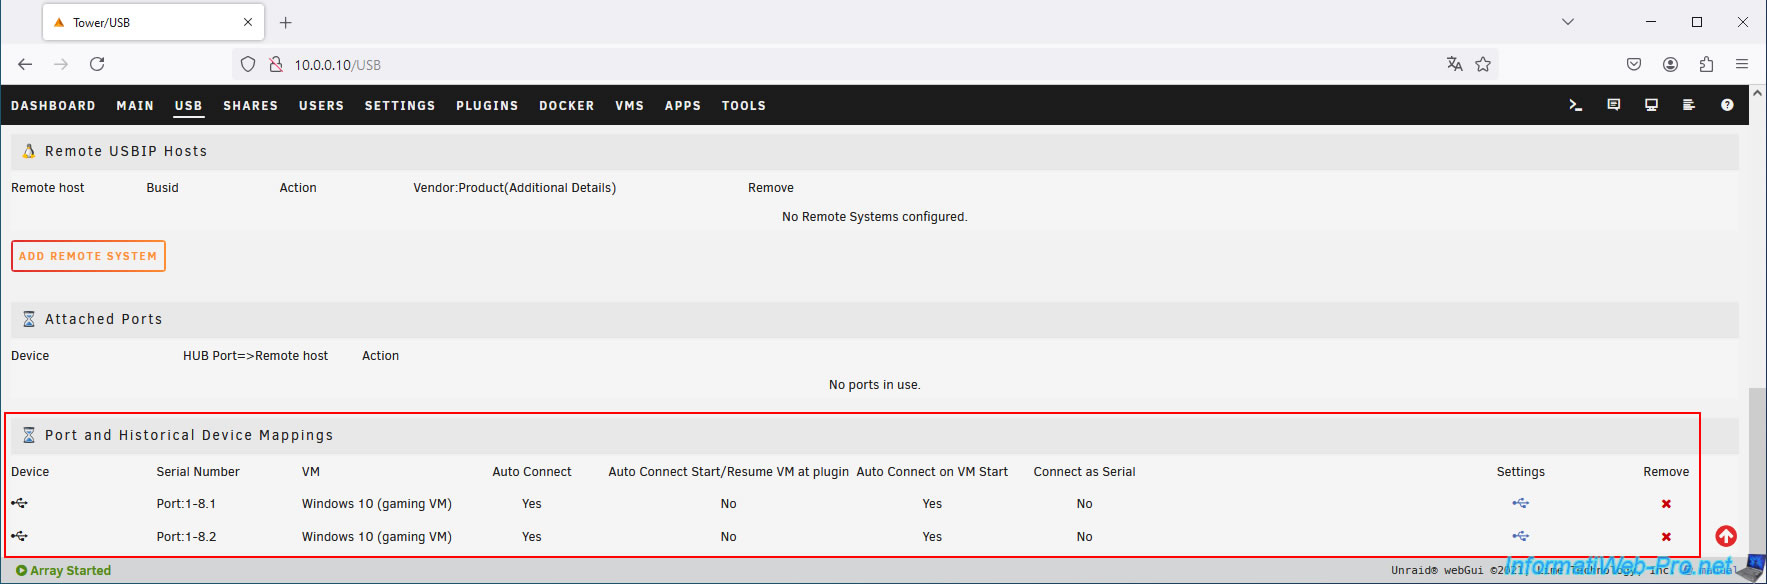
However, if you look at the very bottom of the page, in the "Port and Historical Device Mappings" section, you'll notice that the "USB Manager" plugin keeps a history of previously configured USB port and device mappings.
We can see our previously configured port mappings "1-8.1" and "1-8.2," even though our USB mouse and keyboard are no longer connected to them (due to the selection of another PC on our physical KVM).
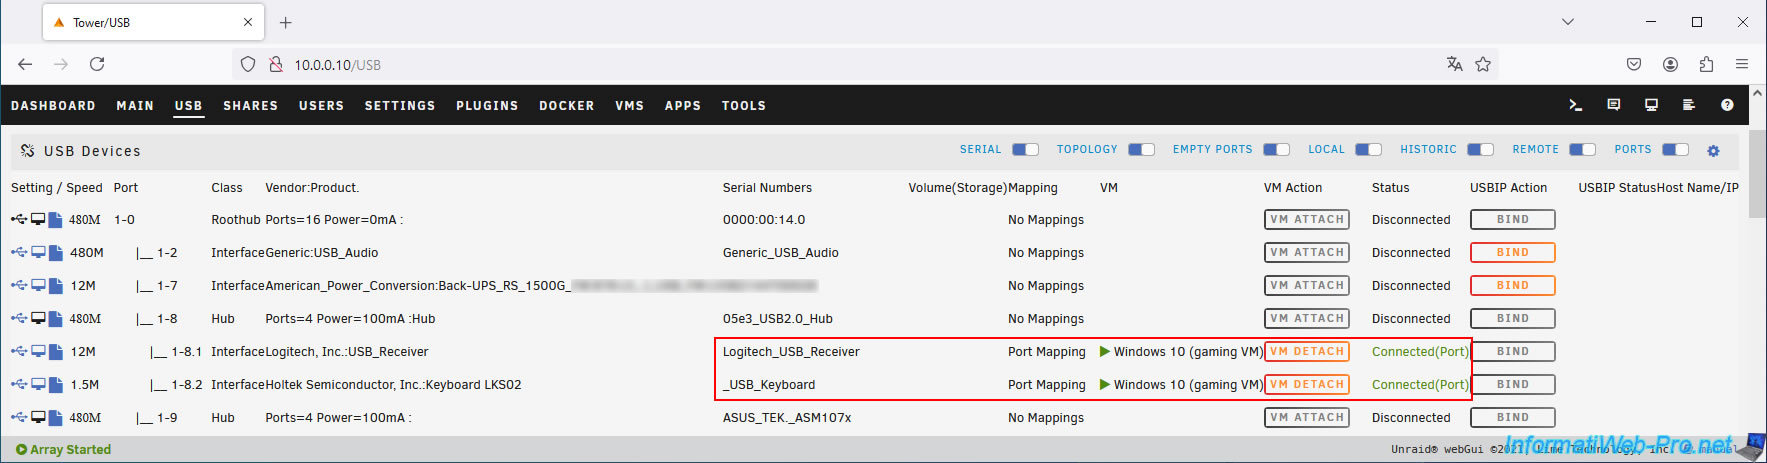
If you select your gaming VM again on your physical KVM, you will see that your USB mouse and keyboard will be reconnected to the same USB port numbers and will therefore be automatically reconnected to your gaming VM (using the mappings configured previously).
If you go back to the "VMs" tab, you will see that your USB mouse and keyboard are once again connected to your gaming virtual machine.
6.3. Automatically reconnect USB keyboard and mouse to your powered-on gaming VM
As you can see, currently our Unraid server does not see our USB mouse or keyboard, because we have selected our desktop PC on our physical KVM.
As a reminder, at the bottom of the page, we can always see the history of the mappings configured for our USB mouse and keyboard.
Start your virtual machine (although your USB mouse and keyboard are not currently seen by your Unraid server).
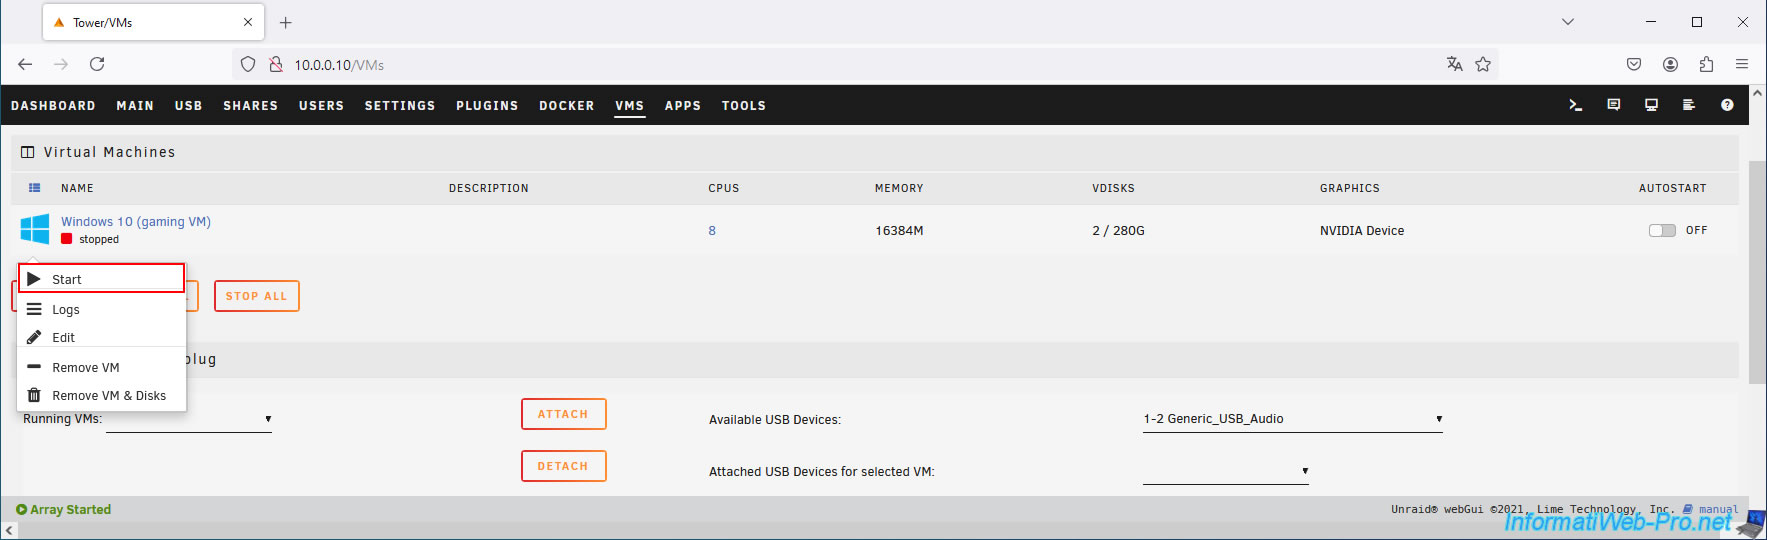
As expected, no USB device is connected to your virtual machine, so it has started without a mouse or keyboard.
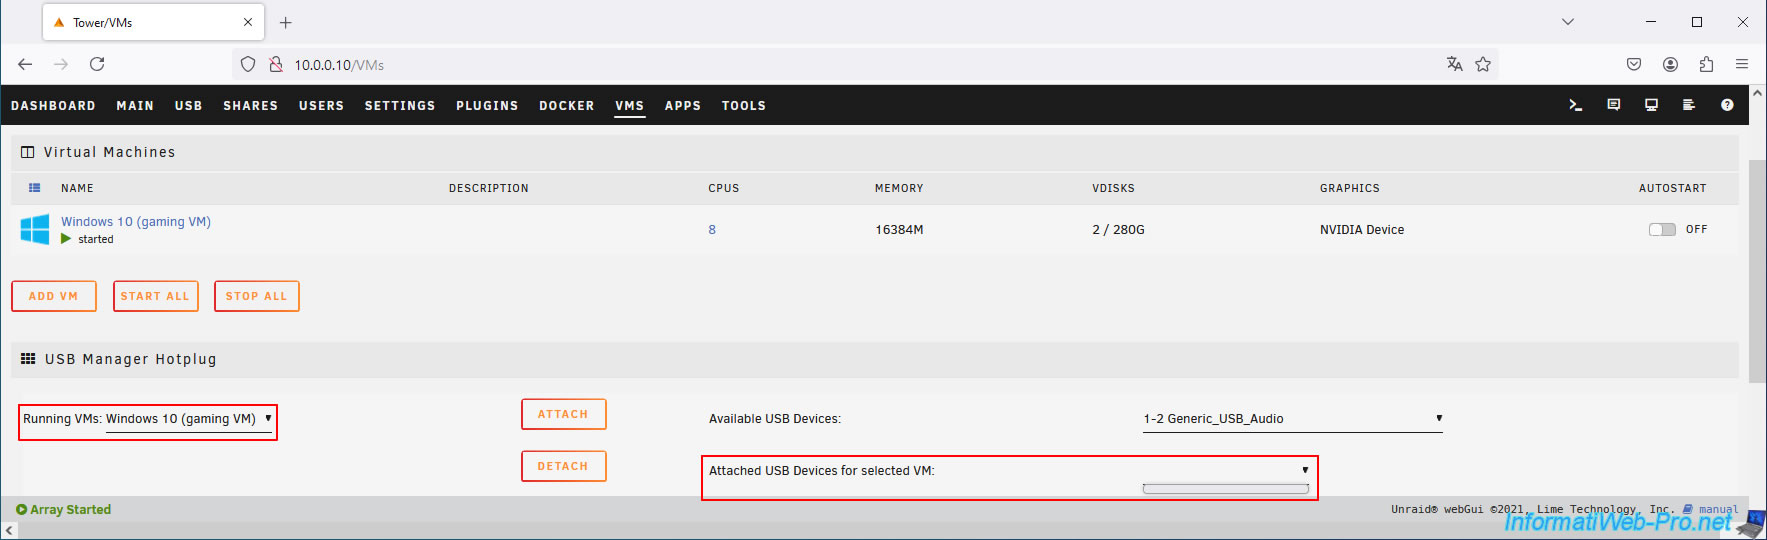
If you look in the "Available USB Devices" list, you will also notice that your USB mouse and keyboard are not there.
However, once you select your gaming VM on your physical KVM, your USB mouse and keyboard will automatically be connected to your gaming VM and will therefore appear in the "Attached USB Devices for selected VM" list.
Note: you must refresh this page (by pressing F5) to see this change on this page.
This list is not updated in real time, unlike the "USB" tab in the Unraid web interface.
In the "USB" tab of the Unraid web interface, you will see your USB mouse and keyboard appear again and you will also see that these have been automatically reconnected to your gaming VM.
Share this tutorial
To see also
-
NAS 2/11/2026
Unraid 6.9.2 - Customize the web interface
-
NAS 7/29/2026
Unraid 6.9.2 - VMs - Backing up a VM automatically
-
NAS 7/22/2026
Unraid 6.9.2 - VMs - Backing up a VM manually
-
NAS 8/13/2026
Unraid 6.9.2 - VMs - Guest not initialized display (solution)
No comment