Create a network bridge on pfSense 2.6 between 2 network interfaces
- Firewall
- pfSense
- 06 August 2025 at 07:51 UTC
-

- 2/2

6. Allow DHCP traffic through network bridge
By default, network traffic that must pass through the bridge you just created is blocked by the pfSense firewall.
To resolve the problem, go to: Firewall -> Rules.
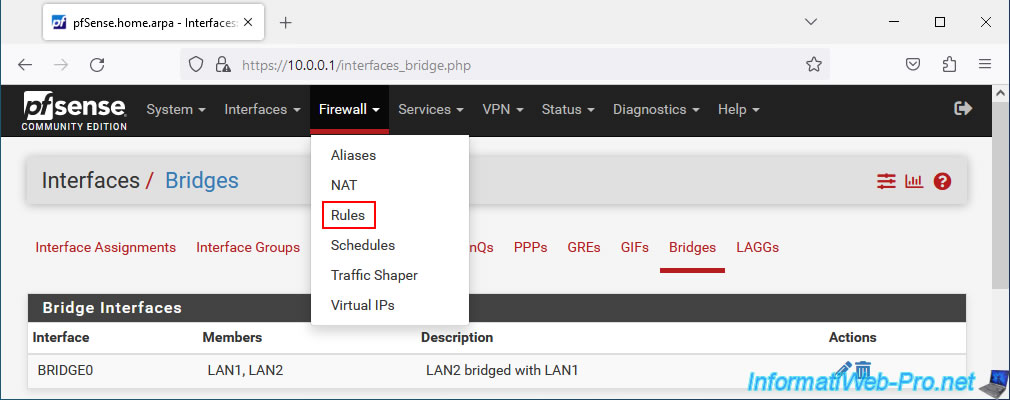
To allow DHCP-related network traffic to pass through the network bridge, you must add a firewall rule for the interfaces that are part of the bridge you just created.
In other words, in this case, you will need to create this rule for the logical network interfaces LAN1 and LAN2.
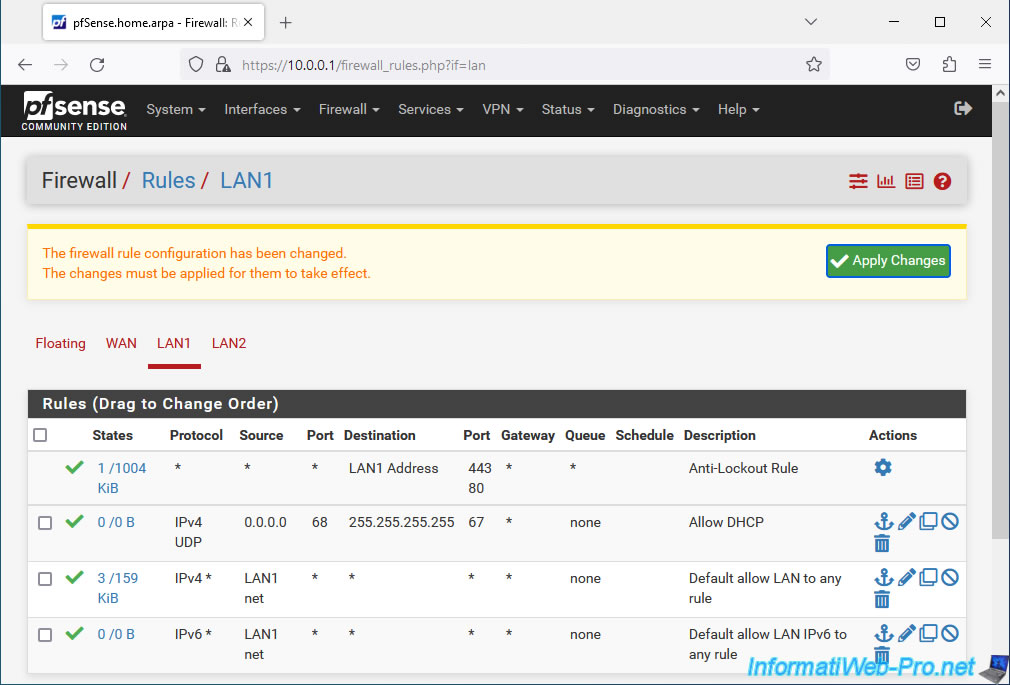
To get started, go to the "LAN1" tab and click Add.
Source : Bridging Two Internal Networks | pfSense Documentation.
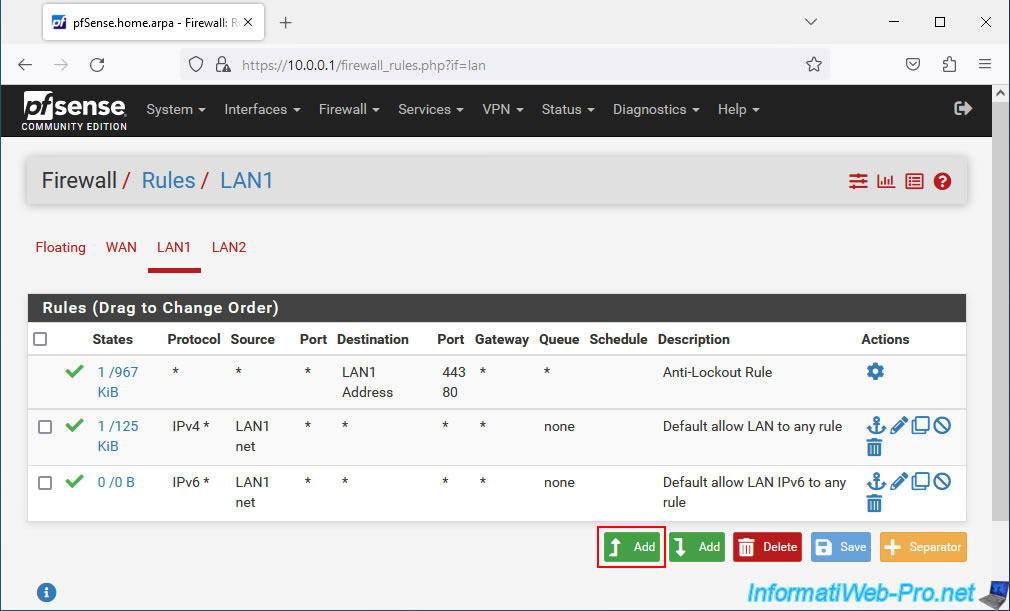
Configure the rule like this:
- Action: Pass.
- Interface: LAN1.
- Address Family: IPv4.
- Protocol: UDP. The DHCP protocol uses UDP ports 67 and 68.
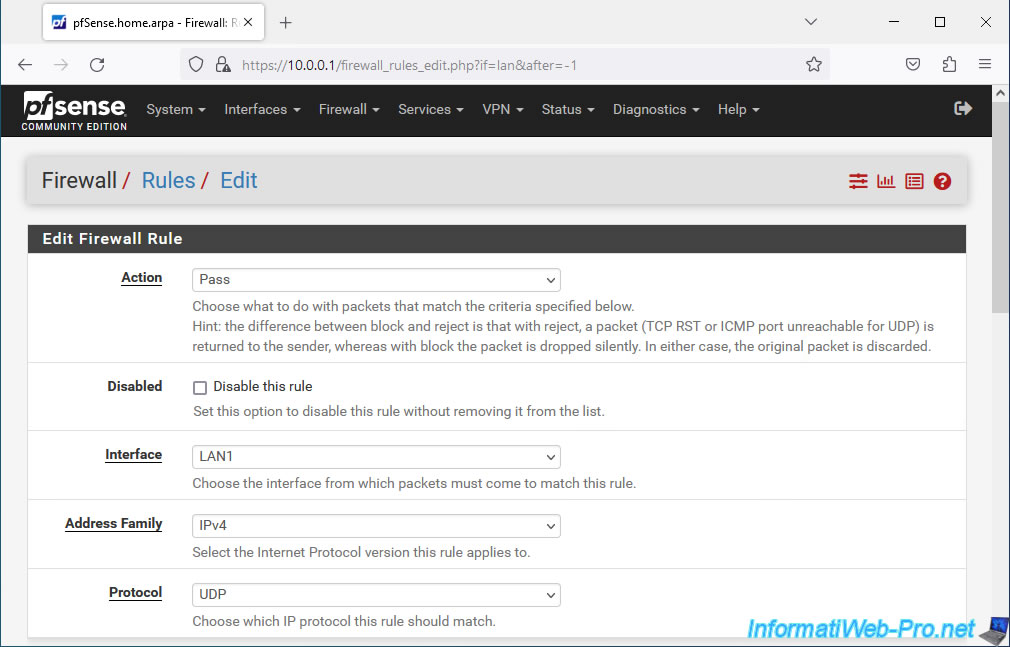
- Source: select "Single host alias" and enter the IP address "0.0.0.0".
- Source Port Range: enter "68" in both boxes.
- Destination: select "Single host alias" and enter the IP address "255.255.255.255".
Indeed, clients who do not yet have an IP address send their DHCP request to the broadcast address (...255). - Destination Port Range: enter "67" in both boxes.
- Description: indicate for example "Allow DHCP".
Then, click Save.
Click: Apply Changes.
DHCP traffic is allowed on the LAN1 interface.
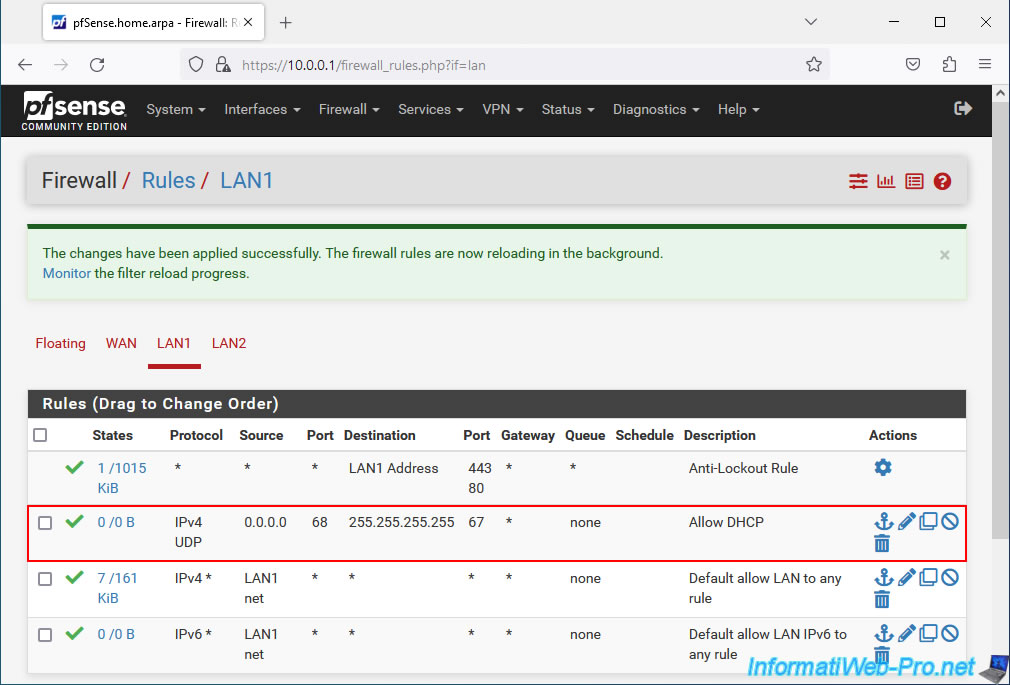
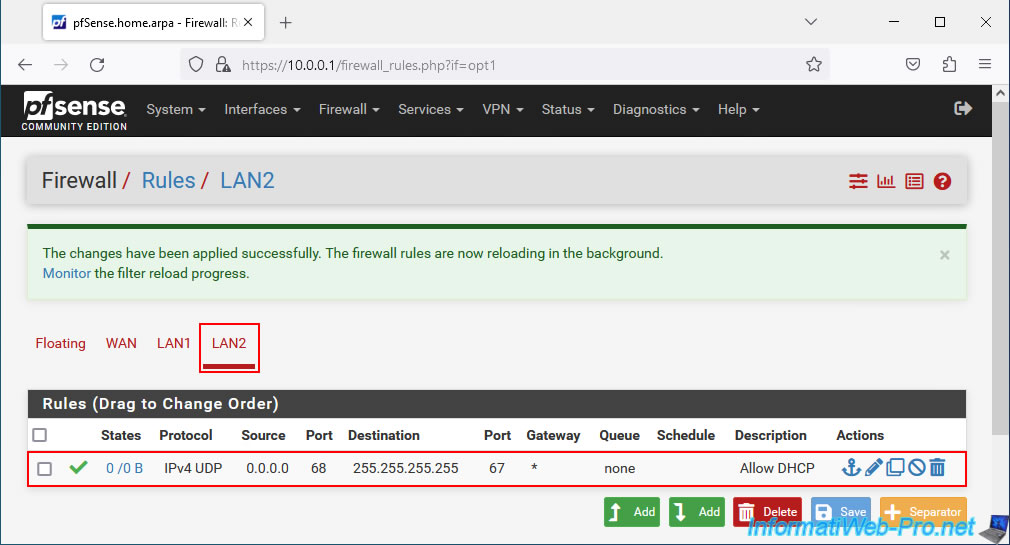
Now, go to the "LAN2" tab and add the same rule.
Note: when creating the rule, the interface selected this time will be "LAN2".
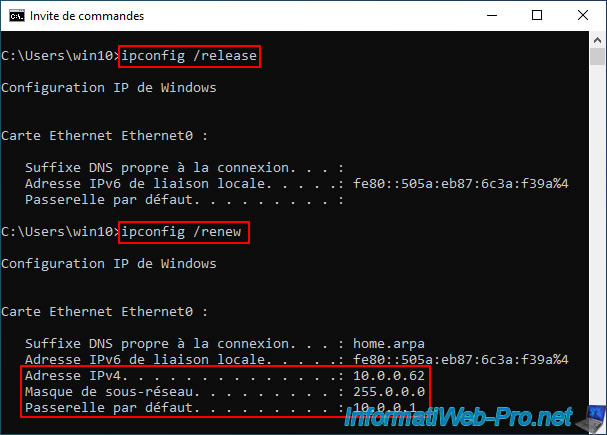
7. Force a machine to obtain new DHCP information
If you have already connected a machine to your "LAN2" switch, it probably does not have access to the network and has an IP address "169.254...".
Which means that it did not receive an IP address from a DHCP server, because it was not reachable on the current network.
Now that DHCP traffic is authorized for the network bridge created on pfSense, you must force the machine to request an IP address again from your DHCP server.
To do this, open a command prompt and type these commands:
Batch
ipconfig /release
ipconfig /renew
Note: this allows you to release the current IP address (if there is one), then request one from the DHCP server present on the network.
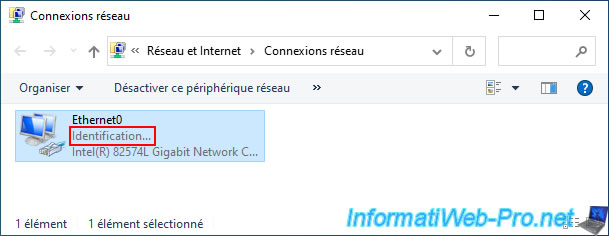
In the Windows GUI, while your computer is sending the DHCP request and waiting for a response from a DHCP server, you will see the status "Identification" appear on your network adapter.
Once the IP address is received, it will say "Network" (or "Network X").
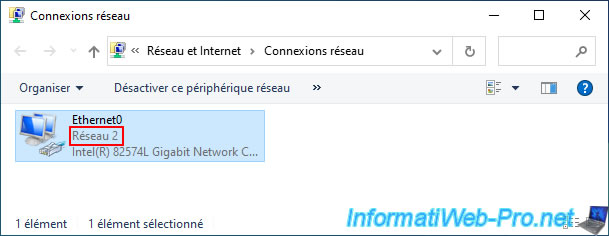
As you can see, this machine (connected to the "LAN2" switch) received an IP address from the DHCP server of our pfSense machine without any problem.
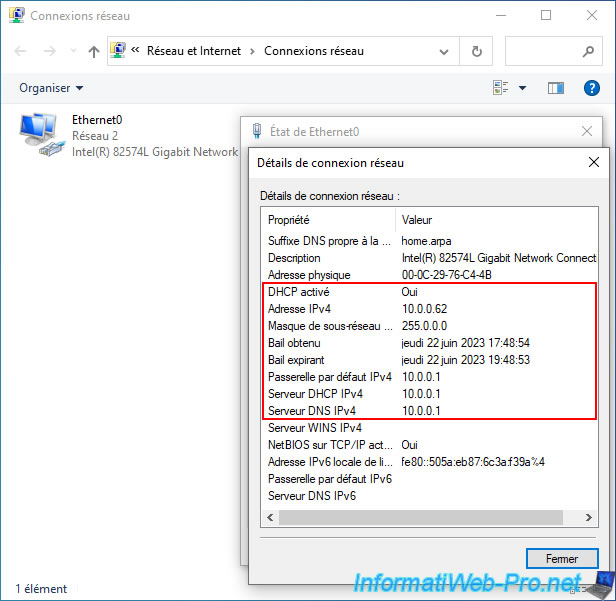
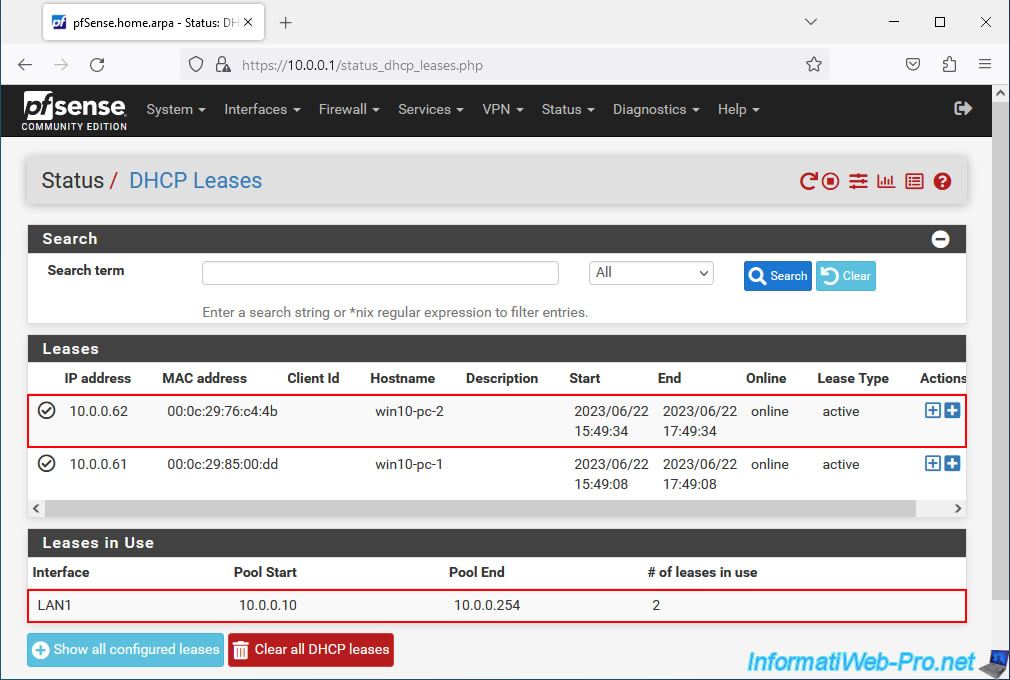
In addition, this machine is part of the same network (10.x.x.x) as our first Windows PC connected to the "LAN1" switch (see image of DHCP leases below).
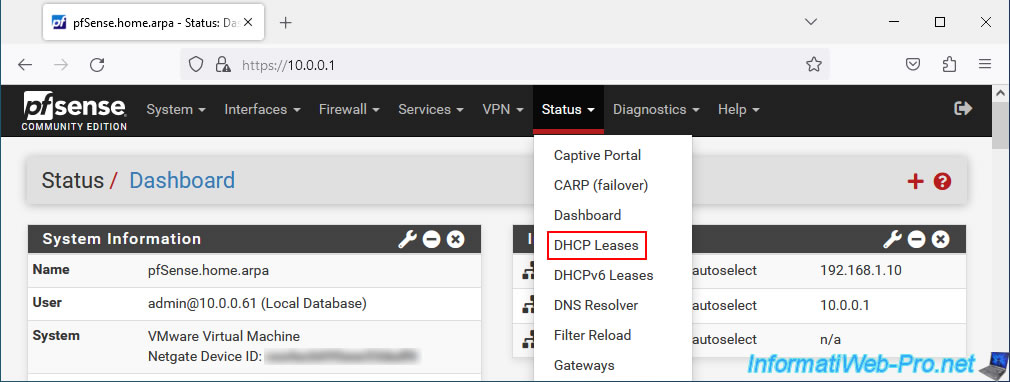
To view current DHCP leases under pfSense, go to: Status -> DHCP Leases.
As you can see, our 2 Windows 10 machines are part of the same network "10.x.x.x" and received an IP address from the DHCP server of the pfSense LAN1 interface.
However, the "win10-pc-2" machine is connected to the "LAN2" switch. The IP address was therefore received via the bridge "BRIDGE0" connecting the logical interfaces "LAN1" and "LAN2".
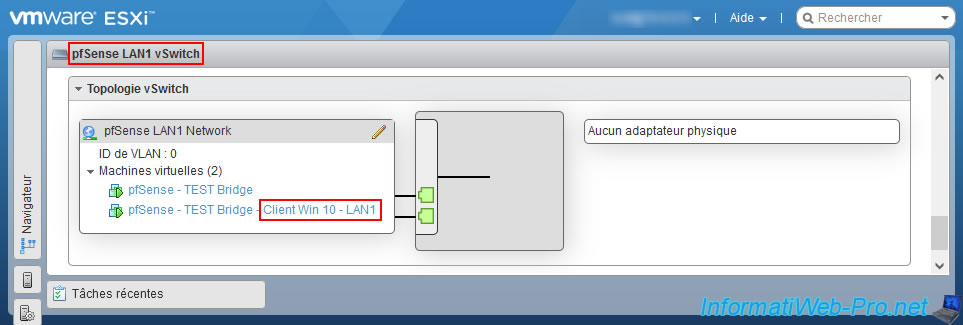
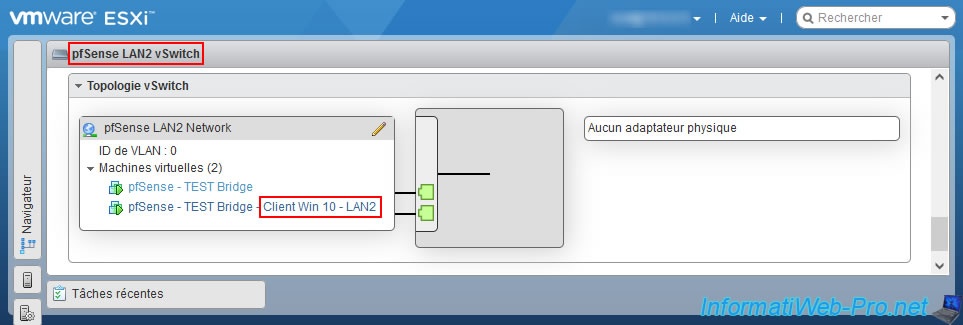
As proof, here are the machines connected to our 2 local switches (LAN1 / LAN2).
As you can see :
- the "pfSense" machine is connected to the 2 switches, since it is this which forms the bridge between them.
- the "win10-pc-1" machine is connected to the "pfSense LAN1 vSwich" switch.
- the "win10-pc-2" machine is connected to the "pfSense LAN2 vSwich" switch.
8. Fix the problem of access to the network and the Internet via the network bridge
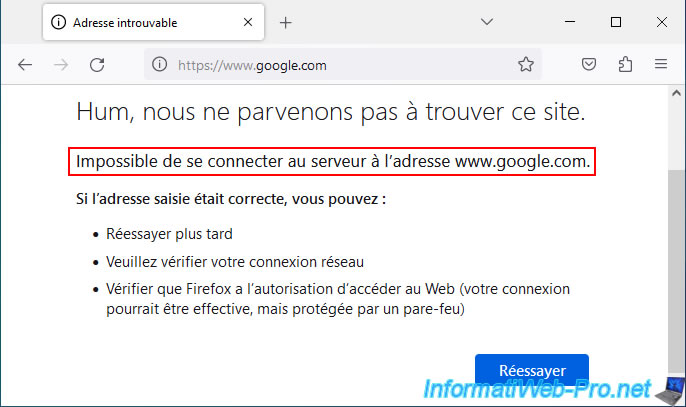
If you try to access the pfSense gateway, a machine on the LAN network, or the Internet from a machine connected to LAN2, you will see that this is not possible at the moment.
When accessing a website, you will get the error message below.
Plain Text
Firefox can't establish a connection to the server at ...
For ping command you will receive the error below.
Plain Text
Request timed out.
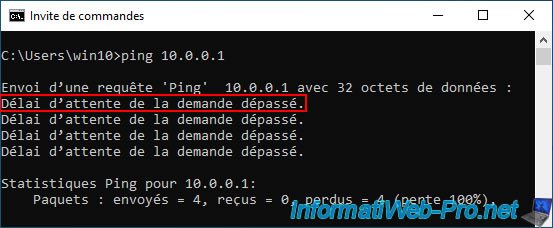
The reason is simple, network traffic is blocked by default by the pfSense firewall.
Hence the fact that the packets never arrive at their destination.
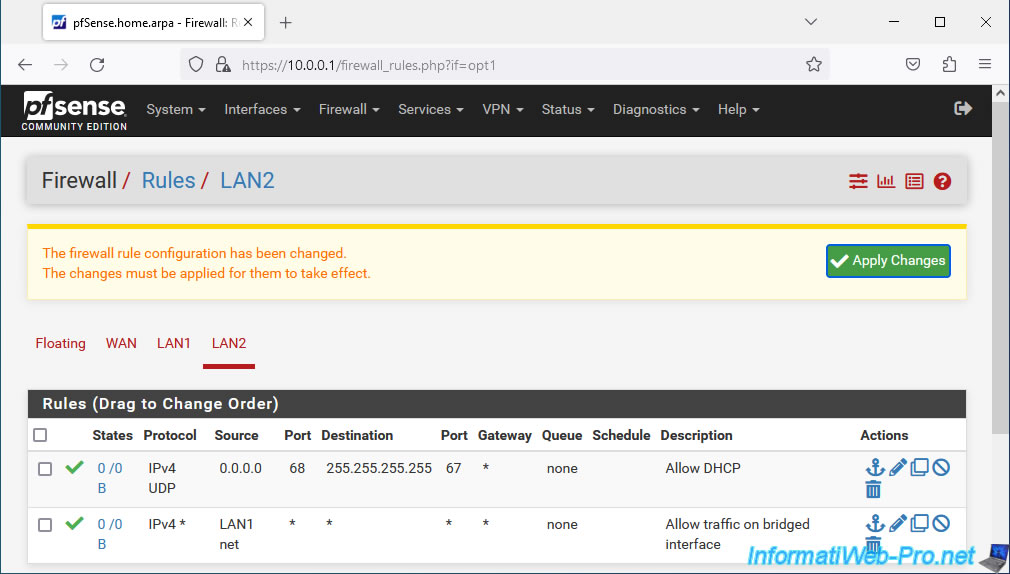
To correct this problem, go to "Firewall -> Rules -> LAN2" to allow network traffic on the logical network interface that does not have an IP address and is part of the bridge created earlier.
- Action: Pass.
- Interface: LAN2.
- Address Family: IPv4.
- Protocol: Any.
- Source: select "LAN1 net" to allow network traffic coming from the LAN1 network and therefore entering the LAN2 interface selected above.
- Destination: select "Any".
- Description: Allow traffic on bridged interface.
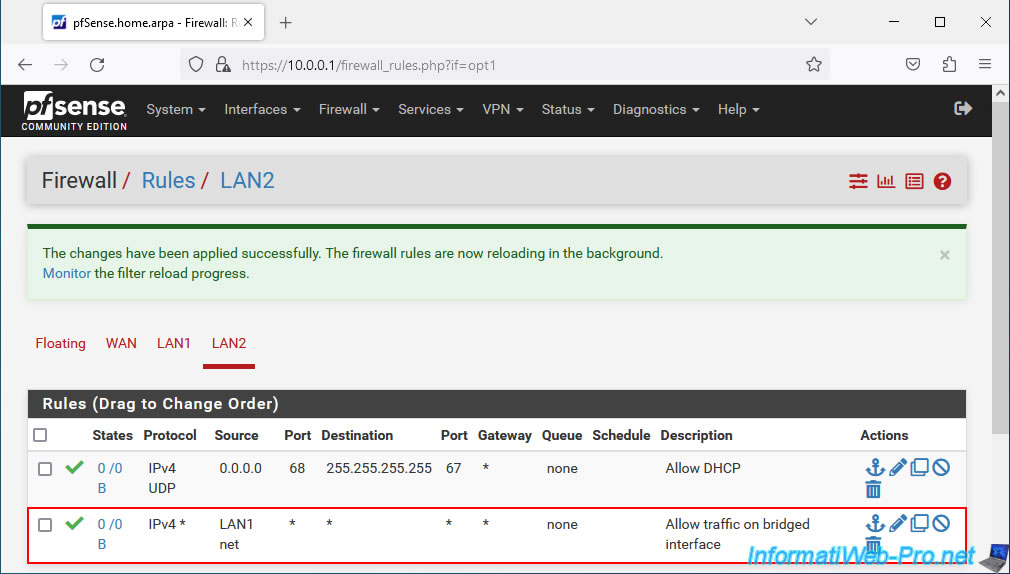
Then, click Save.
Note: this rule allows incoming traffic to be authorized on the "LAN2" interface when the network traffic comes from the "LAN1" network.
Outbound traffic is allowed by default since only inbound traffic is blocked by default on an interface.


Click: Apply Changes.
Your rule has been created successfully.
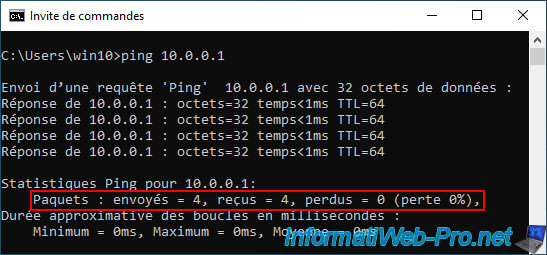
Which notably authorizes access to the "10.0.0.1" gateway (which is part of the LAN1 network) and therefore also to the Internet, as well as to the machines on the LAN1 network (if their firewall allows it).
As expected, the Internet works.

The gateway can be reached via a ping, for example.
9. Access to network machines via the bridge
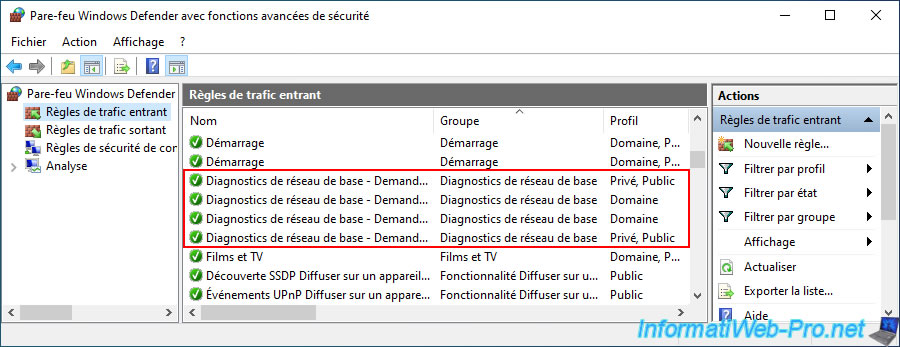
To test communication between your Windows machines, go to the "Inbound Rules" section of Windows Firewall and enable the rules below:
- Basic Network Diagnostics - ICMP Echo Request (ICMPv4-In) | Profiles: Private, Public AND Domain.
- Basic Network Diagnostics - ICMP Echo Request (ICMPv6-In) | Profiles: Private, Public AND Domain.
Note: 2 rules for IPv4 and 2 other rules for IPv6. 2 rules for the "Domain" network profile and 2 other rules for the other network profiles.
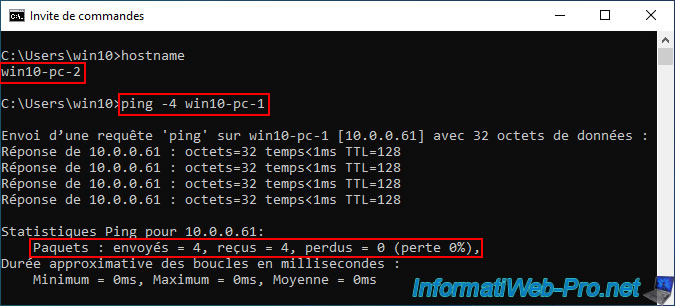
As you can see, the "win10-pc-1" machine connected to the "pfSense LAN1 vSwich" switch can communicate without problem with the "win10-pc-2" machine connected to the "pfSense LAN2 vSwich" switch.
Additionally, you can see that these are on the same network "10.x.x.x".
To check this, use the ping command specifying the "-4" parameter (to force the use of IPv4) and the name of the remote machine.

Obviously, it works the other way too.
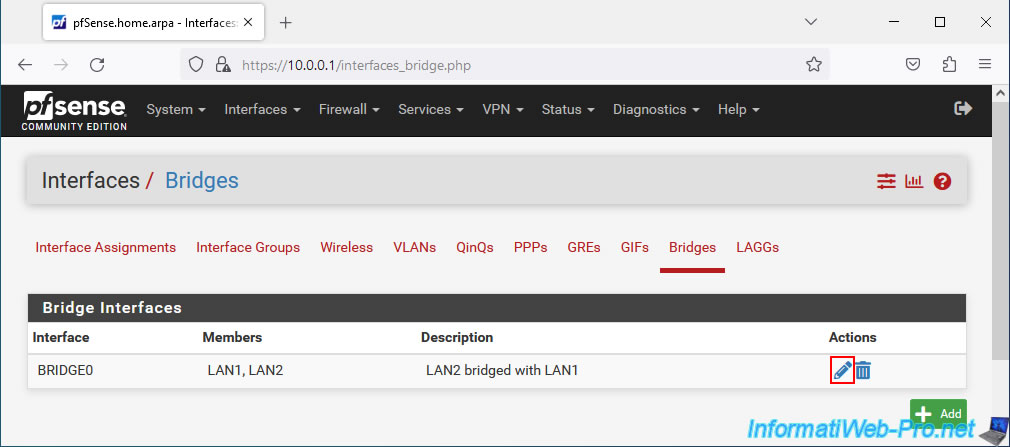
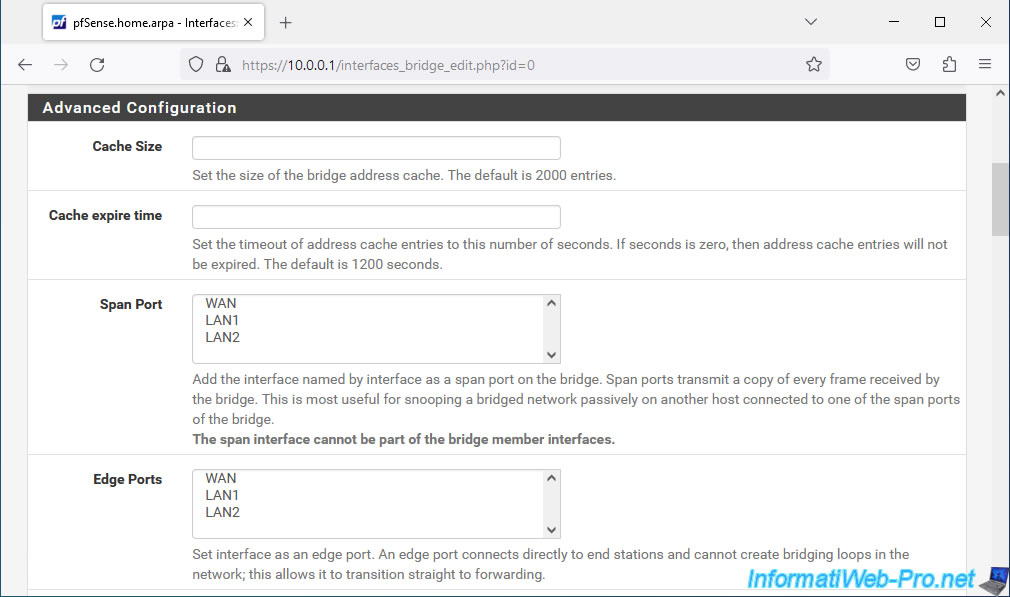
10. Advanced options for network bridge
Now that your network bridge is working, please note that pfSense offers several advanced options for network bridge.
To see them, go to "Interfaces -> Assignments -> Bridges" and modify your network bridge (BRIDGE0).
Important : in our case, we only connect 2 switches together.
However, if you create multiple network bridges or connect more than 2 switches together, your network may quickly fail due to a network loop.
To avoid this problem, you will need the RSTP or formerly STP protocol supported by pfSense.
Click the button: Display Advanced.
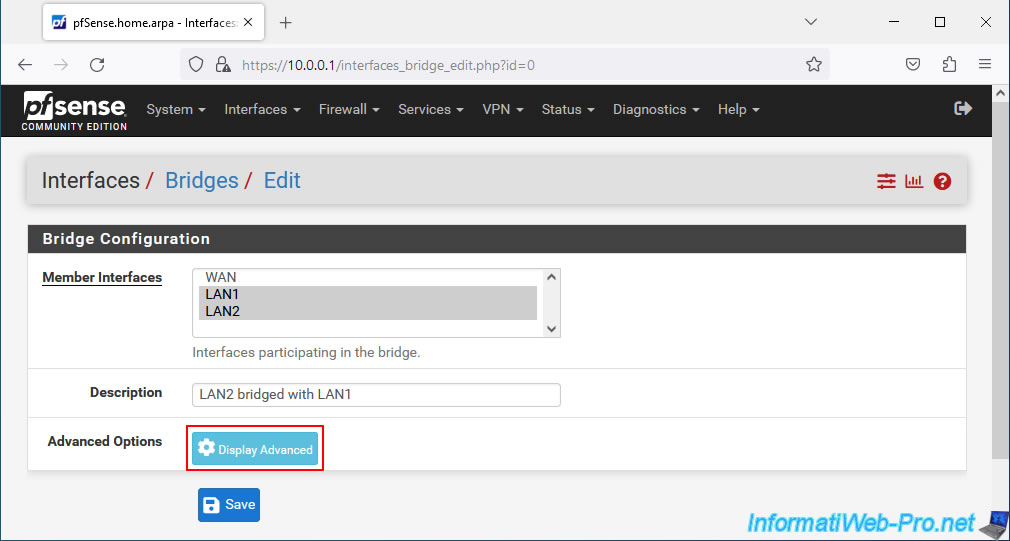
As you can see, you can, for example, configure a port as "span".
This allows frames received by a network bridge to be copied to a specific network port. This makes it possible to monitor the network traffic of the network bridge via a machine connected to the "span" port, using Wireshark, for example.
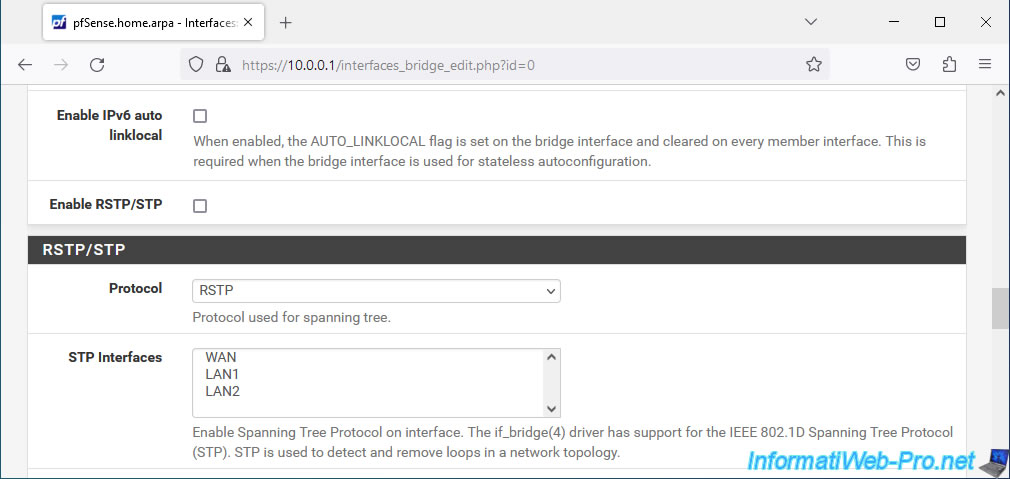
Further down, you can activate the "Enable RSTP/STP" option, which is essential to avoid creating a network loop when you connect more than 2 network switches in the same company.
In the "RSTP/STP" section, you will see that pfSense defaults to "RSTP" which is the successor to STP and is also faster than STP.
Share this tutorial
To see also
-
Firewall 5/21/2025
pfSense 2.6 - Access to the web interface via the WAN interface
-
Firewall 8/8/2025
pfSense 2.6 - Configure a LACP link (LAGG)
-
Firewall 8/24/2025
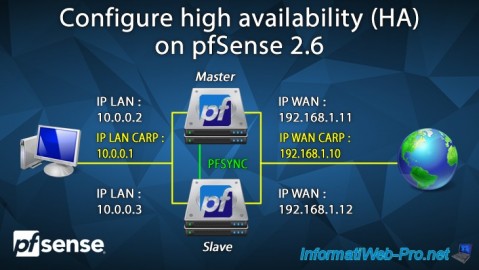
pfSense 2.6 - Configure high availability (HA)
-
Firewall 5/30/2025
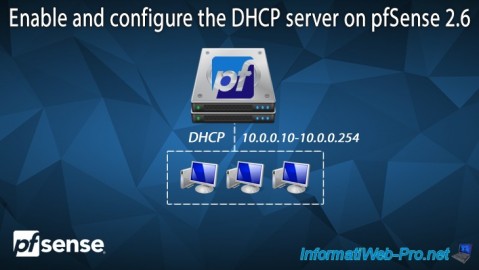
pfSense 2.6 - Enable and configure DHCP server
No comment