- VMware
- 26 July 2024 at 07:52 UTC
-


From the VMware vSphere Client of your VMware vCenter Server (VCSA), you can join your VMware ESXi host to an Active Directory domain to benefit from Active Directory authentication for this host, but also be able to use Kerberos authentication in the case of an NFS 4.1 database.
However, joining a VMware ESXi host to an existing Active Directory domain requires some prerequisites.
- Synchronize VMware ESXi host date and time using NTP
- Change the preferred DNS server of the VMware ESXi host
- Create the “ESX Admins” Active Directory group (optional)
- Join the VMware ESXi host to your Active Directory domain
- Configure permissions for Active Directory users from the VMware ESXi host
1. Synchronize VMware ESXi host date and time using NTP
So that the join to a domain can succeed the first time and the authentication can work correctly, it is strongly recommended to synchronize the clock of your VMware ESXi host with the time server (NTP) present by default on your controller. domain.
Important : if you have multiple Active Directory domain controllers, specify the IP address of the domain controller with the FSMO role "PDC emulator (Primary Domain Controller emulator)".
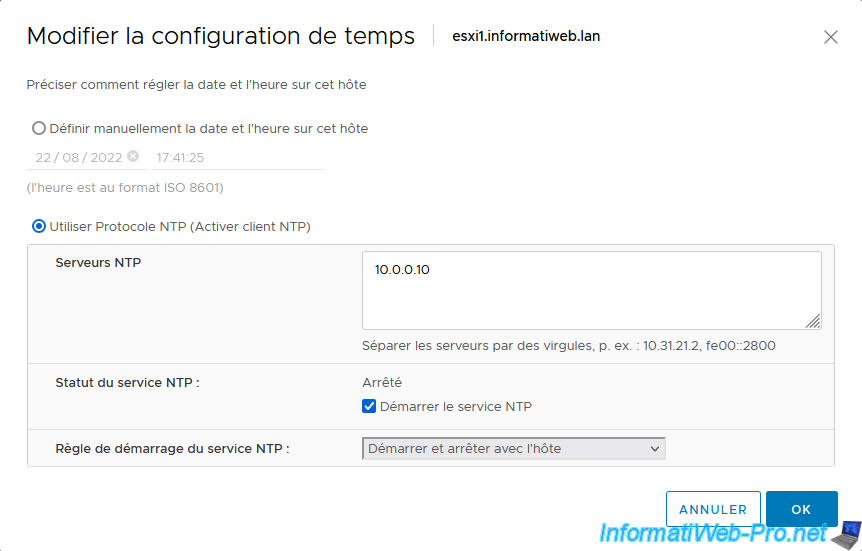
To do this, select your VMware ESXi host and go to “Configure -> System -> Time Configuration”.
Then, click: Edit.
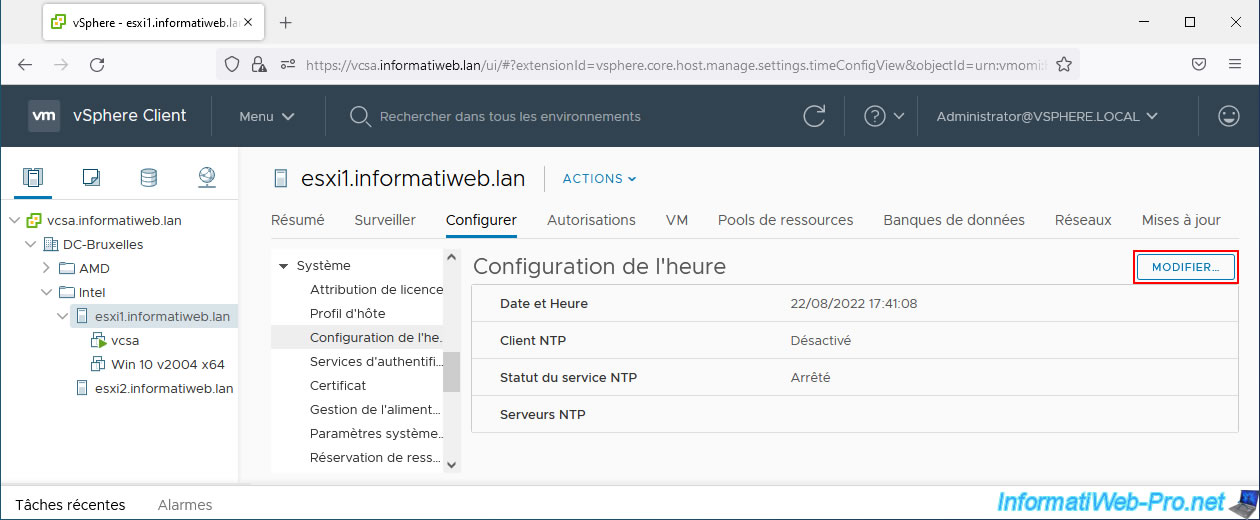
In the “Edit Time Configuration” window that appears:
- select "Use Network Time Protocol (Enable NTP client)"
- provide the IP address of your Active Directory domain controller for the NTP server.
- check the box "Start NTP service" in the line "NTP Service Status"
- select "Start and stop with host" for the NTP Service Startup Policy.
So even if you restart your host, it will continue to regularly synchronize its clock with that of your Active Directory domain controller.
Then click OK.
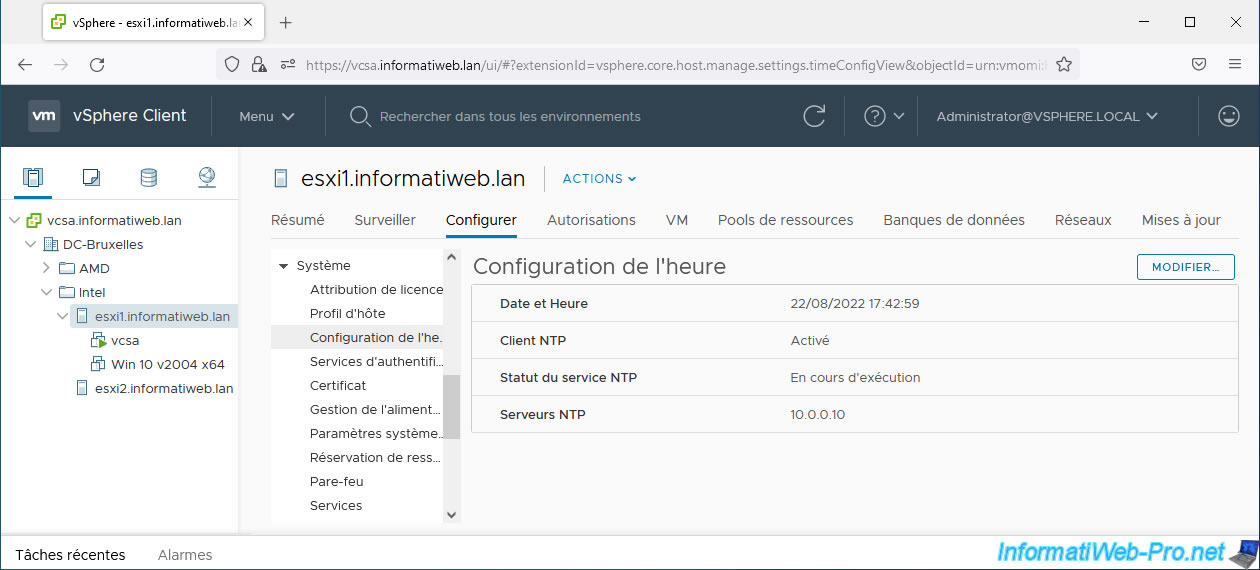
Clock synchronization from your NTP server has been enabled.
- NTP Client: Enabled.
- NTP Service Status: Running.
- NTP Servers: 10.0.0.10 (domain controller IP address).
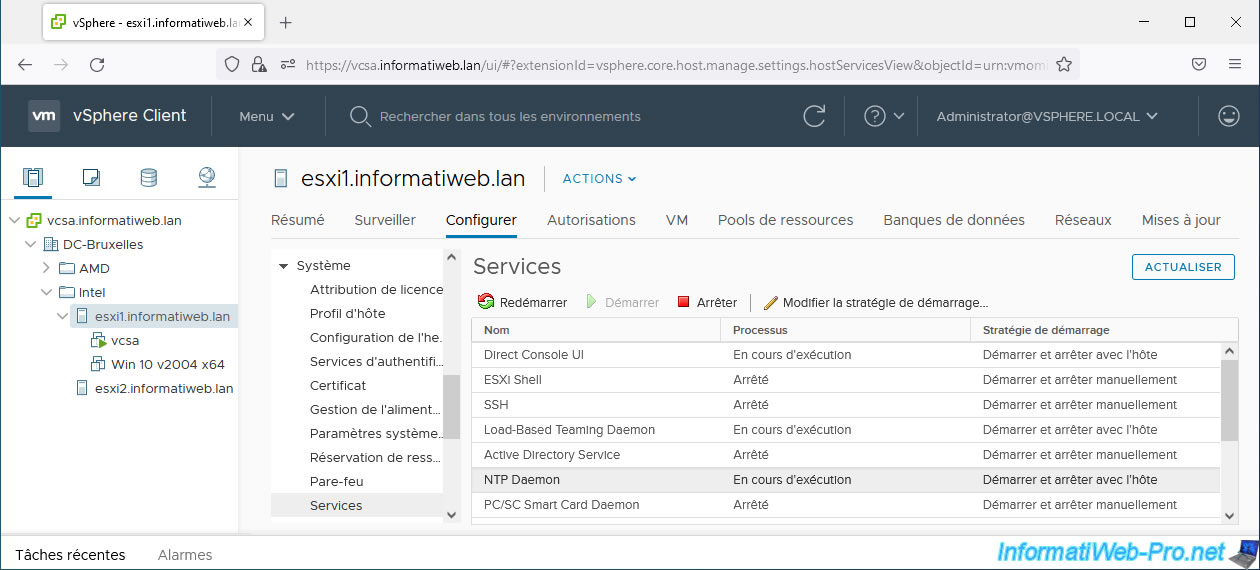
If you go to "Configure -> System -> Services", you will see that your VMware ESXi host's "NTP Daemon" service is running and is configured to start and stop with the host.
2. Change the preferred DNS server of the VMware ESXi host
For your host to find your Active Directory domain, it must use the IP address of your local DNS server as its preferred DNS server.
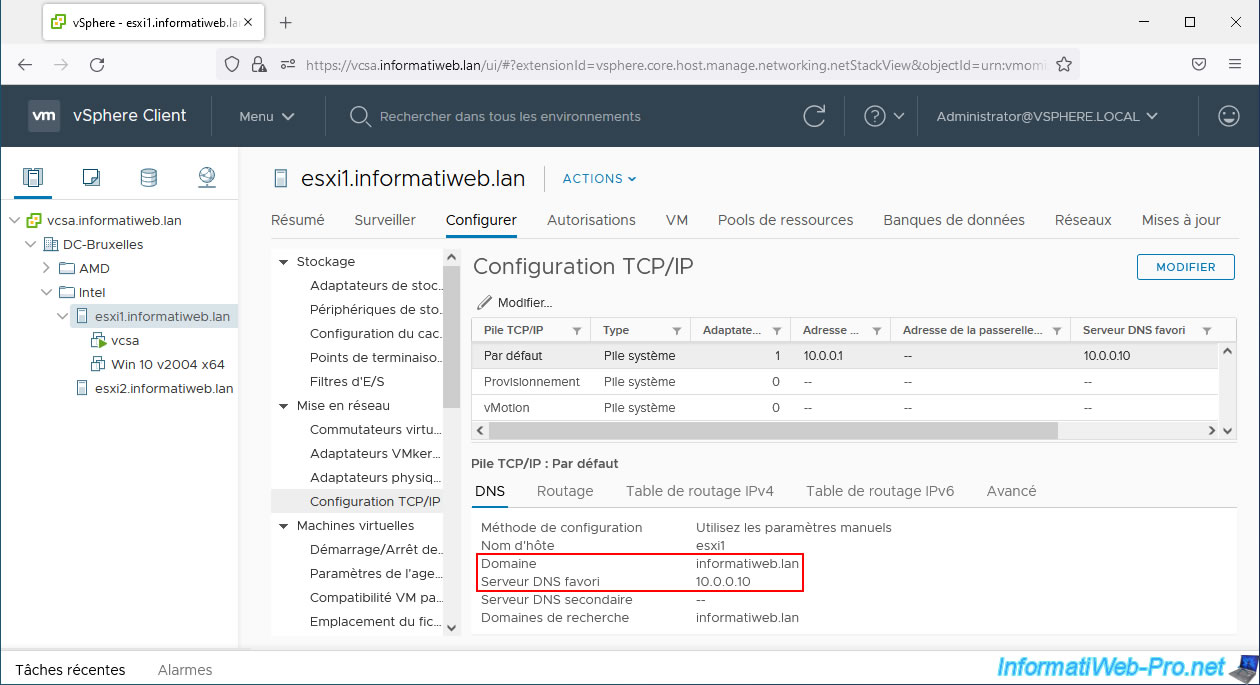
To do this, select your VMware ESXi host and go to "Configure -> Networking -> TCP/IP configuration".
Next, select the "Default" TCP/IP stack and verify that:
- the specified domain matches the Active Directory domain you want to join.
- the preferred DNS server IP address is the IP address of your local DNS server (usually this is the IP address of your Active Directory domain controller).
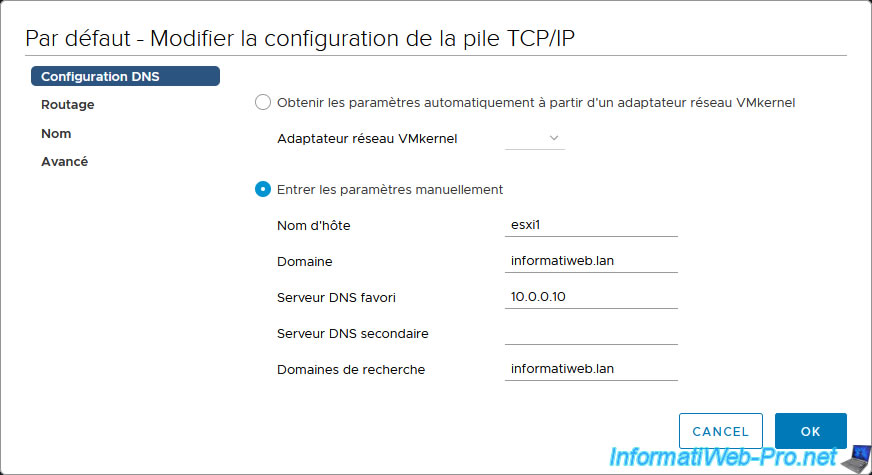
If not, make sure you have selected the "Default" TCP/IP stack and click "Edit".
In the "DNS configuration" section, specify:
- Hostname: the short name of your host (if necessary).
- Domain: the Active Directory domain name you want to join.
- Preferred DNS server: the IP address of your Active Directory domain controller.
- Alternate DNS server: nothing. Useful only if you have multiple local domain controllers for the same Active Directory domain.
This should be the case in businesses, given that at least 2 domain controllers are required per domain and per site for fault tolerance reasons. - Search domains: the Active Directory domain name you want to join.
This resolves the short name to an IP address by attempting to resolve the associated DNS domain name.
For example, resolving the short name "esxi1" with the search domain "informatiweb.lan" is the same as resolving the domain name "esxi1.informatiweb.lan" using the DNS server specified above.
3. Create the “ESX Admins” Active Directory group (optional)
By default, all VMware ESXi hosts are configured to grant administrator rights to the "ESX Admins" Active Directory group (if one exists).
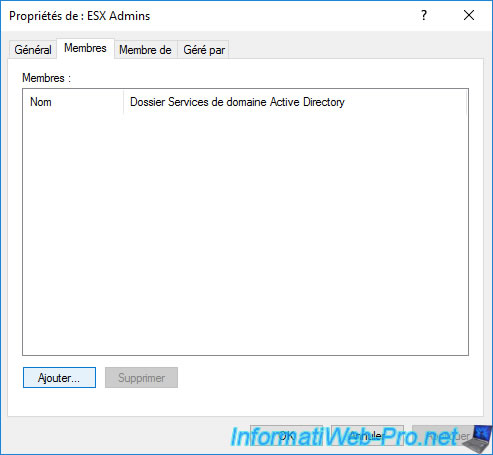
To use this option, launch the "Active Directory Users and Computers" console on your Active Directory domain controller and right-click "New -> Group" on the "Users" folder.
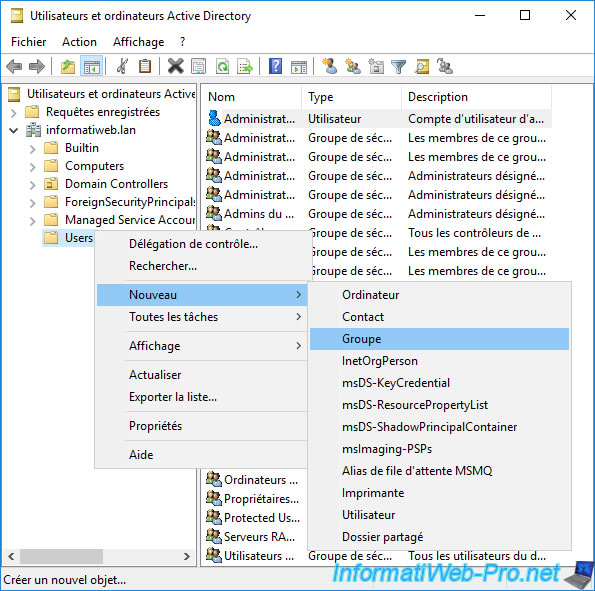
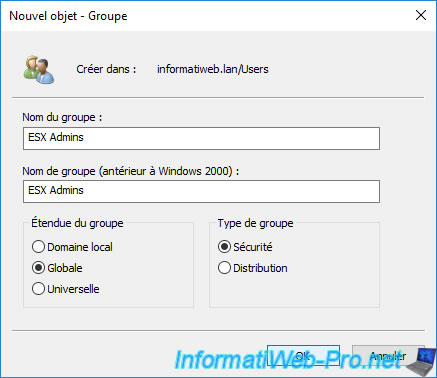
Create a security group named "ESX Admins".
Warning : this name is important. Don't change it.
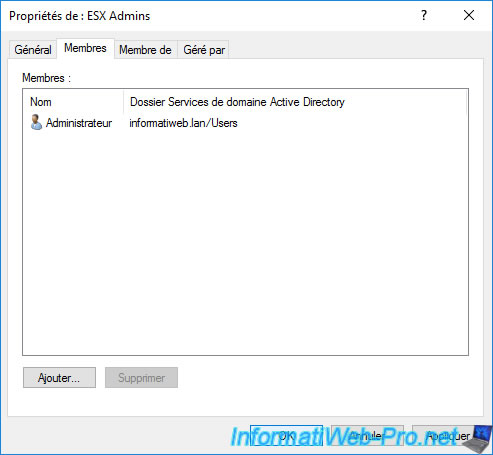
Once this group is created, add the desired Active Directory users to this group.
In our case, we add the Active Directory domain administrator.
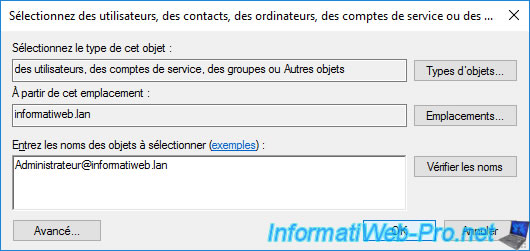
Once the desired users have been added to this group, click OK.
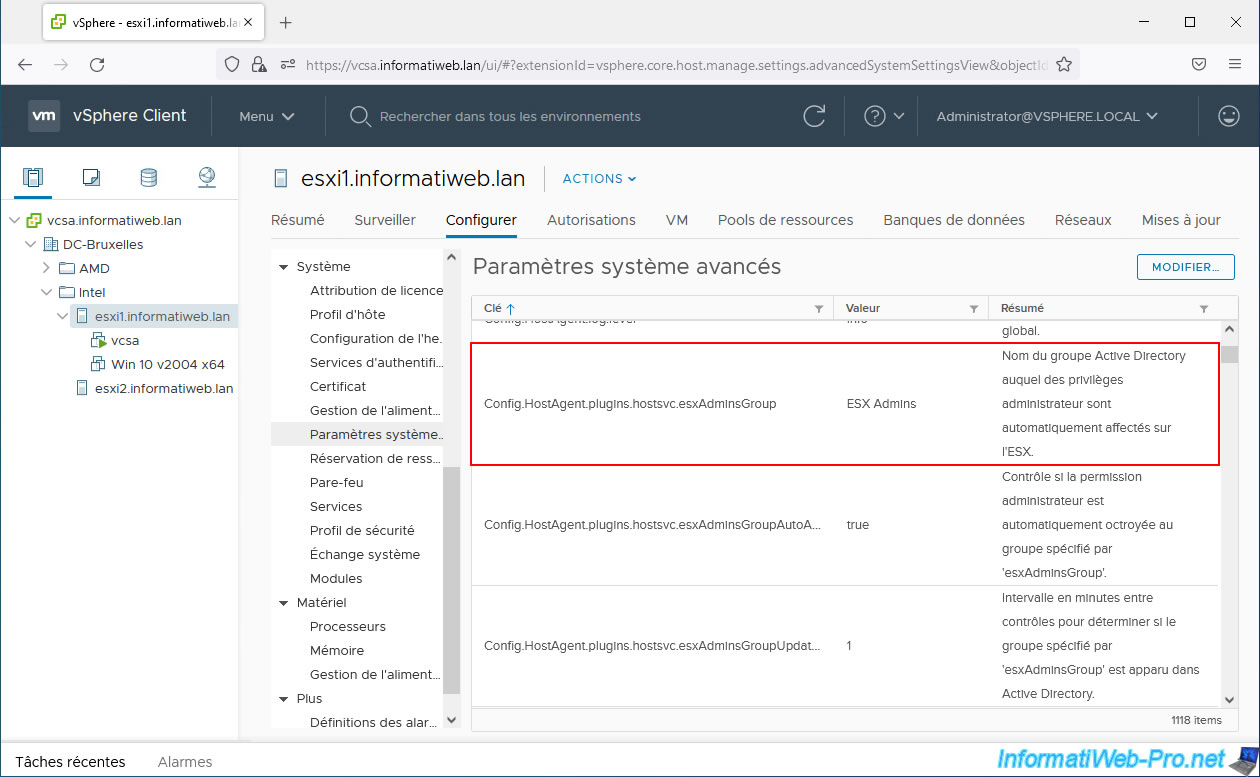
Note that the Active Directory group name is a default found in the advanced settings of your VMware ESXi host.
To see it, select your host and go to: Configure -> System -> Advanced System Settings.
In the long list that appears, you will find in particular the advanced setting "Config.HostAgent.plugins.hostsvc.esxAdminsGroup".
As you can see, the default is "ESX Admins" and this setting is the name of the Active Directory group that is automatically assigned administrator privileges on the ESX.
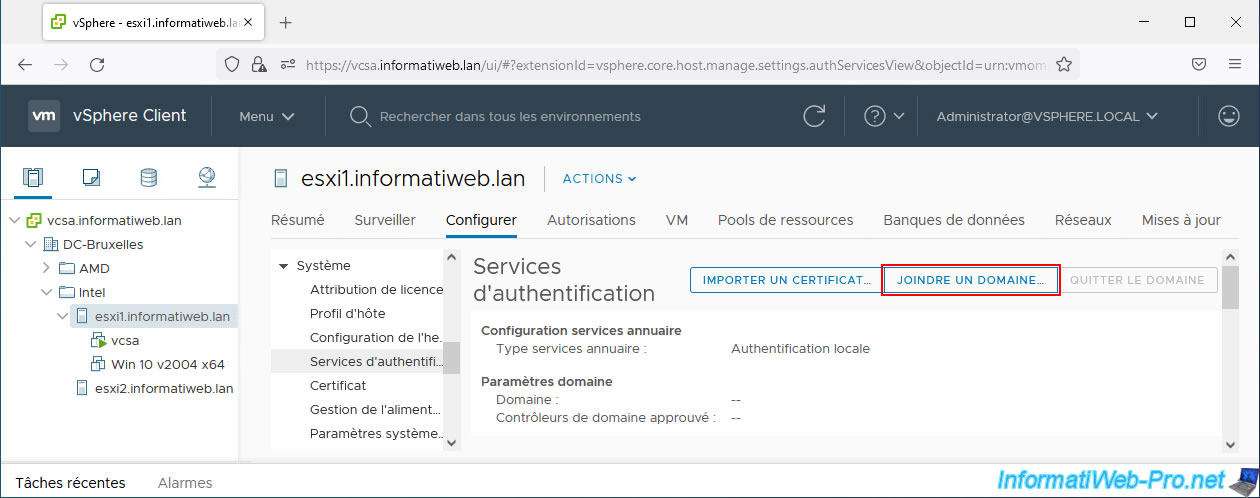
4. Join the VMware ESXi host to your Active Directory domain
Now that your VMware ESXi host is properly configured, go to "Configure -> System -> Authentication Services" and click: Join Domain.
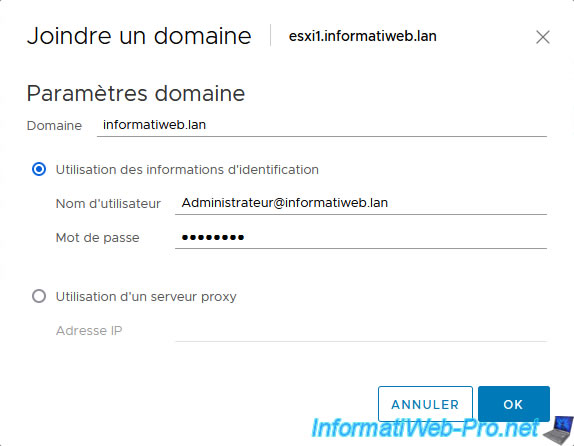
In the "Join Domain" window that appears, enter the Active Directory domain name you want to join and select "Using credentials."
Next, specify the credentials of an account authorized to join machines to your Active Directory domain.
In our case, we will use the domain administrator:
- User name: Administrator@informatiweb.lan.
- Password: his password.
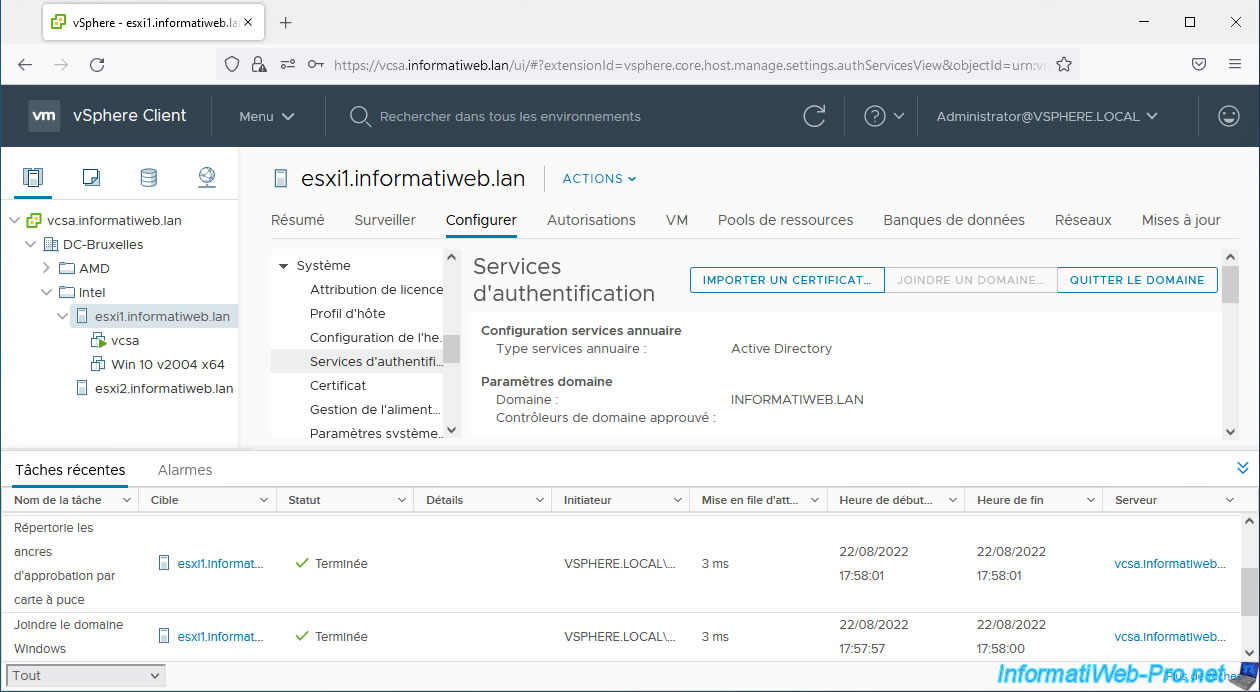
Wait 30 seconds and your server will have joined your Active Directory domain.
You will see your domain name appear in this "Authentication Services" section and you will also see the tasks below appear in recent tasks:
- Lists smart card approval anchors.
- Join the Windows domain.
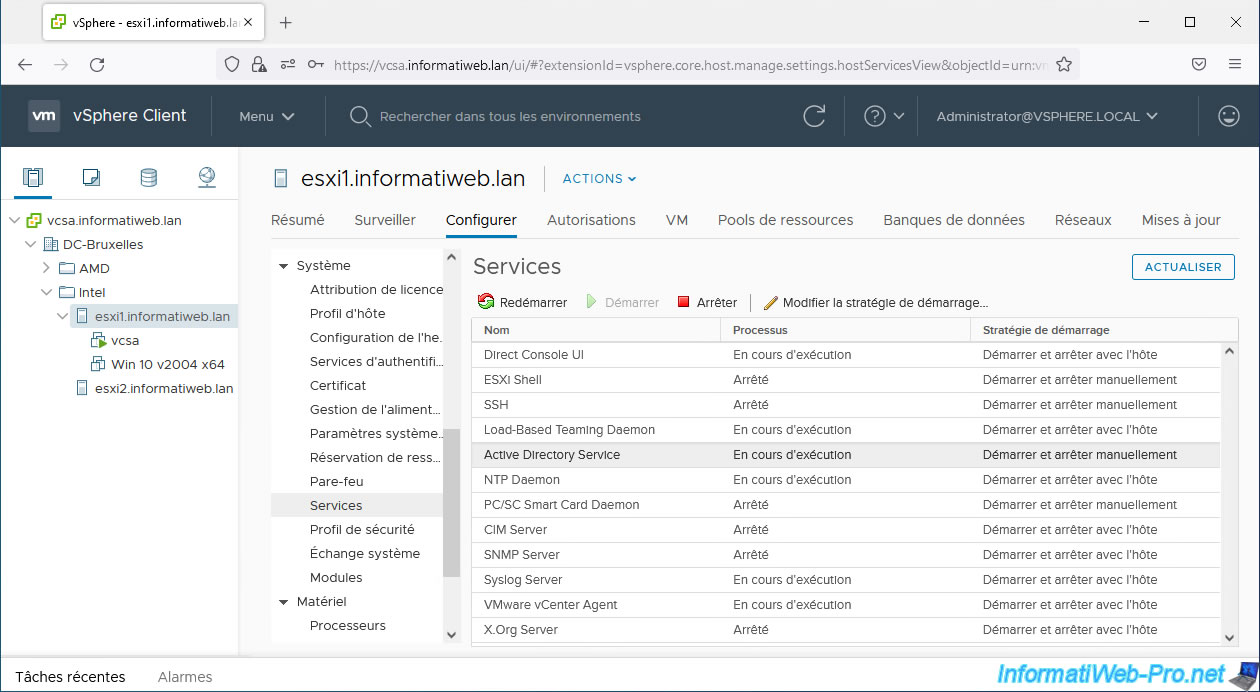
If you go to "Configure -> System -> Services", you will see that the "Active Directory Services" service is running.
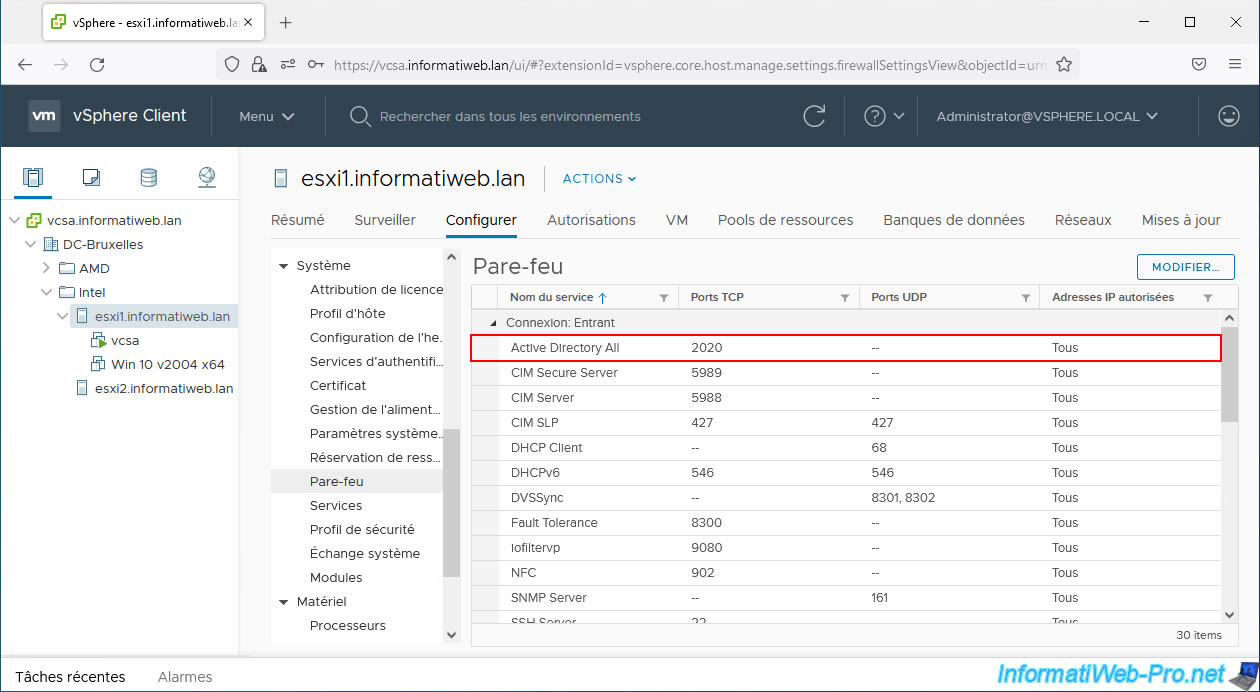
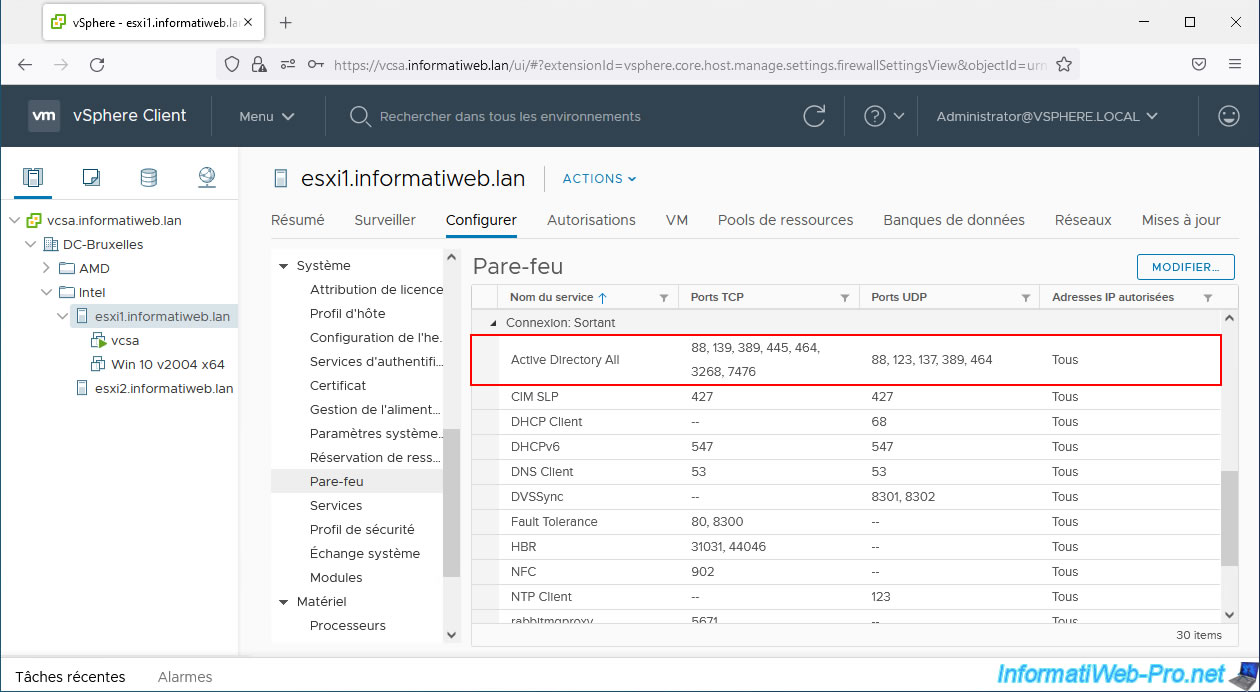
If you go to "Configure -> System -> Firewall", you will be able to find out the ports used by your VMware ESXi host for incoming and outgoing connections with Active Directory.
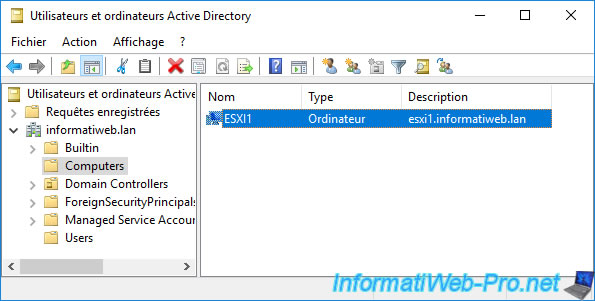
On your Active Directory domain controller, you will see that a new computer object (corresponding to your VMware ESXi host) has been created.
5. Configure permissions for Active Directory users from the VMware ESXi host
From the VMware vSphere Client, you can only manage permissions that refer to users created on your VMware vCenter Server (VCSA).
Because this is the host that you joined to your Active Directory domain, you can only configure permissions for Active Directory users from your VMware ESXi host.
If you want to add Active Directory permissions on VMware vCenter Server (VCSA), it is the VMware vCenter Server (VCSA) server that you must join to your Active Directory domain.
To do this, refer to our tutorial: VMware vSphere 6.7 - Join vCenter Server to an Active Directory domain.
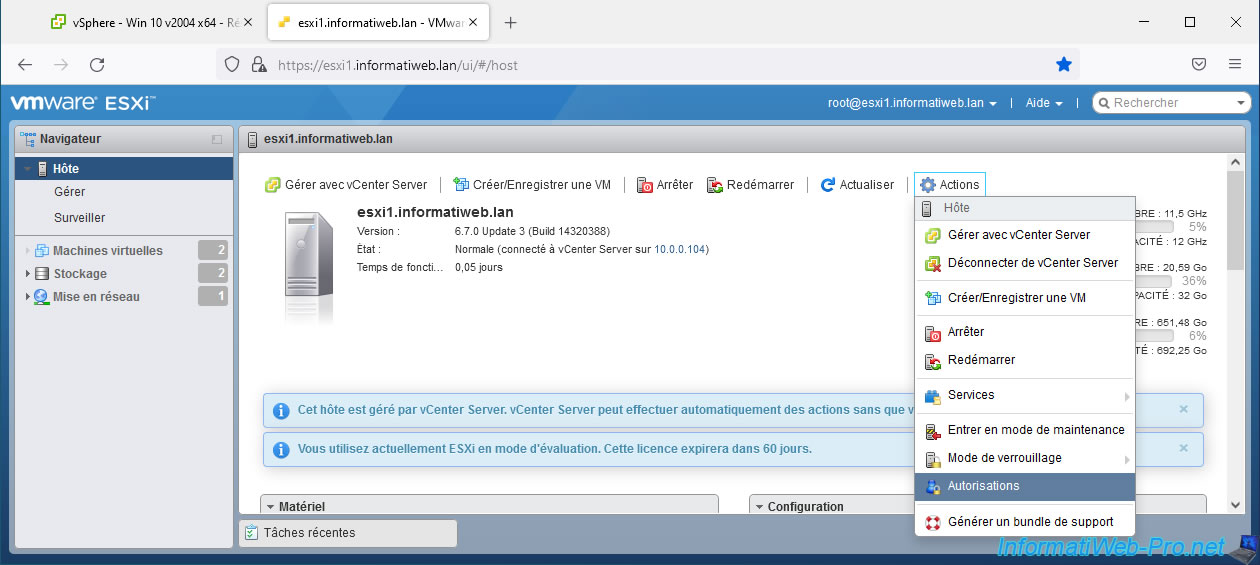
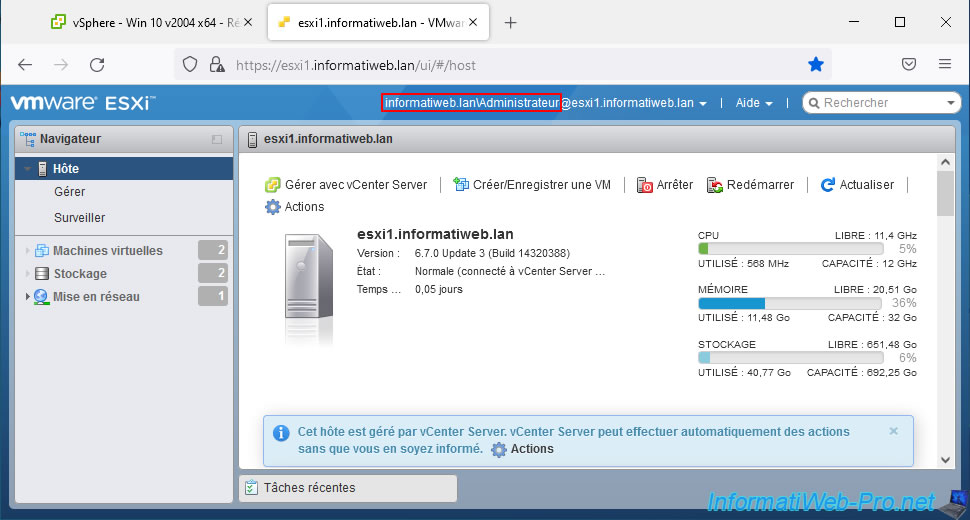
Log in as "root" to the web interface of your VMware ESXi host and go to: Host -> Manage -> Security & users -> Authentication.
As you can see, your VMware ESXi host is joined to your Active Directory domain.

To manage permissions on your VMware ESXi host, go to "Host" and click: Actions -> Permissions.
In the "Manage Permissions" window that appears, you will see the Active Directory group "ESX Admins" appear under the name "[NETBIOS domain name]\esx^admins" with an "Administrator" role (if this group is Active Directory exists).
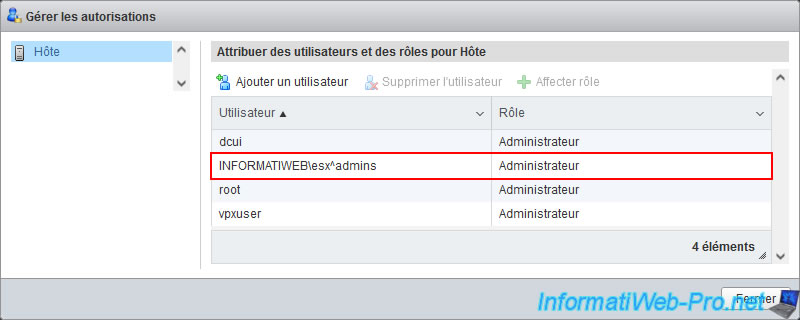
As previously stated, this will allow you to connect to the web interface of your VMware ESXi host with a user account from your Active Directory.
In our case, the domain "Administrator" account joins.
To manage users and permissions on your VMware ESXi host, refer to step "9. Configure permissions for Active Directory (AD) users" in our tutorial for joining a VMware ESXi host to an Active Directory domain.
Share this tutorial
To see also
-
VMware 3/13/2024
VMware ESXi 6.7 - Synchronize the clock of ESXi hosts from a time server (NTP)
-

VMware 3/8/2024
VMware ESXi 6.7 - Synchronize the clock of VCSA from a time server (NTP)
-
VMware 7/31/2024
VMware vSphere 6.7 - Add an Active Directory identity source
-
VMware 5/22/2024
VMware vSphere 6.7 - Change default console
You must be logged in to post a comment