- VMware
- 20 September 2024 at 07:37 UTC
-

- 1/3

Because NFS 3 is not secure, it is recommended to use a dedicated network for NFS-related traffic.
Which means that the gateway and the subnet used will therefore be different. To use a different gateway IP address for NFS traffic, you will therefore need to create a custom TCP/IP stack.
- Create a custom TCP/IP stack for NFS
- Create a VMkernel adapter to use the custom "nfs" TCP/IP stack
- Create the NFS share on your NFS server on Windows Server
- Create an NFS 4.1 datastore with multipath support
1. Create a custom TCP/IP stack for NFS
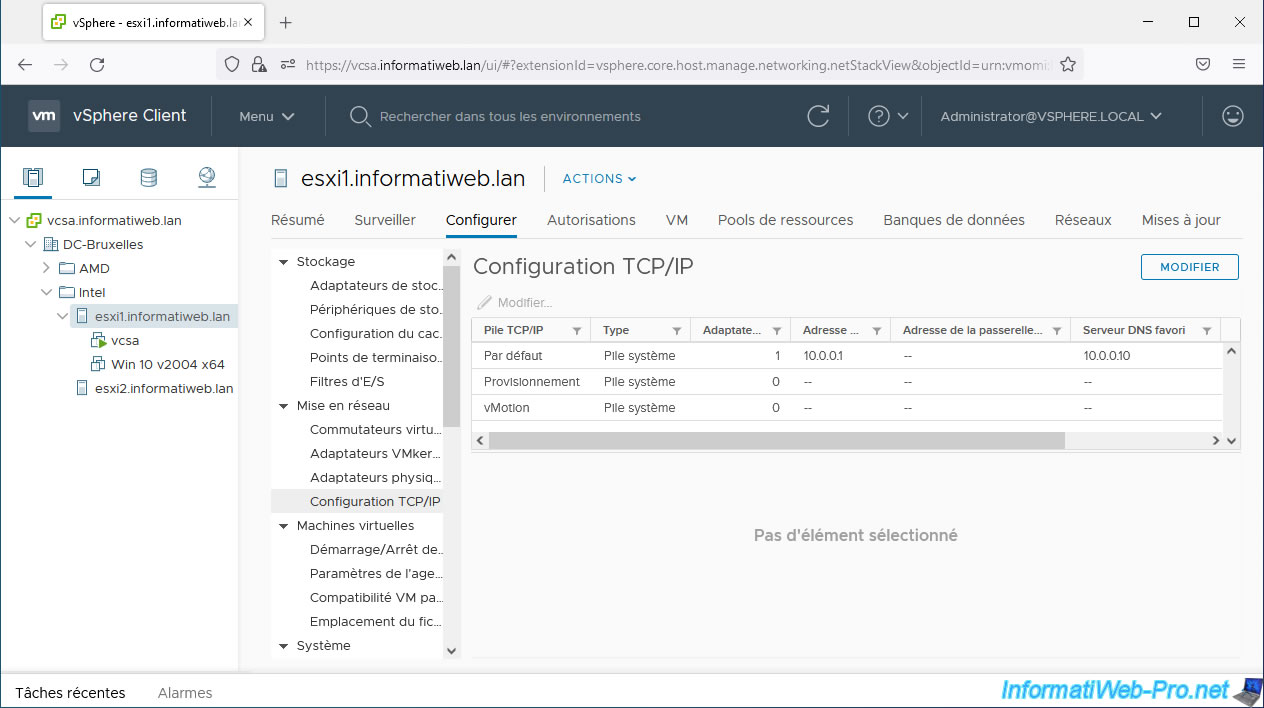
If you select your VMware ESXi host and go to "Configure -> Networking -> TCP/IP configuration", you will see that by default, since VMware vSphere 6.0, there are 3 TCP/IP stacks:
- Default
- Provisioning
- vMotion
However, as noted on the "Create a Custom TCP/IP Stack - VMware Docs" page, it is possible to create custom TCP/IP stacks on a VMware ESXi host from the command line (via SSH).
To get started, go to "Configure -> System -> Services" and start the "SSH" service.

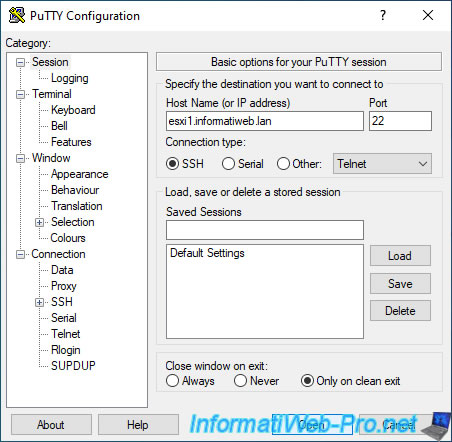
Connect via SSH to your VMware ESXi host using PuTTY.
So that NFS-related traffic can pass correctly through a custom TCP/IP stack, simply use the commands provided by Broadcom in its KB: NFS fails when using custom TCP/IP stack.
Here they are below.
Create a TCP/IP stack named "nfs".
Plain Text
localcli network ip netstack add --netstack=nfs
Dismount existing datastores (if applicable).
Plain Text
localcli storage nfs remove -v volume-name
Stop the NFS service.
Bash
/etc/init.d/nfsgssd stop
Plain Text
watchdog-nfsgssd: Terminating watchdog process with PID 2098037
Waiting for process to terminate...
nfsgssd stopped
Unload the NFS modules: nfs41client, nfsclient and sunrpc.
Plain Text
vmkload_mod -u nfs41client
Plain Text
Module nfs41client successfully unloaded
Plain Text
vmkload_mod -u nfsclient
Plain Text
Module nfsclient successfully unloaded
Plain Text
vmkload_mod -u sunrpc
Plain Text
Module sunrpc successfully unloaded
Configure the "sunrpc" module to use the custom TCP/IP stack you just created.
Plain Text
localcli system module parameters set -m sunrpc -p netstackName=nfs
Reload the NFS modules.
Plain Text
localcli system module load -m sunrpc
localcli system module load -m nfsclient
localcli system module load -m nfs41client
Start the NFS service.
Bash
/etc/init.d/nfsgssd start
Plain Text
nfsgssd started
For the custom TCP/IP "nfs" stack you just created to appear, you must restart your ESXi host.
Warning : if your "vcsa" VM is on this host, first migrate this VM to another host to maintain access to vCenter or shut down all VMs on your host (if you are in a test environment) before to restart your VMware ESXi host.
Bash
reboot
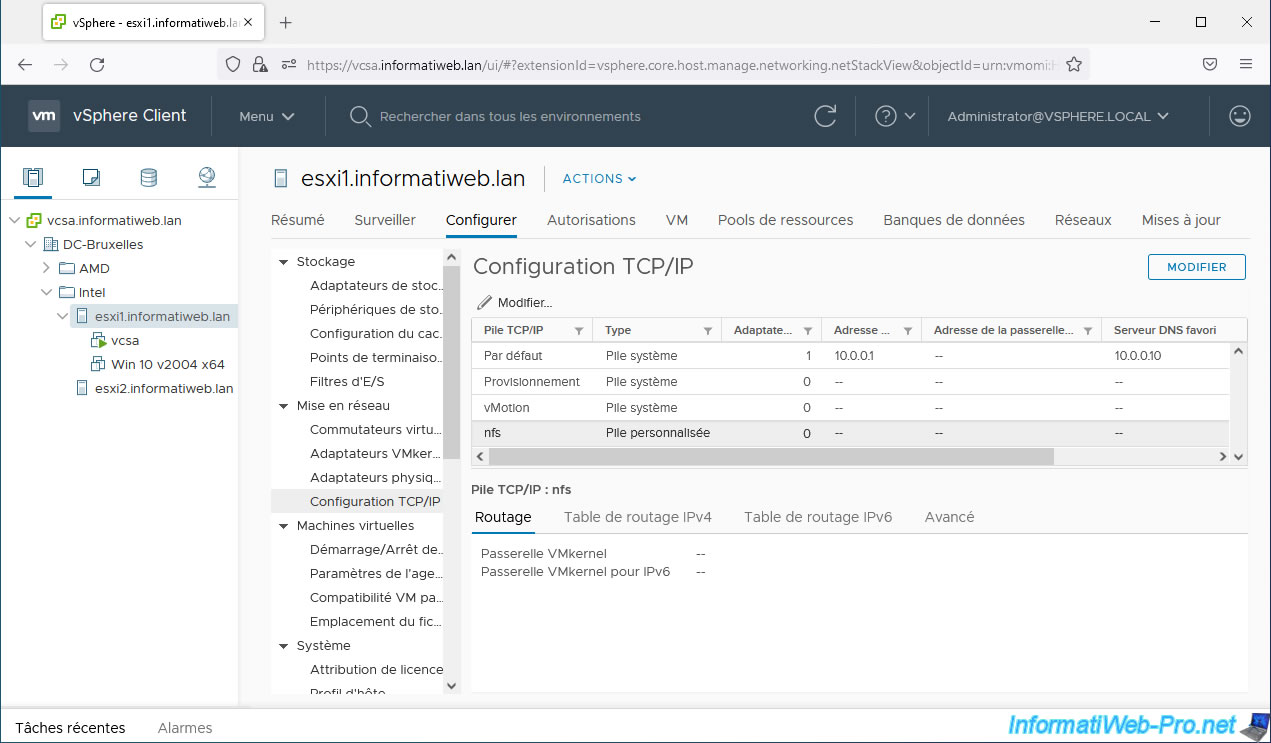
Once the VMware ESXi host restarts, you will see a new custom TCP/IP stack "nfs" appear.
2. Create a VMkernel adapter to use the custom "nfs" TCP/IP stack
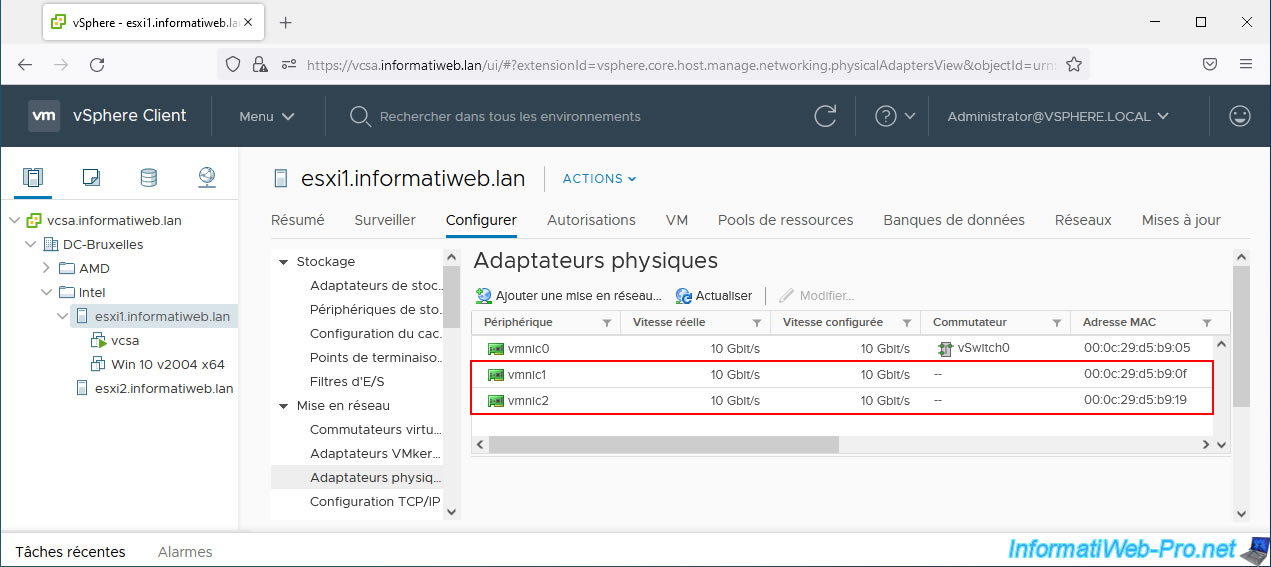
For NFS-related traffic, we added 2 physical network cards to our host to comply with VMware recommendations.
Source : NFS & iSCSI Multipathing in vSphere - VMware.
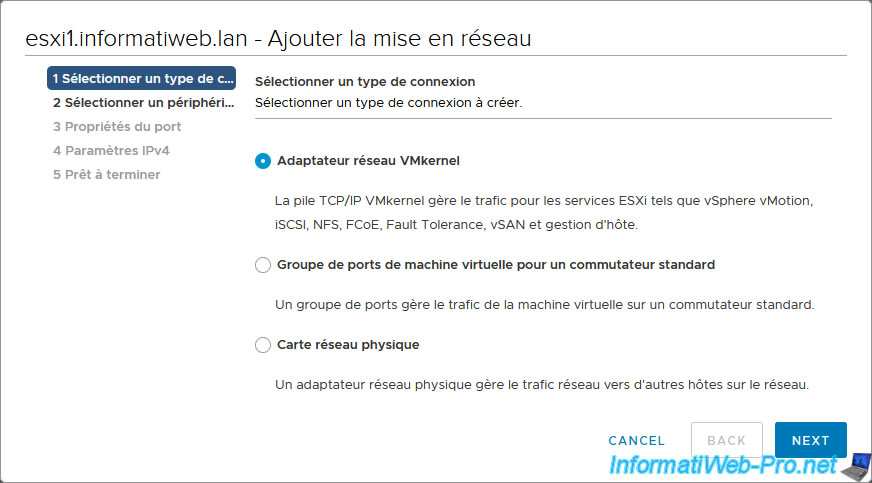
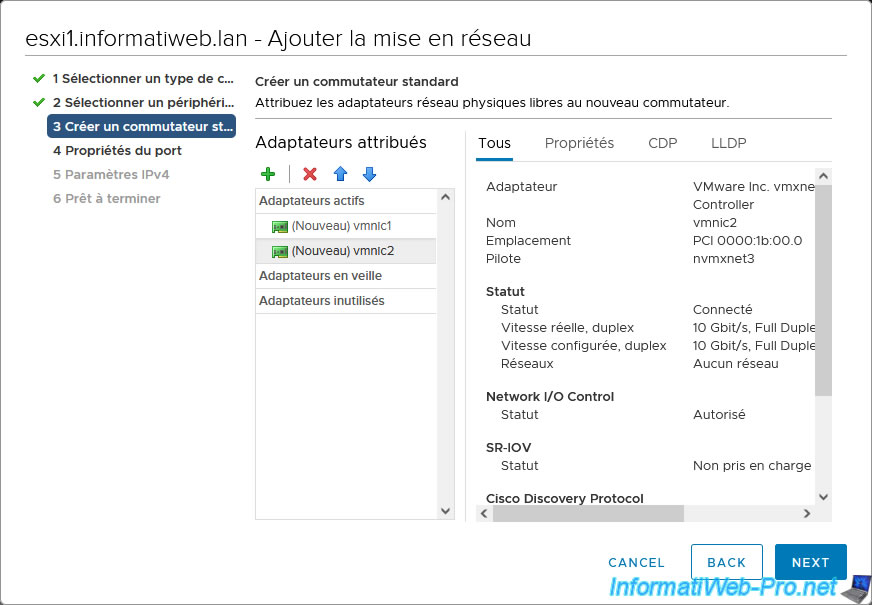
Go to "Configure -> Networking -> VMkernel adapters" and click: Add Networking.
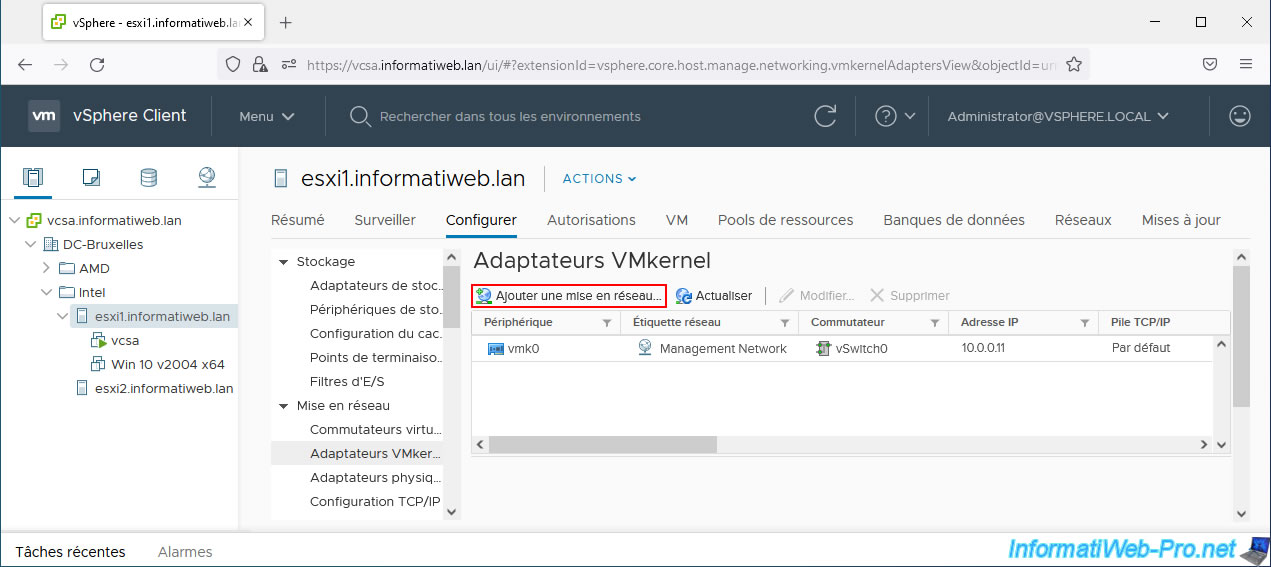
Select: VMkernel Network Adapter.
Select "New Standard Switch" and leave the MTU shown as default which is the one set on all virtual and physical switches.

Click the "+" icon to add a physical adapter (physical network card) to your future virtual switch.
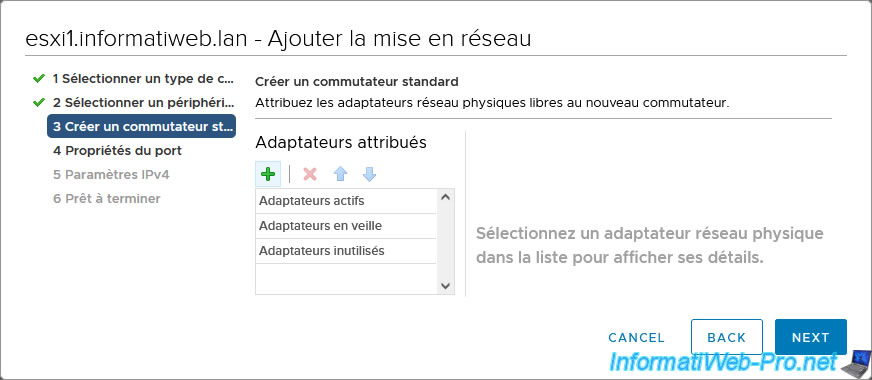
Select one of your free physical adapters and click OK.
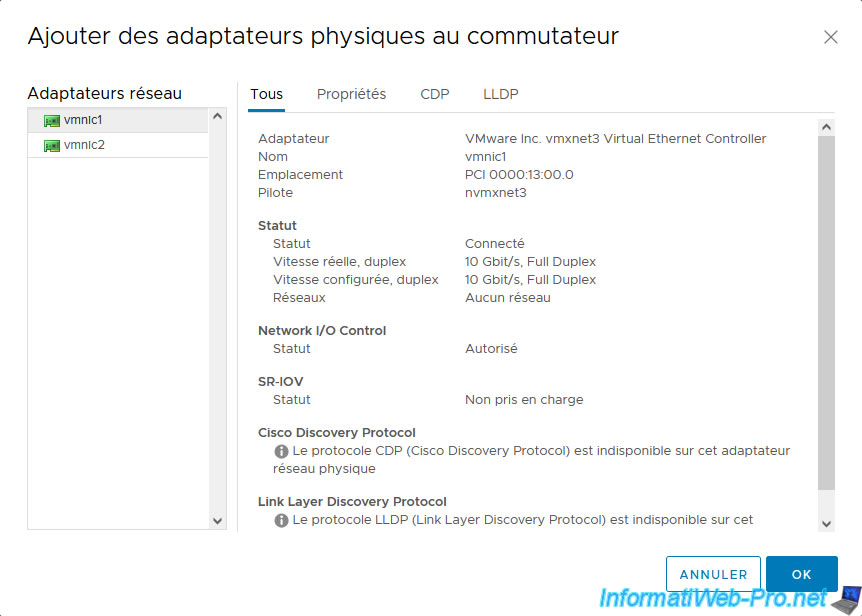
In our case, we added our 2 new physical network cards.
Click Next.
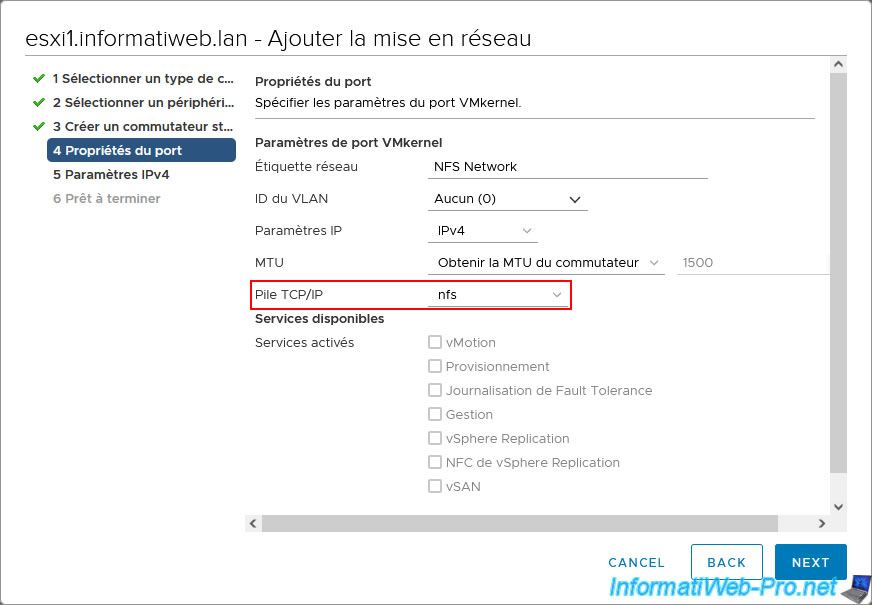
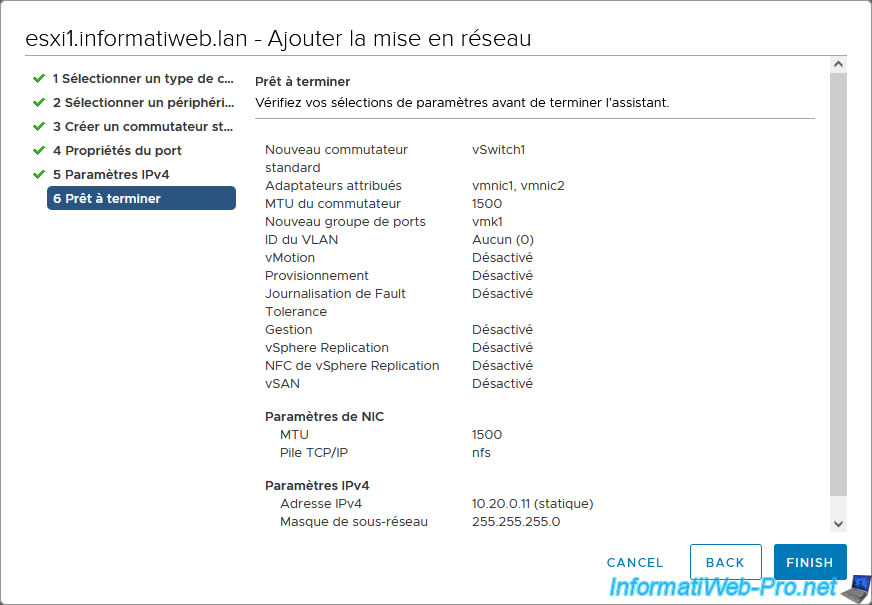
Specify "NFS Network" as the network label and select the "nfs" TCP/IP stack you created earlier.
For enabled services, there is no need to check a box here. Moreover, these are automatically grayed out in this case.
Source : Solved: Which VMKernel port does NFS use - Management? - VMware Technology Network VMTN.
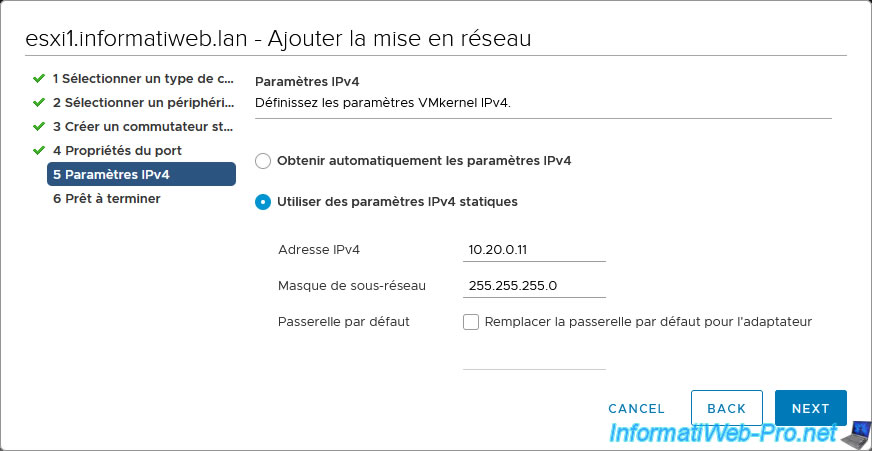
Select "Use static IPv4 settings" to manually set an IP configuration for this VMkernel adapter.
In our case, it is a separate subnetwork using a physical switch and where there is no gateway.
Specify:
- IPv4 address: the IPv4 address to set for this VMkernel adapter on this subnet.
- Subnet mask: the subnet mask used on this subnet.
In our case, we use the subnet mask "255.255.255.0". Which means that the networks "10.0.0.x" and "10.20.0.x" are 2 different networks. - Default gateway: if there is a gateway on this network, check the box "Override default gateway for adapter" and provide its IP address here.
By default, there is no gateway defined on a custom TCP/IP stack.
A summary of the network configuration to be created appears.
Click Finish.
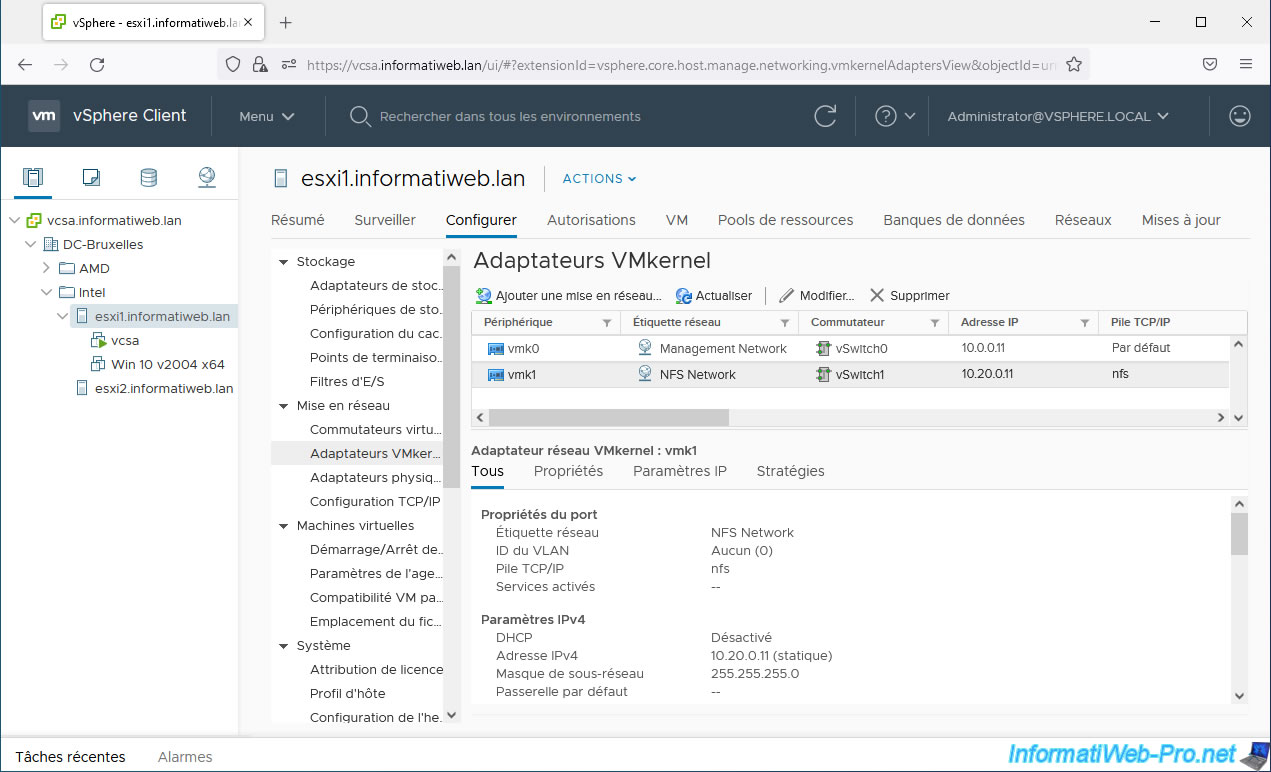
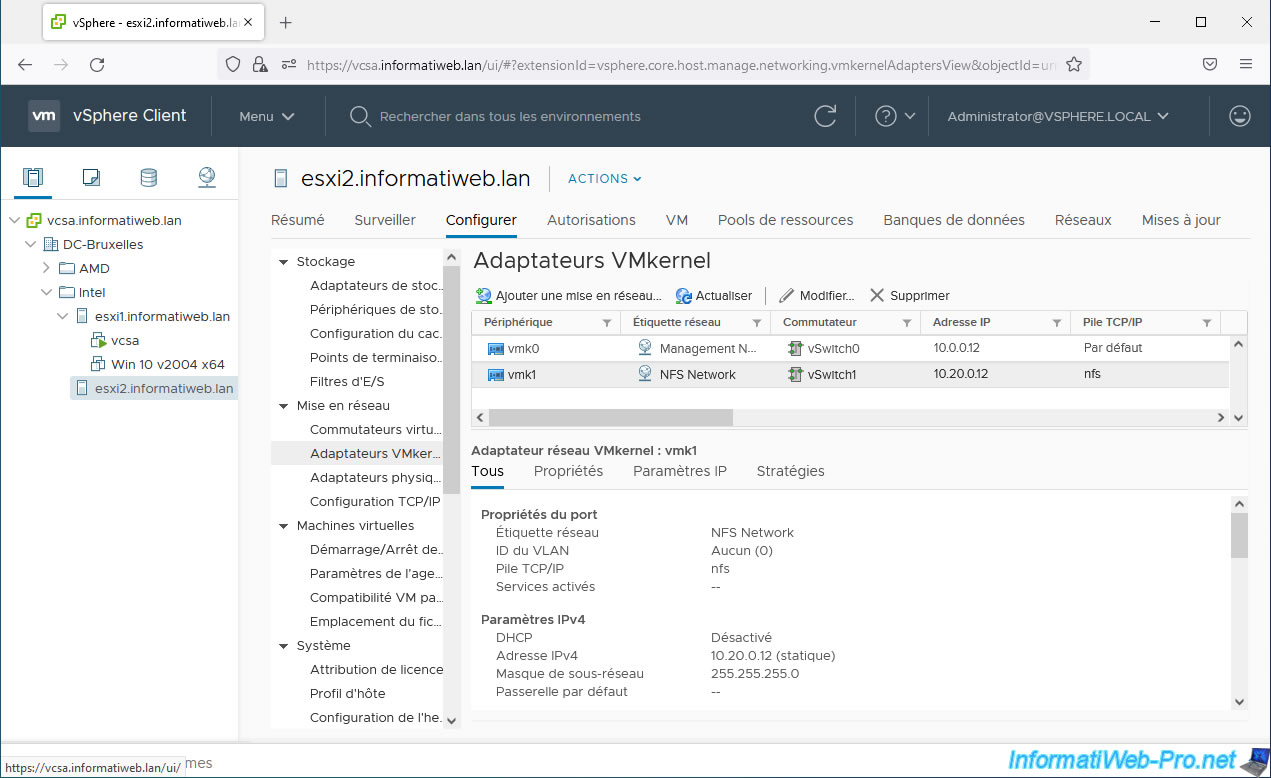
The desired VMkernel adapter appears.
As you can see, it has a single IP address and it uses your new "nfs" TCP/IP stack.
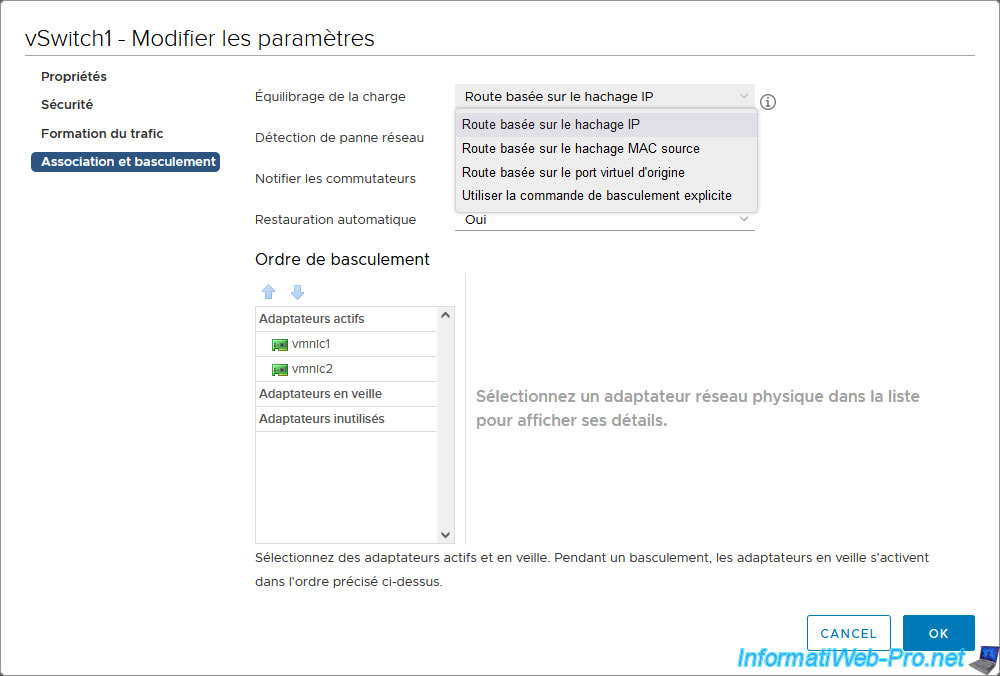
If you go to the "Policies" tab of this new VMkernel adapter, you will see that the load balancing policy used by default is: Route based on originating virtual port.
However, VMware recommends another (as indicated on the VMware page cited above).
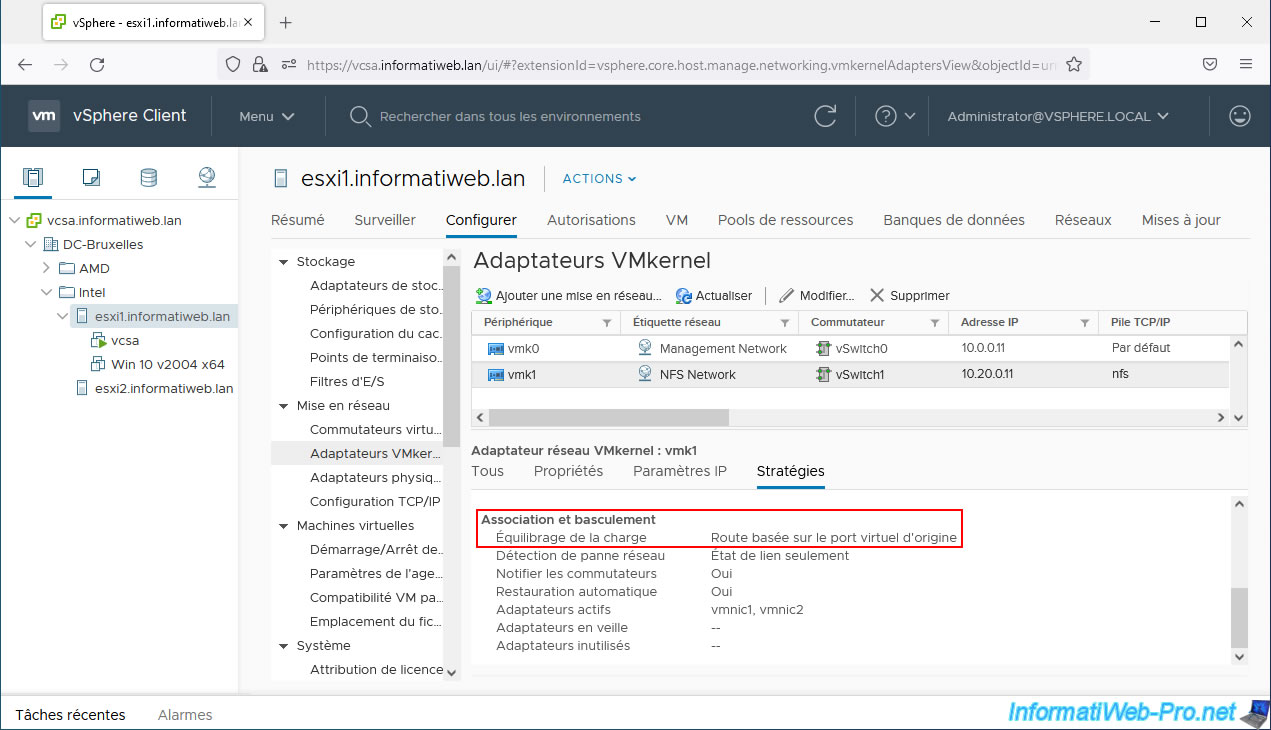
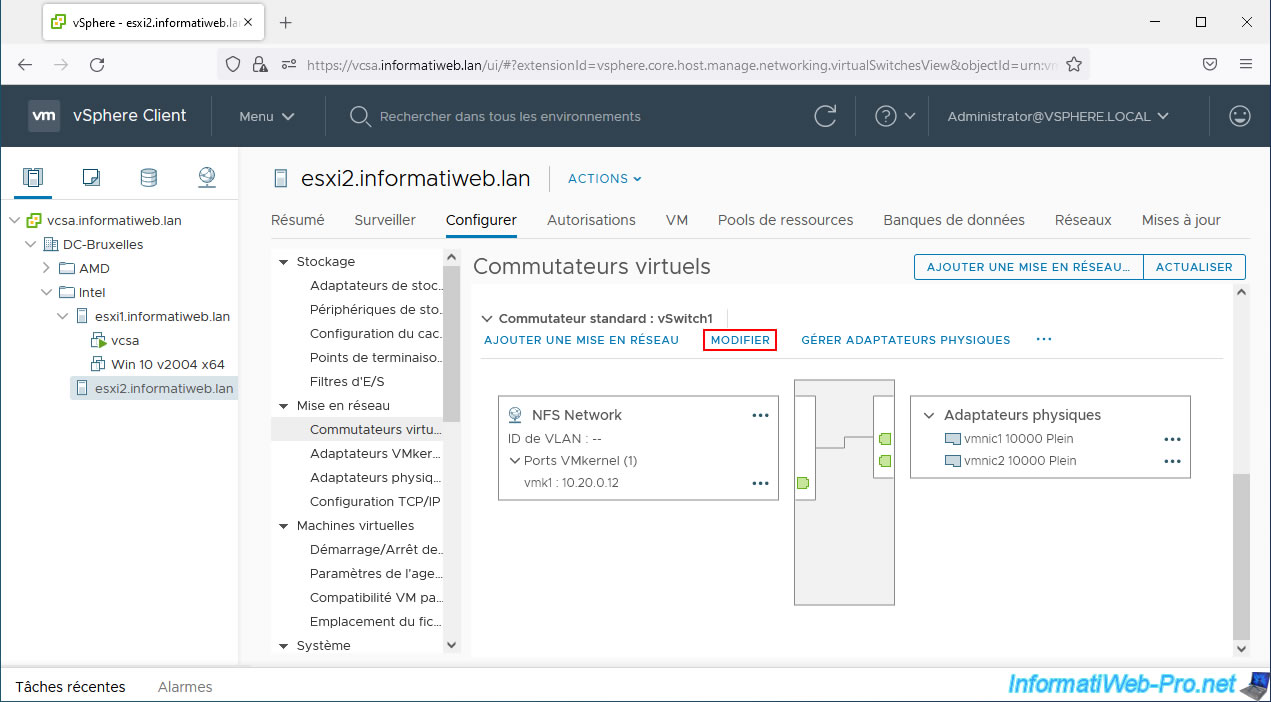
To change the load balancing policy, you need to go to "Configure -> Networking -> Virtual switches" and click on the "Edit" link of your new virtual switch (in our case: vSwitch1).
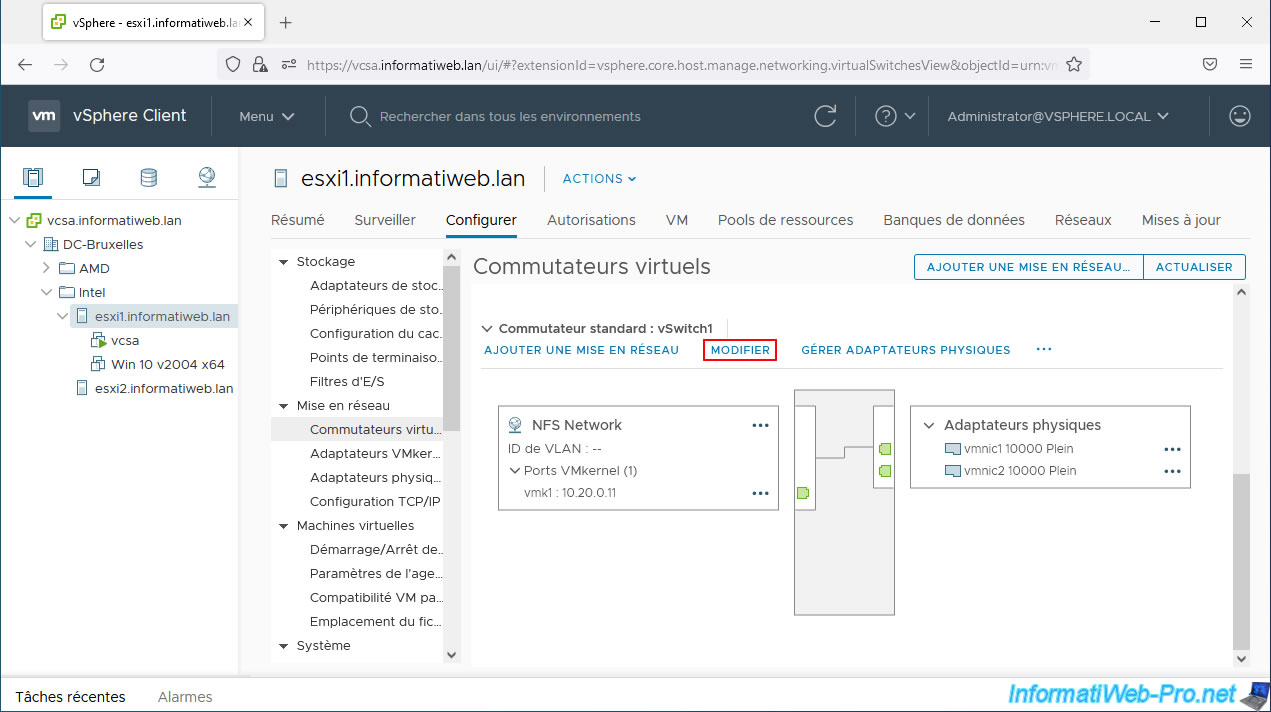
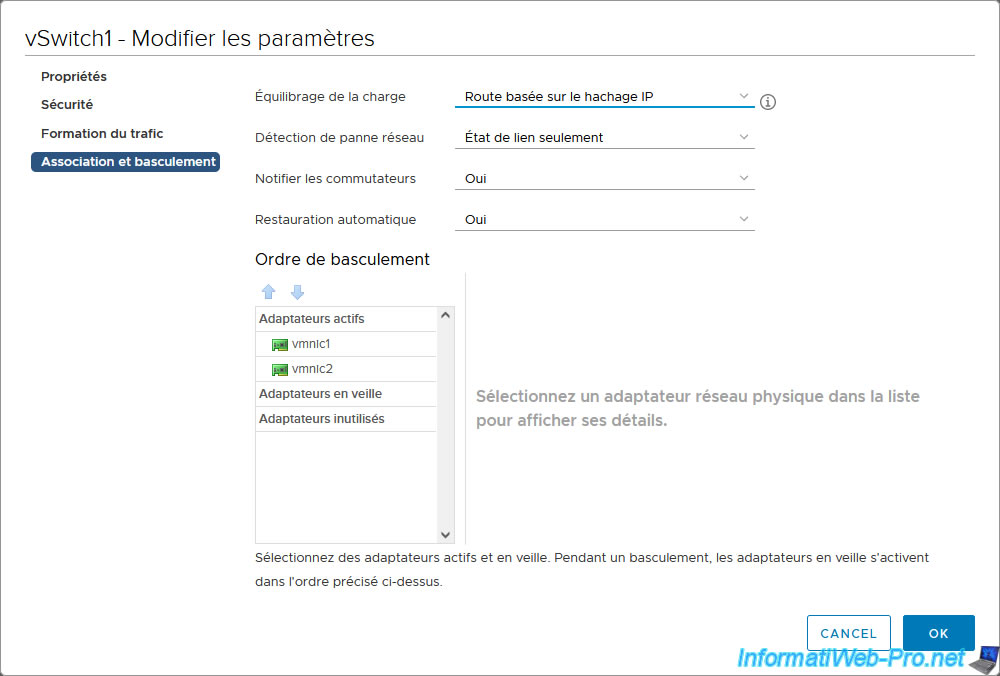
In the "Teaming and failover" section, select the "Route based on IP hash" load balancing policy and click OK.
Don't forget to do the same on your other VMware ESXi hosts if you also want to mount NFS datastores on them.
The important thing is that they have access to the same subnet and that the IP address matches that subnet.
Warning : don't forget to modify the load balancing policy also on the new virtual switch of these hosts if you want to use NFS datastores on them as well.
Again, select the "Route based on IP hash" load balancing policy in the "Teaming and failover" section of this virtual switch.
Share this tutorial
To see also
-

VMware 5/15/2024
VMware vSphere 6.7 - Add a physical disk to host
-

VMware 9/27/2024
VMware vSphere 6.7 - Array integration APIs (VAAI)
-

VMware 9/6/2024
VMware vSphere 6.7 - Configure port binding (iSCSI traffic)
-

VMware 6/13/2024
VMware vSphere 6.7 - Configure Virtual Flash (SSD cache)
You must be logged in to post a comment