- VMware
- 17 February 2023 at 12:16 UTC
-

- 1/2

With the VMware ESXi hypervisor, you can virtualize many operating systems and create complete virtual machines.
Indeed, VMware ESXi offers many options to add virtual or physical hardware to your virtual machines, as well as to configure the boot mode of this one (BIOS / EFI) or other advanced options (in particular via the vmx configuration options).
In this article, we will introduce you to all the options available for these virtual machines on VMware ESXi, as well as explain what they are used for.
1. Virtual Hardware
When you create or modify a virtual machine, you will be able to configure its virtual hardware.
However, note that when the virtual machine is powered on (started), some options and components of the virtual hardware can't be changed.
For this article, we used a virtual machine in Windows 10.
Note : if the guest operating system is different in your case, it's possible that some components of its virtual hardware are not displayed by default or that they are configured differently.
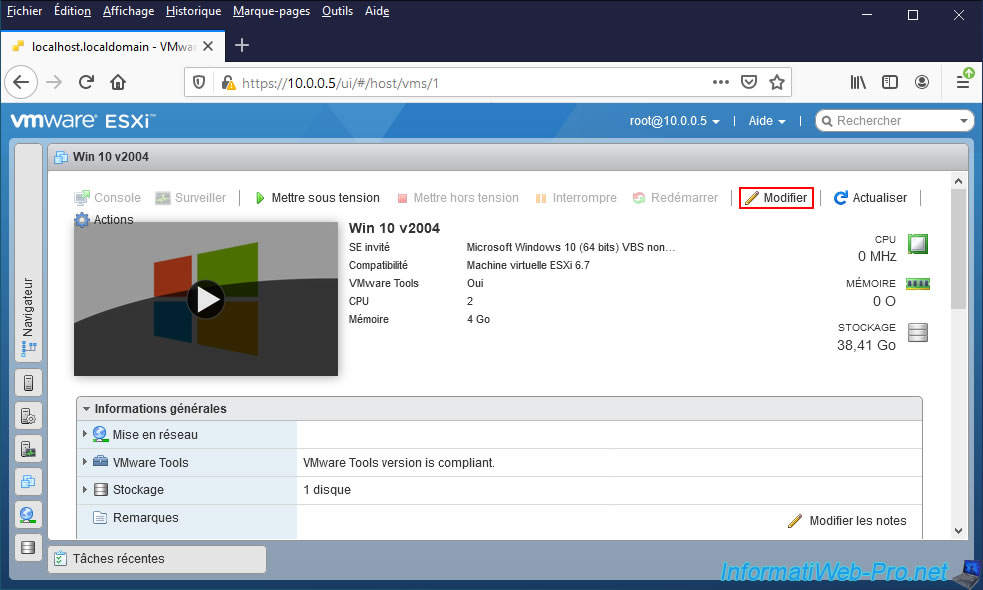
In the "Virtual Hardware" section, you will find the virtual hardware currently used by this virtual machine, as well as 3 options to add virtual or physical hardware to it.
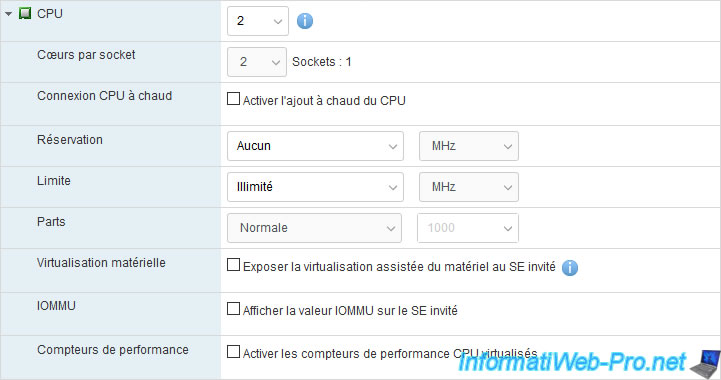
1.1. CPU (processor)
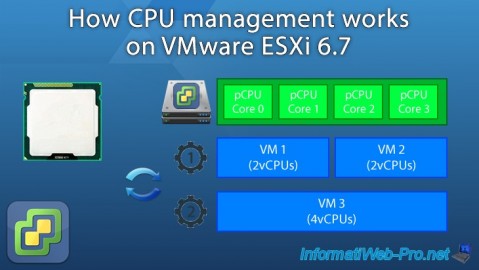
When the "CPU" section is reduced, the number you specify will define the number of processors (or processor cores) allocated to this virtual machine, but these will be seen by default as virtual processors and not as processor cores by the guest operating system.
Once this "CPU" section is deployed, you can also configure the number of cores per socket (which depends on the 1st "CPU" setting).
For the allocation of processors and/or processor cores to your virtual machine, you will find the following settings :
- CPU : number of logical cores to allocate to this virtual machine.
Note that with hyperthreading, the number of logical cores available is doubled compared to the number of physical cores available on your processor (if it supports this technology). - Cores per Socket : allows you to configure the way in which the processor cores will be seen by the operating system.
You can therefore easily simulate a virtual processor with several cores, or several virtual processors with several cores each or several virtual processors with a single core each.
While it doesn't really matter for performance, it can allow you to validate a prerequisite when testing specific software or specific business solutions.
On the other hand, be aware that some operating systems can support the use of several cores, but not the use of many virtual processors.
For example, if the guest operating system is "Windows 10", the use of a virtual processor with 4 cores is supported. But, not the use of 4 virtual processors with one core each.
It's therefore preferable to use a single virtual processor with several cores, rather than the other way around. Unless it's a prerequisite requested by the guest operating system or the application that you want to virtualize. - CPU Hot Plug : allows you to hot add virtual processors to your virtual machine. So, without having to restart it.
However, this requires some prerequisites, including the fact that the VMware Tools are installed in the guest operating system and that the latter supports hot-add CPU.
If you want to use this possibility, check the "Enable CPU Hot Add" box. - Reservation : allows you to reserve a part of the physical processor (or more precisely of its frequency) for this virtual machine to ensure that this one will be able to use at least a specific number of MHz or GHz.
- Limit : allows you to limit the use of the processor by this virtual machine. By default, the limit is imposed by the number of logical processor cores assigned to this one.
But, you can also indicate here a lower limit so that the virtual machine is constrained transparently. However, don't misuse this option in business. - Shares : allows you to configure the relative importance for the sharing of resources (in this case, the processor). The available values are: low (500), normal (1000) and high (2000).
For example, if VM1 is configured on "High (2000)" and VM2 is configured on "Normal (1000)", this VM1 can therefore use double the resources compared to VM2 if these 2 virtual machines would compete to use the CPU resources of your VMware ESXi hypervisor. - Hardware virtualization : if you want to virtualize a hypervisor (such as VMware ESXi or another concurrent hypervisor), check the "Expose hardware assisted virtualization to the guest OS" box will allow the virtual machine to use processor virtualization (Intel VT-x / AMD-V).
- IOMMU : when you want to test some professional solutions in a virtual machine, the activation of the IOMMU (at AMD) or its equivalent Intel VT-d may be advised or required. This is particularly the case with Citrix XenServer which needs the IOMMU when you want to virtualize Windows virtual machines.
In this case, you will need to check the " Expose IOMMU to the guest OS" box. - Performance counters : allows developers to optimize the performance of their software through profiling programs that they install in the virtual machine.
However, once this option is enabled, this virtual machine can no longer be used on an EVC (Enhanced vMotion Compatibility) cluster. To fix the problem, you will need to disable this option. - Scheduling Affinity : lets you specify the physical processor cores that this virtual machine should use.
You can do this by specifying a range of hearts (for example : 0-3) or the number of each heart (for example : 0, 2, 4).
Small quick example : to allocate 1 virtual processor with 2 cores to your virtual machine, you will have to specify :
- CPU : 2
- Cores per socket : 2. Which will display "Sockets : 1" on the right.
As a reminder, the "Cores per socket" setting is linked to the 1st "CPU" setting. So, the more you allocate logical processor cores (CPU) of the physical processor, the more cores you will be able to assign per virtual processor (Cores per Socket).
1.2. Memory (RAM)
In the "Memory" section, you can define :
- RAM : the maximum amount of random access memory (RAM) that this virtual machine can use.
- Reservation : allows you to reserve a minimum amount of RAM or all of the memory defined just above to ensure that this virtual machine will be able to use at least the amount of RAM you want.
Note that if you want to use technologies such as PCI passthrough or GPU passthrough, you will have to reserve all the RAM allocated to it to be able to start it.
In this case, check the "Reserve all guest memory (All locked)" box.
Warning : if the amount of RAM indicated as reservation here is not currently available on your VMware ESXi hypervisor, the virtual machine will not be able to start.
In addition, this amount of RAM will be reserved for this virtual machine and therefore CAN'T be used by other virtual machines (which might need more than it at any given time). - Limit : allows you to limit the use of RAM by this virtual machine. By default, the maximum amount of RAM that your virtual machine can use is limited by the "RAM" setting.
However, if you specify a lower limit here, this virtual machine will be transparently restricted.
That is, if you allocate 4 GB of RAM (via the 1st setting) and set a limit to 2 GB of RAM, the user will see in the task manager that it has 4 GB of RAM, but the operating system will not be able to use more than 2 GB of RAM.
Again, avoid misusing this setting in business. - Parts : as for the "CPU" section, this allows you to define a relative importance for the sharing of the RAM when 2 virtual machines compete to use the resources of your VMware ESXi hypervisor.
- Memory Hot Plug : allows you to hot add random access memory (RAM) to your virtual machine.
However, this requires that the operating system supports this feature and that VMware Tools are installed in it.

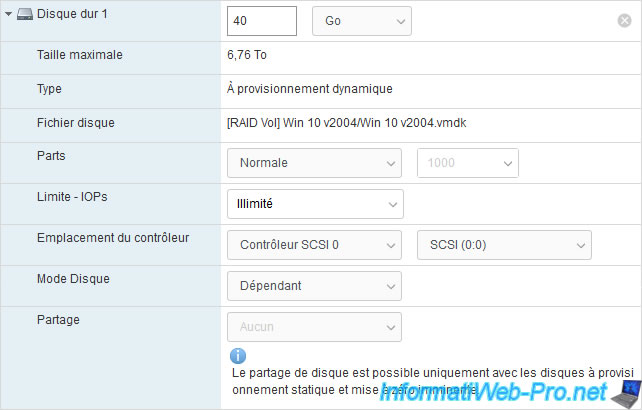
1.3. Hard disk (virtual)
For each virtual hard drive, you will be able to :
- Hard disk X : specify the maximum size of this one
- Maximum Size : indicates what is the maximum size that you can specify for this one taking into account the free space available on your hypervisor.
- Type (Disk Provisioning) : indicates how it's provisioned or allows you to choose how it will be provisioned (when creating this one)
- Thin provisioned : the virtual hard disk file will only grow as large as is necessary for the data on it. This saves disk space, speeds up the creation of the virtual hard disk file (since no block will be zeroed beforehand and it may grow larger as you store data from the guest operating system.
- Thick provisioned, lazily zeroed : the desired size for this virtual hard disk is reserved directly for the creation of this one. This means that if you create a 40 GB virtual hard disk, it will always take 40 GB, even if it's empty or almost empty.
In the case of this "lazily zeroed" option, this means that the blocks reserved on the physical disk will not be zeroed directly, but only during the first write by the virtual machine.
However, the operating system will not have access to old data on the physical disk affected by blocks that have not yet been zeroed. - Thick provisioned, eagerly zeroed : as with the previous option, the desired size for this virtual hard disk will be reserved when it's created.
However, the main difference with this "eagerly zeroed" option is the zeroing of the affected blocks on the physical disk.
In this case, the blocks reserved for the creation of this virtual hard disk will be zeroed directly during the creation of this one. This will lengthen the time needed for the creation of this one, as well as in the event that you wish to enlarge it in the future.
- Disk File : indicates the location (relative path) where this virtual hard disk file is stored, as well as its file name. The name in square brackets corresponds to the name of the datastore where it's located.
- Location : when creating a virtual hard disk, this option allows you to choose the location (datastore and folder) where it will be stored.
- Shares : allows you to manage the priority at the input/output (I/O) level at the hard disk level thanks to a relative importance compared to the other virtual machines of your VMware ESXi hypervisor.
As with the use of the processor (CPU) or random access memory (RAM), you can choose a preset value (low, normal or high) or choose "Custom" to specify a numeric value manually. - Limit - IOPs : allows you to limit the number of inputs/outputs (I/O) per second on this virtual hard disk and thus prevent a single virtual machine from saturating the bandwidth of your physical disk (whether it's a hard drive, SSD, or RAID volume, for example).
- Controller location : allows you to choose on which controller (IDE, SATA, SCSI or NVMe) you want to plug this virtual hard disk and in what position.
Note that the IDE controller is obviously limited to 4 positions (due to its "master / slave" operating principle in "primary / secondary") unlike other types of controllers which allow many devices to be connected (hard disks and/or CD/DVD drives). - Disk mode : allows you to choose whether this virtual hard disk should be excluded from the snapshot system or not :
- Dependent : normal operating mode. When you create a snapshot on the virtual machine affected by this virtual hard disk, the state of this virtual hard disk will also be backed up and restored when you restore a snapshot on it.
- Independent - persistent : this virtual hard disk will be excluded from the snapshot system and its data will persist even if you create or restore a snapshot of your virtual machine.
- Independent - Non-persistent : the state of this virtual hard disk will be reset on each shutdown or each reboot of the affected virtual machine. For this, changes made from the operating system will not be stored in the original virtual hard disk file, but in a separate file that will be deleted when shutting down or rebooting the affected virtual machine.
- Sharing : allows you to share the same virtual hard disk with other virtual machines by selecting the "Multi-writer sharing" value provided that it was created with a eagerly zeroed, thick provisioned.
Additionally, you should only use this feature with clustering applications that can properly handle simultaneous writing by multiple servers and/or computers to a single disk.
Otherwise, data corruption may occur randomly.
1.4. SCSI Controller
Most of the time, a SCSI controller will be added to your virtual machine and it allows you to connect physical or virtual hard disks.
Although you can manually choose the type of SCSI controller used by your virtual machine, the default choice made by VMware ESXi allows you to get the best possible performance and to ensure that the controller is compatible with your guest operating system that you want to virtualize.
However, for the SCSI controller, you will have the choice between :
- LSI Logic SAS : in particular allows the use of hard disks larger than 2 TB.
- LSI Logic Parallel : this type of controller doesn't support drives larger than 2 TB.
- VMware Paravirtual : provides better performance through higher throughputs and reduced processor (CPU) usage.
However, performance may not be optimal if the virtual machine has snapshots or the host's memory is heavily used.
In the case of the SCSI controller, you can enable or disable the sharing of virtual hard disks using the "SCSI Bus Sharing" option :
- None : virtual hard disks connected to this SCSI controller can't be shared
- Virtual : virtual hard disks connected to this SCSI controller can be shared with other virtual machines, but only on the same server
- Physical : same as for the "Virtual" value, but in this case, the virtual hard disks can also be accessible from other servers

1.5. SATA Controller
For the SATA controller, you will have no option.
This only allows the connection of virtual hard disks and/or virtual CD/DVD drives in SATA. Which can be useful for compatibility reasons. Especially with various live troubleshooting CDs.
![]()
1.6. USB Controller
Allows you to change the version to be used for this USB controller, as well as to connect physical USB supports (USB keys, external hard disks, ...) or virtual (thanks to our "VMware ESXi 6.7 - Create a virtual USB key" tutorial) on your virtual machine.
Note that the version chosen by default by VMware ESXi varies depending on the version of the operating system that you want to virtualize.
For example, VMware ESXi will default to USB 2.0 for Windows XP and Windows 7 and USB 3.0 for Windows 8, 8.1 and 10.
![]()
1.7. Network Adapter (network card)
As explained in our "VMware ESXi 6.7 - Basics of network management on VMware ESXi" tutorial, access to the network (and to the Internet, if applicable) of virtual machines on VMware ESXi is managed via port groups created from virtual switches.
For each network adapter, you can first choose which port group you want to connect it to. By default, the "VM Network" port group.
For each network adapter, you will also find these options :
- Status : allows you to virtually connect the network cable between the network adapter (virtual network adapter) and the desired port group when the virtual machine starts up by checking the "Connect at power on" box.
- Adapter Type : allows you to choose the model of network adapter that will be virtualized by VMware ESXi. Again, VMware ESXi chooses the appropriate model based on the models of network adapters natively supported by the operating system you want to virtualize.
Note that the list of available network adapters may vary depending on the guest operating system selected in the configuration of your virtual machine, as well as depending on its compatibility level (virtual hardware version).
Among the supported models, you will find :- E1000 : emulates an Intel 82545EM Gigabit Ethernet network card natively supported since Windows XP and Linux v2.4.19.
- E1000e : emulates an Intel 82574 Gigabit Ethernet network card.
- SR-IOV passthrough : allows the use of a physical network card from a virtual machine, therefore without going through VMKernel. This helps reduce network latency for this virtual machine.
However, this requires the use of a physical network card supporting this "SR-IOV" feature and the installation of the appropriate driver in the guest operating system.
In addition, this requires that the VMware ESXi host, the desired physical network card, ... are compatible and officially supported by VMware.
Source : SR-IOV Support. - VMXNET 3 : paravirtualized network card supporting 10 Gb/s. This makes it possible to obtain better performance thanks to paravirtualization. However, this requires a recent operating system.
- and more : Network Adapter Basics - VMware Docs.
- MAC Address : if you select "Automatic" when adding a network adapter, VMware ESXi will automatically generate a MAC address starting with "00:0c:29" which is the prefix reserved by VMware.
Alternatively, you can also use the MAC address you want by selecting "Manual" and entering the desired MAC address in the box next to it.

1.8. CD/DVD Drive
By default, VMware ESXi obviously adds a CD/DVD drive to allow you to easily install the desired guest operating system in your virtual machine.
For this, you can use :
- Host device : the CD/DVD present in the CD/DVD drive of the physical server.
- Datastore ISO file : an iso file stored in a datastore of your VMware ESXi hypervisor.
Note that by clicking on Browse, you can also store it at the desired location without having to leave the window for creating or modifying your virtual machine.
For the virtual CD/DVD drive, you will also find these settings :
- Status : allows you to automatically insert or not the CD/DVD of the host device or the desired ISO file when starting the virtual machine by checking the "Connect at power on" box.
- CD/DVD Media : allows you to select the physical CD/DVD drive (if you have chosen "Host device" for the 1st setting) or the desired ISO file (if you have selected "Datastore ISO file" for the 1st setting).
- Controller location : allows you to choose on which virtual controller (IDE or SATA) the virtual CD/DVD drive will be connected and in which position it will be connected on it.

1.9. Video Card (virtual)
By default, a "VMware SVGA" virtual video card is used to provide you with a display.
This will be sufficient in 99% of cases, but you could also use a compatible physical graphics card from a virtual machine thanks to the GPU passthrough, if you wish.
For the VMware virtual video card, you will be able to :
- select "Default settings" to use the default values for all the settings available for this virtual video card or select "Specify custom setings" to be able to change the settings below.
- Number of displays : choose the number of screens that the virtual machine can use (if you have the necessary number of physical screens).
- Total video memory : video memory to be allocated to the virtual machine to manage the screens.
- 3D Graphics : enable 3D support for graphics
- 3D Renderer : allows you to choose how the 3D calculations will be performed :
- Automatic : automatically selects the appropriate option for your virtual machine.
- Software : 3D calculations will be performed by the processor (CPU)
- Hardware : 3D calculations will be performed by the graphics card (GPU)
- 3D Memory : memory to be allocated for 3D graphics. Note that 3D applications typically use between 64 and 512 MB of memory (as noted in the official VMware documentation).

Share this tutorial
To see also
-
VMware 4/14/2023
VMware ESXi 6.7 - Best practices for creating a VM
-
VMware 6/2/2023
VMware ESXi 6.7 - Connect a smart card reader to a VM
-
VMware 10/19/2022
VMware ESXi 6.7 - DirectPath I/O (PCI passthrough)
-
VMware 3/31/2023
VMware ESXi 6.7 - How CPU management works
You must be logged in to post a comment