- Windows Server
- 10 November 2025 at 17:31 UTC
-

- 1/11

When you work for a multinational company and therefore have offices in multiple countries, it's highly likely that you're deploying an Active Directory infrastructure with domain controllers spread across multiple countries.
When you Google how to create a multi-site Active Directory infrastructure, you only find tutorials that explain how to configure Active Directory subnets and sites via the "Active Directory Sites and Services" console.
But none of them explain how to connect the different domain controllers even though they're physically located in different countries.
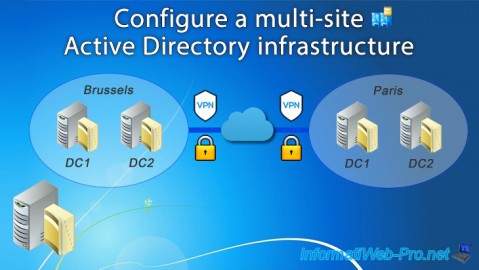
In this tutorial, we'll show you step-by-step a technique for creating a multi-site Active Directory infrastructure by connecting the different sites with configurable site-to-site VPN tunnels under Windows Server.
Using these site-to-site VPN tunnels under Windows Server (i.e., software-based) is obviously an example (usable by anyone), but you can also use physical VPN devices available for the professional world or do it under pfSense (with IPsec or OpenVPN).
Important : if you've never set up site-to-site VPN tunnels on Windows Server, we recommend first taking a look at our tutorial: Create a site-to-site (S2S) VPN tunnel via PPTP/L2TP on Windows Server 2022, 2016 and 2012.
This tutorial will give you the basics you need to understand the tutorial below.
Note: tutorial created on Windows Server 2016 and also tested on Windows Server 2022.
Last tutorial update: end of 2025.
Warning : to prevent automatic SYSVOL folder replication (managed by DFRS) from disabling itself, it is strongly recommended that you never start all your domain controllers at once. In a lab environment, where you will shut down all your domain controllers at some point, remember to start them one after the other, waiting for the previous domain controller to fully complete its startup before starting the next. Otherwise, simultaneously starting multiple domain controllers can cause a conflict in this automatic replication managed by DFRS and disable automatic SYSVOL folder replication (which is problematic because GPOs will no longer be replicated to other domain controllers, etc.).
- Inter-site Active Directory replication
- Active Directory best practices
- Network topology used
- Configuring hardware firewalls
- Create VPN tunnels between your physical sites (Brussels and Paris)
- Edit the network configuration of your 2 VPN servers for use in a multi-site Active Directory infrastructure
- Create your Active Directory forest on the 1st Active Directory site
- Add an Active Directory domain controller on site 1 at Brussels
- Add an Active Directory domain controller on site 2 at Paris
- Add a second Active Directory domain controller on site 2 at Paris
- Configure Active Directory sites
- Join VPN gateways to your Active Directory domain
- Create users in Active Directory for authentication used for connecting site-to-site VPN tunnels
- Join your VPN servers to your Active Directory domain
- Connection status "Unreachable" on your VPN servers
- Reconfigure login credentials on demand (from AD join)
- Authorize DHCP servers in the Active Directory infrastructure
- Authorize the DHCP server of site 1 (Brussels) in the Active Directory infrastructure
- Authorize the DHCP server of site 2 (Paris) in the Active Directory infrastructure
- Force DHCP data replication in a multi-site Active Directory infrastructure
- Restart the problematic DHCP server for authorization in AD
- Create and link group policy objects (GPOs) to an Active Directory site
- Join Windows 10 computers to your multi-site Active Directory infrastructure
1. Inter-site Active Directory replication
As explained in a previous article, the Active Directory replication topology is managed by the KCC service present on each domain controller.
By default, because all of your domain controllers are in the same Active Directory site, the KCC service considers them to be in the same physical location (for example : your company building).
In order for the KCC service to adapt the replication topology and replicate the data at an appropriate time (for example : at night), you must tell Active Directory in a logical way how your servers are physically located.
What is possible thanks to this notion of Active Directory sites.
The configuration of Active Directory sites is therefore essential in this type of Active Directory infrastructure, because it influences the way in which the data replication will be carried out between your different domain controllers.
2. Active Directory best practices
When you want to deploy a multisite Active Directory infrastructure, it's recommended to :
- create an Active Directory site at every geographic location where you need quick access to information of your Active Directory.
- deploy at least 1 Active Directory domain controller per site and define at least one domain controller as a global catalog per site.
Otherwise, the computers on the site that don't have a domain controller will be dependent on a domain controller located on one of your other Active Directory sites. This can greatly slow down session openings, ... - preferably, deploy at least 2 domain controllers per site in order to maintain an identical response time on the client PCs even in the event that one of the domain controllers fails on a site. And configure the client PCs to use these 2 domain controllers as primary and secondary DNS server.
- only use internal DNS servers. Because if the primary DNS server is unavailable, the client PC may only use the secondary DNS (which may have been an external - remote DNS server) even when the primary DNS will be available again. This can prevent access to your Active Directory infrastructure, if the secondary DNS points to Google (8.8.8.8) for example.
- client PCs should preferably use the DNS servers of the site where they are located before using those of remote Active Directory sites to avoid saturating your WAN bandwidth unnecessarily and to accelerate their DNS requests.
- and more.
Sources :
3. Network topology used
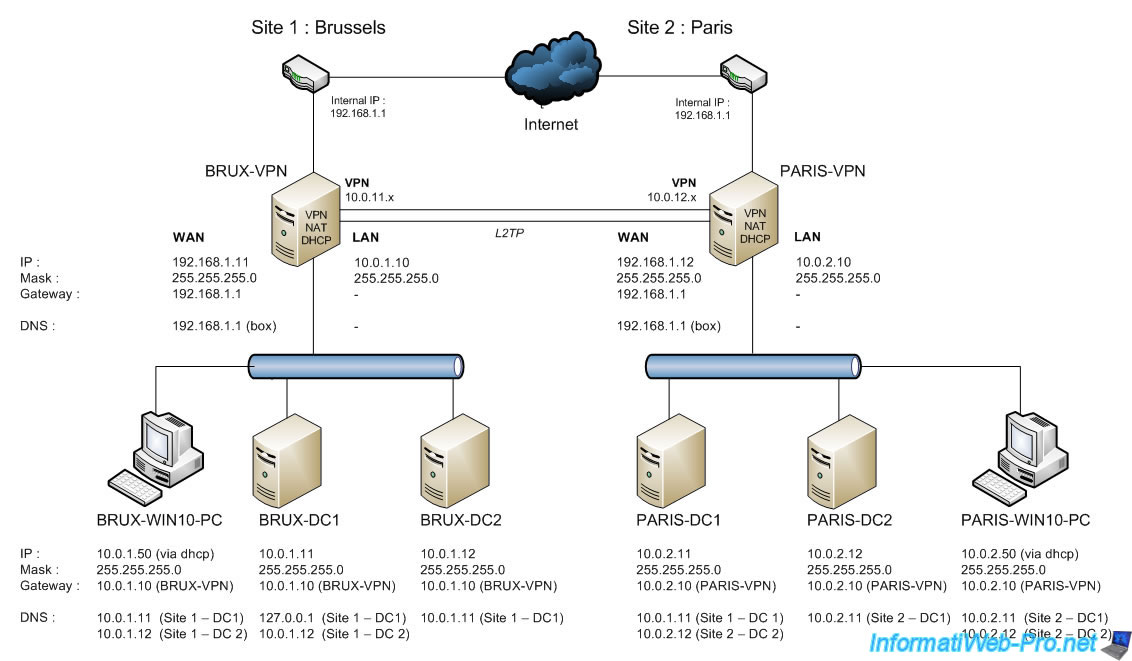
For this tutorial, we'll create an Active Directory infrastructure step by step with two remote physical sites: one in Brussels (Belgium) and one in Paris (France).
Their physical location is obviously irrelevant for the technical side of this tutorial, but the further apart they are physically, the lower the network bandwidth will be.
As explained in the introduction, we'll be using VPN tunnels (site-to-site) that we'll deploy using Windows Server servers. This choice simply allows anyone to follow this tutorial.
However, you can of course use the "pfSense" software solution (by following the links in the tutorial introduction) or professional VPN equipment rather than a simple Windows Server server to securely connect your remote sites if you wish.
Note that in our case, we will only use a single Active Directory domain "informatiweb.lan" which will be unique (same domain SID on both sites), but whose data will be replicated on 4 domain controllers (2 on each site).
4. Configuring hardware firewalls
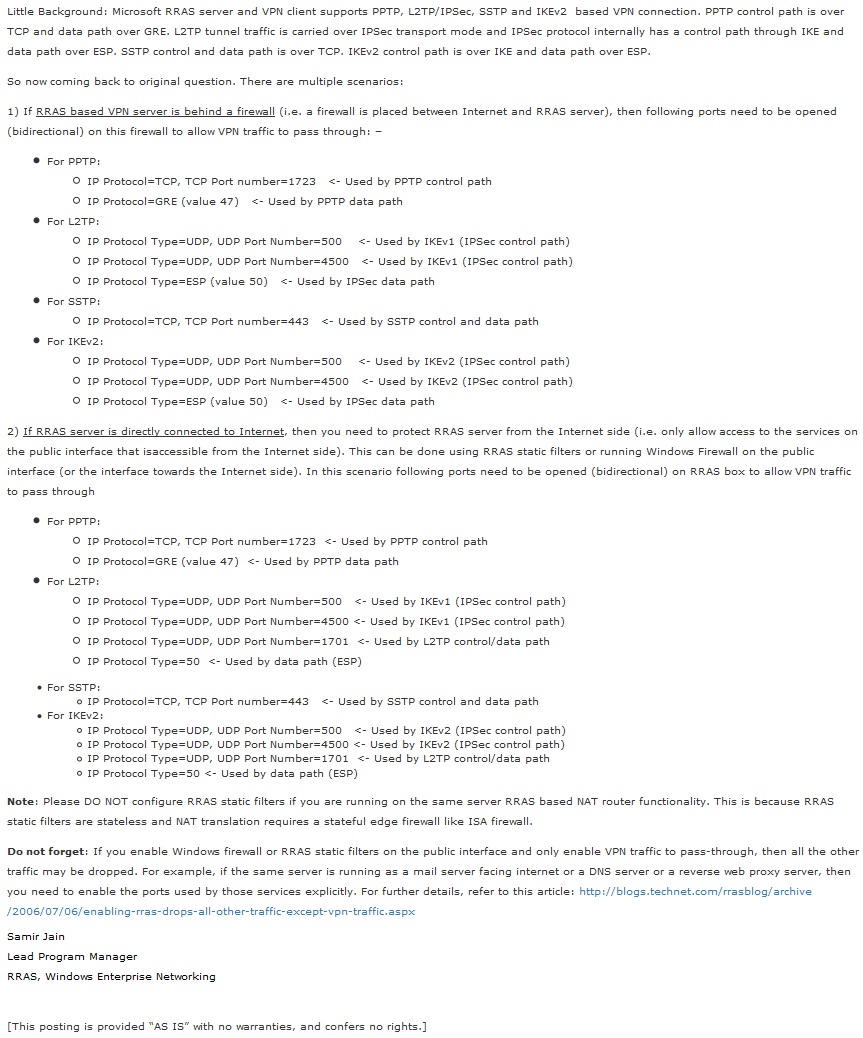
In order for your VPN gateways to be reachable from the outside, it will be necessary to configure your hardware firewalls if you have them.
For that, see the "Which ports to unblock for VPN traffic to pass-through ?" available on Microsoft's Technet.
5. Create VPN tunnels between your physical sites (Brussels and Paris)
To begin, you must first connect your two (or more) physical sites with VPN tunnels configured in site-to-site (S2S) mode.
To do this, we will use the technique used in our tutorial: Create a site-to-site (S2S) VPN tunnel via PPTP/L2TP on Windows Server 2022, 2016 and 2012.
Important : for a stable VPN connection in site-to-site mode, use the IPsec protocol (widely used to connect physical sites with VPN tunnels) or L2TP in the case of Windows Server.
You can also choose to create these tunnels using pfSense if you wish, referring to the tutorial mentioned in the introduction to this tutorial.
In our case, we will stay with Windows Server and therefore use the L2TP protocol for these VPN tunnels.
5.1. Network configuration of VPN servers (Brussels and Paris)
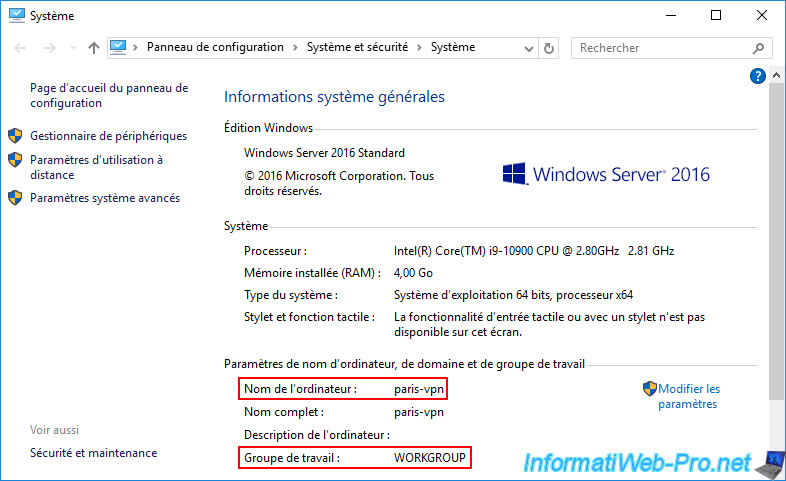
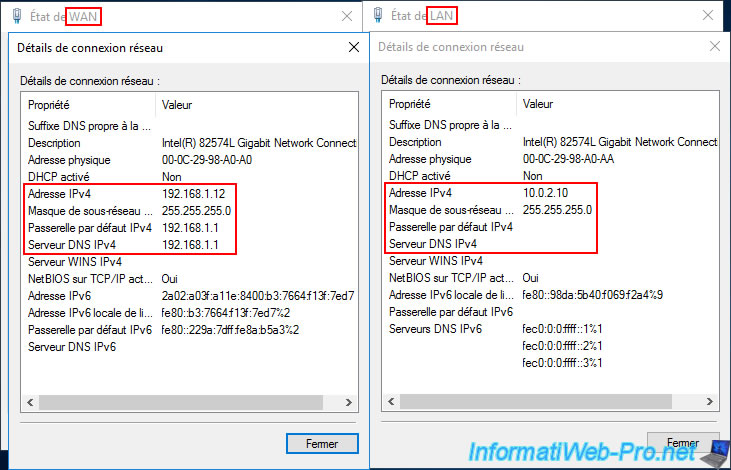
At the moment, our VPN server "brux-vpn" (on site 1 (Brussels)) is in a workgroup (since the Active Directory infrastructure is not yet created).

As explained in the previously mentioned tutorial (for VPN tunnels under Windows Server), this VPN server has two network cards, as it will also act as a router (to provide Internet access to machines on the LAN).
Furthermore, at Site 1 (Brussels), the LAN uses the network ID "10.0.1.X" (hence the subnet mask "255.255.255.0" instead of "255.0.0.0").
Note: this VPN server will temporarily use the IP address of our ISP's (Internet Service Provider) box as its DNS server (on the WAN interface) to access the Internet.
For the LAN interface, no DNS server is currently specified. However, at the end of this tutorial, you will see that your VPN servers will only use your local Active Directory domain controllers (on the LAN interface) as DNS servers. On its WAN interface, it There will no longer be a DNS server entered, as this will allow you to meet the requirements for Active Directory and avoid DNS resolution problems for Active Directory. Internet access will therefore be via the DNS servers automatically installed on your domain controllers, which will then contact the root DNS servers (on the Internet) or a public DNS server (if you wish).

Our VPN server "paris-vpn" (at site 2 (Paris)) is in the same workgroup (since the Active Directory infrastructure is not yet created) as the other VPN server.
Again, the second server has two network cards (WAN/LAN).
At this site 2 (Paris), the LAN uses the network ID "10.0.2.X".
5.2. Install and configure DHCP servers (Brussels and Paris)
5.2.1. Install and configure the DHCP server for site 1 (Brussels)
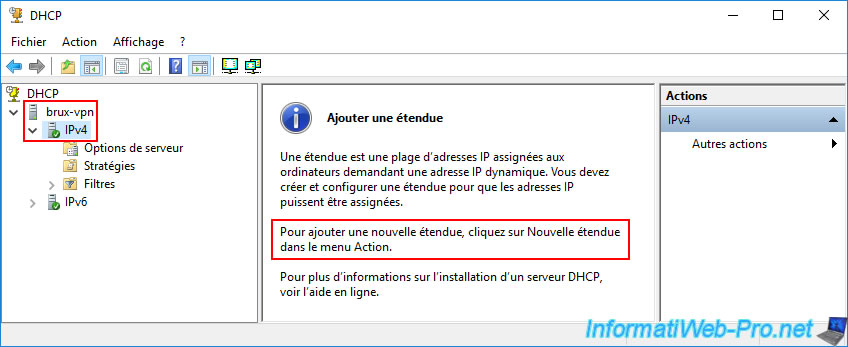
Install the "DHCP Server" role on the "brux-vpn" server at Site 1 (Brussels), then open the "DHCP" console.
Next, right-click "New Scope" on "IPv4".
In the New Scope wizard, enter a name for the scope.
For example: LAN Scope.

Specify the IP address range to distribute to the computers at Site 1 (Brussels).
In our case: from the IP address "10.0.1.50" to "10.0.1.100".
Then, specify the subnet to use.
In our case, a length of "24" (which corresponds to the subnet mask "255.255.255.0" displayed just below).
The network ID for Site 1 (Brussels) is "10.0.1.0" (i.e., "10.0.1.X").

In the "Router (default gateway)" step, enter the LAN IP address of your VPN server ("brux-vpn" because we are on site 1 (Brussels)).
Then, click "Add".
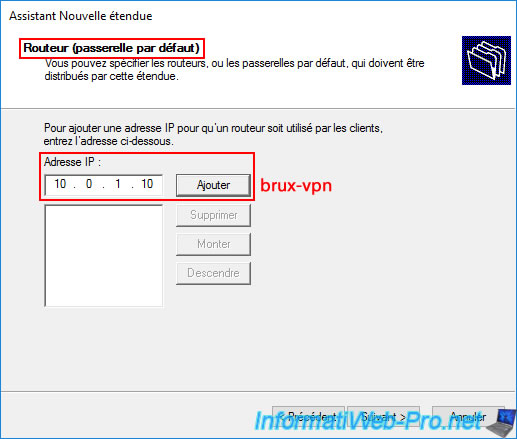
The LAN IP address of your VPN server (brux-vpn) appears in the list.
Click "Next".

To facilitate the integration of your computers into your future Active Directory domain, enter the domain you will use as your Active Directory domain in the "Parent Domain" box.
This domain will be the same on both physical sites, as this will be a multi-site Active Directory infrastructure (i.e., with the same domain SID).
Next, delete the IP address displayed by default in the list of DNS servers to use.
By default, this is the IP address specified as the DNS server in one of your VPN server's network cards.
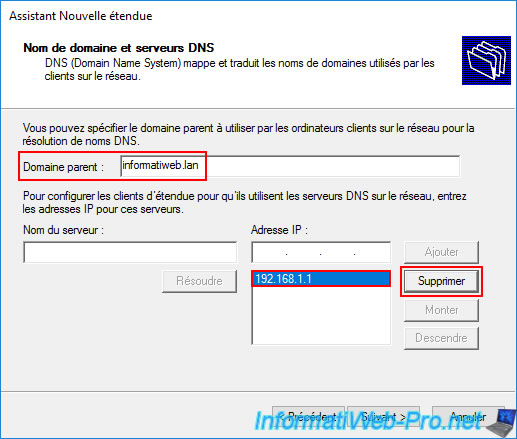
Then, enter the IP address of your server "brux-dc1" (which will be the 1st Active Directory domain controller on site 1 (Brussels) in our case) and click on "Add".

Please wait a few seconds while this IP address is validated as a DNS server.
Plain Text
DNS Validation.
Validation in progress. If the DNS Server service is started on 10.0.1.11, this process may take some time due to network traffic.

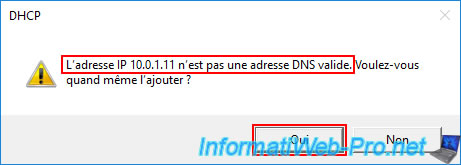
Since Active Directory (and its prerequisite "DNS Server") is not installed, the warning below will appear.
Plain Text
The IP address 10.0.1.11 is not a valid DNS address. Do you want to add it anyway?
Ignore it by clicking "Yes".
The IP address "10.0.1.11" of our "brux-dc1" server appears in the list of DNS servers that will be used for this DHCP scope.
Add the IP address "10.0.1.12" of the "brux-dc2" server (as a reminder, it is recommended to install at least two Active Directory domain controllers per physical site) and click "Add" again.
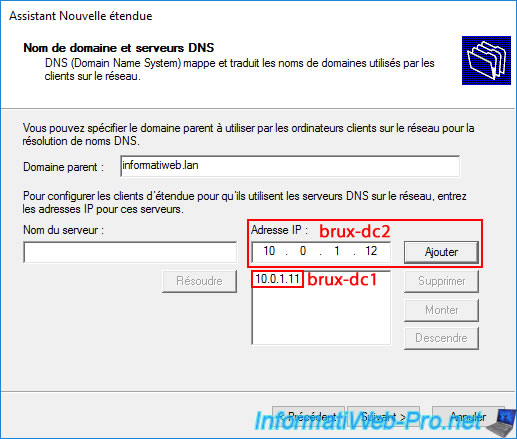
Ignore the warning that appears again, and you'll see the IP addresses of your two domain controllers (brux-dc1 and brux-dc2) at Site 1 (Brussels) appear in the list.
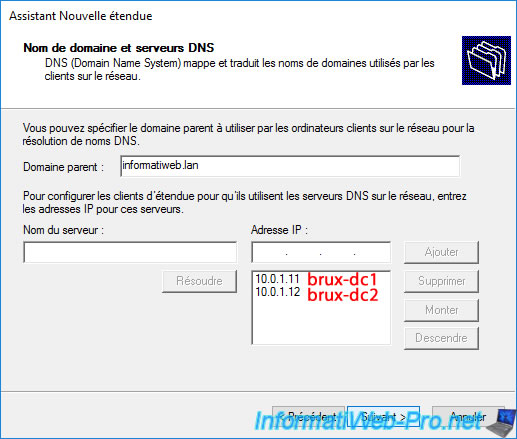
This means that the computers at Site 1 (Brussels) will already know which DNS servers to use to join and access your Active Directory domain and your local and remote resources (via your AD domain).
Once the Add Scope Wizard is complete, navigate to the "Scope Options" subfolder of your DHCP scope, "LAN Scope".
You should see three DHCP options appear:
- 003 Router: the IP address of your VPN server at Site 1 (Brussels).
In our case, the IP address "10.0.1.10" (brux-vpn). - 006 DNS Servers: the IP addresses of your two future domain controllers at Site 1 (Brussels).
Thus, the computers at Site 1 (Brussels) will use these local DNS servers and Active Directory domain controllers (for speed).
In our case, the IP addresses "10.0.1.11" (brux-dc1) and "10.0.1.12" (brux-dc2). - 015 DNS Domain Name: the DNS domain name you will specify when you create your Active Directory forest on your first Active Directory domain controller. This domain will then be replicated across all your Active Directory domain controllers (across both physical sites) and will therefore be a single AD domain.

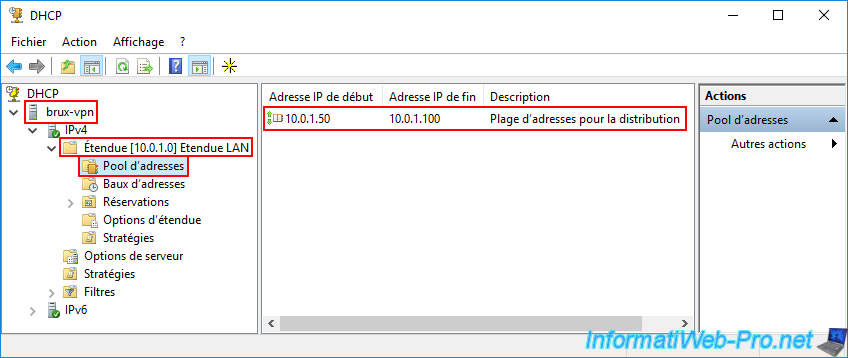
In the "Address Pool" subfolder, you'll see that this DHCP server, "brux-vpn," will distribute IP addresses from "10.0.1.50" to "10.0.1.100" on Site 1 (Brussels) to computers.
So, a subnet "10.0.1.X."
5.2.2. Install and configure the DHCP server for site 2 (Paris)
On the "paris-vpn" server at site 2 (Paris), install the "DHCP Server" role, then open the "DHCP" console.
Create a new scope of type "IPv4".
But this time, the network ID will be "10.0.2.X".
So, specify the range "10.0.2.50" to "10.0.2.100" and again a subnet mask of "255.255.255.0".
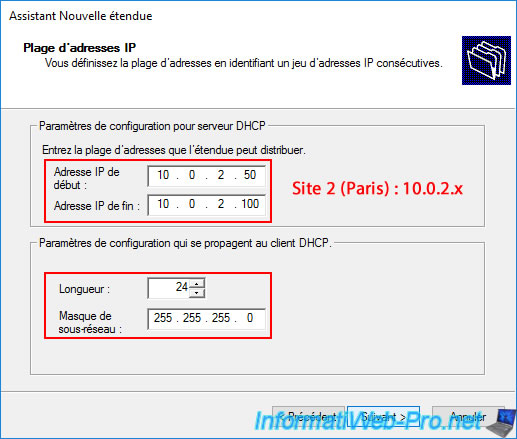
Adjust the IP addresses for the router and DNS servers to point to the servers at Site 2 (Paris) and not those at Site 1 (Brussels).
This will ensure that the new DNS server remains local to the site.
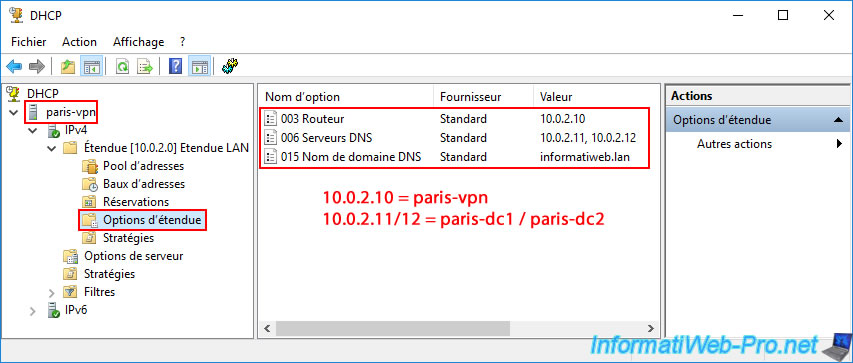
This should give you the following options for this new "10.0.2.0" scope:
- 003 Router: the IP address of your VPN server at Site 2 (Paris).
In our case, the IP address "10.0.2.10" (paris-vpn). - 006 DNS Servers: the IP addresses of your two future AD domain controllers at Site 2 (Paris).
In our case, the IP addresses "10.0.2.11" (paris-dc1) and "10.0.2.12" (paris-dc2). - 015 DNS Domain Name: the same DNS domain name (Active Directory domain) as before.
For the "Address Pool" at Site 2 (Paris), it starts at the IP address "10.0.2.50" and ends at "10.0.2.100".
So, a subnet "10.0.2.X".

Share this tutorial
To see also
-

Windows Server 4/16/2021
Windows Server - AD DS - How Active Directory replication works
-
Windows Server 4/30/2021
Windows Server - AD DS - Overview of Active Directory functional levels
-
Windows Server 4/3/2021
Windows Server - AD DS - The basics of Active Directory
-

Windows Server 5/21/2021
WS 2016 - AD DS - Add a domain controller to an existing AD domain
You must be logged in to post a comment