- Windows Server
- DNS
- 11 May 2018 at 09:01 UTC
-

- 1/3


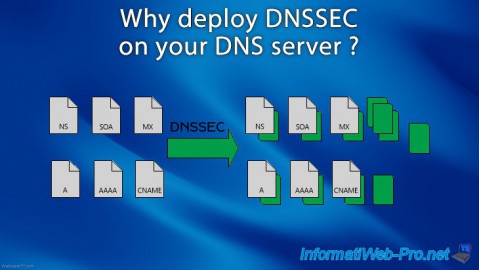
DNSSEC (Domain Name System Security Extensions) is a technology that allows (if everyone sets it up) to secure all requests and DNS responses that pass through the Internet.
Typically, DNSSEC is set up on public (or externally accessible) DNS servers because they are more exposed to hackers than the DNS servers used internally (for an intranet and / or a network with an Active Domain Directory, for example).
To learn more about DNSSEC, read our article : Why deploy DNSSEC on your DNS server and how does it work ?
- DNSSEC support in Microsoft environments
- Required configuration
- Where are trust points or trust anchors stored ?
- Sign a DNS zone with DNSSEC
- Zone files, trust anchors, ...
- Make a DNSSEC request to a DNS server secured with DNSSEC
- Delete the DNS zone signature
- Sign the DNS zone again
- Enable WINS lookup for signed DNS zones (not recommended)
1. DNSSEC support in Microsoft environments
1.1. DNSSEC support on Windows (clients)
Windows client computers support DNSSEC from Windows 7.
1.2. DNSSEC support on Windows Server
For Windows Server servers, DNSSEC is supported since Windows Server 2008 R2 and its support has been improved since the 2012 release.
Indeed, Windows Server 2008 R2 didn't support the NSEC3 and RSA/SHA-2 standards and was limited to offline signing of static zones.
Since Windows Server 2012, its support includes :
- DNS integration in the Active Directory, as well as dynamic updates in DNSSEC signed zones
- updated DNSSEC standards, such as NSEC3 and RSA/SHA-2
- automatic distribution of trust anchors through the Active Directory
- validation of the DNS records signed with the standards mentioned above (NSEC3 and RSA/SHA-2)
- signing DNS zones online
- and more
Source : Why DNSSEC | Microsoft Docs
2. Required configuration
DNSSEC can be enabled only on zones that your DNS server is authoritative.
As noted in our article about DNSSEC, you will need to distribute the trust points to other servers so that they can validate the signatures received from your DNS for your DNSSEC signed zones.
If you want to distribute them automatically, your DNS server must also be a controller.
If not, you will have to do it manually. It's up to you to choose what you prefer to do.
3. Where are trust points or trust anchors stored ?
If you installed your DNS server at the same time as the Active Directory, these trust points will be stored in the Active Directory so that they can be replicated to your other domain controllers by replicating the Active Directory.
For that, it will be enough to make a right click "DNSSEC -> Properties" on your signed DNS zone and to go in the "Trust Anchor" tab.
Then, check the "Enable the distribution of trust anchors for this zone" check box.
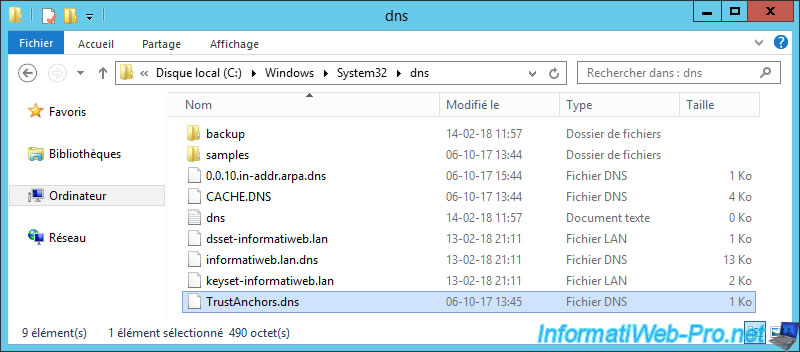
However, if you have installed your DNS server separately, these trust points will be stored in the "C:\Windows\System32\dns\TrustAnchors.dns" file on the master DNS server that manages the KSK and ZSK keys.
4. Sign a DNS zone with DNSSEC
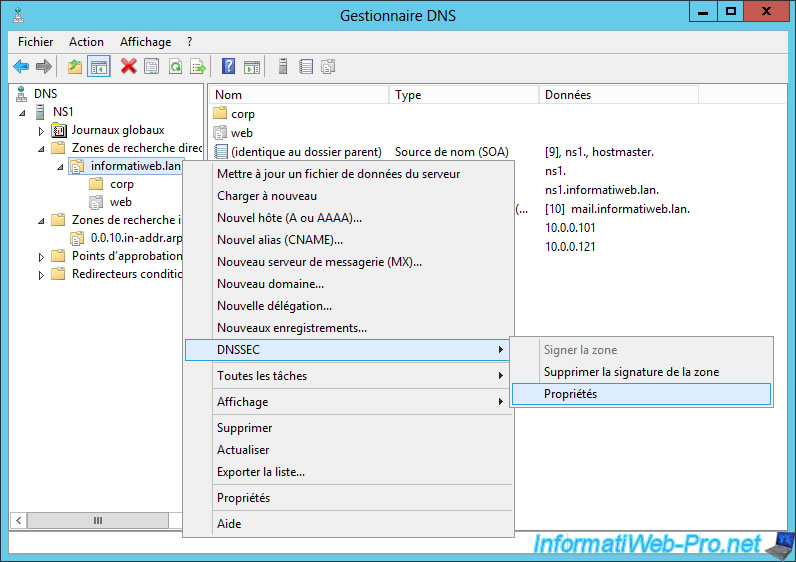
To sign a primary DNS zone through DNSSEC, open the DNS Manager, then right-click "DNSSEC -> Sign the Zone" on your forward lookup zone.
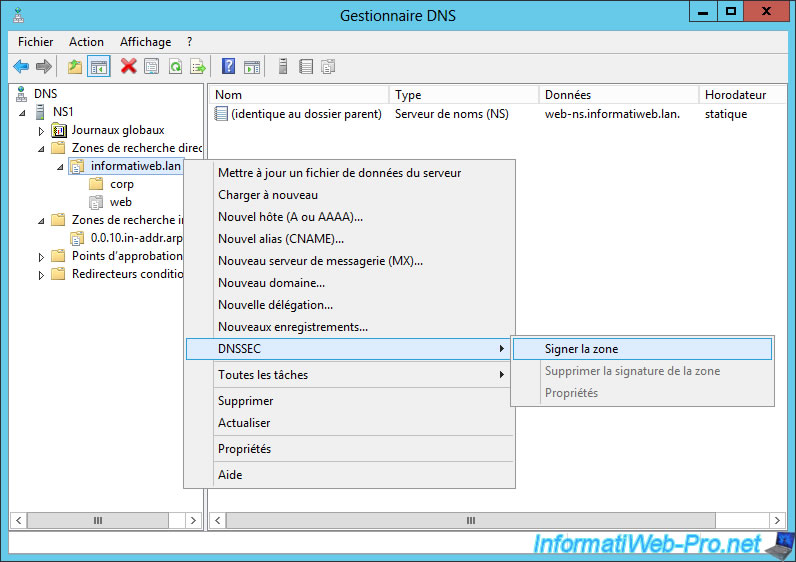
The zone signing wizard appears.

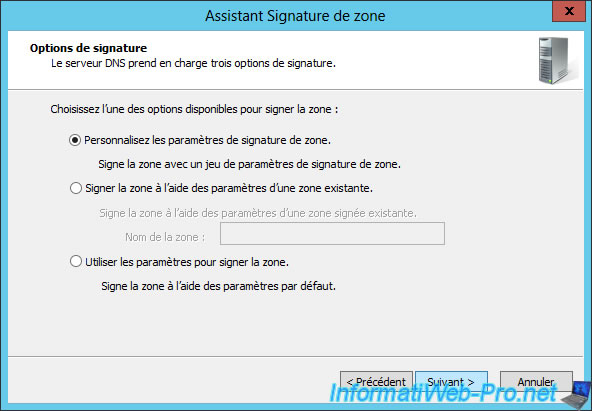
To sign your 1st DNS zone, you have 2 possibilities :
- use the default settings (shown on Microsoft Docs) to sign your DNS zone in 2 clicks.
- or choose the "Customize zone signing parameters" option to be able to change the settings if you wish.
Note that when you choose "Customize zone signing parameters", the options selected by default will be the same as if you had chosen the "Use settings to sign zone" option.
Nevertheless, for this tutorial, we will use the long version "Customize zone signing parameters" to explain the zone's signature in detail.
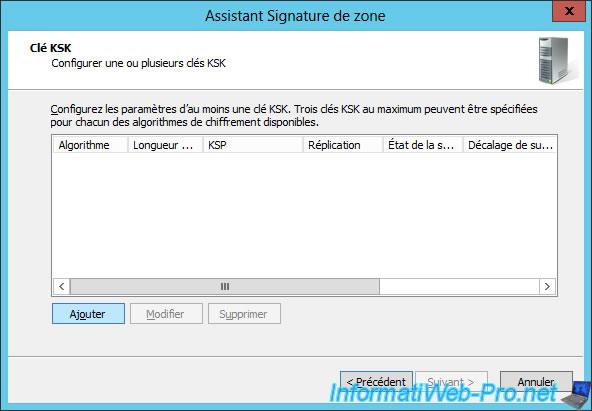
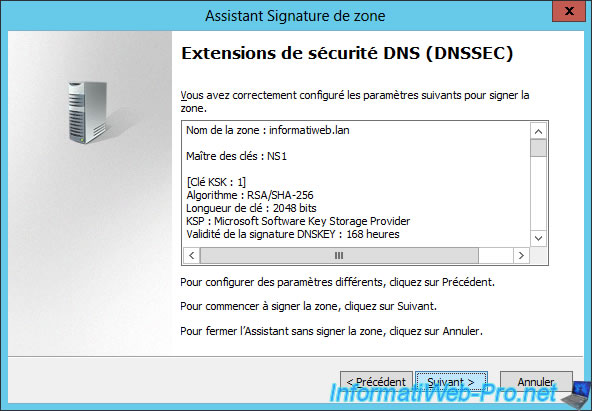
To begin, you will need to create a KSK key.
This key will allow you to sign other keys and may be longer than the key ZSK (which you will see later).
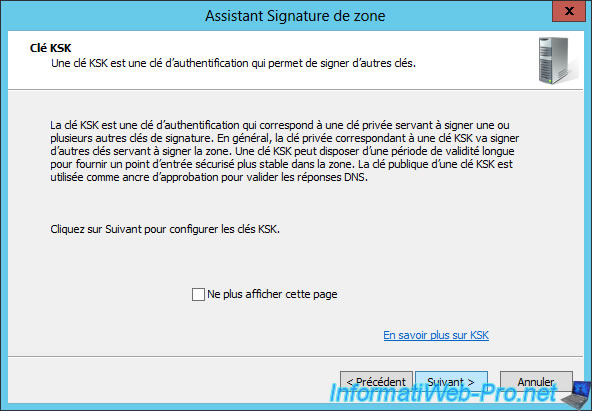
Click Add to create a new KSK key.
Note that you can create up to 3 KSK keys with the same encryption algorithm or create KSK keys with different encryption algorithms.
Nevertheless, only one is sufficient in most cases.
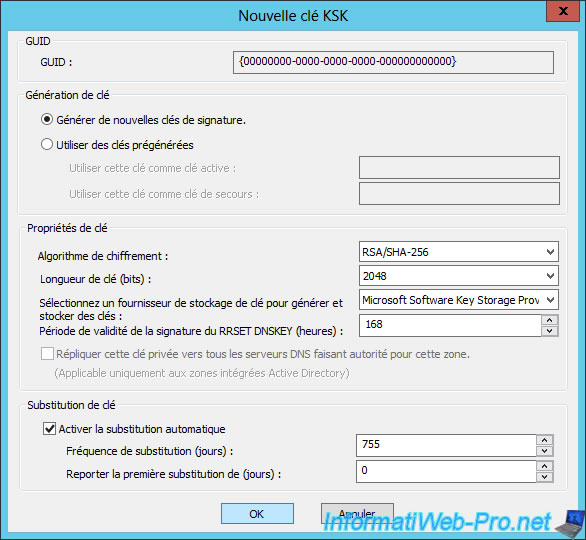
By default, the wizard will generate a new signing key (as shown in the "Key Generation" section).
Then, you will be able to choose :
- the encryption algorithm : RSA/SHA-1, RSA/SHA-1 (NSEC3), RSA/SHA-256, ...
- the key length (in bits) to use
- the key storage provider ...
- the period of validity of the RRSET DNSKEY signature
- (if your DNS server is also a domain controller) if you want to replicate the private key to the authoritative DNS servers for that zone.
Encryption algorithm :
The choice of the encryption algorithm affects the type of NSEC record that will be used for DNS records that don't exist or that no longer exist in your DNS zone.
Source : Cryptographic algorithms - Microsoft Docs
Length of the key :
The longer the key, the more secure it is.
But, the longer it is, the more resources your server will be used for the calculation of signatures.
Key storage provider :
If the keys will be distributed through the Active Directory, you must choose : Microsoft Software Key Storage Provider.
Source : KSK parameters - Microsoft Docs
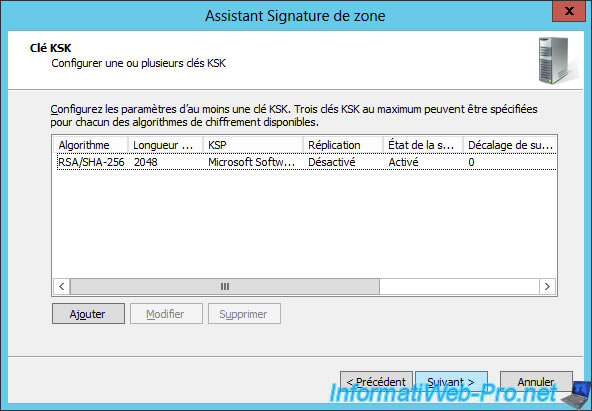
Click Next.
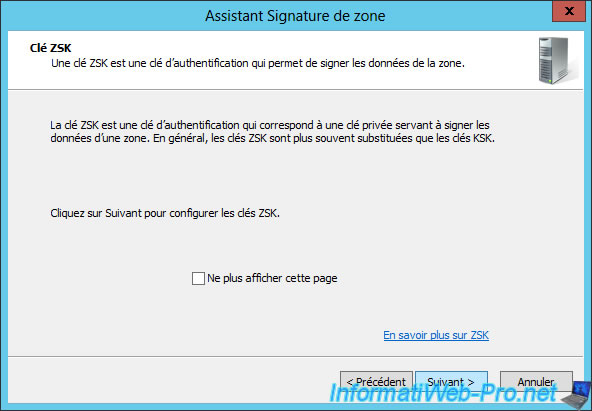
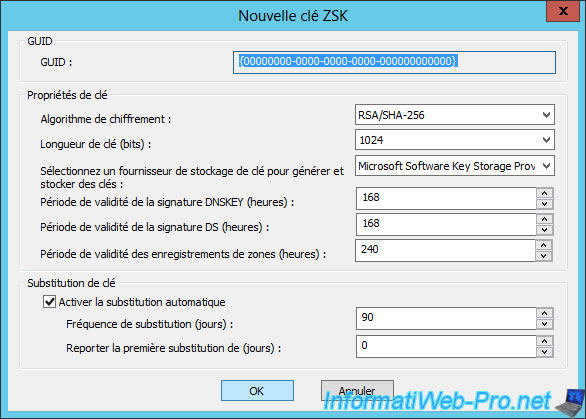
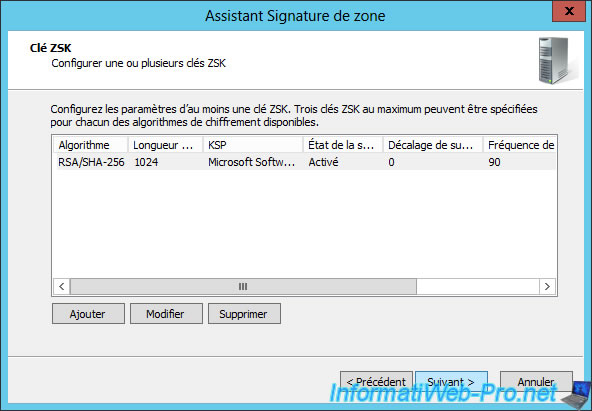
Now, the wizard offers you to create a ZSK key.
This ZSK key is used to sign the data (the DNS records) of the DNS zone to sign.
Generally, these keys have a shorter validity than the KSK keys (created previously).
Click Add to create a new KSK key.
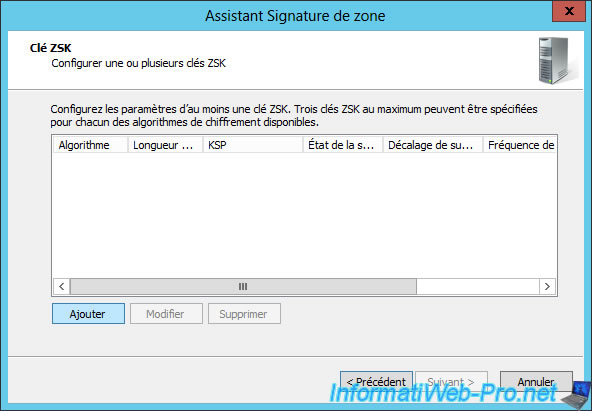
To create a new ZSK key, you find almost the same options, including the storage provider option.
If your DNS server is also a domain controller, choose: Microsoft Software Key Storage Provider.
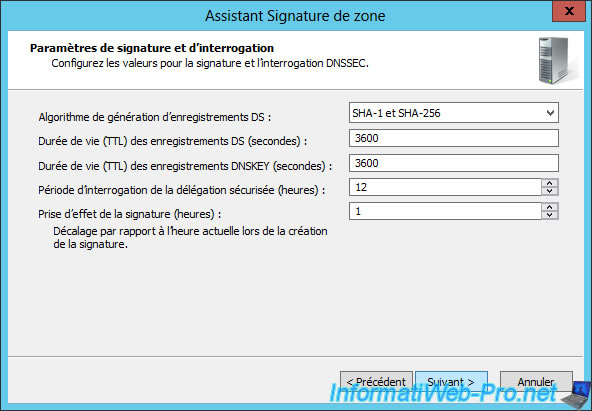
For periods of validity, they concern :
- the DNSKEY signature : the DNSKEY is the public key of your DNS zone that the other DNS servers will be able to use to check if the signature obtained is valid or not.
- the DS signature : the DSs are records to secure DNS delegations
- signing your DNS zone records
Click Next.
When a DNS record doesn't exist in a zone signed with DNSSEC, your server will still respond to the user's request by certifying that this record doesn't exist in your DNS zone.
In order to be able to send an authentic response to the user, your server will use NSEC or NSEC3 records (an improved version of the NSEC).
Note that NSEC and NSEC3 are not compatible with all cipher algorithms (as previously explained).
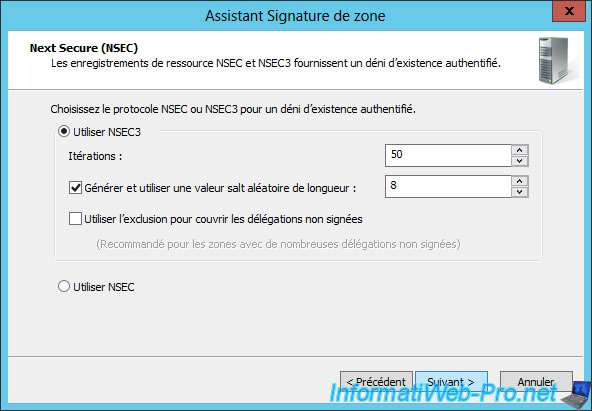
Change the encryption algorithm for DS records if you want.
Click Next.
The Zone Signing Wizard appears. Then, click Finish.

Now that your DNS zone is signed, right-click on it and click on : DNSSEC -> Properties.
In the DNSSEC properties of your DNS zone, you will find all the parameters previously configured :
- the KSK key
- the ZSK key
- the type of NSEC record to use
- information about trust anchors
- advanced informations (algorithm to use for DS records, ...)

If your DNS server is also a domain controller, don't forget to check the "Enable the distribution of trust anchors for this zone" box in the "Trust Anchor" tab.
Then, click OK.

Click Yes to save these settings.


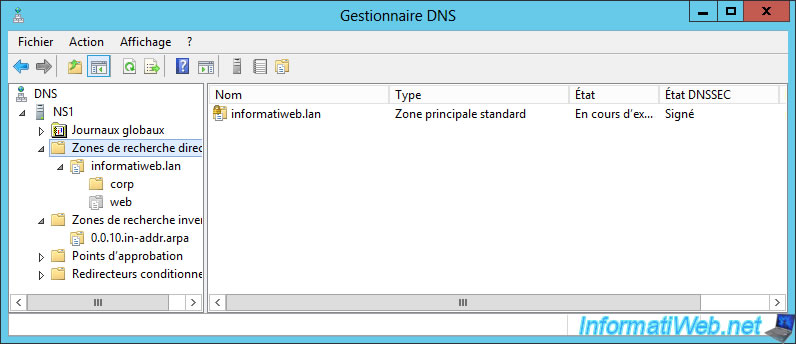
If you click on "Forward Lookup Zones", you will see that your zone is signed with DNSSEC and that a small padlock appeared in the icon next to the name of your DNS zone.
Note that even if the DNS zone has been signed, the padlock will not appear on your secondary DNS servers (if you have one) or on your primary DNS server if the zone was created on an older version of Windows Server (ex : 2008 R2).
Share this tutorial
To see also
-
Articles 5/1/2018
Why deploy DNSSEC on your DNS server ?
-
Windows Server 1/15/2013
WS 2008 - Create a DNS server
-
Windows Server 4/15/2018
WS 2012 / 2012 R2 - Create a DNS server and delegate subdomains
-
Windows Server 4/25/2018
WS 2012 / 2012 R2 - Create a secondary DNS server
You must be logged in to post a comment