Configure a LDAP server and a web interface to manage it on Ubuntu
- Linux
- 15 January 2014 at 20:26 UTC
-

- 2/2

13. Remove warnings displayed on each connection
When you connect to the web "phpLDAPadmin" interface, you receive the warning "Unknown XML setting", "Automatically removed objectClass from template" and "Automatically removed attribute from template" depending on the version of "phpLDAPadmin".
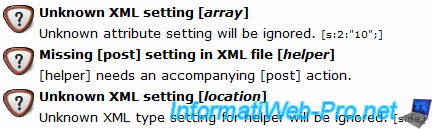
These warnings are not there by chance and they did not result from a bug "phpLDAPadmin". In reality, "phpLDAPadmin" is provided with a series of templates that are not all based on classes and / or existing default attributes. It is for this reason that you appear once per session warnings. He says he has also deleted (for the duration of the session) those that did not exist on your server to avoid a possible bug.
If you are using only one LDAP server, you can afford to change the source code of this interface to these warnings disappear. In summary, the solution is to abolish classes and "non-standard" attributes that cause these warnings.
13.1. Download the new version 1.2.3 of phpLDAPadmin
To solve this problem, we will download and install the new version "1.2.3" manually since it isn't available in the Ubuntu repositories. The second reason is simply that this new version is more stable than the previous one and it's possible to remove all these warnings properly.
IMPORTANT : You must have a version of phpLDAPadmin on your Ubuntu machine to apply this solution. For example, to install version 1.2.2 (current version), type the command :
Bash
sudo apt-get install phpldapadmin
As installed by "apt-get" version is in the folder "/etc", so we will install the new version next to this one.
To do this, first go in the "/etc" folder.
Bash
cd /etc
Then go to the download page for "phpLDAPadmin", then :
- Click on the latest version available
- Click the "tgz".
- Right click on the "direct link" link and click on "Copy link location".
Then, in the Ubuntu terminal, type the following command :
Bash
wget -O phpldapadmin.tgz https://sourceforge.net/ (direct link)
Note :
- Replace "https://sourceforge.net/ (direct link)" by the direct link that you just copied from the site.
- Once the download is complete (when the download has reached 100%), press the "Enter" button to exit the "wget" program.
13.2. Installing the new 1.2.3 version of phpLDAPadmin
Then unzip the archive you just downloaded by typing this :
Bash
tar -xvf phpldapadmin.tgz
Then move the downloaded archive into the folder that was just created (if you want to keep as a backup) :
Bash
mv phpldapadmin.tgz phpldapadmin-1.2.3/phpldapadmin-1.2.3.tgz
Then copy the configuration of the alias (installed by the downloaded version by apt-get) to create an alias for the new version :
Bash
cp /etc/phpldapadmin/apache.conf /etc/apache2/conf.d/phpldapadmin-1.2.3.conf
Then change the alias of the old version that does not conflict with that of the new version.
Bash
vi /etc/phpldapadmin/apache.conf
Change the alias of the old version (1.2.2)
Bash
<IfModule mod_alias.c>
	Alias /phpldapadmin /usr/share/phpldapadmin/htdocs
</IfModule>
like this :
Bash
<IfModule mod_alias.c>
	Alias /phpldapadmin-1.2.2 /usr/share/phpldapadmin/htdocs
</IfModule>
Then change it to the new version (in this case 1.2.3)
Bash
<IfModule mod_alias.c>
	Alias /phpldapadmin /usr/share/phpldapadmin/htdocs
</IfModule>

# .....

<Directory /usr/share/phpldapadmin/htdocs/>
that the alias points to the "htdocs" folder of this new version
Bash
<IfModule mod_alias.c>
	Alias /phpldapadmin /etc/phpldapadmin-1.2.3/htdocs
</IfModule>

# .....

<Directory /etc/phpldapadmin-1.2.3/htdocs/>
Finally, restart the web server "Apache" for the changes to take effect.
Bash
/etc/init.d/apache2 restart
13.3. Configuration of phpLDAPadmin
Before moving to the removal of these warnings, we must now configure the new version of "phpLDAPadmin".
Since we installed manually, you must configure it manually.
Note : If you try to access the interface before you configure it, you will receive the following error message "Notice: Undefined variable: _SESSION in /etc/phpldapadmin-1.2.3/lib/page.php ...".
For the configuration is easier to do and you avoid having to change all via the command line, we recommend that you install an SSH server on your Ubuntu machine to create a remote project by the Eclipse program.
Note: It is also possible to connect with an FTP client via the SSH connection you have previously installed.
To configure the web interface, first copy the default configuration file like this :
Bash
# It moves in the folder "/etc/phpldapadmin-1.2.3/config"
cd /etc/phpldapadmin-1.2.3/config
# The default configuration file is copied to "config.php".
cp config.php.example config.php
Then edit the "config.php" file like this.
Note : Locate the box "Define your LDAP servers in this section" and you'll find the lines below.
Bash
$servers->setValue('server','name','InformatiWeb LDAP Serveur'); // Server Name
$servers->setValue('server','host','127.0.0.1'); // Server address. Since the web interface is installed on the same computer as the LDAP server, you can leave the IP address : 127.0.0.1
$servers->setValue('server','base',array('dc=informatiweblan,dc=net')); // The research base server is based on the domain name of the server. Our domain is "informatiweblan.net", so we write "dc=informatiweblan,dc=net".
$servers->setValue('login','bind_id','cn=admin,dc=informatiweblan,dc=net'); // Change the information dc = as above. The cn=admin specify that the connection will be made with the admin account on the LDAP server.
13.4. Suppress warnings
Since we just reconfigure the alias, you can now access the new version (1.2.3) by the address "http://ldap.informatiweblan.net/phpldapadmin/" or "http://localhost/phpldapadmin/"(if you are on the Ubuntu machine).
Note :
- The old version is accessible via address "http://ldap.informatiweblan.net/phpldapadmin-1.2.2/".
- ldap.informatiweblan.net address is pointing to our Ubuntu server.
When you connect to the web interface, you will receive warnings "Automatically removed objectClass from template" and "Automatically removed attribute from template".
To remove them, so we will have (as shown on top of this solution) delete the objects and attributes that are the source of these warnings.
For this part, we will consider that you have installed Eclipse on a computer network and you have created the project via the remote plugin "Remote system explorer" explained in this tutorial.
After analyzing the various warnings displayed, we know what objects / files and what attributes will remove from "templates".
Notes :
- These "templates" are in the "/etc/phpldapadmin-1.2.3/templates/creation" folder.
- We will not remove files concerned, but move them to a subfolder "bak" for safety.
Here are the objects / files and delete commands to execute :
- Create the folder "bak" : mkdir bak
- courierMailAccount / courierMailAccount.xml : mv courierMailAccount.xml bak
- mozillaOrgPerson / mozillaOrgPerson.xml : mv mozillaOrgPerson.xml bak
- sambaSAMAccount / sambaSamAccount.xml : mv sambaSamAccount.xml bak
- sambaGroupMapping / sambaGroupMapping.xml : mv sambaGroupMapping.xml bak
- courierMailAlias / courierMailAlias.xml : mv courierMailAlias.xml bak
After you delete (or move these files), click on "logout" and reconnect you. This will redisplay of the remaining warnings.
Then click your domain dc=informatiweblan, dc=net
It should be the warning "Automatically removed objectClass from template" about the object "Samba: Machine: sambaSAMAccount".
In reality, this object no longer exists but it was a dependency of "sambaMachine" object. We'll remove this dependency.
To do this, edit the "sambaMachine.xml" file and comment the line:
XML
<objectClass id="sambaSAMAccount"></objectClass>
like this :
XML
<!-- <objectClass id="sambaSAMAccount"></objectClass> -->
Log out a second time from the web interface and reconnect. You should not receive any warning.
Share this tutorial
To see also
-
Linux 7/21/2017
Debian - Clustering and service balancing (with 2 servers)
-

Linux 6/17/2015
Debian / Ubuntu / CentOs - Block DDOS attacks
-
Linux 10/5/2015
Network monitoring in real time with IPTraf
-
Linux 2/12/2016
OVH - KVM mode
No comment