- Linux
- 21 July 2017 at 10:23 UTC
-

- 1/2

When you host data on a server and/or offering services hosted on one or more servers, it's important that these data and/or services be available even in the event of a server crashing.
To prevent the service or important data from becoming inaccessible, high availability is often set up.
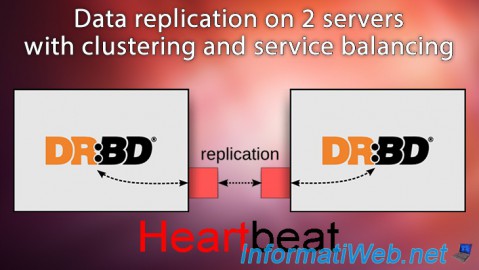
In the case of a Linux server, we can provide high availability for almost any service (web, FTP, NFS, iSCSI, ...) thanks to DRBD and Heartbeat.
Note that Heartbeat is limited to 2 servers. To create a cluster with more than 2 servers, you will need to use Pacemaker.
But keep in mind that Heartbeat is widely used for its performance, flexibility and stability.
- What is DRBD
- What is Heartbeat
- Configuration used
- DRBD (Data replication)
- Heartbeat (Clustering and balancing of services)
- Test of the cluster
1. What is DRBD
DRBD means Distributed Replicated Block Device and allows you to create a sort of RAID 1 over the network.
It's DRBD that will allow us to create a real-time copy of a hard drive, a partition or a LVM system, on another server.
This synchronization will be carried out in real time over the network and it is therefore recommended (but not mandatory) to use a dedicated network between the 2 concerned servers (the main server and the backup server).
Thanks to DRBD, our data will be accessible from 2 servers. If a server fails, data will always be accessible from the other server.
Nevertheless, something is missing so that the service is always accessible by your users.
This is what we will see in the next step. (Heartbeat)
2. What is Heartbeat
Heartbeat is a program that monitors the availability of a server and when one of them fails, services are automatically switched to the other server.
To perform this check, the 2 servers will contact each other over the network at regular intervals.
In summary, if server 1 is faulty, the user can still access the same services on server 2.
In addition, to make this transparent to your users, you will need to define a virtual IP address with Heartbeat.
Finally, be aware that it is highly recommended to use at least 2 different paths to verify that another server is still available.
This ensures that the server is failing.
Indeed, if a network card fails, heartbeat will always know the state of the server via the other network card. Otherwise, Heartbeat would have mistakenly considered that the other server was failing.
3. Configuration used
2 servers under Debian 7.7.0 x64 with :
- 2 hard drives for each server (1 for Debian and the other for the data to be replicated)
- 2 network cards for each server (1 for access from the outside and the other dedicated to data replication)
As mentioned earlier, the use of 2 network cards will allow you to have :
- a network card for external access by your users
- a dedicated network for data replication. Replication will therefore be faster and will not affect network performance for user access.
To connect your two servers to each other, you can use a router, a switch or even a crossover cable (connected directly to the two eth1 network cards (see below) of each server).
In our case, these 2 servers will have 2 network interfaces :
- eth0 : 10.0.0.31 for server 1 and 10.0.0.32 for server 2. This is the network card connected to the router through which users will access our services (webserver, ...)
- eth1 : 192.168.1.31 for server 1 and 192.168.1.32 for server 2. This is the network adapter connected to another router or switch (since the servers will have static IPs, the DHCP server will be unnecessary in this case)
To define the IP addresses on your Linux servers, refer to our tutorials : Debian - Define a private static IP address or Ubuntu - Define a private static IP address.
Note : if you don't have a gateway for the eth1 interface, don't specify the "gateway" line for this interface in the "/etc/network/interfaces" file.
In our case, we have a dedicated network between our 2 servers through the switch and the eth1 interfaces of our 2 servers.
4. DRBD (Data replication)
IMPORTANT: the indicated commands must always be executed on your 2 servers (unless stated otherwise), at the same time (otherwise you may get error messages).
4.1. Installation
Before starting, we will create a partition on the 2nd hard disk (sdb) of each server.
To do this, type this on the 2 servers :
Bash
fdisk /dev/sdb
To create a partition on the entire hard disk, type "n" (new partition), then "p" (primary), then leave the default values for the rest.
When prompting you for a command again, type "w" (write the partition table).
If you want to partition your hard disk in a different way, please refer to our tutorial : Partition your hard drive with fdisk
To install DRBD, simply install the "drbd8-utils" package on both servers.
Bash
apt-get install drbd8-utils
Once installed, enable the "drbd" module.
Bash
modprobe drbd
Note : to obtain information about the DRBD's version, use this command :
Bash
modinfo drbd
4.2. Resource configuration
As stated in the official documentation, the resources must be defined in "*.res" files.
In our case, we will create a "drbd0.res" file.
Note : this file must be identical on both servers.
Bash
vi /etc/drbd.d/drbd0.res
In this new file, we will paste this.
Note that :
- iw0 is the name of the resource you will need later to manage this resource.
- server1 and server2 are the hostnames of our two Debian servers.
- 192.168.1.31 and 192.168.1.32 correspond to the IP addresses of our 2 Debian servers on the dedicated network (the switch).
- "device /dev/drbd0" is the "disk" provided by DRBD
- "disk /dev/sdb1;" is the partition 1 (sdb1) of our "sdb" hard disk.
- "syncer" allows you to limit the synchronization speed between the 2 servers. (optional)
Plain Text
resource iw0 {
	startup {
		wfc-timeout 30;
		degr-wfc-timeout 15;
	}

    disk {
		on-io-error   detach;
	}

   # Transfer rate
	# 10M for 100mbits
	# 100M for 1Gbits
	syncer {
		rate 100M;
	}

	on server1 {
		device /dev/drbd0;
		disk /dev/sdb1;
		address 192.168.1.31:7788;
		meta-disk internal;
	}
	on server2 {
		device /dev/drbd0;
		disk /dev/sdb1;
		address 192.168.1.32:7788;
		meta-disk internal;
	}
}
On both servers, check and modify the name of your server if necessary by modifying these files :
- "/etc/hostname" : contains only the name of your Linux server
- "/etc/hosts" : contains the correspondences between the name of your Linux server and its IP address..
Bash
vi /etc/hostname
Note : if you change the name of your Linux server, it's best to restart it completely.
To avoid problems, add this to the "/etc/hosts" file of your 2 servers.
Bash
vi /etc/hosts
Plain Text
192.168.1.31	server1
192.168.1.32	server2
4.3. Enabling data replication
To enable the data replication, use these commands.
Note : iw0 is the name of the resource we just defined in the file "drbd0.res".
Bash
drbdadm create-md iw0
drbdadm up iw0
If you use the "drbd-overview" command, you should see that your 2 servers are currently connected and that they are all 2 in "secondary".
So, the replication doesn't occur because DRBD doesn't know in which direction it should synchronize your data.
Bash
drbd-overview
Plain Text
0:iw0 Connected Secondary/Secondary Inconsistent/Inconsistent C r-----
To solve the problem, type this command on the server1 (only) :
Bash
drbdadm -- --overwrite-data-of-peer primary iw0
Now, DRBD knows that server1 is the primary server and the other is the secondary server (the one that will be used in the event of failure of the main server).
Note : if you need to iron the master server in secondary, here is the command to use :
Bash
drbdadm secondary r0
If you type the "drbd-overview" command, you will see that DRBD begins data replication from the primary server to the secondary server.
This may take time depending on the use of your network and the size of the "disk" to replicate.
Bash
drbd-overview
Plain Text
  0:iw0  SyncSource Primary/Secondary UpToDate/Inconsistent C r-----
	[>....................] sync'ed:  0.2% (81760/81916)Mfinish: 0:08:53 speed: 156,416 (156,416) K/sec
To check the status of the synchronization, you can also use the command :
Bash
cat /proc/drbd
Or this command to see the progress live.
Note : press CTRL + C to exit the watch program.
Bash
watch cat /proc/drbd
4.4. Creating the file system on the DRBD Disk
To store data on the DRBD replicated partition, you will need to create a file system.
To do this, use the command :
Bash
mkfs.ext4 /dev/drbd0
If you receive this error, it's that your primary server is not in "Primary" or you try to create the file system on the "/dev/drbd0" disk of the secondary server.
Bash
mke2fs 1.42.5 (29-Jul-2012)
mkfs.ext4: Wrong medium type while trying to determine filesystem size
To resolve this issue, type this command on your primary server.
Bash
drbdadm -- --overwrite-data-of-peer primary iw0
Now, our data will always be available from 2 servers.
Finally, we need to create a cluster with these 2 servers so that our services are accessible with a single IP and that the services are always available, even if one of the 2 servers breaks down.
Share this tutorial
To see also
-

Linux 12/31/2016
Debian - Transform your server into a router and a DHCP server
-

Linux 2/4/2014
Debian / Ubuntu - Install a FTP server
-
Linux 9/12/2015
Debian / Ubuntu - Network monitoring with HTML statistics
-

Linux 1/11/2014
Ubuntu - Enable root account
You must be logged in to post a comment