- Linux
- 12 December 2014 at 15:33 UTC
-


When you buy a VPS server, or create an intranet with multiple servers, it's interesting to create a DNS server on your VPS or on your local network. So, you can manage subdomains of your domain without a middleman. That said, this requires to understand how DNS works (What is the purpose of DNS servers, why there are different types of records, ...).
Tutorial tested on Ubuntu 12.04 and Debian 7.7.0.
- Install and configure BIND
- Creating forward lookup zones (domain -> IP)
- Create reverse lookup zones (IP -> domain)
- Checking the Configuration
- Test the DNS server
- Configuring the secondary DNS server for your domain
- Tip : Force the update of the OVH secondary DNS server
- Reverse DNS at OVH
1. Install and configure BIND
To start, install the DNS Server "Bind".
Note : It's possible that this server is already installed by default. It depends, if the DNS server has been checked during the installation of the Linux distribution or not.
Bash
apt-get install bind9
Then, go to the folder "Bind".
Bash
cd /etc/bind
First, we will configure the DNS server to "listen" on all IP addresses. That allows us to send requests to the DNS server from anywhere : the server itself, the local network where the server is located and Internet).
To do this, edit the file "/etc/bind/named.conf.options" like this :
Bash
vim named.conf.options
Replace this :
Bash
listen-on {127.0.0.1;};
By this :
Bash
listen-on {any;};
Note : If the line "listen-on" doesn't exist, add it after the "listen-on-v6" line.
2. Creating forward lookup zones (domain -> IP)
Then, edit the "/etc/bind/named.conf.local" file to declare the zones to manage on this DNS server.
Bash
vim named.conf.local
At the end of the file, add this :
Notes :
- A zone corresponds to a domain.
- In our case, our domain is : informatiweb-tuto.net
Bash
zone "informatiweb-tuto.net" {

	type master;
	file "/etc/bind/db.informatiweb-tuto.net";

	//allow-transfer {xxx.xxx.xxx.xxx;}; // Secondary DNS server of the hoster
};
This configuration is the minimum needed, for that zone to be declared on your DNS server.
Informations :
- type master; : indicates that your DNS server is the master server for this zone. Without going into details, we configure the zone on a master DNS server and we can duplicate this zone on secondary DNS servers to distribute the network load (of DNS queries) on different servers.
- file "/etc/bind/db.domaine.com" : indicates the path of the file that will contain the details of your zone configuration. It's in this file that you set up the SOA, the serial, records (A, AAAA, CNAME, MX, ... of your different subdomains), ...
- If your Linux server is a VPS (virtual machine that you rent on the Internet), you can add the IP address of a secondary DNS server. With OVH, this address is in your OVH Manager.
This synchronizes your DNS configuration on their secondary DNS server. Thus, a part of DNS queries go to the secondary DNS server of OVH and the other will go to your server.
This improves the performance of your server.
Now that the basic setup is configured, we will create a file for each zone declared above.
Bash
vim db.informatiweb-tuto.net
Note : This file is empty because it will be created.
In this file, paste this :
Bash
;
; BIND data file for local loopback interface
;
$TTL	604800
@	IN	SOA	ns.informatiweb-tuto.net. webmaster.informatiweb-tuto.net. (
			      5		; Serial
			 604800		; Refresh
			  86400		; Retry
			2419200		; Expire
			 604800 )	; Negative Cache TTL
;
@	IN	NS	vpsxxx.ovh.net.
@	IN	NS	sdns2.ovh.net.
;
@	IN	A	xx.xx.xx.xx
@	IN	AAAA	xxxx:xxxx:xx:xxx:x:x:x:xxx
;
	IN	MX  10	mail.informatiweb-tuto.net.
;
ns	IN	A	xx.xx.xx.xx
www	IN	A	xx.xx.xx.xx
us	IN	A	xx.xx.xx.xx
mail	IN	A	xx.xx.xx.xx
smtp	IN	CNAME	www
pop	IN	CNAME	www
imap	IN	CNAME	www
ftp	IN	CNAME	www
webmail	IN	CNAME	www
In this file, replace the values :
- xx.xx.xx.xx : by the IPv4 address of your server
- xxxx:xxxx:xx:xxx:x:x:x:xxx : by the IPv6 address of your server (if applicable, otherwise delete this line)
- informatiweb-tuto.net. : by your domain, followed by a dot. The dot is mandatory. It isn't an error.
- vpsxxx.ovh.net : by the address of your DNS server (which is the primary DNS server for that zone)
- sdns2.ovh.net : by the address of the secondary DNS server of your hoster.
To create additional subdomains, so you rely on this configuration.
You can, of course, separate the different protocols on different servers.
For example :
- To point subdomains "mail", "SMTP", "pop", "imap" and "webmail" on an IP address "10.0.0.1". The IP address "10.0.0.1" is the IPv4 address of your mail server
- And point subdomains "www", "ftp" ... on IP address "10.0.0.2". The IP address "10.0.0.2" is the IPv4 address of your server where you installed : Apache, PHP, MySQL and phpMyAdmin.
Information on different types of DNS records :
- A : to point the domain or a subdomain on an IPv4 address (format : xx.xx.xx.xx)
- AAAA : same as A, but for IPv6 addresses (format : xxxx:xxxx:xxxx:xxxx:xxxx:xxxx:xxxx:xxxx)
- CNAME : to point a subdomain on the same address as another subdomain. This makes future changes faster.
- MX : Specifies the subdomain that points on your mail server.
- NS : Specifies the DNS server that handles this zone.
Warning : the NS record must point to an "A" record (not a CNAME).
Important :
- The MX record is required if you install a mail server on your server. This record allows your server to be visible from external computers when you send mails from your Linux server.
- If you install a mail server on your server, your server will need to be accessible from the outside. If it's a VPS, you will not have problems. By against, if you want to host your server at home, you will need do the necessary : buy a domain online (at OVH or another) and configure your router to forward the necessary ports to your server.
- At each change, you have to change the "Serial" indicated at the beginning of the file. One of the most reliable methods is to use the current date in English format : yyyymmddxx (xx is a number that you increment if you change this information several times on the same day.)
Note for the local network use :
- The NS record is mandatory, so you need to add this in this zone file :
Bash
@       IN      NS      ns.
ns      IN      A       xx.xx.xx.xx ; IP of your DNS server
3. Create reverse lookup zones (IP -> domain)
Now that we have created our forward lookup zone, we will create a reverse lookup zone. This zone is mandatory to translate IP addresses to domain name.
Thus, we can recover the domain name of a website through its IP address.
The reverse lookup zone name consists of the network ID (but reversed) followed by : .in-addr.arpa
For example :
- If the server have an IP address "10.0.0.5", its network ID will be "10.0.0" and the reverse zone name will be "0.0.10.in-addr.arpa".
- If the server have an IP address "192.168.1.5", its network ID will be "192.168.1" and the reverse zone name will be "1.168.192.in-addr.arpa".
To add a reverse lookup zone, edit the "/etc/bind/named.conf.local" file.
Bash
vim /etc/bind/named.conf.local
and add this (by change the id network reversed and the file name, if necessary) :
Bash
zone "0.0.10.in-addr.arpa" {
	type master;
	notify no;
	file "/etc/bind/db.10";
};
Then, create the file of the reverse zone.
Bash
vim db.10
And paste this inside :
Note : You can refer to an existing file if you wish. For example, the "db.127" file.
Bash
;
; BIND reverse data file for local loopback interface
;
$TTL    604800
@       IN      SOA     ns.informatiweb-tuto.net. webmaster.informatiweb-tuto.net. (
                              2         ; Serial
                         604800         ; Refresh
                          86400         ; Retry
                        2419200         ; Expire
                         604800 )       ; Negative Cache TTL
;
@       IN      NS      ns.
;
6       IN      PTR     ns.informatiweb-tuto.net.
6       IN      PTR     www.informatiweb-tuto.net.
6       IN      PTR     us.informatiweb-tuto.net.
6       IN      PTR     mail.informatiweb-tuto.net.
6       IN      PTR     smtp.informatiweb-tuto.net.
6       IN      PTR     pop.informatiweb-tuto.net.
6       IN      PTR     imap.informatiweb-tuto.net.
6       IN      PTR     www.informatiweb-tuto.net.
6       IN      PTR     webmail.informatiweb-tuto.net.
As you can see, the header (which contains info : SOA, Serial, Refresh, ...) is identical to the header of the forward lookup zone (domain -> IP).
Then you need to create a pointer (PTR) for each sub-domain configured in the forward lookup zone.
The number in front of the "IN" is the last octet of the IP address of the server concerned by this subdomain.
In our case, we point these subdomains on the IP address : 10.0.0.6 (10.0.0 is the network ID specified in the "named.conf.local" file for the "db.10" file and 6 is the last octet of the IP address).
4. Checking the Configuration
Now that the configuration files are modified or created, we will check our configurations.
To verify the basic configuration of BIND, use the following command:
Bash
named-checkconf -z
If you get something like this, your configuration is correct.
Bash
zone informatiweb-tuto.net/IN: loaded serial 6
zone 0.0.10.in-addr.arpa/IN: loaded serial 2
zone localhost/IN: loaded serial 2
zone 127.in-addr.arpa/IN: loaded serial 1
zone 0.in-addr.arpa/IN: loaded serial 1
zone 255.in-addr.arpa/IN: loaded serial 1
To check a specific zone, use the "named-checkzone" command.
Bash
named-checkzone informatiweb-tuto.net. db.informatiweb-tuto.net
If your forward lookup zone is configured correctly, a message similar to this will appear.
Bash
zone informatiweb-tuto.net/IN: loaded serial 6
OK
Then, don't forget to check your reverse lookup zones.
Bash
named-checkzone informatiweb-tuto.net. db.10
If your reverse lookup zone is configured properly, a message similar to this will appear.
Bash
zone informatiweb-tuto.net/IN: loaded serial 2
OK
5. Test the DNS server
After checking all your zones and the BIND basic configuration, reload the configuration of BIND to save the changes to your DNS server.
Bash
service bind9 reload
Finally, we will test our DNS server to be sure that it works properly.
To do this, use the command "nslookup".
Note : The second parameter specifies the DNS server to use to resolve the domain name. This parameter is optional in normal times, but it's mandatory to test your DNS server before DNS propagation has been completed (usually, this time is 24H).
Bash
nslookup informatiweb-tuto.net vpsxxx.ovh.net
If your domain is displayed with its associated IP address, is that your DNS server is running.
If not, check your DNS configuration.
To test the reverse zone, use the nslookup command like this :
Note : xx.xx.xx.xx is the IP address associated to a subdomain of your choice.
Bash
nslookup xx.xx.xx.xx vpsxxx.ovh.net
If lines like this occur, your reverse zone is configured properly :
Bash
xx.xx.xx.xx.in-addr.arpa name = sous-domaine.votre-domaine.net.
6. Configuring the secondary DNS server for your domain
If your domain is hosted by OVH, you will need to configure your domain to OVH for it to be handled by your DNS server, not the DNS server of OVH (specifically, the OVH master DNS server).
To do this, log into your OVH Manager (web version).
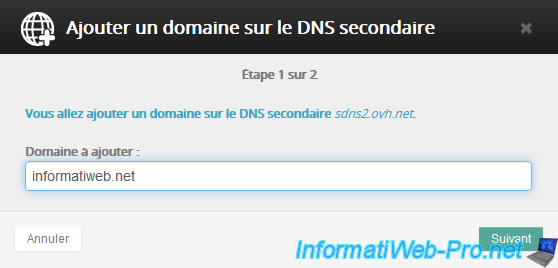
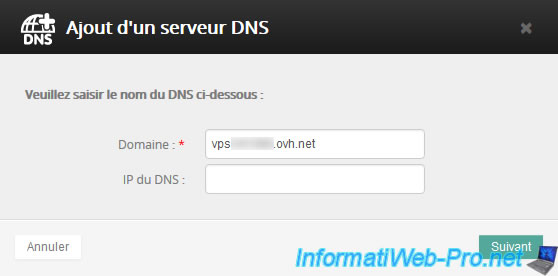
Select your VPS or dedicated server, click on "expert mode" at the top right, go to the "Secondary DNS" tab and click "Add Domain".
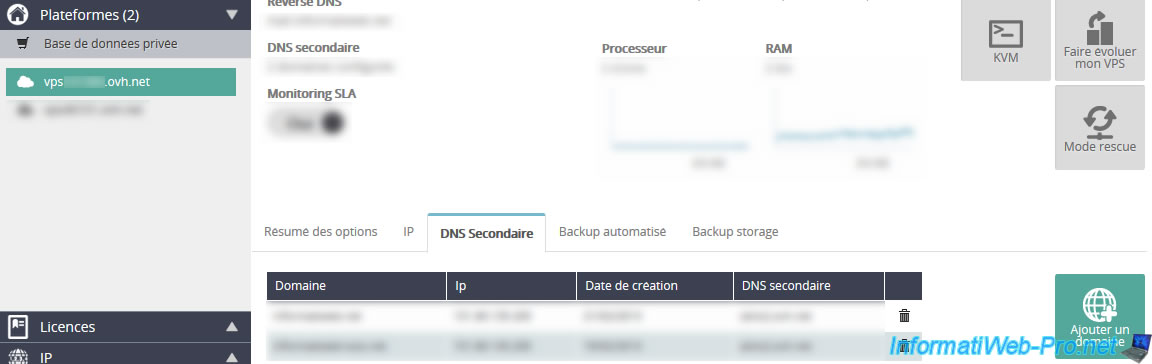
Specify the domain name to copy to the OVH secondary DNS server.
Note : It's possible that OVH asks you to create a TXT type DNS record with a random value. In this case, add the DNS record that OVH asks and try again.
The DNS zone of the domain will be copied to the secondary DNS server of OVH.
Next, select your domain, go to "DNS Management" and click "Add DNS Server".
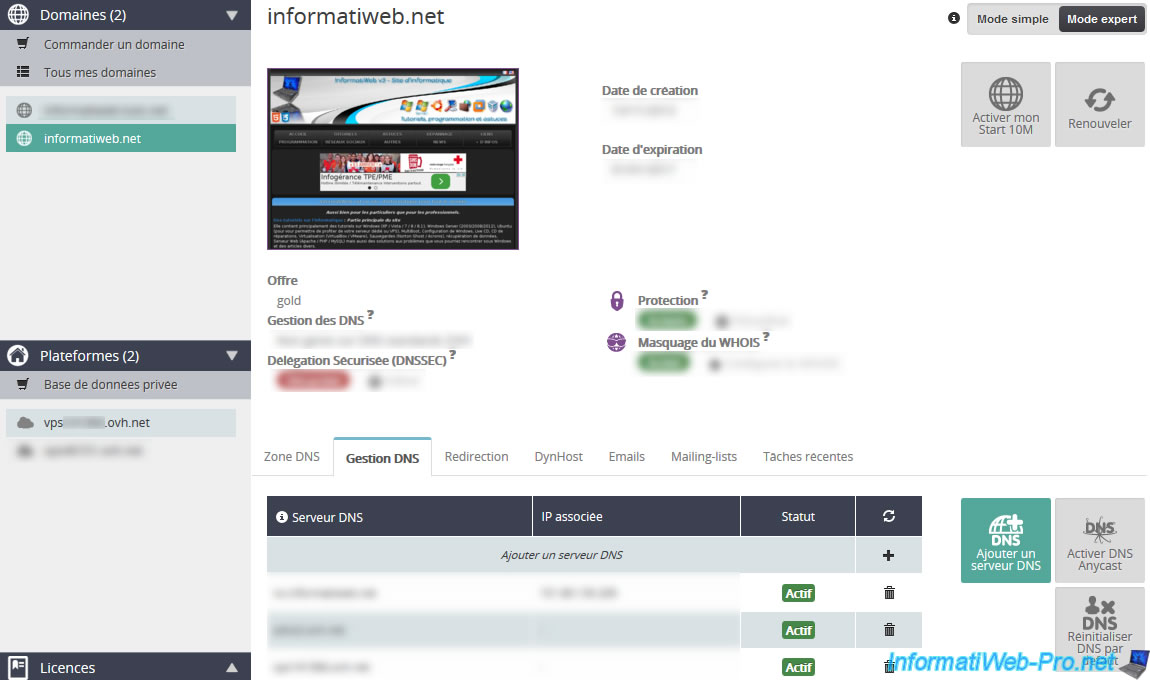
Specify the address of your VPS or dedicated server using its address "vpsxxxxxx.ovh.net" or "ksxxxxxx.kimsufi.com". If you use the address "ns.your-domain.net", you will need to specify the IP address of the server.
Wait for 24 to 48 hours for DNS propagation.
7. Tip : Force the update of the OVH secondary DNS server
If you forget to reduce the TTL (Time to Live) of your DNS zone a few days before changing server for your hosting (web or otherwise), the modification of your DNS zone is not taken into account for several days. Indeed, assume that the OVH secondary DNS server has grab a copy of your DNS Zone at 1 december and the TTL is equivalent to 2 days. So, your modification will not be taken into account before 3 december.
To solve this small problem, here's a little tip :
- First, in your OVH manager, select the desired domain and remove it from the secondary DNS server
- Then, occasionally, use Windows commands "ipconfig / flushdns" (to flush the DNS cache of Windows), then the command "nslookup your-domain.net sdns2.ovh.net".
Usually, the "nslookup" command will show you the following information :
Plain Text
Server : Name of the DNS server that responded to your request (in our case : the secondary DNS server of OVH)
Address : xx.xx.xx.xx (the IP address of the DNS server)

Name : your-domain.net
Address : xx.xx.xx.xx (the IP address associated to your domain name)
After 30 minutes or a few hours, your domain will disappear from the secondary DNS server.
Plain Text
Server : Name of the DNS server that responded to your request (in our case : the secondary DNS server of OVH)
Address : xx.xx.xx.xx (the IP address of the DNS server)

*** UnKnown can't find your-domain.net : Query refused
Finally, edit your DNS zone, and then add your domain on the secondary DNS server of OVH.
Since your DNS zone doesn't exist on the secondary DNS server of OVH, it will retrieve the new configuration. So, DNS servers around the world will get the new configuration and not the old configuration that was present on the secondary DNS server of OVH.
Next time, consider reducing the TTL of the DNS zone of your domain a few days before changing server. ;-)
8. Reverse DNS at OVH
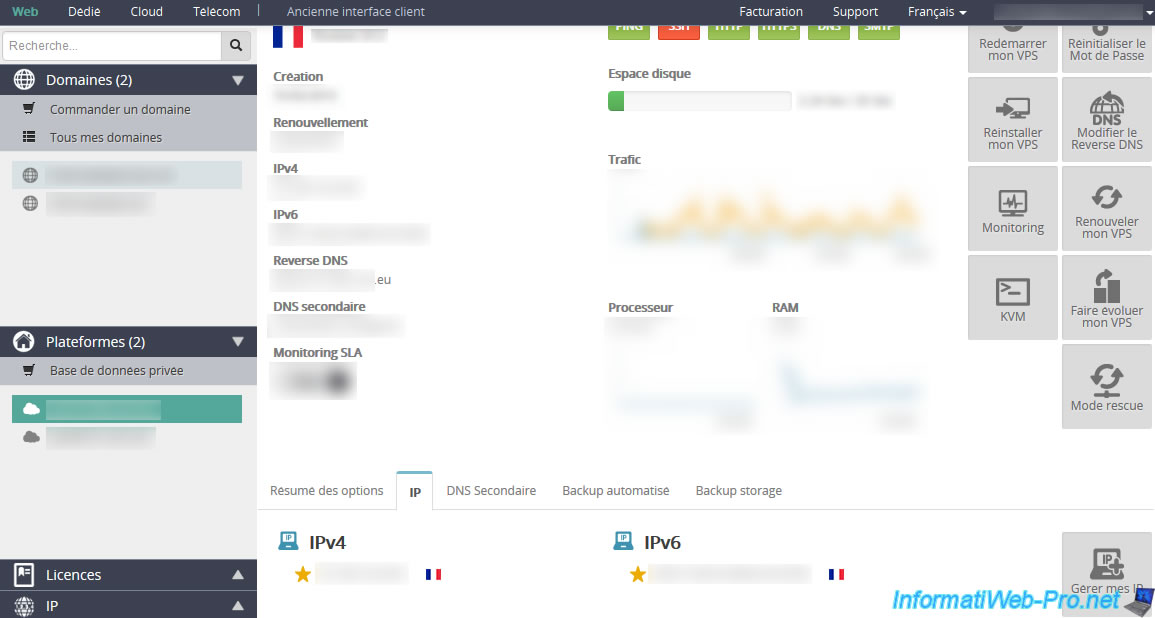
If you have purchased your VPS at OVH, you can configure the reverse DNS of your VPS in your OVH account.
To do this, select your VPS and go to the "IP" tab displayed at the bottom.
Then, click on the "Manage my IP" button on the right.
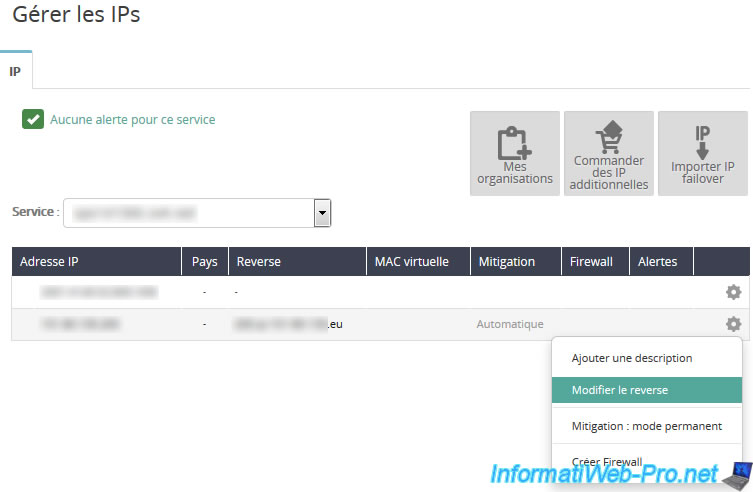
In the list, you will see two lines :
- one with only an IPv6 address
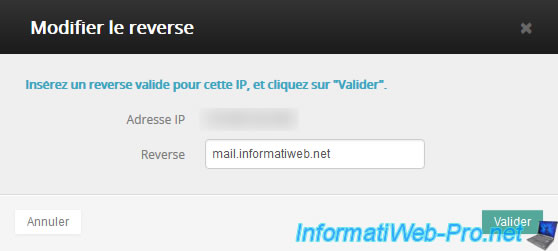
- the other with an IPv4 address and a generic domain name in the "Reverse" column. On this line, click on the gear at the right and click on "Change reverse".
In the case where you have installed an e-mail server on your VPS and it will also serve to send emails on the outside, you must specify the domain name that you use to send e-mails .
In our case, it's the e-mail server "mail.informatiweb.net".
If you don't configure the reverse DNS here, your email may go in the recipient's spam folder because these two names don't match.
In the case where you have not installed an email server on your VPS, you can put your root domain name or with the www.
In our case, we could have : informatiweb.net or www.informatiweb.net
Share this tutorial
To see also
-
Linux 7/21/2017
Debian - Clustering and service balancing (with 2 servers)
-
Linux 3/5/2015
Debian - Define a private static IP address
-
Linux 10/11/2016
Debian / Ubuntu - Configure an iSCSI server and an iSCSI client
-

Linux 1/15/2014
Ubuntu - Configure a LDAP server and a web interface to manage it
You must be logged in to post a comment