- Linux
- 12 September 2015 at 11:39 UTC
-

- 1/2

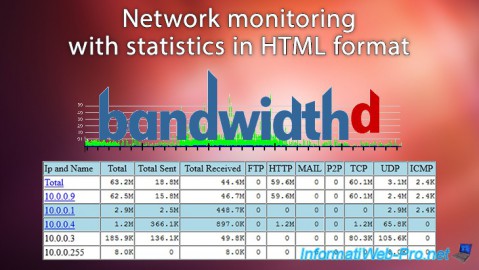
BandwidthD is a network monitoring program that generates statistics in HTML format every x minutes.
This program will allow you to :
- detect DDOS attacks and to know the IP address of the attacker (unless the attacker is using a botnet for its DDOS attack).
- find which computer uses the most bandwidth in your network or of your Internet connection.
- detect the use of file-sharing software (which are hungry of network traffic) like eMule, Bittorrent, ...
Note : Because this program generates statistics in HTML format, you'll need a web server to view theses data. In this tutorial, we will use the Apache web server.
- Install BandwidthD
- Install the Apache web server
- Configure BandwidthD
- Analyze LAN traffic entering and leaving your server
- Analyze all the traffic of your local network (Internet not included)
- Analyze network traffic (LAN and Internet) entering and leaving your server
- Analyze all traffic of your local network (including the Internet)
1. Install BandwidthD
To install BandwidthD, use the command :
Bash
apt-get install bandwidthd
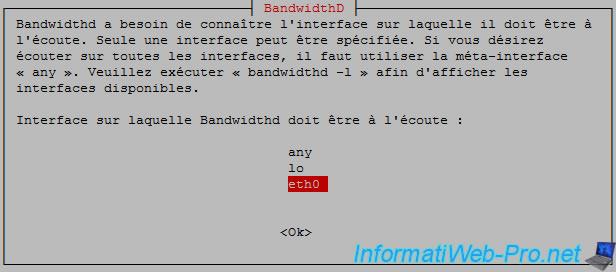
During the installation, the wizard will ask you for the network interface to listen :
- any : all network interfaces
- lo : the local loop (loopback) : IP address 127.0.0.1.
- eth0 : Ethernet network connection (wired)
- wlan0 : Wireless network connection
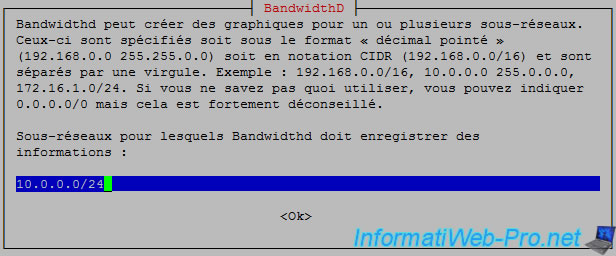
And the network ID to be analyzed.
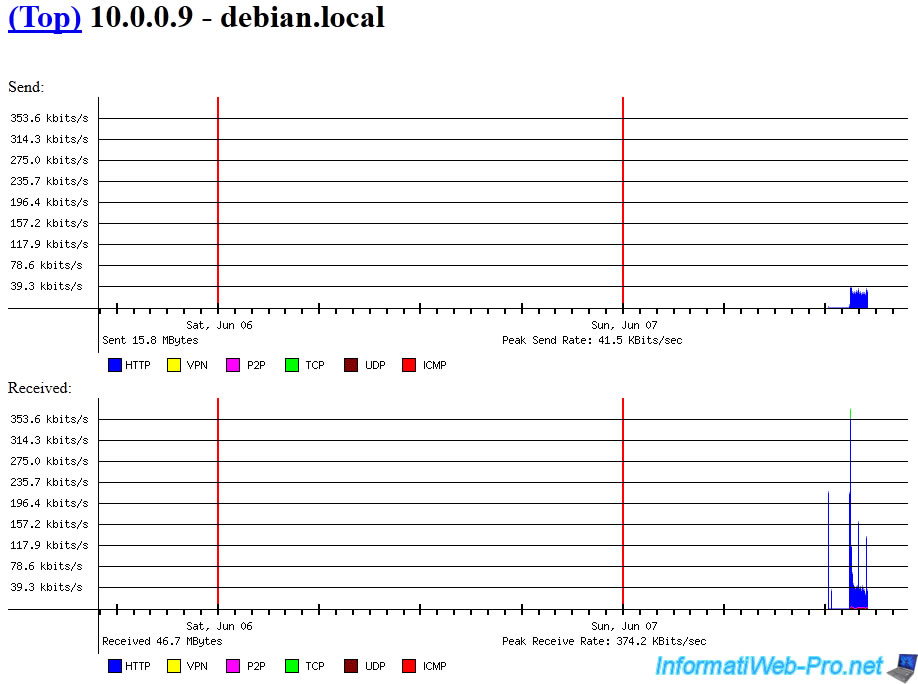
BandwidthD allows you to know statistics, per IP address.
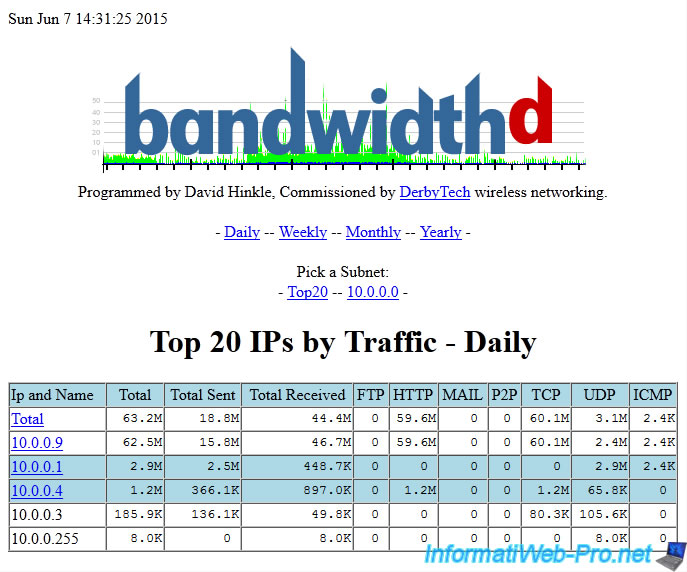
It can also create graphs based on the recorded data.
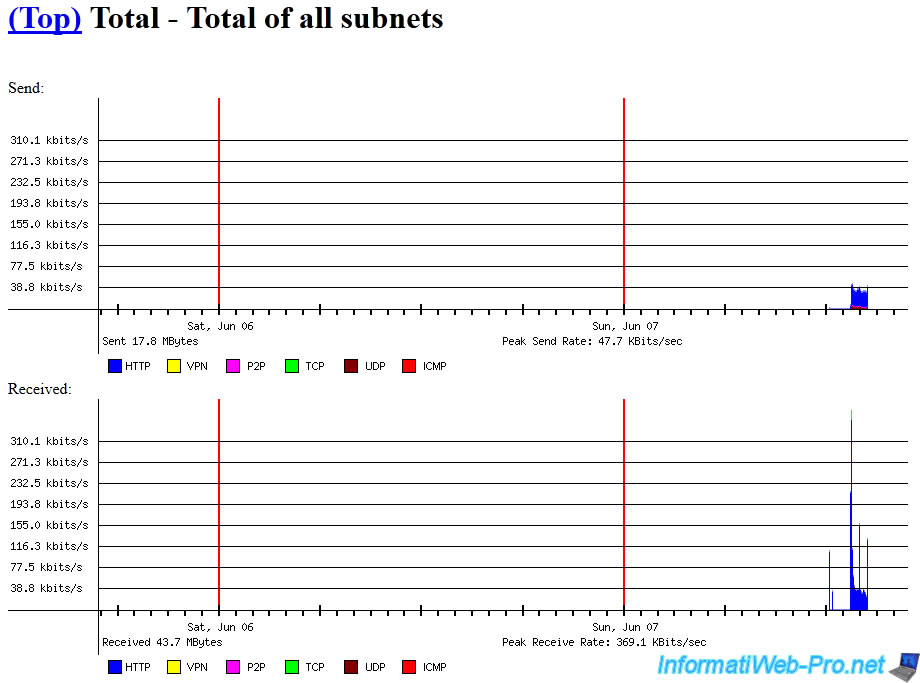
For the monitoring of the network, there are 3 possibilities :
- You analyze LAN traffic entering and leaving your server
- You analyze all the traffic of your local network (including Internet traffic coming, or not)
- You analyze network traffic (LAN and Internet) entering and leaving your server
2. Install the Apache web server
To install the Apache web server, use the command :
Bash
apt-get install apache2
Note : If you want to install a complete web server, please see our tutorial : Debian / Ubuntu - Install a complete web server with Apache, PHP, MySQL and phpMyAdmin
3. Configure BandwidthD
To configure BandwidthD, edit the "/etc/bandwidthd/bandwidthd.conf" file.
Bash
vim /etc/bandwidthd/bandwidthd.conf
In this file, you will find especially these values :
- subnet : Network ID to be analyzed. Eg : 10.0.0.0/24 or 192.168.0.0/24 for a local network. Or, 0.0.0.0/0 to analyze all network traffic (LAN and Internet)
- dev : Name of the network interface (NIC) to monitor.
Eg :
- eth0 for an Ethernet network connection (wired)
- wlan0 for a wireless network connection
- lo for the local loop (IP address : 127.0.0.1). - promiscuous : Promiscuous mode. By default (state : false), the NIC accepts only packets that are destined to him, or that she send. If you want to analyze all network connections (if your network equipment allows you to do it), you must activate this promiscuous mode.
- graph : Enable or not the creation of graphics. This line is commented by default, but graphics are enabled by default.
- meta_refresh : By default, the HTML page refreshes automatically every 150 seconds (2.5 minutes).
- htdocs_dir : Folder path that will contain statistics in HTML format.
To use the default path, just leave the comment (the # at the beginning of this line) of the line.
To use another path, uncomment this line and specify the desired path.
After editing the configuration, be sure to restart BandwidthD :
Bash
service bandwidthd restart
In order to access this web interface through our apache server, there are 2 possibilities :
- you change the "htdocs_dir" value in the configuration file of BandwidthD
- or you create a symbolic link between the default folder and a subfolder of "/var/www"
In our case, we'll use a symbolic link.
Bash
cd /var/www/
ln -s bandwidthd /var/lib/bandwidthd/htdocs
Share this tutorial
To see also
-

Linux 7/21/2017
Debian - Clustering and service balancing (with 2 servers)
-
Linux 3/5/2015
Debian - Define a private static IP address
-

Linux 12/20/2014
Debian / Ubuntu - Monitor your server with Monit
-

Linux 10/2/2016
Install and use the LVM on Linux
You must be logged in to post a comment