- Linux
- Apache
- 31 January 2014 at 19:13 UTC
-


In this tutorial, we will install a full server web development including :
- Apache : The web server itself.
- PHP : to create dynamic websites.
- MySQL : The server database (which is the most used in the world of web).
- phpMyAdmin : The database tool management known worldwide, written in PHP.
1. Apache installation
![]()
Begin by installing Apache web server.
Bash
apt-get install apache2
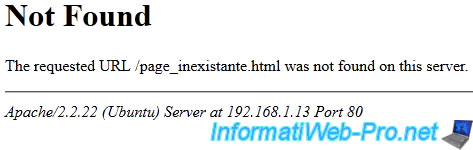
Once the server is installed, we will prevent the display of information about the server, displayed (for example) in a 404 error :
Apache/x.x.xx (Ubuntu) Server at 192.168.1.xx Port 80
To do this, add the following lines at the bottom of "/etc/apache2/apache2.conf" file.
Bash
vi /etc/apache2/apache2.conf
Apache
# Prevents display information from the server
ServerSignature Off
ServerTokens Prod
You can then give a name to your Apache server by adding the line below.
Apache
# Server name
ServerName www.mon_domaine.com
Then restart the apache configuration to reflect the changes :
Bash
/etc/init.d/apache2 reload
2. PHP installation
![]()
Then, install the "PHP" module in order to create dynamic websites.
Note: PHP will be automatically linked to your Apache web server.
Warning : PHP5 is no longer available at present, so the command below no longer works.
Bash
apt-get install libapache2-mod-php5 php5 php5-common php5-curl php5-dev php5-gd php5-idn php-pear php5-imagick php5-imap php5-json php5-mcrypt php5-memcache php5-mhash php5-ming php5-mysql php5-ps php5-pspell php5-recode php5-snmp php5-sqlite php5-tidy php5-xmlrpc php5-xsl
Important : to install the latest version available for php, as well as common extensions (Curl, GD, MySQL, ...), use the command below.
Bash
apt-get install libapache2-mod-php php php-common php-curl php-dev php-gd php-pear php-imagick php-imap php-json php-memcache php-mysql php-ps php-pspell php-snmp php -tidy php-xmlrpc php-xml
Then, edit the following informations in the "/etc/php/8.1/apache2/php.ini" as below.
Note : the path of the "php.ini" file varies according to the versions of PHP.
Bash
vi /etc/php/8.1/apache2/php.ini
PHP
# Super global variable (disable for security reasons)
register_globals = Off
# Cache PHP (PHP mask information about the header of the web server).
# Because hackers will not know the php version used on the server, you will be more protected against attacks.
expose_php = Off
# The "display_errors" directive to display the errors generated by PHP.
# Activate it when developing a website but disable it at the start of production thereof to prevent hackers from falling on "sensitive" informations.
display_errors = On
# short_open_tag allows you to use short tags <? ?> instead of <?php ?>
short_open_tag = On
# magic_quotes_gpc can "protect" the "GET" data "POST" ... in adding / before '
# Before PHP 5.4, it's recommended to disable and protect their PHP code correctly. Moreover, this feature no longer exists since version "5.4.0".
magic_quotes_gpc = Off
# Sets a list of dangerous turn on your server functions. You will also notice a list of functions "pcntl_" is already entered in the latest version of PHP5. In this case, simply add them to the list.
disable_functions = symlink,shell_exec,exec,proc_close,proc_open,popen,system,dl,passthru,escapeshellarg,escapeshellcmd
Then, restart the apache configuration to reflect the changes.
Note : PHP is a module that is linked to the Apache web server. So that web server must be restarted.
Bash
/etc/init.d/apache2 reload
3. MySQL installation and securing
![]()
Now install the server MySQL database.
Bash
apt-get install mysql-server mysql-client mysql-common
Then edit the "/etc/mysql/conf.d/mysql.cnf" file like this :
Bash
vi /etc/mysql/conf.d/mysql.cnf
Plain Text
[mysqld]
# Configure the server to work with the default UTF8.
# So when creating a database via phpMyAdmin (for example),
# the collation will be automatically set to "utf8_general_ci".
character-set-server = utf8
collation-server=utf8_general_ci
Then restart the MySQL configuration to reflect the changes :
Bash
/etc/init.d/mysql reload
Then secure your MySQL server using the command below.
Warning : MySQL now uses the "root" account of your Linux distribution instead of the internal MySQL "root" account.
Changing the password of the "root" account internal to MySQL is therefore no longer possible via the command below.
To enable the Ubuntu "root" account or change its password, refer to our tutorial : Enable root account on Ubuntu.
Bash
mysql_secure_installation
The following questions will be asked :
Bash
# The password for the MySQL root user
Enter current password for root : ****
# No need to change the password because we just configure
Change the root password? : n
# Finally, answer yes (Y) for the rest of the questions by pressing the "Enter" key (since the default is Y (yes)).
# Removes anonymous users
Remove anonymous users? : y
# Disable root access to the MySQL server for obvious safety reasons
Disallow root login remotely? : y
# Database "test" created during the installation and is accessible by default deletes everyone.
Remove test database and access to it? : y
# Updating server rights (in particular to take into account the new root password if you have changed it)
Reload privilege tables now? : y
# Your MySQL server is now secure
All done!  If you've completed all of the above steps, your MySQL installation should now be secure.
4. phpMyAdmin installation
![]()
Now install the tool database management known worldwide data written in PHP phpMyAdmin
Bash
apt-get install phpmyadmin
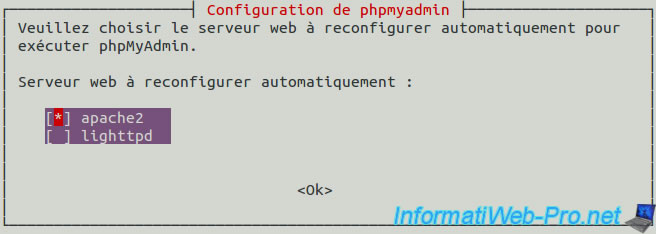
During the installation of phpMyAdmin, a window will appear for you to select which web server phpMyAdmin is installed. Check the "apache2" box by pressing the space bar and press "Enter" to confirm.
Note : If you confirm the selection without having checked the box, simply type the command "dpkg-reconfigure phpmyadmin" to restart the configuration of this package.
Important : make sure to check the "apache2" box by pressing the spacebar before proceeding to the next step.
Then answer "Yes" to the question : "Should we configure the database phpmyadmin with dbconfig-common."
Then, type the password for the MySQL server (password of the administrator of the database) when the wizard prompted.
And finally, enter a password (2x) for phpmyadmin account will be automatically created on the MySQL server.
You can a little more secure your phpmyadmin, changing his alias in the apache configuration file.
To do this, edit the "vim /etc/apache2/conf-available/phpmyadmin.conf" file like below.
Apache
# Phpmyadmin address (choose a personal address so that hackers can not find it easily)
Alias /my_super_admin /usr/share/phpmyadmin
Reload the Apache web server configuration to take into account the modification of this alias by running the command below.
Bash
/etc/init.d/apache2 reload
Share this tutorial
To see also
-
Linux 9/8/2016
StartSSL - Renew your SSL certificates
-
Linux 7/24/2015
StartSSL - Secure your website for free
-

Linux 2/13/2014
Ubuntu - Secure your Apache web server (HTTPS)
You must be logged in to post a comment