- Linux
- 25 February 2015 at 15:52 UTC
-

- 1/5

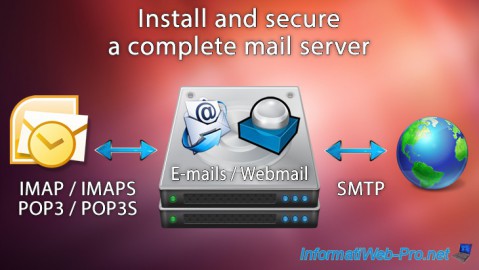
You bought a VPS or a dedicated server where you want to install a complete mail server in order to send emails directly from your server. So, this tutorial will allow you to do this.
Note : You can also follow this tutorial to create a local mail server (ie sending mails only on your local network). Sending mails to the outside may not work in this case. This is the case of the Google server that automatically rejects connections from servers that are not accessible from the outside.
Prerequisites :
- A VPS or dedicated server on Debian (7.7.0 version used for this tutorial)
- Online Server : A registered domain name on the Internet.
- Local Server : A registered domain name on the Internet or not managed on a local DNS server (Warning : Your email server must be visible from the outside to be able to send mail to the outside).
- Be comfortable with Linux. Because the installation of a mail server is complicated.
- Install the mail server (+ SMTP) : Postfix
- Create the Postfix database
- Install and configure the postfix database
- Postfix configuration (mapping database)
- Test the mail server using telnet (initialize the e-mail address)
- Install POP3 and IMAP protocols (Courier)
- Fix : IMAP Error
- Advice : POP3 protocol
- Install the Webmail : "RoundCube Webmail"
- Secure SMTP server with an authentication using SASL
- Telnet test
- Activating the submission port (587)
- Generate or buy SSL certificates
- Secure the webmail over HTTPS
- Secure SMTP over TLS
- Secure IMAP and POP3 over SSL
- Reminder of the configuration parameters
- Optional : Use IMAPS and SMTPS with RoundCube
1. Install the mail server (+ SMTP) : Postfix
To begin this long tutorial, we will first install the mail server "Postfix".
Because Postfix also supports MySQL databases, we will install the "postfix-mysql" package that will install postfix with its MySQL extension.
Bash
apt-get install postfix-mysql
Note : Under debian, you should use this command instead of the above :
Bash
apt-get install postfix postfix-mysql
Press the TAB and ENTER keys to skip the screen
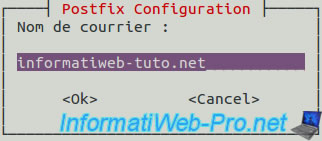
Choose "Website".
Then, enter your domain name. (It is behind the @ in your email addresses)
Once the server is installed, open the "/etc/postfix/master.cf" file and make sure you have a dash for the SMTP line in the "chroot" column.
If this is not the case, specify a dash to activate the Postfix chroot.
2. Create the Postfix database
For security reasons, we will create a postfix user with a different password of other MySQL users and we give him all the rights to the database "postfix" only.
To do this, go to the phpMyAdmin interface and click on "Databases" in the top menu.
Then, type "postfix" in the box provided for that purpose and select "utf8_general_ci" in the list. Then, click "Create".

Now that the database is created, make sure you have selected it (see image below) and then, click the "Privileges" tab.
![]()
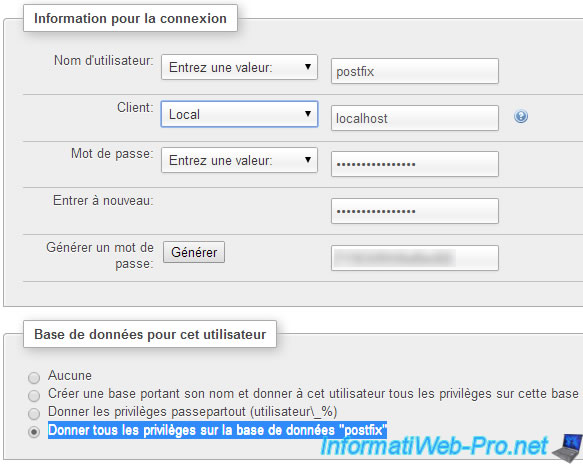
Then, click "Add User" at the bottom of the list.
Now enter the following information :
- Username : postfix
- Client : localhost (or select Local in the list)
- Password : **** (click the "Generate" button located below, for safety)
Finally, make sure that the box 'Give all privileges on the database "postfix"' is selected and click "Run" at the bottom of the page.
3. Install and configure the postfix database
To successfully create the Postfix MySQL database, we will use the "Postfix Admin" tool written in PHP.
Note : You can of course create it yourself if you wish.
To install "Postfix Admin", get the download link for the latest version and right click on the "direct link" link.
Then, click on "Copy Link Location". You will have that kind of link :
Plain Text
https://sourceforge.net/projects/postfixadmin/files/postfixadmin/postfixadmin-2.3.6/postfixadmin-2.3.6.tar.gz/download?use_mirror=netcologne&=&r=https%3A%2F%2Fsourceforge.net%2Fprojects%2Fpostfixadmin%2Ffiles%2Fpostfixadmin%2F&use_mirror=switch
Delete what is behind the ".tar.gz" and then type the following commands :
Move to the root home folder
Bash
cd ~
Download the latest version of "Postfix Admin" for Linux (.tar.gz).
Bash
wget https://downloads.sourceforge.net/project/postfixadmin/postfixadmin/postfixadmin-2.3.6/postfixadmin-2.3.6.tar.gz
Unzip the archive you just downloaded, in the apache www folder.
Bash
tar xzvf postfixadmin-2.3.6.tar.gz -C /var/www/
Move to the "/var/www" folder.
Bash
cd /var/www
Rename the "postfixadmin-xxx" folder to "postfixadmin".
Bash
mv postfixadmin-2.3.6 postfixadmin
Give the rights to the apache user "www-data" on the "postfixadmin" folder (and its contents : -R)
Bash
chown -R www-data:www-data postfixadmin
Save the "config.inc.php" file of "postfixadmin".
Bash
cp postfixadmin/config.inc.php postfixadmin/config.inc.php.bak
Replace all occurrences of "change-this-to-your.domain.tld" with your domain (in our case : informatiweb-tuto.net) in the file "postfixadmin/config.inc.php"
Note : You must enter your domain name and not a subdomain like mail or otherwise. Moreover, it's this domain which will be shown after the @ in your e-mail addresses of the server.
Bash
sed -i 's/change-this-to-your.domain.tld/informatiweb-tuto.net/g' postfixadmin/config.inc.php
Then, edit the same file (postfixadmin/config.inc.php) to configure the connection details for the database :
Bash
vi postfixadmin/config.inc.php
PHP
$CONF['configured'] = true; // Enables the use of the postfixadmin installation program
...
$CONF['default_language'] = 'fr';
...
$CONF['database_type'] = 'mysqli'; // Extension used by PHP. In our case mysqli. (if you put mysql, a warning is displayed on the "setup.php" page of "postfixadmin.")
$CONF['database_host'] = 'localhost'; // MySQL server address. localhost if apache and MySQL is on the same computer.
$CONF['database_user'] = 'postfix'; // MYSQL Username (postfix user that was created in step 2)
$CONF['database_password'] = 'his_password'; // His password
$CONF['database_name'] = 'postfix'; // Database to use
...
$CONF['encrypt'] = 'md5crypt'; // Encryption to use
Now that manual configuration is complete, go to page : http://www.your-domain.com/postfixadmin/setup.php
The php script will now test your configuration and try to create tables in the database "postfix".
If all goes well, you will have only lines ending with OK without error messages.
If you get an error "Warning: Depends on: IMAP functions", install the "php5-imap" package (if needed).
It may be that this package is already installed but disabled.
Bash
apt-get install php5-imap
php5enmod imap
service apache2 restart
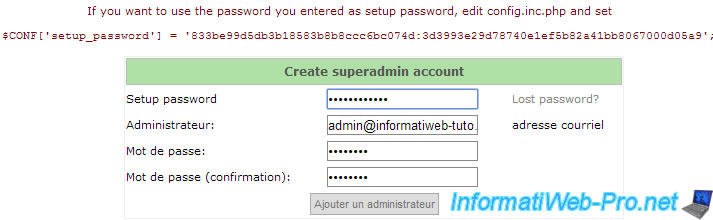
At the bottom you will find a form in which you need to enter a password.
Then, you need to specify the encrypted password that will be displayed to you, in the file "postfixadmin/config.inc.php".
Once you have specified the encrypted password in the configuration file, create the administrator account by filling out the form provided.
Note : As mentioned in the form, the user name must be an email address.
Now that "Postfix admin" is configured, log on at "http://www.your-domain.com/postfixadmin/."
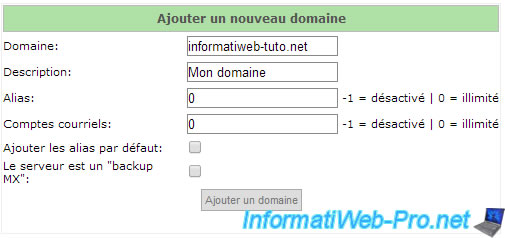
Once logged in, click on : List fields -> New Domain.
And specify :
- Domain : your-domain.com
- Description : What you want
- Alias : Maximum number of aliases for this domain.
- E-mail accounts : Maximum number of mail addresses for the domain.
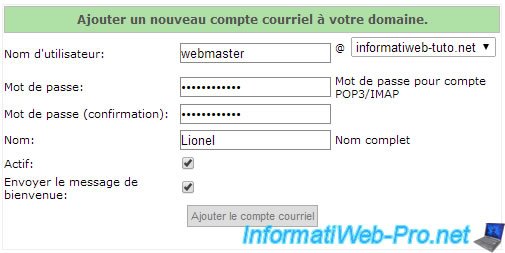
Then, go to the menu "Virtual List -> Add an email account" to create e-mail addresses in your mail server.
And specify :
- Username @domain : What you want @ your-domain.com
- Password : Account Password
- Name : Name of the person
Now, the database of "Postfix" is configured.
4. Postfix configuration (mapping database)
Now that the mail server "postfix" and its database (created properly using Postfix Admin) are created and configured, it remains to configure Postfix to be able to use this database properly.
Note : We'll tell to postfix where are this or that information. It's called : the mapping.
To store mails, we will create a user "vmail" which will be in the group of the same name, and we assign their the id 4000 (for convenience).
Bash
groupadd -g 4000 vmail
useradd -g vmail -u 4000 vmail -d /var/spool/vmail -m
Then, move to the "/etc/postfix" folder.
Bash
cd /etc/postfix
Now, we will create the following "mapping" files :
- mysql_virtual_mailbox_domains.cf
- mysql_virtual_mailbox_maps.cf
- mysql_virtual_alias_maps.cf
- mysql_relay_domains.cf
These files contain all the following structure :
- Hosts : MySQL server address
- User : MySQL user
- Password : This user password
- Dbname : the name of the postfix database
- Query : The SQL query that "Postfix" will send to the server to retrieve the information that it need.
Here are the contents of these files (the lines "vi ..." allow you to create the above listed files) :
Bash
vi mysql_virtual_mailbox_domains.cf
Plain Text
hosts = 127.0.0.1
user = postfix
password = his_password
dbname = postfix
query = SELECT domain FROM domain WHERE domain='%s' and backupmx = 0 and active = 1
Bash
vi mysql_virtual_mailbox_maps.cf
Plain Text
hosts = 127.0.0.1
user = postfix
password = his_password
dbname = postfix
query = SELECT maildir FROM mailbox WHERE username='%s' AND active = 1
Bash
vi mysql_virtual_alias_maps.cf
Plain Text
hosts = 127.0.0.1
user = postfix
password = his_password
dbname = postfix
query = SELECT goto FROM alias WHERE address='%s' AND active = 1
Bash
vi mysql_relay_domains.cf
Plain Text
hosts = 127.0.0.1
user = postfix
password = his_password
dbname = postfix
query = SELECT domain FROM domain WHERE domain='%s' and backupmx = 1
Now that the files "mapping" are created, we will configure the "/etc/postfix/main.cf" file of postfix to tell it (especially) where those files are located.
Bash
vi /etc/postfix/main.cf
At the end of the file, add the following lines :
Plain Text
virtual_uid_maps = static:4000
virtual_gid_maps = static:4000
virtual_mailbox_base = /var/spool/vmail

virtual_mailbox_domains = mysql:/etc/postfix/mysql_virtual_mailbox_domains.cf
virtual_mailbox_maps = mysql:/etc/postfix/mysql_virtual_mailbox_maps.cf
virtual_alias_maps = mysql:/etc/postfix/mysql_virtual_alias_maps.cf
relay_domains = mysql:/etc/postfix/mysql_relay_domains.cf

smtpd_recipient_restrictions = permit_mynetworks, reject_non_fqdn_hostname, reject_non_fqdn_sender, reject_non_fqdn_recipient, reject_unauth_destination, reject_unauth_pipelining, reject_invalid_hostname
Note :
Don't put "reject_non_fqdn_hostname" if you want to send mail through your SMTP server for clients emails (specifically : If your computer doesn't have a domain name : FQDN).
Otherwise, the user will have an error "Helo command rejected : Need fully-qualified hostname" when trying to send his email.
Now that postfix knows : domains, email addresses, ... we must remove our domain of the "mydestination" line.
Otherwise, the following warning will appear in the "/var/log/syslog" file : warning: do not list domain informatiweb-tuto.net in BOTH mydestination and virtual_mailbox_domains
If you wish, you can set the maximum lifetime has mail to reach the recipient.
After this time, you will get a warning indicating that the mail was not delivered to the recipient.
By default, this line is commented so you will need to remove the # to activate it :
Plain Text
delay_warning_time = 4h
For security, change the rights of these 4 files by typing the following commands :
Bash
chmod u=rw,g=r,o= mysql_*.cf
chgrp postfix mysql_*.cf
Finally, restart the "postfix" service.
Bash
service postfix restart
5. Test the mail server using telnet (initialize the e-mail address)
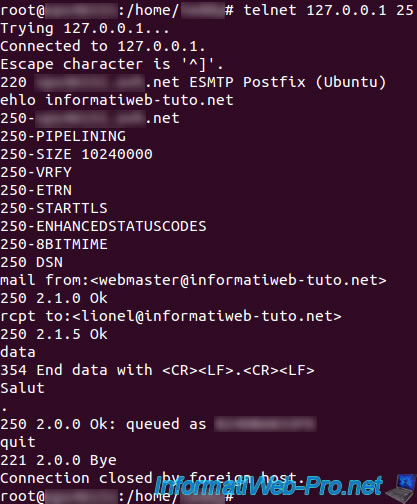
To test and initialize a local e-mail address (of your domain), connect to the postfix mail server by using telnet.
If debian does not find the telnet command, install it by typing this :
Bash
apt-get update
apt-cache search telnet
apt-get install telnet
Information :
- 127.0.0.1 (or localhost) : indicates that you are on the same computer as the SMTP server
- 25 : The port number corresponding to SMTP
Bash
telnet 127.0.0.1 25
Then, say hello to the SMTP server. (Note that the command looks like hello in English)
Bash
ehlo votre-domaine.com
Specify an existing local sender otherwise errors will occur in the logs.
Bash
mail from:<lionel@informatiweb-tuto.net>
Specify a local recipient (to initialize this email address)
Bash
rcpt to:<webmaster@informatiweb-tuto.net>
Then, type "data" to write your message.
Bash
data
Salut
Then, finish by typing a "." on the next line and press again Enter
Finally, type "quit" to exit telnet and return to the terminal.
Now, check that your email has been sent, by going to the "/var/log/mail.log" file.
Bash
cat /var/log/mail.log
If all goes well, you should find a message with this "(Delivered to maildir)."
Otherwise, refer to the error messages you find there.
If the message was displayed in the logs, you can list the "/var/spool/vmail" to be sure that the folder of the recipient's email address has been created.
If this is the case, perform, if necessary, this for your other local email addresses.
![]()
Share this tutorial
To see also
-
Linux 9/12/2015
Debian / Ubuntu - Network monitoring with HTML statistics
-

Linux 10/2/2016
Install and use the LVM on Linux
-

Linux 8/23/2016
PuTTY - Fix the issue with the numeric keypad
-

Linux 1/15/2014
Ubuntu - Configure a LDAP server and a web interface to manage it
You must be logged in to post a comment