Create a VPN server (remote access) via OpenVPN (in L3 mode) secured via SSL/TLS on pfSense 2.6
- Firewall
- pfSense
- 05 September 2025 at 19:07 UTC
-

- 4/4

8. Test access to the company network via the VPN tunnel
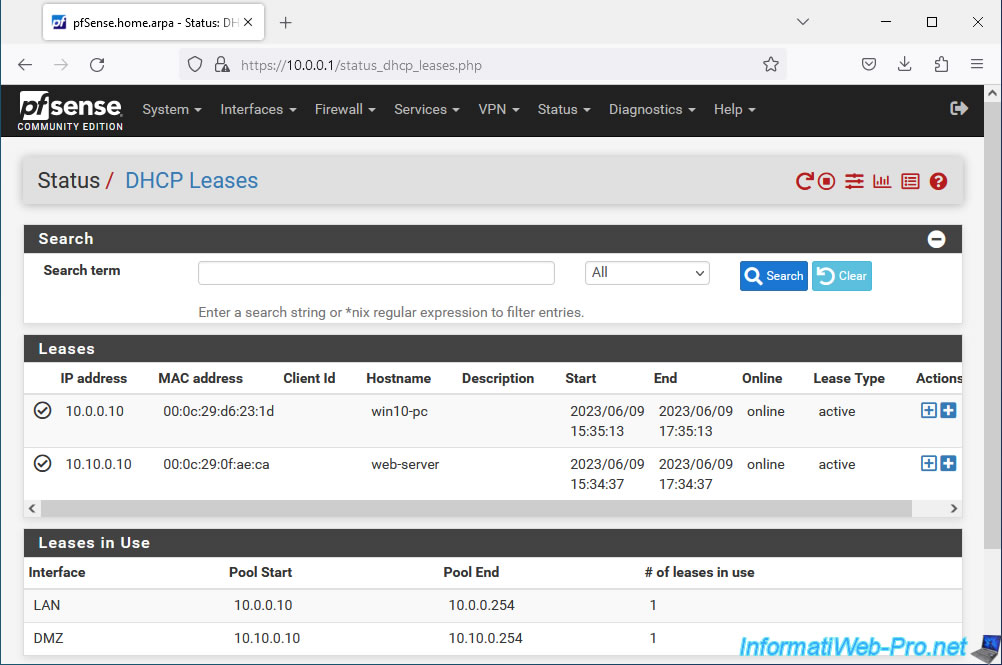
For your information, in our case, we have 2 machines in our company, as well as 2 subnets.
- win10-pc: a PC running Windows 10 that is on the pfSense LAN and has the IP address 10.0.0.10.
- web-server: a web server on Windows Server which is located on the pfSense DMZ network and which has the IP address 10.10.0.10.
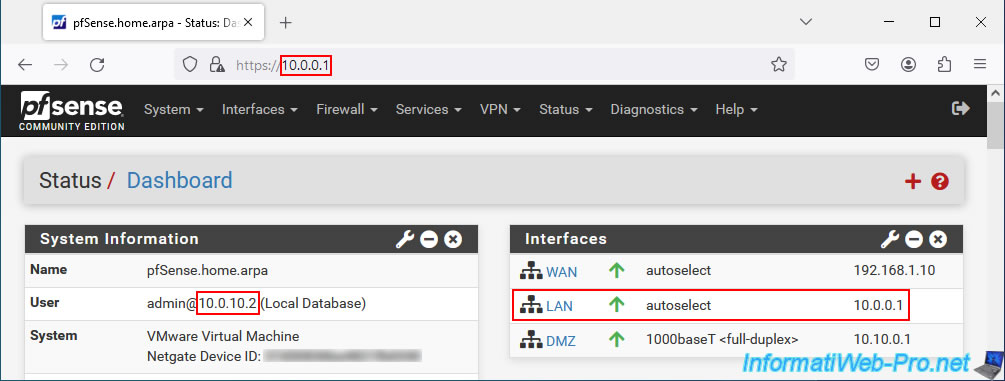
If you try to access the pfSense LAN IP address from your remote client connected via the OpenVPN client, you will see that you can access it without problems.
As you can see, in our case the IP address "10.0.0.1" corresponds to the LAN IP address of pfSense and we are connected from a remote PC (via OpenVPN Client) which has the virtual IP address "10.0 .10.2".
As a reminder, the IP address "10.0.10.2" is part of the network used for the OpenVPN tunnel (via the "Tunnel Network" option).
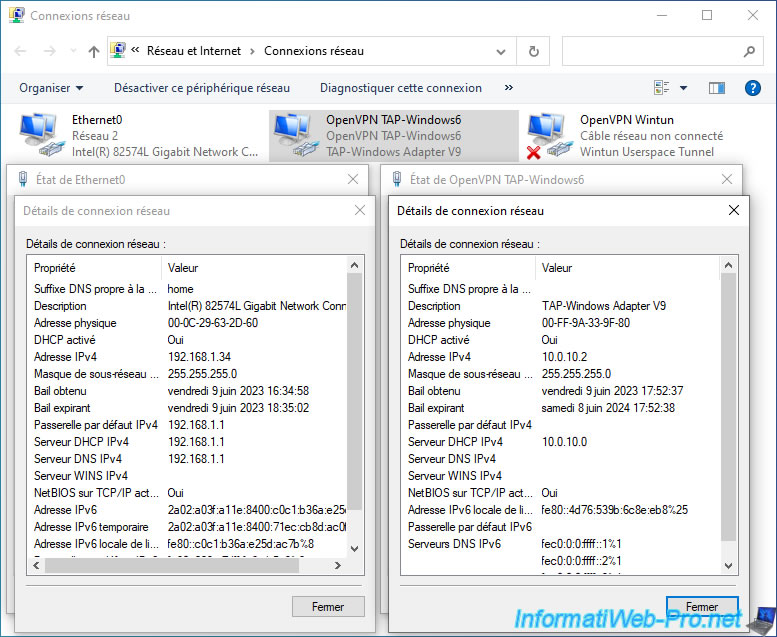
On your remote computer, if you look at your network connections, you will see that 2 OpenVPN network cards have been added.
As you can see, in our case:
- Ethernet0: our Ethernet network card (wired network) has the IP address "192.168.1.34" and the IP address of our physical router is "192.168.1.1".
- OpenVPN TAP-Windows6: the virtual network card used by OpenVPN to establish the VPN tunnel to your company's network has the IP address "10.0.10.2" which is part of the network "10.0.10.0/24" defined for the network at use for OpenVPN tunnel.
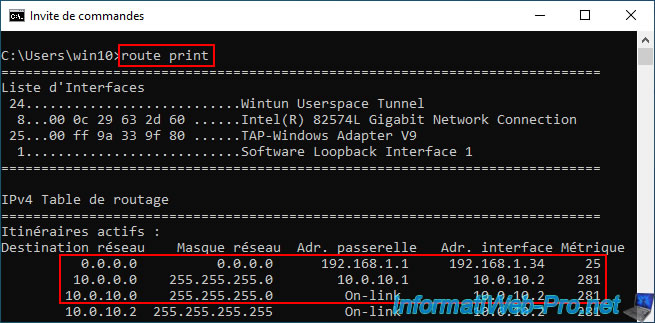
On this remote computer, open a command prompt and view the configured routes:
Batch
route print
As you can see :
- 0.0.0.0 / 0.0.0.0: most network traffic (remote network: 0.0.0.0 = everything except networks with a different route below) from your computer will go through your physical router (192.168.1.1) thanks to the card network with the IP address "192.168.1.34" in our case.
- 10.0.0.0 / 255.255.255.0 (= 10.0.0.0/24) network traffic destined for the network "10.0.0.0/24" (used by the LAN network of pfSense and our company) will pass through the VPN tunnel via the IP address "10.0.10.1".
The gateway IP address "10.0.10.1" is the virtual IP address assigned to your OpenVPN server and is part of the network used for the OpenVPN tunnel (10.0.10.0/24).
Note that OpenVPN always assigns the 1st IP address of the network defined for the tunnel to the OpenVPN server. The IP in "10.0.10.1" therefore corresponds to the OpenVPN server. - 10.0.10.0 / 255.255.255.0 (= 10.0.10.0/24): network traffic destined for the network "10.0.10.0/24" (which corresponds to the network used internally for the OpenVPN tunnel) will pass through the network card with the IP address "10.0.10.2" (in our case).
Which corresponds to the "OpenVPN TAP-Windows6" network card and therefore to the VPN tunnel.
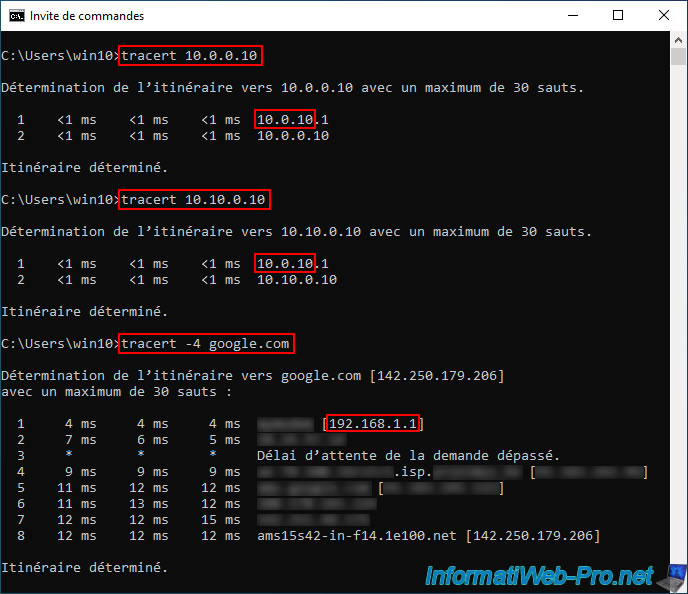
To see where network packets are going through, you can use the Windows "tracert" command to attempt to communicate with a machine on the company's LAN network, a machine on the DMZ network (if applicable), as well as a server on Internet (like Google's web server).
As you can see, when you try to communicate with a machine or server on the pfSense LAN or DMZ network (known by the OpenVPN server via the "Local Network" setting), your computer goes through the OpenVPN tunnel (whose network used internally is "10.0.10.0/24").
Batch
tracert 10.0.0.10
tracert 10.10.0.10
If you try to contact the Google website via IPv4 (using the "-4" parameter of "tracert"), you will see that your computer will use your Internet Box to access it instead of going through the VPN.
Hence the appearance of the name of your Internet service provider (ISP or ISP in English) on the path of network packets sent over the Internet.
Batch
tracert -4 google.com
Note: the domain "1e1000.net" belongs to Google. You can easily verify this using the WHOIS of this domain.
The domain change is simply because the domain "google.com" uses an alias of the domain "ams15s42-in-f14.1e100.net" and these point to the same IP address.
Except that reverse DNS will only display the real domain name (ams15s42...).
9. Check OpenVPN tunnel status
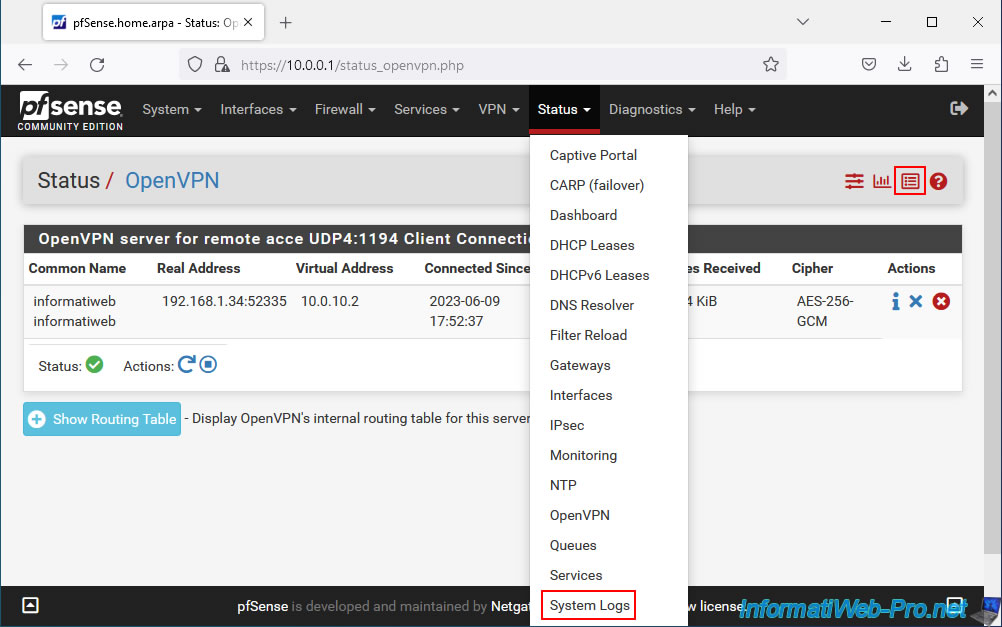
To check the status of OpenVPN, go to: Status -> OpenVPN.
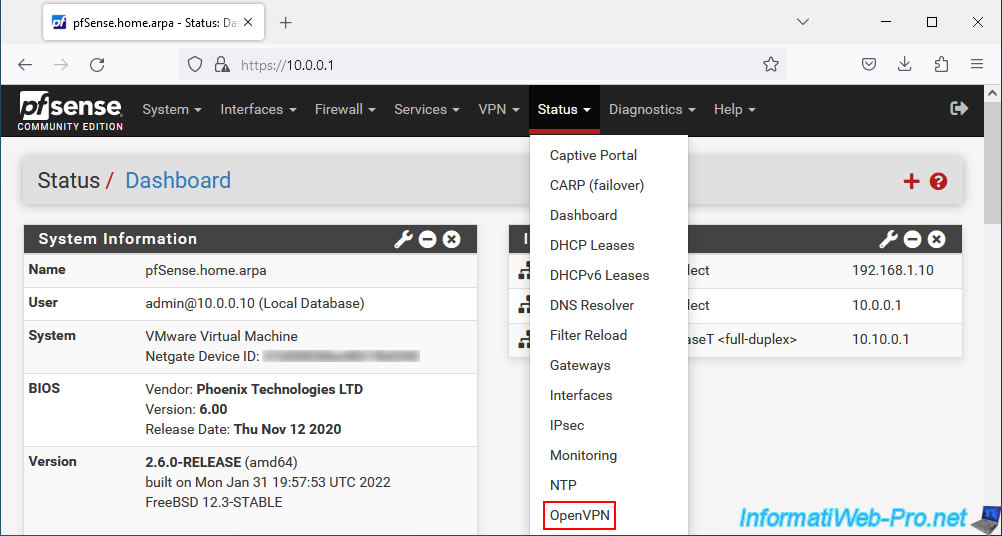
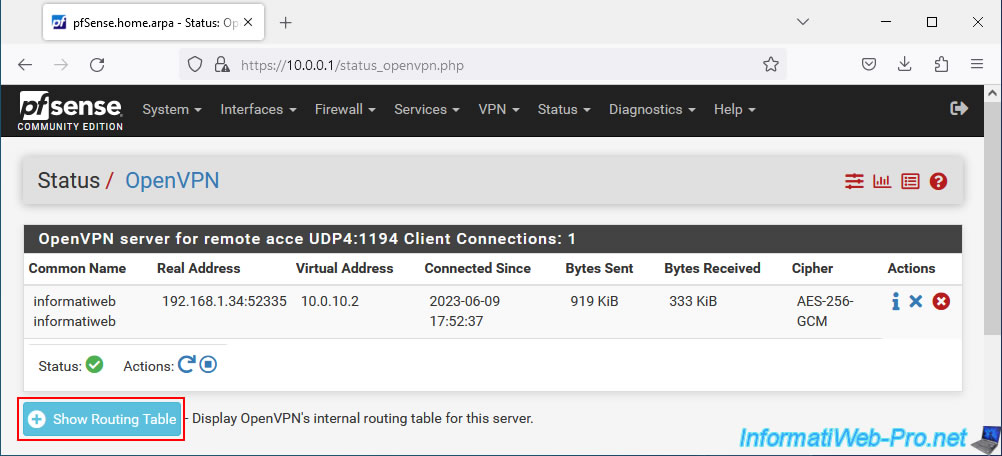
On the "Status / OpenVPN" page that appears, you will see a section "OpenVPN server for remote access UDP 4:1194 Client Connections" with the list of connected OpenVPN clients:
- Common Name: name of the connected user.
- Real Address: external (public) IP address of the connected client.
- Virtual Address: virtual IP address assigned to this OpenVPN client for the OpenVPN tunnel.
- Connected Since: indicates how long this OpenVPN client has been connected.
- Bytes Sent: amount of data sent.
- Bytes Received: quantity of data sent.
- Cipher: encryption algorithm used.
- Actions: click a cross to forcefully disconnect a client.
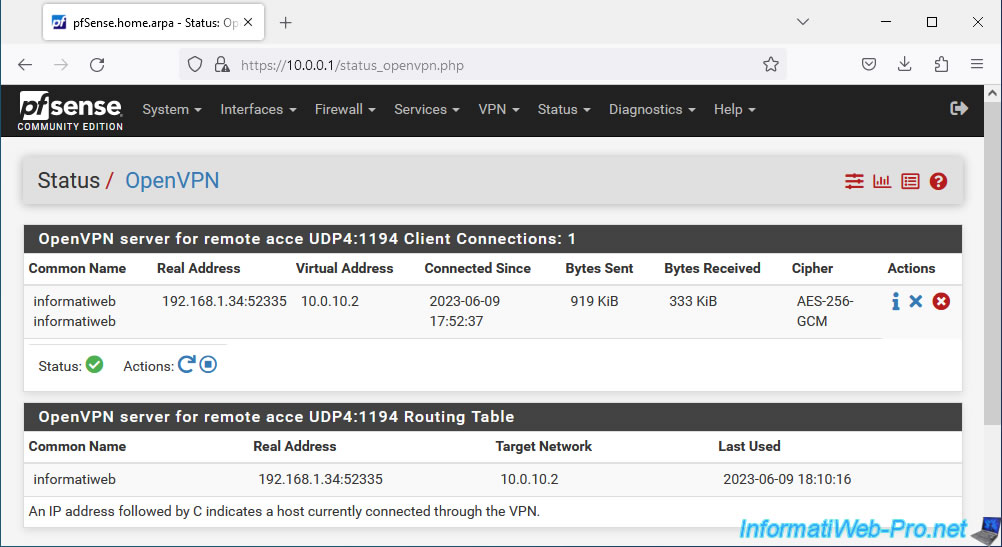
To view the current OpenVPN routing table, click the "Show Routing Table" button.
In the case of a VPN configured in "remote access" mode, you will see almost the same information as in the list above.
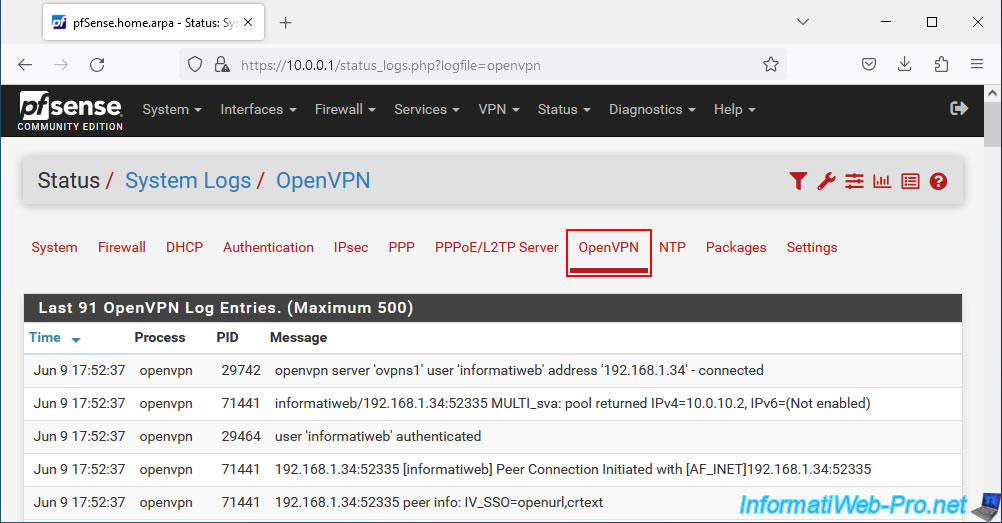
10. View logs for OpenVPN
In the event of a problem with OpenVPN, consult the OpenVPN logs via the "Status -> System Logs" menu, then go to the "OpenVPN" tab of the page that will appear.
Otherwise, from the OpenVPN status page, you can also click on the penultimate red icon to go directly to the right place.
In both cases, you will arrive on the "Status / System Logs / OpenVPN" page.
Sort the list by date/time (Time) and try to find interesting information that would explain the cause of the problem.
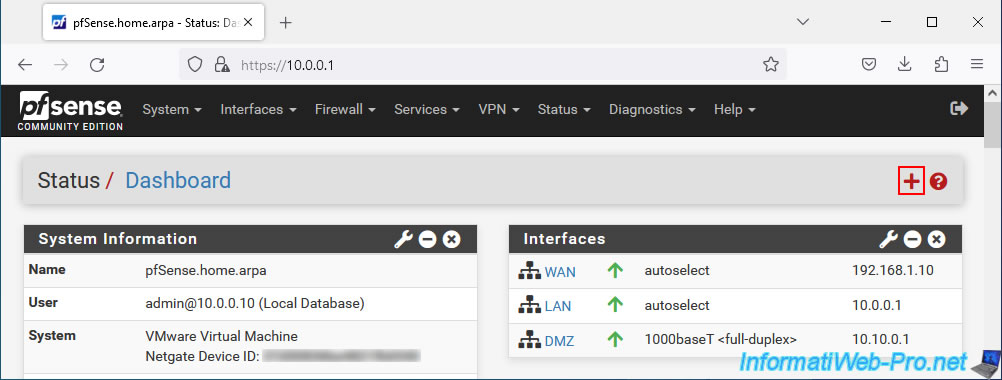
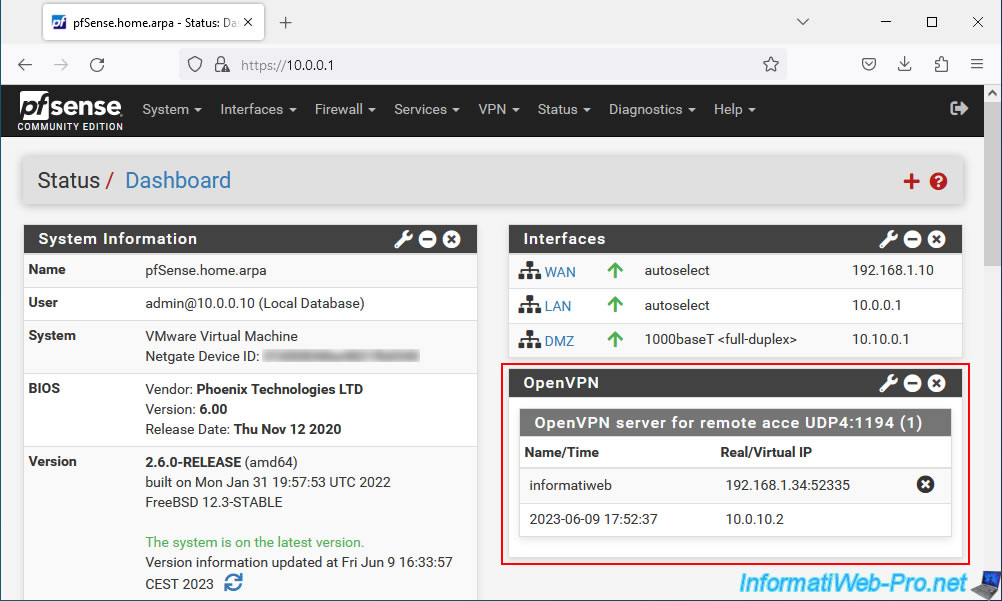
11. Add the OpenVPN widget to the pfSense dashboard (optional)
Finally, you can display OpenVPN information on the pfSense dashboard by clicking on the pfSense logo.
Next, click the "+" icon at the top right of the page.
In the "Available Widgets" section that appears, click on: OpenVPN.
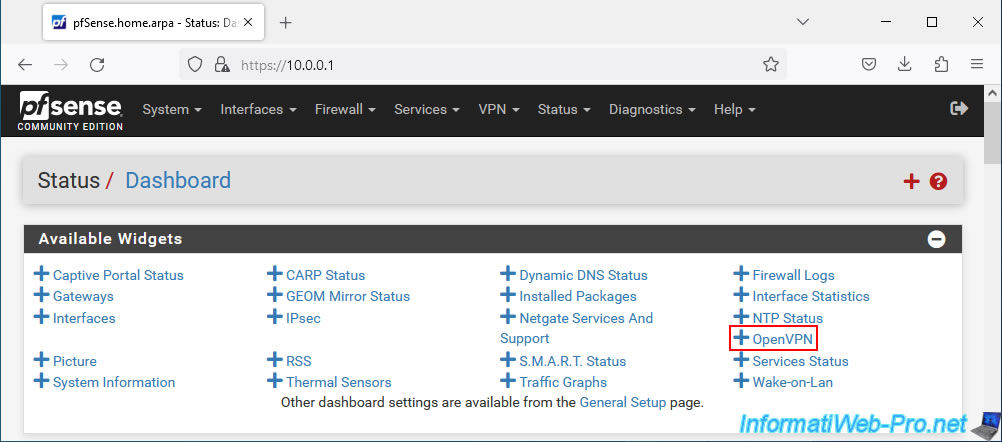
The "OpenVPN" widget appears with the "OpenVPN server for remote access UDP4:1194" section in which you will find:
- Name: the name of a logged in user.
- Time: the date and time since he has been connected.
- Real IP: the public IP address of the connected client.
- Virtual IP: the virtual IP address assigned to this client by OpenVPN for the network used in the OpenVPN tunnel.
Share this tutorial
To see also
-
Firewall 6/25/2025
pfSense 2.6 - 1:1 NAT (IP address mapping)
-

Firewall 6/11/2025
pfSense 2.6 - Create a DMZ and configure the firewall
-

Firewall 6/18/2025
pfSense 2.6 - Manage quality of service (QoS)
-

Firewall 6/20/2025
pfSense 2.6 - NAT (port forwarding)
No comment