Configure a LACP link (LAGG) on pfSense 2.6
- Firewall
- pfSense
- 08 August 2025 at 08:07 UTC
-

- 2/3

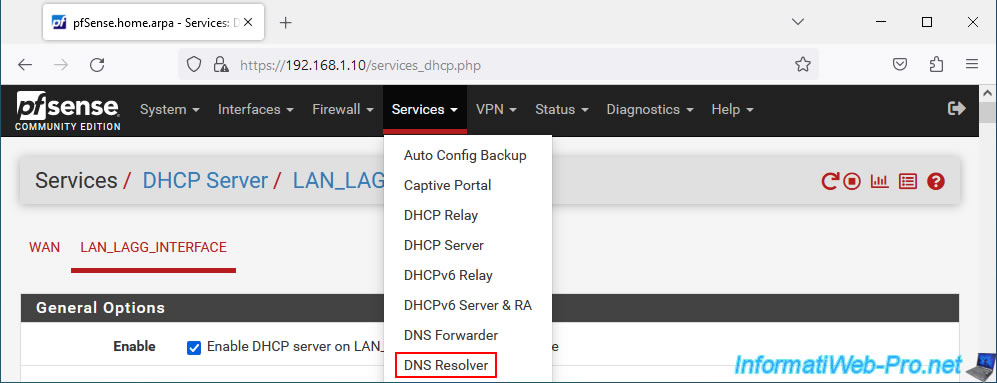
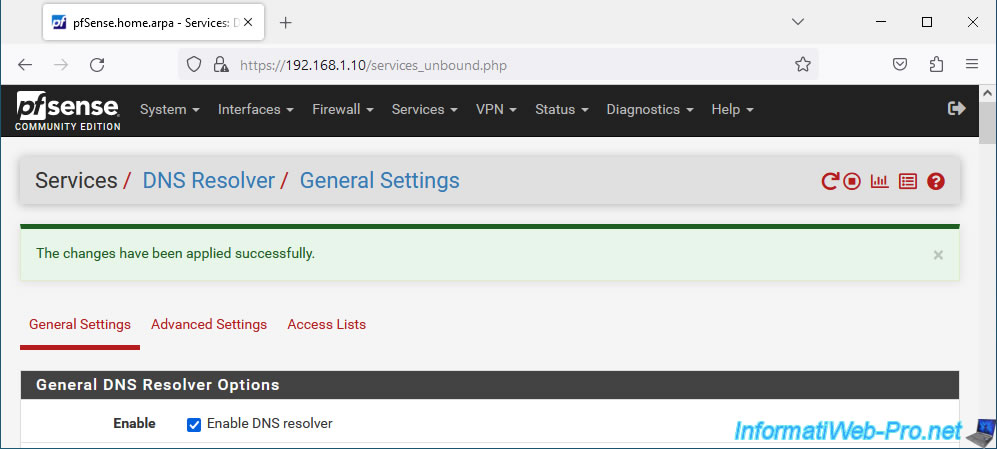
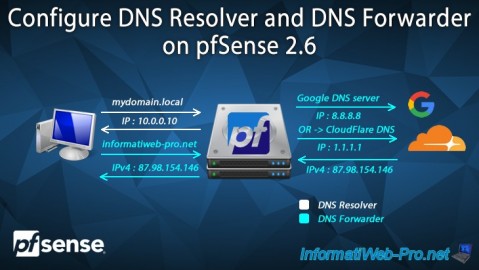
6. Enable DNS resolver
For your client PCs to resolve domain names, you must enable the pfSense DNS resolver on your new LAGG LAN.
To do this, go to: Services -> DNS Resolver.
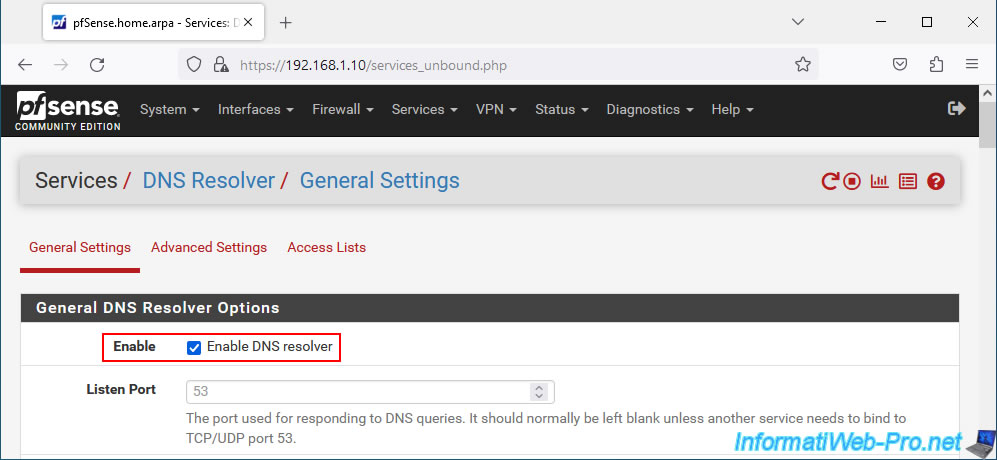
At the top of the page, check the "Enable DNS resolver" box to enable the pfSense DNS resolver.
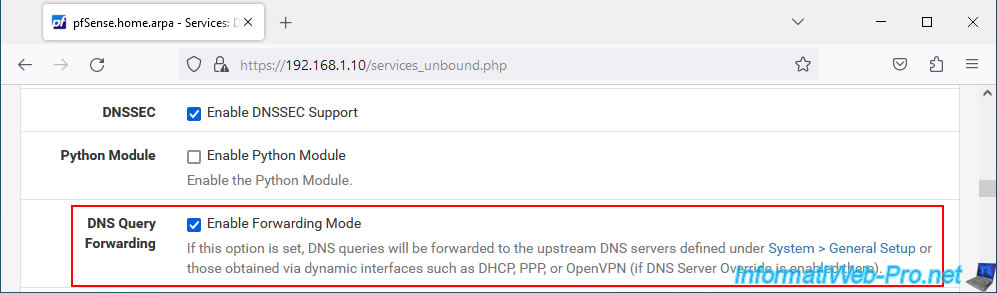
Check the "Enable Forwarding Mode" box to resolve domain names using the DNS servers configured on the "System -> General Setup" page.
At the bottom of the page, click Save.
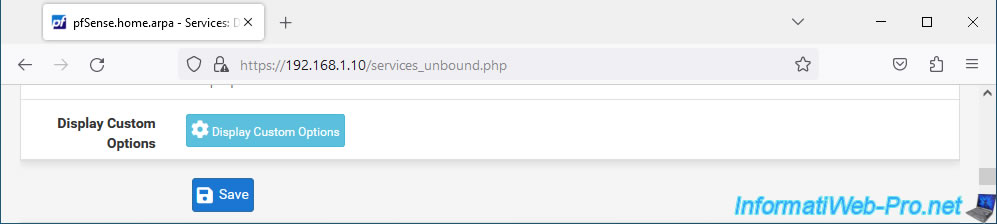
At the top of the page, click: Apply Changes.

The DNS resolver has been enabled and configured.
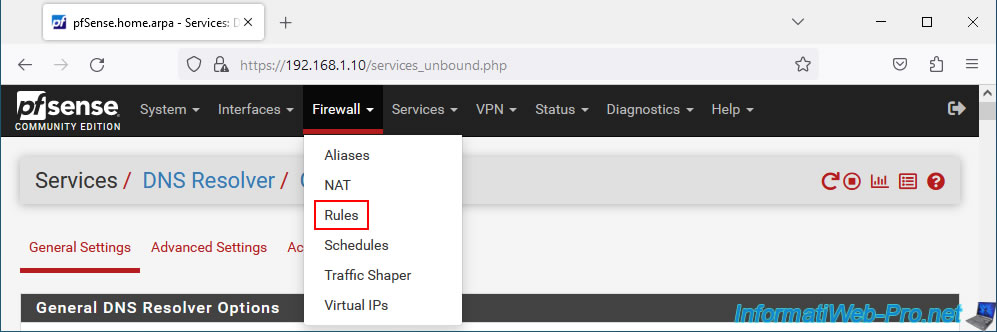
7. Allow network traffic on the LAGG LAN network interface
Although, by default, pfSense allows network traffic on the LAN interface, this is not the case for logical network interfaces created later.
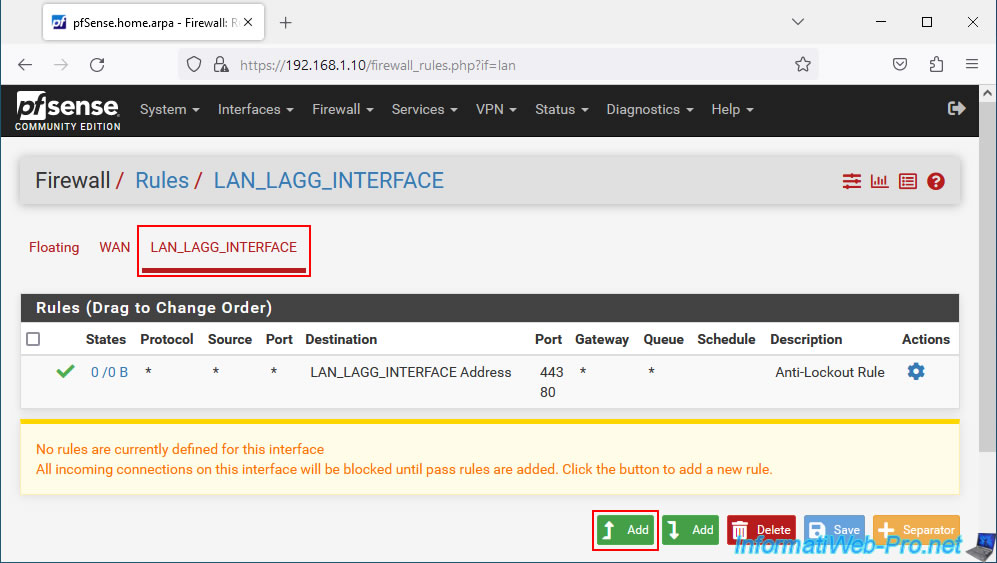
You must therefore adapt the pfSense firewall configuration by going to: Firewall -> Rules.
In the "LAN_LAGG_INTERFACE" tab, click on: Add.
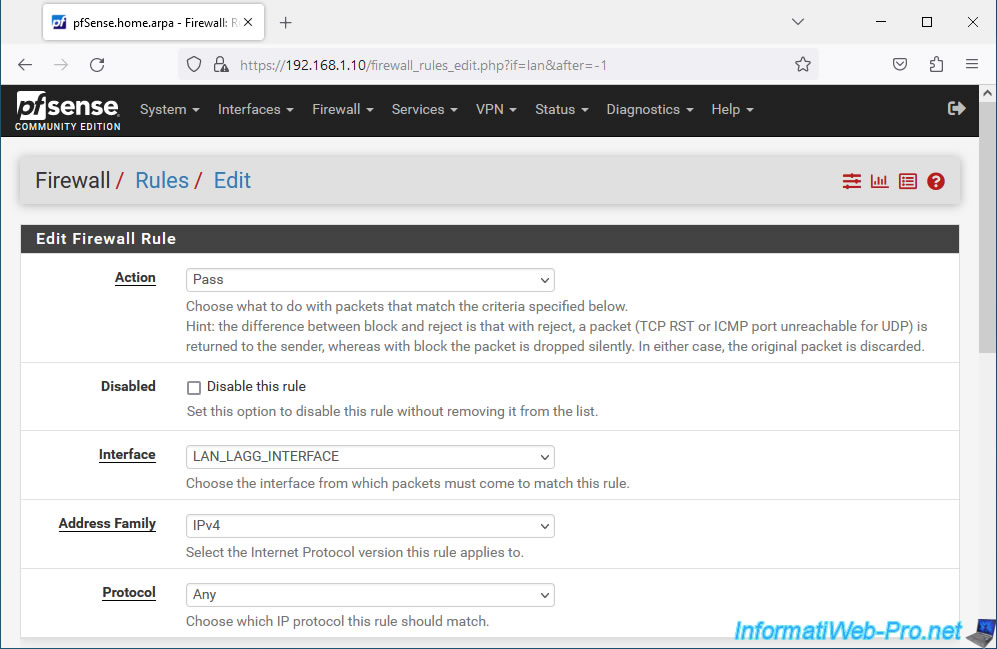
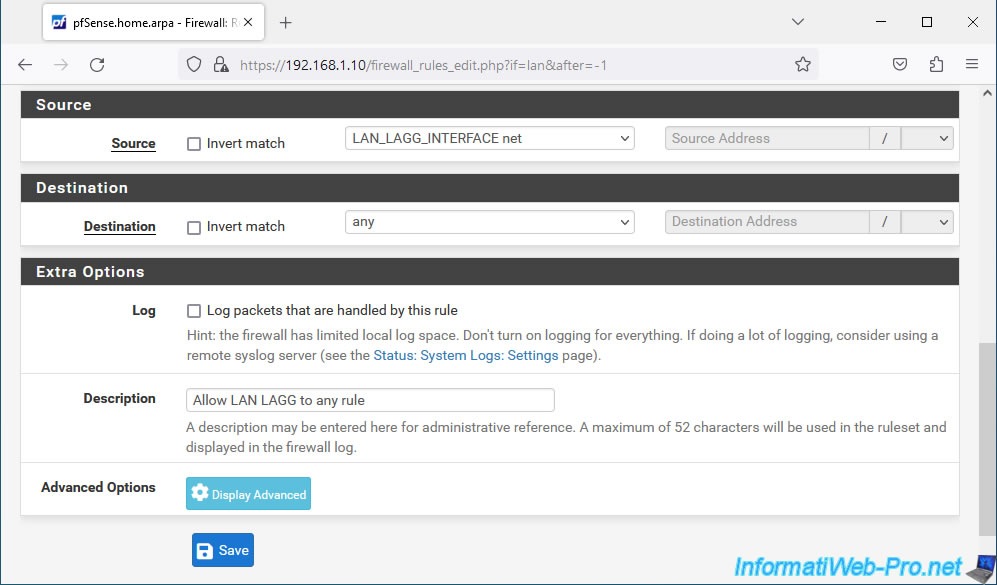
Configure the rule like this:
- Action: Pass. allows network traffic to be allowed.
- Interface: LAN_LAGG_INTERFACE. The affected network interface is your new network interface "LAN_LAGG_INTERFACE".
- Address Family: IPv4. In our case we only use IPv4. But if you also want to support IPv6, select "IPv4+IPv6".
- Protocol: Any. Allows all protocols.
- Source: LAN_LAGG_INTERFACE net. Targets computers and servers connected to the "LAN_LAGG_INTERFACE" network.
- Destination: any. Allows all destinations (including Internet).
- Description: Allow LAN LAGG to any rule.
Then, click Save.
Note: the configuration of this rule is based on the one created by default by pfSense for the LAN interface.
Click: Apply Changes.
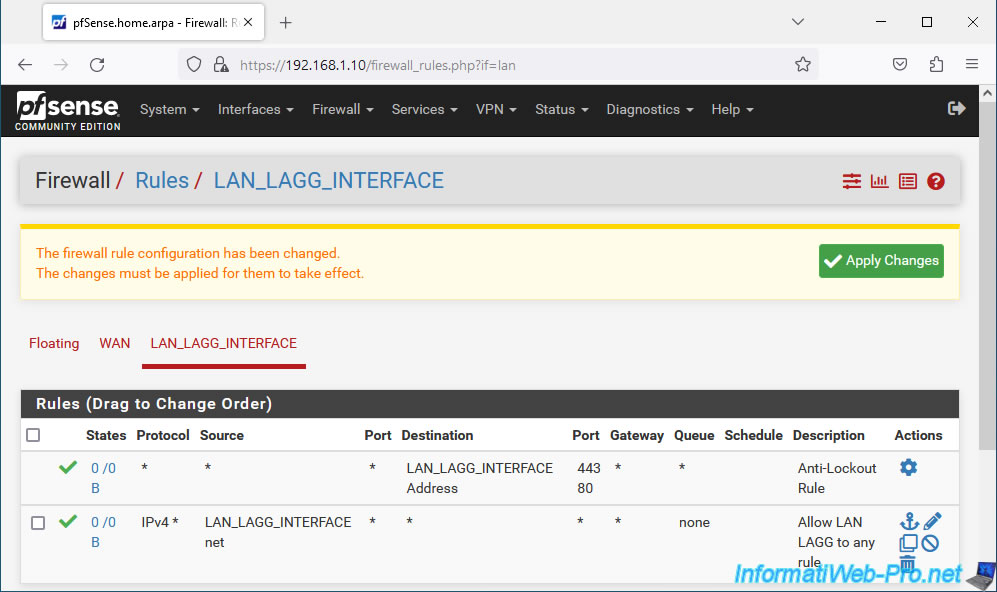
Your new rule has been created.
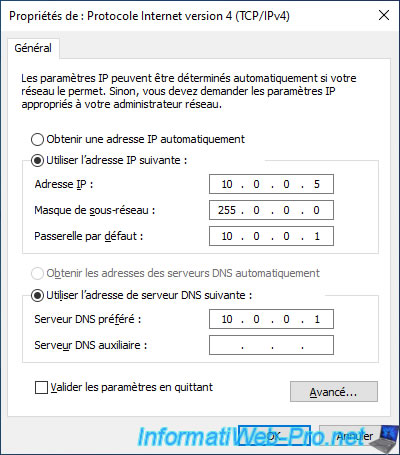
8. Set a static IP address on your PC to access the physical switch
If your computer has not yet received an IP address from the pfSense DHCP server on the LAN, your local computer may not have an IP address.
In this case, you will see the mention "Unidentified network" and the IP address "169.254.xx.xx" appear for your connection to the local network (Ethernet).
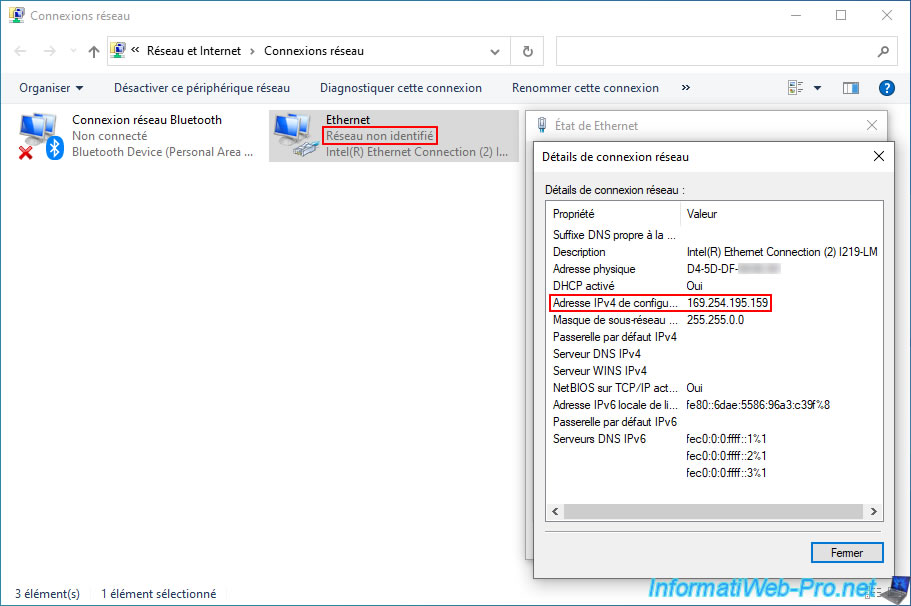
If this is the case, temporarily set a static IP address on your desktop PC connected to your physical switch.
Notes :
- in our case, we know that our switch uses the IP address "10.0.0.2". We have therefore defined an IP address on our desktop PC which is in the same subnet (10.x.x.x).
- the IP address of the gateway and DNS server is useless, since it is the IP address of pfSense (which is not accessible at the moment on its LAGG LAN interface).
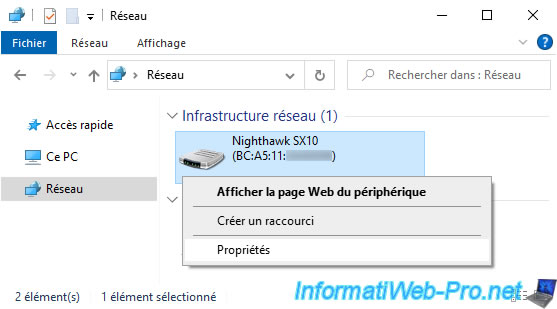
Once your computer has an IP address on the same subnet as your switch, open File Explorer and go to the "Network" section.
If network discovery is enabled, you will see your switch appear in the "Network Infrastructure" section.
Otherwise, Windows will offer to enable network discovery and set your network as a private network.
In Windows 10, follow our tutorial: Windows 10 - Change the network profile used.
For other versions of Windows, search for "Change the network profile used" on our "InformatiWeb" site.
As you can see, in our case, we have a "Nighthawk SX10" switch.

Right-click "Properties" on your switch.
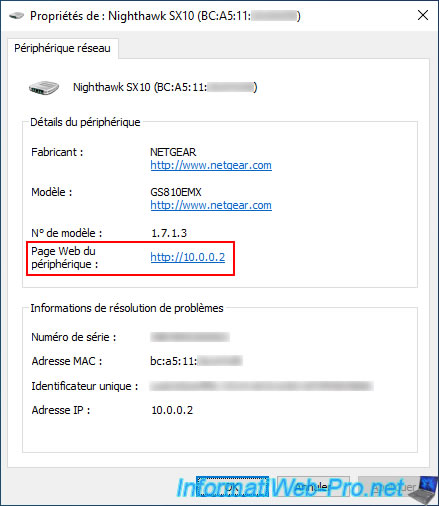
The address of your switch's web interface appears to the right of the "Device Web Page" property.
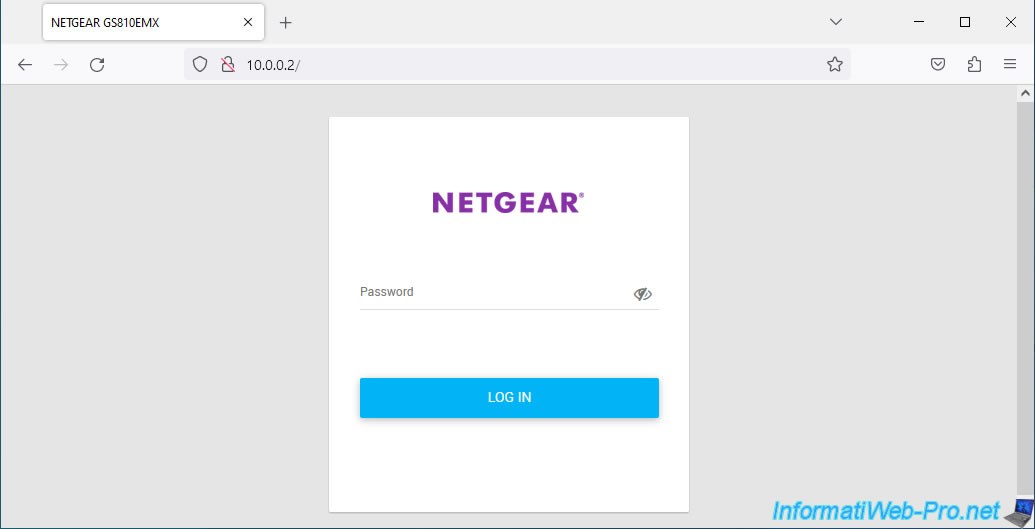
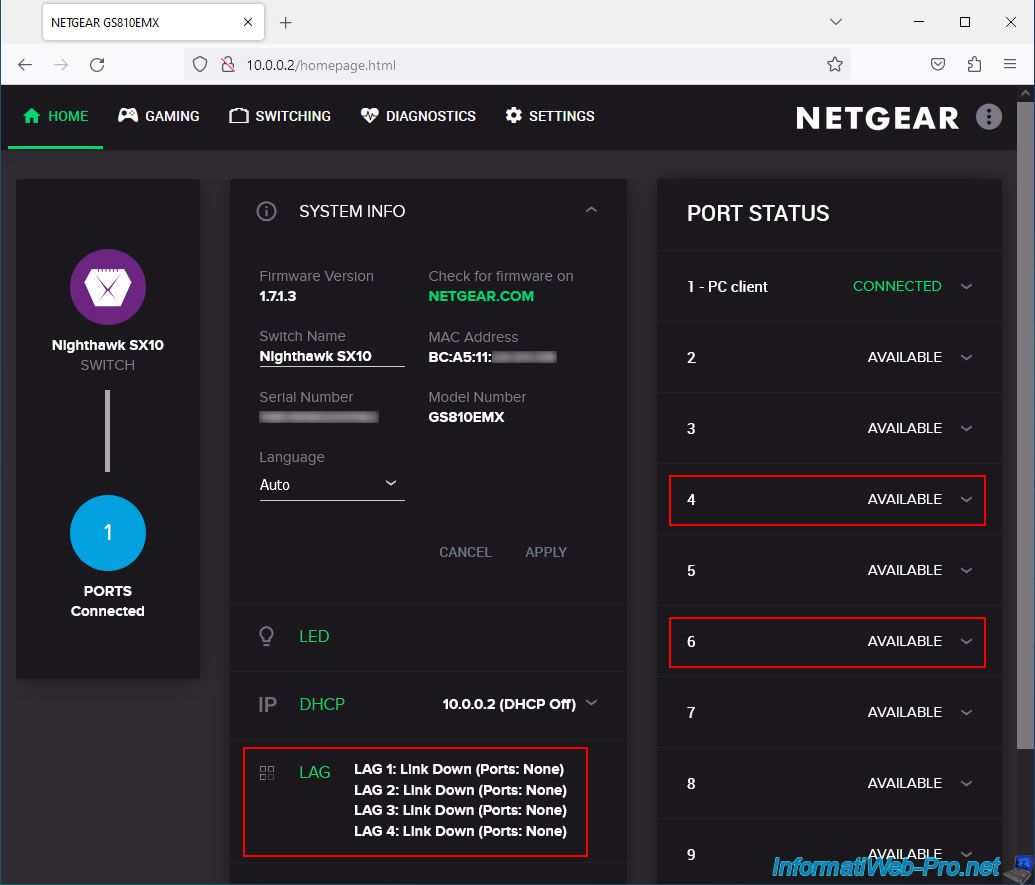
9. Configure a LAG (LACP) on a Netgear GS810EMX (Nighthawk SX10) switch
Once you have found the address of your switch's web interface, access it from your favorite web browser.
In our case, we have a Netgear GS810EMX (Nighthawk SX10) switch.
As you can see, the Netgear GS810EMX (Nighthawk SX10) switch allows you to create 4 LAGs.
In our case, we will use ports 4 and 6 for LAG 1 on our physical switch.
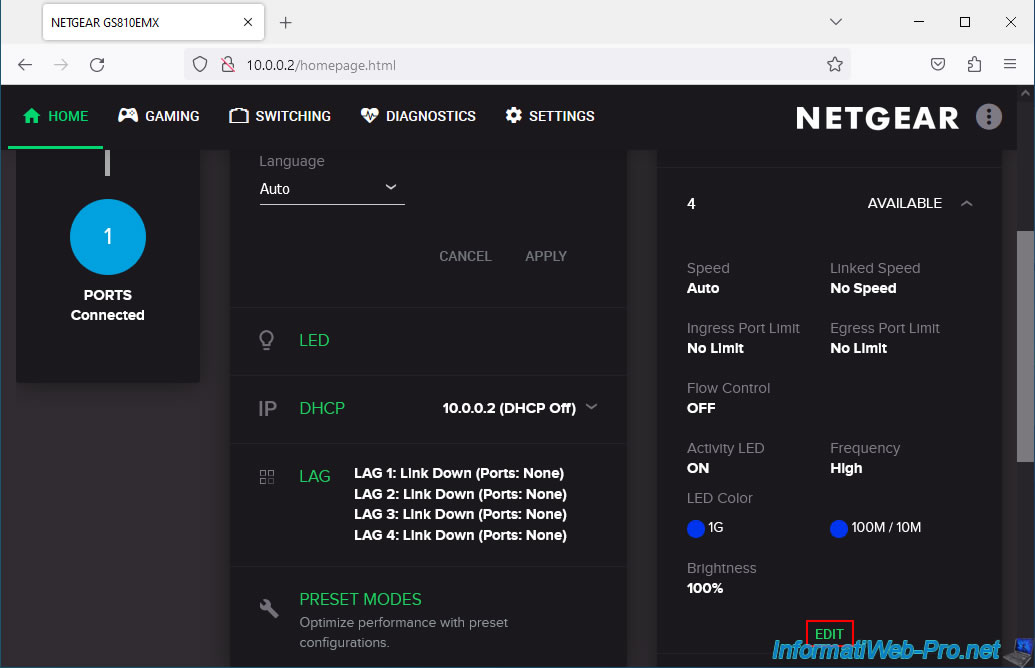
On this switch, you can rename a network port (for information only) by clicking on its number, then on: Edit.
In our case, we indicate "pfSense (LAG 1)" as the name, then we click on: Apply.
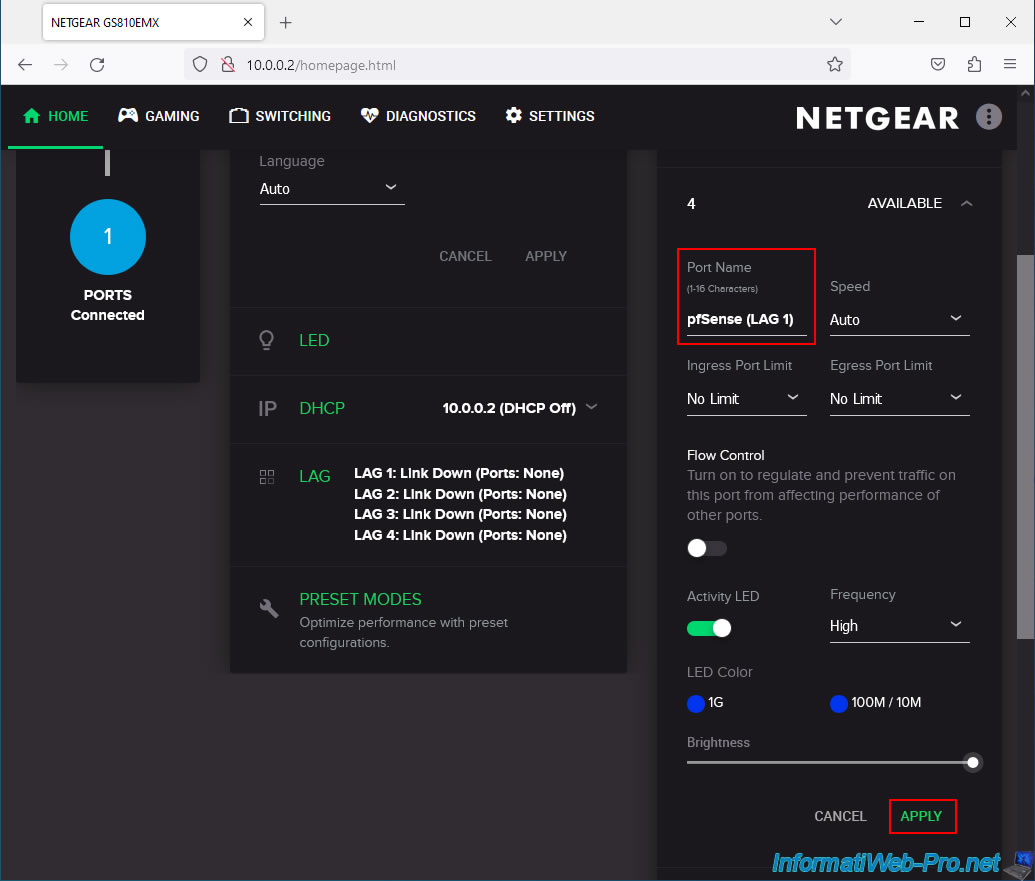
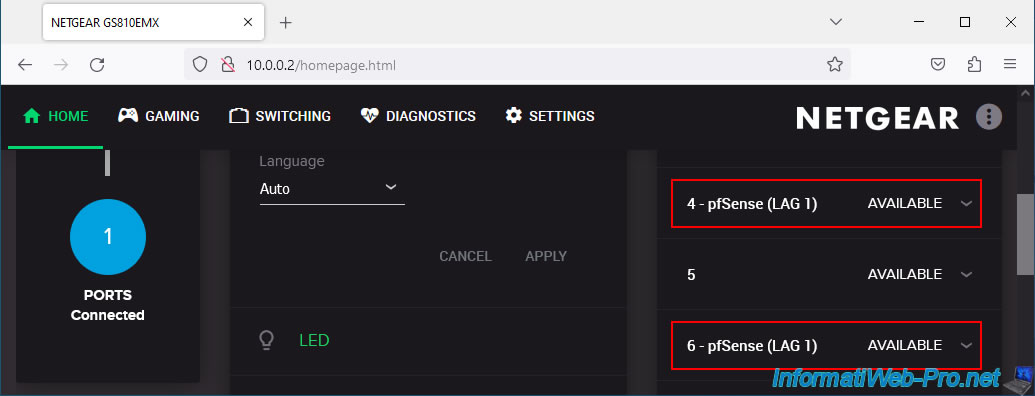
We are also renaming port 6 which we will also use for our LAG 1 on this physical Netgear switch.
Now go to "SWITCHING -> LAG".
By default, "LAG 1" is selected.
To configure this "LAG 1":
- Enable the "Disable/Enable" slider to enable this LAG.
- Enable the "Static/LACP" slider to use "LACP" mode and NOT "Static".
- click on the physical network ports that will be part of this LAG.
In our case, ports 4 and 6 of our physical switch. - click "Apply" to apply the changes.
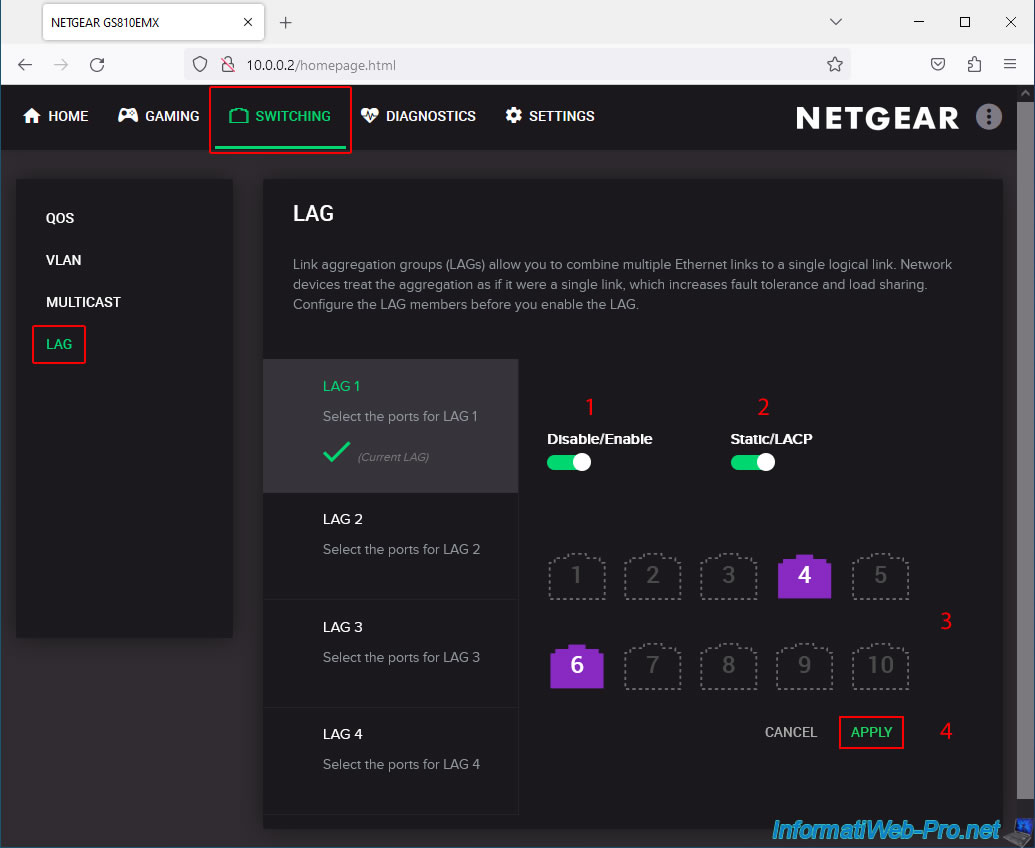
The "LAG Mode has been updated" message appears at the bottom of the page.

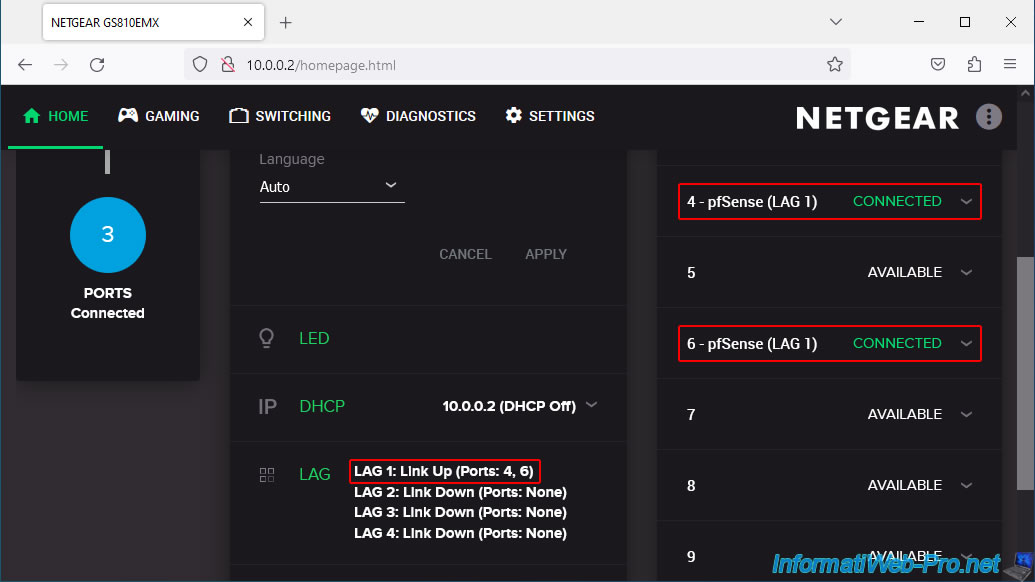
On the "HOME" page of your Netgear switch, you will see that "LAG 1" uses ports 4 and 6.
However, for the moment, the Netgear switch indicates that the "LAG 1" link is "Down".
Which is normal since the network cables are not plugged in at the moment (hence the status of ports 4 and 6 is "AVAILABLE").
Plain Text
LAG 1: Link Down (Ports: 4, 6).

Once the network cables are plugged into the physical Netgear switch and the network ports of the pfSense machine, you will see that:
- ports 4 and 6 (in our case) of our Netgear switch are connected (CONNECTED).
- the "LAG 1" link is established. LAG 1: Link Up (Ports: 4, 6).
Note: if you still see the "Link Down" status for your "LAG 1" even though the 2 network ports concerned on your Netgear switch are properly connected (CONNECTED), it is because:
- there is a problem in your LAGG / LACP configuration on your Netgear switch.
- a configuration problem on pfSense.
- you are using network cards not supported by LACP on pfSense.
As a reminder, if you use USB network adapters on pfSense for the LACP link, it is very possible that it will not work and that the status remains "Link Down" without you knowing why.
Share this tutorial
To see also
-
Firewall 8/13/2025
pfSense 2.6 - Create a captive portal
-

Firewall 7/25/2025
pfSense 2.6 - Create and manage aliases
-
Firewall 6/6/2025
pfSense 2.6 - DDNS (dynamic DNS)
-
Firewall 6/4/2025
pfSense 2.6 - DNS resolution
No comment