Create snapshots of a VMware vSphere 6.7 virtual machine (VM) to quickly restore its state
- VMware
- 12 April 2024 at 11:18 UTC
-

- 2/2

4. Create a snapshot hierarchy and manage snapshots
Although you can create a snapshot and easily restore the last snapshot created, you can also create multiple snapshots that depend on each other (if you wish) and thus create a hierarchy via this snapshot system.
As explained at the beginning of this tutorial, it is not recommended to use more than 2 or 3 nested snapshots on a virtual machine for performance reasons.
However, when doing some testing in your virtual machine, it may be useful to create temporary snapshots and then maintain the state you prefer by restoring the desired snapshot and then deleting all snapshots (except the current state) .
To do this, you must go to the snapshot management of your virtual machine by clicking on: Actions -> Snapshots -> Manage Snapshots.
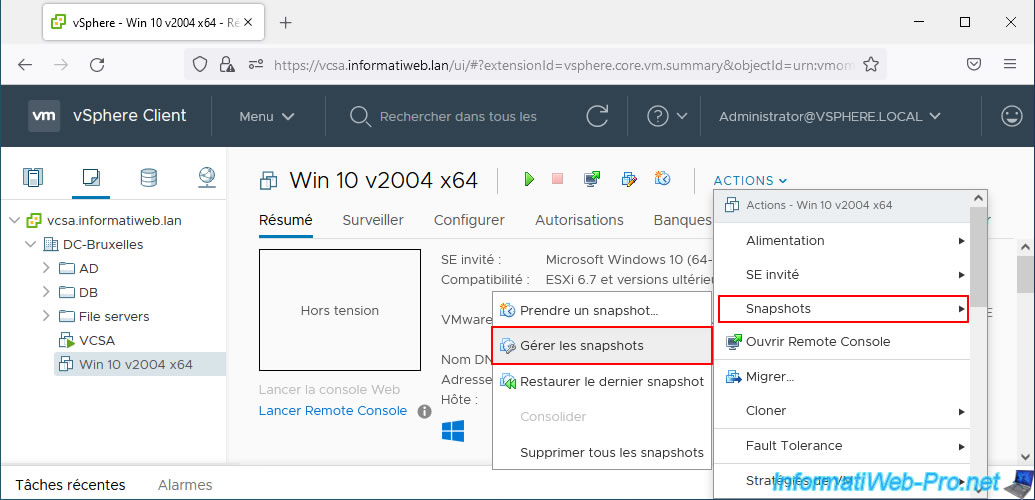
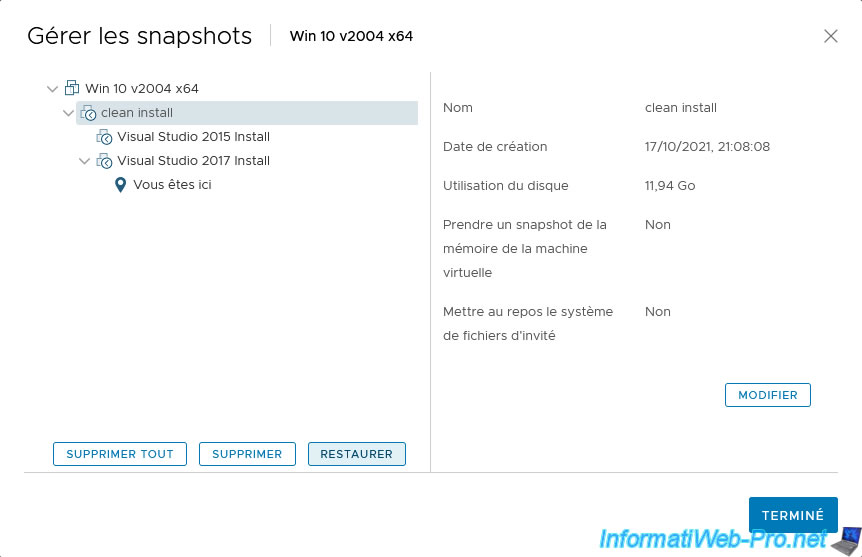
The "Manage Snapshots" window appears.
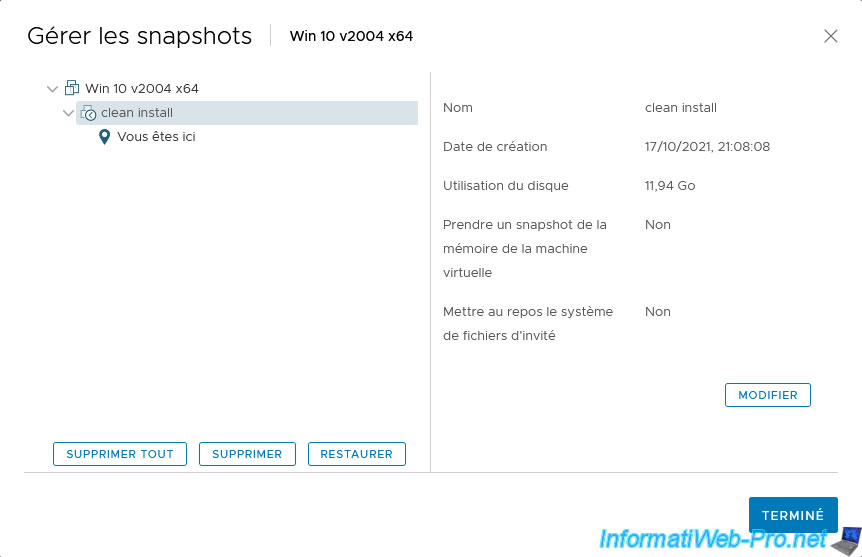
At the moment we have:
- the basic state of our virtual machine: [virtual machine name]
- the state saved via the creation of a snapshot: [name of the previously created snapshot]
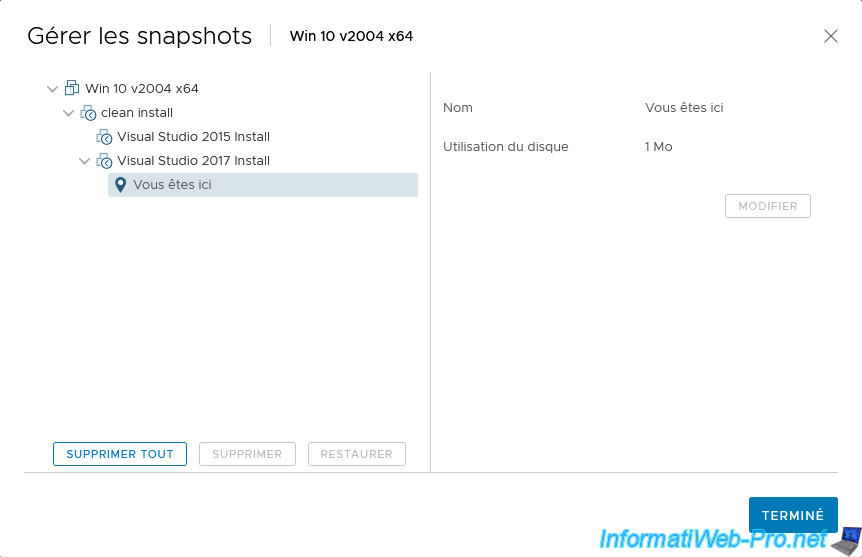
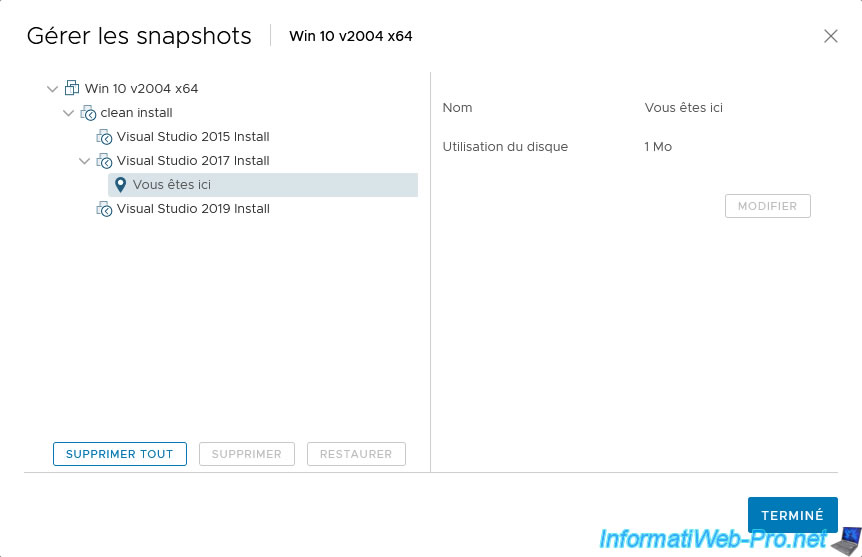
- You are here: the current state of your virtual machine. This current state also depends on the base state of the VM, as well as the parent snapshot.
To explain the creation of this hierarchy of snapshots, we will take the example of a program available in several versions, but for which you do not yet know which version is suitable for your needs (for reasons of compatibility, for example).
For this tutorial, we will simulate the use of the "Visual Studio" program in different versions: 2015, 2017 and 2019.
To begin, we start our virtual machine, we install the 2015 version of this program, then we shut down the virtual machine and we create a "Visual Studio 2015 Install" snapshot as explained previously.
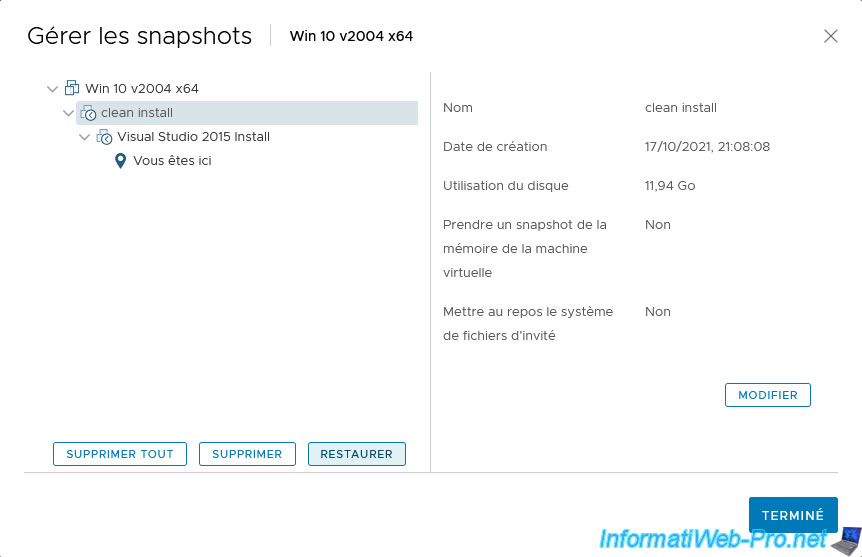
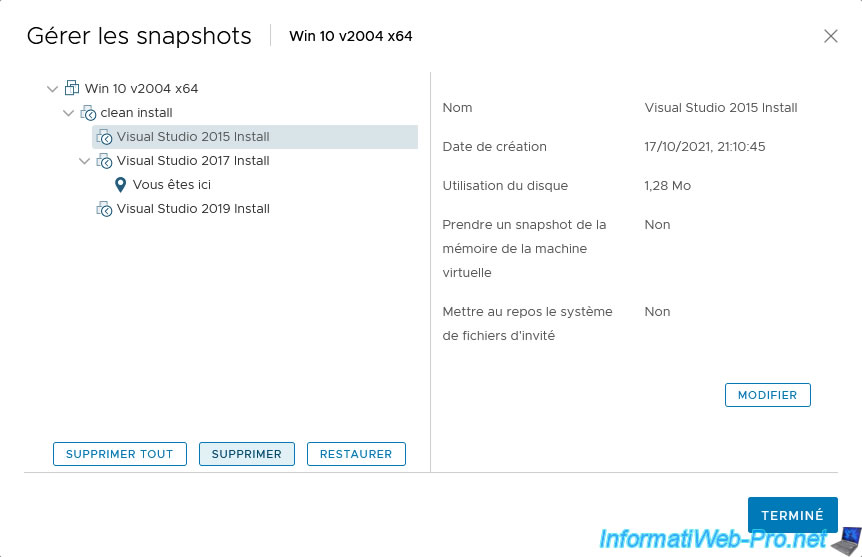
Then, we return to the snapshot management and we see our "Visual Studio 2015 Install" snapshot appear.
As you can see, the current state (You are here) depends on the parent snapshots "Visual Studio 2015 Install" and "clean install", as well as the base state of our virtual machine (root item).
Restoring the "Visual Studio 2015 Install" snapshot therefore makes it possible in this case to restore the virtual machine to the state in which it was just after the installation of Visual Studio 2015.

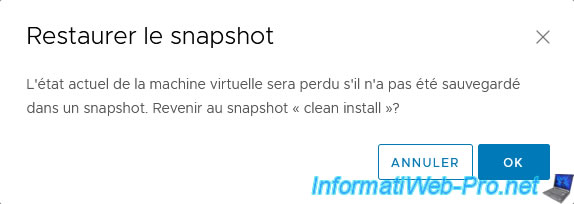
To test another version of this program, restore the "clean install" snapshot.
To do this, select the "clean install" snapshot and click: Restore.
Confirm the restoration of the snapshot by clicking OK.

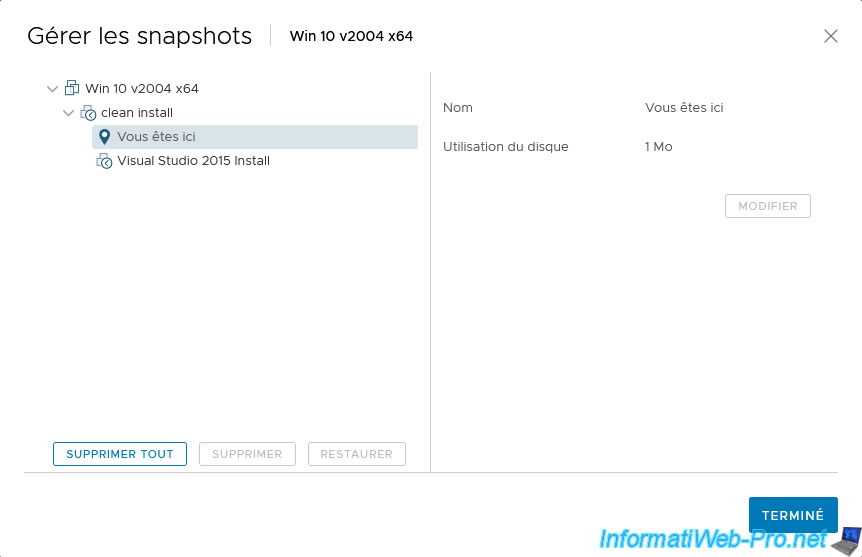
As you can see, the current state of our virtual machine now depends only on the "clean install" snapshot (and the base state of the VM thanks to the root element).
If you start the virtual machine, Visual Studio 2015 will therefore not be visible from the guest operating system, but you can restore the Visual Studio 2015 installation if necessary by returning to the "Visual Studio 2015 Install" snapshot.
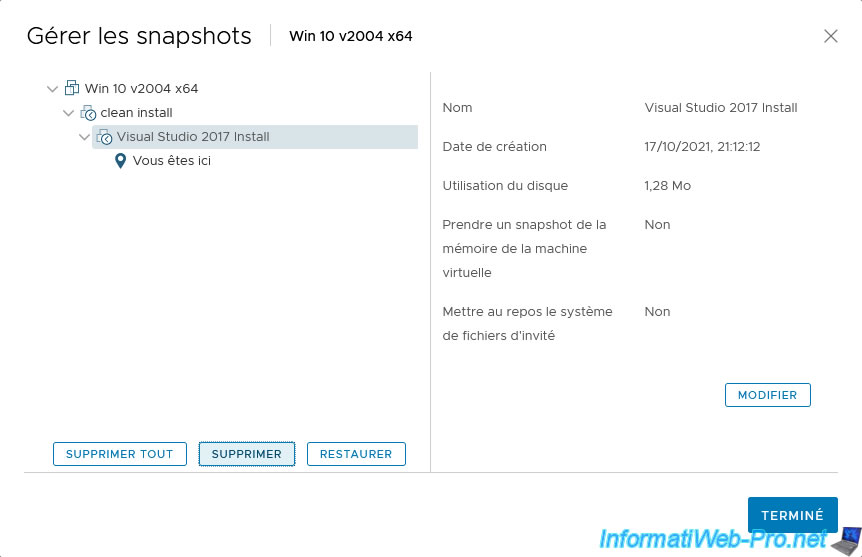
For the moment, we start the VM, we install the 2017 version, we shut down the VM and we create a new snapshot "Visual Studio 2017 Install".

Now the current state (You are here) therefore depends on the "Visual Studio 2017 Install" and "clean install" snapshots, as well as the base state of the virtual machine.
The data contained in the "Visual Studio 2015 Install" snapshot is therefore not used at the moment when you start your virtual machine.
We want to test a 3rd version of Visual Studio, so we select the "clean install" snapshot and click "Revert to" again.
Click "OK" when the "Restore to Snapshot" window appears.
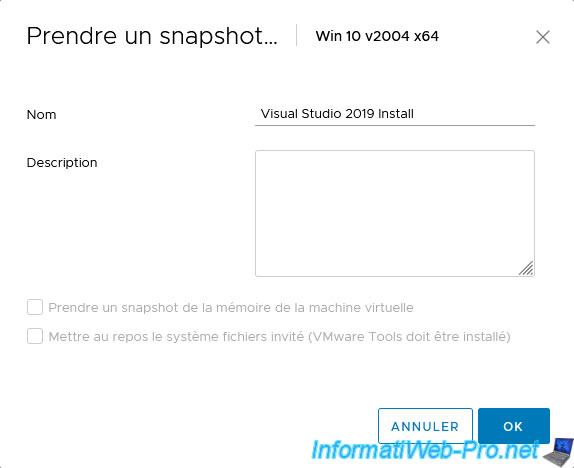
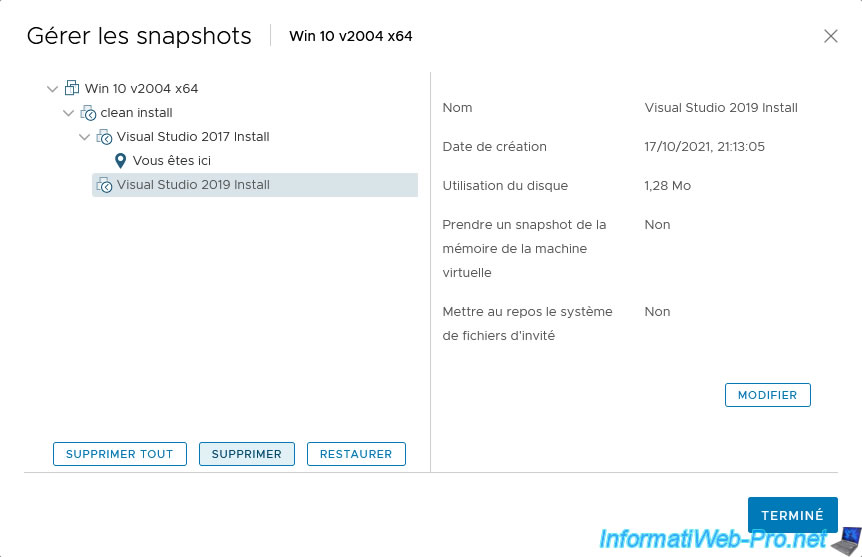
We start the VM, we install the 2019 version, we shut down the VM and we create another new snapshot: Visual Studio 2019 Install.
As expected, the current state of our virtual machine this time depends on the "Visual Studio 2019 Install", "clean install" snapshots and the base state of the virtual machine.
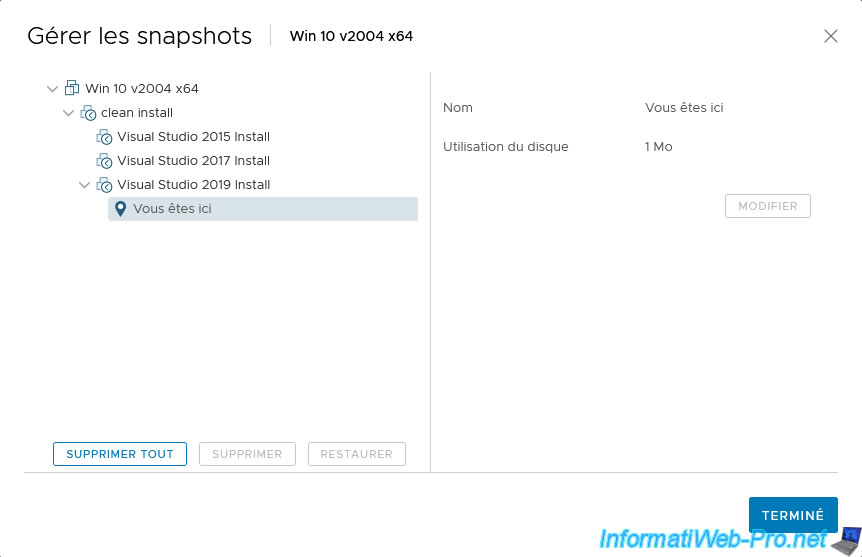
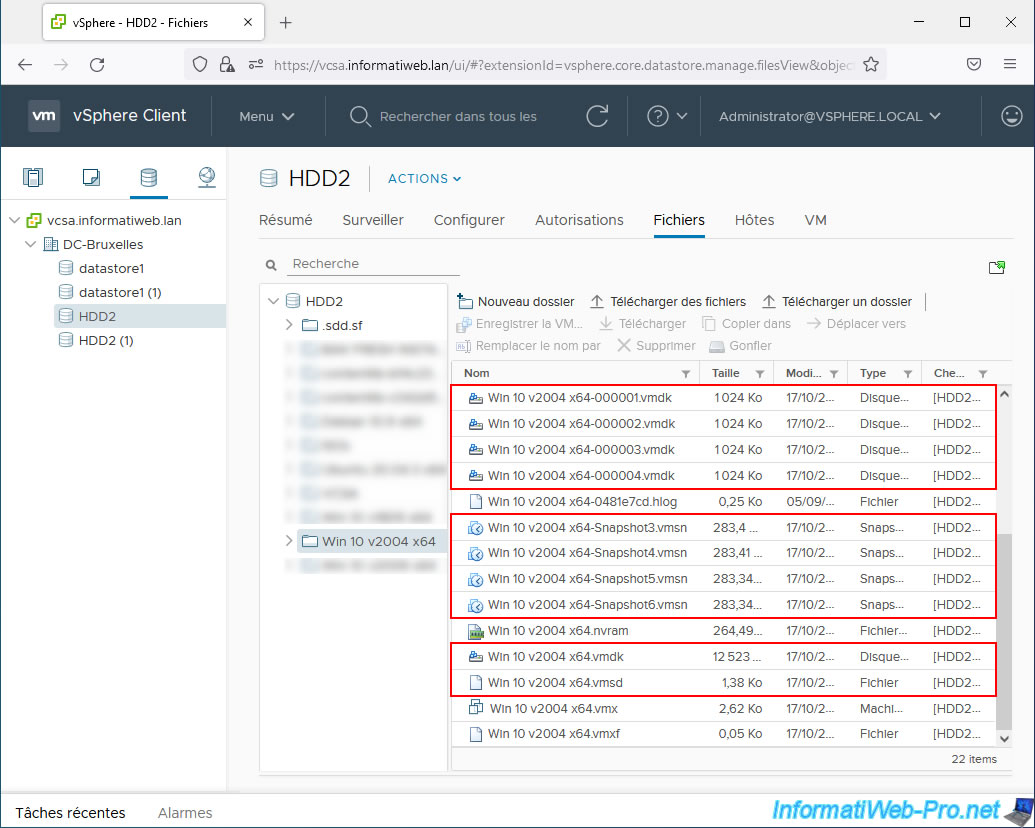
Note that creating these snapshots creates new files on the host's physical disk each time.
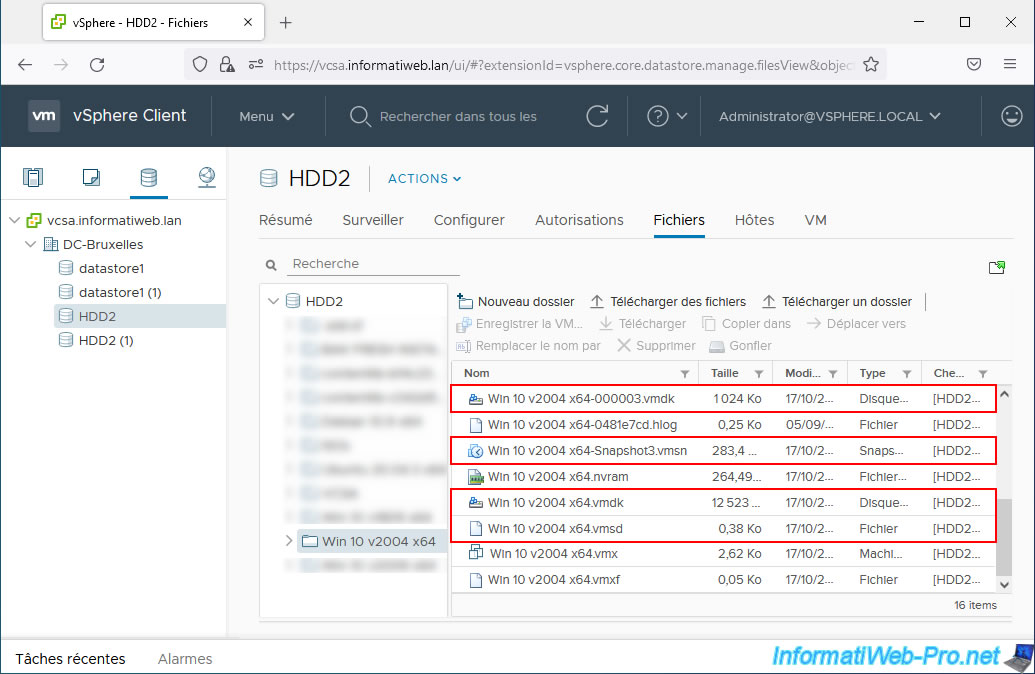
To see them, go to the "Datastores" tab of your virtual machine to find out on which datastore(s) its files are stored.

Go to your virtual machine folder and you will see that many "xxxxxx.vmdk" and "SnapshotX.vmsn" files have appeared in it.
Indeed, when creating a new snapshot on a virtual machine, a new ".vmsn" file (snapshot information) and a new "xxxxxx.vmdk" file (delta for each virtual hard disk depends on the snapshot system) are created in your virtual machine folder.
When you create a snapshot, changes made to your virtual machine's virtual hard disks are stored in a new file "xxxxxx.vmdk" and not in the original virtual hard disk.
When creating a snapshot, the unique ".vmsd" file of your virtual machine is also modified, because it is it which contains the list of snapshots present for it and which references the files necessary for these snapshots.
For the remaining ".vmdk" file, this is the base hard drive of the virtual machine on which the snapshots depend.
The other "xxxxxx.vmdk" files contain only the modifications made since the creation of the corresponding snapshot (as explained previously).
Source : Snapshot Files - VMware Docs
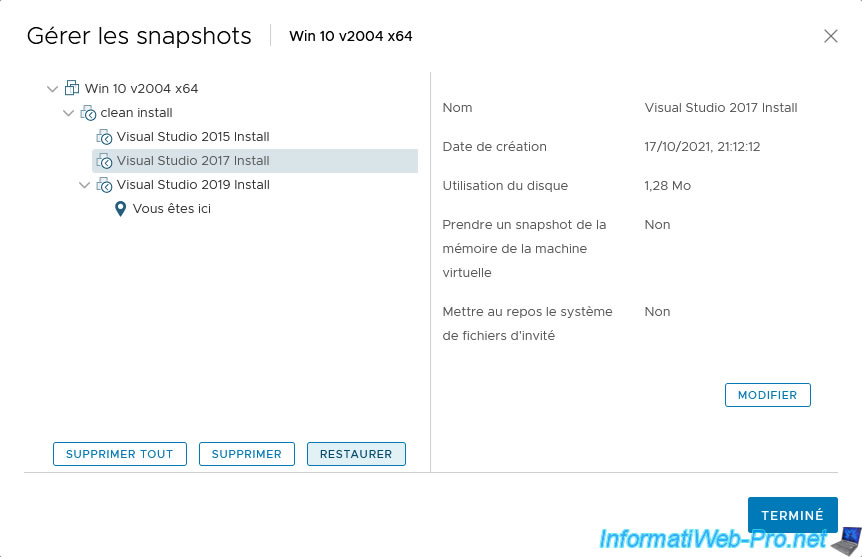
After testing these 3 versions of Visual Studio, we consider (for the example) that the 2017 version is the most suitable for our case.
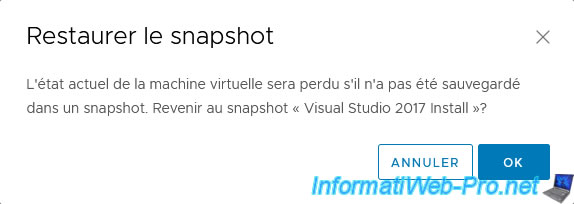
So, we select the "Visual Studio 2017 Install" snapshot and click "Restore".
Confirm the restoration of the selected snapshot by clicking OK.
As expected, the "You are here" line becomes a child of the "Visual Studio 2017 Install" snapshot that we just restored.
As we chose the 2017 version, the snapshots containing the Visual Studio 2015 and 2019 files will no longer be of any use to us.
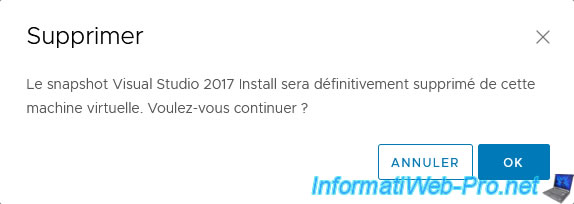
We can therefore start by deleting the "Visual Studio 2015" snapshot.
Confirm the deletion of this snapshot.

Then, we delete the "Visual Studio 2019 Install" snapshot which we no longer need either.
Confirm the deletion of this snapshot.

Now if we start our virtual machine, we will be able to see a clean installation of Visual Studio 2017.
However, for performance reasons, you should delete the parent snapshots (if you no longer need them).
To get started, delete the "Visual Studio 2017 Install" snapshot.
Note that deleting this snapshot will not delete Visual Studio 2017 files in the operating system, only the ability to return to this state via the snapshot system.
In other words, the affected ".vmdk" files will be merged and the ".vmsn" file corresponding to this snapshot will be deleted from the physical disk.
Confirm the deletion of the snapshot.
Now, we only have one snapshot left.
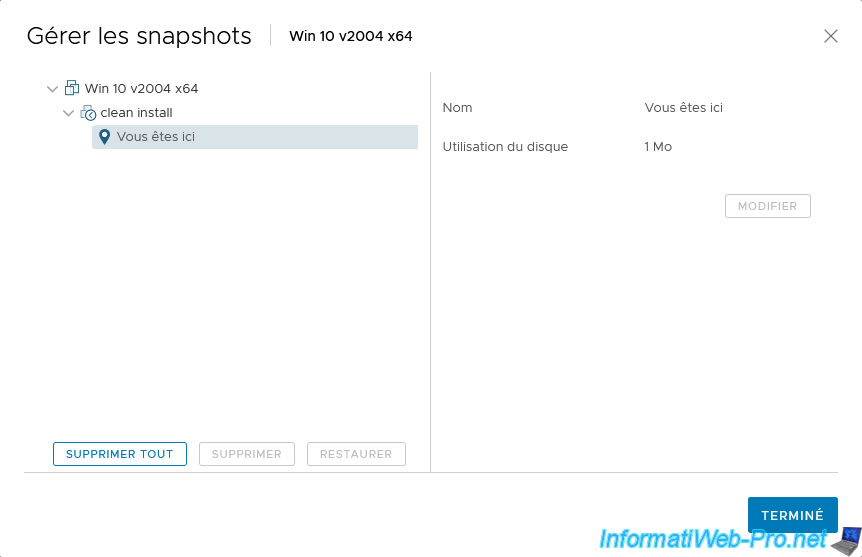
If you look in your virtual machine folder, you will see that only:
- 1 "xxxxxx.vmdk" file which corresponds to the delta disks of the remaining snapshot for the virtual hard disk and which depends on the base .vmdk file of the VM.
- 1 ".vmsn" file which contains the information from this snapshot.
- 1 ".vmdk" file which corresponds to the base virtual hard disk of the virtual machine, on which the other "xxxxxx.vmdk" file depends.
- 1 ".vmsd" file which contains the list of snapshots of the VM and which in this case allows you to know that there is only one snapshot for it.
Note that when no snapshot is present for a VM, this file may exist, but be empty.
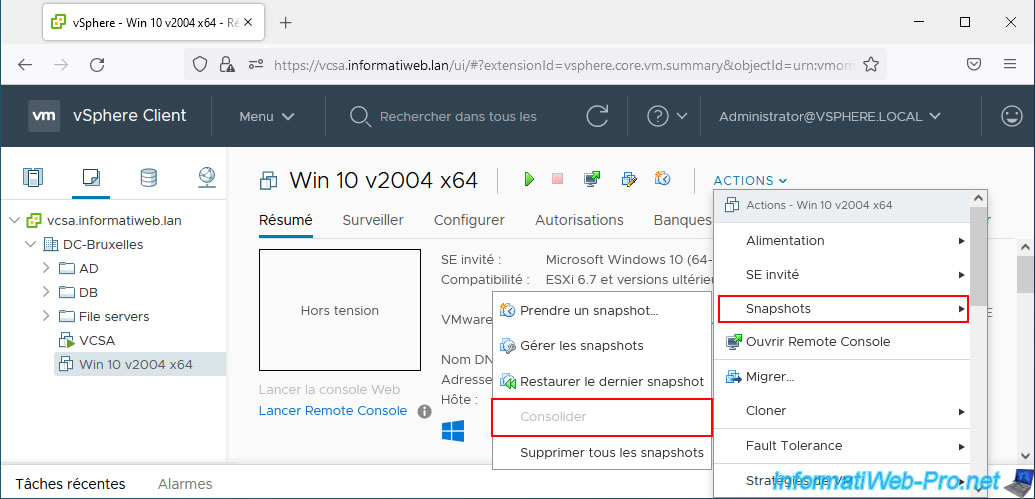
5. Consolidate snapshots
When an error or inconsistency occurs with the corresponding snapshots and/or delta virtual hard disks, the snapshot consolidation option allows you to delete unnecessary data on the physical disk that is no longer used by your virtual machine nor by his snapshots.
To do this, click: Actions -> Snapshots -> Consolidate.
If the "Consolidate" option is grayed out in your case, it is because there is no inconsistency in the snapshots of your virtual machine and this option is therefore not useful in your case.
When an inconsistency is detected by VMware vCenter Server, then this option will be available.
Source : Consolidate Snapshots in vCenter 6.5 via webclient.
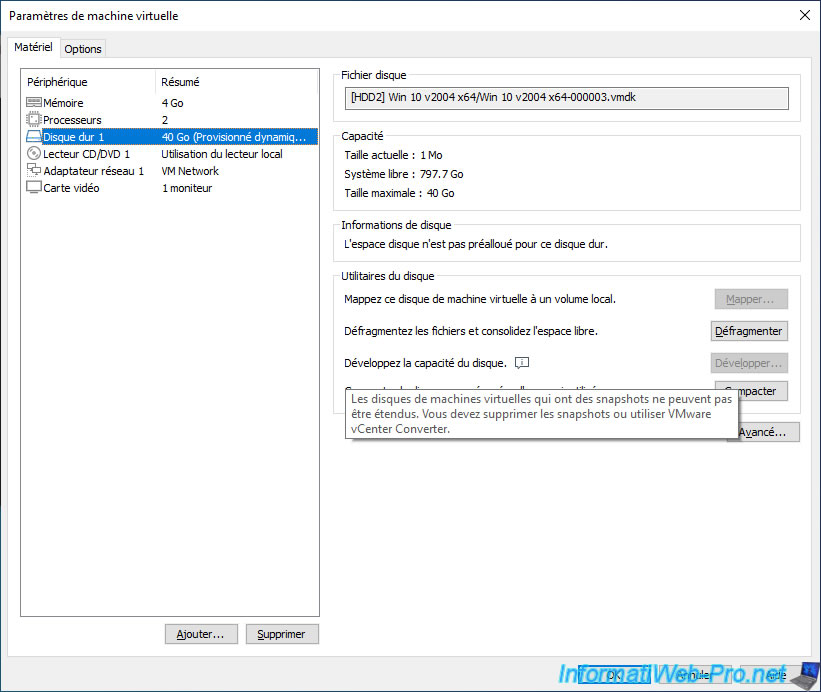
6. Impossible to expand a virtual hard disk after creating snapshots
As explained at the beginning of this tutorial, you cannot use snapshots when you want to extend a virtual hard disk.
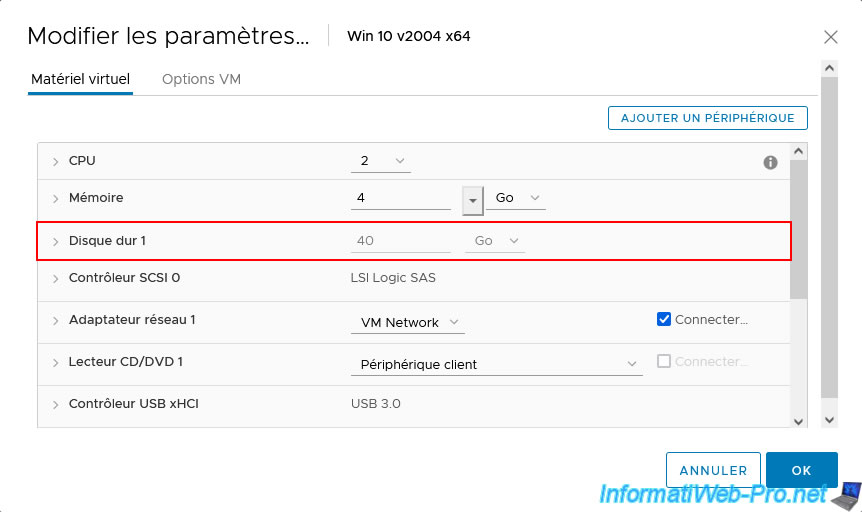
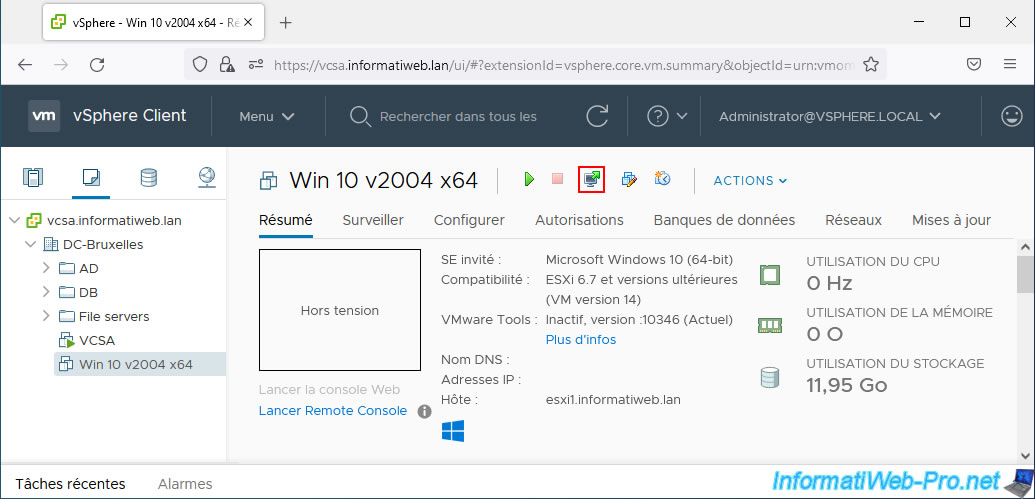
To check this, shut down your virtual machine (if necessary), then go to its settings by clicking on the 4th icon next to its name.

As you can see, the options for virtual hard disk size are grayed out.
Which proves that you cannot extend a virtual hard disk when one or more snapshots have been created on your virtual machine.
To fix the problem, you will first need to delete the snapshots created on your virtual machine.
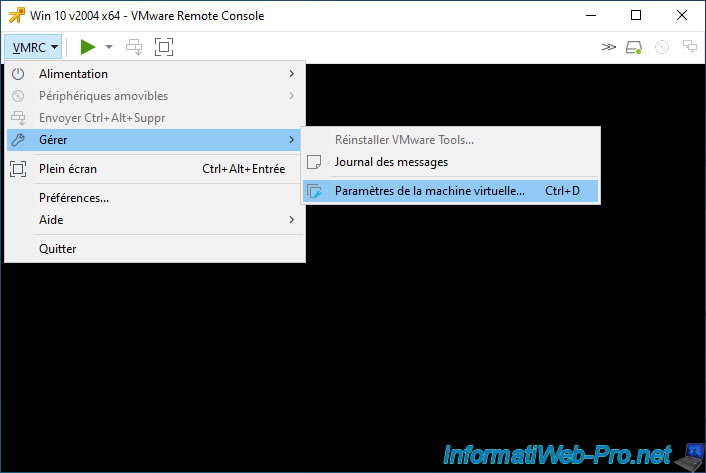
To see the reason for this hang, open the console of this virtual machine via VMware Remote Console (VMRC).
In the "VMware Remote Console" that appears, go to: VMRC -> Manage -> Virtual machine settings.
Select your virtual machine's virtual hard drive and you will see that the "Expand" button is disabled (grayed out).
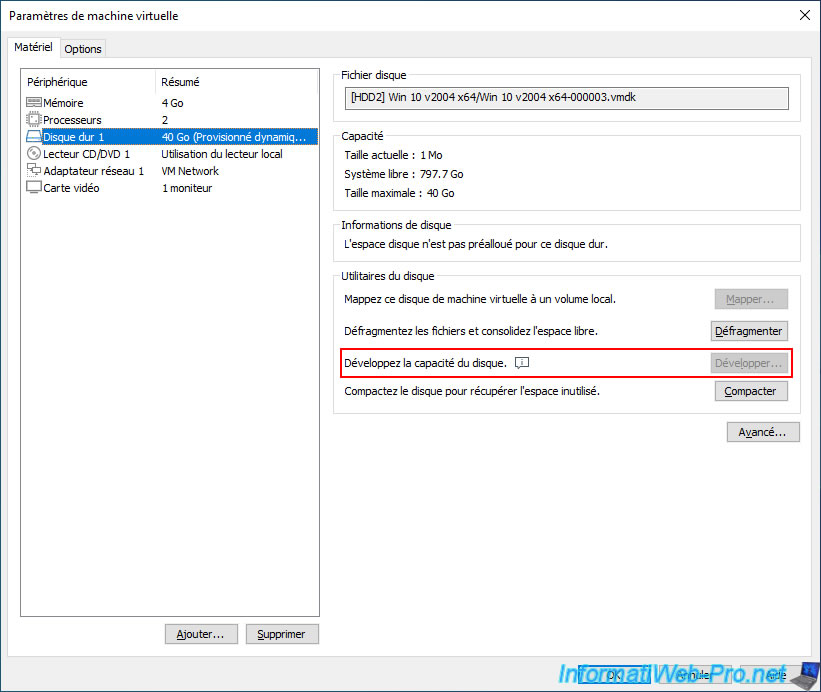
If you hover over the "Expand disk capacity" option, you will see this message:
Virtual machine disks that have snapshots cannot be extended. You must delete snapshots or use VMware vCenter Converter.
Share this tutorial
To see also
-
VMware 3/13/2024
VMware ESXi 6.7 - Synchronize the clock of ESXi hosts from a time server (NTP)
-
VMware 3/8/2024
VMware ESXi 6.7 - Synchronize the clock of VCSA from a time server (NTP)
-
VMware 7/31/2024
VMware vSphere 6.7 - Add an Active Directory identity source
-
VMware 5/22/2024
VMware vSphere 6.7 - Change default console
No comment