- VMware
- 19 July 2024 at 10:51 UTC
-

- 1/2

On VMware vCenter Server (or VCSA), you have the possibility of creating very efficient and very complete virtual machines.
You also have the option to choose between a virtual BIOS or EFI firmware, add virtual or physical hardware, or even directly modify the settings in the machine's ".vmx" configuration file to use advanced settings.
If you are already familiar with the settings for virtual hardware and VM options for virtual machines under VMware ESXi, you will not be lost, as these are very similar to those available under VMware ESXi.
Except in some places where VMware vCenter Server specific options have been added. In particular, for the virtual CD/DVD drive of the virtual machine where you can also use ISO files present in a content library hosted on your "vCenter Server".
With this article, you will be able to understand what each option and setting available for the virtual hardware and VM options of your virtual machines are used for.
1. Virtual hardware
To get started, select the desired virtual machine and click on the "Edit Settings" icon (4th icon next to the VM name).
Note that some settings may not be editable if your virtual machine is powered on.
Additionally, some virtual hardware settings can only be configured when creating your virtual machine or virtual hardware (such as the provisioning type of a virtual hard disk, for example).

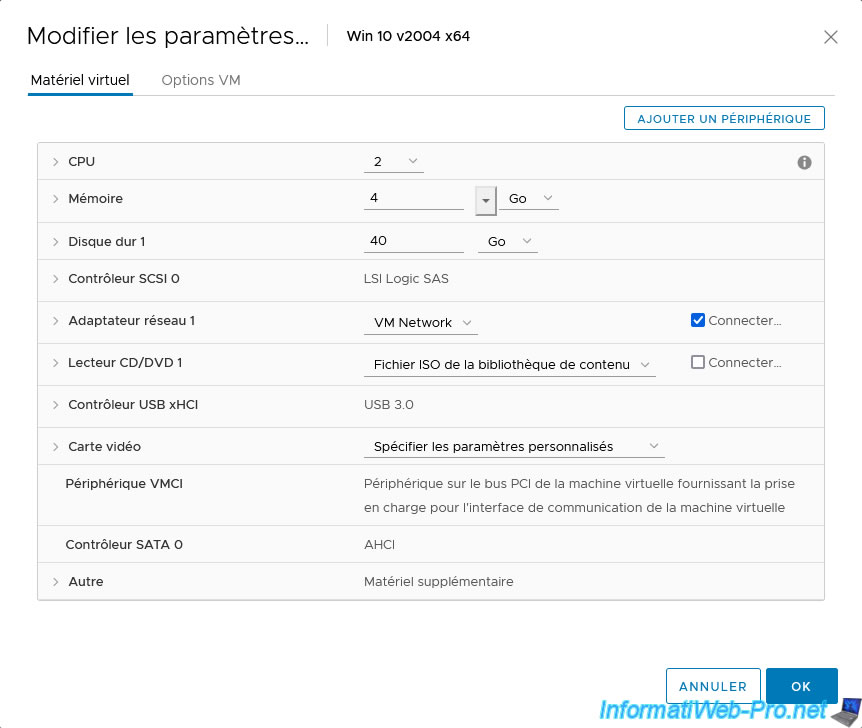
In the "Virtual Hardware" tab, you will be able to see the virtual hardware present in your virtual machine, as well as the different settings of each virtual component.
Note that the virtual hardware and the default values used for it by VMware vCenter Server depend on the guest operating system selected when creating the virtual machine.
This is intended to default to virtual hardware that is natively compatible with the guest operating system you want to install in your virtual machine.
1.1. CPU (processor)
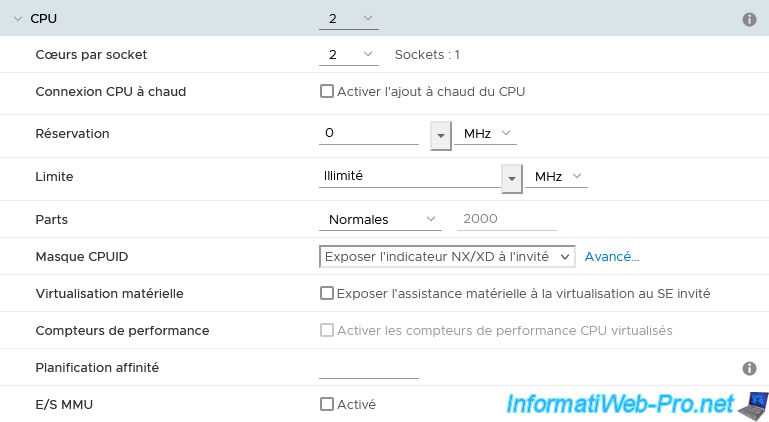
For the "CPU" (processor) section, you will have the possibility to define:
- CPU: the number of processor cores to allocate to your virtual machine.
- Cores per Socket: the number of processor cores. Depending on the value specified here, this will allow you to create a single virtual processor with multiple cores, multiple virtual processors with one core each, or multiple multi-core processors.
If you specify the same value for "CPU" and "Cores per Socket", the guest operating system will see a single virtual processor with multiple cores. - CPU Hot Plug: if you check the "Enable CPU Hot Add" box, you will be able to add virtual processors to your virtual machine without needing to restart it.
- Reservation: ensures that your virtual machine can always use at least the frequency indicated here.
However, this also means that if the desired frequency is not currently available on your host, this virtual machine will not be able to boot. - Limit: allows you to limit the use of the virtual processor(s) allocated to this virtual machine from the guest operating system.
So you could allocate multiple cores and specify a lower frequency as a limit so that the guest operating system is not able to use the CPU resources allocated to it at 100%.
This amounts to transparently throttling a virtual machine in terms of CPU usage. - Shares: allows you to set the relative priority for sharing CPU resources compared to other virtual machines to decide which virtual machines can request more CPU resources in case the host's CPU is overused.
- CPUID Mask: allows you to expose or hide the NX/XD indicator from the guest. NX/XD corresponding to AMD No eXecute (NX) and Intel eXecute Disable (XD) technologies.
Masking these NX/XD bits makes it possible to migrate the virtual machine to a host whose processor does not have these CPU functions.
By clicking on "Advanced", you can also modify the CPU compatibility mask. However, according to the official VMware documentation, you should only use this option if VMware support or their knowledge base asks you to do so for a specific case. - Hardware virtualization: checking the "Expose hardware assisted virtualization to the guest OS" box allows you to expose CPU virtualization features (Intel VT-x / AMD-V) to the guest OS.
Which is useful when you want to virtualize a hypervisor or install a virtualization solution in a virtual machine (mainly for educational purposes).
This option is also necessary when you want to enable virtualization-based security (VBS) for a compatible virtual machine (with Windows 10 as guest OS, for example). - Performance Counters: this option is only useful for developers who want to use profiling software to analyze and attempt to improve the performance of their software.
- Scheduling Affinity: allows you to define the affinity for certain cores of the physical processor. Thus, you could force a virtual machine to use certain cores (which are not used by other VMs) to be sure that it will be able to use these processor cores to their maximum capacity.
To specify which cores to use, specify a range of cores "0-3" (cores 0 to 3) or several specific cores separated by commas "0, 2, 4, 5" (cores 0, 2, 4, and 5). - I/O MMU: allows you to expose input/output (I/O) virtualization capabilities corresponding to Intel VT-d and AMD IOMMU technologies to the guest operating system.
1.2. Memory (RAM)
For the "Memory" (RAM) section, you will have the possibility to define:
- Memory: quantity of RAM (RAM) in MB, GB or TB to allocate to your virtual machine.
To find out the minimum value and the maximum possible value (depending on the guest operating system of the VM), click on the small button located between the number and the unit of this parameter. - Reservation: ensures that this virtual machine can use at least the amount of RAM indicated here.
However, if your host does not have enough RAM for this reservation to be respected, the virtual machine will not be able to start.
Note: the "Reserve all guest memory (All locked)" option allows, as its name suggests, to reserve the amount of RAM indicated for the "Memory" setting from the start of this virtual machine.
Which is necessary when you want to pass physical peripheral devices to your virtual machine via PCI passthrough. - Limit: allows you to limit RAM usage by the guest operating system to the amount of RAM defined here.
In case you allocate 4 GB of RAM to your virtual machine, but set a limit to 3 GB, the guest operating system will not be able to use more than 3 GB of RAM. - Shares: allows you to define a relative priority for sharing RAM compared to other virtual machines to decide which virtual machines will be able to obtain the desired amount of RAM in the event that RAM begins to run out on the host (VMware ESXi).
- Memory Hot Plug: enabling this option will allow you to hot add RAM to your virtual machine without having to restart it.

1.3. Hard disk (virtual)
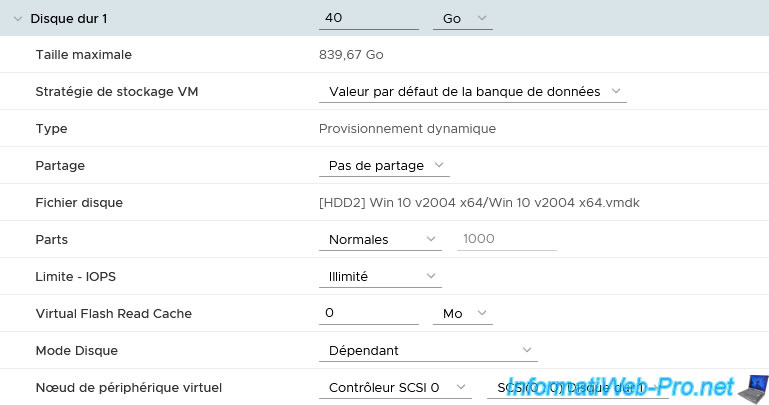
For each virtual hard disk, you will be able to define:
- Maximum Size: indicates the amount of free space available in this case, depending on the datastore where this virtual hard disk is located.
- VM storage policy: allows you to choose the VM storage policy to use.
- Location: when adding a new virtual hard disk, this allows you to choose whether it should be stored in the same location as the virtual machine or whether it should be stored in another datastore.
- Type (Disk Provisioning): the type of provisioning used for this virtual hard disk.
However, this choice is only possible when creating a virtual hard disk.
The possible values being:- Thick Provision Lazy Zeroed: the space needed for this virtual hard disk will be pre-allocated on the desired datastore. Which means that the size of the ".vmdk" file will be equal to the maximum size of this virtual hard disk.
Then, when you store data in this virtual hard disk from the guest operating system, the corresponding blocks on the physical disk will be zeroed just before writing the data to it. - Thick Provision Eager Zeroed: similar to the previous option, but with the difference that all matching blocks on the physical disk will be zeroed immediately when the virtual hard disk is created.
Which means that creating the virtual machine (if applicable) or added virtual hard disk will take more or less time (depending on the maximum size desired for it). - Thin Provision: space will not be pre-allocated. Which means that the size of the ".vmdk" file will correspond to the space needed to store the data in it and that this ".vmdk" file will grow as you store data from the system in it. guest operating system.
- Thick Provision Lazy Zeroed: the space needed for this virtual hard disk will be pre-allocated on the desired datastore. Which means that the size of the ".vmdk" file will be equal to the maximum size of this virtual hard disk.
- Sharing: allows you to share a virtual hard disk with other virtual machines by choosing the "Multi-writer" value.
However, this requires that the VHD uses an "Immediately Zeroed Static Provisioning" provisioning type.
In addition, it is recommended to use this option only if you use clustering software capable of managing writing from several servers to the same disk. Otherwise, the data written to this disk might get corrupted at some point. - Disk File: indicates where this virtual hard disk is located. The path displayed is composed of the name of the database (in square brackets), the name of the folder, as well as the name of the ".vmdk" file corresponding to this virtual hard disk.
- Shares: allows you to manage the relative priority (such as for CPU and memory usage) for the use of this disk at the level of its inputs/outputs (I/O).
- Limit - IOPS: allows you to limit the number of inputs/outputs (I/O) for this virtual hard disk to prevent the guest operating system of this virtual machine from being able to saturate the bandwidth of the physical disk(s) concerned by the host (VMware ESXi).
- Virtual flash read cache: allows you to accelerate certain inputs/outputs of this virtual hard disk using a pool of SSDs defined at the host (hypervisor) level.
Important: this "vFlash Read Cache (vFRC)" feature has been deprecated since VMware vSphere 6.7 and no longer exists since vSphere 7.0. - Disk Mode: allows you to choose whether or not this hard disk should be included in the snapshots process.
- Dependent: when you create a snapshot, the state of this virtual hard disk is also saved.
When restoring a snapshot, its state will therefore be restored to that corresponding to the time when the snapshot was created. - Independent - Persistent: indicates that this virtual hard disk is simply excluded from the snapshot system of this virtual machine. Creating and restoring snapshots on this virtual machine will therefore never affect the state of this virtual hard disk.
- Independent - Nonpersistent: indicates that the state of this virtual hard disk will be reset every time the virtual machine is shut down or reset (restart).
For this to happen, changes made to the virtual hard disk are not stored in the original ".vmdk" file, but in a separate file which is then deleted when shutting down or resetting the virtual machine.
- Dependent: when you create a snapshot, the state of this virtual hard disk is also saved.
- Virtual Device Node: allows you to choose which SCSI, SATA or IDE controller this virtual hard disk should be connected to and to which position of this controller.
The choice of controller allows you to respect their native support (for example: the IDE on Windows XP), but also to benefit from new features such as the hot addition of SCSI virtual hard disks.
Note that the hardware limit of the IDE is 4 positions (2 masters and 2 slaves, one of which is primary and the other secondary).
1.4. SCSI controller
For each SCSI controller, you can choose:
- Change Type: allows you to choose the type of SCSI controller to use.
The recommended choice in your case (depending on the VM's guest OS) is the one chosen by default by VMware vCenter Server.- BusLogic Parallel: used primarily with older guest operating systems.
- LSI Logic Parallel: virtual hard drives connected to this SCSI controller must have a capacity of less than 2 TB.
- LSI Logic SAS: allows the use of virtual hard disks with a capacity greater than 2 TB.
- VMware Paravirtual: improves performance by increasing throughput and reducing CPU usage. This type of controller is therefore particularly interesting for virtualized database servers, for example.
- SCSI Bus Sharing: allows you to enable or not the sharing of SCSI virtual hard disks.
- None: no sharing.
- Physical: virtual hard disks connected to this SCSI controller can be shared on the same server, but also with other servers.
- Virtual: virtual hard disks connected to this SCSI controller can only be shared on the same server.

1.5. Network adapter (network card)
For each network adapter (virtual network card), you will be able to:
- Network adapter x: choose which virtual network you want to connect this network adapter to.
Default: VM Network. - Status: choose whether you want to virtually connect the network cable of this network card or not by checking or not the "Connect At Power On" box.
- Adapter Type: choose the type of emulated, virtualized or paravirtualized network adapter (network card) to use.
However, this choice is only possible when adding a network adapter.
The model chosen by default by VMware vCenter Server allows you to use a virtual network card natively supported by the guest operating system of your virtual machine.
Among the models available, you will find:- E1000: emulation of the Intel 82545EM Gigabit Ethernet network card natively supported from Windows XP and Linux v2.4.19.
- E1000E: emulation of the Intel 82574 Gigabit Ethernet network card used by default for guest operating systems "Windows 8" and its server version "Windows Server 2012".
- SR-IOV passthrough: allows you to use a virtual function (VF) of a physical network card of the host when it supports SR-IOV (Single-Root Input/Output Virtualization).
- VMXNET 3: paravirtualized network card allowing better network performance.
- and others: Network Adapter Basics.
- MAC Address: allows you to let your server automatically choose the MAC address for this virtual machine (Automatic) or define a MAC address for this virtual machine yourself (Manual).
Note that the prefix "00:50:56" belongs to VMware and is used by default with VMware vSphere products (ESXi, vCenter, ...). This ensures that there will never be a conflict with physical (real) network cards.
Source : Choosing a network adapter for a virtual machine - Broadcom.

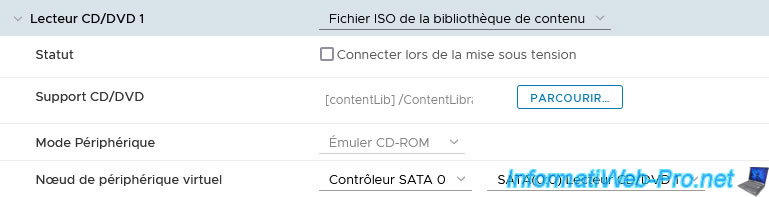
1.6. CD/DVD drive
For the virtual CD/DVD drive, you can:
- CD/DVD drive x: choose where the ISO file or CD/DVD you want to insert into the virtual CD/DVD drive of your virtual machine is located.
On VMware vCenter Server, you will have the choice between:- Client Device: option used to connect an ISO file or local CD/DVD from a client computer using client software such as VMware Remote Console or VMware Workstation Pro.
- Host Device: allows you to use a CD/DVD present in the host CD/DVD drive to virtually insert it into the virtual machine's virtual CD/DVD drive.
However, in production, this option may not be usable. Indeed, the servers are generally located in a data center and are therefore not easily accessible physically.
This option is therefore especially useful in the case of learning virtualization with a "home lab". - Datastore ISO File: allows you to use an ISO file stored in the datastore of your VMware ESXi host.
- Content Library ISO File: allows you to use an ISO file stored in a content library on your VMware vCenter Server.
- Status: choose whether the ISO file should be inserted automatically (or whether the connection between the virtual and physical CD/DVD drive should be established automatically) when the virtual machine starts by checking the "Connect At Power On" box.
- CD/DVD Media: choose which ISO file you want to insert into the virtual CD/DVD drive of the VM.
If an ISO file is already inserted into it, you will be able to see which content library or datastore it is in, as well as the path to it. - Device Mode: use the value "Passthrough CD-ROM" when you connect a CD/DVD drive to the physical client machine or "Emulate CD-ROM" otherwise (using an ISO file).
Most of the time, VMware vCenter Server will select the appropriate value and this option will be grayed out. - Virtual Device Node: allows you to choose which IDE or SATA controller you want to connect this virtual CD/DVD drive to and at what position on this virtual controller.
Note that you can only connect 4 devices on an IDE controller, unlike the SATA controller which supports up to 30 devices per SATA controller.
1.7. USB xHCI controller (USB 3.0)
For the USB controller used by default, you will have a USB xHCI controller (USB 3.0) if your virtual machine's guest operating system natively supports USB 3.0.
Which is particularly the case since Windows 8.

1.8. Video card (virtual)
For the video card settings (VMware SVGA 3D), you can choose:
- Video card: automatically detect the parameters (to let VMware vCenter Server adapt its configuration automatically) or configure its parameters yourself by selecting "Specify custom settings".
- Number of screens: default "1". Allows you to use multiple screens in a virtual machine by accessing the console of this virtual machine from a computer that itself has several physical screens.
- Total Video Memory: video memory allocated to this virtual machine.
- 3D graphics: allows you to benefit from 3D acceleration in the virtual machine by checking the "Enable 3D Support" box.
- 3D rendering: allows you to choose how 3D calculations will be managed (if 3D support is activated).
- Automatic: the option suited to your case will be chosen automatically.
- Hardware: your processor (CPU) will take care of the 3D calculations.
- Software: your graphics card (GPU) will take care of the 3D calculations.
- 3D Memory: memory to allocate for 3D graphics. 3D applications often use between 64 MB and 512 MB (source: Configure 3D Graphics and Video Cards).

1.9. VMCI device
In the virtual hardware of your virtual machine, you will also find a VMCI device which ensures communication between the virtual machine and the hypervisor (host) via a PCI bus.
This device is not configurable, but is necessary for the proper functioning of your virtual machine.

1.10. SATA controller
The SATA controller allows you to connect SATA virtual hard drives and/or SATA virtual CD/DVD drives.
Which can be practical for compatibility reasons.
In this case, VMware tells you that it is AHCI.
![]()
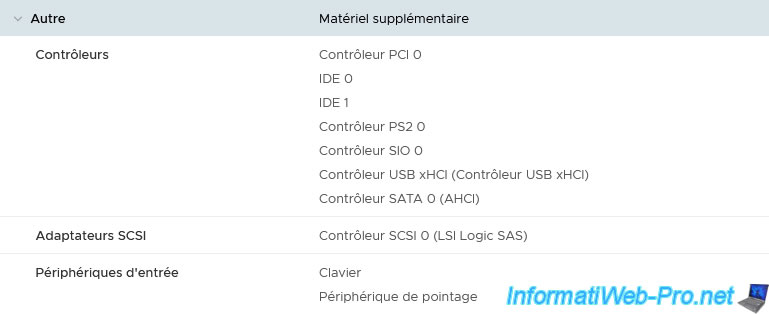
1.11. Other (additional hardware)
Finally, you will find a list of additional hardware used by your virtual machine with:
- Controllers:
- PCI controller 0: allows the virtual machine to communicate with various virtual components, including hard drives.
- IDE 0 / IDE 1: allows you to connect virtual CD/DVD drives, virtual hard disks, as well as floppy disk drives.
However, this type of controller is especially useful for older operating systems, such as Windows XP, for example. - PS2 Controller 0: provides a virtual implementation of the mouse that is recognized by default as a PS/2 mouse in the guest operating system.
- SIO 0 Controller: allows use of floppy disk drives, serial and parallel ports.
- USB xHCI controller: USB 3.0 controller (already described previously)
- SATA controller 0 (AHCI): SATA controller (already described previously)
- SCSI Adapters - SCSI controller 0 (LSI Logic SAS): SCSI controller (already described previously)
- Input Devices: keyboard and pointing device (mouse). Corresponds to the virtualization of the mouse and keyboard in the virtual machine.
Share this tutorial
To see also
-
VMware 3/13/2024
VMware ESXi 6.7 - Synchronize the clock of ESXi hosts from a time server (NTP)
-
VMware 3/8/2024
VMware ESXi 6.7 - Synchronize the clock of VCSA from a time server (NTP)
-
VMware 7/31/2024
VMware vSphere 6.7 - Add an Active Directory identity source
-
VMware 5/22/2024
VMware vSphere 6.7 - Change default console
You must be logged in to post a comment