Understand and configure the settings of your virtual machines on VMware vSphere 6.7
- VMware
- 19 July 2024 at 10:51 UTC
-

- 2/2

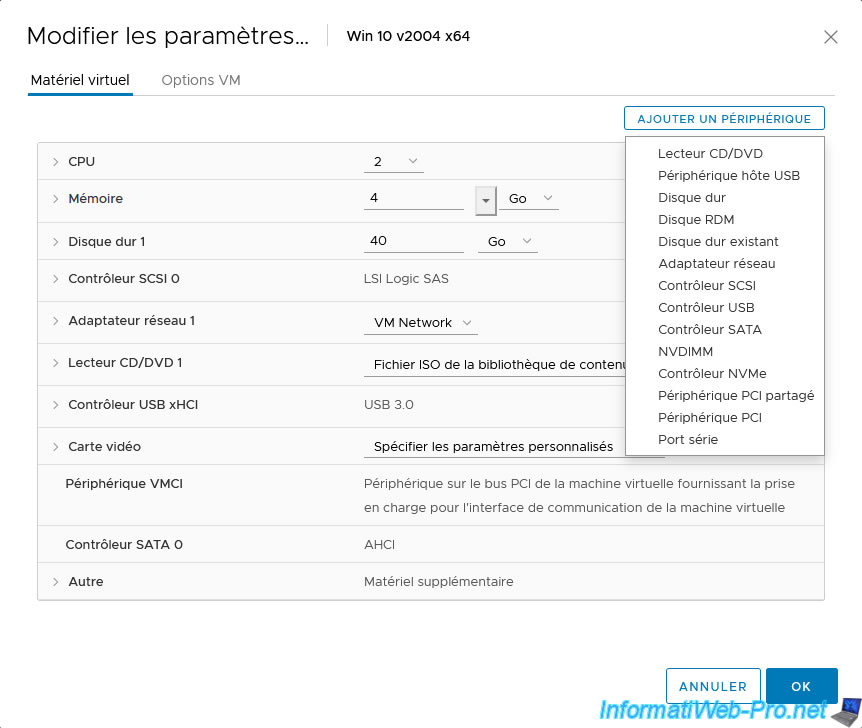
2. Add virtual hardware
In the "Virtual Hardware" tab of your virtual machine settings, you will have the possibility to add additional virtual hardware by clicking on the button: Add New Device.
Thanks to this "Add New Device" button, you will be able to add a:
- CD/DVD Drive: an additional CD/DVD drive for using additional ISOs or CDs/DVDs simultaneously.
- Host USB Device: to connect a USB device (USB external hard drive, USB key, etc.) to the virtual machine.
- Hard disk: a new additional virtual hard disk
- RDM Disk: Raw Device Mapping (RDM). This allows data to be stored directly in a SAN LUN, rather than in a virtual hard disk.
Note that using an RDM disk will create a ".vmdk" file in the desired datastore, but this ".vmdk" file will only contain mapping information to the desired SAN LUN. - Existing Hard Disk: a virtual hard disk already existing in one of your databases in ".vmdk", ".dsk" or ".raw" format.
- Network Adapter: an additional virtual network card.
- SCSI Controller: an additional SCSI controller.
Which can also be used to use another type of SCSI controller for certain virtual hard disks.
For example: a VMware paravirtual SCSI controller for virtual hard disks used to store the database of a virtualized database server. - USB Controller: a USB 2.0 or 3.0 controller
- SATA Controller: an additional SATA controller for connecting virtual hard drives or virtual CD/DVD drives.
- NVDIMM: an NVDIMM controller, as well as an NVDIMM module.
Requires persistent memory modules (PMem) to be present in the hardware of the affected host. - NVMe Controller: an NVMe controller. This allows you to simulate the use of virtual SSDs by connecting virtual hard drives to this NVMe controller.
- Shared PCI Device: allows you to use virtual GPUs using a physical (real) NVIDIA vGPU graphics card in your physical server hardware.
- PCI Device: allows you to pass a physical device from the host via PCI passthrough to your virtual machine (provided that PCI passthrough has previously been enabled for the desired device).
- Serial Port: a serial port for which you can use an output file, a physical serial port (if applicable), a named pipe, or the network.
3. VM Options
In the "VM Options" tab, you can rename your virtual machine, as well as manage its options and many settings (including those in its ".vmx" file).
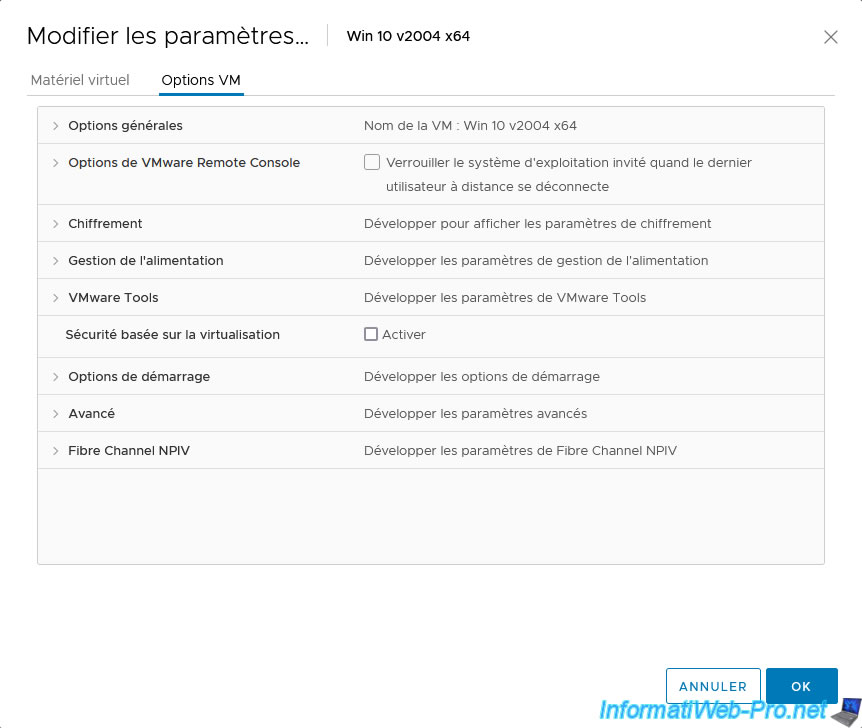
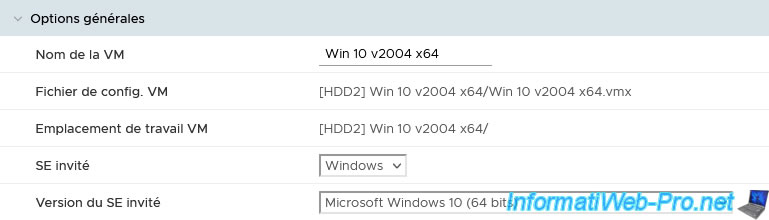
3.1. General options
In the "General Options" section, you can:
- VM Name: rename your virtual machine.
- VM Config File. VM: know the location of the configuration file (.vmx) of your virtual machine. The value in square brackets is the name of the database concerned.
- VM Working Location: know the base location of your virtual machine. Again, the name of the database concerned is indicated in square brackets.
- Guest OS: choose the type of guest operating system (Windows, Linux, or Other) installed in your virtual machine.
- Guest OS Version: version of this guest operating system. For example: the version of Windows, the name and version of the Linux distribution, ...
Note that selecting the correct guest OS is important because VMware vCenter Server uses this information to insert the correct VMware Tools virtual CD, as well as to adapt some system settings for the virtual machine to function properly.
3.2. VMware Remote Console Options
In the “VMware Remote Console Options” section, you can choose:
- Guest OS lock: lock the guest operating system when the last remote user logs out.
- Maximum number of sessions: limit the maximum number of concurrent sessions on this virtual machine.

3.3. Encryption
In the "Encryption" section, you can choose:
- Encrypt VM: allows you to fully encrypt the virtual machine (its configuration file, its virtual hard disks, as well as its other files).
This feature is available since vSphere 6.5. However, it requires the use of a key management server (KMS). - Encrypted vMotion: allows you to choose whether or not encrypted vMotion will be used and how it should be used (if applicable).
Note that this option is only editable when the virtual machine is not encrypted.- Disabled: do not use encrypted vMotion for this VM.
- Opportunistic: use encrypted vMotion if encrypted vMotion is supported by the source and destination hosts.
This is only possible since vSphere 6.5. Otherwise, the migration will not be encrypted. - Required: use encrypted vMotion only if the source and destination hosts support encrypted vMotion.
Otherwise, migration will be prohibited.

3.4. Power management
In the "Power management" section, you can choose:
- Standby response: how the virtual machine should behave when the operating system goes to sleep.
- Suspend the virtual machine: pause the virtual machine (and therefore cut off its power).
- Put the guest OS into standby mode and leave the virtual machine powered on: leave the virtual machine on (powered on) while the operating system is asleep.
This has the advantage of being able to restart the virtual machine remotely thanks to Wake on LAN (WoL) if this feature is enabled (via the following setting). This is not the case with the "Suspend the virtual machine" option above.
- Wake on LAN: allows you to enable the Wake on LAN (WoL) feature on the desired network card(s) of this virtual machine to be able to wake up this virtual machine using Wake on LAN.

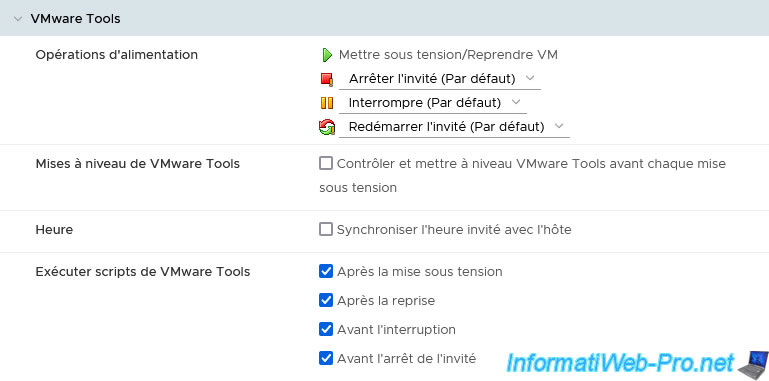
3.5. VMware Tools
In the "VMware Tools" section, you can configure:
- Power Operations: choose the power options to use by default when VMware Tools are available:
- Power On / Resume VM: start the virtual machine / continue running a virtual machine (when it was previously paused).
- Power Off/Shut Down Guest (Default): shutdown power to the virtual machine/cleanly shut down the guest operating system of the virtual machine before shutting down the virtual machine.
- Suspend (Default) / Suspend Guest: pauses the virtual machine by leaving it connected to the network / suspends the guest operating system, runs the corresponding script using VMware Tools (if installed), then suspends the virtual machine.
- Reset / Restart Guest (Default): hard restart the virtual machine (as if you had pressed the "Reset" button on the computer) / cleanly restart the guest operating system in the virtual machine.
- Tools Upgrades: checking the “Check and upgrade VMware Tools before each power on” box ensures that the VMware Tools installed in the virtual machine will always be up to date.
- Time: allows you to synchronize the guest time with the host. This allows you to synchronize the clock of your virtual machines without having to use a time server (NTP).
However, nothing prevents the operating system from synchronizing later from a time server. This is the case for computers running Windows (via the time server "time.windows.com"), servers running Windows Server, but also computers and servers that are members of an Active Directory domain from the domain controller (DC) referred to as "PDC Emulator". - Run VMware Tools Scripts: allows you to choose which VMware Tools scripts should be executed in the guest operating system during the following virtual machine events:
- After powering on: after it starts
- After resuming: when you "start" a virtual machine that was paused
- Before suspending: when you want to pause (suspend) the virtual machine, the corresponding script will be executed before the machine is finally paused.
- Before shutting down guest: when you want to shut down the guest operating system cleanly, the corresponding script will be executed before the shutdown of the guest operating system is finally initiated.
3.6. Virtualization Based Security (VBS)
In the "Virtualization Based Security" section, you will have the option to enable Virtualization Based Security (VBS) for supported guest operating systems (Windows 10 and Windows Server 2016).
![]()
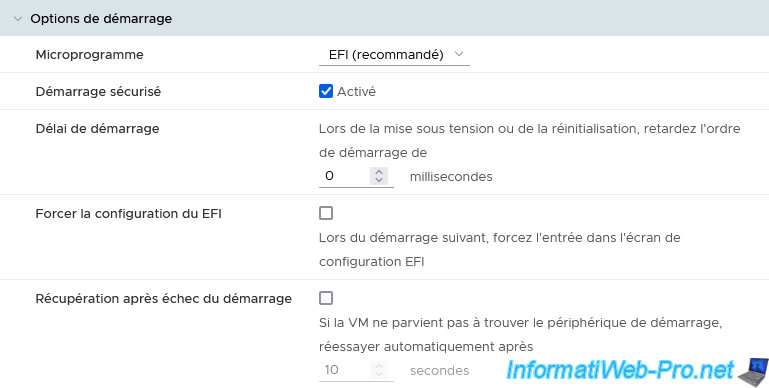
3.7. Boot options
In the "Boot Options" section, you can configure:
- Firmware: allows you to choose between BIOS or EFI firmware.
- Secure Boot: allows you to activate or not secure boot (if the firmware used is “EFI”).
Note that Secure Boot is not supported by Windows 7 although EFI firmware is supported by this version of Windows. On the other hand, secure boot is supported since Windows 8. - Boot Delay: allows you to delay the startup of this virtual machine by x milliseconds.
In the case where several virtual machines are programmed to start automatically when the host starts, this makes it possible to delay the start of the latter compared to other virtual machines. - Force EFI setup: allows you to force the virtual machine to automatically enter the configuration screen of this EFI firmware when the virtual machine starts by checking the box "During the next boot, force entry into the EFI setup screen".
- Failed Boot Recovery: if the virtual machine cannot find the boot device, this will automatically restart the virtual machine after x seconds to try again to find a boot device. Which can be handy when booting over the network via a PXE server (and a TFTP server used in the background).
To do this, check the box “If the VM fails to find boot device, automatically retry after x seconds”.
3.8. Advanced
In the "Advanced" section you will find:
- Settings :
- Disable acceleration: allows you to resolve freezing problems in case a specific program is causing this type of problem with your virtual machine.
However, this will obviously reduce the performance of your virtual machine. - Enable logging: allows you to enable the creation of logs (".log" files) allowing you to more easily find the solution to a problem that you encounter with your virtual machine.
This will also allow you to obtain help from VMware support (or via the official VMware forum) by providing these ".log" files upon request.
- Disable acceleration: allows you to resolve freezing problems in case a specific program is causing this type of problem with your virtual machine.
- Debugging and statistics: allows you to obtain additional information (debugging information or statistics) to be able to communicate it to VMware in the event of a problem.
- Swap file location:
- Default: stores the paging file according to host or cluster settings (if applicable).
- Virtual machine directory: stores the paging file in the same folder as the virtual machine.
- Datastore specified by host: stores the paging file in the datastore specified in the host settings for storing paging files (when possible).
Otherwise, the swap paging file will be stored in the virtual machine folder.
Note that if the database used is not visible to both hosts, this may reduce vMotion performance for this virtual machine.
Which means that if you check the "Reserve all guest memory (All locked)" box in your virtual machine's virtual hardware, no paging file (.vswp) will be created (or this one will have a size of 0 bytes). - Configuration Parameters: allows you to modify the configuration (contents of the ".vmx" file) by clicking on the "Modify configuration" link.
- Latency Sensitivity: allows you to adjust the latency of the virtual machine to resolve latency problems that you may encounter with the mouse, keyboard, multimedia software, VoIP applications, ...

If you clicked on the "Edit configuration" link in the "Advanced" section, a "Configuration Parameters" window will appear with a table allowing you to modify the various configuration parameters of the virtual machine present in its ".vmx" file ".
You can also add additional configuration parameters by clicking on the "Add configuration params" button.
Using this table, you can for example add the parameter "hypervisor.cpuid.v0: FALSE" which allows you to virtualize Hyper-V on VMware ESXi.
Once you have made the desired changes, click the “OK” button.

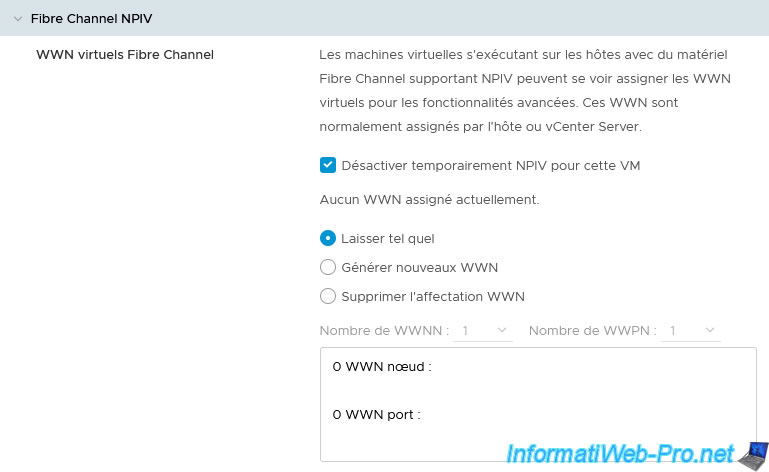
3.9. Fibre Channel NPIV
In the "Fibre Channel NPIV" section, you can configure the virtual machine so that it can connect to storage bays via optical fiber (Fiber Channel).
Note that the fiber optic connection (Fiber Channel) is managed via WWNs and not with IP addresses as is the case for the network.
Share this tutorial
To see also
-
VMware 3/13/2024
VMware ESXi 6.7 - Synchronize the clock of ESXi hosts from a time server (NTP)
-
VMware 3/8/2024
VMware ESXi 6.7 - Synchronize the clock of VCSA from a time server (NTP)
-
VMware 7/31/2024
VMware vSphere 6.7 - Add an Active Directory identity source
-
VMware 5/22/2024
VMware vSphere 6.7 - Change default console
No comment